
14. Performing Mail and Data Merges
Mail merge combines a main document with a list of database records to create customized copies of the main document for each record.
The most common type of mail merge, of course, is a mailing. Mail merging was originally developed to create form letters, like the kind you probably get in your mailbox every day that address you by name and suggest that you buy some can’t-live-without product.
Word’s mail merge feature can actually do much more than generate form letters, however. You can use it to generate envelopes, labels, personalized copies of business reports or children’s stories, auction catalogs—just about anything that combines fixed text with variable text. In this chapter, you find out how to prepare several types of merges.
Understanding Mail Merges
Let’s start by looking at the files involved in a mail merge. A mail merge uses two files:
• The main document is a Word document. It contains all the text that should remain the same from copy to copy.
• The data file contains the variable data to be merged. It can be a Word document (with the data in a table), an Excel worksheet, an Access database, an Outlook contact list, a Windows Mail address book, a delimited text file, or any of several other data types.
![]() To learn more about delimited text files, see the sidebar “Understanding Delimited Data” on p. 560.
To learn more about delimited text files, see the sidebar “Understanding Delimited Data” on p. 560.
To set up a mail merge, you insert merge fields that reference the data file into the main document. For example, if the data file has a FirstName field, you might have a line in the main document that looks like this:
Dear <<FirstName>>:
When you perform the merge, you can send the results either to a new file or directly to the printer. The result is a separate copy of the main document for each of the database records, with that record’s information inserted:
Dear Joe:
You can set up a mail merge main document manually, but Word provides several features that partially automate the process. The features that Word provides are different depending on the document type you want to produce:
• Letters—Create a personalized form letter for each recipient. Each letter prints on a separate sheet of paper.
• E-Mail Messages—Create an email message for each recipient with customized information inserted from the recipient’s contact information.
• Envelopes—Create an envelope for mailing a letter to each recipient. This is similar to Letters except for the paper size and type.
• Labels—Create sheets of mailing labels in which each label contains the mailing address of a different recipient. This is similar to Envelopes except instead of the recipients being on separate sheets, they are combined.
• Directory—Create a listing of database entries, such as a product catalog. This is like Labels except there is not a defined area in which each record’s data appears; instead, you can set up the layout any way you like.
• Normal Word Document—This option enables you to use mail merge features in an ordinary Word document—that is, one that is not one of the listed special types.
Word provides the tools you need for setting up merges on the Mailings tab, shown in Figure 14.1. You can go your own way with them, or you can use a step-by-step Mail Merge Wizard to guide you.

Figure 14.1. The Mailings tab contains buttons and lists for setting up mail merges.
The Mailings tab has five groups to it. The first one, Create, has buttons for creating individual envelopes and labels, which you learned about in Chapter 8, “Working with Templates and Nonstandard Layouts.” The Create group has no role in mail merging.
The other four groups on the Mailings tab, shown in Figure 14.1, correspond to the stages of setting up a mail merge. They appear from left to right in chronological order:
• Start Mail Merge—In this group, you choose the type of document and select the data source.
• Write & Insert Fields—In this group, you insert field codes and set up rules that sort and filter the records to be included.
• Preview Results—In this group, you view and proofread the merge, so you can make any changes needed to it.
• Finish—In this group, you save the results to a file, print them, or email them.
This chapter covers all the controls in each of these groups in detail. Because many beginners find mail merges intimidating to set up, though, Word also offers a Mail Merge Wizard utility. The following section shows how to use this wizard to do a simple mail-merged letter.
Performing a Letter Merge with the Mail Merge Wizard
The Mail Merge Wizard guides you through the process of setting up a mail merge for letters, email messages, envelopes, labels, or a directory. Mail merge beginners find it useful because it prompts you for each step of the process; mail merge experts seldom use it because it is a bit clunky and because creating your own merges on-the-fly is faster.
Because the rest of this chapter covers each step of the mail merge process more thoroughly, I do not go into detail for each step here. Instead, the following steps take you through a simple Letters type of merge using the Mail Merge Wizard and your Microsoft Outlook contact list. After you’ve completed the rest of this chapter, you can come back to the Mail Merge Wizard with a more complete understanding of its options.
To use the Mail Merge Wizard to create a set of mail-merged letters based on the addresses in your Microsoft Outlook contact list, follow these steps:
1. Start a new blank document. Then on the Mailings tab, in the Start Mail Merge group, click Start Mail Merge, and then click Step-by-Step Mail Merge Wizard. The Mail Merge task pane appears.
2. In the Mail Merge task pane, click Letters (see Figure 14.2, left). Then at the bottom of the task pane, click Next: Starting Document.

Figure 14.2. The first three screens of the Mail Merge Wizard.
3. In the Select Starting Document section of the task pane, leave Use the Current Document selected (refer to Figure 14.2, center). Then, click Next: Select Recipients.
4. Click Select from Outlook Contacts (refer to Figure 14.2, right).
5. Make sure to select the correct contact list by doing the following:
a. Click Choose Contacts Folder.
b. If the Choose Profile dialog box opens, click OK to accept the default profile name.
c. In the Select Contacts dialog box, click the desired contact folder and click OK. The name of the folder depends on your mail setup and on whether you are using Outlook or Windows Mail.
![]() For more information about selecting a data source, see “Choosing an Existing Data Source,” p. 562.
For more information about selecting a data source, see “Choosing an Existing Data Source,” p. 562.
6. In the Mail Merge Recipients dialog box, if you don’t want to send the letter to every contact in the data source, clear the check box next to each entry you want to exclude. Then, click OK.
![]() For more information about excluding certain records, see “Filtering and Sorting the Data,” p. 576.
For more information about excluding certain records, see “Filtering and Sorting the Data,” p. 576.
7. At the bottom of the task pane, click Next: Write Your Letter.
8. Position the insertion point at the top of the document and then click Address Block in the task pane (see Figure 14.3, left).

Figure 14.3. The second three screens of the Mail Merge Wizard.
![]() Note
Note
To save you some time, Word has some built-in merge blocks that combine the data from multiple fields. To make up a standard postal mailing address, Word combines fields such as first name, last name, address, city, state, and ZIP into a single field called <<AddressBlock>>. Similarly, it combines fixed text such as Dear with first or last name fields to create the <<GreetingLine>> field.
You are free to use individual fields in the mail merge if you prefer or if the address and greeting blocks aren’t delivering the results you want. To access the full list of available fields in the Mail Merge Wizard, choose More Items instead of Address Block or Greeting Line.
9. In the Insert Address Block dialog box, select any options to fine-tune the formatting of the recipient address, and then click OK. An <<AddressBlock>> code appears in the document.
![]() For more information about address blocks, see “Inserting Address Blocks,” p. 571.
For more information about address blocks, see “Inserting Address Blocks,” p. 571.
10. Press Enter a few times after the <<AddressBlock>> code and then click Greeting Line in the task pane.
11. In the Insert Greeting Line dialog box, choose a greeting style and then click OK. A <<GreetingLine>> code appears in the document.
![]() For more information about greeting lines, see “Inserting Greeting Lines,” p. 573.
For more information about greeting lines, see “Inserting Greeting Lines,” p. 573.
12. Finish composing the letter as you would any other letter. When you finish, at the bottom of the task pane click Next: Preview Your Letters.
13. In the Preview Your Letters section of the task pane, use the << and >> buttons to move between previews of the letters. To exclude a recipient, click Exclude This Recipient when that person’s preview appears (see Figure 14.3, center).
14. At the bottom of the task pane, click Next: Complete the Merge.

<<AddressBlock>> Puts Too Much Space Between the Lines
1. Right-click the <<AddressBlock>> code and choose Paragraph.
2. In the Paragraph dialog box, mark the Don’t Add Space Between Paragraphs of the Same Style check box.
3. Click OK.
15. To send the letters to the printer, click Print in the task pane (see Figure 14.3, right). A Merge to Printer dialog box appears; click OK to print the letters from there.
Or, to open the letters in a new document for further editing, follow these steps:
a. Click Cancel to close the Merge to Printer dialog box if it is open.
b. Click Edit Individual Letters. The Merge to New Document dialog box appears.
c. Click OK. The letters open in a new document.
16. Save the main document if you think you will want to perform this same merge again. Otherwise, close the main document without saving.
Selecting a Main Document Type
A mail merge starts with your selection of the type of main document. To do this, click the Start Mail Merge button on the Mailings tab and select a type from the menu (see Figure 14.4).
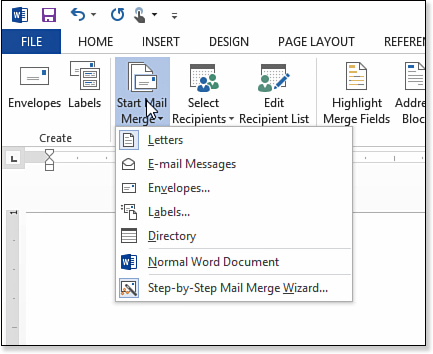
Figure 14.4. Select the type of main document.
As listed at the beginning of this chapter, there are several main document types to choose from. The type you select changes the paper size and view that Word uses for the main document:
• Letters—Regular 8.5-inch × 11-inch page size, Print Layout view
• E-Mail Messages—Regular 8.5-inch × 11-inch page size, Web Layout view
• Envelopes—Opens an Envelope Options dialog box in which you set the size
• Labels—Opens a Label Options dialog box in which you set the size
• Directory—Same page size and view as Letters
Setting Envelope Options
When you select Envelopes from the Start Mail Merge button’s menu, the Envelope Options dialog box appears, shown in Figure 14.5. From here you can select the envelope size from the Envelope Size list. Many standard sizes are provided; you can also choose the Custom Size option and enter your own dimensions for it.

Figure 14.5. Select the envelope options.
You can also set the font to be used for the delivery and return addresses on the envelopes. Click the Font button in either the Delivery Address or the Return Address area to set its font size, typeface, and color.
![]() For details about setting the envelope font, see “Changing the Envelope Font,” p. 320.
For details about setting the envelope font, see “Changing the Envelope Font,” p. 320.
The From Left and From Top settings in the Delivery Address and Return Address sections enable you to fine-tune the positioning of those addresses on the envelope. The default setting of Auto places the return address half an inch from the top-left corner, and it places the delivery address in the horizontal center of the envelope, slightly lower than the vertical center. In most cases, the Auto setting is appropriate, provided you have correctly identified the envelope size.
Finally, you can choose how the envelopes feed into the printer—or rather, how Word perceives that they do. We covered this in Chapter 8, where you learned about printing individual envelopes. Refer to the section “Controlling How Envelopes Feed into Your Printer” in Chapter 8.
Setting Label Options
When you select Labels from the Start Mail Merge button’s menu, the Label Options dialog box appears, shown in Figure 14.6. From here you can select the label type, which in turn tells Word the size of each label and how many rows and columns of labels appear on each sheet.

Figure 14.6. Select the label options.
To print labels, you need special label paper. There are many brands and sizes of labels; most come in full 8.5-inch × 11-inch sheets, with perforated peel-off labels. Word recognizes the model numbers for many popular brands and sizes; you can also set up custom labels if none of Word’s presets are appropriate.
![]() Caution
Caution
Make sure that you buy the type of label sheets designed for your printer type. Labels designed for ink-jet printers cannot withstand the heat generated by the laser printing process and might become curled or wrinkled—or worse yet, peel off or melt inside the printer—if used with a laser printer.
From the Label Options dialog box, first select the type of printer you have: continuous-feed or page printer. This makes a difference because the label products available are different for each type. A page printer accepts individual sheets of paper. A continuous-feed printer uses a tractor feed to pull connected sheets through the printer. Most ink-jet and laser printers are page printers, and most dot matrix printers are continuous feed. There are special labels-only printers, however, that use ink-jet technology to print on continuous-feed labels.
After selecting the printer type, choose a label brand. The most common brand is Avery, but Word supports many other brands as well. Selecting a label brand filters the Product Number list to show only the product numbers for that brand. Select the product number that matches what you have.
If you’re using a generic label brand and you don’t know the equivalent model number for a well-known brand, you have a choice: You can browse through the product numbers for a well-known brand such as Avery until you find one that matches up with what you’ve got, or you can create a new custom label specification by clicking New Label and creating a new definition in the Label Details dialog box.
![]() For complete steps for creating a new label specification, see “Creating a Custom Label Specification,” p. 325.
For complete steps for creating a new label specification, see “Creating a Custom Label Specification,” p. 325.
Selecting a Data Source
Word can pull data for a mail merge from a variety of data source types. Because Word is part of the Office suite, it’s only natural that mail merge readily accepts data from Outlook, Excel, Access, and even other Word files (provided the data is in a table). It accepts data from a variety of other non-Microsoft sources too, including web pages and OpenDocument text files, as well as from delimited data files stored in plain text format. Or, if the data source you need does not already exist, you can create a new data source via Word’s own interface.
Choosing an Outlook Contact List as a Data Source
Because Outlook is the default email and contact management program for Office, Word makes it easy to use it as the data source for a mail merge. The fields are already mapped between the two programs so that Outlook’s address fields fit into the <<AddressBlock>> field, for example. There’s little you need to do in the way of setup if you’re planning to use an Outlook file for the merge.
You saw earlier in the chapter, in “Performing a Letter Merge with the Mail Merge Wizard,” how to choose Outlook as a data source from the wizard. To do it without the wizard, follow these steps:
1. From the Mailings tab, click Select Recipients.
2. On the Select Recipients menu, click Choose from Outlook Contacts. If the Choose Profile dialog box opens, click OK to accept the default profile. The Select Contacts dialog box opens.
3. Click the desired Outlook contact file.
If there are multiple choices, and you do not know which one to pick, look for the one with Contacts in the name, the largest number in the Count column, and Outlook in the Location column.
4. Click OK to accept the chosen Outlook contact file. The Mail Merge Recipients dialog box opens (see Figure 14.7). Yours will have different contacts in it (and probably more contacts than shown in the figure).

Figure 14.7. Select merge recipients.
When you have selected a valid Outlook contact file, the Edit Recipient List button becomes available on the Mailings tab. If the Edit Recipient List button remains unavailable, try again to select the Outlook contact list.
5. Clear the check boxes for any entries you do not want to include in the merge, and then click OK.
![]() For more information about excluding certain records, see “Filtering and Sorting the Data,” p. 576.
For more information about excluding certain records, see “Filtering and Sorting the Data,” p. 576.
Choosing an Existing Data Source
Outlook is only one possible program from which you can draw data. Word can accept data from a variety of data sources, including Excel worksheets, Word tables, text files, and files from various database programs. You can also pull data from server-based SQL and Oracle databases.
Choosing an Excel Data Source
An Excel worksheet works well as a data source for a mail merge, provided you set it up according to these guidelines:
• The first row of the file should contain the field names.
• The records should appear, one per row, immediately below the field names.
Some people set up an Excel worksheet with a sheet title in cell A1, a few blank rows, and then the data after that. Word cannot interpret such a layout as a valid data file for a merge, though, so you need to edit the Excel file beforehand to omit any rows at the top that are extraneous to the data. Figure 14.8 shows an Excel file that is correctly set up.

Figure 14.8. This Excel file is properly configured to be used in a Word mail merge.
In addition, if you are planning on using the <<AddressBlock>> field to create an address block in the main document, rather than inserting individual fields, the field names in the first row of the worksheet should be similar to the field names used in Outlook: First Name, Last Name, Address, City, State/Province, ZIP/Postal Code, and Country/Region. The closer you get to that naming convention, the more flawlessly the data maps to Word’s <<AddressBlock>> field.
To select an Excel file as a data source, follow these steps:
1. From the Mailings tab, choose Select Recipients, Use an Existing List. The Select Data Source dialog box opens.
2. Select the Excel file to use as a data source and click Open. The Select Table dialog box opens.
3. Select the worksheet that contains the data. If you are not sure, try Sheet1$. Excel 2013 workbooks contain only one worksheet by default, so you may only have one listed, as in Figure 14.9. Earlier versions of Excel placed three worksheets in a default workbook, so if your Excel file was created in an earlier version, you will probably have three.
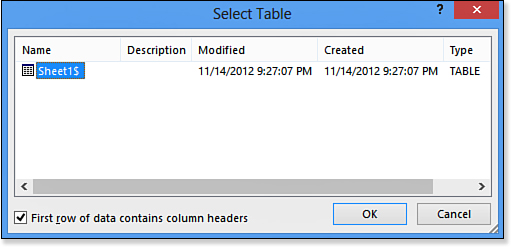
Figure 14.9. Select the sheet that contains the data to be used in the mail merge.
4. Click OK. The Excel file is now connected as the data source for the mail merge.
5. (Optional) To confirm that the field names have been set up properly, click the Insert Merge Field button on the Mailings tab. The field names should appear here.
![]() Tip
Tip
You can rename the tabs in an Excel workbook by double-clicking a tab and typing a new name (in Excel). The names you assign appear in the Select Table dialog box in Word if you have assigned any; otherwise, the sheet names appear generic, as in Figure 14.9.
If generic names appear there instead, check the file in Excel to make sure the field names appear in row 1.
Choosing a Word Data Source
A Word file can serve as a data source if one of these conditions is true:
• The Word document begins with a table, and that table contains the records, one per row, with the field names in the first row. In this case, the Word file is treated like an Excel worksheet.
• The Word document contains the records, one per paragraph, with the fields delimited by a consistent character such as a tab or comma. In this case, the Word file is treated like a delimited text file (discussed later in the chapter).
To choose a Word document, follow these steps:
1. From the Mailings tab, choose Select Recipients, Use an Existing List. The Select Data Source dialog box opens.
2. Select the Word document file to use as a data source and click Open.
3. If the records are delimited, rather than in a table, a dialog box might appear prompting you to specify the delimiter character. This happens only if Word cannot figure out the delimiters on its own. If needed, enter the information required and click OK.
Choosing a Delimited Text Data Source
In a data source file in which the fields are delimited, you might need to specify which character is used as the delimiter. Word prompts you if needed. Other than that, you’ll find it pretty straightforward:
1. From the Mailings tab, choose Select Recipients, Use an Existing List. The Select Data Source dialog box opens.
2. Select the text file to use as a data source and click Open.
3. If a Text File Connection Parameters dialog box appears prompting you to specify the delimiter characters, specify the characters used for field and row delimiters, and then click OK, only if Word cannot figure out the delimiter on its own.
Setting Up an Oracle or SQL Database as a Data Source
Word can connect to a variety of database server types, including SQL and Oracle. You set up a data source once, and then you can reuse it without having to go through its configuration again.
To set up a SQL or Oracle database, follow these steps:
1. From the Mailings tab, choose Select Recipients, Use an Existing List. The Select Data Source dialog box opens.
2. Click the New Source button. The Data Connection Wizard dialog box opens (see Figure 14.10).

Figure 14.10. Choose the type of data source you want to set up.
3. Select the type of server to which you want to connect (Microsoft SQL Server or Microsoft Data Access – OLE DB Provider for Oracle) and click Next.
4. Type the server name in the Server Name box.
5. If the server is on your own network, you might be able to connect to it using Windows Authentication (the default Log On Credentials setting). If not, choose Use the Following User Name and Password and then enter the username and password required to log in to the server.
6. Click Next to continue. Word logs in to the server.
7. When prompted, select the data table or query from which you want to pull records, and then click Next.
8. At the Save Data Connection File and Finish screen, enter a filename in the File Name box for the shortcut to the database.
You can optionally enter a description and a friendly name.
9. Click Finish to connect to the data source and close the dialog box.
In the future, you can select the shortcut you just created from the Select Data Source dialog box (step 1) and bypass the other steps.
Using an ODBC Data Source
ODBC (Open Database Connectivity) is a widely used standard for connecting to databases. Data sources that use ODBC use SQL to connect, but they go through an ODBC driver installed in Windows. Using ODBC, you can access Excel workbooks, Access databases, and other types of sources such as dBASE databases if you have ODBC drivers for them, stored either on a server or on a local or network client. For example, if your company’s customer database is stored in Access on the main server, you could access it via ODBC for your mail merge.
Follow these steps to connect to an ODBC data source:
1. From the Mailings tab, choose Select Recipients, Use an Existing List. The Select Data Source dialog box opens.
2. Click the New Source button. Choose ODBC DSN from the list of server types and click Next.
3. Select the type of ODBC data source to which to connect. The items on the list depend on the ODBC drivers set up on your PC; under Windows 8 and Office 2013, Excel and Access are provided. Then click Next.
4. As prompted, specify the data file you want to use, click OK, and then select the specific data table within it. If no tables appear for selection, clear the Connect to a Specific Table check box. Then click Next.
5. At the Save Data Connection File and Finish dialog box, enter a filename in the File Name box for a shortcut to be created for this data source (see Figure 14.11).

Figure 14.11. Name the shortcut to the database so that you can reuse it in the future.
You can optionally enter a description and a friendly name.
6. Click Finish to connect to the data source and close the dialog box.
In the future, you can select the shortcut you just created from the Select Data Source dialog box (step 1) and bypass the other steps.
![]() Note
Note
You can also specify Excel and Access files as data sources by choosing them directly from the Select Data Source dialog box, as you would any file. In fact, that’s what you did earlier in the chapter, in the section “Choosing an Excel Data Source.” It’s basically the same process except the method described in the previous steps sets up an .odc shortcut to the file for easier access.
Creating a New Data Source in Word
If the data source does not already exist, you might find it easier to create it from within Word than to fire up some outside program to create it. Word makes it easy to create a simple Access database to hold mail merge data for a personal contacts mailing list, even if you do not have Access installed on your PC and don’t know anything about that program. It’s all just fill-in-the-blanks.
To create a new data source, follow these steps:
1. From the Mailings tab, choose Select Recipients, Type a New List. The New Address List dialog box appears.
2. If desired, customize the field names that appear in the columns. To do so, see “Customizing Fields” later in this chapter.
3. Enter the first record into the top row of the grid provided. To omit a field, simply leave it blank.
4. To start a new record, click New Entry. Another blank row appears (see Figure 14.12).
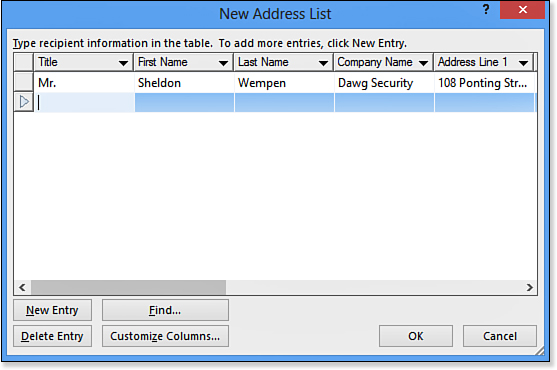
Figure 14.12. Create a new data source by entering records in the rows and columns provided.
5. Continue adding records until you are finished; then click OK. The Save Address List dialog box appears.
6. Type a filename to use, and change the location if needed.
7. Click Save. Word creates a new Access database containing a single table with the data you just entered.
![]() To add more records to the address list, or edit it, see “Editing the Data Source,” p. 569.
To add more records to the address list, or edit it, see “Editing the Data Source,” p. 569.
You can use the new database in future mail merge projects by choosing it as an existing data source, as you learned in “Using an ODBC Data Source” earlier in this chapter, or by selecting it directly from the Select Data Source dialog box, as you would an Excel file.
![]() Caution
Caution
You can open this database in Access if you have Access installed. However, do not change the table name or structure, or the connection to your main document in Word will no longer work.
Customizing Fields
The fields provided for a new data source are typical for a personal mailing list, including name, address, and phone number. Perhaps you do not need or want all those fields, or maybe you need some different fields instead or in addition. For example, if you are creating a new data source to store inventory or events, the default fields need to be almost totally changed.
Here’s how to customize the fields in the New Address List dialog box:
1. On the Mailings tab, click Select Recipients, and click Type a New List.
2. From the New Address List dialog box, click Customize Columns. The Customize Address List dialog box opens (see Figure 14.13).

Figure 14.13. Change the columns (fields) that appear in the Customize Address List dialog box.
3. Delete any fields you don’t want. To delete a field, select it, click Delete, and click Yes to confirm.
4. Rename any fields as desired. To rename a field, select it, click Rename, type the new name, and click OK.
5. Add any new fields as desired. To add a field, click Add, type the new field name, and click OK.
6. Reorder any fields as desired. To move a field, select it and then click Move Up or Move Down.
7. Click OK to return to the New Address List dialog box. (If you’re done, you can click the OK button for that dialog box, too.)
Editing the Data Source
Normally when you pick database records for your mail merge, you are not editing the data source; you’re simply changing your usage of it. For example, if you exclude a certain person from a mailing, that person’s record still exists in the database. To edit the database, you would normally go through the database program’s own interface.
However, if you created the database from within Word, as in the preceding sections, Word might be the only means you have of accessing that database, particularly if you do not have Access installed. If so, you might need to delete or add records to the database from Word.
To edit the data source from within Word, follow these steps:
1. From the Mailings tab, click Edit Recipient List. The Mail Merge Recipients dialog box opens.
2. In the Data Source box (bottom-left corner), select the data source (probably an .mdb file) and then click Edit. The Edit Data Source dialog box opens. It is just like the New Address List dialog box (refer to Figure 14.12) except for the name.
3. Do any of the following:
• To create a new entry, click New Entry and fill in the fields.
• To delete a record, click the gray box to its left to select it, and then click Delete Entry and click Yes to confirm.
• To change the columns, follow the steps in the section “Customizing Fields” earlier in this chapter.
4. Click OK to accept the changes to the data source.
5. Click OK to close the Mail Merge Recipients dialog box.
Preparing the Main Document
The main document is the file in which you place all the boilerplate text and the merge codes that will personalize each copy. Depending on the type of merge you are doing, the main document can be an envelope, a label sheet, a letter, an email message, or just about anything else. It’s just an ordinary Word document except for the presence of the merge fields.
To prepare the main document, do the following:
• Confirm that the margins, page size, and page orientation are correct for the document you want. These were set automatically when you chose the document type from the Start Mail Merge button’s menu, but it’s worth checking.
• If needed, apply a template or change the paragraph styles to suit the needs of the project. Choose a different formatting theme if desired.
• Type the boilerplate text, leaving blank spots or reminders for the fields that you’ll insert. To avoid forgetting to insert a merge field later, you might want to type something like FIELD HERE in the spot where it will go and then apply a bright-colored highlight to it (from the Home tab or the Mini Toolbar).
Some of the templates that Microsoft provides have merge in their names, meaning they are special versions designed for mail merging. For example, try searching for templates with the keyword merge and start a new document using the Mail Merge Letter (Adjacency design) template. It contains placeholders with suggestions for inserting merge fields. Those placeholders are “dead.” In other words, they do not reference actual merge fields. You must delete them and replace them with real merge fields, as described in the next section.
Inserting Merge Fields
Now that the two essential pieces are in place—the main document and the data source—it’s time to join them. To do this, you insert merge fields that reference the data source into the main document.
Inserting Single Fields
The most straightforward way to go is to insert individual fields, one at a time. When you insert a field, Word places a code with double angle brackets into the document, like this: <<City>>.
To insert fields into the main document one at a time, follow these steps:
1. Position the insertion point where you want to place the field.
2. On the Mailings tab, click Insert Merge Field. A list of available fields from the data source appears (see Figure 14.14).

Figure 14.14. Insert a merge field from the Mailings tab.
3. Click the desired field. A code appears for it in the document.
4. Repeat these steps to insert additional fields in the document as needed.
The field names come from the data source, so they change depending on the data source you’ve selected and might not be the same as shown in the examples in this chapter.
As you insert fields, make sure you leave the appropriate spaces and punctuation between them. For example, press the spacebar once between a <<First_Name>> and a <<Last_Name>> field.
Inserting Address Blocks
One of the most common uses for mail merge is to enter a mailing address block, like this:
Joe Smith
120 Main Street
Any Town, IN 46822
You can set up a mailing address block by inserting fields one at a time, as you learned in the preceding section, but it is time-consuming to do so. Assuming the first and last name are in separate fields, and so are the city, state, and ZIP code, you end up having to insert six separate fields just to create a simple address block.
Word offers a shortcut for setting up address blocks in the <<AddressBlock>> field. This field pulls the needed data from each of the applicable fields and creates a nicely formatted address block in a single step.
To insert an <<AddressBlock>> field, follow these steps:
1. Position the insertion point where you want the block to appear.
2. On the Mailings tab, click Address Block. The Insert Address Block dialog box opens (see Figure 14.15).

Figure 14.15. Specify options for the address block to be inserted.
<<AddressBlock>> Isn’t Using the Correct Fields
1. From the Mailings tab, click Match Fields. The Match Fields dialog box opens. Word’s internal names appear on the left, and the fields in the current data source to which they are mapped appear on the right (see Figure 14.16).

Figure 14.16. Specify which fields in your data source match up with Word’s Address List.
2. For any mappings that do not seem correct, open the drop-down list and select the proper field to map to that placeholder.
3. Click OK to accept the changes.
4. Update all fields in the document by selecting the entire document (Ctrl+A) an
3. In the Insert Recipient’s Name in This Format box, select the sample that best represents how you want the name to appear.
4. If you do not want the company name, clear the Insert Company Name check box.
5. In the Insert Postal Address area, specify how you want to (or don’t want to) insert the country/region. The default setting is to include the country only if it is different from the value set in the drop-down list (United States in Figure 14.15).
6. Preview the addresses in the Preview area by clicking the right and left arrow buttons.
7. Click OK to insert the address block.
How does Word know what fields to use in the address block? It attempts to match up the fields in your data source with the various placeholders in an address block. If the data source uses common naming conventions, it usually does a pretty good job. If it makes any mistakes, click the Match Fields button in the Insert Address Block dialog box to make adjustments.
Inserting Greeting Lines
A greeting line is the line at the beginning of a letter that usually starts with Dear. It’s similar to an address block in that Word builds it automatically by drawing from multiple fields in the database.
To insert a greeting line, follow these steps:
1. Position the insertion point where you want the block to appear.
2. On the Mailings tab, click Greeting Line. The Insert Greeting Line dialog box opens (see Figure 14.17).

Figure 14.17. Specify options for the greeting line to be inserted.
3. Set up the greeting the way you want it by selecting from the drop-down lists provided.
![]() Tip
Tip
For business letters, it is customary to start with Dear, to use the person’s title and last name (as in Mr. Jones), and to finish with a colon (not a comma). For personal letters, it is customary to start with Dear, use the person’s first name, and finish with a comma.
4. Specify a greeting line for invalid recipient names. Word will use this setting if the field from which it is drawing the name is blank or unreadable.
5. Click OK to insert the field code.
As with address blocks, you can remap the fields that Word uses from the data source. To do so, click the Match Fields button in the Insert Greeting Line dialog box. For more help with this, refer to the “<<AddressBlock>> Isn’t Using the Correct Fields” section.
Setting Up Fields on Labels
If you set up your mail merge using the Letters, E-Mail Messages, or Envelopes document type (from the Start Mail Merge button’s menu), each record in the data source is used for a separate copy of the document. For example, you create a single letter in the master document, and then the merge process generates as many customized copies as needed for the data in the data source.
However, if you set up your mail merge for labels, there will be more than one record per page of the document. A label layout consists of a table, and each record is in its own cell.
If you use the Mail Merge Wizard, the cells of the table are populated with the <<AddressBlock>> field automatically. However, if you are setting up labels manually, you need to enter them yourself. This is not difficult; you simply create one label’s layout and then update all the other fields.
Follow these steps to set up the fields in a label layout:
1. Begin the mail merge by choosing the document type (Labels) from the Start Mail Merge button and then setting up the type of labels you want, as you learned earlier in this chapter.
2. Select or create the data source, as you learned earlier in this chapter.
After you’ve selected a data source, a <<Next Record>> field appears automatically in each cell of the table (except the first cell).
3. (Optional) To make the table cells easier to see, do the following:
On the Home tab, click the Show/Hide (¶) button to toggle on the display of hidden characters.
On the Table Tools Layout tab, click View Gridlines.
4. Click in the top-left cell in the table and insert the fields you want. It is easiest to simply insert the <<AddressBlock>> field, but you can manually create the address block if you prefer.
5. On the Mailings tab, click the Update Labels button. The <<AddressBlock>> field, or whatever fields you entered in step 4, are copied to the remaining cells (see Figure 14.18).

Figure 14.18. Enter the fields in the top-left cell and then click Update Labels to populate the change in the rest of the cells.
6. Continue with the merge, as described in the rest of this chapter.
Setting Up Fields in Directories
A directory is a free-form type of mail merge document, in which you can place many records on a page if you like. It’s somewhat like a set of labels except there are no table cells to tell Word where to break things off. Instead, you must insert a <<Next Record>> field manually where you want one record to stop and the next one to begin.
Suppose, for example, that you want a listing of people’s names and phone numbers, as in Figure 14.19. This merge consists of three fields: first name, last name, and phone number.

Figure 14.19. A directory merge places information from multiple records on a single page.
![]() For information about setting tab stops and dot leaders, see “Working with Tab Stops,” p. 184.
For information about setting tab stops and dot leaders, see “Working with Tab Stops,” p. 184.
The merge shown in Figure 14.19 was created by inserting the name fields, pressing Tab, and inserting the phone number field. Then the tab stop was changed to a right-aligned stop and placed at the right margin, and a dot leader was added.
To create a directory merge, you need to enter the desired fields once in the document, and then enter a <<Next Record>> field. Follow these steps:
1. Insert the fields to be displayed for each record.
2. Position the insertion point to the right of the last field.
3. On the Mailings tab, click Rules. Then click Next Record on the menu that appears. Word inserts a <<Next Record>> field. Figure 14.20 shows the fields that were used for Figure 14.19, for example.

Figure 14.20. The merge fields used for the listing shown in Figure 14.19.
4. Continue with the merge, as described in the rest of this chapter.
![]() Note
Note
If you preview the merge results before performing the actual merge, you do not see the directory as it will actually be; instead, you see one record only. This is the normal behavior for a directory type of merge. The only way to see the full directory is to perform the merge to a new file or to the printer.
Filtering and Sorting the Data
If the data source was created specifically for this mail merge project, it might contain exactly the records you want and no others. If that’s your situation, you can skip this whole section on filtering. (Stick around, though, if you want the records sorted in a certain way.)
Most of the time, however, people do mail merges using generic databases that are designed for more than just a single mail merge. For example, you might draw recipients from your Outlook contact list or a SQL database containing the personnel listings for your entire company. To avoid wasting paper and generating a lot of unneeded copies of the merge, apply a filter to the data set so that it contains only the records you want.
Excluding Individual Records
If your data source does not contain many records, you might find it easier to manually mark the records to exclude than to set up a formal filter that defines exclusion criteria.
To exclude records, follow these steps:
1. On the Mailings tab, click Edit Recipient List. The Mail Merge Recipients dialog box opens.
2. Clear the check box for the records you want to exclude (see Figure 14.21).

Figure 14.21. Exclude any records you do not want to use.
3. Click OK.
Applying a Filter
Applying a filter is useful when the records that you want to include have something quantifiable in common. For example, perhaps you want only addresses in a certain range of ZIP codes, or only people whose last names begin with a certain letter, or perhaps you want only the records that have complete mailing addresses. The following sections explain some techniques for filtering.
Filtering for Blank or Nonblank Entries
One of the most basic filters is to include only records in which a certain field is blank or nonblank. For example, for an email merge, you might include only records for which the E-Mail field is nonblank, or for a merge that prints labels to send cards to only your friends, not your business contacts, you might include only records for which the Company field is blank.
To filter for blank or nonblank entries, follow these steps:
1. From the Mailings tab, click Edit Recipient List. The Mail Merge Recipients dialog box opens.
2. Click the down arrow to the right of a field name to open a menu, and then click either (Blanks) or (Nonblanks) from the menu (see Figure 14.22).

Figure 14.22. Filter a particular field based on its blank or nonblank status.
![]() Caution
Caution
Be careful to click the arrow, not the field name. If you click the field name, the list becomes sorted by that field and the menu does not open.
3. Repeat step 2 for each field you want to filter by. You can filter by multiple fields this way. For example, you could include only records that have nonblank Address, City, State, and ZIP fields.
To turn a filter off, reopen the menu for that field and choose (All).
Creating an Advanced Filter
An advanced filter is one in which you actually specify criteria for inclusion based on certain values or ranges. It consists of one or more criteria. A criterion consists of a field name, a comparison operator, and a value. For example, in “State equals IN,” State is the field name, equals is the comparison operator, and IN is the value.
Advanced filters can have multiple criteria, joined with either And or Or. If you use And, both of the rules must be true for a record to be included; if you use Or, at least one of the rules must be true.
To set up an advanced filter, follow these steps:
1. From the Mailings tab, click Edit Recipient List. The Mail Merge Recipients dialog box opens (refer to Figure 14.21).
2. Click the Filter hyperlink. The Filter and Sort dialog box appears.
3. On the Filter tab, open the Field drop-down list and select the field for the first rule.
4. Open the Comparison drop-down list and choose the comparison operator.
5. In the Compare To box, type the value to which to compare. Figure 14.23 shows an example in which the State must equal IN.

Figure 14.23. Create filtering criteria in the Filter and Sort dialog box.
6. (Optional) Set the And/Or indicator for the second line and enter an additional rule. Keep entering additional rules as needed.
7. Click OK to apply the filter. The list in the Mail Merge Recipients dialog box changes to show only the records that the filter selects.
8. Click OK to accept the filtered list.
Sorting the Records
Usually when you create a mailing, the order in which the items print is not an issue because you’re just going to drop them in the mailbox and they’ll get all mixed up there anyway. However, with large bulk mailings, some mail processing services ask that clients provide the items for mailing in a certain order, usually by ZIP code. To have the items print in a certain order, you can set up a sort.
To perform a simple sort, click a field’s column heading in the Mail Merge Recipients dialog box. Each time you click, it toggles between an ascending and descending sort. Alternatively, you can open the field’s menu (by clicking its arrow) and choosing Sort Ascending or Sort Descending.
You can perform advanced sorting in the Filter and Sort dialog box. You can set up a sort as part of creating the filter, as in the preceding section’s steps; just click the Sort Records tab and enter the sort criteria before closing the Filter and Sort dialog box.
If you just want to sort (no filtering), or if you have already closed the dialog box, follow these steps:
1. From the Mailings tab, click Edit Recipient List. The Mail Merge Recipients dialog box opens.
2. Click the Sort hyperlink. The Filter and Sort dialog box appears with the Sort Records tab displayed.
3. Open the Sort By drop-down list and select the field by which you want to sort. For example, Figure 14.24 shows a Last Name sort.

Figure 14.24. Set up one or more fields by which to sort.
4. Click Ascending or Descending to set the sort order. Ascending is 0 to 9, then A to Z; Descending is Z to A, then 9 to 0.
5. (Optional) Specify additional sorts in the subsequent rows. The additional sorts take effect only in the event of a tie for the first sort. For example, if two records have the same Last Name, perhaps you want the tiebreaker to be First Name.
6. Click OK to accept the sort conditions.
Finding a Recipient
In a large database, it can be a challenge to find a particular record by scrolling through and browsing. To access the Find feature within the Mail Merge Recipients dialog box and use it to locate a certain record, follow these steps:
1. From the Mailings tab, click Edit Recipient List. The Mail Merge Recipients dialog box opens.
2. Click the Find Recipient hyperlink. The Find Entry dialog box opens.
3. Type the text string you want to find.
4. Choose one of the option buttons: All Fields or This Field. If you choose This Field, open the drop-down list and select the field to search.
5. Click Find Next. The list jumps to the first occurrence of that string.
6. Click Find Next again to find the next instance, and so on until you have found the record you are seeking.
Finding Duplicate Entries
Large databases can sometimes contain duplicate entries due to data entry errors and lack of synchronization between sources. To ensure that none of these duplicates gets into your mail merge, you can use the Find Duplicates feature:
1. From the Mailings tab, click Edit Recipient List. The Mail Merge Recipients dialog box opens.
2. Click the Find Duplicates hyperlink. The Find Duplicates dialog box opens, showing groups of records that appear to be very similar or identical (if any).
3. Clear the check box for the items you do not want to be included in the mail merge.
4. Click OK to return to the Mail Merge Recipients dialog box and continue the merge.
Validating Addresses
Address validation looks up addresses in an actual postal mailing database online and determines whether each one is deliverable. This feature is not included with Word, but Word does provide a link for accessing a third-party data validation service, such as Stamps.com.
If you have subscribed to such a service, you can access it from the Mail Merge Recipients dialog box by clicking Validate Addresses. If you have not signed up for a service, a message appears offering to take you to the Microsoft Office website, from which you can browse for available third-party services.
Previewing and Printing the Merge
After setting up the main document and performing any needed sorting or filtering on the data set, the next step is to preview the merge. Previewing is optional, but it can save you from printing stacks of documents that contain merge errors. With paper and ink costs as high as they are these days, previewing can be a real benefit.
To preview the merge results, click the Preview Results button on the Mailings tab. This button is an on/off toggle between the field codes and the merge results.
While you’re looking at the preview results, you can use the arrow buttons in the Preview Results group on the Mailings tab to scroll from one record to another (see Figure 14.25).

Figure 14.25. Preview merge results.
![]() Note
Note
As noted earlier, if you are previewing a directory merge, or other merge type in which you have inserted the <<Next Record>> code yourself to separate records that will appear on a page together, you might see only one record at a time with Preview Results, not the entire page as it will actually be. To preview the page more accurately, merge to a new document (Finish & Merge, Edit Individual Documents).
Checking for Errors
To save on paper, it’s important to check the merge for errors before you print. But, if you have thousands of records, it can be a chore to sort through them manually.
To automate the process of checking for common errors, such as empty fields or invalid field names, follow these steps:
1. On the Mailings tab, click Check for Errors. The Checking and Reporting Errors dialog box opens.
2. Click Simulate the Merge and Report Errors in a New Document.
You can use the other options in this dialog box to go ahead and complete the merge if you prefer.
3. Click OK. If there are any errors, they appear in a report in a new document. Otherwise, a dialog box appears, telling you there are no errors; click OK to clear it.
4. If Word finds errors, correct them.
Merging to a New Document
To save paper, I always merge to a new document rather than directly to a printer. That way, if there are errors that the Error Check did not catch, such as a missing ZIP code or improper spacing between fields, I’ll notice them before printing.
Merging to a new document also has the side benefit of enabling you to edit individual copies before printing. For example, perhaps for one certain person you want to add a personal note in an extra paragraph at the end of the letter.
To merge to a new document, follow these steps:
1. From the Mailings tab, click Finish & Merge, Edit Individual Documents. The Merge to New Document dialog box appears (see Figure 14.26).

Figure 14.26. Merge all records or enter a range.
2. Click All to merge all records, or specify a range of records if you don’t want to do them all at once. (For example, perhaps you want only the first 100 records in the new file, and then you perform the merge again to put the next 100 in another new file, and so on.)
![]() Note
Note
The numbers you enter in the From and To fields in the Merge to New Document dialog box (Figure 14.26) refer to the record numbers—that is, the records in the order you specified in the sort, or the default order from the data source if you did not specify a sort.
3. Click OK. Word performs the merge and places it in a new document.
Merging to a Printer
If you’re feeling confident about your merge, you can send it directly to the printer, without creating a new document. You might do this for a merge that you’ve already completed successfully before, such as a merge you perform every month to send letters to the same group of people.
To merge directly to the printer, follow these steps:
1. From the Mailings tab, click Finish & Merge, and then click Print Documents. The Merge to Printer dialog box appears. It is identical to the Merge to New Document dialog box in Figure 14.26 except for its name.
2. Click All to merge all records, or specify a range of records if you don’t want to print them all at once.
3. Click OK. The Print dialog box opens.
4. Set any print options as desired (including selecting the printer to use), as you learned to do in Chapter 3, “Correcting and Printing Documents.”
5. Click OK to print.
Merging to Email
Merging to email sends the messages via your default email program, using the email address in whatever field you specify from the data source. (You must make sure, therefore, that your data source has an email address for every record you select.)
Follow these steps to merge to email:
1. From the Mailings tab, click Finish & Merge, Send E-mail Messages. The Merge to E-Mail dialog box appears (see Figure 14.27).

Figure 14.27. Merge to email by specifying the field containing the email addresses and the subject line and mail format.
2. Make sure that the field containing the email addresses is selected from the To drop-down list.
3. Enter the subject line to use in the Subject Line box.
4. Select a mail format from the Mail Format list.
If your document includes formatting, such as colors, different font sizes, and so on, make sure that you choose HTML as the mail format.
5. In the Send Records section, choose All, or choose the current record or a range of records.
6. Click OK. Your email program opens, the emails are created, and they are placed in your Outbox folder for sending.
7. In your email program, perform a Send/Receive operation to send the messages if they are not sent automatically.
![]() Caution
Caution
Before performing step 6, make sure that your emails are just the way you want them. Word sends them immediately after the next step, with no opportunity to check them.
Creating Custom Merges with Word Fields
The simple mail merges you’ve learned about so far in this chapter insert data by referencing fields in the specified data source. Nine times out of ten, that’s all you need for a mail merge. But, wouldn’t it be nice to be able to do something a little more complex for that tenth time?
Suppose you are creating a letter to all your customers, but you want the letter to say different things depending on the values in certain fields of your database. For example, perhaps you want customers who have not ordered from you in more than 6 months to receive a special promotional offer. Or perhaps you want to be able to enter a different promotional offer each time you run the merge and be prompted to enter the offer in a dialog box. All that and more is possible by using fields.
There are two types of fields: merge fields and Word fields. Throughout this chapter, you’ve been using merge fields—that is, fields that come from the data source you specify for a mail merge. These fields exist only because of the data source connection. Merge fields are indicated by angle brackets, like this: <<Name>>. Word fields, however, are preprogrammed into Word itself and can be used in any type of document, not just merge documents. Word fields are expressed inside curly braces, like this: {Ask}.
You will learn about fields in Chapter 16, “Working with Fields and Forms,” including how to insert and modify them and how to control their syntax. For now, though, let’s look at a few specific fields that are useful when doing merges. They’re so useful for merges, in fact, that they appear on a special menu on the Mailings tab. Click Rules to see the list, as shown in Figure 14.28.

Figure 14.28. Certain Word fields that are especially useful in mail merges appear on the Rules menu on the Mailings tab.
Collecting Information with a Fill-In Field
A {FillIn} field prompts the user for an entry and then places it in the document. You can set it up to ask you only once per merge or to ask you separately for each copy.
Suppose, for example, that you have a standard form letter in which you offer customers a certain percentage of discount if they bring the letter with them into your store on certain dates. You can reuse the same main document time after time and set it up to ask you each time how much discount you want to offer and what the date range should be.
To insert a {FillIn} field, follow these steps:
1. Position the insertion point where you want the field to appear.
2. On the Mailings tab, click Rules, and then choose Fill-In. The Insert Word Field: Fill-In dialog box opens.
3. In the top part of the dialog box, enter the prompt that will appear to the user.
4. (Optional) In the bottom part of the dialog box, as shown in Figure 14.29, enter a default value that will be used if the user does not fill in the dialog box (for example, if he clicks Cancel or closes the dialog box without typing anything).
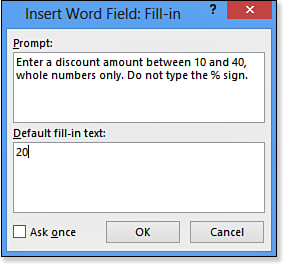
Figure 14.29. Create a {FillIn} field.
5. (Optional) If the value should be the same for every record in the merge, mark the Ask Once check box. Otherwise, Word asks you repeatedly, once for each record.
6. Click OK to insert the field.
Whenever you open the document or initiate the merge, Word updates the field and prompts the user for the entry.
{FillIn} fields are useful when the value that the user enters does not need to be stored for reuse. In the preceding example, the user enters a discount amount to offer to the customers, but that discount amount does not need to be stored for calculations; it is simply placed in the document. If you need to store the user’s entry as a variable and then perform a calculation on it or reprint it later in the document, use an {Ask} field instead, as described in the following section.
Collecting and Storing Information with an Ask Field
An {Ask} field is like a {FillIn} field, except the value that the user enters is stored in a bookmark for later reuse. So, for example, you could prompt for a certain value, such as a discount percentage, and then have that value be repeated in several places in the document.
You discover more about bookmarks in Chapter 15, “Copying, Linking, and Embedding Data.” A bookmark is a named location or text entry in the document. Bookmarks have a variety of uses. You can create bookmarks to mark certain paragraphs and then set up hyperlinks that jump directly to those paragraphs, for example.
![]() To learn about bookmarks, see “Working with Bookmarks,” p. 601.
To learn about bookmarks, see “Working with Bookmarks,” p. 601.
When you use an {Ask} field to prompt the user for an entry, Word stores that entry in a bookmark. The bookmark in this case is like a variable you might set in computer programming. You can then insert that bookmark’s content in various places in the document by using a {Ref} field.
For example, at the beginning of the mail merge, you might use an {Ask} field to prompt the user for a company name and to store that name in a bookmark called Company. Then, that company’s name can be set to appear in the body of the letter and below the signature line.
To insert an {Ask} field and then reference its bookmark in the document, follow these steps:
1. Move the insertion point to the beginning of the document. Do not select text.
2. Create the bookmark, as follows:
a. On the Insert tab, click Bookmark. (You may need to click Links to access the Bookmark command.)
b. In the Bookmark dialog box, type the name you want to use.
c. Click Add.
3. Create references to the bookmark as needed in the document, as follows:
a. Move the insertion point to where you want the bookmark’s content.
b. On the Insert tab, click Quick Parts, and then click Field.
c. On the Field Names list, click Ref.
d. In the Bookmark Name list, click the bookmark name (see Figure 14.30).

Figure 14.30. Reference a bookmark with the {Ref} field.
e. Click OK.
4. Move the insertion point to the beginning of the document.
5. On the Mailings tab, click Rules and then click Ask. The Insert Word Field: Ask dialog box opens.
6. On the Bookmark list, select the bookmark you created earlier.
7. In the Prompt box, type the text that should appear in the user prompt.
8. In the Default Bookmark Text box, type the default text to use if the user does not enter text. Figure 14.31 shows the completed dialog box.

Figure 14.31. Create an {Ask} field that prompts the user to fill in the value for a bookmark.
10. To test the fields in the document, select the entire document (Ctrl+A) and press F9 to update all the fields.
![]() To learn more about updating fields, see “Updating and Editing Fields,” p. 639.
To learn more about updating fields, see “Updating and Editing Fields,” p. 639.
Setting Up Conditions with an If...Then...Else Field
You can use the {If} field (aka the If...Then...Else field) to insert different text in each copy of the merge depending on the value of a certain field. For example, suppose that you’re going to send the mail merge letter to customers in several countries, and depending on the country, you would like to offer a different promotion. In the spot where the sentences will appear with the promotional offer, you can insert an {If} field and specify the value of the Country field as the condition in choosing one block of text or another to be inserted.
To create an {If} field that displays different text based on a condition, follow these steps:
1. Position the insertion point where you want the conditional text to appear.
2. On the Mailings tab, click Rules and then click If...Then...Else. The Insert Word Field: IF dialog box opens.
3. In the Field Name list, select the field that will provide the criterion.
4. In the Comparison list, select the comparison operator, such as Equal To or Greater Than.
5. In the Compare To box, type the value to which to compare the field.
6. In the Insert This Text box, type the text string to display if the comparison is true. (Leave it blank if you want nothing to display if true.)
7. In the Otherwise Insert This Text box, type the text string to display if the comparison is false. (Leave it blank if you want nothing to display if false.) Figure 14.32 shows a completed example.
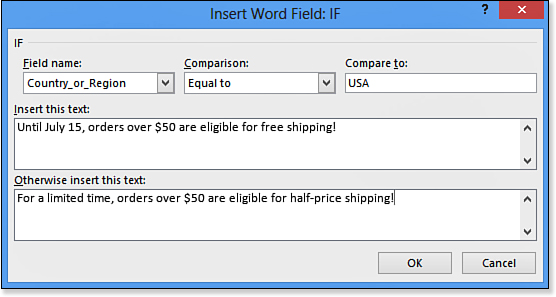
Figure 14.32. Use an {If} field to set up different scenarios based on the entry in one of the fields.
8. Click OK to insert the field.
![]() Caution
Caution
Make sure to preview the merge after inserting an {If} field and before sending it to a printer to ensure that the results are as you intended.
Using a Field to Set Bookmark Text
Earlier in the chapter, you saw how to use the {Ask} field code to set a bookmark’s value based on input from the user. A related field, {Set}, is used to set a bookmark without user input. You could use this to set an initial value for a bookmark, for example. (Then, later in the merge, you could allow the user to change that value with a {Fill-In} or {Ask} field.)
To insert a {Set} field into a document:
1. From the Mailings tab, click Rules and then click Set Bookmark. The Insert Word Field: Set dialog box opens.
2. On the Bookmark list, click the bookmark name for which you want to set a value.
3. In the Value box, type the value to which to set the bookmark.
4. Click OK.
One important usage for the {Set} field is within an {If} field. You might want a bookmark to be set one way if an {If} statement is true and another way if it is false. For example, if a letter recipient is female, you might want the pronouns in the document to be feminine (her/hers); otherwise, the pronouns should be masculine (him/his).
However, to nest a {Set} within an {If}, you must manually edit the field code, and you must manually create the {If} statement. (You can’t use the Rules button’s If...Then...Else insertion method.) Therefore, you might want to postpone this topic until after you’ve read Chapter 16. Then, read the section “Nesting Fields” to learn how to nest one field inside another.
Assigning Numbers to Merge Records
Sometimes when creating a large number of merged copies, you need to sequentially number the copies as Word generates them, so that each copy has a unique identifying number. There are two ways of doing this in Word: Merge Record # {MergeRec} and Merge Sequence # {MergeSeq}.
The {MergeRec} field assigns a number to each copy based on the actual number of the record within the data source. If you skip over any records in the data source, the numbering skips, too. For example, if a filter excludes the first 100 records, {MergeRec} begins with 101.
The {MergeSeq} field assigns a number to each copy based on the records that were included in the merge, not the records in the original data source. So even if you skip over 100 records, {MergeSeq} always begins with 1.
To insert either of these, select it from the Rules menu on the Mailings tab: Merge Record # or Merge Sequence #. There are no options for either of these; they simply insert a code.
Advancing to the Next Record (or Not)
As you saw earlier in the chapter, in the section “Setting Up Fields in Directories,” you can insert a {NextRecord} field to force the merge to continue to the next record without starting a new copy of the main document. To do this, on the Mailings tab, choose Rules, Next Record.
Two related fields, {NextRecordIf} and {SkipRecordIf}, enable you to set up conditions whereby you either process or skip the next record in the merge according to certain conditions you specify. Each of these has its own command for insertion on the Rules menu, and each opens a dialog box in which you can set up a criterion based on the contents of a field in the data source. Neither of these is commonly used; if you want to skip certain records based on the content of a certain merge field, it’s easier to simply set up a filter for the data source that excludes certain values for that field.