
8. Working with Templates and NonStandard Layouts
Word can be used to create a wide variety of documents, from newsletters to greeting cards to mailing labels. While you can set up each document manually using your own settings, it is often easier to start with a template designed for the general type of document you want to create. In this chapter, you will learn how to employ templates as shortcuts to creating documents, and you’ll learn some tips and tricks for working with unusual document types.
About Templates
Templates are specifications on which documents are based. So far, you have been working with Normal.dotm, the default template for Word documents. If you don’t specify otherwise, Word always bases new documents on that template. It consists of a blank document (no default content) with 1-inch margins on all sides, no extra spacing between paragraphs, and Calibri 11-point text. But, a template is much more than just formatting setup; a template can also store styles to be applied to the document, and in some cases, sample or boilerplate text.
One way to think about a template is that it’s the starting point for a document. Suppose you want to make 100 documents, all basically the same but with some small changes to each one. You would put the standard parts in a template and base each new document on it. Then, all you would need to do to each one is insert the unique content.
Word installs several templates on your hard disk, and you can access Microsoft’s library of templates online for additional choices. You can also create your own templates or modify any of the preinstalled ones and save the modified copy as your own template.
You can apply template files to a document in several ways:
• You can start a new document based on a template. See “Starting a New Document Based on a Template,” p. 287.
• You can switch an open document to a different template. See “Changing a Document’s Template,” p. 298.
• You can apply a template globally, so that its features are available to all documents. See “Applying Global Templates,” p. 299.
Before diving into those skills, however, take a moment to read the next section to learn more about the types of template files you might encounter.
Types of Template Files
Word 2013 accepts three types of templates. When you are using templates to create new documents, the distinction between them is not very important, but as you move into modifying and creating them, the template type becomes a major issue:
• Word 97-2003 template (.dot)—These templates work in any version of Word (97 through 2013). If you have templates you created in Word 2003 or earlier, they’ll be in this format. It’s also the format you’ll want to use if you are creating templates that you’ll share with others who don’t have Word 2007 or later. Documents created with these templates do not support any of the new features in Word 2007 and later. When working with a document based on one of these templates, Compatibility Mode appears in the Word window’s title bar.
• Word template (.dotx)—These are the standard templates for Word 2007 and later. They support all Word 2007 and later features, but they do not store macros. Not storing macros is a security feature, because macros can carry viruses.
• Word Macro-enabled template (.dotm)—These are just like regular Word templates except they do store macros. Create and use these templates whenever you need to store macros in the template.
![]() For more information about macros, see “Understanding Macro Basics,” p. 855.
For more information about macros, see “Understanding Macro Basics,” p. 855.
Determining What Template a Document Is Using
To see what template a document is using, follow these steps:
1. Click the File tab and click Info. The Info page appears for that document.
2. Click the Properties heading, and on the menu that appears, choose Advanced Properties. The Properties dialog box for the document opens.
3. Click the Summary tab. The Template name is reported near the bottom of the dialog box (see Figure 8.1).

Figure 8.1. Check a document’s template usage from its Properties dialog box.
4. Click OK to close the Properties dialog box.
Starting a New Document Based on a Template
Technically, there is no way to create a new document without basing it on some form of template because blank documents themselves are based on a template (Normal.dotm). However, generally when we refer to basing a document on a template, we mean something other than Normal.dotm.
As you learned in Chapter 1, “Creating and Saving Documents,” hundreds of templates are available from Microsoft via Office.com. A template can hold any settings that a document can, as well as any type and length of text. The most common uses for a template are to provide page-layout settings, custom definitions for document styles, and boilerplate text.
![]() For more information about styles, see “Understanding Styles,” p. 213.
For more information about styles, see “Understanding Styles,” p. 213.
Using a Microsoft Template
Some Word templates are preinstalled on your hard drive when you install Word, including several different designs for letters, resumes, and reports. You can access these templates whether or not you have an active Internet connection at the moment.
If you are connected to the Internet when you start a new document, you also have automatic access to templates from Office.com. Office.com provides hundreds of additional templates free to Word users. These templates are professionally designed, and they contain complex combinations of clip art, drawn shapes, text formatting, text boxes, and more. The templates available are changing constantly as Microsoft adds new templates and retires old ones. For access to these, ensure that an Internet connection is available.
![]() Tip
Tip
If you’ve upgraded from an earlier version of Word, you might find the Word 2003 Look or Word 2010 Look templates useful. They create blank documents with the same settings as the default blank document in Word 2003 and Word 2007/2010, respectively. (The default blank document was the same in Word 2007 and Word 2010.)
To start a new document based on one of Microsoft’s templates, choose File, New. A New page appears in Backstage view, containing a Search for online templates box at the top and two headings below it: Featured and Personal (or Custom). Under Featured are the Microsoft-supplied templates stored on your hard disk; under Personal or Custom are your own templates (discussed later in this chapter) (see Figure 8.2).
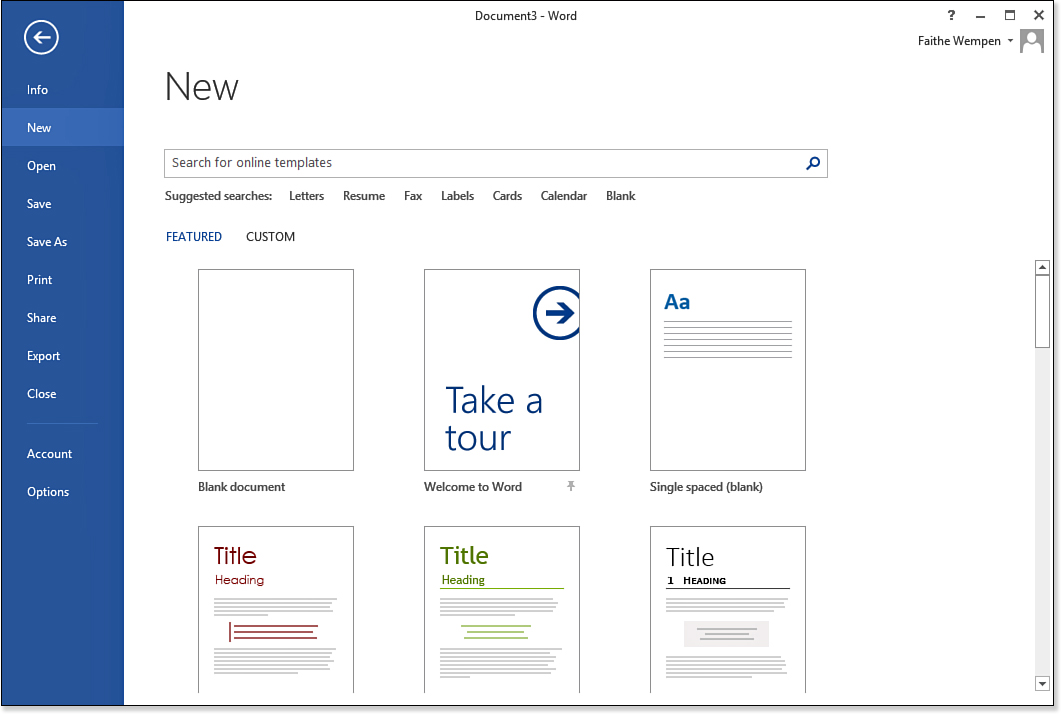
Figure 8.2. Select a template or use the Search box to locate a template online.
![]() For more information about creating your own templates, see “Creating Your Own Templates,” p. 297.
For more information about creating your own templates, see “Creating Your Own Templates,” p. 297.
Some of the templates under the Featured heading are the locally installed ones on your hard drive; others are from Office.com. There is no obvious distinction between them on the list. However, you will see a difference after you select one. If it’s a local template, a new document opens immediately based on that template. (Try the Adjacency Letter template, for example, to see this in action.) If it’s an Office.com template, an information box appears for the template when you click it. Figure 8.3 shows an example. You can read about the template, check out its rating, and, if you decide you want to use it, click Create to download it to your hard drive and start a new document based on it.

Figure 8.3. When you select an online template, information about it appears; click Create to use it.
![]() Note
Note
The rating is determined by people just like you who have downloaded a template and then voted on it. You can’t rate templates from the Available Templates pane, but you can from the Office Online website.
Many more templates are available on Office.com besides the few that show up on the Featured list. To search, click in the Search for online templates box, type a keyword, and click the Search button or press Enter. You can use one of the keywords on the Suggested searches list below the search box or use your own keywords. Figure 8.4 shows an example of a search using the keyword newsletters. Notice the Category list at the right; you can click a category to narrow down the search results even further. Microsoft is constantly changing the available template sets, so your search results might not exactly match what’s shown in Figure 8.4.
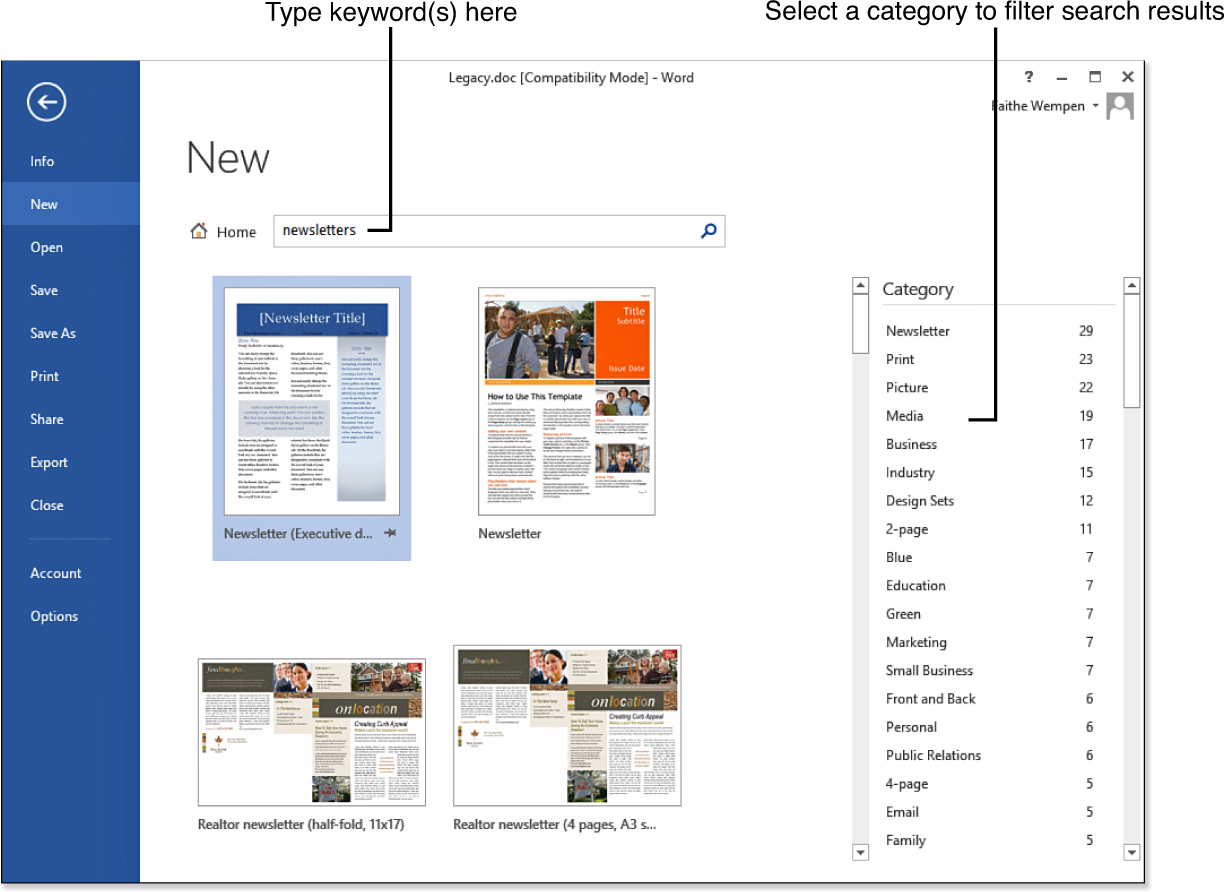
Figure 8.4. Search results for the keyword newsletters.
 No Headings Appear for Featured and Personal
![]() To learn how to choose a default location for workgroup template storage, see “Storing and Accessing Workgroup Templates,” p. 294.
To learn how to choose a default location for workgroup template storage, see “Storing and Accessing Workgroup Templates,” p. 294.
Using a Personal or Custom Template
A personal template is one that you or another user has created. Templates you create are stored in the default template folder, but as pointed out in the Troubleshooting note in the previous section, by default Office 2013 does not define what that folder is. You must specify a folder yourself. To do so, click the File tab, click Options, click Save, and enter a location in the Default personal templates location text box. If you don’t know what location to use, try this one: C:UsersusernameAppDataRoamingMicrosoftTemplates.
![]() Caution
Caution
If you log in to Windows as a different user, you will not have access to your user templates. See “Storing and Accessing Workgroup Templates” later in this chapter to learn how to share templates with all the local users of the PC and how to change the default storage location for both workgroup and user templates.
After you set up a default personal templates location, a Personal (or Custom) heading appears on the New page, and you can click that heading to access your personal template location. Your personal template location might be empty at first, but it fills up fast as you create your own templates. Copies of any Microsoft templates that you have previously downloaded from Office.com also appear under Custom, so you do not have to redownload the same template multiple times.
![]() Tip
Tip
Here’s a little quirk: If you have not yet specified a personal template location, and you download and use a Microsoft template, Word stores it in C:UsersusernameAppDataRoamingMicrosoftTemplates for later use. That’s why I recommended that you use that location for your personal templates—because Word is saving things there anyway, and you might already have some templates there. It’s also the location that was used in Word 2010, so if you have personal templates from the previous Word version, they’re available from there.
Here’s how to access custom templates:
1. Choose File, New.
2. If Personal appears, click it. Thumbnails appear for the templates stored in your personal template location.
If Custom appears, click it and then click one of the folder icons that appears. You see two folder icons: one for the folder containing your personal templates (perhaps named Templates) and one containing your workgroup templates (named whatever you named that folder location). You then see the thumbnails for the templates stored in the chosen location.
If Shared appears, that means you have a workgroup template location set up but not a personal one. Click Shared and thumbnails appear for the shared workgroup templates.
3. Click a template to create a new document based on it.
![]() To create your own templates, see “Creating Your Own Templates,” p. 297.
To create your own templates, see “Creating Your Own Templates,” p. 297.
![]() Caution
Caution
When you edit an existing template, you’re making a permanent change to it, so do this with caution. Even if you open the template with intentions of saving it under another name, it’s easy to forget and click the Save button and accidentally overwrite the original version. For this reason, the safest route is to create a backup folder into which you can put copies of the original template files that you can restore later, if needed.
Saving an Existing Document as a Template
You can convert any document to a template by saving it with a .dotx extension. However, you do not have to convert a document to a template to create other documents based on it. Any document can function as a makeshift template. To save a copy of an existing document as a template, follow these steps:
1. Open the document that you want to use as a template.
2. Choose File, Export, Change File Type.
3. In the Document File Types list, click Template (*.dotx) (see Figure 8.5).

Figure 8.5. Choose to save the file as a template.
4. Click Save As. The Save As dialog box opens.
5. Navigate to the folder where you store your personal templates (probably C:UsersusernameAppDataRoamingMicrosoftTemplates).
6. Change the name in the File Name box if desired.
7. Click Save. The template is created. The original document is unchanged.
Modifying Templates
The easiest way to get comfortable with creating templates is to modify an existing template. For example, suppose Word provides a calendar template that you really like, but you wish the colors were different. You can make the color changes and then save your work, either overwriting the previous version or creating a new file.
Understanding Template Storage Locations
To open a template, you must know where it’s stored. As you learned earlier, a template can potentially be stored in several locations, depending on the type of template it is:
• Personal user templates—Anywhere you specify, as you learned earlier in this chapter, but it’s a good idea to use C:UsersusernameAppDataRoamingMicrosoftTemplates (unless you have a reason to use something different) because that’s the folder that earlier versions of Word used.
• Workgroup user templates—Anywhere you specify. See “Storing and Accessing Workgroup Templates” later in this chapter for details of how to specify a workgroup template location.
• Microsoft-installed templates—C:Program FilesMicrosoft OfficeTemplates1033.
![]() Caution
Caution
When you edit an existing template, you’re making a permanent change to it, so do this with caution. Even if you open the template with the intention of saving it under another name, it’s easy to forget and click the Save button and accidentally overwrite the original version. For this reason, the safest route is to create a backup folder into which you can put copies of the original template files that you can restore later, if needed. This is especially relevant if you decide to edit the Microsoft-installed template in C:Program FilesMicrosoft OfficeTemplates1033.
Opening a Template for Editing
Opening a template is like opening any other Word file. By default, the Open dialog box displays all files that Word can open, including templates, but you might find it easier to filter the files to show only a certain type of template. To do that, change the Files of Type setting in the Open dialog box, as shown in Figure 8.6. Choose All Word Templates to see all the template types, or choose a particular template type to narrow down the listing to just that one type.

Figure 8.6. Filter the Open dialog box’s file listing to show only templates.
You need to browse to the folder where the template to be modified is stored. As mentioned earlier in the chapter, user templates are stored on a per-user basis. Each Windows user has his or her own template storage location.
Storing and Accessing Workgroup Templates
If your personal templates are stored in a folder that only you can access, other people who use your computer aren’t able to get to them. In situations where you need to make certain templates available to other people, possibly including people on different computers altogether, you should set up a network template storage location. This can be a folder on your own hard drive that others can access, or it can be a location on a centrally available network server.
![]() Tip
Tip
You can change any of the other locations in the File Locations dialog box too if you like. The User Templates setting here is the same as the one you entered on the Save tab of the Word Options dialog box earlier in this chapter. The Documents location points to the default location on your local system; the Images location points to the location that comes up by default whenever you use a dialog box interface to insert a picture from a file.
As noted earlier in this chapter, if you specify a workgroup template location, there are some subtle differences in the New page in Backstage view. Instead of the headings being Featured and Personal, they’re Featured and Custom (if you also have specified a personal template location) or Featured and Shared (if you haven’t done so).
First, find out if you have a workgroup templates folder set up. Here’s how to tell: choose File, New. If you see Custom or Shared, workgroup templates are set up. If you see Personal, or no headings at all, they aren’t.
Follow these steps to define a workgroup template location:
1. Choose File, Options. The Word Options dialog box opens.
2. Click Advanced.
3. Scroll down to the General section and click the File Locations button. The File Locations dialog box opens.
4. Look at the Workgroup Templates line to see what folder has been defined for workgroup templates. In Figure 8.7, the current location is C:Workgroup Templates. (That’s a folder I created myself specifically for this purpose.)
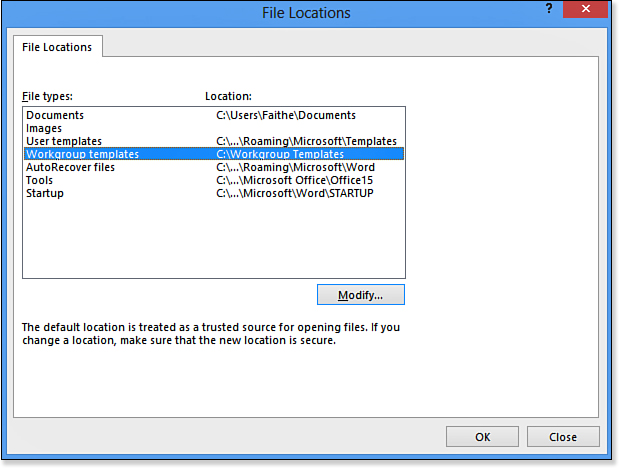
Figure 8.7. Note the location defined for workgroup templates, and change it if desired.
5. (Optional) Change the assigned folder by doing the following:
a. Double-click Workgroup Templates, or click Workgroup Templates and then click Modify.
b. Navigate to the folder you want to use. (It can be either a local or network location.)
c. Click OK.
![]() Caution
Caution
After you’ve specified a workgroup template location, there’s no removing it. You can change the workgroup template location, but you cannot go back to the state of having no location defined. If you decide not to use workgroup templates at all, define the workgroup template folder as the same folder you use for your personal templates.
6. Click OK to accept the new location.
7. Click OK to close the Word Options dialog box.
Next, move all the templates you want to share into that folder. You can do so from File Explorer. For example, to move templates from your personal template storage to the workgroup storage, follow these steps:
1. In Windows, open File Explorer (Windows 8) or Windows Explorer (Windows 7).
2. Navigate to the location where your existing user templates are stored.
3. Select the desired template files to share. Hold down Ctrl as you click each one to select multiple files.
4. Cut the files to the Clipboard by pressing Ctrl+X (or use any other method you prefer).
5. Navigate to the folder you specified for workgroup templates.
6. Paste the files from the Clipboard by pressing Ctrl+V (or use any other method you prefer).
As you create new templates, as described later in this chapter, save them in either the personal or the workgroup location, depending on whether or not you want to share them.
Modifying a Template by Modifying the Current Document
You can also modify a template in certain ways by editing a document based on it. For example, when you add a style or macro to a document, you’re prompted for a storage location for that style or macro. You can choose to store it either in the current document or in the current template. If you choose to store it in the template, the template is modified when you save your work.
![]() Caution
Caution
It is convenient to have changes silently saved to Normal.dotm, but some macro viruses infect Normal.dotm by making changes to it that you might not be aware of. Forcing Word to prompt you before making changes to that file is an extra layer of security.
A message might appear asking whether you want to save your changes to the document template, or the changes might be saved behind the scenes. You can specify whether you want changes to Normal.dotm to be made “silently” or not by doing the following:
1. Choose File, Options. The Word Options dialog box opens.
2. Click Advanced.
3. Scroll down to the Save section and either mark or clear the Prompt Before Saving Normal Template check box (see Figure 8.8).
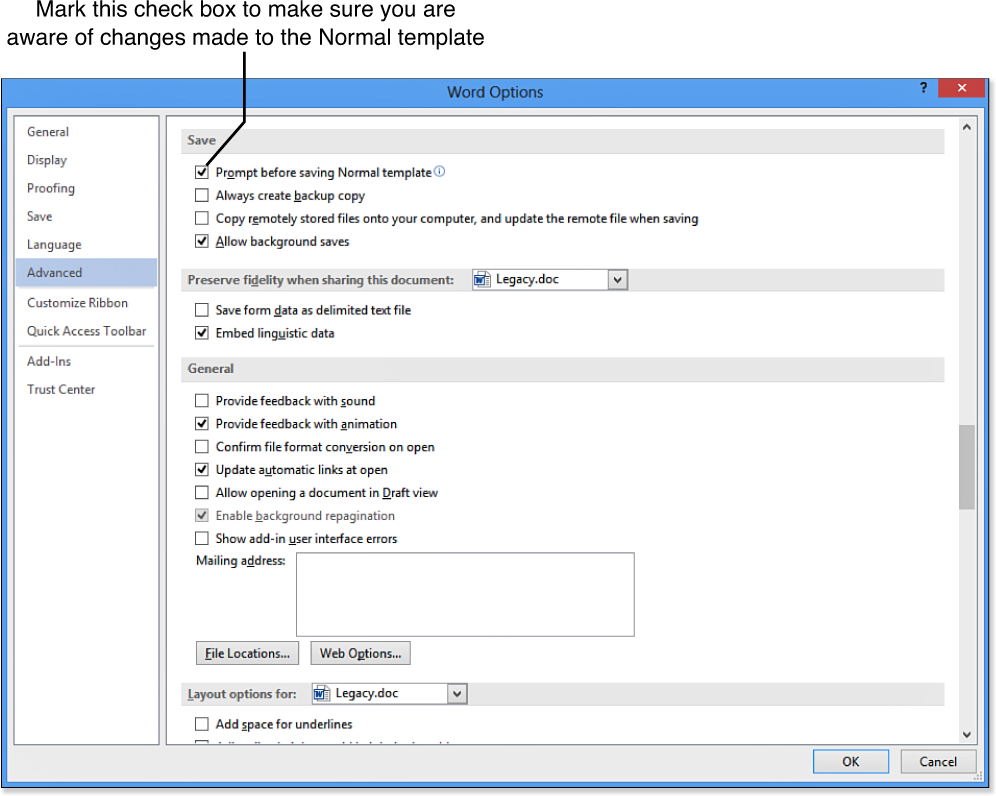
Figure 8.8. Choose whether to be prompted when changes are made to Normal.dotm.
4. Click OK.
Protecting Templates
You can protect templates from changes, just like you can regular documents. See “Protecting a Document” in Chapter 21, “Protecting and Securing Documents,” for information about password-protecting and encrypting templates, making them read-only, and preventing them from being copied or emailed using Information Rights Management (IRM).
Creating Your Own Templates
One way to create a template is to save a modified template or document under a different name. That way, you can base the new template on an existing one and save yourself some time.
To create a template, you must first decide on the type to use. Review the template types explained in “About Templates” at the beginning of this chapter. Word 97-2003 templates are best when compatibility is an issue with earlier Word versions. Use the Word Template type for a template that will not need to include macros; use the Word Macro-Enabled Template type for one that will.
![]() Note
Note
If the document or template on which you are basing the new template is in an earlier Word format, and the template type you chose to save as in step 3 is .dotx or .dotm, an information box lets you know that it will be upgraded to the newest file format. Click OK.
Follow these steps to create a template:
1. Open the template or document on which you want to base the new template, and then make any changes to it.
2. Choose File, Save As. The Save As screen appears in Backstage view.
3. Click Computer and then click Browse. The Save As dialog box opens.
4. Open the Save as Type list and choose the desired template type.
5. Navigate to the location in which you want to save the template. Refer to the locations listed in the preceding section, “Modifying Templates.”
6. Click Save. The template is created.
![]() Tip
Tip
If you have a lot of personal templates, consider creating subfolders within your personal or workgroup template storage location and placing templates into appropriate folders based on document type, client, or some other useful criteria. (Do this from File Explorer, outside of Word.) From then on, folder icons for each of the subfolders appear when you are browsing your personal templates in Word, and you can click a folder to browse its content.
Changing a Document’s Template
Most of the time, you’ll start a document based on the template you want it to use. If you change your mind later, though, you can switch templates without having to re-create the document. You can also make additional templates available, so you can use any macros or building blocks from them, without changing the primary template assigned to the document.
Follow these steps to apply a different template to the document:
1. If the Developer tab does not appear, do the following to display it:
a. Choose File, Options.
b. Click Customize Ribbon.
c. On the list at the right side, mark the Developer check box.
d. Click OK.
![]() Caution
Caution
Automatically updating document styles works only if the styles in the new template have the same names as the styles already applied to the text. If the new template uses different names for styles, you need to do a Find-and-Replace operation to replace all instances of the old style name with the new style name. See “Finding and Replacing” in Chapter 2, “Typing and Editing Text,” for more information on find-and-replace operations.
2. On the Developer tab, click the Document Template button. The Templates and Add-Ins dialog box opens, shown in Figure 8.9.

Figure 8.9. Use the Templates tab to change the template assigned to the document.
3. On the Templates tab, click Attach. The Attach Template dialog box appears.
4. Select the desired template from the Attach Template dialog box. (Navigate to the location containing the template.)
5. Click Open to return to the Templates tab.
6. (Optional) If you want the style definitions to update automatically to match the new template’s definitions, mark the Automatically Update Document Styles check box.
7. Click OK.
If you use the Templates and Add-Ins dialog box often, consider adding a shortcut to it in the Quick Access toolbar. To do so, display the Developer tab, right-click the Document Template button, and choose Add to Quick Access Toolbar.
Applying Global Templates
A global template is a template that makes its features available to all documents, not just when it is specifically applied. You can store styles and macros that you use often in a global template, for example.
To make a template global, follow these steps:
1. Do one of the following:
On the Developer tab, click Document Template. If the Developer tab is not visible, do the following to display it:
a. Choose File, Options.
b. Click Customize Ribbon.
c. On the list at the right side, mark the Developer check box.
d. Click OK.
or
If you have previously placed a Document Template shortcut on the Quick Access toolbar, click it. The Templates and Add-Ins dialog box opens, as shown in Figure 8.9.
2. In the Global Templates and Add-Ins section of the Templates tab, click Add. The Add Template dialog box appears.
3. Select the template to add globally and click OK. It appears on the list.
4. (Optional) To enable or disable global templates, mark or clear their check boxes on the list. Or to remove a template from the list completely, select it and click Remove.
5. Click OK.
![]() Tip
Tip
It is usually better to disable a global template than to remove it because it can be more easily reenabled later.
Enabling Global Templates at Startup
If you find yourself reenabling the same global templates every time you start up Word, here’s a shortcut. Copy the template into the Startup folder for Word: C:UsersusernameAppDataRoamingMicrosoftWordSTARTUP. Doing so forces the template to load globally at startup. You can disable it if needed from the Templates and Add-Ins dialog box on a case-by-case basis.
Preventing a Template from Loading at Startup
Some third-party applications, such as Adobe Acrobat, set up Word templates to load at startup to provide tighter integration with other programs. In the case of Adobe Acrobat, the automatically loaded template provides a macro for creating a new PDF document using Acrobat.
If you see items in the Templates and Add-Ins dialog box that you don’t recognize and don’t want, and they appear to be marked by default at startup, here’s how to get rid of them:
1. Exit Word.
2. In Windows, navigate to C:UsersusernameAppDataRoamingMicrosoftWordSTARTUP.
![]() Note
Note
The startup template location of C:UsersusernameAppDataRoamingMicrosoftWordSTARTUP is not set in stone. You can change where Word looks for startup templates by changing the Startup value in the File Locations dialog box, as you did for workgroup templates earlier in this chapter (see Figure 8.7).
3. Delete the unwanted templates, or copy them elsewhere, or rename them so that they do not have a template file extension anymore (and therefore Word won’t recognize them as templates).
4. Restart Word and then confirm that the templates no longer automatically load.
Automatically Changing the Template of All Documents Opened
Suppose your organization has been using a certain template for all documents, but now you’ve been given a new template and a directive to switch over all your documents to this new template.
One way to do that is to open each document and then manually switch the template assigned to the document and save/close it. An easier way, however, is to create a special macro called AutoOpen. Whatever commands you place in AutoOpen run automatically whenever you open a document. Save the AutoOpen macro in Normal.dotm.
Macro recording is covered in Chapter 24, “Macros and Add-Ins,” but here’s a quick overview:
1. Make sure that you have already created a Document Template button on the Quick Access toolbar. To do so, display the Developer tab, right-click the Document Template button, and choose Add to Quick Access Toolbar.
2. Click the Macro Recording button on the status bar (the icon immediately to the right of ENGLISH (UNITED STATES) or whatever language and country you are using) (see Figure 8.10).

Figure 8.10. Record an AutoOpen macro
If you do not see this button on the status bar, right-click the status bar and click Macro Recording.
3. In the Record Macro dialog box, type AutoOpen as the macro name (see Figure 8.10).
4. In the Store Macro In list, make sure that All Documents (Normal.dotm) is selected.
5. Click OK to begin the recording.
6. Click the Document Template button on the Quick Access toolbar.
7. Click the Attach button, select the template to attach, and click Open.
8. Mark the Automatically Update Document Styles check box.
9. Click OK.
10. Click the Stop Macro button (the white square that replaced the Record Macro button on the status bar).
The macro is now created. To try it out, open a document that uses some other template, and then note whether the document’s template changes.
To see what template a document is using, choose File, Properties, Advanced Properties. On the Summary tab of the dialog box that appears, you can find the template’s name near the bottom of the dialog box.
To stop the macro from running automatically at startup, delete or rename the AutoOpen macro. You can do either of those things from the Macros dialog box (Developer tab, Macros).
![]() For information about deleting and renaming macros, see “Renaming and Deleting Macros,” p. 870.
For information about deleting and renaming macros, see “Renaming and Deleting Macros,” p. 870.
Troubleshooting Problems with Normal.dotm
Normal.dotm is the default template for Word documents. When Normal.dotm develops problems, those problems carry over to many documents, so it’s important to know how to resolve them quickly.
Normal.dotm Is Missing
Depending on the situation, it might be perfectly normal that you can’t find Normal.dotm anywhere on your hard disk. If you have not made changes to the default settings in Word, such as changing the default font, Normal.dotm will not appear in a file listing. In its default state, it is built in to Word. It appears as a separate file only if you have changed it in some way.
To force it to appear, make some sort of change to the default settings. For example, on the Home tab, open the Font dialog box, change the font, and click the Default button. When prompted to change the default font, click Yes.
Normal.dotm will then appear in the default location for your personal templates. To browse to its folder, you might need to turn on the display of hidden files. See the next section for details.
Can’t Find the AppData Folder
As you learned earlier in the chapter, earlier versions of Word stored personal templates in C:UsersusernameAppDataRoamingMicrosoftTemplates and that’s where you should store yours also unless you have another location in mind.
However, if you try to navigate to this folder in Windows, you might not be able to find it. That’s because the AppData folder is hidden by default.
To display hidden folders, in Windows 8, open File Manager, display the View tab, and make sure that the Hidden Items check box is marked.
To display hidden folders in Windows 7, choose Organize, Folder and Search Options, click the View tab in the dialog box that appears, select the Show Hidden Files, Folders, and Drives option, and click OK.
The Document Formatting Doesn’t Change When I Apply a Different Template
Simply changing the template does not automatically change the formatting. For example, suppose the Heading 1 style is defined as 18-point Arial in the current document, and you apply a template that defines Heading 1 as 20-point Times New Roman. The existing Heading 1 text does not change automatically, but if you reapply Heading 1 to the text, it changes at that point. In addition, any new headings you create with the Heading 1 style have the new definition.
To force the existing Heading 1 text to change, mark the Automatically Update Document Styles check box in the Templates and Add-Ins dialog box as you are applying the new template.
If that doesn’t help, you can force all the styles in the document to update themselves in each instance by selecting the entire document (Ctrl+A) and then pressing Ctrl+Q.
I Want the Original Version of Normal.dotm
If you make changes to Normal.dotm that you later decide were ill advised, or if Normal.dotm gets corrupted, you might want to go back to the original Normal.dotm that came with Word.
To revert to the original Normal.dotm, simply delete your customized copy of it. The next time you restart Word, it creates a fresh copy of Normal.dotm.
Creating Text Box Layouts
Word is obviously well suited to writing ordinary documents such as reports, letters, and memos, but it also has some other uses that most people never get a chance to explore. In this chapter, you discover some of the interesting things Word can do with nonstandard layouts.
Text box layouts are layouts in which text is not typed directly onto the page, but instead placed in floating text boxes. This type of page layout has many advantages, and in fact that’s the standard operating mode for most professional-quality desktop publishing programs, including Adobe InDesign and QuarkXPress, as well as consumer-level publishing programs such as Microsoft Publisher and presentation programs such as PowerPoint. You can freely move each text box on the page, so the text need not follow a strict top-to-bottom flow. Figure 8.11 shows an example of a page layout constructed with text boxes.

Figure 8.11. Text boxes make it possible to place text precisely where you want it on the page.
Inserting a Text Box
Word includes a variety of text box building blocks for quickly inserting preformatted boxes with sample text. (Yes, it’s the same building blocks feature as is used with AutoText, headers and footers, and page numbering.)
![]() Caution
Caution
Text boxes can hold almost anything that the document itself can hold—text, graphics, tables, fields, and so on. There are a few exceptions, however. Text boxes cannot contain multiple columns or column breaks, page breaks, drop caps, comments, footnotes, endnotes, or markings for indexes and tables of contents.
To insert a preset text box, display the Insert tab, click Text Box, and then click one of the presets on the menu (see Figure 8.12). Then click inside the text box and edit the sample text as desired.

Figure 8.12. Select a text box preset.
If none of the presets are to your liking, you can draw your own text box anywhere on the page and then format it and place text in it later. To draw a text box, follow these steps:
1. From the Insert tab, click Text Box and then click Draw Text Box. The mouse pointer changes to a crosshair.
2. Drag to draw a text box on the page. When you release the mouse button, the text box appears and the Drawing Tools Format tab appears.
The default text box style is a thin solid black border and a white fill.
3. Click inside the text box and type text into it.
To select a text box, click it. When a text box is selected, it has its own indent markers on the ruler; set those as you would in any document (see Figure 8.13).

Figure 8.13. A text box has its own ruler settings.
When a text box is selected, a Format tab appears, containing options for formatting the text box. The following sections explore those options.
Moving and Resizing a Text Box
To move a text box, select it by clicking it so that a border with selection handles appears around it (refer to Figure 8.13). Then, to move the text box, drag it by its border (but not by a selection handle), or to resize it, drag any selection handle. If you need the text box to be a precise size, enter values in the Height and Width boxes on the Format tab.
Another way to enter height and width values is via the Layout dialog box:
1. Right-click the border of the text box and choose More Layout Options. The Layout dialog box appears.
2. Click the Size tab.
3. Enter values in the Height and Width sections. If the Absolute option button is not already selected in each section, select it, so absolute measurements are entered (see Figure 8.14).

Figure 8.14. Specify a height and width in the properties for the text box.
4. Click OK.
![]() Note
Note
Absolute is the default for both height and width for drawn text boxes, but for some of the preset ones, the width value is set to Relative and set at a percentage of the page width. (A relative width enables the same building blocks to be used on different paper sizes and take up the same proportional amount of space.)
Applying and Removing Text Box Borders and Fills
Word provides a variety of style presets that can be applied to text boxes. There are six different styles, and each is available in seven different colors. (These are the same as the presets you can apply to drawn shapes, as you learn in Chapter 11, “Working with Drawing Tools and WordArt.”)
![]() Tip
Tip
To copy formatting from one text box to another, use the Format Painter button on the Home tab.
Select the text box. Then open the Shape Styles list from the Format tab and make your selection, as shown in Figure 8.15.

Figure 8.15. Select a formatting style for the text box.
![]() To learn about Format Painter, see “Copying Formatting with Format Painter,” p. 165.
To learn about Format Painter, see “Copying Formatting with Format Painter,” p. 165.
If you’re using text boxes for document layout, rather than as decorative aids, you probably don’t want to do much with their formatting; in fact, you probably want most text boxes to be invisible (no border, no fill).
By default, drawn text boxes have visible borders; here’s how to turn off the border on a text box:
1. Select the text box.
2. Display the Drawing Tools Format tab.
3. Open the Shape Outline button’s list and choose No Outline.
And here’s how to remove the fill, if one is applied:
1. Select the text box.
2. Display the Drawing Tools Format tab.
3. Open the Shape Fill button’s list and choose No Fill.
Need more control? There’s a whole lot you can do to fine-tune the text box’s line and fill. Display the Drawing Tools Format tab, and use the Shape Fill, Shape Outline, and Shape Effects controls. These controls work the same for text boxes as they do for AutoShapes, so I won’t cover them here; instead, flip to Chapter 11 for the details.
![]() To learn about line, fill, shadow, and 3D options, see “Creating and Modifying WordArt,” p. 453.
To learn about line, fill, shadow, and 3D options, see “Creating and Modifying WordArt,” p. 453.
Changing the Text Box Shape
Text boxes are rectangular by default, but you can convert them to any of a variety of shapes—rounded rectangles, circles, ovals, parallelograms, diamonds, and more.
Here’s how to change the shape of a text box:
1. Select the text box.
2. On the Drawing Tools Format tab, click Edit Shape, Change Shape and then click the desired shape (see Figure 8.16).

Figure 8.16. Select a shape for the text box.
Even though the text box may have an asymmetric shape, the text within it still conforms to a rectangular area. For example, in a parallelogram in Figure 8.17, the lines do not begin at different positions to hug the borders of the shape; instead, the text is confined to a small area in the center that does not overlap borders.

Figure 8.17. A text box with a parallelogram shape.
Setting Text Box Margins and Vertical Alignment
By default, a text box has 0.1-inch left and right internal margins and 0.05-inch top and bottom internal margins. These margins allow the text to fill the text box completely but not quite touch the border lines.
Vertical alignment is the placement of the text within the text box vertically. If there is not enough text to fill the entire text box vertically, where will the blank space occur? Text boxes have a default vertical alignment of Top, so any blank space appears at the bottom.
To change either of these settings, use the Format Shape task pane. Follow these steps:
1. Right-click the border of the text box and choose Format Shape.
2. Click the Text Options heading and then click the Layout & Properties icon. The Text Box controls appear (see Figure 8.18).

Figure 8.18. Set internal margins and vertical alignment for the text box.
3. Change the Left, Right, Top, or Bottom internal margin settings.
4. Change the vertical alignment setting if desired. The choices are Top, Middle, and Bottom.
5. Click OK.
Wrapping Text Around a Text Box
When a text box overlaps with regular document text, it interacts with it according to the Wrap Text setting you specify. These are the same wrap text settings as for shapes, photos, clip art, and all other types of content. These wrap settings are covered in detail in “Setting Text Wrap” in Chapter 10, “Working with Pictures and Videos,” but here’s a quick summary of the process:
1. Select the text box, and click the Wrap Text button on the Drawing Tools Format tab to open a menu of wrap choices (see Figure 8.19). Alternatively you can click the Layout Options button to the right of the text box to display a panel containing almost exactly the same options as on the menu.

Figure 8.19. Select a wrap text setting.
2. Click the desired wrapping style:
• In Line with Text—Treats the graphic as a large character of text, running it along with the text. When you edit the text, the graphic shifts along with it. You can drag and drop the graphic only into places where text could go.
• Square—Wraps text around both sides of the text box in a rectangular shape.
• Tight—For a rectangular text box, this is the same as Square. For a text box with some other shape (as covered in the preceding section), it wraps the text around the shape.
• Through—Same as Tight except somewhat tighter if it’s an irregular-shaped object like a piece of clip art.
• Top and Bottom—The text wraps around the text box above and below it, but the space to the left and right of the text box remains empty.
• Behind Text—The text box is placed behind the text, so the text runs over the top of it. This one is not recommended for text boxes.
• In Front of Text—The text box is placed on top of the text, so the text runs behind it. Usually not a great choice, because the text is obscured.
You can also choose More Layout Options for a dialog box with a few other choices, or choose Edit Wrap Points to manually edit the points around which the text wraps.
![]() To edit wrap points or use advanced wrapping options, see “Setting Text Wrap,” p. 388.
To edit wrap points or use advanced wrapping options, see “Setting Text Wrap,” p. 388.
Linking Text Boxes
In magazine and newspaper publishing lingo, all the text for a particular article is called a story. When a story fills up one text box and continues to another, the two text boxes are said to be linked.
A story-based layout with text boxes in Word is accomplished by creating multiple text boxes and linking them with the Create Link command, as follows:
1. Create all the text boxes needed for the story.
![]() Note
Note
If the text for the story is already typed, it should all appear in the first text box. All other text boxes must be empty or it won’t work. Many people find it easier to create the story in a separate document and then cut and paste it into the set of linked text boxes after the links have been configured.
2. Click the border of the first text box and then click the Create Link button on the Drawing Tools Format tab. The mouse pointer turns into an upright pitcher.
3. Position the mouse pointer over the center of the text box that will be linked next in the chain. The mouse pointer turns into a tilted pitcher (see Figure 8.20).
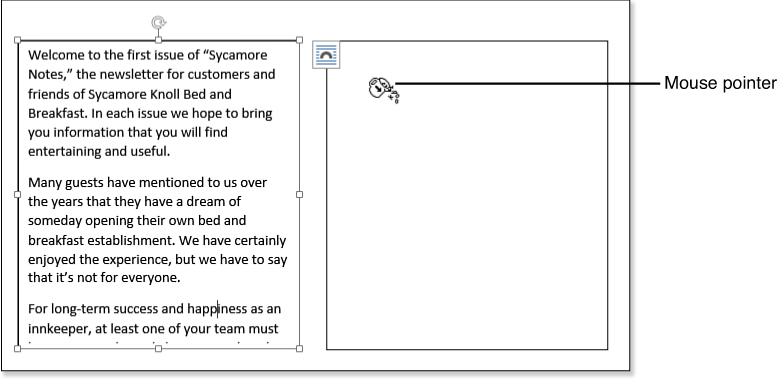
Figure 8.20. The tilted-pitcher mouse pointer indicates the link is ready to be “poured” into the text box.
4. Click to create the link.
5. If there are more text boxes to link, click the second text box and then link it to the third, then the third to the fourth, and so on until all text boxes are linked.
6. Type the story, starting in the first text box.
Alternatively, paste the story into the first text box, and it will flow into the others automatically.
Unlike in some other desktop publishing programs, Word does not have indicator to show overflow text, so if there is nowhere for excess text to go (for example, no subsequent linked text boxes), it is simply truncated. The text still exists, though, and if you enlarge the text box or link another box to it, the truncated text reappears.
Breaking the Link
If a story does not run as long as you expected, you might want to delete the unneeded boxes or break the link to the unused boxes so they can be used for some other story.
To break a link, do the following:
1. Select the text box that should be the last box in the chain. (All boxes after this one will be unlinked.)
2. On the Drawing Tools Format tab, click Break Link.
Changing the Text Direction
One advantage of a text box is that you can set the text to run vertically in it. This enables you to create interesting special effects, such as a newsletter title that runs vertically along the left side of the page.
To create this effect, select the text box and then on the Drawing Tools Format tab, click Text Direction and choose a direction, as shown in Figure 8.21.

Figure 8.21. Vertical text in a text box.
Word supports three text directions: Horizontal, Rotate All Text 90°, and Rotate All Text 270°. To select one of these options from the Ribbon, click the Text Direction button on the Format tab.
Tips for Creating Text Box Layouts
In desktop publishing programs, such as Publisher, Adobe InDesign, and QuarkXPress, it is easy to place the text boxes in the same spots on every page because you can place nonprinting guidelines on each page. Word does not have guidelines per se, but it does have a nonprinting grid you can toggle on and off.
To toggle the grid, on the View tab, mark or clear the Gridlines check box. Gridlines appear in Print Layout view only. Figure 8.22 shows gridlines displayed.

Figure 8.22. Gridlines help you align text boxes and other content.
In addition, here are some other ways to ensure consistent placement of objects between pages:
• Use the Shape Height and Shape Width controls on the Drawing Tools Format tab to make sure that each text box is the same size, and then use the Align and Distribute controls (also on the Drawing Tools Format tab) to place them evenly on the page.
![]() To learn about Align and Distribute, see “Aligning and Distributing Objects,” p. 437.
To learn about Align and Distribute, see “Aligning and Distributing Objects,” p. 437.
• Create one text box the way you want it and then copy it to create the others, ensuring consistent size and shape. To copy a text box, hold down Ctrl as you drag its border (not a selection handle).
• Create one page the way you want it, with all the text boxes in place, and save that page as a building block. On the Insert tab, click Quick Parts and then choose Save Selection to Quick Part Gallery. Make sure to change the Options setting to Insert Content in Its Own Page. You can then insert that page as many times as needed to duplicate the page layout.
![]() To create your own sample pages with building blocks, see “Saving Content as a New Cover Page,” p. 261.
To create your own sample pages with building blocks, see “Saving Content as a New Cover Page,” p. 261.
• Create temporary content to serve as guides. For example, if you want guides for creating three equal-sized columns, set Columns to 3 (Page Layout tab), set the paragraph background shading to a color, and then press Enter enough times to fill an entire page. The result is three empty-but-shaded columns. Then drag your text boxes on top of those, and remove the shading when finished.
Working with Frames
A text box is technically a graphic object, not part of the main document. That’s fine in most cases, and in fact, it provides some formatting benefits. For example, as you saw earlier, you have access to all the same line and fill formatting options as with AutoShapes, including 3D and shadow effects.
However, there are certain special-purpose cases in which the fact that text box text resides in the graphics layer can be problematic. One is that you can’t use any automatically numbered reference elements in a text box, such as footnotes, comments, and captions. You also can’t use certain fields that automatically number things based on their position in the document, such as AUTONUM and AUTONUMLGL. That makes sense if you think about it—if each text box is a separate graphical unit, it has no relationship to the document’s main body.
The following fields work only in frames, not in text boxes: AUTONUM, AUTONUMLGL, AUTONUMOUT, TC, TOC, RD, XE, TA, and TOA.
The solution in these cases is to convert the text boxes into frames. Frames are part of the text layer, so they can use all the aforementioned reference elements, but the frames are sectioned off from the main text (which can wrap around them).
![]() Caution
Caution
With a frame, you give up some of the formatting functionality of a text box, and you lose the ability to link. A linked text box cannot be converted to a frame. You must remove the link first.
Frames can be used only in legacy format documents—that is, documents in Word 97–2003 format. Before you can convert a text box to a frame, you must save in that format.
To convert a text box to a frame, follow these steps:
1. Make sure that you have saved the document in Word 97–2003 (.doc) format. This procedure will not work in a Word 2007 and later document.
2. Right-click the text box’s border and choose Format Text Box.
3. Click the Text Box tab, and then click the Convert to Frame button.
4. A warning appears; click OK. The text box becomes a frame.
You cannot convert from a frame to a text box; you must create a new text box and then cut and paste the text from the frame into it.
The most immediately apparent difference between a frame and a text box is that on a frame, the selection handles are all squares, whereas on a text box, the corner ones are circles. The squares indicate that the frame is an inline object in the document, part of the text.
To format a frame, right-click its border and choose Format Frame. The Frame dialog box opens, as shown in Figure 8.23. From here you can do the following:
• Set the text wrapping around the frame. However, it is limited to None (same as Top and Bottom for a text box) or Around (same as Square for a text box).
• Set the size of the frame, either to exact measurements or to Auto (to change the frame size based on the contents).
• Set the horizontal and vertical positions of the frame, in relation to the margin, column, or page.
• Specify whether the frame should move with the text. For example, if you add more text above the frame, should the frame shift down or should it stay static?
• Specify whether to lock the frame’s anchor. The anchor marks the position on the page.

Figure 8.23. Set frame properties in the Frame dialog box.
The Frame dialog box also contains a Remove Frame button. Use this to place the frame’s text into the main document as regular text and delete the frame. The text from the frame is placed at the location of the frame’s anchor point.
Creating Banners
Word is perhaps not the best program for creating large-format items such as posters and banners because it doesn’t have any special features in that regard. Microsoft Publisher, if available, is a more satisfactory solution. However, Word will serve in a pinch, and this section explains how to make that happen.
The challenge when working with large-format items is that most people don’t have a large-format printer, so they end up printing pieces of the document on separate sheets and then knitting them together with tape or staples. Most printers have a “dead” area of about 1/4-inch around all sides of a printed page, so when creating pages designed to be pasted together, you’ll need to figure in at least 1/2-inch of overlap area between them (1/4-inch on each page where two pages come together). In practice, however, it is better to leave even more space than that for overlap to simplify the connections.
Each panel of a multisheet banner is a separate page in Word. The pages can be landscape in orientation for a banner that is 8.5 inches high or portrait for a banner that is 11 inches high.
![]() To switch between portrait and landscape page orientation, see “Setting Page Orientation,” p 255.
To switch between portrait and landscape page orientation, see “Setting Page Orientation,” p 255.
The best way to create a banner in Word is to start with a Microsoft-provided template and then modify it as dictated by the needs of your project. The Microsoft templates have divider lines that show where the copies will join, taking the guesswork out of the overlap. After you’ve used the template a few times and have an idea of how things work, you can create your own from-scratch versions. Search the Office Online templates for the word banner to locate appropriate templates to use.
![]() To review how to create a document by using a template, see “Starting a New Document Based on a Template,” p. 287.
To review how to create a document by using a template, see “Starting a New Document Based on a Template,” p. 287.
Figure 8.24 shows a birthday banner in Print Preview, created from a template. Notice that each panel is a separate page, and each page has dotted vertical lines on it showing where the pages should be overlapped. You can either fold the pages or cut along the dotted lines to prepare them.

Figure 8.24. A multisheet banner created in Word.
When it comes time to create your own banner designs, here are some tips:
• For graphic elements that repeat on each page, such as the bar below the letters in Figure 8.24, place them in the page header and footer rather than copying them onto every sheet individually.
• Use the drawing tools in Word to draw the vertical dotted lines that will guide your cutting or folding. To make it less obvious if you don’t cut the lines quite right, use a light color for the lines, such as pale gray.
• Use text boxes to place the text on the banner rather than placing the text directly onto the page. To make sure that the text boxes are the same size and position on every page, use the Clipboard to copy a text box from one page and paste it on another page.
• Try to make page breaks wherever there are natural breaks in the text, such as between letters or words.
• Do not attempt a patterned background; it’s too hard to get the pieces lined up. In fact, it’s best to just stick with a plain background. Use colored paper if you want.
Addressing Envelopes
There are two ways to print envelopes in Word: You can print a single envelope at a time (or multiple copies, but all addressed to the same person), or you can do a mail merge and print lots of envelopes at once, all addressed to different people. The latter is a huge topic all its own, and it’s covered separately in Chapter 14. In this chapter, you find out how to create single envelopes, store addresses for them, and place them in letter documents.
Adding an Envelope to a Letter
Ready to generate an envelope for the letter you’ve just typed? Word can do it automatically. It even pulls out the delivery address from the letter and places it on the envelope.
Follow these steps to create an envelope layout:
1. In the letter you’ve composed, select the complete delivery address.
2. On the Mailings tab, click Envelopes. The Envelopes and Labels dialog box appears, with the recipient’s address in the Delivery Address box (see Figure 8.25).
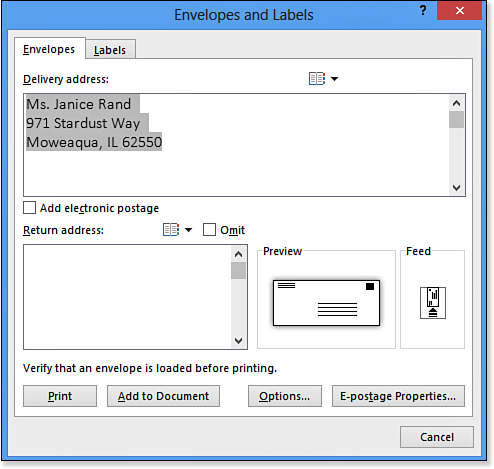
Figure 8.25. Word identifies the recipient address and places it in the Delivery Address box.
3. If your return address does not already appear in the Return Address box, type it there. (Word remembers it after you enter it initially.)
Or, if you are going to print on an envelope with a preprinted return address, mark the Omit check box.
![]() Note
Note
If you don’t need the envelope to be stored with the document, click Print to send the envelope directly to the printer instead of adding it to the document.
4. Change the envelope size if needed. (This is covered in the next section.)
5. Click Add to Document. Word creates a new section above the main letter, with an appropriate page size for the envelope size you chose and with the delivery and return addresses filled in.
Setting the Envelope Size
The default envelope size is Size 10, which is a regular business envelope in the United States (4 1/8 inches × 9 1/2 inches). To change to a different size, click the Options button in the Envelopes and Labels dialog box. Then in the Envelope Options dialog box, select a different Envelope Size setting from the list provided (see Figure 8.26).
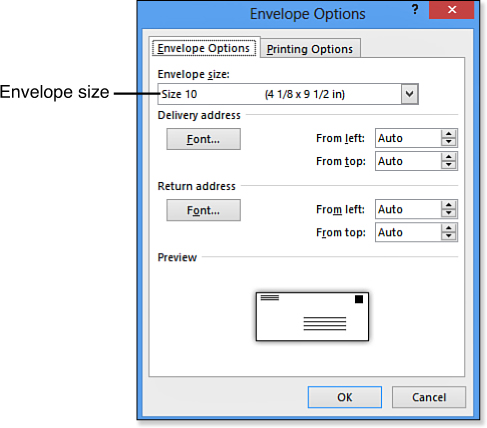
Figure 8.26. Select an envelope size.
If none of the sizes matches your envelope, choose Custom Size from the bottom of the Envelope Size list. The Envelope Size dialog box opens, in which you can enter the exact dimensions of the envelope you have.
Changing the Address Position
Usually the default address positions work well; Word places the return address in the upper-left corner of the envelope, about 1/2 inch from the top and left edges, and places the delivery address in the center horizontally and slightly lower than center vertically.
To change the position of either of these addresses, click the Options button in the Envelopes and Labels dialog box, and then change the From Left and From Top values as needed.
Changing the Envelope Font
If you add the envelope to the document, you can then select the addresses and change their font formatting afterward.
However, if you choose not to add the envelope to the document—that is, if you send it directly to the printer with the Print button in the Envelopes and Labels dialog box—then, there is no opportunity to change the font after the fact, so you must set the desired font within the Envelope Options dialog box.
From the Envelopes and Labels dialog box, click Options, displaying the Envelope Options dialog box (refer to Figure 8.26). Then, in the Delivery Address area, click Font. The Envelope Address dialog box opens, which looks very much like the Font dialog box you worked with in Chapter 4, “Applying Character Formatting.” Change the font, style, size, color, and so on, and then click OK to accept the changes. Then do the same thing for the return address.
Printing an Envelope
To quickly print the envelope, click the Print button in the Envelopes and Labels dialog box. (You can reopen the dialog box by clicking the Envelopes button again on the Mailings tab if needed.) One copy of the envelope (only) prints on the default printer. It happens immediately; the Print dialog box does not appear.
Do you need more control than that? Perhaps you need multiple copies of the envelope, or a different printer than the default? For this, you must have added the envelope to the document. Just click the envelope (moving the insertion point onto its page) and choose File, Print. Under Settings, choose Print Current Page from the first drop-down list. Change the Printer if needed, increase the number of copies if needed, and then click Print.
Controlling How Envelopes Feed into Your Printer
Word recommends an envelope feed orientation based on the default printer’s driver information. That recommendation appears in the Feed area of the Envelopes and Labels dialog box.
Sometimes, however, the default envelope feed orientation won’t work for some reason. For example, perhaps it is based on having an envelope tray that feeds the envelopes in centered, but you don’t have such a tray so you’re feeding the envelopes in at the left edge of the paper guide. Or perhaps the default orientation is to feed the envelope in head-first, but the printer’s paper carriage width isn’t wide enough for a large envelope.
To change the envelope printing orientation, follow these steps:
1. In the Envelopes and Labels dialog box, click the picture in the Feed area. The Envelope Options dialog box opens with the Printing Options tab displayed.
2. Click a picture that best represents the feed orientation needed (see Figure 8.27).

Figure 8.27. Choose an envelope feed orientation.
3. Click the Face Up or Face Down button, as appropriate. (This setting doesn’t change which side of the page Word prints on, except if you have a duplex-capable printer, but it does change the graphic shown to help you remember how to place the envelopes in the paper tray.)
4. If you’re feeding the envelope in sideways, if the return address prints to the right, click Clockwise Rotation.
5. (Optional) Select a different paper tray in the Feed From list if needed.
6. Click OK.
Storing and Retrieving Addresses
After you’ve entered a return address, Word offers to save it as the default return address. If you click Yes, it fills in that same return address automatically for all future envelopes.
![]() Caution
Caution
Sometimes, when you insert an address from Outlook using the Envelopes and Labels dialog box, the address appears with extra vertical space between each line. To get rid of this extra space, you need to add the envelope to the document. Then select the paragraphs of the address and open the Paragraph dialog box (on the Home tab, click the dialog box launcher in the Paragraph group) and set the Before and After spacing to zero.
You can also select an address from the Address Book that is used in Windows Mail or Microsoft Outlook. To do so, follow these steps:
1. Click the Insert Address icon above either the Delivery Address or Return Address box in the Envelopes and Labels dialog box.
2. If prompted to select a mail profile, choose the desired profile and click OK.
3. In the Select Name dialog box, addresses appear from your Outlook contact list or from the mail system associated with the profile you chose in step 2.
Depending on the mail programs installed, you might have more than one address book available. Select from the Address Book drop-down list at the top-right corner of the dialog box.
4. Click OK. The address is filled into the Delivery Address or Return Address box.
Adding Graphics to an Envelope
There’s no special feature for adding envelope graphics, but all the regular graphics tools can be used to place a graphic on an envelope that has been added to the document. You can use clip art, logo graphics, WordArt, and so on. Here’s a quick list of cross-references for learning about various graphic types:
• Graphics from files—See “Inserting a Picture from a File,” p. 383.
• Clip art—See “Working with Clip Art,” p. 458.
• WordArt—See “Creating and Modifying WordArt,” p. 453.
• Shapes—See “Drawing a Shape,” p. 421.
After inserting a graphic on the envelope and positioning it appropriately, you might find it useful to save the graphic (and optionally the return address with it) as a building block. You can then insert that building block into future envelope layouts, saving yourself the trouble of reimporting the graphic each time. See “Creating a Building Block” in Chapter 2, “Typing and Editing Text,” for more information.
Using E-Postage with Word
If you use a third-party postage service such as Stamps.com, it can be accessed via Word’s Envelope feature. Such systems save you trips to the post office by enabling you to print government-approved postage directly onto your envelopes. You then pay your monthly postage bill by credit card through the service.
First, of course, you must sign up for a service. When you mark the Add Electronic Postage check box (or try to) in the Envelopes and Labels dialog box, and you haven’t yet installed postage software on your PC, a message appears offering to open the Microsoft Office website so you can find out more about e-postage. Click Yes to visit that page and find a link for signing up.
After you’ve signed up and the postage software is installed, the Envelopes and Labels dialog box enables you to mark the Add Electronic Postage check box, and the E-Postage Properties option becomes available. (Click E-Postage Properties to set up options such as certified or registered mail or insurance.)
The exact steps for adding e-postage depend on the service you are using. For example, Stamps.com’s service checks the delivery address you entered to make sure that it is valid, makes corrections if needed, and prompts you for the weight and mailing date. Just follow the self-explanatory prompts to complete the postage purchase.
Creating Labels
As with envelopes, there are two ways of printing labels in Word. You can print individual labels (or a sheet containing multiple copies of the same label), or you can do a mail merge that creates one label apiece for a whole list of addressees. The latter is covered in Chapter 14. In this chapter, you find out how to create and print individual labels only.
To print labels, you need special label paper. There are many brands and sizes of labels; most come in full 8.5-inch × 11-inch sheets, with perforated peel-off labels. Word recognizes the model numbers for many popular brands and sizes, and you can set up custom labels in situations where none of Word’s presets are appropriate.
![]() Caution
Caution
Make sure that you buy the type of label sheets designed for your printer type. Labels designed for ink-jet printers cannot withstand the heat generated by the laser printing process, and might become curled or wrinkled—or worse yet, peel off or melt inside the printer—if used with a laser printer. Laser labels will work okay in ink-jet printers, but the ink might not stick to them quite as well because laser label paper tends to be less porous.
Printing a Full Page of the Same Label
One common use of the Labels feature is to create return address labels for packages and other mailings. You can get really creative with these and include graphics, photos, colors, fancy fonts, and so on, or you can go strictly utilitarian.
To print a basic label, follow these steps:
1. On the Mailings tab, click Labels. The Envelopes and Labels dialog box opens with the Labels tab displayed (see Figure 8.28).

Figure 8.28. Set up a label for printing.
2. In the Address box, type the address to appear on the label. (It doesn’t really have to be an address; you can put any text you want here, such as THIS END UP or FRAGILE or HAVE A NICE DAY.)
You can also select an address from your Address Book; see “Storing and Retrieving Addresses” earlier in this chapter. You can also mark the Use Return Address check box to use the currently stored return address as the label address.
![]() Note
Note
A continuous feed printer uses a tractor-feed style of label, usually one label per row. Most continuous feed printers are dot matrix. The model numbers differ for this type of label than for page printers. Most page printers are ink-jet or laser.
3. In the Print area, choose Full Page of the Same Label.
4. (Optional) Change the label size or type if needed. To do so:
a. Click the sample in the Label area. The Label Options dialog box opens.
b. In the Printer Information area, select Continuous Feed Printers or Page Printers.
c. Select the label manufacturer from the Label Vendors list. This sets up the model numbers.
d. Select the model number from the Product Number list. In the Label Information area, confirm that the height and page size matches up with the label sheet’s actual content.
If you can’t find the right number, see the “Creating a Custom Label Specification” section later in this chapter.
e. Click OK.
5. Click Print to send the print job directly to the printer (make sure that your label sheet is loaded) or click New Document to create a new document containing the label sheet (which you can then edit as needed before printing).
Printing a Single Label
Printing a single label is similar to printing a full sheet, except for one thing: When you’re printing a single label, you’re probably reusing a label sheet that is already missing one or more labels. So follow the steps in the preceding section, but in step 3, choose Single Label. Then enter the Row and Column numbers that describe the first available label on the sheet.
![]() Caution
Caution
Some label sheets don’t feed through the printer very well when some of the labels are missing. If you find that paper jams occur often when reusing a label sheet, try using a different printer. Ink-jet printers are often more forgiving of paper feed issues than laser printers are, for example.
Creating a Custom Label Specification
If you’re using a generic label brand and you don’t know the equivalent model number for a well-known brand, you have a choice: You can browse through the product numbers for a well-known brand such as Avery until you find one that matches up with what you’ve got, or you can create a new custom label specification.
![]() Tip
Tip
Avery is the most popular manufacturer of labels; you will probably find what you want in the Avery Standard set.
To create a new label specification, follow these steps:
1. From the Labels tab of the Envelopes and Labels dialog box, click Options. The Label Options dialog box opens.
2. Select an existing label that closely matches the label you want to create. (It doesn’t have to be exact.)
3. Click the New Label button. The Label Details dialog box opens.
4. Type a name for the new label in the Label Name box.
5. Change any of the label measurements or specifications as needed. Refer to the Preview area for what each measurement represents (see Figure 8.29).

Figure 8.29. Create a new custom label specification.
6. Click OK to create the new label specification. The new label appears at the top of the Product Number list in the Label Options dialog box, and the Label Products box changes to Other/Custom.
7. Click OK to accept the new custom label as the layout to use.
8. Continue printing normally.
Fine-Tuning the Label Appearance
Use the New Document button in the Envelopes and Labels dialog box to create a new document containing the sheet of labels for printing. You can then save it for later use like any other document.
A side benefit of creating a new document is that you can customize the labels before printing them. For example, you can change the font, size, color, or other attributes of the text.
The new document that holds the labels is laid out as a table. You can choose whether to display or hide the table gridlines by displaying the Table Tools Layout tab and clicking View Gridlines.
You can do anything with the labels that you can do with table cells, as covered in Chapter 9, “Creating and Formatting Tables.” For example, you might add a colored background to the table cells. Here’s how to do that:
1. Select the entire table by clicking the table selector box (the four-headed arrow box in the table’s upper-left corner).
2. On the Table Tools Design tab, click the Shading button, and click the desired color. All the labels now have a shaded background.
That’s just one example. Check out Chapter 9 to learn what else you can do with table formatting. Don’t change the row heights or column widths, though, and don’t add cell border lines, because those things can interfere with the appearance of the printed labels.
Sometimes, the small differences in the way various printers feed their paper can cause text to be offset on a label. To make an adjustment, follow these steps:
1. From the Labels tab of the Envelopes and Labels dialog box, click Options.
2. Confirm that the correct label product and product number are selected, and then click Details. An information dialog box appears for the chosen label.
3. Change any of the measurements listed for the label. For example, to scoot everything to the right, increase the Side Margin setting, or to start the labels slightly higher on the page, decrease the Top Margin setting.
4. Click OK.
Rather than making a change to the overall specification for that product number, you might instead choose to create a new custom label specification that mirrors the label number but uses the different offset. Follow the steps in “Creating a Custom Label Specification” earlier in this chapter.
Creating Folded Note Cards
First, the bad news: Word is not the ideal program for creating special-paper projects like folded note cards. It doesn’t have any of the friendly built-in helpers for such tasks like Microsoft Publisher does, so you have to either start with a template (if one is available that meets your needs) or set everything up manually. Nevertheless, sometimes Word is the only thing available and must be made to serve.
A folded note card is a printing challenge because certain fold types require some of the text to appear upside-down. For example, one of the most common layouts is a quarter-fold card, in which you fold a regular 8.5-inch × 11-inch sheet of paper twice (see Figure 8.30).
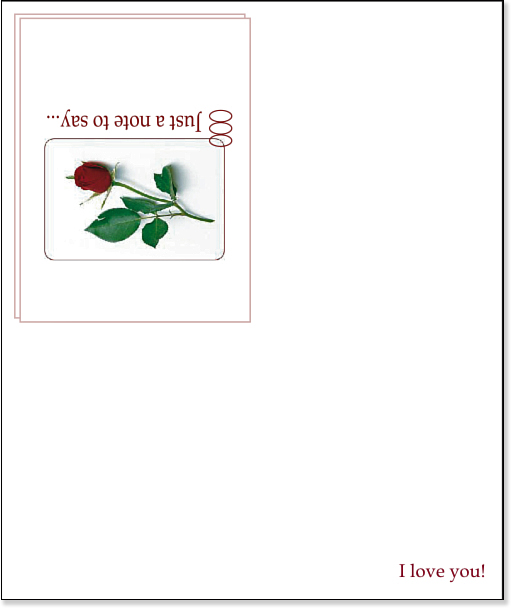
Figure 8.30. A quarter-fold note card is printed with half the text upside-down so it will look right when folded.
Special note card paper is available that works in half-fold layout, meaning the sheet of paper is folded only once. This results in a card that is more like a store-bought greeting card. (The paper packs usually come with envelopes of the correct size for use with the cards.)
Custom paper size presents one challenge to this half-fold type of layout. There are various sizes of cards available, and most of them don’t conform to any of the preset paper sizes in Word. (Their envelopes are often nonstandard sizes, too.)
Depending on the fold location, other issues arise as well; for a top-fold card, half the content must be printed upside-down, and for both top- and side-fold cards, half the content must be printed on the opposite side of the paper.
The following sections explain how to address these challenges to create folded note cards in Word.
Using Card Templates
Many greeting card templates are available in Word via Office.com, and these are great for helping you get started. Certain templates are designed for certain sizes of greeting card paper manufactured by Avery, and the Avery model numbers are indicated in the template names where applicable. Other templates are designated half-fold or quarter-fold for regular paper. Search for templates using the keywords greeting card, as you learned earlier in this chapter.
![]() To review how to create a document by using a template, see “Starting a New Document Based on a Template,” p. 287.
To review how to create a document by using a template, see “Starting a New Document Based on a Template,” p. 287.
The templates are especially advantageous for quarter-fold cards because they already have placeholders for the upside-down parts. Rather than having to make upside-down text yourself, you edit what’s there.
Specifying the Paper Size and Type
To specify the paper type and size, display the Page Layout tab and choose Size, More Paper Sizes. In the Paper Size list, select the paper size if it happens to appear there, or choose Custom Size from the bottom of the list and enter the exact size of the card sheet.
![]() For more information about custom paper sizes, see “Setting Paper Size,” p. 256.
For more information about custom paper sizes, see “Setting Paper Size,” p. 256.
Paper type cannot be controlled in Word, but some printers enable you to set a paper type in their driver. This can be useful on printers that treat paper with different coatings differently, such as printing in a higher resolution on glossy paper than on matte, or allowing for different feed roller positions for thick cardstock paper. To explore the printer’s paper settings, do the following:
1. Choose File, Print.
2. Under Printer, select the desired printer.
3. Click the Printer Properties hyperlink. The Printer Properties dialog box opens for that printer.
4. Look for options for controlling the paper type, and set them to match the paper used for the card.
5. Click OK and continue printing normally.
Creating Upside-Down Text
Technically, Word cannot produce upside-down text. That is, nothing that Word considers to be “text” can be upside-down.
There are ways around every limitation, though, and in this case the solution is provided by WordArt. You can create a WordArt text object and then rotate the object 180 degrees. It’s not really text—it’s a graphic that looks just like text—but your audience will never know the difference.
WordArt is covered in detail in Chapter 11, but here’s a quick preview of how to use it to create upside-down text for a card (see Figure 8.31):
1. On the Insert tab, click Insert WordArt and then click the first sample on the list (plain black text). Some dummy text appears in its own frame.
2. Type your own text in the WordArt frame to replace the dummy text.
3. Change the font, size, and text attributes (such as bold and italic) as needed.

Figure 8.31. Enter and format the text that should appear upside-down on the card as WordArt.
4. On the Drawing Tools Format tab, use the controls in the WordArt Styles group (Text Fill, Text Outline, and Text Effects) to change the text’s appearance.
5. Click the Rotate Objects button and then click Rotate Right 90° (see Figure 8.32). Do this once more so that the text is upside-down.
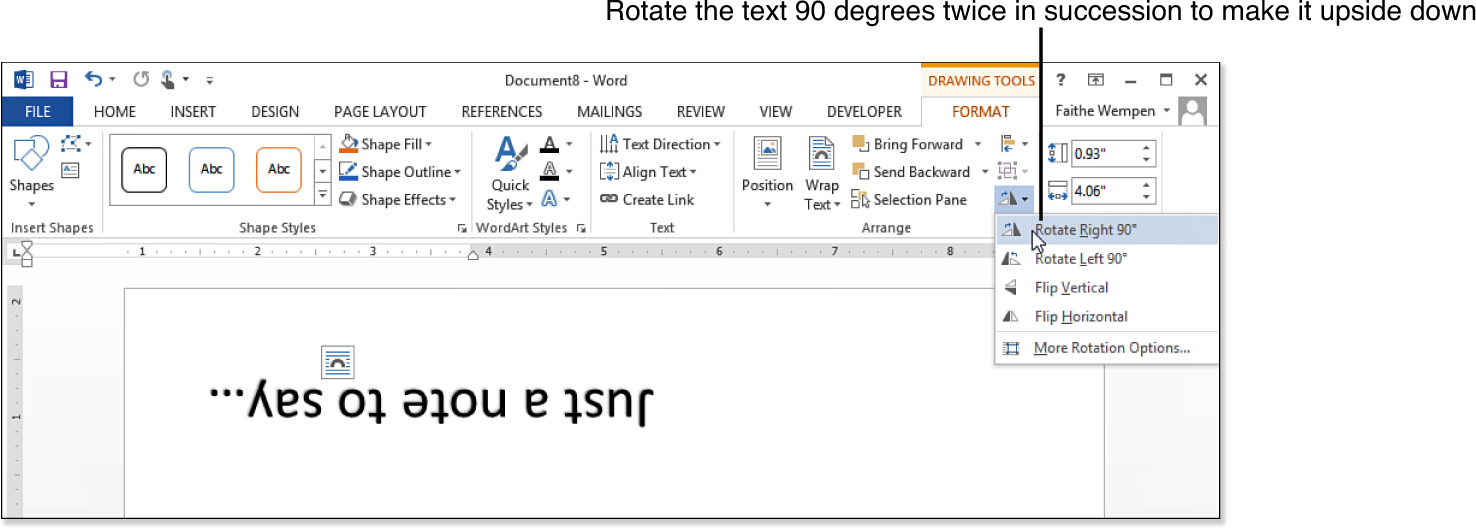
Figure 8.32. Rotate the WordArt from the Format tab.
![]() Tip
Tip
To rotate the WordArt text some amount other than 90 degrees, drag the white circle on the WordArt frame to rotate the text a custom amount.
![]() For more information about WordArt formatting, see “Creating and Modifying WordArt,” p. 453.
For more information about WordArt formatting, see “Creating and Modifying WordArt,” p. 453.