
24. Macros and Add-Ins
A macro is a sequence of operations that Word can execute whenever you tell it to. Word’s powerful macro facilities enable you to automate just about anything you would do manually in Word. You can assign a macro to a keyboard shortcut, run it from the Macros dialog box, or place a button for it on the Quick Access toolbar (or anywhere else on the Ribbon).
You can create Word macros in two general ways:
• Use Word’s macro recorder to capture the steps in your macro as you perform them in Word. After you save the macro, you can play it back at any time using one of the options listed previously.
• Write the code of the macro yourself in the Visual Basic for Applications (VBA) programming language. Word comes with a complete programming environment, the Visual Basic Editor, which you can use to enter and edit your code, as well as powerful tools to help you debug and test your macros.
This chapter focuses mostly on recording and playing back a Word macro. To use the VBA method, you must have some background in Visual Basic programming.
Understanding Macro Basics
The most common purpose for macros is to speed your work by taking a set of operations that you perform repeatedly and turning them into a one-step operation. Anytime you find yourself doing the same set of actions over and over again, you might have found a good candidate for a macro. Macros also make your work more reliable by ensuring that the steps of the macro are performed the same way, each time the macro runs. Of course, that does mean it is essential to record the macro properly. Otherwise, it performs the same wrong set of steps each time it runs.
Before you take the step of creating a macro, however, you might want to consider some of the other timesaving features in Word that you can use instead of macros:
• If you often need to type the same text, such as your name or address, including formatting, you might want to use Word’s Building Blocks feature, which lets you save named collections of text and formatting.
![]() To learn about building blocks, see “Working with Building Blocks,” p. 86.
To learn about building blocks, see “Working with Building Blocks,” p. 86.
• To quickly apply formatting in a consistent way throughout one or more documents, you can use styles and themes.
![]() To learn how to create and apply styles and themes, see Chapter 6, “Creating and Applying Styles and Themes” p. 213.
To learn how to create and apply styles and themes, see Chapter 6, “Creating and Applying Styles and Themes” p. 213.
• To create neatly formatted standard documents, such as letters, résumés, or fax cover sheets, you can use one of the document templates or wizards that come with Word, or you can create your own template.
![]() To learn about working with templates in Word, see “Creating a Document Based on a Microsoft Template,” p. 20 and “Creating a Document Based on a Personal Template,” p. 21.
To learn about working with templates in Word, see “Creating a Document Based on a Microsoft Template,” p. 20 and “Creating a Document Based on a Personal Template,” p. 21.
If none of Word’s automated features alone will do the job for you, or if you want to use several of these features together, you can create a macro to carry out your commands. There is just about no end to the uses you might think of for macros. A few of the most common include the following:
• Applying complex formatting that you can’t easily capture in a style, such as a mixture of different formatting types.
• Completing any task that takes several steps, such as creating a mail merge, applying complicated page setup settings, or requesting custom printing routines.
• Performing repetitive tasks in a long document. This is especially useful for documents that you have imported from other programs or that other users have created. You can record a macro that finds and replaces special characters, removes extra paragraph breaks, or applies formatting.
• Performing commands normally found in Word’s built-in dialog boxes. You might want to turn a display feature—such as the display of field codes—on or off as needed. Or you might want to quickly apply a text attribute that is not on the Ribbon and doesn’t have a keyboard shortcut, such as double-strikethrough.
Choosing the Macro Creation Method
When you need to create a new macro, you have a choice between recording the macro and typing the VBA code yourself. Of course, if you don’t know the VBA programming language, your only option is to record the macro. You can use the recorder as a teaching tool by recording the macro and then studying the resulting VBA code. As mentioned, this book focuses on using the macro recorder.
It’s worthwhile to know a little about how the macro recorder works before recording a macro. After you turn on the macro recorder, it captures just about everything you do in Word, including typing text, applying formatting, and performing menu commands. The recorder is literal: It picks up just about every detail during the recording session. Don’t be surprised, if you look at the VBA code that results from recording a macro, if Word recorded a lot more than you had in mind.
If you are, or become, proficient with VBA, you’ll probably find that it is often useful to record a macro and then edit the resulting code to get it to work exactly as you want. As your VBA skills improve, you might even find that it’s sometimes quicker and more accurate to type the code yourself in the first place.
Planning Your Macro
It’s always a good idea to take some time to think about exactly what you want your macro to do before you begin recording. You might even want to take a few notes on paper that you can refer to while you record the macro. Think about several things before recording your macro:
• Consider how your document should be set up before the recording begins. For example, if your macro is to apply font formatting to selected text, you need to have the appropriate text selected before you start recording the macro. However, you might want to record the actual selection of the text. In many cases, the first action you record will be moving to the beginning of your document. This can ensure that the steps that follow are applied to the entire document.
![]() Tip
Tip
If you want to record a macro that performs a series of actions to selected text, select some text before you begin recording the macro. Then record your macro as you normally would. For example, you could create a macro that makes selected text bold and italic. Select some text, begin recording the macro, click the Bold and Italic toolbar buttons, and stop recording. The resulting macro toggles the bold and italic setting for any selected text.
• Make sure that you know your keyboard shortcuts, especially the ones for moving through the document and for selecting text. Word doesn’t record text selections or navigation you perform with the mouse, but you can use keyboard shortcuts to perform the same tasks. (You can still use the mouse to select Quick Access toolbar and Ribbon commands while recording.)
• Think about the exact meaning of what you want to record. For example, to move to the beginning of the next paragraph while you are recording, press the shortcut key to move to the next paragraph (Ctrl+down arrow). If you simply use the arrow keys to move to the desired location, your macro records the arrow movements, not your intention to move to the following paragraph. When you run it in a different document, it replays the arrow movements, which may not have the same result in that document.
A good way to plan a macro is to take one or more “test runs” before turning on the recorder: Perform the commands and write down exactly what you did along the way. When you’re satisfied that you’ve written down a workable list of steps, use it as a reference when recording the macro.
Recording a Macro
Ready to record? Click the Record Macro button (it looks like a table with a little ball on it) on the status bar. The Record Macro dialog box opens (see Figure 24.1).
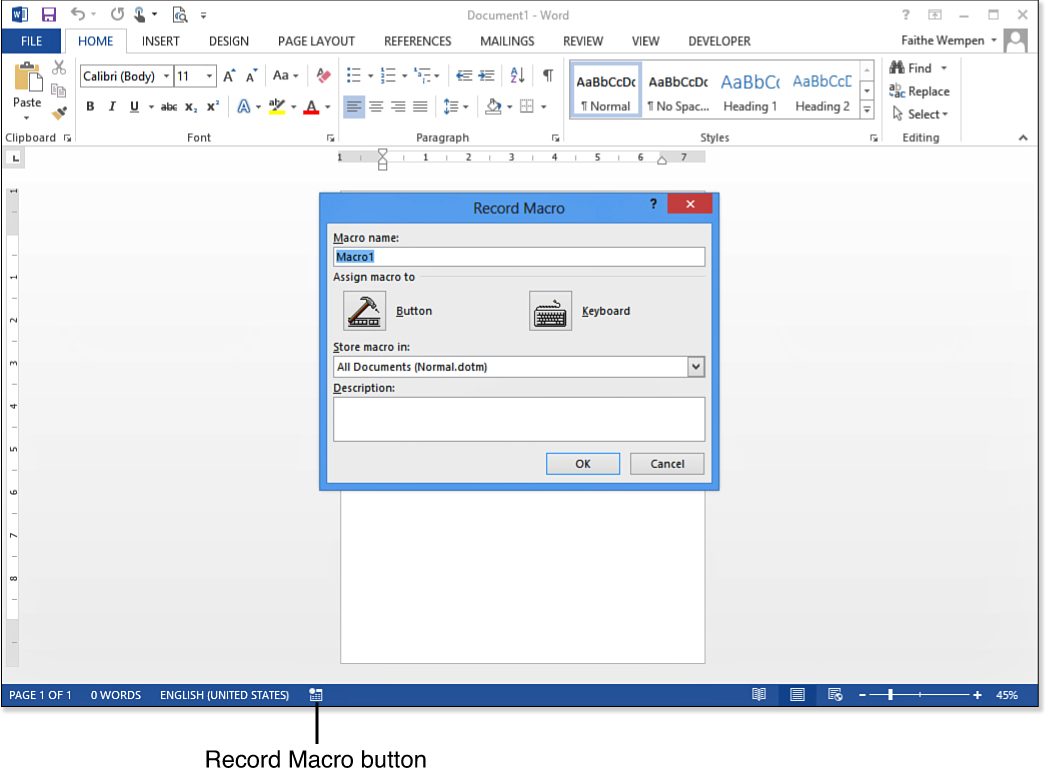
Figure 24.1. Enter the name and description of your new macro in the Record Macro dialog box.
Before you can begin recording the macro, you must give it a name and decide where you want to store it. You can also assign the macro to a keyboard shortcut or a custom Quick Access toolbar button. Although you can change all these items later, it’s much more convenient to make these decisions up front and enter them correctly now.
![]() Note
Note
Another way to start a new macro is to click Record Macro on the Developer tab. If the Developer tab does not appear, choose File, Options, click Customize Ribbon, and select the Developer check box in the right list pane.
Naming Your Macro
As you can see from Figure 24.1, Word suggests a name for your macro: Macro1, Macro2, and so on. It’s usually much more useful to give your macro a more descriptive name so that it will be easy to identify when you want to use it later. Your macro name should describe the purpose of the macro and must follow these rules:
• Macro names must begin with a letter but can include numbers.
• Names can contain up to 80 letters and numbers. Spaces and other characters are not allowed (except the underscore character).
For example, the following macro names are legal:
ApplyMyCustomFormatting
Insert5BlankParagraphs
TwoB_Or_Not2B
The following names are not legal:
Create Letter
2Spaces
New?Document
Word does not warn you that your macro name is invalid until you click OK to start recording your macro. If your macro name contains invalid characters, Word displays a dialog box indicating Invalid Procedure Name. Simply click OK and launch the Record Macro dialog box again. Edit the name until it conforms to the naming rules. When it does, Word allows you to proceed.
At the time you name your macro, you can also enter a description. It’s a good idea to enter a more specific description for your macros. For example:
This macro goes to the top of the document and then performs a find and replace to eliminate the second space between sentences.
Deciding Where to Store Your Macro
Macros can be stored in templates and in individual documents. A macro is available for you to run only if the document or template that contains the macro is open. You can store macros in the following locations:
• Normal.dotm—The simplest way to create a macro that you can run at any time, in any document, is to store the macro in your Normal template. As you can see in Figure 24.1, the Normal.dotm template is selected by default as the storage place for recorded macros.
• Active Document—If you prefer to store the macro in the active document, click the Store Macro In drop-down list to select the document. The macro is available for you to run only when this document is the active document.
• Other Templates—If you store a macro in a template other than Normal, the macro is available only when that template is open or when a document based on that template is open. For example, suppose that you have created a template for writing sales proposals. If you want to record a macro that you will use only when you are working on these proposals, be sure to select the template name in the Store Macro In drop-down list. The template, or a document based on the template, must be the active document when you record the macro.
Assigning a Macro to a Keyboard Shortcut or Toolbar Button
If you expect to use your macro often, and you want to save time when you run it, you can assign a shortcut key or Quick Access toolbar button for running the macro. Then, you can run your macro quickly by pressing the shortcut key combination or clicking the button.
Word does not require you to assign your macro to anything: You can always run the macro using the Macros button on the Developer tab. Although adding some form of shortcut can make a macro more accessible, you might prefer not to use up a key assignment or space on the Quick Access toolbar for macros you use only rarely.
![]() Tip
Tip
You can print a list of the custom key assignments associated with any document or template. To do so, choose File, Print; then, click the Print All Pages button to open a menu. Scroll down to the bottom of that menu and click Key Assignments. Then, click Print. Word first prints all custom key assignments associated with the document itself, and then all custom key assignments associated with the template the document is based on.
For commonly used macros, however, you probably should assign a keyboard shortcut or Quick Access toolbar button.
Keyboard shortcuts are a great convenience for macros that you use often. If you use a macro only occasionally, however, you might find it difficult to remember the shortcut key. Also, if you’re creating macros for other users, some users prefer shortcut keys, whereas others don’t want to memorize anything.
A button on the Quick Access toolbar makes a macro readily available for use at any time. Many people prefer not to memorize shortcut keys but don’t mind clicking a button.
Assigning a Macro to a Keyboard Shortcut
To assign a keyboard shortcut to the macro you’re about to record, follow these steps while the Record Macro dialog box is open:
1. Click Keyboard in the Assign Macro To group. The Customize Keyboard dialog box appears, as shown in Figure 24.2.

Figure 24.2. Use the Customize Keyboard dialog box to assign a key combination for your macro.
2. Make sure that the correct template or document is selected in the Save Changes In drop-down list. In nearly every case, you’ll want to save the keyboard shortcut in the same template or document the macro will be stored in. (Word’s default setting is to store the change in the Normal.dotm template, not the current document.)
3. Click in the Press New Shortcut Key box if the insertion point is not already there.
4. Press the shortcut key combination you want to use for the macro. You can create keyboard combinations that include function keys F1 through F12, the Ctrl key, the Alt key, and the Shift key (but not the Windows key). The key combination you choose is displayed in the Press New Shortcut Key text box. Under the Current Keys text box, the current assignment for this key combination is displayed, or the combination is shown as [unassigned].
5. To accept the new keyboard assignment, click Assign. The new assignment appears in the Current Keys list. You can assign more than one key combination for each macro if you want to, but remember that a relatively limited number of key combinations are available for everything Word has to do. Use the Remove button to delete a previously assigned shortcut.
6. To complete the assignment and continue with the recording process, click Close to begin the recording.
You cannot set up both a keyboard shortcut and a button for a macro while initially recording it, because the macro recording begins immediately when you click Close in step 6, but you can add a button for the macro to the Quick Access toolbar after the recording is finished. See “Creating a Quick Access Toolbar Button for an Existing Macro “later in this chapter to learn how to do that.
![]() Caution
Caution
Word enables you to override default keyboard shortcut assignments, and it doesn’t require you to confirm the overrides with a confirmation dialog box. As soon as you click Close to start recording your macro, the macro replaces the default key assignment.
To reset the keyboard shortcuts, choose File, Options, click Customize Ribbon, click the Reset button, and click Reset All Customizations. Click Yes to confirm.
You should be reluctant to change default key assignments. For example, if you decide to assign Ctrl+P as the shortcut key for your macro, you can no longer use that keyboard combination to print. If you store your macro in a specific document or a template you’ve created, the change in keystrokes will affect only the document, or documents, created with that template. In other words, the same keystrokes perform different tasks at different times, which can be terribly confusing—for you and especially for others who may use your macro.
Assigning a Macro to a Toolbar Button
To assign a Quick Access toolbar button to run your macro before you begin recording it, follow these steps when the Record Macro dialog box is displayed:
1. Click Button in the Assign Macro To group. The Quick Access Toolbar tab of the Word Options dialog box opens.
2. Click the macro name in the left list, and then click the Add button to move it to the right list (see Figure 24.3).

Figure 24.3. Add a macro to the Quick Access toolbar.
3. Click OK. The macro recording begins.
As noted in the preceding section, you cannot set up both a button and a keyboard shortcut for a macro while initially recording it, because the macro recording begins immediately when you click OK in step 3. However, you can add a shortcut key combination after the recording is finished. You find out how to do that later in this chapter.
Recording the Steps for Your Macro
If you chose to assign a keyboard shortcut or Quick Access toolbar button to your macro, Word turns on the macro recorder after specifying one or the other. If you have not assigned either one, click OK in the Record Macro dialog box to get the recording started.
When recording is enabled, a Stop Recording button (a white square) appears in the status bar, and the mouse pointer turns into a cassette tape symbol. If the Developer tab is displayed, you also have access to a Pause Recording button that you can use to temporarily halt the recording while you set something up, and then you can continue the recording (see Figure 24.4).
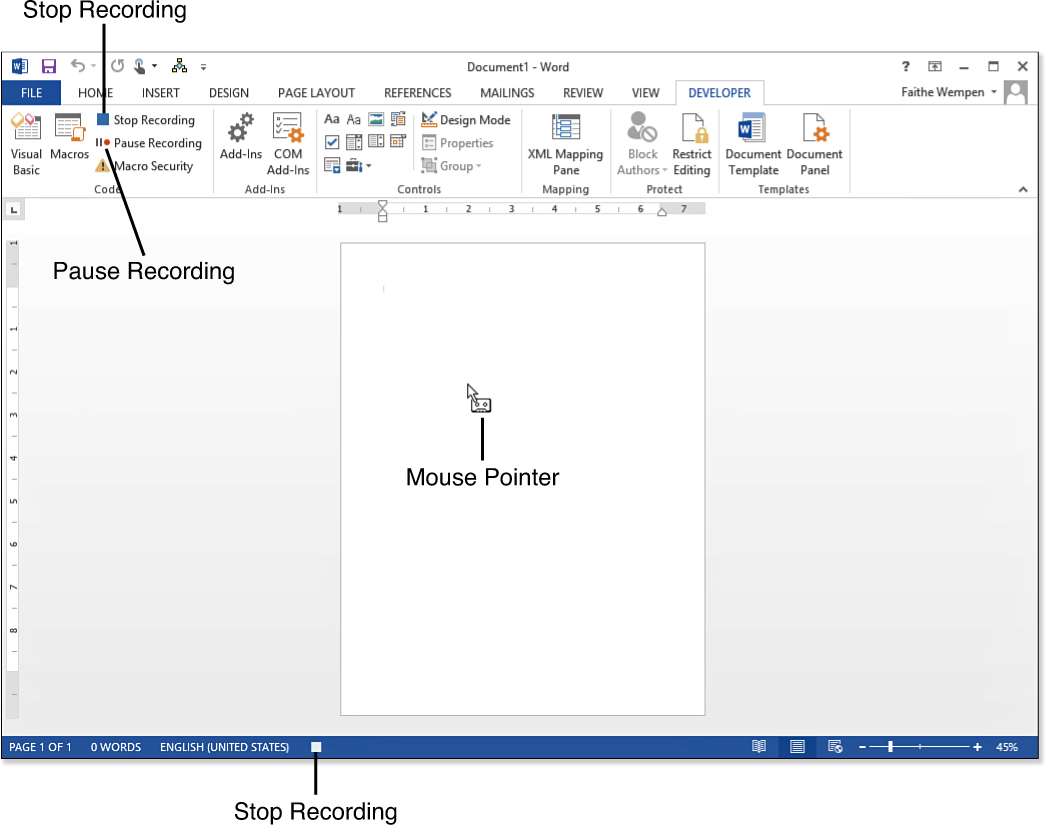
Figure 24.4. When a macro is recording, the status bar shows a Stop Recording button.
When the macro recorder is active, you can perform most normal activities in Word, and those activities are recorded as part of your macro. Some examples of actions you can record in your macro include the following:
• You can type, edit, and delete text.
• You can select text and move through the document with keyboard shortcuts. You can’t use the mouse to select text or scroll while you are recording. Instead, use the arrow keys to navigate, as well as the Home, End, Page Up, and Page Down keys, as needed. To select text, press and hold the Shift key while you use the arrow or navigation keys.
• You can click buttons on the Ribbon or the Quick Access toolbar and fill out the dialog boxes associated with the commands.
• You can open and close documents and create new ones.
• You can choose File, Options and set or change program options.
![]() Note
Note
You can still use the mouse to select Ribbon commands and Quick Access toolbar buttons while you’re recording a macro.
If you want to pause your recording session and return to it later, click the Pause Recording button on the Developer tab. Any actions you perform while recording is paused are not recorded. Click Resume Recorder (same button location as Pause Recording) when you’re ready to resume your recording session. That button is available only on the Developer tab, so you must have displayed the Developer tab before you started recording. (You can turn it on during the recording, but the fact that you are turning it on is recorded as an activity.)
Keep a few things in mind as you record your macros:
• The macro recorder captures the actions you perform, not the keystrokes you use to complete them. So, for example, if you open the Print dialog box, the macro does not notice which method you use to do so.
• If you record a command that displays a dialog box, such as clicking a dialog box launcher for a group on a tab, the dialog box doesn’t reappear when you later run the macro. Rather, Word applies whatever settings you entered using the dialog box while you were recording the macro.
• Word records everything in the dialog box, so if you only want to turn on italic, it’s better to press Ctrl+I or click the Italic button on the Home tab of the Ribbon than it is to use the Font dialog box. Otherwise, Word also records other text attributes that apply to the current text—attributes you might not want to apply every time you run the macro.
• If you display a dialog box while you’re recording, but you cancel the dialog box, Word doesn’t record that command.
• Word records your actions literally. For example, if you record the File, Open command and select a file, Word records the exact filename you opened. When you run the macro, Word attempts to open the same file. If the file is not found, an error occurs, and the macro stops running.
When you finish recording your macro, you can turn off the recorder in the following ways:
• Click the Stop Recording button on the status bar.
• Click the Stop Recording button on the Developer tab.
Running a Macro
Now that you have recorded and stored your macro, you can run it to perform the steps you have recorded. Use one of the following methods to run your macro:
• If you assigned the macro to a button on the Quick Access toolbar, you can click the button to run the macro. If you have more than one macro on the Quick Access toolbar, point at a button to see its ScreenTip to determine which is which.
![]() Note
Note
To change a macro’s button on the Quick Access toolbar, choose File, Options, Quick Access Toolbar. Click the button in the right pane, and then click the Modify button. Then choose an icon from the Modify Button dialog box.
• If you assigned a keyboard shortcut for the macro, press the key combination.
• To select the macro name from the list of available macros, click the Macros button on the Developer tab. The Macros dialog box appears, as shown in Figure 24.5. Select the macro name that you want to run and click Run to execute the macro.

Figure 24.5. Use the Macros dialog box to select a macro to run.
Dealing with Macro Error Messages
When your macro runs, the statements you recorded are performed just as you recorded them. Sometimes, though, an error occurs.
The two most common problems are these:
• Missing macros (for example, trying to run a macro from a Quick Access toolbar button where the macro has been deleted or is not stored in an available template)
• Security settings preventing a macro from running
Both of these situations result in the same error message, shown in Figure 24.6.
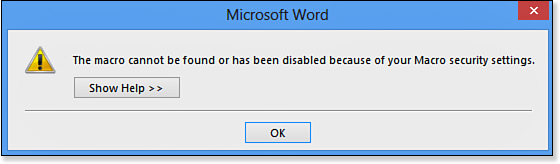
Figure 24.6. This error means the macro cannot run, either because it is missing or because your macro security settings will not allow it.
To check that the macro is available, open the Macros dialog box (shown previously in Figure 24.5) and set the Macros In setting to All Active Templates and Documents. If the macro does not appear there, you probably have stored it somewhere else by accident. You can either re-create it or copy it from the other document or template file. (To do the latter, see “Copying Macros Between Documents” later in this chapter.)
If the macro is available, it’s your security settings that need tweaking. See “Working with Macro Security,” later in this chapter, for help with that.
Another common error occurs when the macro cannot execute one or more lines of its code. This is called a runtime error. It happens when the conditions that existed when you recorded the macro no longer exist in some way. For example, perhaps the macro specifies opening a file that does not exist anymore in the referenced location. A runtime error looks like the one in Figure 24.7.

Figure 24.7. A runtime error points out a problem with the macro’s code.
To correct a runtime error, you can edit the VBA code for the macro (if you are able), or you can delete and rerecord the macro.
If you want to delete the macro and rerecord it, click End to stop the macro and then delete it from the Macros dialog box (refer to Figure 24.5).
If you want to edit the code, click Debug to open the macro in the Visual Basic Editor (VBE) and then examine the code. The line that caused the error is highlighted, as shown in Figure 24.8.
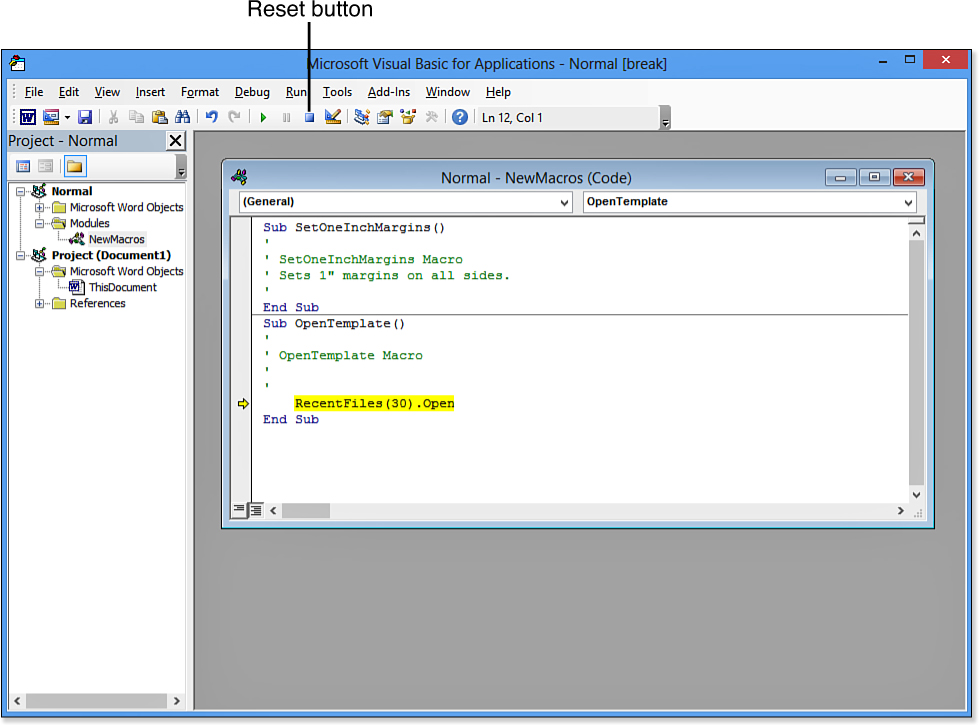
Figure 24.8. The line of code that caused the error is highlighted.
At this time, the macro is still running but is suspended in a state known as Break mode. After making the needed correction to the code, click the Reset button in the toolbar (see Figure 24.8). Then, close the Visual Basic window and try running the macro again.
![]() Caution
Caution
Occasionally, a macro runs out of control, repeating its actions over and over. This is not likely to happen with a recorded macro, but it sometimes happens when there is a programming error in a macro you have edited. In this case, you can stop the macro by pressing Ctrl+Break. Again, this puts the macro in Break mode, and you must reset the macro project.
Making Additional Macros Available
If the macro you want to use is not available in the current document but is stored somewhere else, there are several ways of making it available. The following sections provide some ideas.
Opening Additional Templates to Run Macros
If you want to run a macro that is stored in a different template, you can open that template as a global template. There are two ways to make sure that a template is loaded globally:
• Save the template in the Word Startup folder—To determine where that folder is located, choose File, Options. Click Advanced, click the File Locations button in the General section, and then double-click Startup to see the location. Any template in this folder is opened invisibly, and as a read-only document, each time you start Word.
• Open a template globally—To do this, on the Developer tab, click Document Template. In the Global Templates and Add-Ins section of the Templates and Add-Ins dialog box, click Add and then select the template to load.
Copying Macros Between Documents
Each Word document has a single VBA project, which is a collection of modules. A Word document can store many types of VBA code, not just macros, so it needs the capability of having multiple modules in its project. For macro purposes, however, you will work mostly with one module: the default module for storing macros, called NewMacros.
![]() Note
Note
You can rename modules and develop extra modules. Therefore, a template you receive from someone else might have multiple modules in them, and they might have names other than NewMacros.
Each macro is stored in the macro module as a VBA procedure, which is a set of step-by-step instructions to execute.
If a given document or template contains some useful macros, you might want to reuse them in some other template. One way to achieve this is to copy the macros from one project to another using the Organizer.
Follow these steps to copy one or more macros:
1. Open the source and destination templates or documents in Word.
2. On the Developer tab, click Macros, and then click Organizer. The Organizer dialog box opens (see Figure 24.9). This dialog box lets you display the modules in two templates or documents and copy modules from one list to another.

Figure 24.9. Use the Organizer to copy modules from one template or document to another.
3. Under either list, if needed, display a different template:
a. Click Close File.
b. Click Open File.
c. Select a different template or document.
d. Click Open.
4. To copy a module from one list to another, select the module that you want to copy and click Copy. The macro is copied to the destination list.
![]() Caution
Caution
After you delete a module and save the template that contained it, there is no way to recover the deleted module.
5. (Optional) To delete a module from a project, select the module and click Delete. Word asks for confirmation that you really want to delete the module.
6. When you finish using the Organizer, click Close.
![]() Note
Note
If a module with the same name is already in the destination project, Word doesn’t let you copy the module. If you still want to copy the module, you must rename it before copying it.
To rename a module, select it and click Rename. Type the new name for the module and click OK. For example, if both the source and destination locations call the module NewMacros, rename one of them.
Renaming and Deleting Macros
The Organizer copies, renames, and deletes entire modules, each of which might contain many individual macros. You might prefer to rename and delete individual macros instead.
To delete a macro, open the Macros dialog box (by clicking the Macros button on the status bar or the Developer tab) and then select the desired macro and click Delete.
To rename a macro, select the macro from the Macros dialog box and click Edit. The macro opens in the VBE. Find the line of code that starts with Sub and then shows the macro’s name, and change the text following Sub to the desired name. Do not delete the parentheses. Close the Visual Basic window when you finish.
Assigning a Keyboard Shortcut to an Existing Macro
As you saw earlier in the chapter, you can assign a keyboard shortcut to a macro as you create it. However, if you want both a keyboard shortcut and a Quick Access toolbar button for it, you must set up one or the other afterward.
To assign a keyboard shortcut to an existing macro, follow these steps:
1. Choose File, Options.
2. Click Customize Ribbon.
3. Click the Customize button next to Keyboard Shortcuts, near the bottom of the dialog box. The Customize Keyboard dialog box appears.
4. In the Categories list, scroll down to the bottom of the list and click Macros. A list of the macros in the current document or template appears in the Macros list (see Figure 24.10).
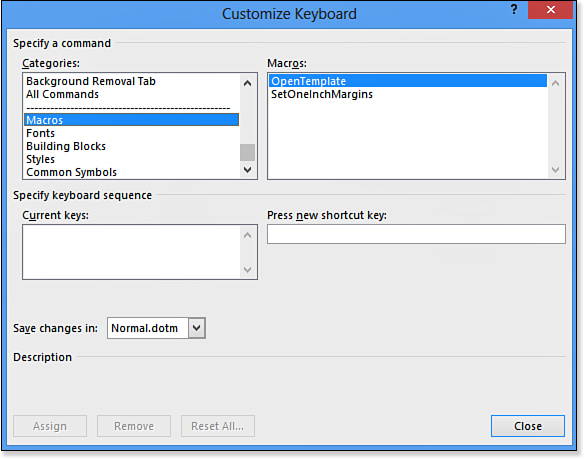
Figure 24.10. Assign a keyboard shortcut to an existing macro.
5. Click the desired macro. Any existing keyboard shortcut assigned to it appears in the Current Keys box.
6. Click in the Press New Shortcut Key box.
7. Press the shortcut key combination you want to use for the macro.
You can create keyboard combinations that include function keys F1 through F12, the Ctrl key, the Alt key, and the Shift key (but not the Windows key). The key combination you choose is displayed in the Press New Shortcut Key text box. Under the Current Keys text box, the current assignment for this key combination is displayed, or the combination is shown as [unassigned].
![]() Tip
Tip
If you find it difficult to identify unused keyboard sequences, try sequences that begin with the Alt key; most of these are unassigned.
Alternatively, you can obtain a list of shortcut keys assigned to existing Word commands. Open the Macros dialog box. From the Macros In drop-down list, select Word Commands. This presents you with a list of Word commands. Scroll down to and select the ListCommands entry. Then, click the Run button. From the List Commands dialog box, select Current Keyboard Settings. Click OK, and a new document is generated containing all the commands and associated shortcut keys and menu items.
8. To accept the new keyboard assignment, click Assign. The new assignment appears in the Current Keys list.
![]() Tip
Tip
Click Reset All to reset all key assignments.
You can assign more than one key combination for each macro if you want to, but remember that a relatively limited number of key combinations is available for everything Word has to do.
9. (Optional) Assign keyboard shortcuts to other macros as needed by repeating steps 5–8.
10. Click Close.
11. Click OK.
Creating a Quick Access Toolbar Button for an Existing Macro
You can add each macro to the Quick Access toolbar. This can save you some time compared to opening the Macros dialog box and selecting the desired macro each time.
To add an existing macro to the Quick Access toolbar, follow these steps:
1. Choose File, Options.
2. Click Quick Access Toolbar.
3. Open the Choose Commands From list and select Macros. A list of the macros appears.
4. Click a macro and then click the Add button to add it to the toolbar (see Figure 24.11).
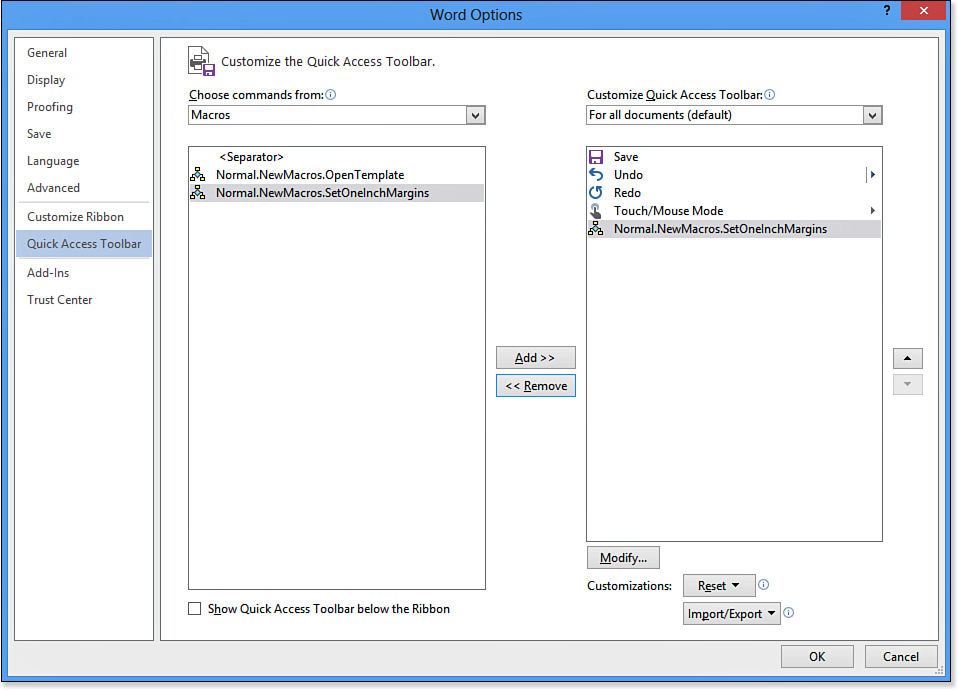
Figure 24.11. Create a button for a macro on the Quick Access toolbar.
5. Add any other macros as needed; then click OK.
Each macro has an identical button on the Quick Access toolbar. To tell the macros apart, point to a button to see its ScreenTip. You can also change a macro’s button by selecting it from the right pane in the Word Options dialog box (see Figure 24.11) and clicking Modify.
![]() Tip
Tip
Although it is less common to do so, you can add buttons for macros directly to the Ribbon. See Chapter 25, “Customizing the Word Interface,” to learn more about customizing the Ribbon.
Editing Macro Code in VBA
Macros are written in Visual Basic for Applications, a variant of the Visual Basic programming language designed for use within Office and other applications.
To write your own VBA code from scratch, you need to understand Visual Basic, and perhaps have taken a class or done some self-study in the language. However, if you just want to edit a macro, you can usually figure out what the various lines of code do and modify them in small ways or delete extraneous lines of code.
Opening a Macro for Editing
To open a macro in the VBE, follow these steps:
1. Click Macros on the Developer tab, opening the Macros dialog box.
2. Click the desired macro and then click Edit. The macro opens in the VBE. If there are multiple macros, each one appears in a separate section within a single window for the module. Figure 24.12, for example, shows two macros (CodeFormat and InsertPicture) in the NewMacros module.
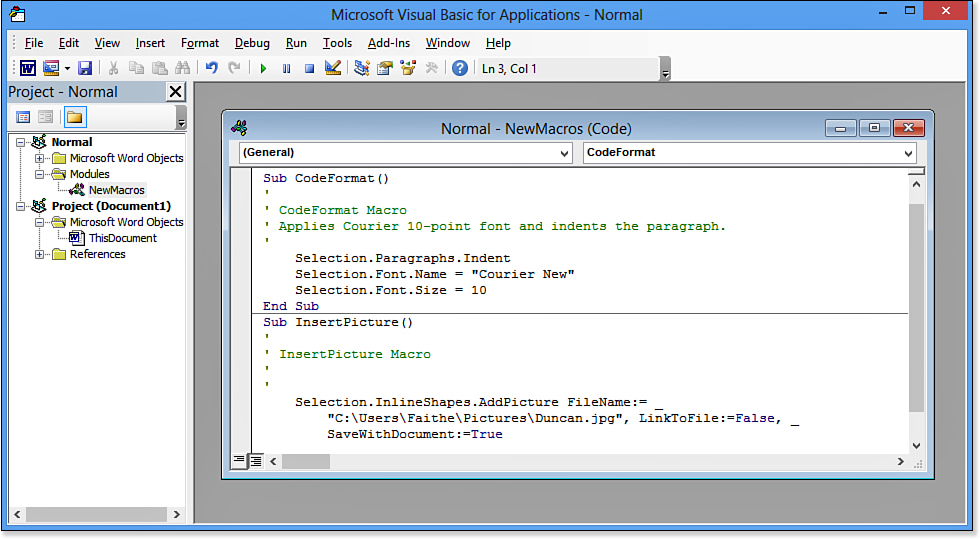
Figure 24.12. Use the Visual Basic Editor to change the macro code.
Here’s a brief guide to what you see in Figure 24.12:
• Each macro’s section begins with the statement Sub, followed by the macro name, and then empty parentheses (). For example:
Sub CodeFormat()
• Each macro ends with the statement End Sub.
• Lines with apostrophes (’) at the beginning are comment lines and do not execute. These lines are there for reference purposes for someone who is examining the code. For example, in the CodeFormat macro in Figure 24.12, the following is a comment line, which came from the Description entered when recording the macro:
' Applies Courier 10-point font and indents the paragraph.
• Each command in a macro defines a part of the document or program and then has an equal sign and a value for that item. For example:
Selection.Font.Name = "Courier New"
Examples of Macro Command Syntax
The best way to understand macro code is to record some macros and then look at them in the VBE. Let’s look at a few of the commands from Figure 24.12 as examples.
Applying Character Formatting
The first macro in Figure 24.12, CodeFormat, applies two types of character formatting and one type of paragraph formatting to text:
Selection.Paragraphs.Indent
Selection.Font.Name = "Courier New"
Selection.Font.Size = 10
Each one begins with Selection, which tells the macro you are going to be acting upon the selected text (or the insertion point location). For the first line, Paragraphs us next, which tells the macro you will be applying paragraph formatting. After that comes the individual attribute being set. In the first line, it’s set with .Indent. In the second and third lines, where font formatting is being applied, there is in each case an equal sign (=) and the value for it.
Inserting Graphics
The second macro in Figure 24.12, InsertPicture, contains only one command:
Selection.InlineShapes.AddPicture FileName:= _
"C:UsersFaithePicturesDuncan.jpg", LinkToFile:=False, _
SaveWithDocument:=True
This command (Selection.InlineShapes.AddPicture) has several arguments to it: FileName, LinkToFile, and SaveWithDocument. They are all run together, rather than being separated on different lines.
Instead of the plain equal sign (=), this command uses a colon and an equal sign (:=) to separate the attribute from its value. Why? That’s just the way the syntax works. The only way to know this is to take a course in VBA or study a lot of macro codes that you’ve recorded.
Performing the Same Action in Different Ways
Now, let’s look at another pair of macros. Both of the macros make selected text bold and italic. However, they go about it in different ways, and in certain circumstances could provide different results.
The following macro, called BoldItalics1, toggles the Bold and Italic buttons on the Home tab with these lines:
Sub BoldItalics1()
' BoldItalics1 Macro
' Applies bold and italic from the Home tab's buttons.
'
Selection.Font.Bold = wdToggle
Selection.Font.Italic = wdToggle
End Sub
The macro appears to make the text bold and italic, but wait—does it really? Nope, it toggles the state of those features. Furthermore, it does not check their current states. If the text you selected before running the macro were already bold and italic, it would remove those attributes.
Here’s another macro, BoldItalics2, that creates a snapshot of the text’s complete character-level formatting status. When I recorded this macro, I simply opened the Font dialog box, clicked Bold Italic, and clicked OK. I did not touch any of these other options, yet they are included in the macro because the macro records everything that was in that dialog box.
Sub BoldItalics2()
'
' BoldItalics2 Macro
' Applies bold and italic from the Font dialog box.
' With Selection.Font
.Name = "+Body"
.Size = 11
.Bold = True
.Italic = True
.Underline = wdUnderlineNone
.UnderlineColor = wdColorAutomatic
.StrikeThrough = False
.DoubleStrikeThrough = False
.Outline = False
.Emboss = False
.Shadow = False
.Hidden = False
.SmallCaps = False
.AllCaps = False
.Color = wdColorAutomatic
.Engrave = False
.Superscript = False
.Subscript = False
.Spacing = 0
.Scaling = 100
.Position = 0
.Kerning = 0
.Animation = wdAnimationNone
End With
End Sub
Obviously, BoldItalics2 is the less-efficient macro in terms of the number of lines of code needed, but because macros execute nearly instantaneously, it’s not a big deal. Furthermore, BoldItalics2 is actually a better macro if what I really want is for bold and italic to be turned on by the macro in all cases, even if either one is already on. BoldItalics2 also removes any other formatting from the text that happened to be applied already. For example, if the selected text had been set to AllCaps, that would be removed by running BoldItalics2.
Notice in the BoldItalics2 code that a new element is being used you have not seen yet: a With statement. It defines Selection.Font as a parent category, and then everything under that within the With statement inherits that prefix. So, for example, .Italic = True is really Selection.Font.Italic = True.
If you wanted to make sure that bold and italic were turned on by the macro—not toggled—but you did not want to specify formatting for those other settings, you could simply delete the unwanted lines of code, ending up with something more efficient but still effective, like this:
Sub BoldItalics2()
'
' BoldItalics2 Macro
' Applies bold and italic from the Font dialog box.
' With Selection.Font
.Bold = True
.Italic = True
End With
End Sub
Performing Actions Involving Logical Conditions
Some commands involve evaluating the document to see if a certain condition exists and then acting accordingly. The Replace command is an excellent example of that. In the following code, the Replace dialog box replaces all instances of Sample with Example:
Sub FindReplace()
'
' FindReplace Macro
'
'
Selection.Find.ClearFormatting
Selection.Find.Replacement.ClearFormatting
With Selection.Find
.Text = "Sample"
.Replacement.Text = "Example"
.Forward = True
.Wrap = wdFindContinue
.Format = False
.MatchCase = False
.MatchWholeWord = False
.MatchWildcards = False
.MatchSoundsLike = False
.MatchAllWordForms = False
End With
Selection.Find.Execute
With Selection
If .Find.Forward = True Then
.Collapse Direction:=wdCollapseStart
Else
.Collapse Direction:=wdCollapseEnd
End If
.Find.Execute Replace:=wdReplaceOne
If .Find.Forward = True Then
.Collapse Direction:=wdCollapseEnd
Else
.Collapse Direction:=wdCollapseStart
End If
.Find.Execute
End With
End Sub
Let’s break this down. First, there are two actions for clearing existing formatting applied in the Find and Replace dialog box:
Selection.Find.ClearFormatting
Selection.Find.Replacement.ClearFormatting
Next, there’s a With statement, just like before, but this time specifying the settings in the Replace dialog box:
With Selection.Find
.Text = "Sample"
.Replacement.Text = "Example"
.Forward = True
.Wrap = wdFindContinue
.Format = False
.MatchCase = False
.MatchWholeWord = False
.MatchWildcards = False
.MatchSoundsLike = False
.MatchAllWordForms = False
End With
Next, the actual operation is executed. Notice that it is acting only upon the selection at this point:
Selection.Find.Execute
Then, there’s something you haven’t seen yet: a couple of If statements that determine what happens based on whether the searched-for text is found:
With Selection
If .Find.Forward = True Then
.Collapse Direction:=wdCollapseStart
Else
.Collapse Direction:=wdCollapseEnd
End If
.Find.Execute Replace:=wdReplaceOne
If .Find.Forward = True Then
.Collapse Direction:=wdCollapseEnd
Else
.Collapse Direction:=wdCollapseStart
End If
End With
Finally, the macro ends up with another Execute statement, this time in general (not just on Selection):
.Find.Execute
Of course, these examples just scratch the surface of what you need to know to effectively write your own VBA code or even to edit code with confidence. But they give you an idea of how to proceed as you learn more on your own.
Working with Macro Security
Back a few versions ago in Microsoft Office, macro viruses were prevalent. Some people figured out how to write executable virus code that could be stored in a macro; then whenever that macro was run as a document opened, the macro copied itself into the person’s Normal.dot template, and from there it replicated itself to all new documents. (There was a variant in Excel, too.)
![]() Note
Note
Realistically, your chances of getting a macro virus these days are low. Because Word has included macro virus security for several versions now, people who create viruses have lost interest in making them. The last time I actually saw a Word macro virus in a file was about 10 years ago. Better safe than sorry, though.
To counteract this, Microsoft developed macro security measures. These measures check a macro’s source, author, or location and determine whether or not it is safe to run.
In the following sections, you learn how macro security works and how you can configure it to match your level of paranoia (er, comfort with risk).
Understanding Trusted Publishers and Locations
At first the security was simple: You could choose a level of security that applied to all macros in all files. But in Word 2013, macro security has become sophisticated, enabling you to distinguish between different locations and different macro publishers.
Word’s macro security clamps down on running most macros in a document or template. (See “Setting Security Levels for Macro Running” later in this chapter for details.) However, Word relaxes its security when one of two conditions exist:
• The file containing the macro is stored in a trusted location.
• The macro has a digital signature from a trusted source.
A trusted location is one that Word recognizes as being your “home turf.” When you place a file in a trusted location, you tell Word that it’s okay to run whatever it finds in that file. This makes things much easier for amateur macro-writers who want to store their own macros in their own private templates, for example. It also makes it possible to run macros in files that friends and colleagues provide without having to go through the hassle of setting up digital signatures.
![]() Note
Note
Both trusted locations and digital signatures are Office-wide features; they are not just for Word macros.
![]() To set up trusted locations, see “Specifying Trusted Locations,” p. 805.
To set up trusted locations, see “Specifying Trusted Locations,” p. 805.
A digital signature is a code stored with the macro that compares itself to a code stored by an online or network signature authority to determine that it is really from the author it purports to be from and that it has not been modified since that author published it. Digital signatures are somewhat complex to set up, but you’ll find them worthwhile if you are planning to distribute your macros to a wide audience, such as from a public website.
![]() To set up digital signatures, see “Adding a Digital Signature,” p. 813.
To set up digital signatures, see “Adding a Digital Signature,” p. 813.
Determining What Locations Are Trusted
Chapter 21, “Protecting and Securing Documents,” deals with trusted locations in detail, but perhaps you’re just curious at this point about what locations are already set up to be trusted on your system, so you can store your macro-enabled files there.
To find the trusted location list, follow these steps:
1. Choose File, Options and click Trust Center.
2. Click the Trust Center Settings button.
3. Click Trusted Locations. A list of locations appears in the Path column.
4. Click OK two times to close both dialog boxes.
Setting Security Levels for Macro Running
You can access the macro security settings in Word in two ways:
• On the Developer tab, click Macro Security.
• Choose File, Options, click Trust Center, click Trust Center Settings, and click Macro Settings.
The Macro Settings, shown in Figure 24.13, enable you to choose what happens when a file that is not in a trusted location contains macros. You can choose to enable or disable all, or you can differentiate between signed and unsigned ones.

Figure 24.13. Control how macros run (or don’t run) when they’re in files in untrusted locations.
It’s up to you what settings you want to use, but I leave this set to Disable All Macros with Notification most of the time. That way, I can see when a macro is trying to run and I can then check it out and determine if it’s something I want.
If you regularly run signed macros, you might choose instead Disable All Macros Except Digitally Signed Macros. Neither of the other two settings—Disable All Macros Without Notification and Enable All Macros—are optimal because each is extreme in its own direction.
Working with Add-Ins
Add-ins are extra features that you can install for Word that extend its capabilities in some way. You can add, remove, or temporarily enable/disable the various add-ins in Word to control how they behave.
![]() Caution
Caution
Many of the COM add-ins you’ll find available for download on the Internet are written for earlier versions of Word, so their functionality in Word 2013 is uncertain.
One of the most powerful types of add-ins is a Component Object Model (COM) add-in. COM add-ins are supplemental programs that extend Word’s capabilities by adding custom commands or features. COM add-ins can come from Microsoft or from third-party sources. They usually have a .dll or .exe extension and are written in a programming language such as Visual Basic or C++.
To view installed add-ins, follow these steps:
1. Choose File, Options.
2. Click Add-Ins. A list of installed add-ins appears (see Figure 24.14).

Figure 24.14. See a list of installed add-ins here.
An installed add-in can be either enabled or disabled. Having the option of disabling an add-in rather than removing it entirely is handy because it allows you to turn one off temporarily without losing it. Disabling add-ins is also helpful for troubleshooting. If you are not sure what add-in is causing Word to crash, you can disable them all and then enable them one at a time until you find the problem.
To disable or remove an add-in, you need to know what type it is, because the steps are different for the various types. To determine a type, look in the Type column.
Based on the type, open the Manage drop-down list at the bottom of the dialog box and select the desired add-in type. Then, click Go to open a dialog box interface specifically for that type of add-in.
Enabling/Disabling COM Add-Ins
Choose COM Add-Ins in the Manage drop-down list and click Go to display the COM Add-Ins dialog box. It lists the available COM add-ins; you can select one and click Remove, or you can change its load behavior. You can also click Add to add more COM add-ins, although most COM add-ins come with their own setup programs that do that part for you.
Enabling/Disabling Actions
Choose Actions in the Manage drop-down list and click Go to display the AutoCorrect dialog box with the Actions controls, just like in “Working with Actions” in Chapter 3, “Correcting and Printing Documents.”
Enabling/Disabling Other Add-Ins
The remaining types of add-ins are controlled from the same dialog box. If you choose any of them and click Go, the Templates and Add-Ins dialog box opens. The dialog box contains separate tabs for each of the add-in types; add, remove, or enable/disable each type from its tab. Two of these are covered in more detail elsewhere in the book:
• Templates—See Chapter 8, “Working with Templates and Nonstandard Layouts.”
• Linked CSS—See Chapter 22, “Developing Online-Delivered Content.”
 Word Crashes After Enabling an Add-In
• Add-ins are not loaded.
• No customizations are loaded or saved.
• You cannot save preferences.
• You cannot save templates.
• The AutoCorrect list is not loaded, and you cannot save changes to it.
• Recovered documents are not opened automatically.
• Smart Tags are not loaded, and you cannot save new tags.
• You cannot save files to the Alternate Startup Directory.
• You cannot create or open documents with restricted permission.