10. Working with Pictures and Videos
Pictures and videos can do a lot to make a document more interesting. You can use pictures to illustrate technical concepts, to help readers understand a description, or just as decorations to make a page more pleasant and readable.
In the past, most documents have been distributed on paper, so including videos wasn’t possible. Nowadays, though, more and more documents are distributed electronically, opening up the possibility of embedding video clips into documents. In this chapter, you find out about using both pictures and videos in Word documents—how to insert them, how to format them, how to apply special effects to them, and much more.
Understanding Digital Photography
Word tends to treat all picture files more or less the same—it imports them and places them on the page where you specify. All digital images are not created equal, though. There are many types, and some of those types are radically different from others.
This first part of the chapter focuses on one specific type of image: the digital photograph. A digital photo is a computer representation of an analog source. It could be a photo of a person captured with a digital camera, or it could be a picture of a magazine clipping captured with a scanner. Digital photos can also be acquired from online sources or purchased on CDs.
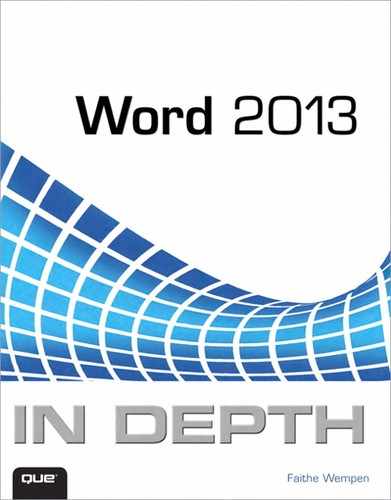
A digital photograph is a type of bitmap image. The word bitmap comes from the fact that the picture consists of a grid (map) of tiny individual pixels of different colors, with the exact color for each pixel described as a string of binary digits (called bits). Figure 10.1 shows a zoomed-in example. (Another name for this type of image is raster.)
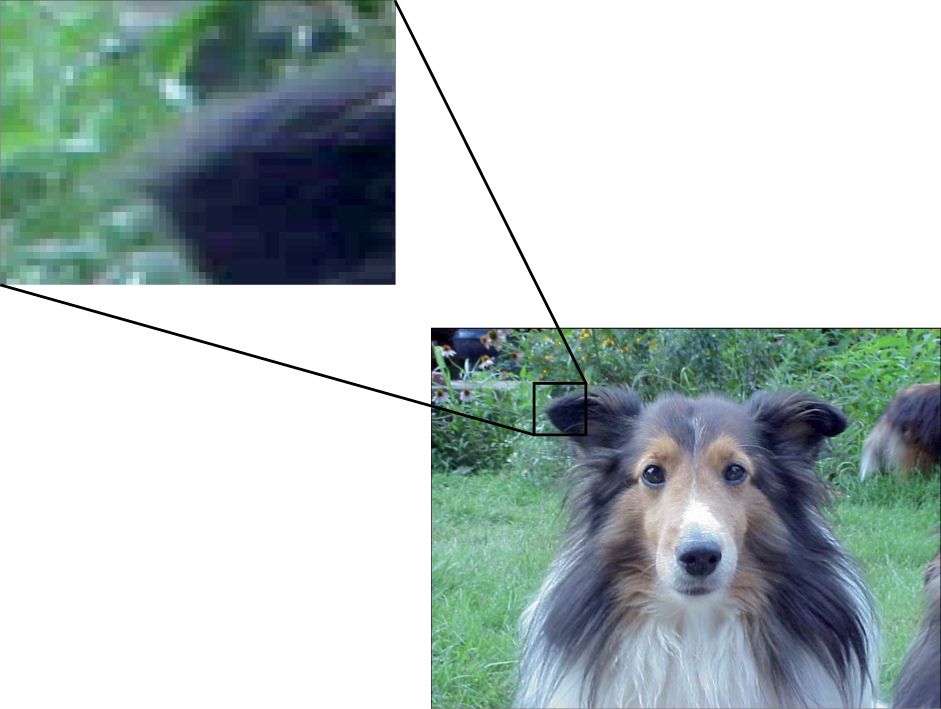
Figure 10.1. A photo consists of a grid of tiny colored pixels.
![]() Note
Note
There are actually two meanings for the term bitmap. One is generic, meaning any picture that is composed of a grid of colored dots. The other is a specific Microsoft-developed file format called Windows Bitmap, with a .bmp extension.
When a photo is taken on a digital camera, the camera uses a light-sensitive grid called a charge-coupled device (CCD) to measure the amount of red, green, and blue for each pixel. These values are then written to a file and stored inside the camera, and then they’re eventually transferred to a computer or printer. When a hard-copy photo is scanned, a similar process takes place inside the scanner.
How large is the resulting file for that digital photo? It could be anywhere from less than 20KB to over 10MB. The exact size depends on these factors:
• Color model—The way the color of each pixel is described, such as CMYK or RGB
• Color depth—The number of bits used to describe each color, such as 24-bit or 32-bit
• File format—The format in which the file is saved, such as JPEG or TIF
• Resolution—The number of pixels that comprise the image horizontally and vertically
The following sections look at each of these factors in greater detail.
Understanding Color Models
A photo can use any of several color models. The most common of these are Red/Green/Blue (RGB) and Cyan/Magenta/Yellow/Black (CMYK).
RGB is the dominant color model used for onscreen display. Use RGB as the color model when creating web pages and other documents that will be distributed online. RGB works so well for onscreen use because it matches the way monitors display colors. RGB defines colors using a 24-bit system that uses 8 bits each for red, green, and blue. Each of the three colors has a value ranging from 0 to 255.
CMYK is the color model used for high-quality printouts. Use CMYK as the color model when creating brochures, newsletters, and other documents that will be printed. Cyan, magenta, yellow, and black are the four colors used in color printers. A CMYK image is a 32-bit image, with 8 bits each for cyan, magenta, yellow, and black. Only a few graphics file formats support CMYK; TIF is one of them.
Most digital cameras and scanners save their images as RGB by default, but there may be a setting you can adjust in the software that will change this mode if your camera will capture in TIF format. If not, you can open the picture in a graphics-editing program such as Photoshop or PaintShop Pro and convert the image between models. You might need to save the file in a different file format to get CMYK color.
What happens if you don’t convert the image? Not much, really, except a minor loss of color quality. You can certainly print RGB color images, and you can use CMYK images on web pages. The colors might not be quite as accurate, however, as if you had used the correct color model for the situation. CMYK and RGB have a slightly different gamut—that is, set of colors they include. If your image contains some colors that are out-of-gamut for the color model, the closest possible color is substituted.
Understanding Color Depth
An image’s color depth (also called bit depth) is the number of bits required to uniquely describe each possible color a pixel can be. In 1-bit color, each pixel is either black or white; in 4-bit color, there are 16 possible on/off combinations for bits, so there are 16 color choices. 8-bit color has 256 color choices (2 to the 8th power), and so on.
![]() Note
Note
Scanners typically advertise higher bit depths than 24 or 32. The extra bits are for color correction. The scanner collects extra data and then throws out the bad bits to account for “noise” or error in the scanning process.
As noted in the preceding section, a color RGB image uses 24 bits to describe each pixel, and a CMYK image uses 32 bits. As you might guess, CMYK has more colors to choose from and is generally more accurate in expressing colors, but the file sizes are also larger.
Some scanners and digital cameras have a grayscale feature that takes the color depth down to 8-bit black-and-white. An 8-bit grayscale image captures 256 levels of gradation between white and black. A grayscale image usually has a much smaller file size than a color one because it requires fewer bits to describe each pixel.
Some scanners also have a black-and-white mode (separate from grayscale), which captures pictures in a 1-bit mode. Each pixel is either black or white and requires only 1 bit to describe it. The resulting files are extremely small (1/24 the size of a full-color RGB image) but not very attractive. Standalone fax machines often use this mode for sending and receiving faxes; that’s why pictures tend to fax poorly.
Depending on the file format, an RGB image might actually have more than 24 bits. For example, some file formats (such as Photoshop’s native PSD format) support alpha channels, which are extra sets of 8 bits used for special purposes such as transparency or clipping. Such file formats tend to produce larger files than their strictly 24-bit counterparts like JPEG.
In some cases, the file format might specify fewer than 24 bits as the maximum. The Graphics Interchange Format (GIF) is like that, for example; it is limited to 8-bit color (256 colors in total).
Understanding File Formats
The file format is the standard by which the information about each pixel is recorded. Different file formats can produce very different file sizes and quality levels. These differences are mainly due to two factors: the color depth supported (as described in the preceding section) and the type and amount of compression used.
Compression is an algorithm (a math formula) that decreases the amount of space a file takes up on disk by storing the pixel color data more compactly. Some file formats do not support compression at all; others support one of these types:
• Lossless compression—The image is compressed but no image quality is lost. The compression is performed via a completely reversible compression algorithm.
• Lossy compression—The image is compressed by recording less data. Either less information about each pixel is recorded, or some of the pixels are removed (and then resimulated when the image is displayed). The image is somewhat reduced in quality as a result.
Some file formats are always compressed; others give you a choice. The ones that give you a choice may also give you a sliding scale of compression level to choose from. You can set the compression level for a file when you resave it in a graphics-editing program.
The TIF format is interesting in a number of ways. It produces very large files, but it also supports a high color depth (up to 48-bit), and it supports a number of lossless compression types, including LZW compression (the most common), Huffman encoding, PackBits, and FAX – CCITT 3. It is also one of the few file formats that Word supports that allows you to save in the CMYK color model. (Adobe Photoshop’s PSD format also does this, but Word does not accept that format.)
Table 10.1 lists some of the most popular file formats for photos as well as their support for compression and color depth.
Table 10.1. Popular Photo Formats Supported in Word 2013

Understanding Image Resolution
The final factor affecting an image’s size is its resolution. Resolution has several meanings, depending on whether the image is already stored in digital form and how it is being captured.
For an image that is already a saved file, resolution is the number of pixels vertically and horizontally that comprise the image, such as 800 (wide) by 600 (high). You can change the resolution on a saved image by using a graphics-editing program to resample the image, either adding or removing pixels. When a graphics program adds pixels, it creates them by interpolation. It takes the numeric values of two adjacent pixels, averages them, and then inserts a pixel between them with the averaged values.
Digital cameras, because they tend to capture images of a consistent height-width ratio, often express the resolution as the total number of pixels (height times width). A million pixels is a megapixel, so a 3-megapixel camera captures images in which the number of pixels vertically times the number of pixels horizontally is somewhere around 3 million.
For an image that is being input into a computer via a scanner, you specify the resolution you want in dots per inch (dpi). The original size of the hard-copy image you are scanning, combined with the dpi setting you choose, determines the overall number of pixels that will comprise the image. For example, if you scan a 3-inch × 5-inch photo at 200 dpi, it will have a resolution of 600 × 1000 when saved as a file.
Understanding Clip Art
The term clip art comes from way back in the days before computers were common. People who needed line art for sales and marketing materials would buy enormous clip art books. These books consisted of nothing but page after page of line drawings of just about any business subject imaginable, all crammed together with dozens of images per page. When they found an image they liked, they clipped it out of the book with scissors and used it in their layout paste-up. (There was no desktop publishing back then, of course.) As computers and desktop publishing became popular, the term clip art stuck around and began to refer to a line-art drawing saved in a file.
Usually, clip art images are vector graphics, not bitmaps. To understand what that means, read “Understanding Vector Graphics” in Chapter 11, “Working with Drawings, WordArt and Clip Art.” Clip art, like all vector graphics, does not look photorealistic; you can always tell it is a drawing, and not a photo. That’s the downside; on the upside, clip art images take up much less disk space and can be resized to any size without degrading the image quality at all. Color depth, resolution, and file format are mostly non-issues with clip art because a clip art image doesn’t need a lot of colors (because it isn’t going to be photorealistic anyway), it has no fixed resolution (because it is resized on-the-fly for any size needed), and there are only a couple of clip art file formats that Office.com provides clip art in (.wmf and .emf) and Word accepts them both.
You find out how to find and insert clip art into your documents in “Inserting a Photo or Clip Art from Office.com” later in this chapter, but for more complete coverage of clip art use, see “Working with Clip Art” in Chapter 11.
Inserting Pictures
Images can come from a variety of sources. You can insert pictures that are stored on your own hard disk (or other disk), or you can find and download pictures from other sources.
Word accepts pictures in these formats:
• Windows Enhanced Metafile (.emf)
• Windows Metafile (.wmf)
• JPEG File Interchange Format (.jpg, .jpeg, .jfif, .jpe)
• Portable Network Graphics (.png)
• Windows Bitmap (.bmp, .dib, .rle)
• Graphics Interchange Format (.gif)
• Compressed Windows Enhanced Metafile (.emz)
• Compressed Windows Metafile (.wmz)
• Compressed Macintosh PICT (.pcz)
• Tag Image File Format (.tif, .tiff)
• Encapsulated PostScript (.eps)
• Macintosh PICT (.pct, .pict)
• WordPerfect Graphics (.wpg)
![]() Note
Note
Graphic import filters are registered in the Windows Registry in HKEY_LOCAL_MACHINESoftwareMicrosoftShared ToolsGraphics FiltersImport. The actual filter files are stored in C:Program FilesCommon Filesmicrosoft sharedGRPHFLT.
To use a picture that’s in some other file format, open the file in a graphics-editing program and then do one of the following:
• Save it in one of the supported formats.
• Copy it to the Clipboard and paste it into Word.
In the following sections, you find out how to insert images from different sources.
Inserting a Picture from a File
To insert a picture from a file stored on your hard disk (or other disk), follow these steps:
1. On the Insert tab, click Pictures. The Insert Picture dialog box opens.
2. (Optional) By default, all supported file types are shown. To narrow down the files shown to a specific type, click All Pictures and select the type.
3. Navigate to the folder containing the file and select it.
4. Click Insert.
You can also create a dynamic link between the picture and the document, so the copy in the document stays up-to-date when the original changes. To do so, click the down arrow next to the Insert button in step 4 and choose either Link to File or Insert and Link (see Figure 10.2).
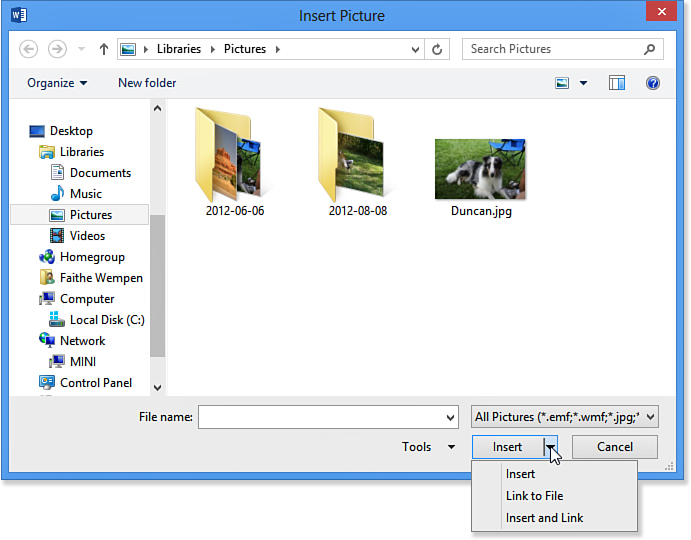
Figure 10.2. Select a file to insert.
Link to File creates a link that is automatically updated each time the document is opened; if the picture file is not available, an error appears. Insert and Link creates a link but also retains a static copy of the picture, so if the original is not available, the last available version appears.
![]() To learn more about linking, see “Linking to Data in Other Files,” p. 612.
To learn more about linking, see “Linking to Data in Other Files,” p. 612.
Inserting a Picture from Your SkyDrive
As you read in Chapter 1, Word 2013 enables you to save your work to a free, secure, online file system called SkyDrive. Each person has his or her own SkyDrive account tied to their email address. You can store all kinds of files on your SkyDrive, not just Office applications; for example, you can store your photo collection there.
![]() To learn more about SkyDrive, see “Understanding SkyDrive,” p. 837.
To learn more about SkyDrive, see “Understanding SkyDrive,” p. 837.
To insert a picture stored on your SkyDrive into a Word document, follow these steps:
1. On the Insert tab, click Online Pictures. The Insert Pictures dialog box opens (see Figure 10.3).

Figure 10.3. Choose an online picture source.
2. Click Browse to browse the content of your SkyDrive.
3. Locate and select the picture you want to insert. You can select more than one picture by holding down the Ctrl key as you click on each picture you want.
4. Click Insert. The pictures are downloaded and inserted in your Word document.
Inserting a Photo or Clip Art from Office.com
Office.com provides a large repository of images, clip art, sounds, and video clips that are free for all Office users. Although Office.com is best known for its clip art, there are also thousands of high-quality photographs there too. When you search for images from Office.com via the interface inside Word, you can’t specify which type of image you want, but you can easily distinguish between photos and clip art at a glance in the search results.
![]() To learn more about clip art, see “Working with Clip Art,” p. 458.
To learn more about clip art, see “Working with Clip Art,” p. 458.
To search for images on Office.com and insert one in your document, follow these steps:
1. On the Insert tab, click Online Pictures. The Insert Pictures dialog box opens. (see Figure 10.3).
2. Click in the Office.com Clip Art text box and type the keyword(s) to search for.
3. Press Enter. The search results appear. Figure 10.4 shows example results when searching for sheepdog. Notice that the results contain both photos and clip art.

Figure 10.4. Results of searching Office.com Clip Art for sheepdog.
4. Select the picture you want to insert. You can select more than one picture by holding down the Ctrl key as you click on each one you want.
5. Click Insert. The picture is inserted in your document.
Inserting a Picture from a Bing Search
Bing is a Microsoft-sponsored search engine that searches the web for images. Because it searches the entire Internet and not just Microsoft’s servers, the resulting set of images is much larger than when searching Office.com.
By default the search results include only images that are licensed under Creative Commons, to help you avoid accidentally violating someone’s copyright. You can override that protection to see even more images, but you risk running into legal problems if the owner of the picture notices that you have used it without permission.
![]() Caution
Caution
An image’s appearance in the Bing search results does not mean it is free for you to use any way you choose without attribution. Creative Commons has a variety of different license types, and some of them require you to attribute the source of the picture or deny permission to modify the picture. To find out about the license type in effect for an image, click the hyperlink to its original location at the bottom of the search results window. For more information about Creative Commons, see http://creativecommons.org.
To search for images with Bing and insert one in your document, follow these steps:
1. On the Insert tab, click Online Pictures. The Insert Pictures dialog box opens (see Figure 10.3).
2. Click in the Bing Image Search text box and type the keyword(s) to search for.
3. Press Enter. The search results appear. Figure 10.5 shows example results when searching for sheepdog. The Bing results are mostly photos; very little clip art turns up in these searches.

Figure 10.5. Results of searching Bing for sheepdog.
Notice that an information bar appears across the search results letting you know that the images are licensed under Creative Commons. You can click the X in the information bar to close it. You can also click Show All Web Results to expand the search to include copyrighted images that you might not be authorized legally to use.
4. Click the desired image and click Insert.
Capturing and Inserting Screenshots
A screenshot, as the name implies, is a graphic snapshot of your computer’s screen at a specific point in time. Instructional designers often use screenshots (also called screen captures) to illustrate procedures to perform on a computer, and most of the figures in this book are screenshots.
To take a screenshot and insert it into Word, follow these steps:
1. Set up Windows or the application that you want to capture.
2. In Word, click the Insert tab and click Screenshot. A menu opens showing thumbnails of all the other open windows plus a Screen Clipping command (see Figure 10.6).

Figure 10.6. Select the window to capture or choose Screen Clipping to define your own area.
3. Click the thumbnail of the window you want to capture.
![]() Tip
Tip
If you want to use Screen Clipping to capture a portion of one of the open windows, make sure that window is “on top” (that is, active), and then switch to Word and choose Insert, Screenshot. That way after Word minimizes itself, the window you want will be fully visible.
Alternatively, click Screen Clipping. Word itself is minimized and the screen is covered by a white semi-transparent overlay. Drag with your mouse to draw a box that covers the area you want to capture. To capture the entire screen, drag from the upper-left corner to the lower-right corner.
Word’s screenshot capability is rather basic; if you do a lot of screen capturing, you should consider a third-party screenshot application such as Snag It.
Setting Text Wrap
By default, a picture is placed into the document as an inline image at the insertion point. An inline image is a graphic that is treated as a character of text would be treated. As far as Word is concerned, the inline image is just a really big, funny-looking letter. When you edit the surrounding text, the picture scoots over to make room, just like text would scoot (see Figure 10.7).
Figure 10.7. A picture is an inline image by default.
You can drag an inline image to a different location, but it will continue to be treated as a text character, so you can drag it only into a spot where you could drag text; you can’t drag it to the far left or right of the paragraph, for example. That’s the nature of an inline image.
If you need more flexibility than that, you need to change the picture’s Wrap Text setting so that it is no longer an inline image, but rather a free-floating object. You can then drag the picture anywhere on the page, regardless of the text. If there happens to be text in the spot where you drag the picture, the text and the picture interact according to the Wrap Text setting you chose. For example, if you chose Square, the text wraps around the picture’s rectangular border, as in Figure 10.8.
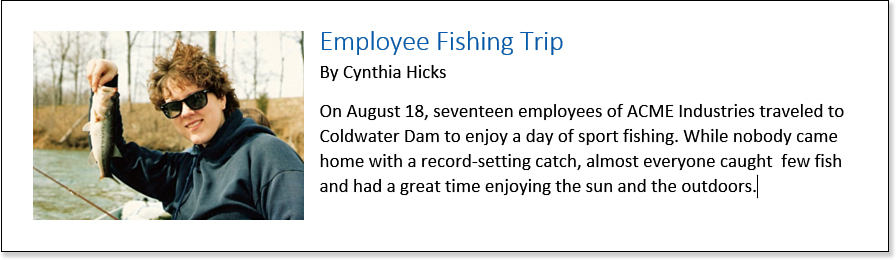
Figure 10.8. Text now wraps around the picture.
To set text wrap for a picture, follow these steps:
1. Select the picture.
2. On the Picture Tools Format tab, click Wrap Text, and then click the desired text-wrap setting.
Alternatively, right-click the picture, point to Wrap Text, and click the desired wrap setting. Or, new in Word 2013, you can click the Layout Options icon to the right of the picture and choose a wrapping option (see Figure 10.9).
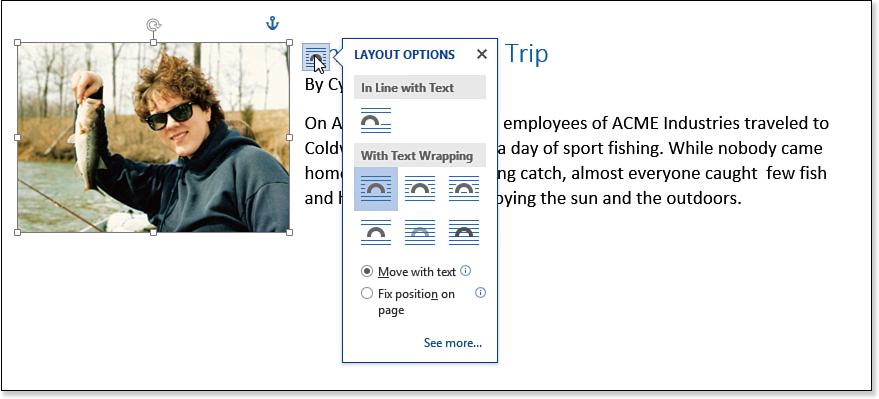
Figure 10.9. Set the picture’s text-wrap setting.
These are the same text-wrap options as for text boxes, which you learned about in Chapter 8, “Working with Templates and Nonstandard Layouts.” All the wrap options allow the image to be free-floating except In Line with Text; that option takes the picture back to being an inline image.
For more control, choose See More from the menu in Figure 10.9, opening the Layout dialog box. From here, you can click the Text Wrapping tab and choose a basic wrapping style using buttons that correspond to the regular menu options, and you can fine-tune the setting by specifying which sides to wrap around and what distance should be left between the text and the picture (see Figure 10.10). Depending on which wrapping style you choose, some of the options might not be available.

Figure 10.10. Specify text-wrap settings.
Setting Picture Position
Often, a picture’s position within a document is significant because it needs to stay with certain text or stay in a certain location in relation to the margins. The following sections explain some methods of positioning a picture.
Manually Positioning a Picture
A floating picture (that is, one with any text-wrap setting other than In Line with Text) can be positioned anywhere on the page simply by dragging it there. Position the mouse pointer over the center of the picture (or actually anywhere on it other than a selection handle) and drag.
Working with Anchors
Each floating picture has an anchor. An anchor is a marker that indicates how a floating paragraph relates to the document text. A picture anchors itself to whatever paragraph is nearest to its top edge. When you drag a picture around on a page, its anchor moves too, re-anchoring itself to whatever paragraph is nearest. You can view the anchor symbol by turning on the display of nonprinting characters (Show/Hide ¶ on the Home tab). Figure 10.11 shows an anchor.

Figure 10.11. Each picture has an anchor.
The anchor is actually part of the paragraph. When the paragraph moves, the anchor moves too, and so does the picture connected with it. For example, if you select the paragraph containing the anchor and cut it to the Clipboard, the picture disappears with it. If you then paste that paragraph in a new location, the picture is pasted there too. If the paragraph floats to another page because of text additions or deletions, the picture floats with it.
Changing a Picture’s Anchor Point
You can manually change which paragraph a picture is anchored to by dragging the anchor symbol to another paragraph. If you subsequently drag the picture to place it somewhere else, though, the picture re-anchors itself to the nearest paragraph, regardless of the anchor reassignment you made.
Locking an Anchor
If you do not want a picture to re-anchor itself to the nearest paragraph when you drag the picture, lock the anchor point. That way the picture remains anchored to the current paragraph even if you move the picture.
To lock the anchor, follow these steps:
1. Select the picture and then display the Picture Tools Format tab.
2. Click Position, and choose More Layout Options. The Layout dialog box opens.
3. Click the Position tab.
4. Mark the Lock Anchor check box.
5. Click OK. The anchor now shows a lock symbol, indicating it has been locked.
To unlock the anchor, repeat these steps and clear the Lock Anchor check box.
Choosing a Position Preset
Position presets are a combination of location settings and text-wrap settings; they determine where on a page the picture appears and how it interacts with surrounding text.
To select a position preset, follow these steps:
1. Select the picture.
2. On the Picture Tools Format tab, click Position.
3. Click one of the position presets.
The positions on the Position menu are grouped according to text-wrap type: In Line with Text or With Text Wrapping (see Figure 10.12). (If you want some other text-wrap setting than that, apply the position preset first and then change the text-wrap setting as in the preceding section.)

Figure 10.12. Select a picture position preset.
These picture presets set the horizontal and vertical alignment in relation to the document margins. The pictures will stay in place no matter how the text moves around them as a result of text editing you might do.
Specifying a Custom Position
For more alignment choices, choose More Layout Options from the menu shown in Figure 10.12, opening the Layout dialog box. Then click the Position tab and use the controls there to fine-tune the picture’s position (see Figure 10.13).
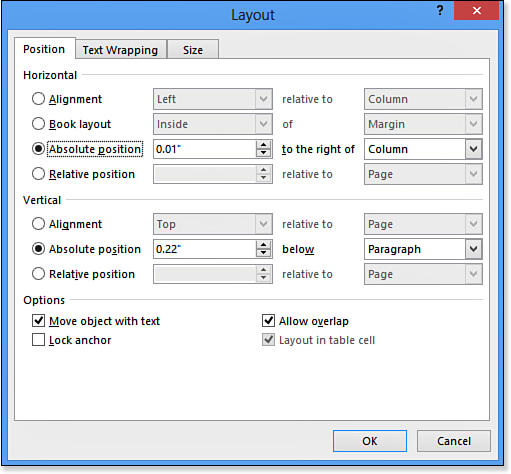
Figure 10.13. Set custom picture position settings.
For horizontal positioning, choose one of these settings:
• Alignment—You can set a position (Right, Left, Centered) and what it should be in relation to (Margin, Page, Column, and so on). Most of the presets use this option. Using this setting ensures that if settings in the document change (such as margin settings), the picture will adjust itself accordingly.
• Book Layout—Use this setting for a two-sided layout in which you want the picture to float to the right or left depending on whether the page is an odd- or even-numbered one. The picture can be set to float either inside or outside the margin or page.
• Absolute Position—Use this if the picture should be locked to a certain spot on the page and be unaffected by margins, columns, or any other document-layout settings.
• Relative Position—Use this setting to specify a percentage relative to some other element. For example, you could set a position of 25 percent relative to the page to position the object 25 percent of the way across the page.
For vertical positioning, the same settings are available, except there’s no Book Layout, and the alignments are Top, Centered, and Bottom, Inside, and Outside instead of Right, Left, and Centered.
Resizing Pictures
To size a picture in a Word document, drag one of its selection handles.
If you need the image to be a specific size, use the Height and Width boxes on the Picture Tools Format tab (see Figure 10.14). These boxes are linked; changing one dimension also changes the other by a proportional amount.

Figure 10.14. Set a height and width on the Picture Tools Format tab.
![]() Note
Note
The Picture Tools Format tab becomes available when the picture is selected. Double-click the picture to bring the Picture Tools Format tab to the forefront.
For even more control over the size, click the dialog box launcher for the Size group on the Picture Tools Format tab. This opens the Layout dialog box. In the Layout dialog box you can set a specific size for Height and Width, or you can increase or decrease the size by percentages in the Scale section (see Figure 10.15).
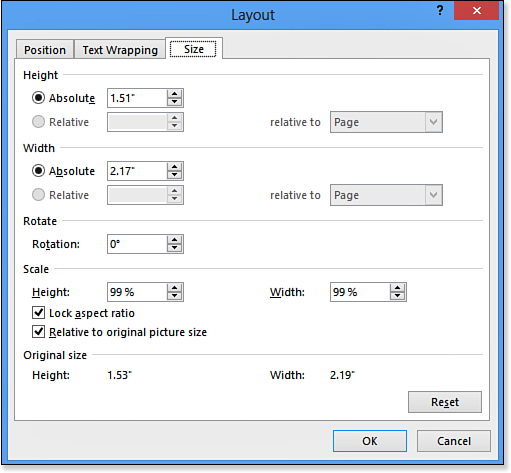
Figure 10.15. Set a precise size for an image.
The Lock Aspect Ratio check box enables you to scale the picture proportionally. When it is marked, if you enter a certain value in the Height box, the Width setting changes by the same percentage.
The Relative to Original Picture Size check box makes the scaling occur in relation to the original size (listed at the bottom of the dialog box), rather than any interim sizing that has been done.
To go back to the picture’s original size, click the Reset button.
Cropping Pictures
To crop a picture is to trim off one or more edges so your audience can focus in on what’s most important in the image. For example, in Figure 10.16, all the extraneous background has been trimmed to show the dog more clearly.

Figure 10.16. Cropping helps the reader focus on what’s important in the image.
The easiest way to crop a picture is to use the Crop tool. Follow these steps:
1. Click the picture.
2. On the Picture Tools Format tab, click the Crop button. The selection handles on the picture change to black lines.
Alternatively you can right-click the picture and then click the Crop icon that appears above or below the shortcut menu to turn on cropping.
![]() Tip
Tip
You can also crop by specifying numeric values. Right-click the picture and choose Format Picture, and then in the Format Picture task pane, click the Picture icon, expand the Crop options, and specify values for the picture cropping and position in the text boxes provided.
3. Drag a selection handle on the image inward to crop the image. Repeat on other sides as needed.
4. Press the Esc key or click the Crop button again to finish cropping.
You can uncrop a picture at any time by reentering cropping mode (steps 1–2) and then dragging the selection handle outward again. You cannot uncrop if you have compressed the picture, however, as discussed in the next section, because compression deletes the cropped areas of the picture (unless you set the option for it to not do so).
You have several additional options accessible from the Crop button (see Figure 10.17):
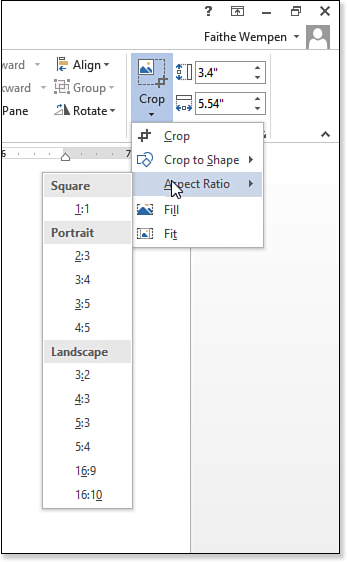
Figure 10.17. Access cropping options by clicking the arrow under the Crop button.
• Crop to Shape—Enables you to select a shape from Word’s collection of drawn objects and crop the image to fit in that shape.
![]() To learn more about cropping to a shape, see “Cropping a Picture to a Shape,” p. 445.
To learn more about cropping to a shape, see “Cropping a Picture to a Shape,” p. 445.
• Aspect Ratio—Enables you to crop to an exact height-to-width ratio. This is often useful when you need a picture to conform to a certain size of box, such as on a form or in a newspaper layout.
• Fill—After you define the crop area, if you choose Fill, it resizes the picture to fit the space you allocated. The picture’s aspect ratio is maintained, and if any blank space remains on the right and left, it is cropped out.
• Fit—Same as Fill, except it fills to the right and left sides, and if any blank space remains at the top or bottom, it is cropped out.
To experiment with Fill versus Fit on your own, try this: Insert a picture, and then use the Crop tool to set a crop area. Then choose Crop, Fit to see what happens. Press Ctrl+Z to undo that change, and then choose Crop, Fill to see the difference.
Compressing Pictures
The larger the original image’s file size, the larger the size will be of the Word file in which you insert it. Resizing or cropping the picture in Word does not decrease the file size; it stays the same, as if the picture were being used at full 100 percent size. If file size is an issue (for example, if you plan to distribute the document via email or the Web), consider taking some steps to decrease it as much as you can.
There are two ways of decreasing the file size. One is to resize or crop the image file in a third-party graphics-editing program before importing it into Word; another is to use the Compress Pictures feature in Word.
Compress Pictures combines a variety of techniques to decrease the file size, including removing cropped-out areas of pictures and resizing the image file to a particular number of pixels per inch based on the document’s planned usage.
To compress pictures in a Word document, follow these steps:
1. Select one of the pictures to be compressed. If you do not want to compress all the pictures in the document, do one at a time, or select only the pictures you want to compress.
2. Click Compress Pictures on the Picture Tools Format tab. The Compress Pictures dialog box opens (see Figure 10.18).

Figure 10.18. Compress the pictures in the document to decrease the file size.
3. (Optional) If you want to compress all picture(s), clear the Apply Only to This Picture check box.
4. Set the compression options:
Delete Cropped Areas of Pictures—When this is enabled, your crops (if any) become permanent when compression is performed with Compress Pictures.
![]() Note
Note
Pixels per inch (ppi) is a more common unit of measurement than dots per inch (dpi) when referring to onscreen resolution.
Target Output—Select an image quality, in pixels per inch, depending on the intended use. A lower ppi results in a smaller file size but poorer image quality. If the image is already at a low ppi, this setting does not increase its ppi; this setting only decreases ppi.
If you just want to delete the cropped areas, but not change the photo compression, choose Use Document Resolution and mark the Delete Cropped Areas of Pictures check box.
5. Click OK to perform the compression.
Setting the Brightness, Contrast, and Color Mode
You can adjust a picture’s brightness, contrast, and image mode (color, grayscale, and so on) in a third-party graphics-editing program before importing the picture into Word; usually that’s how the professionals do it. Most photo-editing programs have great tools for applying such effects.
If you don’t have access to an editing program, though, or you forgot to make the corrections before importing into Word, you can use Word’s relatively modest tools to accomplish these effects.
Adjusting Brightness and Contrast
To adjust brightness or contrast, click the Corrections button on the Picture Tools Format tab and select a sample that represents the effect you want (see Figure 10.19).

Figure 10.19. Choose a contrast or brightness preset adjustment from the Corrections button’s menu.
Alternatively, you can click the dialog box launcher for the Picture Styles group on the Picture Tools Format tab, opening the Format Picture task pane. Click the Picture icon, expand the Picture Corrections category, and use the Brightness and Contrast sliders to make adjustments (see Figure 10.20).
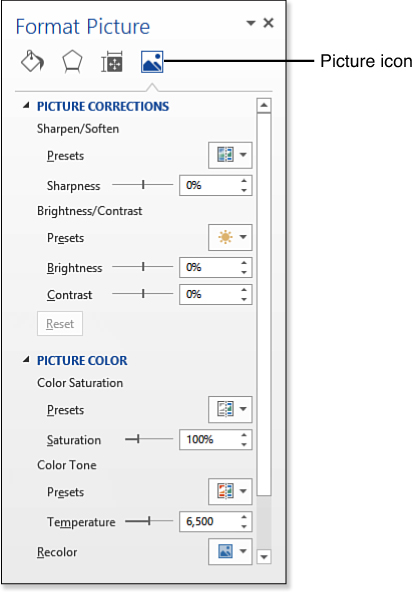
Figure 10.20. Adjust a picture’s brightness and contrast from the Format Picture task pane.
Sharpening or Softening a Picture
Besides brightness and contrast, you can also adjust the sharpness or softness of a picture. This setting emphasizes or deemphasizes hard lines in the picture by subtly changing the pixel colors in areas where there is a sharp contrast between one color and another. Notice in Figure 10.19 that Sharpen and Soften presets appear on the Corrections menu, along with brightness and contrast presets, and there is a Sharpness slider on the Format Picture task pane in Figure 10.20.
Changing the Color Mode
You can control the image mode from the Color button’s menu on the Picture Tools Format tab shown in Figure 10.21. You can click a sample in any of these areas, or you can choose a menu command:
• Color Saturation—Samples represent various degrees of color saturation, from nearly monochrome to very vibrant.
• Color Tone—Samples represent various degrees of tint adjustment, measured in temperature. A low-temperature picture is slightly blue-tinted; a high-temperature picture is slightly orange-tinted.
• Recolor—Samples represent a variety of color washes and black-and-white or washed-out modes.
• More Variations—Opens a color picker with theme and standard colors, from which you can pick additional colors for colored washes to place over the image. Some of the washed-out effects can be used when creating watermarks, for example.
![]() To learn more about watermarks, see “Applying a Page Watermark,” p. 274.
To learn more about watermarks, see “Applying a Page Watermark,” p. 274.
• Set Transparent Color—Enables you to click on a color on the photo that should become transparent, allowing anything under it to show through.
• Picture Color Options—Opens the Format Picture task pane with the Picture Color options displayed. This set of options, shown in Figure 10.20, contains sliders and presets for saturation, tone, and recoloring, all in one place.
![]() For a more detailed discussion of setting a transparent color, see “Setting the Transparent Color,” p. 465.
For a more detailed discussion of setting a transparent color, see “Setting the Transparent Color,” p. 465.

Figure 10.21. Recoloring options for pictures
Removing a Picture Background
With some pictures, setting a transparent color might not work very well because the background is a pattern or gradient. There might be more than one shade of color that needs to be removed.
You can tell Word to remove the background from a photo and then help it “find” the background by adjusting the amount of tolerance for variance in color.
To remove a picture background:
1. Insert the picture into the Word document and select the picture.
2. On the Picture Tools Format tab, click Remove Background.
An overlay appears over the image with the areas that it plans to remove shown in bright pink. A Background Removal tab also appears.
3. Use the Mark Areas to Keep and/or Mark Areas to Remove tools on the Background Removal tab to correct any mistakes that Word has made (see Figure 10.22). For example, if an area is marked for removal that shouldn’t be, click Mark Areas to Keep and then click that area.
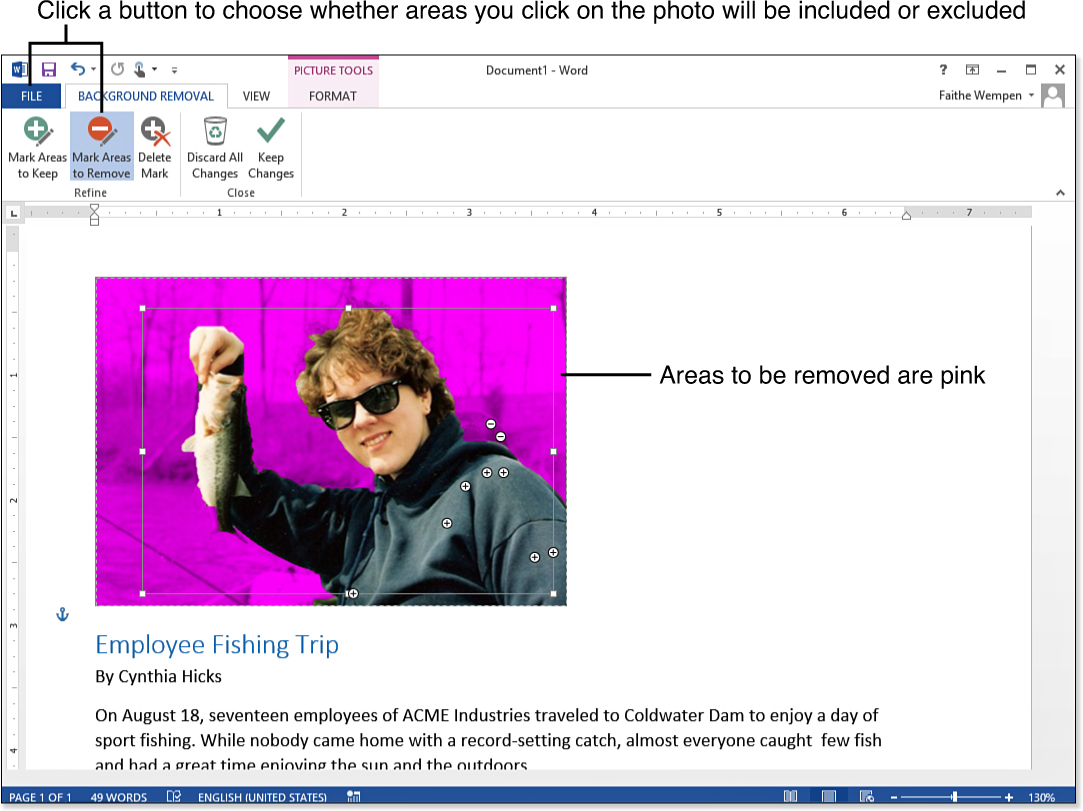
Figure 10.22. Remove the background from a photo.
4. Click Keep Changes. The background removal is finalized.
To reverse the background removal, use Undo (Ctrl+Z). If you can’t do that, delete and reinsert the image.
Applying Artistic Effects
Artistic effects enable you to apply special transformations to a picture, like you might do in a graphics editing program like Photoshop.
To use these, select the picture and then click the Artistic Effects button on the Picture Tools Format tab. After that, click the effect you want. (You can try out an effect by hovering the mouse pointer over it without clicking.) If you don’t like the effect, use Undo (Ctrl+Z) to remove it immediately after applying it.
Some of the artistic effects are very interesting. For example, in Figure 10.23, an effect has been applied that makes the picture look like it is a pencil sketch. To fine-tune the preset you have applied, reopen the Artistic Effects menu and choose Artistic Effects Options. This opens the Artistic Effects section of the Format Picture task pane. From here you can make subtle changes. The controls that appear change depending on the effect you have chosen. Not all of the effects have options.

Figure 10.23. Apply artistic effects to photos for special looks like this one.
Applying Picture Styles and Effects
You can apply a variety of picture styles to your pictures. These are presets that combine several types of formatting, including border style and shape, shadow, edge softening, glow effects, 3-D rotation, and reflection.
Applying a Picture Style
To apply a picture style, click the down arrow in the Picture Styles group of the Format tab and select one of the samples on the menu (see Figure 10.24).

Figure 10.24. Select a picture style.
You cannot save your own picture styles (unfortunately), but you can modify a picture style by changing its effects.
To fine-tune the picture style, on the Picture Tools Format tab, click Picture Effects and use the commands on the submenus to specify various combinations of effects, such as Shadow, Reflection, Glow, Soft Edges, Bevel, and 3-D Rotation.
![]() Tip
Tip
New in Word 2013, you can right-click the picture to make a Style icon appear above or below the shortcut menu. Click it to select from an abbreviated set of picture styles.
Applying a Picture Preset
Word has a number of picture shapes and textures, known as presets. They add special effects to the picture, such as beveled edges, contours, and different surface textures and lighting. You can access these from the Preset option on the Picture Effects button’s menu, shown in Figure 10.25.

Figure 10.25. Choose a picture preset.
For more options, choose 3-D Options from the menu and then in the Format Picture task pane, expand the 3-D Format options if they are not already displayed. You can then set amounts for top and bottom bevel, color depth, contour color, surface material, lighting, and angle.
![]() 3-D Format effects are covered in greater detail later in the book. See “Formatting Drawn Objects,” p. 438.
3-D Format effects are covered in greater detail later in the book. See “Formatting Drawn Objects,” p. 438.
Applying a Shadow Effect
A shadow is a shaded background behind the image that makes it look like it is raised off the page.
A shadow has these adjustable attributes:
• Color—The shadow color
• Transparency—How transparent or opaque the shadow is
• Size—How far past the edges of the image the shadow extends
• Blur—How sharp or fuzzy the edges of the shadow are
• Angle—Which sides of the image are shadowed
• Distance—How far away from the image the shadow is
You can use the Shadow option on the Picture Effects drop-down list to select a shadow preset (see Figure 10.26).
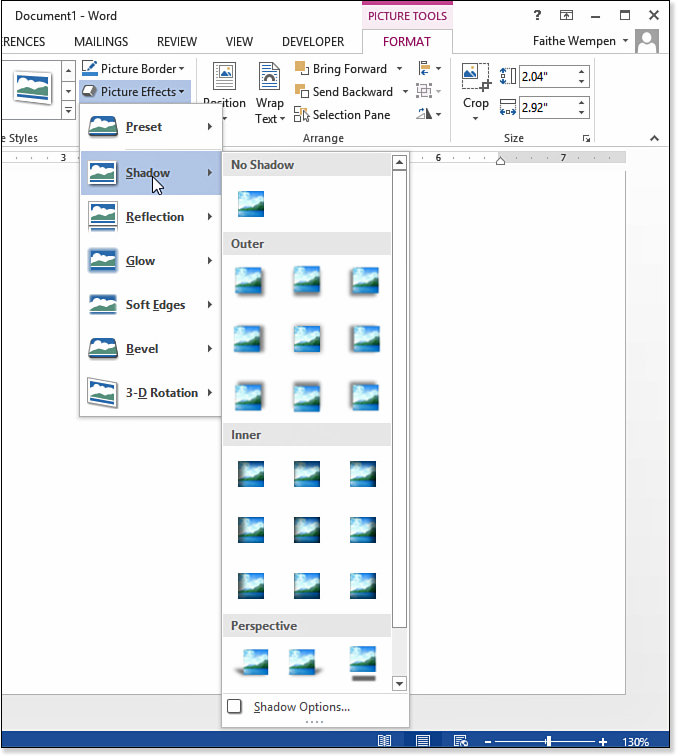
Figure 10.26. Choose a shadow preset.
If none of the presets are exactly what you want, choose Shadow Options from the menu, opening the Format Picture task pane. In the Shadow section, adjust the shadow options, as in Figure 10.27. Start with one of the presets if desired. Then, change the shadow color, and drag each of the sliders to control the shadow’s properties.
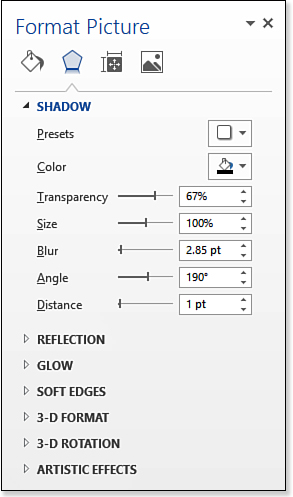
Figure 10.27. Fine-tune the shadow settings here.
Applying Reflection
Reflection creates a reflected effect for the picture; a faint, flipped version of the picture appears below it. Choose a reflection type from the Reflection menu, via the Picture Effects menu on the Format tab. Choose Reflection Options to fine-tune the effect in the Format Picture task pane. You can adjust the following settings:
• Transparency—How transparent or opaque the reflection is
• Size—How far past the edges of the image the reflection extends
• Blur—How sharp or fuzzy the edges of the reflection are
• Distance—How far away from the image the reflection is
Applying Glow
Glow is an extra border around a picture with soft edges applied to it so that it looks like there is a colored light behind the picture. Choose a glow setting from the Glow list on the Picture Effects menu of the Picture Tools Format tab. To select a color that isn’t on the menu, point to More Glow Colors and then click a color to use. To remove the glow, open the menu and choose No Glow.
Choose Glow Options to fine-tune the effect in the Format Picture task pane. You can adjust the following settings:
• Color—The color of the glow effect
• Size—How far past the edges of the image the glow extends
• Transparency—How transparent or opaque the glow effect is
Applying Soft Edges
The Soft Edges feature blurs the edges of the picture. The Soft Edges option appears on the Picture Effects menu on the Picture Tools Format tab. You can select a certain number of points to blur; a higher number blurs more of the picture. To remove the effect, open the menu and choose No Soft Edges. Choose Soft Edges Options to fine-tune the effect in the Format Picture task pane. There is only one adjustment you can make there: Size. It controls how far into the image the soft edge effect extends.
![]() Caution
Caution
Soft Edges is incompatible with some of the Preset settings; when a preset is applied that specifies a certain treatment for the edges of the image, applying a Soft Edges setting will have no effect.
Applying a Beveled Edge and Other 3-D Formatting
A bevel is an effect applied to the edges of a picture to make it look raised or sunken in relation to the page. It is also known as a 3-D format, because its purpose is to simulate 3-D.
You can choose a bevel preset from the Picture Effects menu on the Picture Tools Format tab, the same as the other effects you have learned about so far in this chapter (see Figure 10.28).

Figure 10.28. Choose a bevel preset for a picture.
You can also choose 3-D Options from the menu to display the Format Picture task pane. In the 3-D Format section, you can adjust various aspects of the effect, including the following:
• Bevel—You can adjust the Top and Bottom values, increasing or decreasing the size of the beveled edge effect. The Bottom setting does not do anything obvious unless the picture is also 3-D rotated (covered later in this chapter).
• Depth—This does nothing for the bevel per se, but if the picture is 3-D rotated, it changes the color and depth of the 3-D sides.
• Contour—This changes the size and color of the bevel outline.
• Material and Lighting—You can adjust the Material and Lighting settings to control how the object on which the picture projects is composed. For example, you could make it look like the picture is on a steel plate that is lit with a bright light. These effects are usually used on drawn objects, not photos, but they are available for pictures, too.
Rotating a Picture
Many rotation options are available, including 3-D rotation; in a backward-compatible document, rotation is limited to two-dimensional spinning.
Manually Rotating a Picture
The basic manual type of rotation is the same for all picture types. When a picture is selected, a rotation handle (a circle) appears above it. Drag that handle to rotate the picture (see Figure 10.29).

Figure 10.29. Rotate a picture by dragging its rotation handle.
Rotating a Picture by a Specified Amount
If eyeballing it isn’t producing the desired results, consider rotating a picture by entering a specific rotation amount.
There are presets for rotating to the left or right 90 degrees; you can use one of these twice to rotate the picture 180 degrees (that is, to turn it upside-down). Here’s how to use one of the presets:
1. Select the picture and display the Picture Tools Format tab.
2. Click the Rotate Objects button.
3. To rotate 90 degrees left or right, select Rotate Left 90° or Rotate Right 90°.
If you need some other amount, follow these steps instead:
1. Select the picture and display the Picture Tools Format tab.
2. Click the Rotate Objects button.
3. Click More Rotation Options. The Size tab of the Layout dialog box opens.
4. Type a number of degrees in the Rotation box, or use the up/down buttons to specify the value.
5. Click OK.
Applying 3-D Rotation
3-D rotation is a far cry from ordinary rotation! With ordinary rotation, the image does not change; it’s just rotated wholesale. With 3-D rotation, however, the image is actually distorted to simulate rotation along the X, Y, and Z axes. Figure 10.30 shows some examples.
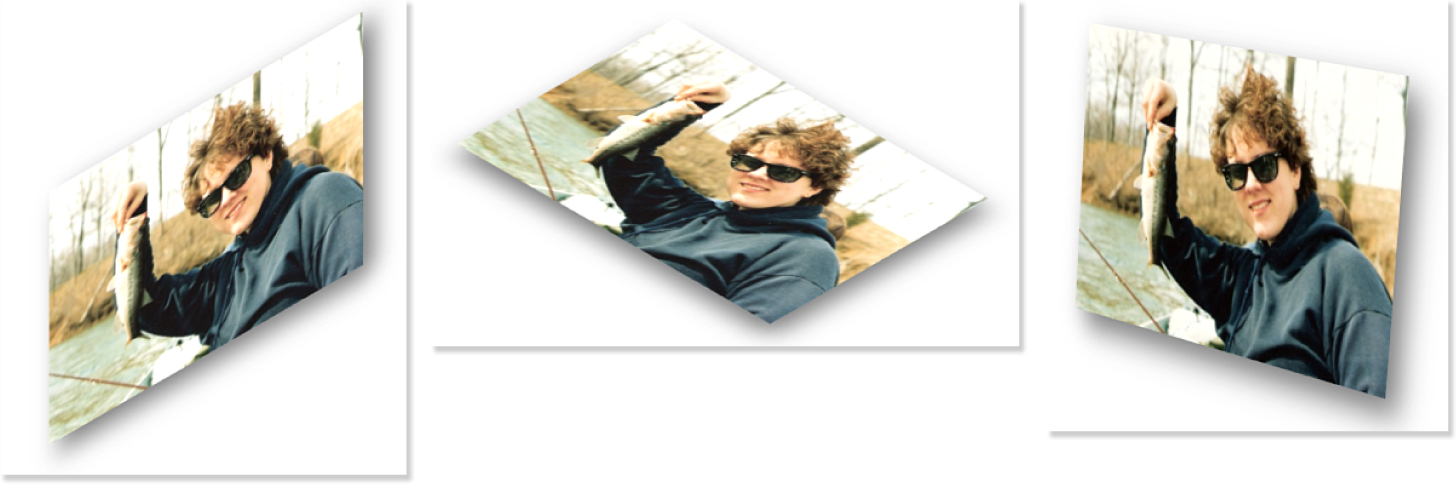
Figure 10.30. 3-D rotation examples.
To apply a 3-D rotation preset, follow these steps:
1. Select the picture and display the Picture Tools Format tab.
2. Click the 3-D Rotation option on the Picture Effects menu.
3. Click one of the rotation presets.
Here’s how to create a custom 3-D effect:
1. Select the picture and display the Picture Tools Format tab.
2. Click the 3-D Rotation option on the Picture Effects menu.
3. Click 3-D Rotation Options. The Format Picture task pane opens with the 3-D Rotation section displayed (see Figure 10.31).

Figure 10.31. Create a custom 3-D effect.
4. (Optional) To use one of the presets as a starting point, choose it from the Presets button’s drop-down list.
5. Use the buttons in the Rotation section to enter amounts of rotation on the X, Y, or Z axes. The up/down arrow buttons increment/decrement the value by 10 degrees per click; you can also type specific values in the text boxes.
6. Close the task pane when you are finished.
Applying a Picture Border
A border is a line around the perimeter of the picture. Some of the picture styles include borders; others don’t, but you can apply the border manually after applying the style; still others, especially the ones that involve 3-D, preclude the use of a border.
You can control the following factors for a picture border:
Color—Choose Picture Tools Format tab, Picture Border and then click a color.
Style—Choose Picture Tools Format tab, Picture Border, Dashes and then click a line style.
Thickness—Choose Picture Tools Format tab, Picture Border, Weight and then click a line width. Figure 10.32 shows the Weight submenu open.
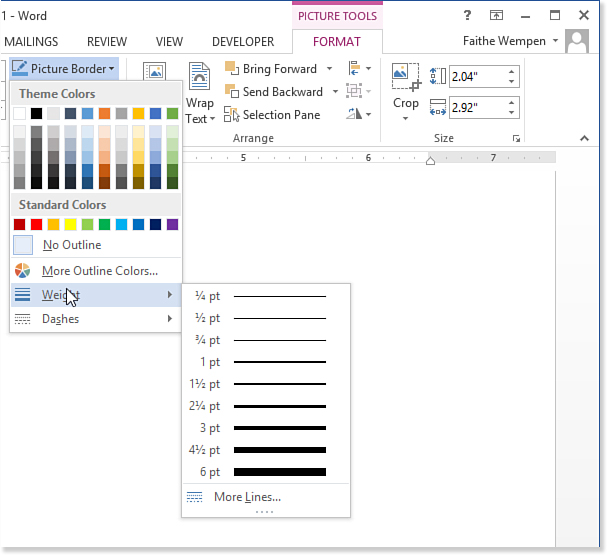
Figure 10.32. Set border options for the picture
Applying Picture Layouts (SmartArt)
Besides all the other formatting options you’ve learned about so far in this chapter, you can also apply picture layouts to your photos. Picture layouts are, essentially, SmartArt effects that apply to single pictures. In other words, you are creating a Picture-type SmartArt diagram with a single object in it. Figure 10.33 shows some examples.

Figure 10.33. Some picture layout examples.
To apply one of these layouts, on the Picture Tools Format tab click the Picture Layout button and then choose a preset (see Figure 10.34).
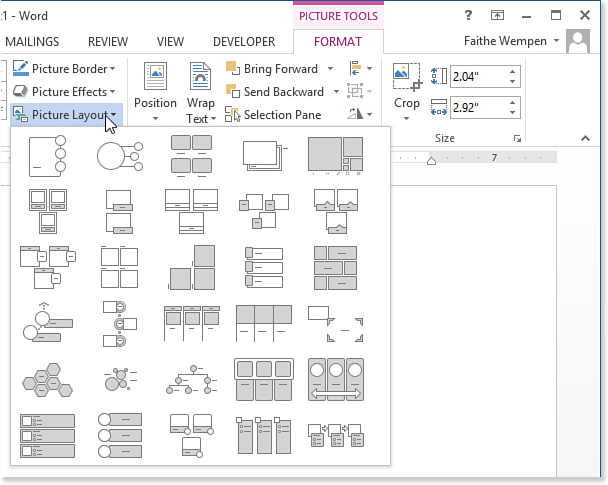
Figure 10.34. Apply a picture layout (SmartArt) preset.
After you apply a layout, the SmartArt Tools tabs become available (SmartArt Tools Design and SmartArt Tools Format), and you can edit the picture as you would any SmartArt diagram.
![]() To learn more about working with SmartArt, see “Working with SmartArt and Math Formulas, p. 521.
To learn more about working with SmartArt, see “Working with SmartArt and Math Formulas, p. 521.
Using Figure Captions
In a document that contains multiple pictures, you might find it useful to number them using Word’s Figure Captions feature. Using the Figure Captions feature is preferable to manually numbering the graphics because the numbers automatically change if you add or remove graphics as you edit the document. Figure captions work just like table captions (see Chapter 9, “Creating and Formatting Tables”), but it’s a separate numbering set.
![]() Note
Note
You can add figure captions to other objects besides pictures; you can include charts, diagrams, and just about any other object as a figure.
To add a caption to a picture (or other object), follow these steps:
1. Right-click the picture and choose Insert Caption. The Caption dialog box opens (see Figure 10.35).

Figure 10.35. Set up a caption for figures in the document.
2. Leave the Label setting at Figure.
3. In the Position list, choose where you want the captions to appear for figures. (Usually, figures have captions below them.)
4. The caption will read Figure 1. If you want some other word than Figure, click New Label and specify some other word(s) instead.
Alternatively, to omit using a word at all before the number, mark the Exclude Label from Caption check box.
5. Click the Numbering button. The Caption Numbering dialog box opens (see Figure 10.36).

Figure 10.36. Control the numbering style for figure captions.
6. Select a format from the Format list.
7. (Optional) To include a chapter number with the caption, mark the Include Chapter Number check box and then choose what style designates a chapter and what separator character should be used.
8. Click OK to return to the Caption dialog box.
9. Click OK. The caption appears in the document, immediately above (or below) the picture.
10. Click to the right of the caption and type a text description if desired.
Adding Alt Text Descriptions
On web pages, page designers often include alternative text descriptions for each image to assist people who cannot see pictures (like people with limited vision who use screen reading software, or people who browse with images turned off for faster page loading). Even though this is traditionally considered “a web thing,” you can also add alternative descriptions (“alt text”) to images in ordinary Word documents too, for greater accessibility. This text is invisible unless it is specifically called for by a screen-reading application or triggered in some other special way.
To add alt text to a picture, follow these steps:
1. Right-click the picture and choose Format Picture. The Format Picture task pane opens.
2. Click the Layout & Properties icon (third icon from the left).
3. Expand the Alt Text options.
4. Enter a title in the Title box and a description in the Description box, as in Figure 10.37.

Figure 10.37. Set up alt text for the selected image.
5. Close the task pane.
Inserting Videos and Interactive Content
A decade or so ago, Word documents were almost always shared in print, so there was little reason to embed interactive content in them that couldn’t be seen on a printed page. Nowadays, however, many people read Word documents on their computers, so it’s useful to be able to insert video and other interactive content. There are several ways to do this, depending on the clip’s source, and each is detailed in the following sections.
Inserting a Video from an Online Source
Word 2013 enables you to insert links to online video content from a variety of sources. Your options are the following:
• Bing Video Search—Use the Bing search engine to find video clips on the Web. As with pictures, search results are filtered to show only clips that are licensed under Creative Commons.
• YouTube—Search the YouTube site for video clips.
• From a Video Embed Code—Paste a video link code that you get from a website to create an in-document link.
When you insert a link to an online video source, a mini-player for it appears in the Word document, and people viewing the document can click the video clip to play it without leaving Word.
To insert a link to an online video in your Word document, follow these steps:
1. Position the insertion point where you want the video clip to appear.
2. If you plan on inserting a video embed code, locate that code on a website or another source and copy it to the Windows Clipboard.
3. On the Insert tab, click Online Video. The Insert Video dialog box opens (see Figure 10.38).

Figure 10.38. Choose one of the methods of locating and inserting a link to a video clip.
4. Do any of the following:
• Click in the Bing Video Search box, type a keyword, and press Enter. Select the desired clip in the search results.
• Click in the YouTube box, type a keyword, and press Enter. Select the desired clip in the search results box.
• Click in the From a Video Embed Code box and then press Ctrl+V to paste the previously copied embed code from the Windows Clipboard into the text box.
5. Click Insert.
After placing a video clip in a document, you can work with it just like you would a picture. The Picture Tools Format tab is available with its full complement of commands. There are no special tools available for controlling the video playback within Word.
Inserting Video Clips from Your Own Files
If you want to insert your own video clips from your local files, you can use the Insert, Object command. This command enables you to insert a wide range of different object types. The video is inserted as an icon. Anyone viewing the document can view the video clip using their own video playing software (such as Windows Media Player) by double-clicking the icon.
Follow these steps to insert a video clip into Word:
1. Position the insertion point where you want the video clip to appear.
2. On the Insert tab, click Object. The Insert Object dialog box opens.
3. Click the Create from File tab.
4. Click the Browse button.
5. Select the video clip and click Insert. The filename appears in the File Name box in the Object dialog box.
6. Click OK. The video clip is inserted in the Word document as an icon.