
25. Customizing the Word Interface
Word 2016 is very customizable. You not only can change what’s on the status bar and Quick Access toolbar, but also can add your own custom groups to Ribbon tabs and can even create your own tabs. This chapter explains all the customization options in Word 2016 so you can set up Word exactly the way you like it for maximum productivity.
Customizing the Quick Access Toolbar
The Quick Access toolbar (QAT) is the row of buttons near the File tab in the top-left corner of the Word window. By default, the Save, Undo, and Redo/Repeat buttons appear on the QAT. In addition, if you have a touchscreen, the Touch/Mouse Mode button also appears there.
You can change its position (either above or below the Ribbon), add buttons to and remove buttons from it, as well as rearrange its buttons.
![]() Tip
Tip
Placing a button on the Quick Access toolbar is useful if you need access to that button no matter which Ribbon tab is displayed. If the button needs to be available only when you are working with a specific tab, you might want to add it to that tab instead. See “Customizing the Ribbon” later in this chapter.
Repositioning the Quick Access Toolbar
Depending on how it’s set up, the QAT is either at the very top of the screen (in the title bar) or below the Ribbon. In the title bar, it’s perhaps more easily accessible, but below the Ribbon there is more room for it, so you can have more buttons on it without interfering with the document name in the title bar.
To reposition the QAT, click the down arrow at its right end to open its menu, as in Figure 25.1, and choose Show Below the Ribbon (or Show Above the Ribbon, depending on its current position).

Figure 25.1 Open the Quick Access toolbar’s menu by clicking the down-pointing arrow on its right end.
Adding Common Commands
The QAT’s menu contains a list of common commands that people like to put on the toolbar. Each one of them can be toggled on or off by selecting it. A check mark next to a command indicates that it is already on the toolbar (refer to Figure 25.1).
Adding Commands from the Ribbon
Any button or control on any tab or menu on the Ribbon can be easily added to the QAT via its right-click menu. Simply right-click it and choose Add to Quick Access Toolbar.
Adding Other Buttons
Word is such a feature-rich program that not all its features are made available by default. Some of these are less-common features that there was simply no room for on the Ribbon; others are features that pertain only to certain specialty types of documents or are carryovers from earlier versions of Word. You can add these commands either to the QAT or to the Ribbon.
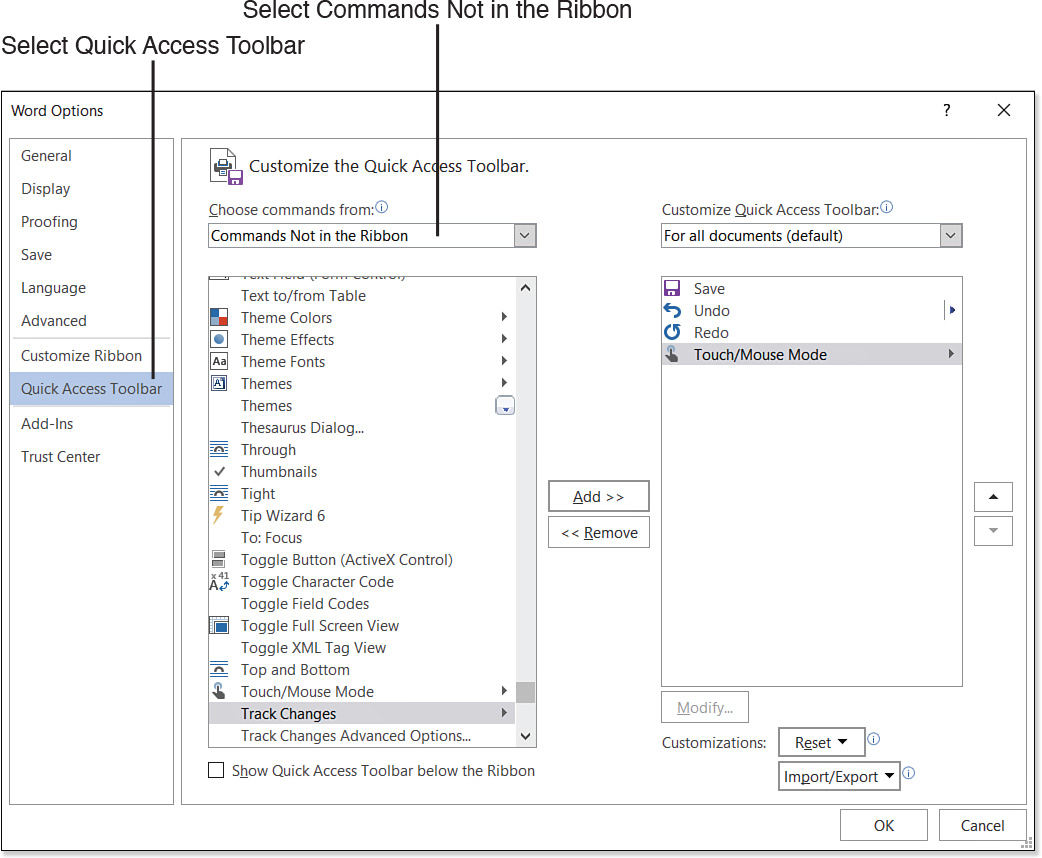
To browse the commands not already on the Ribbon and potentially add some of them to the QAT, follow these steps:
1. Choose File, Options.
2. Click Quick Access Toolbar.
3. Open the Choose Commands From list and select Commands Not in the Ribbon (see Figure 25.2).
![]() Tip
Tip
Instead of steps 1 and 2, you can right-click any button on the Quick Access toolbar and choose Customize Quick Access Toolbar.
4. Click a command and click Add to move it to the QAT.
5. Add more commands if desired.
6. Click OK.
Removing Buttons
You can remove a button from the Customization options from the preceding section by clicking the command and clicking Remove (refer to Figure 25.2). But there’s an easier way: Simply right-click any button on the QAT and choose Remove from Quick Access Toolbar.
Switching Between Touch Mode and Mouse Mode
Office 2016 applications can be run in either Mouse mode or Touch mode. The two modes differ in the spacing between the onscreen controls; Touch mode provides more space so you can more easily select commands on a touchscreen. Figure 25.3 shows the Home tab in Mouse mode (top) versus Touch mode (bottom).

Figure 25.3 Mouse mode (top) places the Ribbon commands and buttons closer together than Touch mode (bottom).
To switch between these two modes, click the Touch/Mouse Mode button on the QAT, and then select one of the two modes from its menu. If that button doesn’t appear on the QAT, add it, as described in “Adding Common Commands,” earlier in this chapter.
Customizing the Ribbon
You can customize any part of the Ribbon in Word 2016. You can even create your own new tabs, making it possible to consolidate the commands you use most often on a single tab for greater efficiency.
Collapsing the Ribbon
If you aren’t using the Ribbon at the moment, you can hide it to get extra space on the screen to see more text at once. There are several ways to do this:
![]() Right-click any button on either the Ribbon or the QAT and choose Collapse the Ribbon.
Right-click any button on either the Ribbon or the QAT and choose Collapse the Ribbon.
![]() Click the up-pointing arrow on the far right end of the Ribbon (see Figure 25.4).
Click the up-pointing arrow on the far right end of the Ribbon (see Figure 25.4).
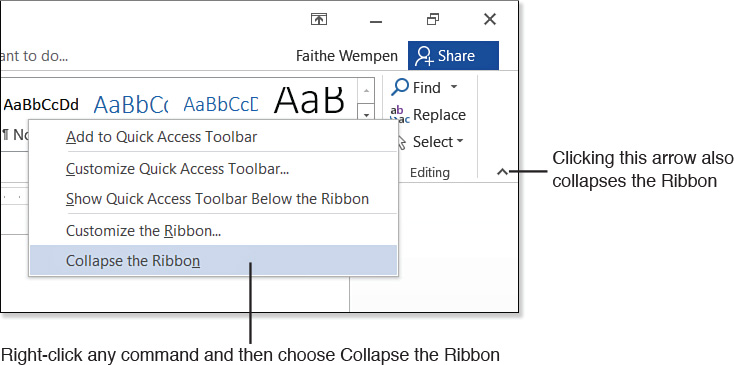
![]() Press Ctrl+F1.
Press Ctrl+F1.
To redisplay the Ribbon again, do any of the following:
![]() Right-click any button on the QAT and choose Collapse the Ribbon to toggle off the option.
Right-click any button on the QAT and choose Collapse the Ribbon to toggle off the option.
![]() Click one of the Ribbon’s tab names to expand the Ribbon display, and then click the pushpin icon in the lower-right corner of the Ribbon to pin it open.
Click one of the Ribbon’s tab names to expand the Ribbon display, and then click the pushpin icon in the lower-right corner of the Ribbon to pin it open.
![]() Press Ctrl+F1.
Press Ctrl+F1.
![]() Double-click any Ribbon tab.
Double-click any Ribbon tab.
Displaying or Hiding Tabs
If you never use certain tabs, you might want to hide them. For example, if you never use mail merge, there is little reason to keep the Mailings tab. Conversely, you might want to make available some nondefault tabs, such as the Developer tab (needed for creating forms and managing macros).
To choose which tabs display, follow these steps:
1. Right-click any button on the Ribbon and choose Customize the Ribbon. The Word Options dialog box opens with the Customize Ribbon tab displayed.
2. Mark or clear the check boxes as needed for each Ribbon tab listed in the right pane (see Figure 25.5).
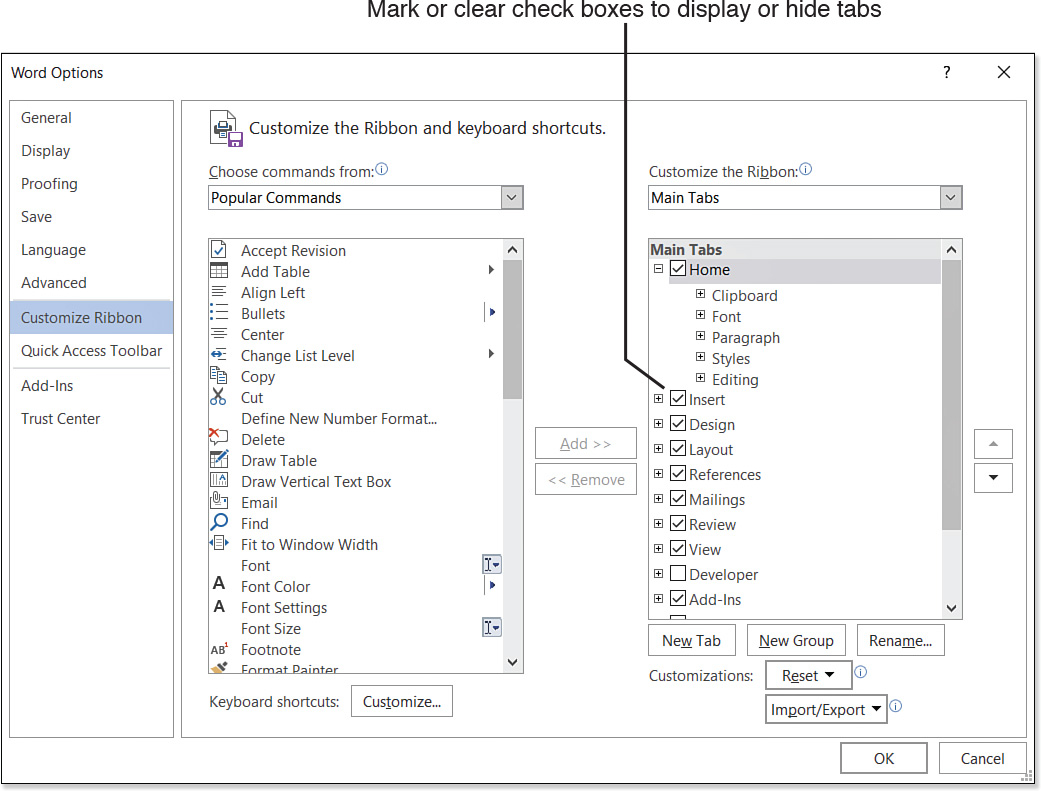
3. Click OK.
![]() Caution
Caution
Some of the tabs listed in Figure 25.5 are not displayed all the time. For example, the Blog Post tab appears only when you are composing a blog post. If you disable one of these tabs and then perform an action that would normally make that tab appear, it won’t appear. This behavior can be perplexing to someone else using your computer who doesn’t know you’ve hidden it, or even to yourself if you forgot you did.
Creating or Deleting a Tab or a Custom Group
You can add any command to any tab, as long as it is in a custom group (that is, a user-created group). Therefore, you have to create the custom group before you can start customizing a tab. If desired, you can create a whole new tab and then create your custom groups on that new tab.
Creating a Custom Tab
To create your own tab, follow these steps:
1. Right-click any button on the Ribbon and choose Customize the Ribbon. The Word Options dialog box opens with the Customize Ribbon tab displayed (refer to Figure 25.5).
2. On the Main Tabs list (right side of dialog box), click the existing tab that the new one should appear after (that is, to the right of).
3. Click New Tab. A new tab called New Tab (Custom) appears on the list. By default, it has one group in it: New Group (Custom) (see Figure 25.6).
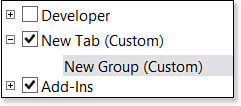
4. Click the new tab, and click the Rename button.
5. In the Rename dialog box, type a new name for the tab and click OK.
6. Click the new group within that new tab, rename it the same way, and click OK.
7. Click OK to close the Word Options dialog box, or leave it open for more editing.
Creating a Custom Group
To create a custom group, follow these steps:
1. If the Word Options dialog box is not already open, right-click any button on the Ribbon and choose Customize the Ribbon.
![]() Note
Note
All custom groups have the same name by default. Word does not number them or give them sequential names.
2. On the Main Tabs list, click the name of the tab on which you want to create the new group.
3. Click New Group. A new group is added to that tab, with the name New Group (Custom).
4. (Optional) Rename the group:
a. Click Rename.
b. Type a new name for the group.
c. Click an icon for the group. (This icon appears if the group is collapsed due to inadequate window width to display it; see Figure 25.7.)

![]() Note
Note
A group does not display on the Ribbon until you add at least one command to it.
d. Click OK.
5. Click OK to close the dialog box, or leave it open for more editing.
Deleting a Custom Tab or Group
To delete a custom tab or a custom group, right-click it on the Customize Ribbon tab of the Word Options dialog box and choose Remove. You can only do this for custom tabs and groups, not the built-in ones.
Adding or Removing Commands
You can’t remove the standard commands on any of the built-in tabs; only the groups and commands you have placed yourself can be modified.
Adding a Command
To add a command to the Ribbon, follow these steps:
1. If the Word Options dialog box is not already open, right-click any button on the Ribbon and choose Customize the Ribbon.
2. From the list at the right, select the custom group to which you want to add the command.
3. From the list at the left, select the command to add.
You might want to narrow down the list of commands by making a selection from the drop-down list first. For example, you could choose Commands Not in the Ribbon to exclude commands that are already on other tabs.
4. Click the Add button. The command appears under the group name on the right side of the window (see Figure 25.8).

5. Click OK to close the dialog box, or leave it open for more editing.
![]() Tip
Tip
Before you add a command to the Ribbon, consider whether it might be better to add it to the Quick Access toolbar instead. The Quick Access toolbar is always available, regardless of which tab is displayed. Placing it here can save you a step in executing the command because you never have to change tabs to get to it.
Removing a Command
To remove a command from the Ribbon, follow these steps:
1. If the Word Options dialog box is not already open, right-click any button on the Ribbon and choose Customize the Ribbon.
2. Click the plus sign next to a group to open it on the right side of the window.
3. Right-click the command you want to remove from the list.
4. Click Remove.
5. Click OK to close the dialog box.
The command is removed from the custom group but is still available on the list on the left, for readding later to some other group or tab.
Renaming or Reordering Tabs
You can change the entire look of the Ribbon by renaming and/or reordering its tabs.
You can rename any tab, even the built-in ones. Just right-click the tab on the Customize Ribbon tab of the Word Options dialog box and choose Rename, and then type the new name. Word does not check whether each name is unique, so you can name them all the same thing if you like. (That wouldn’t be very useful, though.)
To move a tab or group, right-click it and then click Move Up or Move Down.
Resetting Customizations
You can easily get carried away with customizing Word and end up with an interface you barely recognize. If this happens, you might want to reset the Ribbon to its original state and start over.
To reset only one tab, follow these steps:
1. If the Word Options dialog box is not already open, right-click any button on the Ribbon and choose Customize the Ribbon.
2. In the list on the right, click the tab you want to reset.
3. Click the Reset button. A menu opens.
4. Click Reset Only Selected Ribbon Tab.
5. Click OK to close the dialog box, or leave it open for further editing.
To reset all customizations, including any custom shortcut keys, follow these steps:
1. If the Word Options dialog box is not already open, right-click any button on the Ribbon and choose Customize the Ribbon.
2. Click the Reset button. A menu opens.
3. Click Reset All Customizations, and then click Yes to confirm.
4. Click OK to close the dialog box, or leave it open for further editing.
Exporting and Importing Customization Settings
After you get the Ribbon and other customizations just the way you like them, what happens if you need to switch to a different computer? The good news is, you don’t have to recustomize everything; you can export your customization settings to a file. Then you can transfer that file to the other PC and import the customization settings there.
1. If the Word Options dialog box is not already open, right-click any button on the Ribbon and choose Customize the Ribbon.
2. Click the Import/Export button. A menu opens.
3. Click Export All Customizations. The File Save dialog box opens.
4. (Optional) Change the filename and location if desired.
5. Click Save.
6. Click OK to close the Word Options dialog box.
Importing Customizations
User interface configuration files like the one you just saved in the preceding section can be imported into Word 2010 and later on any other PC. Importing wipes out any customization settings on that PC, so make sure there are no customizations that you can’t reproduce that you want to keep before doing this.
Here’s how:
1. If the Word Options dialog box is not already open, right-click any button on the Ribbon and choose Customize the Ribbon.
2. Click the Import/Export button. A menu opens.
3. Click Import Customization File. The File Open dialog box displays.
4. Select the customization file and click Open.
5. A confirmation box appears; click Yes.
6. Click OK to close the Word Options dialog box.
Defining Shortcut Keys
Word has many shortcut keys predefined, such as Ctrl+C for Copy, Ctrl+S for Save, and so on. You can add to these assignments, and even change the assignments for key combinations. That way, if any of the shortcuts are awkward for you to use, you can use keys that feel more natural for your most-used activities.
To define shortcut keys, follow these steps:
1. Right-click any button on the Ribbon and choose Customize the Ribbon.
2. Next to Keyboard Shortcuts, click Customize. The Customize Keyboard dialog box opens.
3. Select the command to which you want to assign the shortcut. Do this by first choosing a category at the left and then a command on the right (see Figure 25.9).
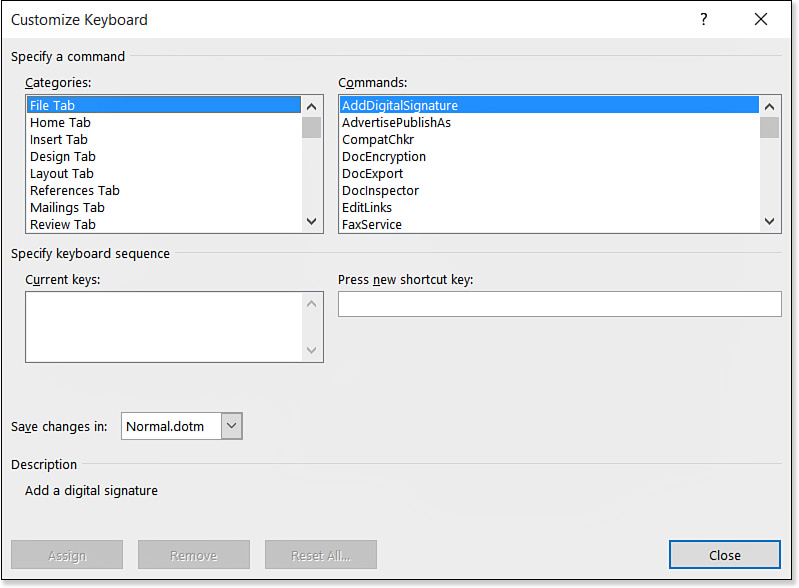
4. Look in the Current Keys box to see if there is a current key assignment for the command. That assignment is removed if you define a new assignment.
5. Click in the Press New Shortcut Key box and then press the key combination to assign.
6. Check to see what command, if any, this key combination was already assigned to.
7. Click Assign.
8. By default, the assignments are stored in Normal.dotm. If you want them assigned somewhere else (such as in the current document only), select that location from the Save Changes In list.
9. Repeat steps 3–5 for other keyboard shortcuts.
10. Click Close.
11. Click OK.
Changing Viewing Options
There are lots of ways you can change how the Word window appears and how documents appear within it. These methods can be broken down into the following broad categories:
![]() View settings—These basic settings can be adjusted from the View tab at any time. They were covered in Chapter 1, “Creating and Saving Documents,” in the section titled “Working with Views.”
View settings—These basic settings can be adjusted from the View tab at any time. They were covered in Chapter 1, “Creating and Saving Documents,” in the section titled “Working with Views.”
![]() Status bar content—You can control what appears in the status bar, such as indicators for word count, page count, and macro controls.
Status bar content—You can control what appears in the status bar, such as indicators for word count, page count, and macro controls.
![]() Word Options settings—You can use the Word Options dialog box to configure various settings unavailable elsewhere.
Word Options settings—You can use the Word Options dialog box to configure various settings unavailable elsewhere.
Changing the Status Bar Content
The status bar is the bar at the bottom of the Word window. The status bar, by default, contains only a few pieces of information, such as the page count and word count, some view buttons, a Record Macro button, and a zoom slider. You can customize it by following these steps:
1. Right-click the status bar. A menu opens with check marks next to the displayed items.
2. Click an item to toggle it on or off (see Figure 25.10).
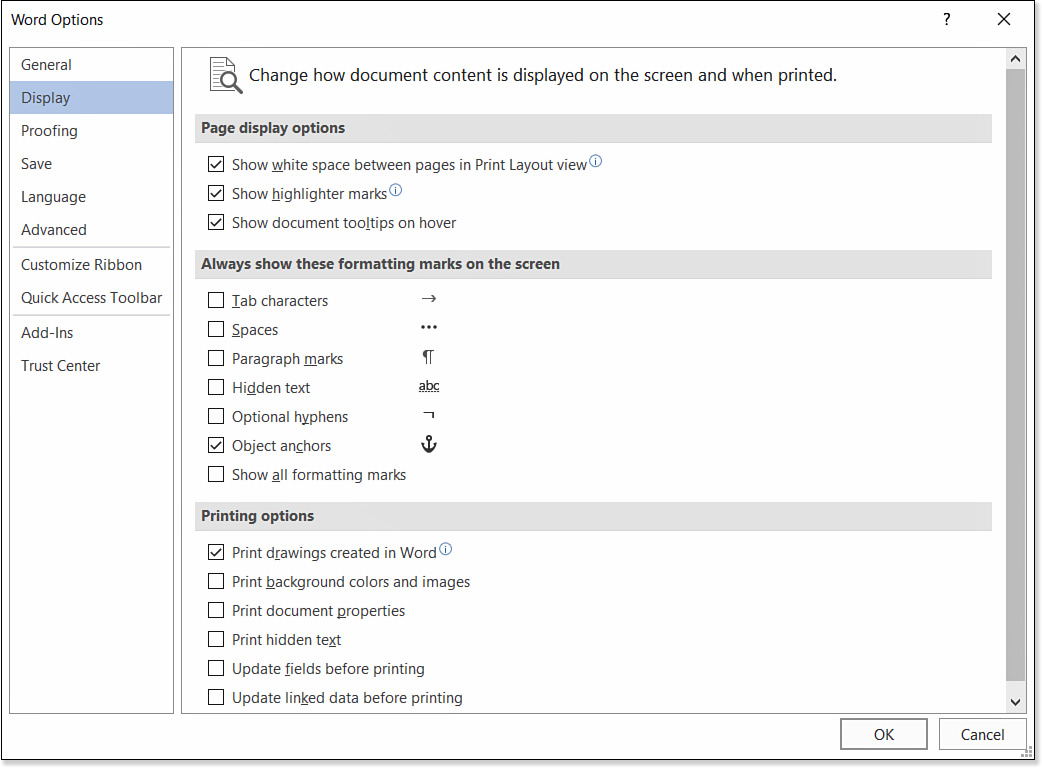
Changing Page Display and Formatting Marks
You can change page display and formatting marks settings from the Display options of the Word Options dialog box. Follow these steps:
1. Choose File, Options. The Word Options dialog box opens.
2. Click Display.
3. In the Page Display Options section, mark or clear these check boxes (see Figure 25.11):
![]() Show White Space Between Pages in Print Layout View—If this is enabled, the pages appear to be separated vertically; if disabled, they run together like continuous-feed paper.
Show White Space Between Pages in Print Layout View—If this is enabled, the pages appear to be separated vertically; if disabled, they run together like continuous-feed paper.
![]() Show Highlighter Marks—When this is enabled, highlighting appears both onscreen and when printed. You can disable it to hide highlighting temporarily without having to remove the highlighting.
Show Highlighter Marks—When this is enabled, highlighting appears both onscreen and when printed. You can disable it to hide highlighting temporarily without having to remove the highlighting.
![]() Show Document ToolTips on Hover—When this is enabled, ToolTips (pop-up messages) appear whenever you point the mouse at something that has a tip associated with it, such as a button on the Ribbon.
Show Document ToolTips on Hover—When this is enabled, ToolTips (pop-up messages) appear whenever you point the mouse at something that has a tip associated with it, such as a button on the Ribbon.

4. In the Always Show These Formatting Marks on the Screen section, mark or clear the check boxes for the various types of formatting marks.
Note that these settings do not depend on the Show/Hide (¶) button’s state (on the Home tab). For example, if you mark the check box here for Tab Characters, tab characters are always displayed, regardless of the Show/Hide (¶) button. However, if you clear that check box, tab characters are shown or hidden according to the button’s status.
5. Click OK.
You can find additional display options under Advanced. Click Advanced and then scroll down to the Display section.
Setting General Options
In the General section of the Word Options dialog box are four sections: User Interface Options, Personalize Your Copy of Microsoft Office, Start Up Options, and Real-time Collaboration Options (see Figure 25.12).
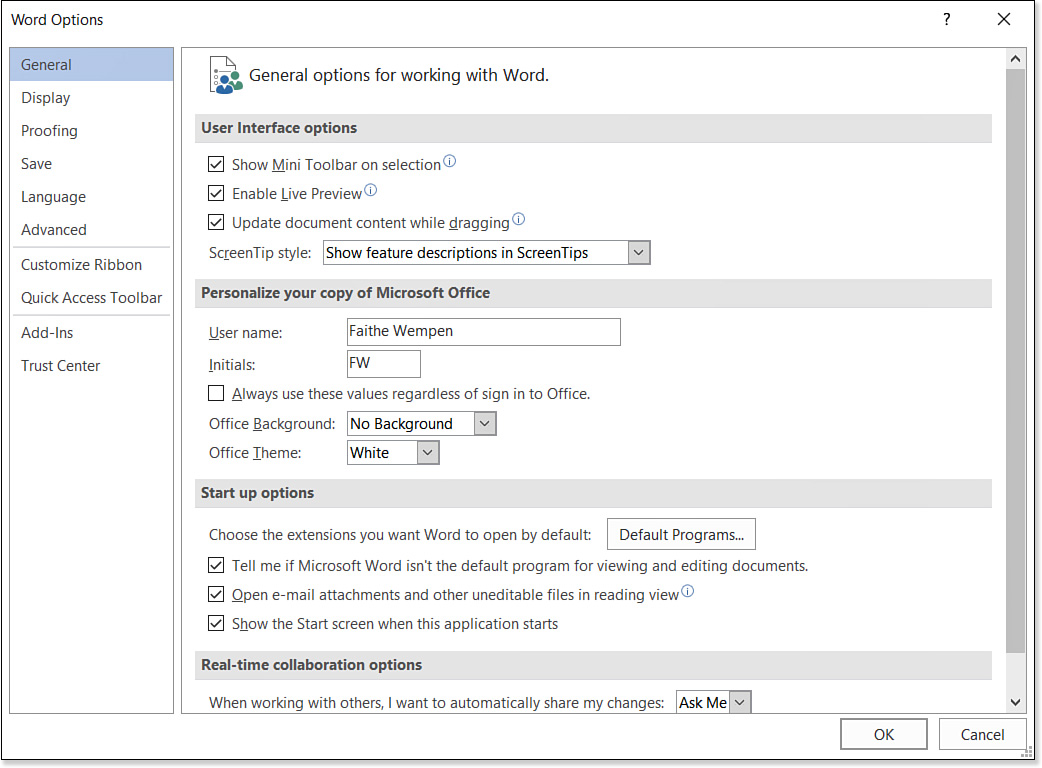
The User Interface Options section includes a compilation of miscellaneous popular settings with no special theme to them:
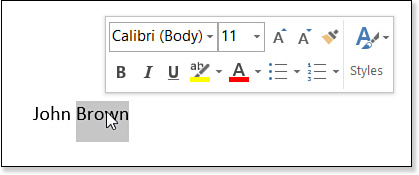
![]() Show Mini Toolbar on Selection—When this is enabled and you point at some selected text, the Mini Toolbar pops up for quick access to formatting buttons (see Figure 25.13).
Show Mini Toolbar on Selection—When this is enabled and you point at some selected text, the Mini Toolbar pops up for quick access to formatting buttons (see Figure 25.13).
![]() Enable Live Preview—When this option is enabled and you point to a setting on a gallery or menu from the Ribbon, a preview of that effect shows on the selected text.
Enable Live Preview—When this option is enabled and you point to a setting on a gallery or menu from the Ribbon, a preview of that effect shows on the selected text.
![]() Update Document Content While Dragging—When this is enabled, you can see how the document content will look as objects are moved, resized, or rotated.
Update Document Content While Dragging—When this is enabled, you can see how the document content will look as objects are moved, resized, or rotated.
![]() ScreenTip Style—From this drop-down list, you can choose Don’t Show ScreenTips, Show Feature Descriptions in ScreenTips, or Don’t Show Feature Descriptions in ScreenTips. If you choose to show feature descriptions, the ScreenTip boxes are larger and contain more information; if you choose not to, the ScreenTip boxes show only the name of the object.
ScreenTip Style—From this drop-down list, you can choose Don’t Show ScreenTips, Show Feature Descriptions in ScreenTips, or Don’t Show Feature Descriptions in ScreenTips. If you choose to show feature descriptions, the ScreenTip boxes are larger and contain more information; if you choose not to, the ScreenTip boxes show only the name of the object.
The Personalize Your Copy of Microsoft Office section provides settings for changing Word’s look and for specifying who is using the program:
![]() User Name and Initials—Customize your copy of Word by entering this information. Your name and initials appear in various places throughout Word, including when you do mail merge and when you make comments and revisions. They also identify you as the author of the document in the document’s properties. The Always Use These Values Regardless of Sign In to Office check box keeps the same username and initials in Word no matter which user account is signed in to Windows itself.
User Name and Initials—Customize your copy of Word by entering this information. Your name and initials appear in various places throughout Word, including when you do mail merge and when you make comments and revisions. They also identify you as the author of the document in the document’s properties. The Always Use These Values Regardless of Sign In to Office check box keeps the same username and initials in Word no matter which user account is signed in to Windows itself.
![]() Office Background—You can optionally choose a pattern that will appear on the title bar in Office applications.
Office Background—You can optionally choose a pattern that will appear on the title bar in Office applications.
![]() Office Theme—You can choose for the Ribbon and title bar to be Colorful, Dark Gray, or White. Colorful is the default. It makes the application title bar and dialog box title bars a default color based on which application you are working with. For Word, it is blue; for Excel, it is green; and for PowerPoint, it is orange.
Office Theme—You can choose for the Ribbon and title bar to be Colorful, Dark Gray, or White. Colorful is the default. It makes the application title bar and dialog box title bars a default color based on which application you are working with. For Word, it is blue; for Excel, it is green; and for PowerPoint, it is orange.
The Start Up Options section enables you to customize what happens when Word opens:
![]() Choose the Extensions You Want Word to Open by Default—The Default Programs button is a shortcut to the Set Program Associations section of the Control Panel in Windows.
Choose the Extensions You Want Word to Open by Default—The Default Programs button is a shortcut to the Set Program Associations section of the Control Panel in Windows.
![]() Tell Me if Microsoft Word Isn’t the Default Program for Viewing and Editing Documents—A message will appear offering to reset the program associations for Word document file extensions if they are not set to Word already.
Tell Me if Microsoft Word Isn’t the Default Program for Viewing and Editing Documents—A message will appear offering to reset the program associations for Word document file extensions if they are not set to Word already.
![]() Open E-Mail Attachments and Other Uneditable Files in Reading View—You can choose to open documents that you can’t edit in Read Mode.
Open E-Mail Attachments and Other Uneditable Files in Reading View—You can choose to open documents that you can’t edit in Read Mode.
![]() Show the Start Screen When This Application Starts—You can turn off the Start screen if desired, so that Word simply starts a new blank document when it opens (as it did in earlier versions of Word).
Show the Start Screen When This Application Starts—You can turn off the Start screen if desired, so that Word simply starts a new blank document when it opens (as it did in earlier versions of Word).
Under Real-Time Collaboration Options, you can set preferences for when multiple people are editing the document at the same time. (If you store a document on OneDrive or some other common accessible location, this could happen.)
![]() When Working with Others, I Want to Automatically Share My Changes—This setting determines whether changes you make are immediately uploaded to the shared copy or stored until you save your work.
When Working with Others, I Want to Automatically Share My Changes—This setting determines whether changes you make are immediately uploaded to the shared copy or stored until you save your work.
![]() Show Names on Presence Flags—When others are editing the same document, a flag appears representing their editing. You can choose whether to show user names on these flags or not.
Show Names on Presence Flags—When others are editing the same document, a flag appears representing their editing. You can choose whether to show user names on these flags or not.
Other Customization Options
Throughout this book, I’ve introduced you to bits and pieces of customization as applicable to various features in Word. Here’s a list of where these topics are covered:
![]() “Setting the Default Save Location and File Type,” p. 44
“Setting the Default Save Location and File Type,” p. 44
![]() “Customizing Spelling and Grammar Options,” p. 97
“Customizing Spelling and Grammar Options,” p. 97
![]() “Customizing and Extending the Research Tools,” p. 122
“Customizing and Extending the Research Tools,” p. 122
![]() “Setting Print Options for Word Documents,” p. 130
“Setting Print Options for Word Documents,” p. 130
![]() “Setting Options for a Certain Printer,” p. 132
“Setting Options for a Certain Printer,” p. 132
![]() “Storing Different Properties for a Single Printer,” p. 133
“Storing Different Properties for a Single Printer,” p. 133
![]() “Customizing the Styles Pane,” p. 223
“Customizing the Styles Pane,” p. 223
![]() “Configuring Revision Tracking Options,” p. 768
“Configuring Revision Tracking Options,” p. 768
![]() “Adjusting Macro Settings,” p. 809
“Adjusting Macro Settings,” p. 809
![]() “Setting Privacy Options,” p. 813
“Setting Privacy Options,” p. 813
![]() “Specifying Trusted Locations,” p. 806
“Specifying Trusted Locations,” p. 806
![]() “Working with Trusted Publishers,” p. 808
“Working with Trusted Publishers,” p. 808