
17. Outlining and Combining Documents
Almost everyone has, at one time or another, stared at a blank page trying to get started on a long or complex writing project. Where to begin? What to include? It can be hard to wrap your thoughts around the project without a grasp of the big picture.
That’s where outlining comes in. By starting with an outline, you create a structure or map that guides your writing each step of the journey and forces you to think through the entire writing process. After the document’s headings are in place, you can start filling in the body text beneath them. Suddenly, the project doesn’t seem so overwhelming when you’re tackling it one section at a time with a clear vision of what you want to accomplish.
Even with a good outline, though, a very large document can become unwieldy. Somewhere around 100 pages or so, Word’s performance might start to suffer. To combat this problem, Word offers a feature called master documents that enables you to work on sections of a document separately, in separate files, and then combine them for indexing and printing.
In this chapter, you find out how to use Word’s Outlining feature, as well as the master document feature, to create long, complex documents with ease.
Outline Basics
Word’s Outline view makes it easy to create complex, multilevel outlines. (Word was the tool used to outline and write this book, in fact!) Word enables you to view the outline at various levels of detail and to easily move topics around. It even can automatically number your headings and update the numbering when you move topics.
Outlines are based on heading styles. The default heading styles are automatically applied as you promote and demote items in an outline. For example, Figure 17.1 shows part of an outline from an early draft of this book’s Chapter 2, “Typing and Editing Text.” The top-level heading (Heading 1) is the chapter title; the second-level headings (Heading 2) are the major sections, and so on.

In addition to the default heading styles, you can set up outlining to work with any custom styles you might have created. In “Setting a Style’s Outline Level,” later in this chapter, you learn how to define which outline level is associated with which styles.
![]() Tip
Tip
If you want to view the document’s outline while you are editing it in another view (such as Print Layout), mark the Navigation Pane check box on the View tab. The Navigation pane appears in a separate pane to the left of the main document window. It has three tabs; the leftmost tab (Headings) displays an outline of the document based on its headings. You can jump to a heading in the document by clicking it there.
Typing an Outline in Outline View
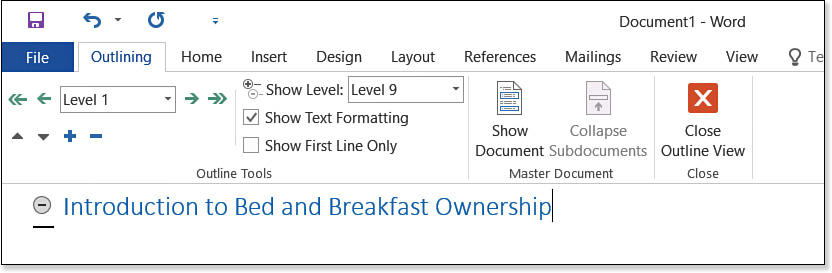
To type or edit an outline, switch to Outline view. To do this, on the View tab, click Outline. Then type the first item for the outline (see Figure 17.2).
Press Enter after each entry. Another line of the same outline level appears. At this point, you can type more lines at the same level, or you can demote the new line so that it is subordinate to the one above it. See the following section for information about promoting and demoting.
![]() Tip
Tip
It seems only natural to make a document’s title the highest level item in the outline (Heading 1). But do you really want to waste the Heading 1 style on an item that appears only once in the document? It might be better to make all the major content headings in the document Heading 1 style, and either style the document title also as Heading 1 or create a special style just for the title (and set its outline level to 1).
When you’re satisfied with the outline, you can start using it as a starting point for writing the rest of the document. You will probably want to switch to Print Layout or Draft view before adding body text. (Use the View tab to switch views, or click the Close Outline View button on the Outlining tab.) Each outline item appears as a heading in the document, with Word’s default heading styles applied. Under each heading, type the appropriate body text, using Normal style or whatever style you have designated for body text in the document.
Demoting and Promoting Outline Items
To demote a line in Outline view, press Tab or press Alt+Shift+Right arrow. It appears indented, and the line above it acquires a plus sign, indicating that it now has subordinate content.
To promote a line so that it moves up a level in importance, click it and press Shift+Tab or Alt+Shift+Left arrow.
![]() Note
Note
In Outline view, the insertion point does not have to be at the beginning of the line to use Tab or Shift+Tab to demote or promote. The reason is that the Tab key does not move the insertion point to tab stops in Outline view. Switch back to Draft or Print Layout view if you want to work with tab stops.
If you prefer to use a mouse to promote and demote, click an item’s plus sign (or minus sign) and then drag it to the left or right. As you drag, the item is promoted or demoted.
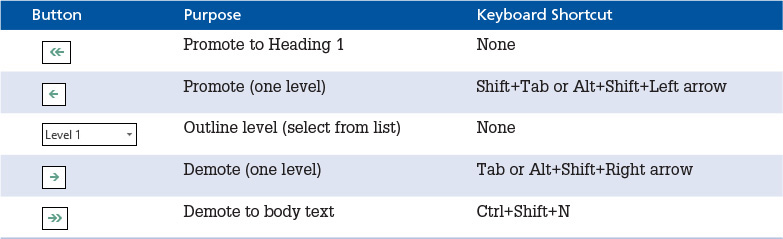
You can also click the buttons on the Outlining tab or use keyboard shortcuts, as in Table 17.1.
If you demote an item as completely as possible, it becomes body text. In this context, body text refers to an outline level, not to a particular style. You can have many different styles that all have body text set as their outline level.
![]() Tip
Tip
If you would rather use other styles than the default Heading 1s in your outline, see “Setting a Style’s Outline Level,” later in this chapter. Keep in mind, however, that you can redefine the formatting for all the default Heading styles, and you can apply different style sets from the Style Sets gallery on the Design tab. You don’t have to apply different styles to achieve a different look.
![]() To change a style’s outline level, see “Setting a Style’s Outline Level,” p. 675.
To change a style’s outline level, see “Setting a Style’s Outline Level,” p. 675.
Creating an Outline from an Existing Document
Outlines aren’t just for prewriting planning; you might also want to see an outline of a document you have already written.
To make sure that the outline is accurate, first check that you have applied the appropriate heading styles to the headings. The first-level headings should be styled as Heading 1, the second-level as Heading 2, and so on. You can have up to nine levels of headings.
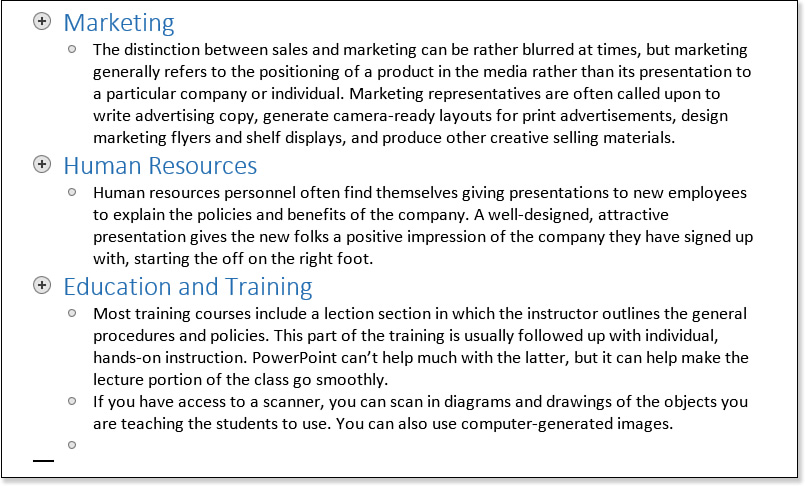
After confirming the styles on the headings, switch to Outline view (from the View tab). By default, the Outline view shows not only the headings, but the body text. Body text paragraphs appear with gray circles beside them. These are not bullets; they are there to help you remember you are in Outline view and to serve as selectors for the paragraphs. You can select a paragraph by clicking its gray circle, or you can move it by dragging its circle (see Figure 17.3).
![]() Tip
Tip
As you are working in Outline view, you might find it helpful to see the style of each paragraph in the Style area. When visible, the Style area reports the style used by each paragraph. By default in Word 2016, the Style area’s pane width is set to 0″ so it is not visible. (It did appear by default in Word 2013.) To display it, choose File, Options, click the Advanced tab, scroll down to the Display section, and enter a value larger than 0 (such as 1 or 1.5) in the Style Area Pane Width in Draft and Outline Views box. Click OK to apply the setting. Once the pane is visible, you can adjust its width by dragging its right border to the left or right.
Outline view makes it easy to catch style errors you might have made, such as applying the wrong style to a particular heading or accidentally styling one of the body paragraphs as a heading. If you find any style application errors, correct them by clicking in that line or paragraph and then applying the desired style. You can apply styles from the Styles group on the Home tab or from the Styles pane, but the easiest and quickest method of applying a style may be to use the Apply Styles pane. (Press Ctrl+Shift+S to display this pane if needed.) Alternatively, you can promote or demote the items with Shift+Tab or Tab, respectively, or you can apply the built-in heading styles with shortcut keys: Ctrl+Alt plus the number of the heading level desired (Ctrl+Alt+1 for Heading 1, and so on). To demote to body text, press Ctrl+Shift+N.
If you don’t want to see the body text in the outline, or if you want to see only certain heading levels, collapse the Outline view, as explained in the following section.
Viewing and Organizing the Outline
When the outline is fully expanded, as it is in Figure 17.3, even body text appears in it. That’s useful for checking the content of a section, but it takes away the main benefit of the outline, which is to provide a high-level summary. Therefore, most of the time, you will probably want to view the outline at some level of compression.
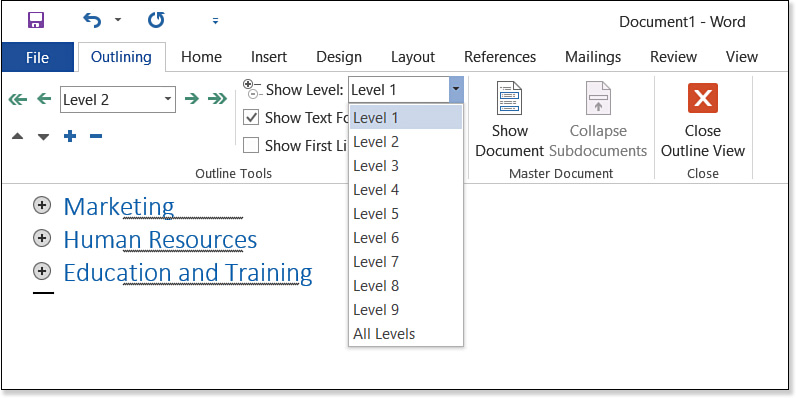
You can collapse or expand the entire outline so that it shows only headings of a certain level and higher. For example, if you set the outline to show Level 3, anything that is not styled with a Level 3 heading or higher is hidden. To collapse the outline to a specific level, choose a level from the Show Level list on the Outlining tab (see Figure 17.4).
You can also collapse or expand individual branches of the outline.
To toggle a branch between being expanded or collapsed, double-click the plus sign to its left. Other expansion and collapse methods operate on individual branches:
![]() Click the Expand button (plus sign button) on the Outlining tab or press Alt+Shift++ (plus sign) to expand everything subordinate to the item where the insertion point lies.
Click the Expand button (plus sign button) on the Outlining tab or press Alt+Shift++ (plus sign) to expand everything subordinate to the item where the insertion point lies.
![]() Click the Collapse button (minus sign button) on the Outlining tab or press Alt+Shift+_ (underscore) to collapse everything subordinate to the item where the insertion point lies.
Click the Collapse button (minus sign button) on the Outlining tab or press Alt+Shift+_ (underscore) to collapse everything subordinate to the item where the insertion point lies.
Expanding and collapsing is not the only way of changing the view of the outline, although it’s the most dramatic way. Here are a couple additional settings on the Outlining tab that control outline appearance:
![]() Show Text Formatting—This on/off toggle shows or hides the different fonts and sizes used for the various heading levels.
Show Text Formatting—This on/off toggle shows or hides the different fonts and sizes used for the various heading levels.
![]() Show First Line Only—This on/off toggle makes multiple-line items (such as body paragraphs and long headings) show up as single-line items on the outline.
Show First Line Only—This on/off toggle makes multiple-line items (such as body paragraphs and long headings) show up as single-line items on the outline.
Rearranging Outline Topics
If you have ever tried to rearrange sections of a large document, you know how cumbersome cut-and-paste operations can be in that situation. You have to cut some text and then scroll to the section where you want to paste it, perhaps many pages away.
It is much easier to rearrange a document in Outline view because you can collapse all the body text beneath the headings and work with the document in a bird’s-eye view. When you move a heading in Outline view, all the collapsed content beneath it moves automatically with it, so you don’t need to scroll through pages and pages of body text to find the spot in which you want to paste.
One way to move a heading in the outline is to drag and drop it. This method works well when you need to move a heading and all its subordinate headings:
1. Click the plus sign (or minus sign) next to a heading to select it and all its subordinates. The mouse pointer becomes a four-headed arrow.
2. Drag up or down to move the heading and its subordinates to a new location.
Another way is to use the buttons on the Outlining tab. This method works well when you need to move one heading but not its subordinates, or when you need to move a block of headings (not necessarily in a neat subordinate structure):
1. Select the content to be moved up or down. You can select any number of headings or body text at any level.
2. Click the Move Up (up arrow) or Move Down (down arrow) button to move the selection up or down one position in the outline.
3. Repeat step 2 as needed until the content is at the desired position.
Setting a Style’s Outline Level
As mentioned earlier, Word uses its built-in heading styles for outlines (Heading 1, Heading 2, and so on) by default. When you create an outline by typing directly into Outline view and pressing Tab and Shift+Tab to demote and promote, those heading styles are automatically applied to the outline levels. There are 10 outline levels: Level 1 through Level 9 headings, plus body text.
![]() To review modifying a style, see “Modifying Styles,” p. 237.
To review modifying a style, see “Modifying Styles,” p. 237.
If you would rather use your own custom styles than the built-in ones for headings, you must set the custom styles’ outline levels so Word knows how to treat them.
To specify the outline level for a style, follow these steps:
1. Display the Styles pane. To do so, on the Home tab, click the dialog box launcher in the Styles group. The Styles pane opens.
2. In the Styles pane, right-click the style and choose Modify (see Figure 17.5).

Make sure that it’s a user-created style you’re modifying; you can’t change the outline level for one of the built-in heading styles.
3. In the Modify Style dialog box, click the Format button and then choose Paragraph from its menu. The Paragraph dialog box opens.
4. Open the Outline Level drop-down list and choose the desired outline level for this style (see Figure 17.6).
5. Click OK to accept the new outline level.
6. Click OK to close the Modify Style dialog box.
![]() Tip
Tip
Here’s another way of changing a custom style’s outline level: In the Modify Style dialog box, choose a different style from the Style Based On list. The custom style takes on whatever outline level is assigned to the style on which it is based unless you set a specific outline level for it. However, with that method, all the unspecified attributes of the custom style change to match the new basis, so additional unwanted formatting changes might occur to the style’s formatting.
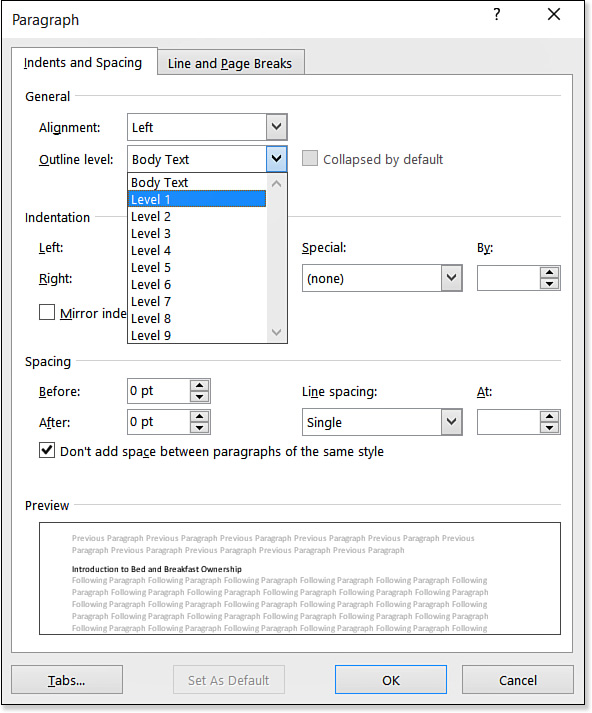
Setting an Individual Paragraph’s Outline Level
You can also change the outline level on an individual paragraph-by-paragraph basis, without affecting the style. For example, you could force a certain body paragraph to appear in the outline by setting its outline level to one of the levels currently being shown in the outline. Here’s how to set the outline level for a paragraph without changing its style:
1. In Print Layout or Draft view, right-click the paragraph and choose Paragraph. Alternatively, you can click anywhere in the paragraph and then click the dialog box launcher in the Paragraph group on the Home tab.
2. In the Paragraph dialog box, open the Outline Level list and select an outline level.
![]() Note
Note
If the Outline Level drop-down list is not available, the style applied to the paragraph is a built-in heading style and its outline level cannot be changed; try switching to a different style for the paragraph, such as Normal, or one of your own custom-created styles.
3. Click OK.
This method works on paragraphs formatted with all styles except the built-in heading styles (Heading 1 through Heading 9).
Numbering Outline Items
When creating an outline that includes consecutively numbered items, you can save yourself some time by allowing Word to manage the numbering for you.
The time savings is not so much in the initial creation of the outline, but in its later editing. For example, when you’re writing a book, the first task is to create an outline of the chapters to include: Chapter 1, Chapter 2, Chapter 3, and so on. If you manually type that text as part of each chapter title, and you rearrange the chapters, you’re in for a tedious job of manually editing each title. However, if you allow Word to handle the numbering for you, you never have to deal with the numbering again; Word renumbers items automatically as you rearrange them.
To number an outline, you apply list formatting to it. You can set up list formatting in either of two ways:
![]() You can apply multilevel lists and create your own list definitions via the Multilevel List button on the Home tab.
You can apply multilevel lists and create your own list definitions via the Multilevel List button on the Home tab.
![]() You can create and apply a list style in which to store the outline numbering format. A list style can do everything a multilevel list can do; plus it can have a name and can have a shortcut key combination assigned to it. You can also save it with a particular template.
You can create and apply a list style in which to store the outline numbering format. A list style can do everything a multilevel list can do; plus it can have a name and can have a shortcut key combination assigned to it. You can also save it with a particular template.
 All Levels Continue the Same Numbers on My Outline
1. Major Heading
2. Minor Heading
3. Minor Heading
4. Major Heading
Subordinate Items Don’t Restart Numbering Under a New Major Heading
1. Major Heading
A. Minor Heading
B. Minor Heading
2. Major Heading
C. Minor Heading
D. Minor Heading
Applying a Multilevel List
You can apply a multilevel list or list style to individual portions of an outline, but usually it’s best for the entire outline to be formatted the same way for consistency.
Select the entire outline (Ctrl+A) or the portion you want to format, and then on the Home tab, open the Multilevel List button’s drop-down list and click a list or list style. Each item receives the numbering format specified for its outline level.
The Multilevel List button’s menu presents a gallery of list-formatting choices, including both lists and list styles (if any have been created in the current document or template). The gallery has several sections:
![]() Current List—This choice appears at the top of the list and shows the currently applied list type, or the default list type if none is currently applied.
Current List—This choice appears at the top of the list and shows the currently applied list type, or the default list type if none is currently applied.
![]() List Library—This collection of list presets always appears. Word provides several, and you can add your own lists.
List Library—This collection of list presets always appears. Word provides several, and you can add your own lists.
![]() List Styles—If you have defined any list styles (using the Styles feature, covered later in this chapter), they appear here; otherwise, this section does not appear.
List Styles—If you have defined any list styles (using the Styles feature, covered later in this chapter), they appear here; otherwise, this section does not appear.
![]() Lists in Current Documents—If you have applied multilevel numbering already, the types you have applied appear here for easy reapplication. Otherwise, this section does not appear.
Lists in Current Documents—If you have applied multilevel numbering already, the types you have applied appear here for easy reapplication. Otherwise, this section does not appear.
As shown in Figure 17.7, you can filter the Multilevel List button’s menu to show only one of these four categories. Click All to open a menu and then click the category you want to show. To return to showing all the categories, reopen that menu and click All.

Creating Your Own Multilevel Lists and List Styles
You can create a multilevel list definition as either an ordinary multilevel list or a list style. The main difference between them is where they are stored:
![]() A multilevel list exists only in the current document. However, if desired, you can easily add it to the List Library gallery. After you do that, it is available globally, no matter what template you are using. You can’t modify it, but you can delete and re-create it.
A multilevel list exists only in the current document. However, if desired, you can easily add it to the List Library gallery. After you do that, it is available globally, no matter what template you are using. You can’t modify it, but you can delete and re-create it.
![]() You can set up a list style to exist either in the current document only or in the currently applied template. If you save it in the template, it is available whenever you are working with a document based on that template. You can modify a list style.
You can set up a list style to exist either in the current document only or in the currently applied template. If you save it in the template, it is available whenever you are working with a document based on that template. You can modify a list style.
The dialog boxes for creating a new multilevel list versus a list style appear to be quite different, but if you compare them feature by feature, they come out almost identical. And in fact, when you are defining a list style, you can access a duplicate of the Define New Multilevel List dialog box, so anything you can do with a multilevel list can be saved as a list style.
Creating a Multilevel List
To create your own multilevel list, follow these steps:
1. (Optional) To apply the new list to an outline or list or a portion thereof, select the text to which to apply it. (You can apply it later if you prefer.)
2. (Optional) If you want to base the new multilevel list on an existing one, open the Multilevel List button’s menu (on the Home tab) and click the desired list to apply it to the selected text.
3. Open the Multilevel List button’s menu and choose Define New Multilevel List. The Define New Multilevel List dialog box opens (see Figure 17.8).
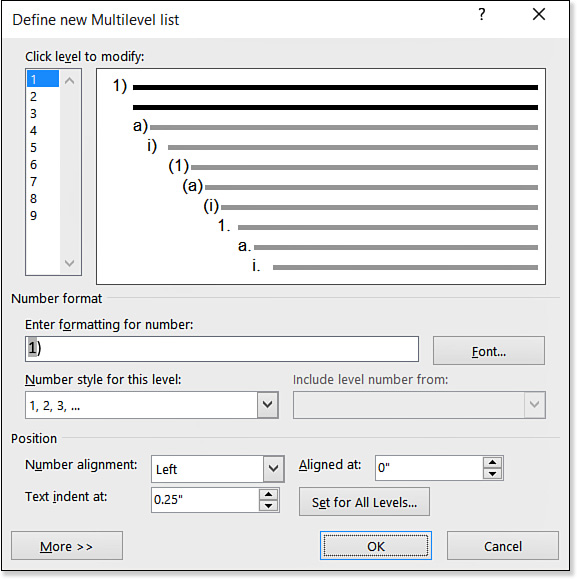
4. Click the number representing the level you want to modify.
5. In the Number Style for This Level list, select the numbering style desired. The placeholder (shaded gray) in the Enter Formatting for Number box changes to represent the new style.
6. In the Enter Formatting for Number box, type any additional text that should surround the number placeholder.
For example, you could type Chapter in front of the placeholder, or add punctuation after it, such as a period, colon, or parenthesis.
7. (Optional) To change the font formatting, click the Font button, make any changes desired, and click OK.
All font attributes are available to apply to outline numbering except Outline and Small Caps.
8. (Optional) To change the position (alignment, indentation, and so on), make changes to the values in the Position section of the dialog box.
You can control every aspect of the positioning here, including the amount of indentation before and after the numbering or bullet, whether a tab character appears after the number, and whether there should be a tab stop to go with that tab character.
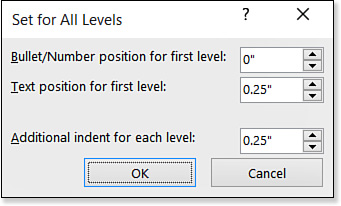
9. (Optional) To change the position settings for all levels at once, click the Set for All Levels button. In the Set for All Levels dialog box shown in Figure 17.9, choose an indentation and text position for the first level and then specify the amount of additional indent for each level beneath it. This creates an orderly cascade effect between levels. Click OK to return to the Define New Multilevel List dialog box when finished.
10. (Optional) For more options, click the More button in the bottom-left corner of the dialog box. This displays the additional options, as in Figure 17.10.
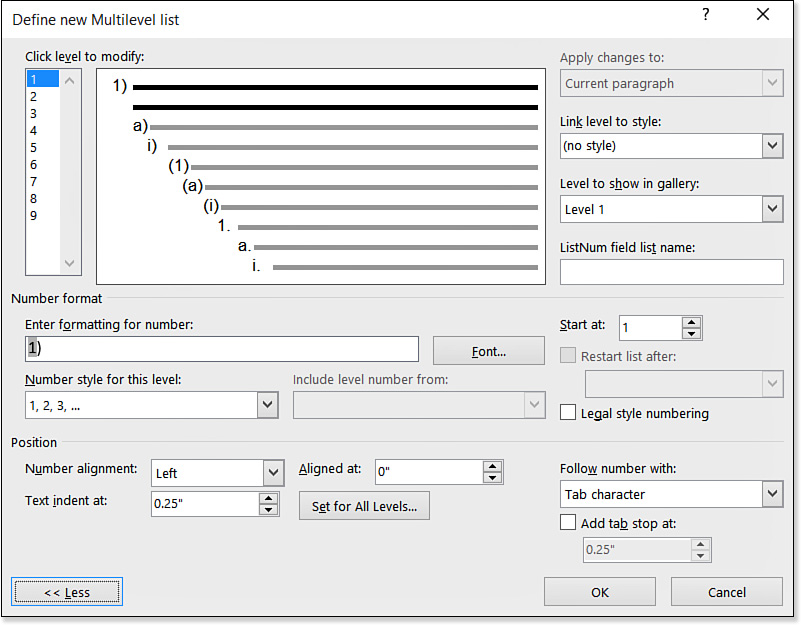
11. Set any of the additional options as needed:
![]() To link a particular level to a certain style, select a style from the Link Level to Style list. This enables you to create a special outline level that pertains only to a certain style, and anytime you apply that style in the document, the numbering appears with it.
To link a particular level to a certain style, select a style from the Link Level to Style list. This enables you to create a special outline level that pertains only to a certain style, and anytime you apply that style in the document, the numbering appears with it.
![]() To define which levels appear when this list appears in the Gallery, choose a level from the Level to Show in Gallery list.
To define which levels appear when this list appears in the Gallery, choose a level from the Level to Show in Gallery list.
![]() To use the specified list formatting with a ListNum field list, specify a name in the ListNum Field List Name box. (Make up a unique name.) Then when you create a numbered list with the
To use the specified list formatting with a ListNum field list, specify a name in the ListNum Field List Name box. (Make up a unique name.) Then when you create a numbered list with the {ListNum} field, you can use the name as a parameter to specify the list’s formatting.
![]() To learn more about the {ListNum} field, see “Numbering Fields,” p. 632.
To learn more about the {ListNum} field, see “Numbering Fields,” p. 632.
![]() To start the numbering for a level at a number other than 1, specify a number in the Start At box.
To start the numbering for a level at a number other than 1, specify a number in the Start At box.
![]() To use legal-style numbering, mark the Legal Style Numbering check box. This forces all the numbering to Arabic (1, 2, 3), regardless of its setting otherwise in the style or list definition.
To use legal-style numbering, mark the Legal Style Numbering check box. This forces all the numbering to Arabic (1, 2, 3), regardless of its setting otherwise in the style or list definition.
![]() To specify a character to appear after the number, set the Follow Number With setting. You can use a tab, a space, or nothing.
To specify a character to appear after the number, set the Follow Number With setting. You can use a tab, a space, or nothing.
![]() If you want some other character to follow the number, type that character following the number code in the Enter Formatting for Number box.
If you want some other character to follow the number, type that character following the number code in the Enter Formatting for Number box.
![]() If you include a tab character after the number, you might want to set a tab stop for it. To include a tab stop in the formatting, mark the Add Tab Stop At check box and then enter a position in inches.
If you include a tab character after the number, you might want to set a tab stop for it. To include a tab stop in the formatting, mark the Add Tab Stop At check box and then enter a position in inches.
12. When you are finished with the specification for the selected level, select another level from the Click Level to Modify list and then repeat steps 5–11. Repeat for each level.
13. Click OK to create the new list format.
The new list format is applied to the portion of the list that was selected when you began the creation process. You can also apply it from the Multilevel List button’s menu, from the Lists in Current Documents section of the menu.
I Can’t Edit a Multilevel List Definition
Including Numbers from Higher Outline Levels
Suppose you want each outline item to be double-numbered, including both the higher level item’s number and its own, like this:
Chapter 1, Section A
Chapter 1, Section B
Chapter 1, Section C
To set this up, use the Include Level Number From drop-down list in the Define New Multilevel List dialog box. For example, here’s how to set up the preceding example for Level 2:
1. In the Define New Multilevel List dialog box (refer to Figure 17.10), click 2 on the Click Level to Modify list.
2. Open the Number Style for This Level list and choose A, B, C. An A appears (shaded) in the Enter Formatting for Number box.
3. Click to move the insertion point to the left of the shaded A code, type Chapter, and press the spacebar once.
4. Open the Include Level Number From drop-down list and choose Level 1. The 1 code appears in the Enter Formatting for Number box, after the word Chapter.
5. Press the spacebar twice after the 1 code; then type Section and press the spacebar once. Now the entry in the Enter Formatting for Number box looks like this: Chapter 1 Section A.
6. Open the Follow Number With list and choose Space.
7. Continue creating the list definition as usual.
Adding a Custom Multilevel List to the Gallery
A custom multilevel list, like the one you created in the preceding section, is saved with the current document only. It does not have a name (like a style would have), and you cannot transfer it between documents.
To add the list formatting specification to the Gallery (that is, the List Library area of the Multilevel List button’s menu) so that it is available in all documents, follow these steps:
1. Open the Multilevel List button’s menu.
2. In the Lists in Current Documents section, locate and right-click the list to be added.
3. Choose Save in List Library. The list formatting now appears in the List Library portion of the menu. It is also saved to the Normal.dotm template, so it will be available in future documents you create.
![]() Note
Note
If you don’t have a Lists in Current Documents section on the menu, you have not created any custom multilevel lists yet. Go back to the previous section to learn how to do so.
Creating a List Style
A list style defines a multilevel list in a slightly different way: It contains all the specifications for a regular multilevel list, but it saves them in a named style that you can then apply as you would any other style. You can also store it with a specific template.
To create your own list style, follow these steps:
1. (Optional) To apply the new list to an outline or list, or a portion thereof, select the text to which to apply it. (You can apply it later if you prefer.)
2. (Optional) If you want to save the style to a particular template, apply that template to the current document.
![]() To apply a different template to a document, see “Changing a Document’s Template,” p. 302.
To apply a different template to a document, see “Changing a Document’s Template,” p. 302.
3. (Optional) If you want to base the new style on an existing multilevel list, open the Multilevel List button’s menu (on the Home tab) and click the desired list to apply it to the selected text.
4. On the Home tab, open the Multilevel List button’s menu and choose Define New List Style. The Define New List Style dialog box opens (see Figure 17.11).
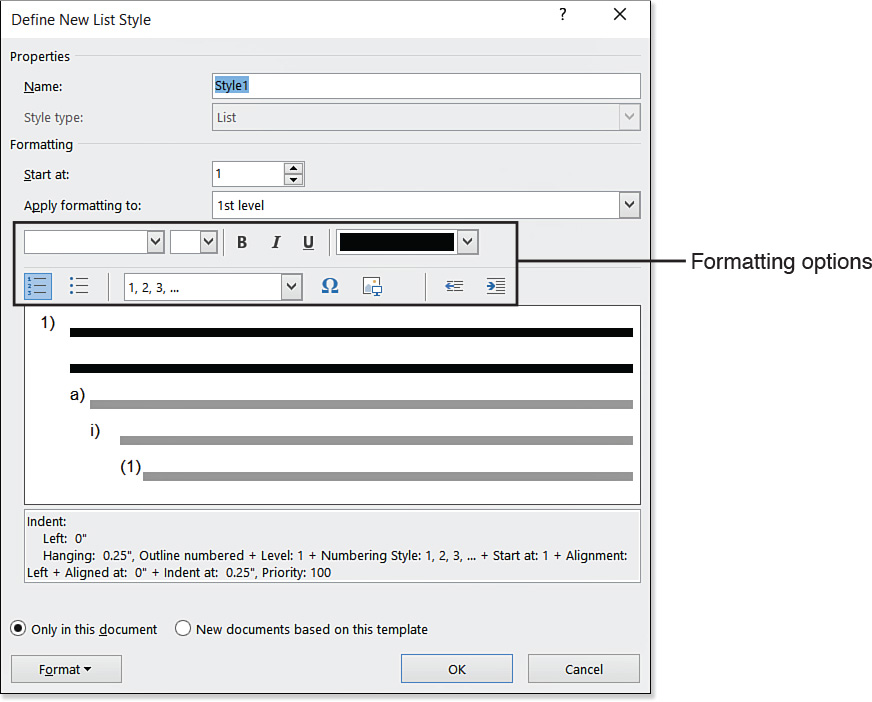
5. Type a name for the style in the Name box.
6. (Optional) To start the numbering at a number other than 1, change the value in the Start At box.
7. Select an outline level from the Apply Formatting To list.
8. Choose text formatting for that list level: Font, Size, Bold, Italic, Underline, and Color.
9. For the selected level, click either the Numbering or Bullets button.
![]() Tip
Tip
If you want to set other text formatting than what appears in the dialog box (for example, strikethrough or superscript), click the Format button and choose Font to open the Font dialog box.
10. Select a number type or bullet character, as follows:
![]() Select a bullet or number type from the list of presets to the right of the Numbering and Bullets buttons.
Select a bullet or number type from the list of presets to the right of the Numbering and Bullets buttons.
![]() Click the Insert Symbol button and select any character from any font to use as a bullet character.
Click the Insert Symbol button and select any character from any font to use as a bullet character.
![]() Click the Insert Picture button and select a picture bullet.
Click the Insert Picture button and select a picture bullet.
11. (Optional) Click the Decrease Indent or Increase Indent button to change the amount of indent for the chosen outline level.
12. Choose where to save the style: Only in This Document or New Documents Based on This Template.
13. Choose a different outline level from the Apply Formatting To list and then repeat steps 8–12.
14. (Optional) To further fine-tune the numbering of the list levels, click the Format button and choose Numbering. Then select additional options from the Modify Multilevel List dialog box.
This dialog box is identical to the one shown in Figure 17.10, except for its name. Refer to step 11 in the section “Creating a Multilevel List,” earlier in this chapter, for specifics about this dialog box. When you are finished working with it, click OK to return to the Define New List Style dialog box.
15. Click OK to define the new style and apply it to the selected text.
Deleting a Multilevel List or List Style
After you add a multilevel list to the List Library gallery, it’s there until you remove it, in all documents regardless of their template. To remove a list from the My Lists gallery, right-click it on the Multilevel List button’s menu and choose Remove from My Lists.
Theoretically, you can delete a list style like any other style (by right-clicking it in the Styles task pane and choosing Delete), except for one thing: List styles don’t show up in the Styles task pane. So instead you must go through the Manage Styles dialog box to delete a list style. Follow these steps:
1. On the Home tab, click the dialog box launcher in the Styles group to open the Styles task pane.
2. Click the Manage Styles button at the bottom of the task pane. The Manage Styles dialog box opens.
3. Click the name of the style to delete.
4. Click the Delete button.
5. At the confirmation box, click Yes.
6. Click OK to close the Manage Styles dialog box.
Printing or Copying an Outline
When you print an outline from Outline view, only the levels that appear in the current view will print. However, the Print Preview that appears when you choose File, Print will make it look otherwise. In Print Preview, it will seem as though you have left Outline view and that the entire document will print, regardless of how the outline is displayed. Print Preview is wrong in this case. Go ahead and print, and you’ll get the outline that was onscreen when you issued the command.
Unfortunately, this method doesn’t work when you’re copying an outline. When you select a collapsed outline and then copy and paste it, the pasted copy is the full document, not just the outline, and you can’t change that. A workaround is to generate a table of contents, as you discover in Chapter 19, “Creating Tables of Contents and Indexes,” and then copy and paste the table of contents.
Understanding Master Documents
When a Word document grows to be more than a certain size—usually around 100 pages or so—it starts becoming unwieldy to work with. It takes longer than normal to save and open, and sometimes there are delays in scrolling, pagination, and picture display. And the larger it gets, the more pronounced the problems become. To get around this, many people create large documents in chunks, with each chunk residing in a separate Word file. For example, as I was writing this book, I put each chapter in a separate document.
Dividing a large writing project into separate files has disadvantages, though, especially if you are doing your own desktop publishing from within Word. Each document has its own page numbering and styles, and it can be a challenge to generate a master table of contents or index that encompasses all the files.
The Master Documents feature in Word offers a compromise between the two approaches. A master document is a regular Word document that contains active links to multiple other document files, inserted as subdocuments. When the links to the subdocuments are expanded, the master document appears to contain all their content, so you can view your entire project as if it were a single document.
A master document does not just help with viewing, however. You can also perform the following tasks:
![]() Do a single spell-check for all subdocuments.
Do a single spell-check for all subdocuments.
![]() Number pages consecutively across all subdocuments.
Number pages consecutively across all subdocuments.
![]() Number captions and footnotes consecutively.
Number captions and footnotes consecutively.
![]() Generate a single index for all subdocuments.
Generate a single index for all subdocuments.
![]() Generate a single table of contents.
Generate a single table of contents.
![]() Caution
Caution
It’s easy to gum up the works if you move or rename a master document or subdocument file from its original location.
In some instances, a master document offers the best of both worlds when working with large documents: You retain the flexibility and performance of individual document files for each section, while still gaining the benefits of having a combined document.
Master Documents Make Word Crash
Master Documents and Styles
Master documents enforce a consistent set of formatting across multiple subdocuments, some of which might have different formatting from the others. Toward this end, the master document imposes its own definition of each style on all the subdocuments.
Subdocuments retain their own style definitions when they are opened for editing separately from the master document. If you open a subdocument using the File, Open command, it shows its own styles. If you open a subdocument from its link in a master document, however, it shows the styles from the master document.
For example, suppose that your master document defines Heading 1 as Arial Bold, and you import another document into it as a subdocument that defines Heading 1 as Times New Roman. When viewed as part of the master document, the headings in the subdocument appear as Arial Bold, but when the subdocument is viewed as a standalone document, its headings appear as Times New Roman.
The master document redefines the definitions for any styles that it has in common with the subdocuments, but if a subdocument contains a style that the master does not contain, that custom style carries over to the master document. For example, suppose in the subdocument that you have a style called MyHead1, and it’s applied to all the headings in the subdocument. The master document does not have this style. When the subdocument is imported into the master document, those headings remain MyHead1, and they do not change.
There’s an exception to this rule, though. If MyHead1 is based on another style, and that style is differently defined in the master document, you might see a trickle-down change. For example, if MyHead1 is based on Heading 1, any facet of MyHead1 that is not explicitly defined carries over from the master document’s definition of Heading 1.
Bottom line: To avoid all this headache-producing worry, use the same styles, with the same definitions of them, in the master document and in every subdocument.
![]() For more information about styles, see “Understanding Styles,” p. 215.
For more information about styles, see “Understanding Styles,” p. 215.
Master Documents and Headers/Footers
The master document applies its headers and footers to all the subdocuments. If a subdocument has its own header or footer that is different, it will be suppressed when the subdocument is viewed within the master document. (However, the subdocument’s own header and footer continue to be available when the subdocument is opened outside the master document.)
That doesn’t mean, however, that you can’t have different headers and footers for each subdocument. When Word inserts subdocuments, it separates them with continuous section breaks. (You can see this by switching to Draft view.) And as you learned in Chapter 7, “Formatting Documents and Sections,” each section can have its own header and footer definition. Therefore, you can set up different headers and footers for each subdocument from within the master document.
![]() For information about creating headers and footers that are different for each section of a document, see “Working with Multiple Headers/Footers,” p. 276.
For information about creating headers and footers that are different for each section of a document, see “Working with Multiple Headers/Footers,” p. 276.
Master Documents and TOCs and Indexes
Tables of contents and indexes work the same way in a master document as in any other document. You position the insertion point where you want the TOC or index to appear, and then you generate it using the commands on the References tab.
The main thing to watch out for when generating a TOC or index for a master document is to make sure that you create it within the master document, not in one of the subdocuments. To ensure you get the insertion point positioned correctly, display the document in Outline view and then click outside any of the subdocument borders. Then switch back to Print Layout view (or whatever view you prefer to work in) and create the table of contents or index.
![]() For information about creating a table of contents, see “Creating a Table of Contents,” p. 731.
For information about creating a table of contents, see “Creating a Table of Contents,” p. 731.
![]() To learn how to create an index, see “Marking Index Entries,” p. 751, and “Generating the Index,” p. 759.
To learn how to create an index, see “Marking Index Entries,” p. 751, and “Generating the Index,” p. 759.
Master Documents and Numbered Notes or Captions
Elements such as footnotes, endnotes, figure captions, and other automatically numbered elements are automatically numbered across all subdocuments. The numbering codes continue from one subdocument to the next automatically.
![]() To create automatically numbered figure captions, see “Using Figure Captions,” p. 422.
To create automatically numbered figure captions, see “Using Figure Captions,” p. 422.
![]() To create footnotes and endnotes, see “Working with Footnotes and Endnotes,” p. 718.
To create footnotes and endnotes, see “Working with Footnotes and Endnotes,” p. 718.
Creating a Master Document
There are two ways to go about creating a master document, depending on what raw material you have already created:
![]() If the subdocuments already exist and you need to combine them into a master document, start with a blank document to be the master document and insert the documents as subdocuments. This is the best way to go, because it results in a more stable, less crash-prone master document.
If the subdocuments already exist and you need to combine them into a master document, start with a blank document to be the master document and insert the documents as subdocuments. This is the best way to go, because it results in a more stable, less crash-prone master document.
![]() If the entire text exists as a single document and you want to break sections of it into subdocuments, start with the existing document as the master document and then create subdocuments from pieces of it.
If the entire text exists as a single document and you want to break sections of it into subdocuments, start with the existing document as the master document and then create subdocuments from pieces of it.
The following sections explain each of these procedures in detail.
Inserting Existing Documents into a Master Document
If parts of the document already exist in separate files, a master document can be useful in joining them without them losing their identities as separate files. After you insert them into the master document, you can edit the subdocuments within the master document or edit them as individual files—whatever works best for you.
To insert a subdocument, follow these steps:
1. Create a new document to function as the master document. It should have the same template applied to it that each of the subdocuments has, and all the styles should be the same.
![]() Tip
Tip
To reduce the number of style conflicts between the master document and its subdocuments, apply the same template to all the subdocuments and to the master document before inserting the subdocuments.
![]() To start a new document based on a template, see “Starting a New Document Based on a Template,” p. 291.
To start a new document based on a template, see “Starting a New Document Based on a Template,” p. 291.
![]() To change a document’s template, see “Changing a Document’s Template,” p. 302.
To change a document’s template, see “Changing a Document’s Template,” p. 302.
2. (Optional) Type any text into the master document that should exist outside of any subdocuments. For example, perhaps you want a cover page for the project as a whole.
![]() Tip
Tip
You don’t have to do step 2 now; you can do it anytime. However, sometimes it is easier to find your place in a master document’s structure when there is text in it that lies outside a subdocument, especially when the subdocuments are collapsed. It can also be easier to move the insertion point before the first subdocument later if text is already there. Therefore, I usually type a few lines of text before the first subdocument, if for no other reason than as a placeholder.
![]() Tip
Tip
If your master document becomes corrupted, the master document text may no longer be accessible, so don’t put text in the master document that you would have a hard time replacing.
3. If the master document is not already in Outline view, switch to it. This step is necessary because the Master Document controls are on the Outlining tab.
4. On the Outlining tab, in the Master Document group, click Show Document. Additional buttons appear on the Outlining tab.
5. Click the Insert button. The Insert Subdocument dialog box opens.
6. Select the document to be used as a subdocument and then click Open.
7. If you see a message about a certain style existing both in the subdocument and the master document, click Yes to All to keep the style names separated, or click No to All to merge the style definitions.
8. Repeat the process to insert additional subdocuments.
The document appears embedded in the main document, surrounded by a nonprinting border. The icon in its top-left corner is a selector; you can click it to select all the text in the subdocument at once. Figure 17.12 shows a master document with three subdocuments. I’m using extremely small subdocument files in these examples because it makes them easier to see in the figures, but your subdocuments will probably be much larger.
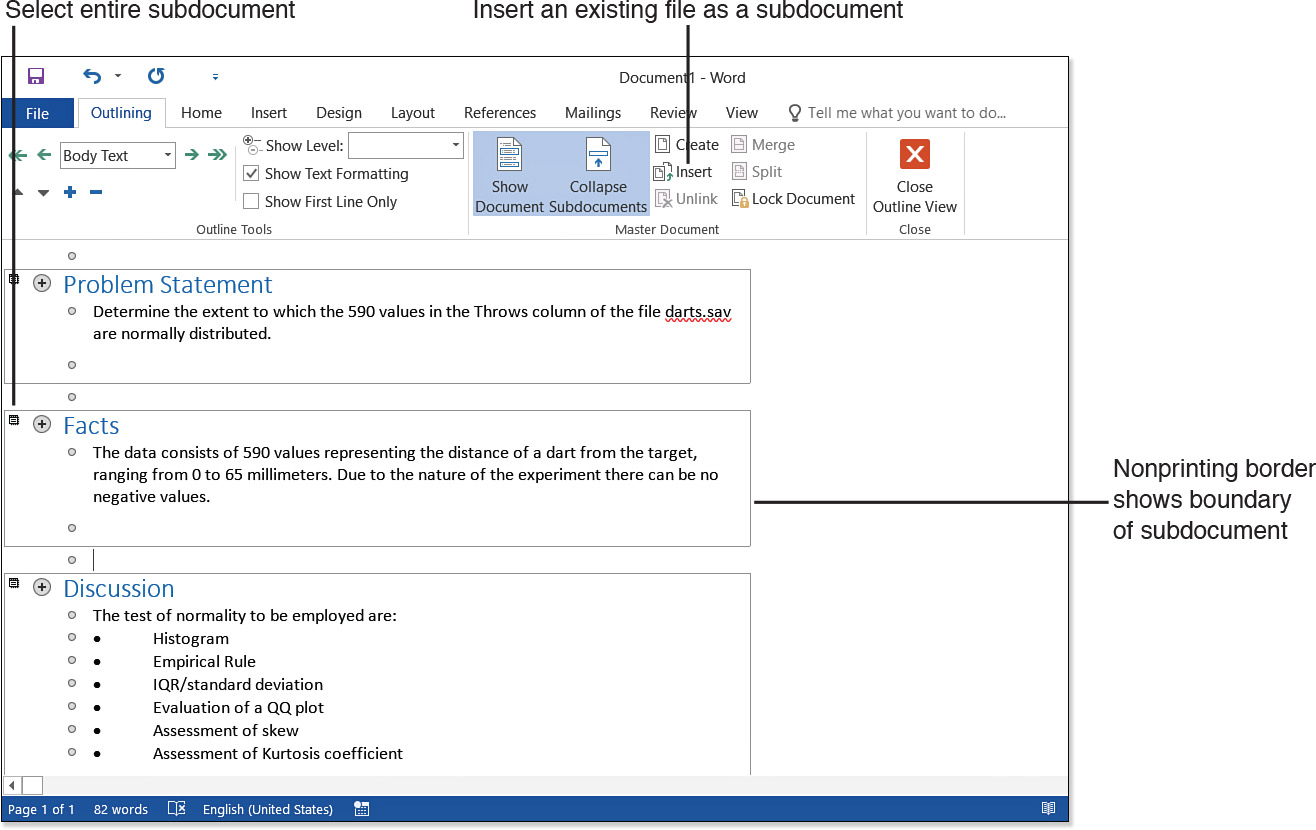
At this point, the display is still in Outline view, but you can switch to any view you like to work with the document. Repeat the steps to insert additional subdocuments where needed.
Separating an Existing Document into Subdocuments
Now let’s look at the other side of the coin: What if the document is already in one big file and you want to split out pieces of it into subdocuments? Splitting a large document into subdocuments can dramatically improve Word’s performance because it does not have to manage so many pages at once. And by using a master document to keep the pieces joined, you can retain all the benefits of having a single document, such as combined pagination and indexing.
Subdocuments can be especially useful when multiple people are collaborating on a project. By breaking a document into subdocuments, people can take their part and work separately, and then recombine their work into the single master document when they’re finished.
To break text into a subdocument, it must begin with a heading (preferably a Heading 1 style one, but others work, too). Word uses the text of that heading as the filename for the subdocument.
You can break out individual subdocuments, or you can break a document into multiple subdocuments all at the same time. If you want to simultaneously create multiple subdocuments, the document must conform to some rules:
![]() The use of heading styles must be consistent. In other words, for two headings of the same importance in the document, you must apply the same style.
The use of heading styles must be consistent. In other words, for two headings of the same importance in the document, you must apply the same style.
![]() The heading style that should delineate the subdocument breaks must be the highest level heading used in the selection. It does not have to be Heading 1, but a lower level heading works only if there are no Heading 1 paragraphs in the selection.
The heading style that should delineate the subdocument breaks must be the highest level heading used in the selection. It does not have to be Heading 1, but a lower level heading works only if there are no Heading 1 paragraphs in the selection.
To create subdocuments, follow these steps:
1. Switch to Outline view, if you’re not already there, and click the Show Document button on the Outlining tab if needed to make the Create button available.
2. Click the plus sign next to a heading to select it and all the subordinate text beneath it.
(Optional) To create multiple subdocuments at once, select other headings of the same level as the one you selected above. (Hold down Shift and click the plus signs to their left.)
3. Click the Create button. Each of the headings in the selection (and all its subordinate text) becomes its own subdocument.
4. Save the master document. Doing so creates the new files for the subdocuments; until you save, the files do not yet exist.
![]() Tip
Tip
To avoid having to rename files, write the headings with the names you want for the subdocument files. Then after the subdocuments have been created, you can rewrite the headings, if you like.
Word assigns subdocument filenames automatically based on the text in the leading heading in the subdocument. It can use up to 229 characters, including spaces in the name, but it does not use symbols or punctuation marks. If it finds one of those, it truncates the name at that point. So, for example, the heading Don’t Panic would generate a subdocument called Don.docx. If you want to change a subdocument’s filename, see “Renaming a Subdocument,” later in this chapter.
Viewing and Collapsing Subdocuments
By default, the master document shows all the subdocuments expanded after their insertion. You can collapse them to show only their hyperlinks by clicking Collapse Subdocuments on the Outlining tab (refer to Figure 17.12).
When you close and reopen a master document, all the subdocuments appear collapsed, as in Figure 17.13. To display them, click Expand Subdocuments on the Outlining tab. The hyperlink addresses will be to web locations if you are using OneDrive as the storage location. If the subdocument files are stored on a local drive, the hyperlink will be to a local path like C:BooksSubdocument01.docx.

After you’ve inserted or created the subdocuments you need, there’s no reason you have to stay in Outline view. Switch to any view you like for editing.
![]() Caution
Caution
You cannot expand or collapse individual subdocuments; it’s an all-or-none proposition. However, you can open individual subdocuments in their own windows, as you learn in the next section.
If you switch to Draft view, you notice that Word has inserted continuous section breaks between the subdocuments. You must leave these in place; they’re necessary for the proper functioning of the master document. You can also view these section breaks from Outline view if you toggle off the Show Document feature on the Outlining tab. If you accidentally delete a section break, press Ctrl+Z to undo the deletion, or reinsert the section break.
Editing Subdocuments
You can edit subdocuments within the master document, just as you would any other document content, using any view you like. When you switch to some other view, such as Print Layout, the borders that delineate the subdocuments disappear, so the master document appears to be one big seamless piece. Content can be moved and copied between subdocuments as easily as between different sections in a single document.
To edit a subdocument within the master, follow these steps:
1. Expand the subdocuments, as you learned in the preceding section.
2. Switch to Print Layout view, or your favorite view for text editing.
3. Make changes to the subdocuments.
4. Save your work (File, Save). Changes are automatically saved to the subdocuments as well as to the master document.
If you prefer, you can open an individual subdocument for editing in its own window. This is faster and more efficient because Word does not have to keep track of the other subdocuments, and it’s the best way to go when you need to make changes that affect only that one subdocument.
There are several ways to open a subdocument in its own Word window:
![]() Open the document file as you would any other (File, Open).
Open the document file as you would any other (File, Open).
![]() When subdocuments are collapsed in the master document, Ctrl+click the subdocument’s hyperlink.
When subdocuments are collapsed in the master document, Ctrl+click the subdocument’s hyperlink.
![]() Double-click the Subdocument icon to the left of the subdocument in the master document, as shown in Figure 17.13.
Double-click the Subdocument icon to the left of the subdocument in the master document, as shown in Figure 17.13.
![]() Tip
Tip
You can set up a header and footer for a subdocument, as described in Chapter 7, to be used when the subdocument is printed by itself. When the subdocument is printed as part of the master document, however, it takes on the header and footer of the master document, and any header/footer that it has on its own is ignored.
When a subdocument is open in its own window, it behaves exactly like any other regular document. There’s no indication that it is a subdocument. The reason is that subdocuments are really just ordinary documents; they are considered subdocuments only in relationship to the master document that references them.
Changes you make to a subdocument from outside the master document are reflected in the master document when you save your work on the subdocument. You can’t edit the copy in the master document while the subdocument is open in a separate window; it is locked there until you close the separate-window copy.
Modifying the Master Document’s Structure
In addition to editing the individual subdocuments, you can change the way the master document organizes them. The following sections explain some of the changes you can make.
Moving a Subdocument
Rearranging subdocuments from Outline view is easiest because you can clearly see where each subdocument starts and ends as a result of the gray outline around each subdocument.
To move a subdocument within the master document, use one of these methods:
![]() Select the entire subdocument (by clicking its Subdocument icon) and drag and drop it up or down. You can do this when subdocuments are either expanded or collapsed.
Select the entire subdocument (by clicking its Subdocument icon) and drag and drop it up or down. You can do this when subdocuments are either expanded or collapsed.
![]() If subdocuments are expanded, select the entire subdocument (by clicking its Subdocument icon) and then cut it to the Clipboard (Ctrl+X). Position the insertion point where you want it to go, and then paste it (Ctrl+V).
If subdocuments are expanded, select the entire subdocument (by clicking its Subdocument icon) and then cut it to the Clipboard (Ctrl+X). Position the insertion point where you want it to go, and then paste it (Ctrl+V).
![]() Caution
Caution
To maintain the separateness of each subdocument, make sure to drop or paste the subdocument in an empty spot, not within another subdocument. (Combining subdocuments is a separate topic, covered later in this chapter.) If you have a hard time finding an empty spot, click where you want to place the subdocument and press Enter a few times to create some extra space in the master document; then paste the subdocument.
Removing a Subdocument
To remove a subdocument from the master document completely, switch to Outline view, collapse subdocuments, select its hyperlink, and press Delete on the keyboard. Removing the subdocument from the master document does not delete the subdocument file; it still exists and can be inserted into any other master document or used as a standalone document.
Unlinking a Subdocument
Unlinking a subdocument converts it to regular text within the master document and removes the link to the subdocument file. The subdocument file still exists outside the master document, but it is no longer linked to the master document, so changes made in one place are no longer reflected in the other.
Here’s how to unlink a subdocument:
1. Display the document in Outline view and expand subdocuments.
2. If Show Document is not already selected, click that button to select it, so that the additional controls appear in the Master Document group.
3. Click anywhere within the subdocument you want to unlink.
4. Click Unlink on the Outlining tab (see Figure 17.14).

If you do not want the subdocument anymore after you’ve unlinked it, delete it from File Explorer (Windows 8, 8.1, or 10) or Windows Explorer (Windows 7).
Renaming a Subdocument
Word automatically assigns subdocument names when you use Create to create new subdocuments out of existing text. These names are derived from the heading text, so usually they are appropriate, but sometimes you end up with filenames that are too long to be practical or too short to be understandable.
To rename a subdocument’s file, follow these steps:
1. Display the master document in Outline view and collapse all subdocuments.
2. Double-click the Subdocument icon to open the subdocument in a separate Word window.
3. Choose File, Save As, and save the subdocument under a different name.
4. Close the subdocument’s window. The hyperlink in the master document reflects the new name for the subdocument.
![]() Caution
Caution
Do not rename a subdocument file outside Word, such as from File Explorer; the master document will lose its connection to it if you do. Rename a subdocument only using the procedure described in the preceding steps.
The old subdocument file still exists, but it is no longer linked to the master document; instead, the copy with the new name is linked. You can delete the old copy if you like; deleting unused subdocuments keeps your file organization tidy and prevents you from accidentally working with outdated copies.
Merging Subdocuments
As you work on your master document, you might find that you have been overzealously creating subdocuments. If it makes more sense to have fewer subdocuments, you can easily combine them.
To combine two subdocuments, follow these steps:
1. View the master document in Outline view and then expand the subdocuments.
2. Make sure that the two subdocuments to be merged are adjacent to one another. Move one of them if needed.
3. Select the first subdocument, and then hold down Shift and select the other one so that both are selected and any space between them is selected.
4. Click the Merge button on the Outlining tab. The two subdocuments are combined into a single one that has the name of the subdocument that was above the other.
The old file for the orphaned subdocument still exists on your hard disk; you might want to delete it to avoid later confusion.
Here’s an alternative method for merging two subdocuments. This one doesn’t involve the Merge button; instead, it uses the Outline Tools on the Outlining tab:
1. View the master document in Outline view and then expand the subdocuments.
2. Select the text of the subdocument that should move into the other one.
3. Click the Move Up or Move Down arrow button in the Outline Tools group of the Outlining tab to move the selected subdocument up or down one position in the outline. Keep clicking the button until the subdocument has moved completely into the other subdocument’s border.
4. Save the master document to save the new content into the combined subdocument.
Nesting Subdocuments
Nesting a subdocument is slightly different from merging two subdocuments. When you merge subdocuments, two files are combined into one. When you nest one subdocument inside another, the two separate files continue to exist, but one is referenced within the other. Most people don’t use nested subdocuments because most projects are not so long and complex as to need that level of organization. However, when you do have an extremely complex project that needs to be divided at multiple levels, having the feature available can be a godsend.
When you nest one subdocument inside another, you are in effect creating nested masters. For example, if A is your master document and B and C are your subdocuments, and you choose to nest D and E inside of B, B is both a subdocument (of A) and a master document (of D and E). Figure 17.15 illustrates this concept.

Figure 17.15 You can nest subdocuments within other subdocuments, creating a virtual document “tree.”
To nest one subdocument into another, follow these steps:
1. View the master document in Outline view and then expand subdocuments.
2. Select the subdocument that is to be nested within another.
3. Drag and drop the Subdocument icon for the selected subdocument inside the border of another subdocument.
The subdocument appears indented, with a gray box inside the gray box of its master.
Splitting a Subdocument
Splitting a subdocument leaves the first heading and its subordinate text under the original subdocument name and creates a new subdocument for each of the additional headings. (All the headings must be the same level.)
To split a subdocument, follow these steps:
1. Display the master document in Outline view and expand the subdocuments.
2. Ensure that the subdocument begins with a heading of the highest level. (That is, there should be no headings of a higher level later in the subdocument than that one.)
3. Add more headings of the same level as the first one in the spots where you want splits to occur.
4. Select the entire subdocument by clicking the Subdocument icon to its left.
5. Click the Split button on the Outlining tab.
6. Save the master document.
![]() Note
Note
Splits and merges appear to happen immediately onscreen, but they do not actually take effect in the data files until you save the master document. That’s why if you collapse the subdocuments, Word asks if you want to save your changes; it can’t display accurate filenames until it updates the files.
Locking and Unlocking a Subdocument
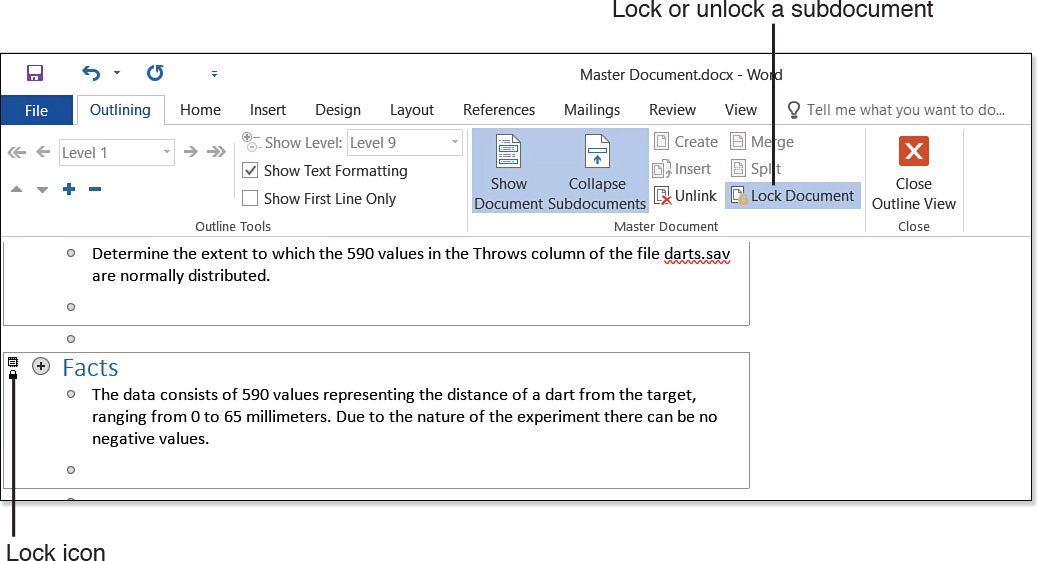
When a subdocument is locked, you cannot modify the copy in the master document, and it does not update when the subdocument is modified outside the master. It might be useful to lock a subdocument when its content is in flux and you want to preserve the most recent “official” version of it until you are ready to update the entire project.
To lock a subdocument, click anywhere within the subdocument in the master document and then click the Lock Document button on the Outlining tab. A lock icon appears to the left of the subdocument, indicating that it is locked (see Figure 17.16).
How Can I Prevent Others from Editing a Subdocument?
![]() Store the subdocument in a folder to which other users have Read-Only access but to which you have full access. Instead of providing the document file via email or on disk, point users to the network location where it is stored.
Store the subdocument in a folder to which other users have Read-Only access but to which you have full access. Instead of providing the document file via email or on disk, point users to the network location where it is stored.
![]() Set the Read-Only attribute in the file’s properties. (Right-click the file and choose Properties to access them.) The users can turn off Read-Only for the file, but they have to know how to do it, so it slows them down.
Set the Read-Only attribute in the file’s properties. (Right-click the file and choose Properties to access them.) The users can turn off Read-Only for the file, but they have to know how to do it, so it slows them down.
![]() When saving the file in the Save As dialog box, click Tools, choose General Options, and mark the Read-Only Recommended check box. This opens the subdocument as Read-Only by default. The user can resave it without Read-Only enabled, but it’s an extra step.
When saving the file in the Save As dialog box, click Tools, choose General Options, and mark the Read-Only Recommended check box. This opens the subdocument as Read-Only by default. The user can resave it without Read-Only enabled, but it’s an extra step.
![]() Set a password for the file. To do so, from the Save As dialog box, click Tools, choose General Options, and enter a password in the Password to Modify box. The person assembling the master document needs to know the password to make changes to your subdocument.
Set a password for the file. To do so, from the Save As dialog box, click Tools, choose General Options, and enter a password in the Password to Modify box. The person assembling the master document needs to know the password to make changes to your subdocument.
Paginating and Printing a Master Document
A master document’s header and footer override those of the individual subdocuments, so pagination is a simple matter. Just place a page-numbering code in the master document’s header or footer, and let Wordj take care of the rest.
![]() For information about using page-numbering codes in headers and footers, see “Adding and Formatting a Page-Numbering Code,” p. 269.
For information about using page-numbering codes in headers and footers, see “Adding and Formatting a Page-Numbering Code,” p. 269.
The print results are different depending on which view you print from:
![]() In Outline view, what you see is what will print. Expand or collapse the subdocuments and outline levels and then print. Word prints whatever was showing.
In Outline view, what you see is what will print. Expand or collapse the subdocuments and outline levels and then print. Word prints whatever was showing.
![]() To learn about expanding and collapsing outline levels, see “Outline Basics,” p. 669.
To learn about expanding and collapsing outline levels, see “Outline Basics,” p. 669.
![]() In any other view, the entire master document prints, including all subdocuments, with the page numbering, styles, and headers/footers defined in the master document. (Any of those settings in individual subdocuments that conflict are ignored.)
In any other view, the entire master document prints, including all subdocuments, with the page numbering, styles, and headers/footers defined in the master document. (Any of those settings in individual subdocuments that conflict are ignored.)