
15. Copying, Linking, and Embedding Data
Windows and Office both have some great data-sharing features that enable you to move data easily from one application to another. You can embed Excel charts in Word, store PowerPoint slides in Access databases, insert web bookmarks and hyperlinks into email messages, and much more. Having so many data-sharing possibilities, however, can sometimes get confusing. In this chapter, you discover the various ways of sharing data and their advantages and drawbacks.
For basic data sharing, most people use the Clipboard, along with its associated commands (Cut, Copy, and Paste), or drag-and-drop. These methods move or copy the content from one location to another without creating a connection between the locations.
![]() To review data sharing via the Clipboard or drag-and-drop, see “Moving and Copying Text and Objects,” p. 61.
To review data sharing via the Clipboard or drag-and-drop, see “Moving and Copying Text and Objects,” p. 61.
The ordinary copy-and-paste operation has its limitations, however. Suppose, for example, that you have a chart in Excel that you want to use in Word. If you copy and paste that chart into Word, and then the data changes in the Excel worksheet on which it was originally based, the copy of the chart in Word does not update automatically. Copy-and-paste creates a one-time snapshot of the chart.
For more active connectivity between a source and destination, various sharing techniques are available:
![]() Hyperlinking—You can create a text-based link to the original source document. When you click the link, the original document opens for viewing.
Hyperlinking—You can create a text-based link to the original source document. When you click the link, the original document opens for viewing.
![]() Bookmarking—You can create an invisible marker in a document; then you can hyperlink to that marker rather than to the document as a whole.
Bookmarking—You can create an invisible marker in a document; then you can hyperlink to that marker rather than to the document as a whole.
![]() Object linking—You can create a link between the pasted copy and the file containing the original object so that the pasted copy changes when the original does.
Object linking—You can create a link between the pasted copy and the file containing the original object so that the pasted copy changes when the original does.
![]() Object embedding—You can insert various types of content into a document without converting that content to Word format. This makes it possible to edit the embedded object in its native program later.
Object embedding—You can insert various types of content into a document without converting that content to Word format. This makes it possible to edit the embedded object in its native program later.
![]() Inserting with field codes—You can use the {
Inserting with field codes—You can use the {IncludeText} and {IncludePicture} field codes to link external files to a Word document. This special-purpose technique has some benefits but also some drawbacks compared to object linking.
This chapter looks at each of these techniques with an eye toward better and more convenient content integration.
Working with Hyperlinks
A hyperlink is a pointer to another file or to an email address. You can assign the hyperlink to either text or a graphic. When you click the text or graphic, the referenced file opens or a new message is started to that email address. That’s called following the hyperlink.
![]() Note
Note
Hyperlinks are actually {Hyperlink} fields. You can see this by selecting the hyperlink and pressing Shift+F9 to toggle field codes on/off. Chapter 16, “Working with Fields and Forms,” covers fields in detail.
Hyperlinks are most common on web pages, but any Word document can have hyperlinks in it. In fact, you might find that the easiest way to join a set of related documents is to place hyperlinks in each document that connect to the other documents in the set.
Automatically Creating Hyperlinks by Typing
Because Word can identify web and email addresses as such, it automatically turns them into hyperlinks as you type them. This works with any text strings that start with http:// or www or that are structured as an email address.
If you do not want certain instances to be hyperlinks, here are some ways to circumvent the process on a case-by-case basis:
![]() Immediately after the automatic conversion, press Ctrl+Z to undo the last action.
Immediately after the automatic conversion, press Ctrl+Z to undo the last action.
![]() At any time, right-click the hyperlink and choose Remove Hyperlink.
At any time, right-click the hyperlink and choose Remove Hyperlink.
Turning Off Automatic Hyperlink Creation
By default, Word converts all web and email addresses to live hyperlinks. If you find yourself often undoing an automatic hyperlink conversion, you might want to turn off that feature.
Follow these steps to disable automatic hyperlink creation:
1. Choose File, Options. The Word Options dialog box opens.
2. Click Proofing and then click AutoCorrect Options. The AutoCorrect dialog box opens.
3. On the AutoFormat As You Type tab, clear the Internet and Network Paths with Hyperlinks check box.
4. Click OK.
5. Click OK to close the Word Options dialog box.
Following a Hyperlink
To follow a hyperlink is to activate it so that the document, web page, or other referenced item opens.
In Word, clicking a hyperlink does not follow it. This is by design, because you might need to click in the hyperlink’s text to edit it. Hold down Ctrl as you click on a hyperlink to follow it in Word.
If a security notice appears when you follow a hyperlink, click OK to continue. This notice appears when the location being referred to is not on the Windows list of trusted sites. If you know the site you’re going to is valid, it’s perfectly safe to ignore this warning. To prevent the notice from appearing in the future for hyperlinks to that location, add that location to the Trusted Locations list, as you learn to do in Chapter 21, “Protecting and Securing Documents.”
![]() To set up a new trusted location, see “Specifying Trusted Locations,” p. 806.
To set up a new trusted location, see “Specifying Trusted Locations,” p. 806.
If you like, you can turn off the Ctrl requirement for following a hyperlink, but there’s a drawback to that: You can no longer click inside a hyperlink to edit its text. Instead, you must right-click the hyperlink, choose Edit Hyperlink, and edit its text in the Edit Hyperlink dialog box.
If you would rather have regular clicking activate hyperlinks in Word anyway, follow these steps:
1. Choose File, Options. The Word Options dialog box opens.
2. Click Advanced.
3. In the Editing Options section, clear the Use Ctrl+click to Follow Hyperlink check box.
4. Click OK.
Creating a Text Hyperlink
The most common type of hyperlink is flagged in Word as a bit of underlined text. You’ve seen this hundreds of times on web pages, and you can create this same type of hyperlink in any Word document. That hyperlink can point to another Word document, a web page, an executable file, or nearly anywhere else.
You can either turn some existing text into a hyperlink or insert brand-new text as you are creating the hyperlink. Either way, follow these steps:
1. (Optional) If the text that you want to use already exists in the document, select it.
2. On the Insert tab, click Hyperlink. (You might need to click Links first, depending on your window size.) The Insert Hyperlink dialog box opens (see Figure 15.1).

You can also reach the Insert Hyperlink dialog box by using the keyboard shortcut Ctrl+K or by right-clicking the selected text and choosing Hyperlink from the shortcut menu.
3. If you selected any text in step 1, it appears in the Text to Display box. Add or change text here if desired.
4. In the Link To list, click Existing File or Web Page if it is not already selected.
5. Do one of the following:
![]() Create a hyperlink to a web address—Enter the web URL for the site to which you want the text to link in the Address text box.
Create a hyperlink to a web address—Enter the web URL for the site to which you want the text to link in the Address text box.
![]() Create a hyperlink to a file on your hard disk—Use the folder list under the Look In box to browse to the desired location, and select the file.
Create a hyperlink to a file on your hard disk—Use the folder list under the Look In box to browse to the desired location, and select the file.
![]() Note
Note
A ScreenTip is text that appears in a box when the user points at the hyperlink in a web browser. If you do not specify a ScreenTip, the hyperlink’s address is the ScreenTip.
6. (Optional) To add a ScreenTip to the hyperlink, click the ScreenTip button, type the text, and click OK.
7. Click OK. When you return to your document, the text you highlighted is now a different color (blue, by default) and underlined, indicating that it is now an active hyperlink.
The exact color of the hyperlinks depends on the theme colors.
Adding a Hyperlink to an Image
A graphic can function as a hyperlink, such that when the user clicks the image, the specified web page or document opens. The process for building a graphical hyperlink is similar to that of building a text hyperlink:
1. Select any picture, drawing object, or WordArt in the document.
2. On the Insert tab, click Hyperlink to display the Insert Hyperlink dialog box. (Or use the Ctrl+K or right-click method if you prefer.)
3. In the Link To list, click Existing File or Web Page if it is not already selected.
4. Type the address for the link in the Address box, or browse for and select the file to which to hyperlink.
5. (Optional) If you want a custom ScreenTip, click ScreenTip, type the text, and click OK. Otherwise, the ScreenTip shows the complete path to the chosen file.
6. Click OK to complete the hyperlink.
The picture will not look different. However, if you click away from the picture to deselect it and then hover the mouse pointer over the picture, the ScreenTip you specified will appear. To test the hyperlink, Ctrl+click the image.
Creating an Email Hyperlink
Besides referencing other files and web pages, hyperlinks can start the user’s email editor and begin a blank email message with the recipient name filled in automatically. This capability is useful for providing a hyperlink through which someone can email you to comment on your web page.
Follow these steps to create an email hyperlink:
1. Select the text or choose an image for the hyperlink.
2. On the Insert tab, click Hyperlink to display the Insert Hyperlink dialog box. (Or use the Ctrl+K or right-click method if you prefer.)
3. In the lower-left corner of the Insert Hyperlink dialog box, click E-Mail Address.
4. Enter the email address to which the hyperlink should send a message, as shown in Figure 15.2.

Notice how the phrase mailto: is automatically added to the beginning of your email address.
5. (Optional) To pre-enter the subject line for the message, type the text in the Subject box.
6. (Optional) If you want a custom ScreenTip, click ScreenTip, type the text, and click OK. Otherwise, the ScreenTip shows the email address.
7. Click OK to complete the link.
Creating and Hyperlinking to a New Document
When you’re creating groups of hyperlinked documents, it’s best to create all the documents first and then create the hyperlinks. If you forget to create one of the documents, though, you can easily create it on-the-fly as you create the hyperlink. The Create New Document option in the Insert Hyperlink dialog box does just that.
Follow these steps to create a new document and a hyperlink to it:
1. Select the text or choose an image for the hyperlink.
2. On the Insert tab, click Hyperlink to display the Insert Hyperlink dialog box. (Or use the Ctrl+K or right-click method if you prefer.)
4. In the Name of New Document text box, type the name to be used for the new document. Do not type the path, just the name.
5. If the path listed under Full Path is not correct, click the Change button, browse to a different path, and click OK.
6. (Optional) If you want a custom ScreenTip for the hyperlink, click ScreenTip, type the text, and click OK. Otherwise, the ScreenTip shows the complete path to the new document.
7. Click Edit the New Document Now if you want the document to open for editing in Word now, or click Edit the New Document Later if you don’t want it to open.
8. Click OK to complete the link.
Editing a Hyperlink
You can change a hyperlink’s text, address, ScreenTip, or any other aspect of it. However, changing the underlined text in a hyperlink does not change its underlying address; they are two separate settings.
The easiest way to change a hyperlink’s displayed text is simply to move the insertion point into the hyperlink text and edit it with Backspace, Delete, or any of the other editing techniques you use with regular text.
There’s one minor way in which editing hyperlink text is different from editing regular text: You can’t delete individual characters from the beginning of the hyperlink text by using the Delete key. Clicking in front of the hyperlink text and pressing Delete once selects the entire hyperlink; pressing Delete again deletes the entire hyperlink. If you want to delete characters at the beginning of the hyperlink text, click after them and then use the Backspace key, or select only the characters to delete and then press Delete or Backspace.
You can alternatively use the dialog box method described in the following steps to edit the hyperlink’s text and also to edit its other settings:
1. Right-click the hyperlink (or the object to which the hyperlink has been assigned) and choose Edit Hyperlink. The Edit Hyperlink dialog box opens. It looks just like Figure 15.1 or 15.2, depending on the hyperlink type.
2. Make any changes desired:
![]() Change the text to display.
Change the text to display.
![]() Click the ScreenTip button and change the ScreenTip text.
Click the ScreenTip button and change the ScreenTip text.
![]() In the Address (or E-Mail Address) box, change the address to which the hyperlink refers.
In the Address (or E-Mail Address) box, change the address to which the hyperlink refers.
If it’s an email address hyperlink, change the subject.
3. Click OK to accept the changes.
Removing a Hyperlink
Removing a hyperlink doesn’t remove the text; it just converts the hyperlink to regular text. To remove a hyperlink, right-click the hyperlink and choose Remove Hyperlink from the menu. Simple, eh? If you already have the Edit Hyperlink dialog box open, you can also click the Remove Link button there to remove a hyperlink.
Changing Hyperlink Underlining and Color
Hyperlink text appears underlined and in whatever color the theme has assigned for hyperlinks (or visited hyperlinks).
You can remove the underlining from the hyperlink by selecting it and clicking the Underline button on the Home tab to toggle off underlining. However, be cautious when stripping off the underline from a hyperlink, because that makes it difficult for your readers to discern that a hyperlink is present.
![]() Note
Note
A visited hyperlink is one that you have clicked (opened). Visited hyperlinks appear in a different color to help you keep track of which links you have used. This distinction is perhaps not all that helpful in a Word document with a couple of stray hyperlinks in it, but on a page with a huge listing of links, it’s invaluable.
You can change the hyperlink’s color in two ways. One is to manually strip off all existing formatting from it and apply your own. Do the following for each hyperlink:
1. Select the hyperlink and press Ctrl+Spacebar. All formatting is removed, but the hyperlink remains.
2. Click the Underline button on the Home tab to reunderline the hyperlink text. (This step is optional but recommended because hyperlinks that are not underlined are difficult to discern in a document.)
3. Apply the desired color.
The other way is to change the color that the theme assigns to hyperlinks. This method affects all the hyperlinks in the entire document at once:
1. On the Design tab, open the Colors list and choose Customize Colors.
2. In the Create New Theme Colors dialog box, open the Hyperlink list and select a different color for (unvisited) hyperlinks.
3. Repeat step 2 for Followed Hyperlink. You can choose the same color as in step 2 or a different color (see Figure 15.3).

4. In the Name box, replace the default name with a name of your choosing.
5. Click Save.
Working with Bookmarks
Hyperlinks are great all by themselves, but they point to entire files, not specific parts of the file. If the referenced document is long, your audience will wonder what specific part of its contents you wanted them to view within it.
![]() Note
Note
Bookmarks are actually {Bookmark} fields. You can see this by selecting the bookmark and pressing Shift+F9 to toggle field codes on/off. Chapter 16 covers fields in detail.
A bookmark provides a more specific way of referring to document content. You can create a named bookmark to indicate a certain spot in the document, and then you can reference that bookmark’s name in a variety of referencing activities, including cross-references and hyperlinks. You can also quickly jump to a bookmark using the Go To feature, as you learned in Chapter 2, “Typing and Editing Text.”
![]() To review the Go To command and how to use bookmarks with it, see “Using Go To,” p. 77.
To review the Go To command and how to use bookmarks with it, see “Using Go To,” p. 77.
Creating a Bookmark
You can create a bookmark to any portion of a document—a heading, a body paragraph, a specific word or phrase, or a graphic object of any type. The bookmark can be a single spot in the document (that is, a single character marker), or it can encompass multiple paragraphs and objects.
Does it matter how large the selection is that you bookmark? The answer depends on how you plan to use the bookmark. If you are going to use the bookmark only for navigation, such as with a Go To operation or a cross-reference, the selection size makes no difference because it will always jump to the beginning of the bookmarked area regardless of the area’s size. However, if you plan to use the bookmark for text insertion operations, such as with the {IncludeText} field covered later in this chapter, make sure you incorporate everything within the bookmark that you want to be included in the insertion.
![]() Tip
Tip
Many of the uses for a bookmark, such as a Go To operation or a cross-reference, work with all the headings in the document automatically, so you do not usually have to create bookmarks for the headings in your document to reference them.
![]() For information about the {IncludeText} field, see “Inserting Text with {IncludeText},” p. 615.
For information about the {IncludeText} field, see “Inserting Text with {IncludeText},” p. 615.
To create a bookmark, follow these steps:
1. Position the insertion point where you want the bookmark to be inserted.
To bookmark a paragraph, position the insertion point at the beginning of that paragraph. To bookmark a graphics object, select the object.
2. On the Insert tab, click Bookmark. (You may have to click Links first, depending on the window size.) The Bookmark dialog box opens.
3. In the Bookmark Name box, type a name for the bookmark (see Figure 15.4).

The name can be up to 40 characters and can include letters, numbers, or a combination of the two, but no spaces and no symbols.
4. Click the Add button. The bookmark is now created.
Jumping to a Bookmark
One use for a bookmark is to quickly find a certain location in the document. To jump to a bookmarked location in the document, follow these steps:
1. On the Insert tab, click Bookmark.
2. In the Bookmark dialog box, click the desired bookmark and click Go To.
3. Click Close.
Here’s an alternative method:
1. On the Home tab, click the Find button’s arrow and then click Go To on the menu that appears. The Find and Replace dialog box opens (see Figure 15.5) with the Go To tab displayed.

2. In the Go to What list, select Bookmark.
3. Open the Enter Bookmark Name list and click the desired bookmark.
4. Click the Go To button to jump to that bookmark in the document.
5. Click Close.
Inserting a Hyperlink to a Bookmark
A hyperlink to a bookmark is like a saved Go To operation. Instead of having to go through the Go To process each time, you can just Ctrl+click the hyperlink to that bookmark. The following sections explain how to set one up.
Hyperlinking to a Bookmark in the Same Document
Most of the time, the bookmarks to which you will want to refer are in the same document as the reference. This is considered a “Place in This Document” type of hyperlink, and there is a special button for it in the Insert Hyperlink dialog box.
To create a hyperlink to a bookmark that’s in the same document, follow these steps:
1. Position the insertion point where you want the hyperlink to be inserted, or select the text that you want to use as the hyperlink.
2. On the Insert tab, click Hyperlink. The Insert Hyperlink dialog box opens.
3. Click Place in This Document. A list of all the headings and bookmarks in the document appears.
4. Click the desired bookmark (see Figure 15.6).

![]() Tip
Tip
You can also use this same procedure to create a hyperlink to the top of the document, or to any of the headings, by selecting one of those items instead in step 4.
5. Check the text in the Text to Display box, and edit it if needed.
6. Click OK to insert the hyperlink.
Hyperlinking to a Bookmark in Another Document
You can also create hyperlinks to bookmarks in other documents. When the hyperlink is followed, not only does the referenced document open, but the display jumps to the referenced bookmark.
Follow these steps to create a hyperlink to a bookmark in another document:
1. Start creating a new hyperlink as you normally would:
a. Select text or position the insertion point.
b. On the Insert tab, click Hyperlink.
c. Change the text in the Text to Display box if needed.
d. Set up a ScreenTip if needed.
2. Still in the Insert Hyperlink dialog box, click Existing File or Web Page, and then browse for and select the desired document. (You must have already saved the document containing the bookmark for it to appear on this list.)
3. Click the Bookmark button. The Select Place in Document dialog box opens, listing all the bookmarks in the selected document (see Figure 15.7).

4. Click the desired bookmark.
5. Click OK to return to the Insert Hyperlink dialog box.
6. Click OK to insert the hyperlink.
![]() Tip
Tip
Word uses standard Hypertext Markup Language (HTML) syntax to reference bookmarks; so if you happen to know the bookmark name, you don’t have to do steps 3–5. Instead, you can click at the end of the filename in the Address text box and then type a # sign followed by the bookmark name.
Inserting a Cross-Reference to a Bookmark
A cross-reference is a dynamic reference to a location. For example, suppose that on page 10 of your document, you want to refer to a certain definition in a paragraph that is currently on page 4 of your document. You could say “Refer to the definition on page 4,” but then what if you add more text to the document later, or delete some text, such that the definition is no longer on page 4? With a cross-reference, rather than a manual reference, you don’t have to worry about the reference becoming out-of-sync. Create a bookmark at the definition’s location and then create a cross-reference to that bookmark.
![]() Note
Note
Cross-references are actually {Ref} or {Pageref} fields. You can see this by selecting the cross-reference and pressing Shift+F9 to toggle field codes on/off. Chapter 16 covers fields in detail.
You can create cross-references to many types of content, not just bookmarks. In Chapter 18, “Citing Sources and References,” you learn more uses for a cross-reference, but for now, take a quick look at how to cross-reference a bookmark:
1. Create the bookmark, as described earlier in this chapter.
2. Position the insertion point where you want to insert the cross-reference, and then type any supporting text that should go along with it.
3. On the Insert tab, click Cross-Reference. (You may have to click Links first, depending on the width of the window.) The Cross-Reference dialog box opens.
4. Open the Reference Type list and select Bookmark.
5. Open the Insert Reference To list and select the type of information you want to appear as the reference. For the example given in step 2, you would want Page Number, for instance. Or for a bookmark, you could choose Bookmark Text to insert the literal text that the bookmark marks.
6. (Optional) If you want the cross-reference to function as a live hyperlink to the bookmark, make sure the Insert as Hyperlink check box is marked.
7. Select the bookmark from the For Which Bookmark list (see Figure 15.8).
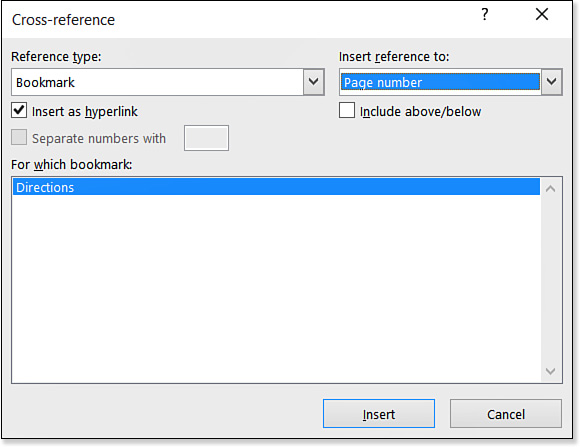
8. Click Insert. The designated information is inserted as a code in the document.
9. Click Close.
![]() For more information about cross-referencing, see “Creating Cross-References,” p. 726.
For more information about cross-referencing, see “Creating Cross-References,” p. 726.
Embedding Data
With a simple cut-and-paste operation that moves content between applications, the cut-and-pasted data retains no memory of the application from which it came. The receiving application converts the incoming data into the best possible format it can, given its capabilities. For example, Excel cells are converted to a table grid in Word. There’s no going back; you must edit the inserted content in Word.
Sometimes, however, you might want the data to retain its connection to the source application. For example, you might want to be able to edit the inserted Excel cells in Excel in the future, because Excel has superior calculating features and can do things that can’t be done in a Word table.
For situations such as this, what you want is embedded data. Embedded data remembers its roots, and you can reopen it in that same application later. You can embed existing data from another program, or you can create a new embedded object in Word using the tools from almost any other application installed on your PC.
There are two different ways to embed existing data, depending on whether you want to embed an entire file or just a snippet of data.
Embedding an Entire Existing File
When you embed an entire existing file in a Word document, you are in effect storing a complete copy of that file within the Word file, so the file size grows dramatically. There are advantages, however, to make up for the larger file size. When embedding an entire file, you do not necessarily have to show the entire file in Word, but the entire file remains available. So, for example, if you embed an Excel workbook that has multiple sheets, you can choose which sheet (or which portion of a sheet) you want to display in Word, and you can change your mind at any time later. You might want to display one sheet, print your work, and then display a different sheet, for example.
![]() Caution
Caution
Embedded data does not retain a connection to the original data file from which it came, so changes made later to the original data file are not reflected in the Word copy and vice versa. If you need a connection like that, what you want is linked data, covered later in this chapter.
To embed an entire file in Word, insert it as an object by following these steps:
1. Position the insertion point where you want the object to appear.
2. On the Insert tab, click Object (the button face, not the arrow adjacent to it). The Object dialog box opens.
3. On the Create from File tab, click Browse.
4. Locate and select the desired file and click Insert. The complete path to the file appears in the File Name box (see Figure 15.9).
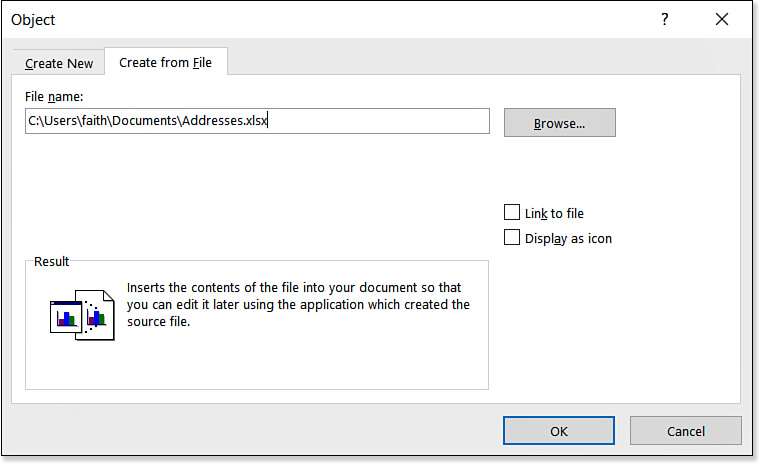
5. Click OK to insert the file.
The embedded object appears in the document. When you select the object, small gray square selection handles appear around it, the same way a backward-compatible graphic would appear.
When you double-click the embedded object, the object opens in its native application for editing. If the native application is a Microsoft Office product or other supported product, the Ribbon or the toolbars for that product appear within the Word window, as in Figure 15.10. If the native application is not fully supported, the object opens in a separate window for that application.

To return to Word if you’re working with a supported Microsoft Office product’s content, click the Word document in an area away from the object. Word’s Ribbon reappears, and the object goes back to being a “picture.”
To return to Word if you’re working with an unsupported product’s content, open the File menu in that application and look for a command that includes Return to in it, such as Exit and Return to Document 1 (where “Document 1” reflects the Word document’s filename).
Embedding a Data Selection
Sometimes embedding an entire data file is overkill. Why embed a huge file and grow your Word document’s file size dramatically when all you really want is a few worksheet cells or a single chart or graphic?
To embed a portion of a file, use the Paste Special command rather than Insert Object. As you learned in Chapter 2, Paste Special provides a means of setting options for a Paste operation, and that’s exactly what you need here.
Follow these steps to embed some data from another program into Word:
1. Open the other program and then open or create the data.
2. Copy the desired data to the Clipboard (Ctrl+C).
3. Switch to Word and position the insertion point where you want the pasted selection to appear.
4. On the Home tab, click the Paste button’s arrow to open its menu and choose Paste Special. The Paste Special dialog box opens.
5. On the As list, select a document type that ends with the word Object. (There will probably be only one choice.) For example, in Figure 15.11, it’s Microsoft Excel Worksheet Object.
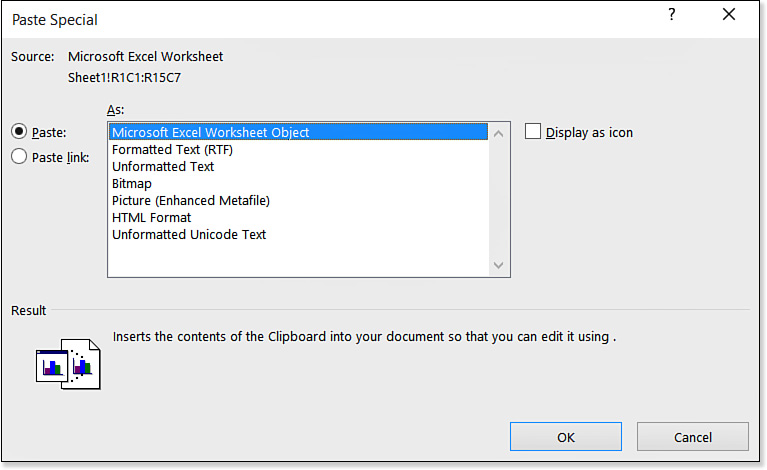
If there is no data type on the As list that ends in Object, you cannot create an embedded object using Paste Special for this data.
6. Click OK. The selection is pasted as an embedded object.
Embedding a New Object
When you want to embed a new object of some other type than Word, you can do so from within Word so that the object is saved within the Word document rather than in a separate file. This can save some time and effort, because you don’t have to open the other application separately.
![]() Caution
Caution
If you think you might want to reuse the object in other programs or documents, do not embed it as a new object in a Word file; instead, create it separately outside of Word and then embed it as an existing file, as you learned earlier in this chapter.
You can create a new embedded object using almost any application installed on your PC. The only requirement is that the application must conform to the Windows Object Linking and Embedding (OLE) standards. Most productivity applications do.
To create a new embedded object, follow these steps:
1. In Word, position the insertion point where you want the new object to appear.
2. On the Insert tab, click Object (the button face, not the arrow). The Object dialog box opens.
3. On the Create New tab, scroll through the Object Type list and select the desired object type. The object types listed depend on the applications installed on your PC. For example, Figure 15.12 shows the creation of a new Microsoft Excel Worksheet object.
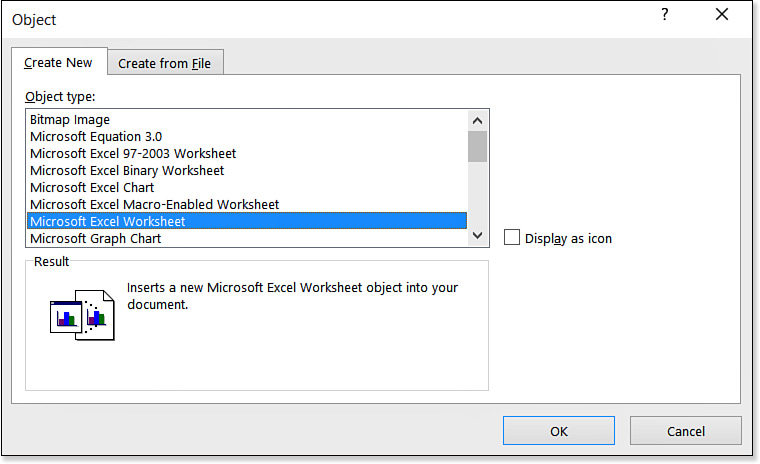
4. Click OK to insert the new object. The tools and menus for the selected object type appear.
5. Create the object and then click outside the object to return to Word.
To re-edit the object at any time later, double-click it.
Linking to Data in Other Files
The terms linking and embedding are sometimes thrown around loosely as if they were a single action, as in Object Linking and Embedding, but they are actually quite different.
As you just learned in the preceding section, embedding creates a static copy of an object within Word, retaining its memory of the application from which it came. Embedding can be done with whole files, snippets of existing files, or brand-new content that is not related to an existing file.
Linking, however, can be done only with existing saved files. Linking inserts a dynamic link to the original data file. That way, if the original data file changes, the version in Word also changes, and vice versa. Linking comes in quite handy when you need to create connections between files that are not finalized yet, because you are always assured of having the most recent data.
![]() Note
Note
Links are {Link} fields. You can see this by selecting the linked content and pressing Shift+F9 to toggle field codes on/off. Chapter 16 covers fields in detail.
However, linking is not always appropriate or even helpful. It has some definite drawbacks. The biggest one is that files containing links are slower to open and save. Whenever a file that contains a link is opened or saved, the linked data is updated, which takes time. You can minimize this effect by setting the links to be manually updated, but then you run into the potential problem of forgetting to update them and losing the benefit of dynamic updates.
![]() To learn how to set a link to be manually updated, see “Managing Link Update Settings,” p. 612.
To learn how to set a link to be manually updated, see “Managing Link Update Settings,” p. 612.
You must also take care not to move the linked files, or the Word document will not be able to find them. This causes an error when the document is opened. Before you distribute a file that contains links via email or on a network where not everyone has access to the folders containing all the files, you should disable or remove the links in it, because the recipients will not have access to the linked file.
![]() To learn how to remove a link, see “Breaking a Link,” p. 614.
To learn how to remove a link, see “Breaking a Link,” p. 614.
As with embedding, there are two different procedures for creating a link, depending on whether you want to link to an entire file or only a portion of it.
Linking to an Entire File
The procedure for linking to an entire file is similar to that of embedding an entire file, except you indicate that you want the file to be linked. Follow these steps:
1. Position the insertion point where you want the object to appear.
2. On the Insert tab, click the Object button. The Object dialog box opens.
3. On the Create from File tab, click Browse.
4. Locate and select the desired file and click Insert. The complete path to the file appears in the File Name box.
5. Mark the Link to File check box, as shown in Figure 15.13. This step is important; if you don’t do it, you get an embedded file, not a linked one.
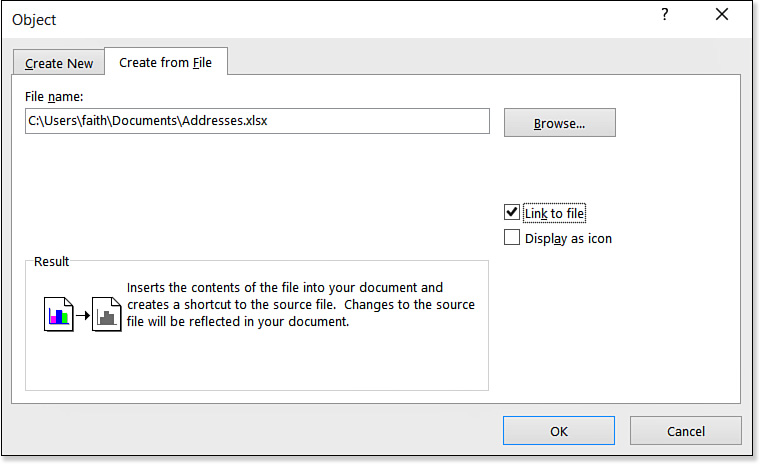
6. Click OK to insert the linked file.
A linked file functions much like an embedded file in a Word document; when selected, it appears with square gray selection handles and can be formatted as a graphic. The main difference is in the editing; when you double-click it to activate it, the original data file opens for editing in its own window, rather than using embedded tabs and menus within Word.
Linking to a Portion of a File
The procedure for linking to a portion of a file is similar to embedding a portion of a file. One difference is that with linking, the data you are copying must be saved in another file, so you must make sure you’ve saved your work in the other application before linking it into Word.
To link to a portion of a file, follow these steps:
1. Open the other program and then open or create the data.
If you’re creating a new data file, make sure that you save it before proceeding; otherwise, there will be no filename to link into Word.
2. Copy the desired data to the Clipboard.
3. Switch to Word and position the insertion point where you want the pasted selection to appear.
4. On the Home tab, click the Paste button’s arrow to open its menu and choose Paste Special. The Paste Special dialog box opens.
5. Click Paste Link. The As list changes to show only the formats in which a link is possible (see Figure 15.14).
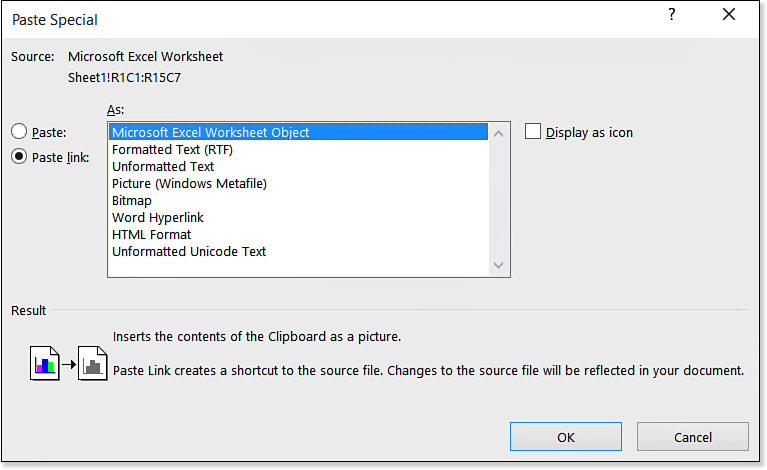
6. On the As list, select the desired content type.
7. (Optional) If you would prefer that the link be an icon in the Word document, rather than a full display of the data, mark the Display as Icon check box. (Or, if you would prefer it to be a text hyperlink, do not mark the check box, but choose Word Hyperlink as the As type.)
![]() Note
Note
You have a wider choice of content types here than with embedding. The content can be based in a variety of formats, any of which will maintain the link to the original data. For example, Formatted Text (RTF) pastes Excel cells as a Word table. Pay attention to the explanation in the Result area of the dialog box to find out what each available option does.
8. Click OK to create the link.
You don’t need to edit the linked file from within Word. If you chose its native application as the content type (in step 6), you can open it separately in its native application, or if Word happens to be open already, you can double-click the linked file in Word to open it in its native application in a separate window.
Managing Link Update Settings
Whenever you open or save a Word document containing a link, the link is updated automatically. Linked data is also updated automatically on-the-fly whenever both files happen to be open at the same time.
As mentioned earlier, updating links takes time, especially in a document with multiple links. To minimize the performance impact, you might choose to set the links for manual updating.
To change a link’s update settings, follow these steps:
1. Right-click the object in Word and point to Linked Worksheet Object (or whatever type of object it is, if not a worksheet) to open a submenu. Then click Links. The Links dialog box opens.
The exact name of the command to open the submenu varies depending on the object.
2. Select the link from the list of links (if there is more than one link in the document).
3. In the Update Method for Selected Link section, click Manual Update (see Figure 15.15).
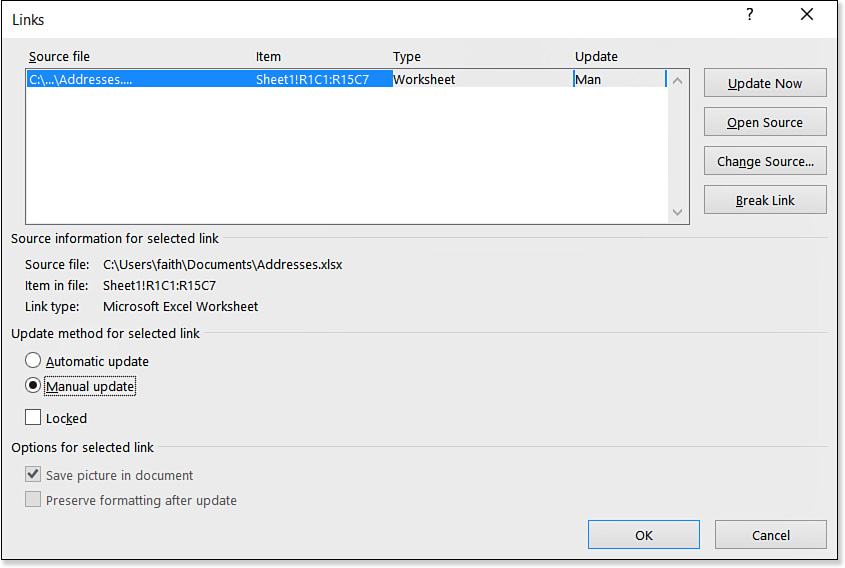
4. Click OK.
![]() Note
Note
The Locked check box locks the link so that it cannot be updated, either manually or automatically. You might use this setting to prevent an error from occurring if the linked data is taken offline, for example, or to preserve a certain version of the data in the document. (Of course, another way to preserve the current version would simply be to break the link entirely. See “Breaking a Link” later in this chapter.)
Manually Updating a Link
After setting a link to manual updates, you must update it yourself. To do so, right-click the linked content and choose Update Link. An alternative method: Display the Links dialog box (shown in Figure 15.15), click the link, and click Update Now.
Changing the Linked File’s Location or Range
If the linked file changes its location or name, or if you need to refer to a different portion of it (for example, a different range of cells from a worksheet), use the Links dialog box shown in Figure 15.15 to make that change. Follow these steps:
1. Right-click the object in Word and point to Linked Object to open a submenu. Then click Links. The Links dialog box opens.
The exact name of the command to open the submenu varies depending on the object. For example, for Excel data, it would be Linked Worksheet Object.
2. Select the link from the list of links (if there is more than one link in the document).
3. Do any of the following:
![]() To check that the link’s source file is still available, click Open Source. If it opens, the link is functional. Close the source file.
To check that the link’s source file is still available, click Open Source. If it opens, the link is functional. Close the source file.
![]() To change the path or name of the source file (for example, if it has been moved or renamed), click Change Source, browse for the new filename and location, and click Open.
To change the path or name of the source file (for example, if it has been moved or renamed), click Change Source, browse for the new filename and location, and click Open.
![]() To change the portion of the source file that is linked, click Change Source. Then after selecting the file and location, click the Item button and specify the portion of the file to be linked. For Excel data, for example, you can specify a cell range or a bookmark name.
To change the portion of the source file that is linked, click Change Source. Then after selecting the file and location, click the Item button and specify the portion of the file to be linked. For Excel data, for example, you can specify a cell range or a bookmark name.
4. Click OK to close the Links dialog box.
Breaking a Link
When you no longer need the dynamic link between the source and the Word document, you should break the link for better performance. (Remember, links slow down the file’s saving and opening.)
To break a link, follow these steps:
1. Right-click the object in Word and point to Linked Object to open a submenu. Then click Links. The Links dialog box opens.
The exact name of the command to open the submenu varies depending on the object. For example, for Excel data, it would be Linked Worksheet Object.
2. Select the link from the list of links (if there is more than one link in the document).
3. Click Break Link. At the confirmation box, click Yes.
4. If there are no more links, the Links dialog box closes automatically. If other links remain, break them too if desired, or click OK to close the Links dialog box.
Inserting Content with IncludeText and IncludePicture
In Chapter 16, you learn a lot about fields, which are codes that insert objects, values, or data into a Word document. You’ve already seen several types of fields in this chapter: {Hyperlink}, {Ref}, {Pageref}, {Link}, and {Bookmark}. Each inserts or marks content in a certain way.
Now it’s time to look at two more fields that are useful for inserting external content: {IncludeText} and {IncludePicture}. These are non-OLE alternatives, and the links do not automatically update. Use them if the data is unlikely to change very often but you still want to maintain a link.
Inserting Text with {IncludeText}
The {IncludeText} field inserts a linked copy of external text into the document. It is not intended to replace OLE linking; instead, it’s used for special-purpose insertions involving field codes. It is designed to provide a flexible block of text that you can combine with other fields. For example, if you have defined a certain number in one document as a bookmark, you could then use it in a field calculation in another document by using {IncludeText} to bring in that bookmark’s content.
There are two ways of inserting an {IncludeText} field. You can use the Insert Text from File command, or you can use Insert Field. Each has its advantages and drawbacks.
Creating an {IncludeText} Field with Insert Text from File
This first method using the {IncludeText} field inserts entire files rather easily, and it enables you to browse for the file you want to insert. However, it does not allow you to browse for bookmark names, so you must know the exact name of the bookmark you want (if you don’t want the entire file). It also does not enable you to use special switches in the field code. Here are the steps to follow:
1. Position the insertion point where you want the inserted text to appear.
2. On the Insert tab, click the arrow on the Object button, and then click Text from File. The Insert File dialog box opens.
3. Navigate to and select the file you want to include.
4. (Optional) To include only a bookmarked range, click the Range button, type the bookmark name or cell range, and click OK.
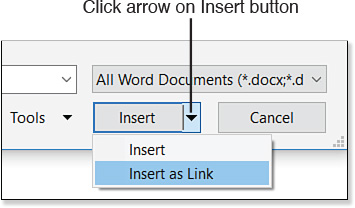
5. Open the drop-down list on the Insert button and choose Insert as Link (see Figure 15.16). The content of the file appears in the document.
Creating an {IncludeText} Field by Inserting a Field Code
An alternative method provides dialog box options for including any of several switches, such as for XSL transformation or namespace mappings, but it does not enable you to browse for the path and name of the file. To use this method, follow these steps:
1. Position the insertion point where you want the inserted text to appear.
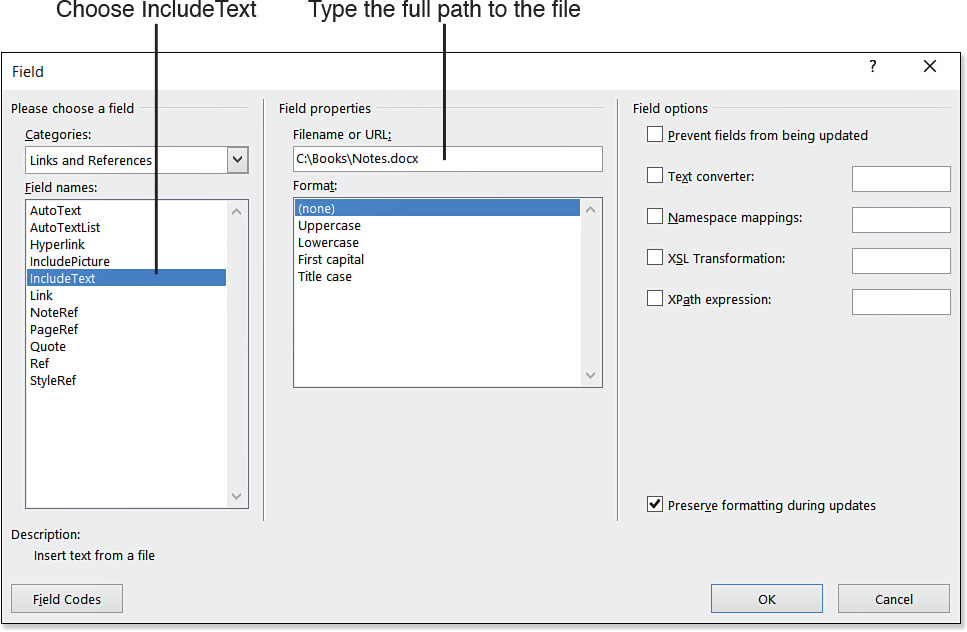
2. On the Insert tab, click Explore Quick Parts and then click Field. The Field dialog box opens.
3. In the Categories list, choose Links and References (or choose All).
4. On the Field Names list, click IncludeText.
5. In the Filename or URL text box, type the complete path and name of the file (see Figure 15.17). If the path includes spaces, enclose the path in quotation marks.
6. (Optional) If you want to enter a bookmark name, do the following:
a. Click the Field Codes button. A Field Codes text box appears, showing the syntax that will be used for the field code.
b. Click at the end of the existing code string and type a space. Then type the bookmark name.
c. Click Hide Codes to return to the regular view of the dialog box.
7. (Optional) For any of the special-purpose field options, mark the check box and enter the desired value. Or, if you are more comfortable working directly with the switches, click Field Codes and enter the syntax manually. Table 15.1 explains the available switches.
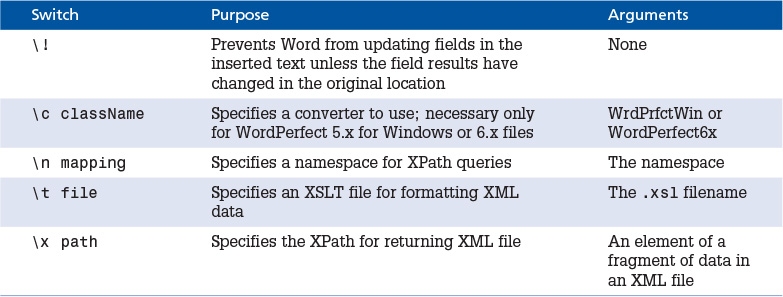
Table 15.1 Switches for the {IncludeText} Field
8. Mark or clear the Preserve Formatting During Updates check box to indicate how you want formatting handled when the field is updated. When the check box is marked, the main document’s formatting prevails; when it’s cleared, the formatting is brought in with the text being inserted.
9. Click OK. The text is inserted.
Updating an {IncludeText} Field
After inserting the field, you can update it by right-clicking it and choosing Update Field or by selecting it and pressing F9.
To view the code on which the field is based, right-click it and choose Toggle Field Codes, or select it and press Shift+F9.
Text that has been inserted using {IncludeText} is directly editable in Word—unlike text brought in with Insert Object. However, the next time you update the field, any changes made to the text are wiped away as a fresh copy is loaded from the original source. To save your changes to the original source, press Ctrl+Shift+F7.
Inserting a Picture with {IncludePicture}
The {IncludePicture} field links to a picture from an outside source. Like {IncludeText}, it’s not meant as a replacement for an OLE link; rather, it has some special-purpose uses. For example, you might set up a field with a logical condition and then use two different {IncludePicture} operations to insert one picture or the other based on the condition.
There are two methods of creating an {IncludePicture} field: the Insert Picture command and the Insert Field command.
![]() Caution
Caution
A linked picture inserted with {IncludePicture} is updatable, but there’s no way of updating it via Word’s user interface. You have to use the shortcut key F9 to do it. Why? Well, an object must have a “context” that determines which shortcut menu command set appears for it. A linked picture is a field-inserted object, but it is also an inline image. The designers of Word had to pick which shortcut menu would be the most useful for you to have, and they went with the one for inline images. That’s why there’s no Update Field command on the shortcut menu for a picture linked with {IncludePicture}.
Creating an {IncludePicture} Field with Insert Picture
In Chapter 10, “Working with Pictures and Videos,” you discovered how to insert a picture from a file. The resulting picture is a static image; it is not linked to the original.
![]() To review the procedure for inserting a picture from a file, see “Inserting Pictures,” p. 390.
To review the procedure for inserting a picture from a file, see “Inserting Pictures,” p. 390.
To use an {IncludePicture} link for it instead of inserting a static copy, there’s just one little change: Instead of clicking the Insert button in the Insert Picture dialog box, open the Insert button’s drop-down list and choose Insert as Link, the same as with Figure 15.16. This method is simple and lets you browse for the file easily, but it does not allow options to be set for the import and linkage.
![]() Tip
Tip
To update all the field codes in the document simultaneously, press Ctrl+F9.
Creating an {IncludePicture} Field by Inserting a Field Code
By using the field code insertion method, you can specify various options and switches for the {IncludePicture} field. However, it’s not quite as easy a method as Insert Picture.
Before starting an {IncludePicture} insertion, make sure you know the full path and name of the file you want to insert, because you can’t browse for it when inserting the field. The full path includes the drive letter and folder, like this: C:BooksXfer.tif.
To insert a graphic by inserting an {IncludePicture} field code, follow these steps:
1. Position the insertion point where you want the inserted picture to appear.
2. On the Insert tab, click Explore Quick Parts, and then click Field. The Field dialog box opens.
3. In the Categories list, choose Links and References (or choose All).
4. On the Field Names list, click IncludePicture.
5. In the Filename or URL text box, type the complete path and name of the file. If the path includes spaces, enclose it in quotation marks. Replace single backslashes with double ones.
6. (Optional) Mark any of the Field Options check boxes for any special options desired:
![]() Graphic Filter—You can specify a certain filter file to use (
Graphic Filter—You can specify a certain filter file to use (.flt file), but Word can usually determine this automatically for you. Marking this check box includes the c switch with the filter you specify as the argument.
![]() Data Not Stored with Document—Marking this check box includes the
Data Not Stored with Document—Marking this check box includes the d switch, which creates a link only; it does not insert the graphics data into the document. This reduces the document file size, but if the original file is not available, the graphic does not display.
![]() Resize Horizontally from Source—Marking this check box includes the
Resize Horizontally from Source—Marking this check box includes the x switch, which resizes the graphic horizontally based on the source image.
![]() Resize Vertically from Source—Marking this check box includes the
Resize Vertically from Source—Marking this check box includes the y switch, which resizes the graphic vertically based on the source image.
7. Click OK. The picture is inserted.
The resulting inserted picture does not obviously appear to be a field, unlike the inserted text with IncludeText. It is not shaded gray, and if you right-click it, no special field-related commands appear. However, the picture is a field, and it is updatable. Select it and press F9 to update it.