Chapter 9. Using the Content Pipeline
In this chapter, you will learn:
• Content processors
• Content importers
• Building assets
New game developers normally don’t consider building content. In fact, most don’t even realize that content (much like code) should be built to begin with! In the XNA Game Studio runtime, building and subsequently loading content is quite simple.
Even if you didn’t realize it, you’ve been using the content pipeline throughout this book. Every time you load a texture, a model, or any other piece of content, it goes through the content pipeline. You even created a basic content processor in Chapter 6, “Built-In Shader Effects.” Many of the intricacies of the content pipeline are discussed throughout this chapter.
Tracing Content Through the Build System
How does content go from an idea in the mind of an artist to something represented in your game? Well, so far, you have added the files to your content projects. Magic happens, and then you load the content in your game! This chapter talks about the magic.
When a file is first added to a content project, its extension is checked. If there is a content importer for the extension, the file’s Build Action is set to Compile. It is now set to go through the content pipeline. During your application’s build task, your content also is built. This is done in essentially a two-step process. First, your content is imported, and this is normally done by reading the data in the file on disk, and performing some operation(s) on it. After the data has been imported, it can be optionally processed, which enables you to massage the data if needed.
After the content has been imported and processed, it writes out to a new file that is called assetname.xnb, where assetname is the name of the asset and xnb is the extension (short for XNA Binary). While your game runs, and you call Content.Load for that asset, the .xnb binary file opens, reads back in, and the content objects are created. Naturally, this description is high level, and throughout this chapter we delve deeper into these facets.
Why do you need to have a content pipeline? In all actuality, you do not, but without a pipeline means that the importing and processing of the content needs to happen during the runtime of your game! For example, say that you create a 2D game to run on the Xbox 360, you have fifty textures in your game, and each one is 512 by 512 pixels.
You created these textures in an art creation tool (for example, Photoshop or Paint), so they are 32-bit PNG files. Without the content pipeline, you need to open each file and load the data. With so many large textures though, you probably want to use DXT compression on the textures. Because the file you just loaded is a 32-bit PNG file, you will have to do the compression at runtime, and then push the compressed data into the texture. Wait though, you aren’t done yet! Your computer processor stores data in little-endian format, but the Xbox 360 CPU expects the data to be big-endian! So you’ll also need to byte swap all of the data before you DXT compress it.
Let’s say it takes approximately 5ms to read the file from the disk. It then takes another 20ms to swap all the bytes, and another 30ms to DXT compress the texture. Each file is now taking 55ms to process, and with a total of 50 files, you’re looking at 2750ms to load the data. That’s an almost three-second load time!
Now compare that to a similar scenario using the content pipeline. It still takes 20ms to swap all the bytes and 30ms to DXT compress the texture. However, the 2500ms it takes to do the two operations on 50 files occurs while your game is building, not while it runs. While it runs, it reads only the file off disk. Because the texture is compressed already at build time, reading the file off the disk takes half the time now that the data is smaller! So instead of having an almost three-second load time, your game now has a 125ms load time, which is not even five percent the time it took before. You’re doing the same operations, but because you moved the bulk of the work out of the runtime of the game and into the build time, your game is faster.
Note
The time spans used in this example were purely hypothetical and used to illustrate a point. Don’t consider them actual measurements.
Now that you have a basic understanding of the flow of the content pipeline (and some of the reasons why you might want to use it), let’s dive right in and see some examples.
Content Processors
First, let’s recreate one of the first examples you did in the book. Create a new Game project, and add an image to your content project. The code in the downloadable example uses cat.jpg. Then, draw that texture by replacing your Draw method with the following:
protected override void Draw(GameTime gameTime)
{
GraphicsDevice.Clear(Color.CornflowerBlue);
spriteBatch.Begin();
spriteBatch.Draw(Content.Load<Texture2D>("cat"),
GraphicsDevice.Viewport.Bounds, Color.White);
spriteBatch.End();
}
Replace the cat asset name in Content.Load with whatever asset you used if you used something else. This does nothing more than render your image to fill the entire game window. However, now let’s mix things up with a different type of content processor.
Note
You might wonder why the content wasn’t stored in a variable and is instead loaded every call to Draw. The content manager caches assets for you, so you do not get a new texture every time you draw this.
To add a new project to your solution to hold your content pipeline extension, right-click the solution, choose Add->New Project, and choose Content Pipeline Extension Library as in Figure 9.1 (you can name it whatever you like).
Figure 9.1. Adding a new content pipeline project

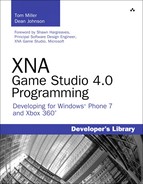
This creates a new content pipeline extension projection in your solution, with a default processor that doesn’t actually do much of anything. Because you will update this though, and you want to change how your content is built, you need to add a reference to the new project to your content project. Right-click the References in your Content project and select Add Reference. Then choose the content pipeline extension project you just created from the Projects tab, as in Figure 9.2.
Figure 9.2. Adding a reference to your content pipeline project
For this example, you take over the processing phase mentioned earlier. Because you modify the texture, you don’t need to import it—you can let the default importer handle that (importers are discussed later in this chapter). To create a content processor, you need to create a class and derive from ContentProcessor, so delete the class that was generated for you and replace it with the following:

Notice that the ContentProcessor is a generic type with two types required. The first type is the input type of the data that is incoming, and the second is the output type that is returned after processing is complete. Because you modify a texture and return a texture, the input and output types are the same.
Also notice that the types are Texture2DContent, not Texture2D objects themselves. Although many times the runtime version of an object and the build-time version of an object are the same (as you see later in this chapter), sometimes you might need (or want) to have different properties/data/methods on your build-time type. This is what Texture2DContent has, and you see how this gets magically transformed to a Texture2D in your game later this chapter.
The last thing to mention before moving on is the first thing your class has, namely the ContentProcessor attribute. The DisplayName property of this attribute enables you to specify what name is displayed when you see the processor in Visual Studio. The name here implies how you process the texture.
In order to do some actual processing, override the Process method in your class. Because it is an abstract method, if you do not do so, you get a compile error. Add the following override to your class:

Notice that the Process override returns the output type (in this case, Texture2DContent) and takes in the input type (again, Texture2DContent) as a parameter. It also takes in a ContentProcessorContext, which provides helper methods for processing. When the texture is first imported, you don’t know what format it is, so first convert it to a known type that you can then modify. The TextureContent class (which Texture2DContent derives from) luckily includes a method that does this for you. To modify each pixel’s color individually, convert to a PixelBitmapContent type of Color.
After the conversion (if it was even needed), loop through each MipmapChain in the texture via the Faces property. In the case of a Texture2DContent, it is only a single Face, and a cube texture has six. You then can enumerate through each mip level in the face. After you have the current mip level, get each pixel’s color by using the GetPixel method, create a new color that is an inversion of the original color, and then use the SetPixel method to update with the new inverted color. At the end, return the Texture2DContent you are modifying and you’re done. You now have a content processor that will invert all of the colors in a texture.
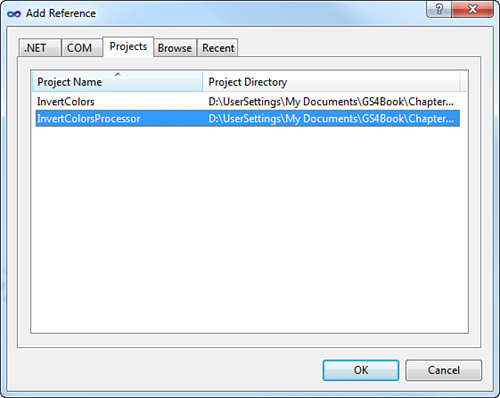
Notice that when running the example, nothing at all has changed. The colors certainly aren’t inverted; it’s the same image as it was last time! That’s because you never changed the actual processor your application uses. Select the image you added to the content project and update its Content Processor to the InvertColorsProcessor, as in Figure 9.3. The name shown here is whatever you used for the DisplayName in the attribute before your class previously.
Figure 9.3. Choosing your processor
Now when you run the application, notice that your original image is shown with the colors inverted because the processor you wrote is used, as in Figure 9.4.
Figure 9.4. The image with the colors inverted

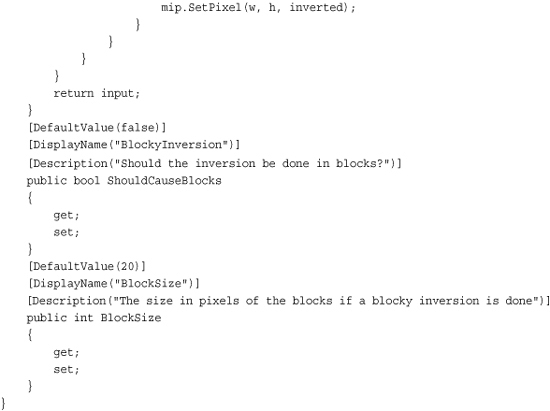
Now, this is all well and good, but it isn’t customizable. The image simply has its colors inverted. A way to customize the processors would be useful, and luckily, you can do just that. Add a couple properties to control how the colors are inverted (allow them to form blocks):

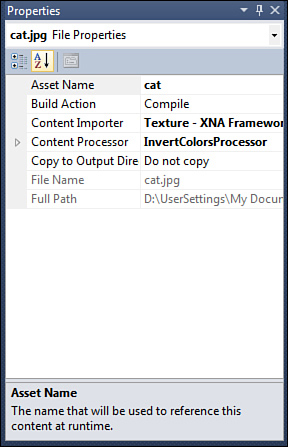
The properties themselves are simple enough—a bool to determine whether you should use the blocky code (that you haven’t written yet), and an int to specify the size of the blocks. Notice that the attributes on the properties enable you to control how the properties are displayed in Visual Studio. If you compile your solution now, and then look at the properties of your image in the content project, you now see two extra properties available, as in Figure 9.5.
Figure 9.5. Content processor properties
Note
If you get compile errors on the attributes, add a using System.ComponentModel clause to the code file.
Notice how the property name in the Visual Studio window is the name specified in the DisplayName attribute, and not the real property name. Set the BlockyInversion property to true. To update the processor to respond to the properties, add the following code before the SetPixel call in your Process method:
if (ShouldCauseBlocks)
{
if ((h % BlockSize > (BlockSize / 2))
|| (w % BlockSize > (BlockSize / 2)))
{
inverted = original;
}
}
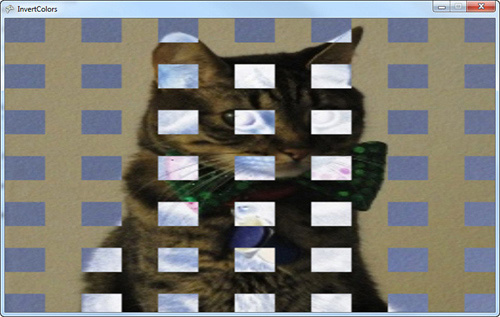
Running the application now causes your image to be partially inverted, and partially not, forming a blocky type pattern, as in Figure 9.6. Remember that all of the inversion is done at compile time. The texture that is loaded into memory is already modified, so none of this happens at runtime.
Figure 9.6. A blocky image inversion
Debugging Content Pipeline Extensions
Because the content pipeline is executed during compilation time, you can’t just “run the application” to debug the code you’re writing in your content pipeline extension. In reality, the application that is running the code is Visual Studio (or MSBuild, depending on how you’re building), which means that you need to do something else for debugging.
One option is to use a second version of Visual Studio (or whichever debugger you use), and use it’s Attach to Process command to attach to the original Visual Studio instance. This enables you to put break points in your content pipeline extension code and debug. However, this makes Visual Studio run remarkably slow, so it isn’t recommended.
An easier solution is to force the compilation of your content to give you the opportunity to debug, which you can do using the Debugger.Launch method in the System.Diagnostics namespace. When the line of your code is executed, it forces the system to attempt to launch the debugger, and you see a dialog much like Figure 9.7. Using this method, you can then debug your content pipeline extension.
Figure 9.7. Debugging a content pipeline extension
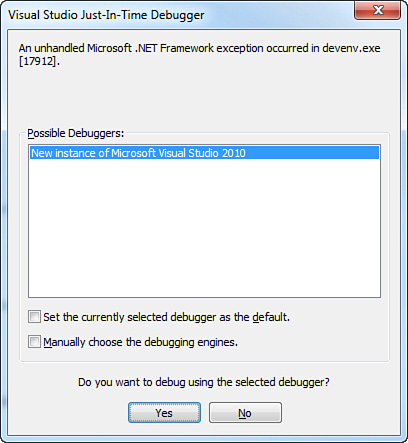
Note that if you select No in this dialog, it kills your Visual Studio session.
Content Importers
Using a file type that the content pipeline already imports is one thing; there are times when you have a completely new type of file to import (for example, a level in your game). So let’s create an example that shows off a concept such as that. First, create a new Game project. You’re actually going to create quite a few projects here, so add a new Content Pipeline Extension project to the solution as well that will hold your importer. Lastly, add another project to your solution, but this time a Game Library project. This is used to hold the data types that both your game and the content pipeline extension will need.
Set up your project references correctly as well. Add a reference to the game library project you just created to both the content pipeline extension project as well as the game project. Add a reference to the content pipeline extension project to your game’s content project as in the previous example.
Now, let’s create the shared data type that will represent your game’s level. In your game library project, replace the class and namespace that it auto-generated with the following:
namespace ContentImporter
{
public class Level
{
public List<Vector3> PositionList;
public List<Vector3> RotationList;
}
}
You don’t need anything fancy for this example. Simply hold a couple lists of Vector3, one of which holds the position of each model in your world, and the other holds the rotation portion. Before the content pipeline extension portion, let’s implement the game portion. Add the following variables to your game project:
Level mylevel;
Model model;
Matrix view;
Matrix proj;
Later in the chapter, you learn how to include things such as Model objects in your runtime classes, but for now add a model to your content project. The downloadable example uses the depthmodel.fbx model. In your LoadContent method, create the following objects:

Finally, replace your Draw method with the following:

Here, you use the data from your level to render the model wherever it says after enabling the default lighting model. With that out of the way though, you are almost ready to create your content pipeline extension. First, add a new file to your content project called mylevel.mylevel, and include the following data in it:
10 10 10 0.3 0.2 0.1
20 20 20 0.1 0.2 0.3
30 30 30 0.2 0.3 0.1
1.5 2.3 1.7 0.4 0.5 0.6
40.2 70.1 -10.2 0.6 0.5 0.4
-10 10 -10 0.7 0.8 0.9
20 -20 20 0.9 0.8 0.7
-30 30 -30 0.8 0.9 0.7
This is the data you are going to import that represents your level. Each line is six different numeric values. The first three represents the position in the world, and the next three represents the yaw, pitch, and roll angles of rotation for the model. Now, go to your content pipeline extension project and remove the default ContentProcessor class it auto-generated, and replace it with the following:

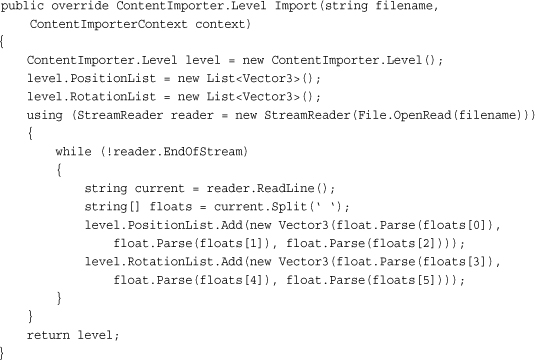
Much like your processor, use an attribute to describe your importer. The first parameter is the extension of the file the class will import; in this case, we picked .mylevel. You also need to derive from the ContentImporter class using the type you will fill with the imported data. This object has a single abstract method (again much like the processor) called Import. You can use this implementation of the method:
Note
If you have compilation errors with the StreamReader class, add a using clause at the top of the code file for System.IO.
Notice that the method is quite simple. You create your level object that you’ll return after importing the data. You create the two lists that will store the data. You then use the standard runtimes StreamReader class to read through the file (which is passed in as a parameter to the import method). You split each line of the file into the individual numbers they contain and drop those into your two lists, and you are done.
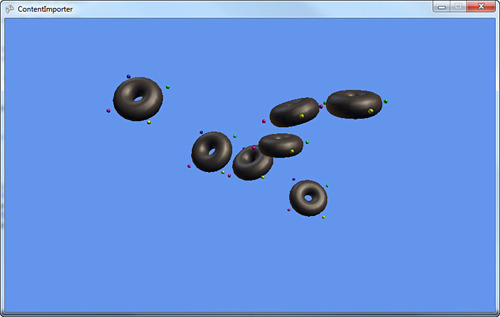
Now, this code doesn’t check errors, so if something goes wrong, it won’t work. We discuss ways to handle this in a few moments. Build the content pipeline extension project, go back to your content project, and notice that your mylevel.mylevel file uses the My Level Importer importer. If it is not, select the content importer, and make sure that the Build Action is set to Compile. If you run your application now, you see your level in action, as in Figure 9.8.
Figure 9.8. Loading a world from a content importer
So as you see, this works, but who would want to build a level that way? You still have to create a model in your game, and you use only a single model in the level. It would be better to make your importer work, and import models and textures and everything all in one go to make a much better level.
Combining It All and Building Assets
Although the concepts are slightly more in depth than what you’ve seen up until now, that’s exactly what you’re about to do. Create a new solution and perform the same steps you did in the previous section, except skip the extra game library project. So, create a new game project, a new content pipeline extension project, and add a reference to the extension project to your game’s content project. Later in this section, you see why you don’t need to create the extra game library project for this example.
Again, let’s start with what your game project will do. Add the following classes that will represent your level to your game project:
public class MyLevelObject
{
public Model Model;
public Vector3 Position;
public Vector3 Rotation;
}
public class Level
{
public List<MyLevelObject> LevelObjects;
public Texture2D Background;
}
Although this still isn’t a realistic object model that you would load a level into, it is much closer than the previous example. The Level object itself stores a texture that is used as the background of your level, and a list of objects that describe the entities in your level. In this case, each entity is a MyLevelObject that includes the Model that is used, along with its Position and Rotation like the previous example. Let’s write the game portion now, so add the following variables to your Game class.
Level mylevel;
Matrix view;
Matrix proj;
Notice that you don’t need the Model variable this time because it is stored inside the Level object. You also don’t have anything declared for your background texture, because this is also a part of the Level object. Create the following objects in your LoadContent overload:

At the end of this section, the last line loads the whole level, including all of the models, textures, and data. Before learning how to make this work, let’s finish the game portion by replacing the Draw method with the following one:
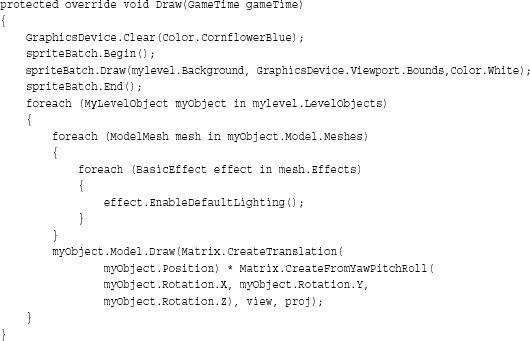
This is similar to the previous method, except you first use the Background property of your level to render a texture covering the entire game. You then make sure that each object in your level has the lighting enabled, and then render each object based on the data found in your level.
From here, things get quite a bit more esoteric. First, notice that the Level object is declared in your Game project this time, rather than a shared project that both the content pipeline extension and the game project has access to. This is because there are certain types where you need (or want) to have a different type of object used at build time than you want to use at run time.
You experienced this earlier in the chapter. If you recall, your first content processor was eventually turned into a Texture2D in your game, but it started out as a TextureContent in the content pipeline. TextureContent is the build-time version of the Texture runtime class. This is because there are things on the build-time version of the class that make no sense in the runtime version (for example, the conversion helper function you used earlier). Knowing this, because your objects use these types, you also need build-time versions, so declare your versions now in your content pipeline extension project:
public class MyLevelObject
{
public ModelContent Model;
public Vector3 Position;
public Vector3 Rotation;
public string ModelFileName;
}
public class Level
{
public List<MyLevelObject> LevelObjects;
public TextureContent Background;
public string BackgroundFileName;
}
Notice that this is almost an exact duplicate of your runtime class, except the graphics objects have been replaced with the build-time versions of themselves (in this case, ModelContent and TextureContent). Each object also includes a new property that is a string representing the filename needed for each of the graphics objects. You see why this is needed in a few moments.
Before you create your importer and processor for these objects, let’s create the actual data you’ll use. Create a new file in your content project called mylevel.mylevel and include the following data:
glacier.jpg
depthmodel.fbx
10 10 10 0.3 0.2 0.1
environmentmapmodel.fbx
20 20 20 0.1 0.2 0.3
depthmodel.fbx
-50 -40 30 0.2 0.3 0.1
box.fbx
1.5 2.3 1.7 0.4 0.5 0.6
environmentmapmodel.fbx
40.2 70.1 -10.2 0.6 0.5 0.4
depthmodel.fbx
-10 10 -10 0.7 0.8 0.9
depthmodel.fbx
20 -20 20 0.9 0.8 0.7
environmentmapmodel.fbx
-30 30 -30 0.8 0.9 0.7
The first line is the filename of the texture that is used as the background for the level. Each pair of lines represents first the model filename and then the data for that associated model. You can use any valid model and texture filename here. Note, however, that these files are expected to be in the same folder as the mylevel.mylevel file, so if they aren’t, copy them there now (they are already in the same folder in the example provided with the downloadable examples).
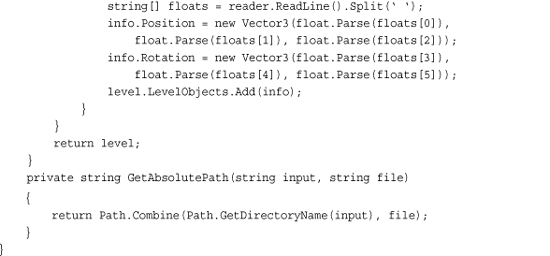
Next, add the ContentImporter class to your extension project:
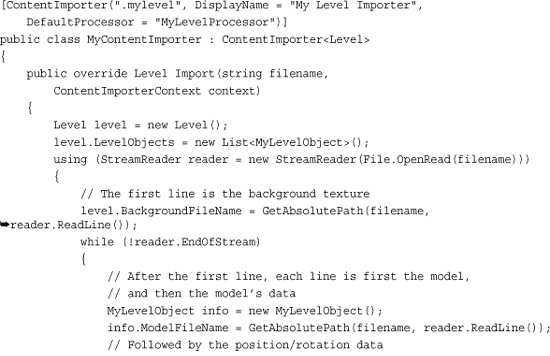
First, notice that the attribute for your importer class has a new property added, the DefaultProcessor. This is used to specify the name of the default processor to be used by things that the importer will import. This is the name of the processor you’ll write in a few moments.
There is also a helper method included that converts the filename you used in the actual data you created to the absolute location on disk by using the folder the data file was found in. This is why you need to make sure the textures and models your level needs are in the same folder as your level file (or change this code so it knows where to find them).
Aside from that, this is almost the same as your other importer except that you are not yet creating the textures and models your level needs, but instead simply storing the full filenames in the extra property. This is because you do that portion in the processor. Because there’s nothing else new here, let’s add the processor to this same code file now:
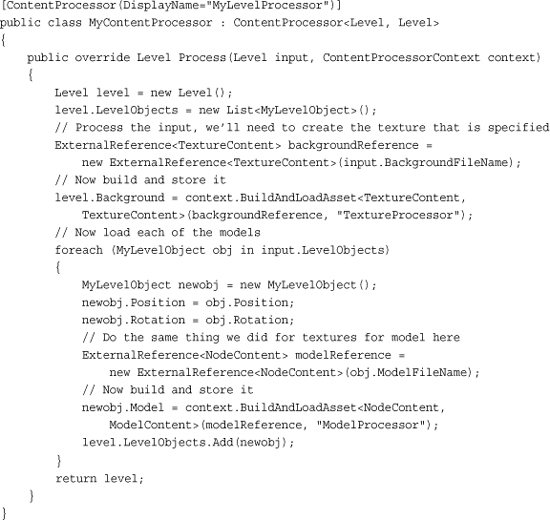
This is different from anything you wrote previously, and there is quite a bit of stuff going on here. First, create the Level you’ll return and the LevelObjects that go with it. Next, load the file you know about for the background texture into an actual TextureContent object. To do this, create an ExternalReference object of the type you want to load—in this case, TextureContent. You can then use the BuildAndLoadAsset helper method, which builds the asset specified in the external reference, and then load its into the appropriate processed type, which you then can store in your new Level object as the Background texture. By using the BuildAndLoadAsset helper method, this also adds the external file as a dependency of your Level file, which enables the content to be recreated if anything is modified.
After you load the TextureContent, you are ready to move on to the object list. Copy the Position and Rotation over, and then perform a similar operation to the Model as you did to the Background earlier. The major difference here is that the model is imported as a NodeContent object, and then processed into the ModelContent you need rather than being imported and processed as the same type. Then, add your new data into the list before finally returning the level.
You might wonder, “Ok, I have the importer and the processor written, now I can run my application and see the work!” If you do that, you get an exception when you try to load your level. It complains about not being able to find the Level type. This is the reason your first importer had the extra game library project that stored the type, so both build time and runtime had access to it. However, you can customize how your content assets are written out to disk by using a ContentTypeWriter. Add the following using clause at the top of your content pipeline project:
using Microsoft.Xna.Framework.Content.Pipeline.Serialization.Compiler;
Then, declare a new class that will be the writer for your content:
[ContentTypeWriter]
public class LevelContentWriter : ContentTypeWriter<Level>
{
}
This attribute tells the system that this class should be checked before writing content, and if the content you write is the appropriate type (the type specified in the generic of the ContentTypeWriter class), then to use this class rather than the default writer. Because this is the writer for the Level class, anytime a Level asset is written, this class will be called instead. There are three methods that need to be overwritten for this class to work. Add the following:
Because you have a customized writer now, you need a customized reader. The first method enables you to specify what to use as the reader for this type of content. It expects you to return this as the assembly qualified name of the reader class. In this case, the game project is called ContentImporter, and the namespace the reader class lives in (after you write in shortly) is also ContentImporter, so this is the assembly qualified name of this type. If you aren’t sure what the name of the type is, you can verify it by using the typeof(Type).AssemblyQualifiedName helper property on the appropriate type.
The next method is also the assembly qualified name of a type, but this time it is the runtime version of this content type. Because you can use the GetRuntimeType method to specify the type that you will load from the data, you don’t need to have the shared game library project.
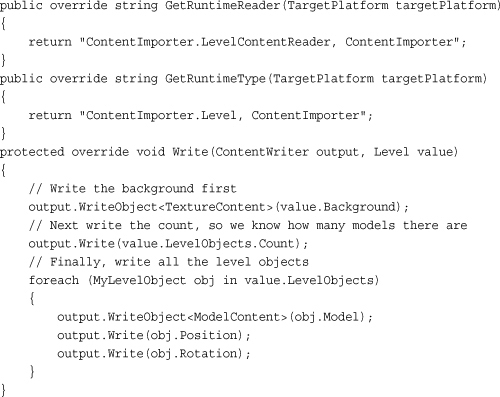
Finally, you have to actually write the data, which is what the Write overload does. You simply write the Background first, then the number of objects in your list, followed by each object itself. Now, you’re ready to see the fruits of all this labor. All you need now is the reader half of this and you’re done. Add the following class back in your game project:

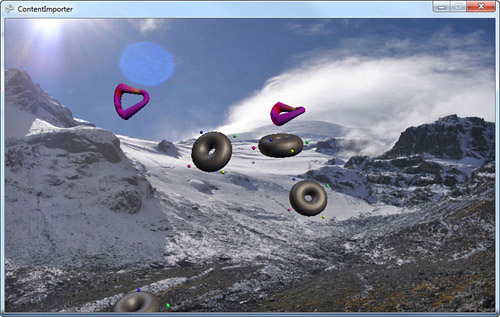
As you see here, you create the new Level object, and then reverse what you did in the writer. You read the Background first, followed by the number of items in the list, before finally reading each list object and adding them to your new list. If you run the application now, it builds everything up into your Level object, your scene renders on the screen much like Figure 9.9.
Figure 9.9. Your full level rendered
Combining What You Learned So Far
What if you want to combine various importers and processors though? What if you wanted to use the color inversion processor on your background texture for your level? Luckily, you can do that, too! Add the final version of the color inversion processor to your content pipeline extension project:

Now you will want to include the same properties on your Level processor, but also include another one to specify whether the level background should be inverted or not. Add the following properties to the MyContentProcessor class:

To invert the background texture (if it was specified as such), add the following code to the beginning of the Process overload of your MyContentProcessor class:

First, choose which processor should be used based on whether or not the user has asked to have the textures inverted. Then, create a new OpaqueDataDictionary that is used to store extra data for the processor if it is needed. Any data in the dictionary is used to populate the properties of the processor before it is executed. So if the user has asked to invert the colors, you pass in the extra parameters specifying whether it should be blocky or not, and by how much.
To update your building command to use these new properties, replace the first BuildAndLoadAsset method with the following:
![]()
This passes in the correct processor and opaque data depending on which options were specified. Compile this now, and then change the properties of your level to allow color inversion of the background. Compile and run to see that the background image is now inverted!
The Content Manager
The ContentManager class is part of the runtime portion of the Content Pipeline. It is the class that you use to load the content. It also caches the content it loads, so subsequent requests for the same piece of content simply returns it again, so you don’t need to worry about it loading multiple copies of the same thing. This also means that when you call Unload on a ContentManager, it destroys all the assets it has loaded in one swoop.
More importantly, you can create as many ContentManager classes as you want, and use them to control how your game manages asset lifetime. For example, to have one ContentManager that holds all of the user interface elements that are needed for menus, startup, and so on, use a separate ContentManager to hold the assets for your content that is part of the game and levels. Then, when a level is over, you can Unload the ContentManager and free up all the resources you were using.
Although all of the examples in this book use a single ContentManager class (and the default game templates do as well), don’t assume that it means you should use only one. More complex games should use several of these and unload them at appropriate times.
Summary
The content pipeline is a powerful tool in your arsenal of creating great games. Moving your asset loading from runtime to build time can give you huge gains in performance, and makes your game code clean and easy to read. This, coupled with the fact that the content pipeline is so extensible, enables you great freedom in how you use the pipeline for your content.
In the next chapter, you learn everything there is to know about Avatars!