Chapter 14. Storage
In the majority of games that are made these days, it is rare that the entirety of the game can be completed in a single sitting of a reasonable length. Some games can last beyond 40 hours, and although sitting around playing games nonstop for that amount of time sounds fun, everyone needs a break sometime! The majority of games now have a concept of saving state for you to continue where you left off. In this chapter you will learn about the various ways to use storage to do this including:
• Using isolated storage
• Using the XNA Game Studio storage API
• Loading loose files in your games
What Is Storage?
Although many games incorporate saving state directly into game play (for example, by having only certain places you can save progress), this chapter focuses solely on how to use the facilities provided by the XNA runtime and the platforms on which it runs.
XNA Game Studio 4.0 comes with two separate storage solutions: one for the Reach profile that runs on the platforms XNA runs on and another for the HiDef profile that runs only on Xbox and Windows and gives you extra control for your Xbox storage needs.
Isolated Storage
The first type of storage you learn about here has actually been around for a while, and it is called Isolated Storage. As the name implies, things stored here are isolated from other things—in this case, other applications. You are safe in the knowledge that anything you write in your store, no other applications can read or write. Let’s start off by creating a new Windows Phone Game project to show some of the features that this storage API has.
Before you can store anything, though, you need something interesting to save. You can imagine that this could be some state of a level such as where the player is, the amount of health they have, and fun stuff like that; however, for this example, you need something simple to show the concepts.
First, add a SpriteFont object called Font to your project because you use this to render the data you will save. Next, you need to add a new using statement to the top of your game1.cs code file because the default template that is used for creating new projects doesn’t actually have the namespace that the isolated storage constructs live in. Add this to the top of your code file:
using System.IO;
using System.IO.IsolatedStorage;
What this example does is to allow a user to plot points for the game, and then save those points for later. You need a few variables for this, so go ahead and add these to your game now:
SpriteFont font;
List<Vector2> points;
As you see, the points are just their positions stored in a vector. You need an easy way for the user to add new points, though, so in your Initialize method, add the following to tell the system that you will listen for a Tap gesture from the touch panel (which is simulated with the mouse on the emulator):
// Support tap gestures to map points
TouchPanel.EnabledGestures = GestureType.Tap;
points = new List<Vector2>();
Also notice that you initialize the points list. Because you need to render these points somehow, you also need to create your SpriteFont object in the LoadContent method:
font = Content.Load<SpriteFont>("font");
Of course, you need to draw these points. You can use a simple x character to show the position of the points, so add the following code to your Draw overload before the call to base.Draw:
spriteBatch.Begin();
foreach (Vector2 position in points)
{
spriteBatch.DrawString(font, "x", position, Color.White);
}
spriteBatch.End();
You don’t need anything super fancy here; you simply draw a white x at every position in the points list. All that is left now is to add points to the list, luckily that’s quite easy! Just add this code to your Update overload:
while (TouchPanel.IsGestureAvailable)
{
GestureSample gesture = TouchPanel.ReadGesture();
points.Add(gesture.Position);
}
This is extremely simple stuff here. Simply read all gestures while any are available and add the position of that tap to your list. Running the game now lets you tap on the screen to get a bunch of white X’s drawn everywhere, much like you’d see in Figure 14.1.
Figure 14.1. A bunch of white X on the emulator

As you’d probably guess, if you stop and restart the application, all of your wonderful x marks get lost. What if you designed a great work of art using small x marks? This situation needs to be rectified.
Saving and Loading Data
First, you need a good spot in your game to save the data. In a real game, this would probably be at the end of a level or at a defined save point in the game. Because this is just an example, though, you can instead pick an arbitrary point, in this case, when the game exits. Add the following override to your game:

The first thing to notice is the creation of an IsolatedStorageFile object via the GetUserStoreForApplication method. You can think of this object as the root of any storage facilities you need. It can contain files, directories, and all kinds of things you see in a few moments. Next, you want to use the CreateFile method to create a new file in your isolated store. The name of this file can be any valid filename you would like; for this example, choose pointData.
Because the CreateFile method returns a stream, you can use the BinaryWriter helper object to allow you to easily write data into your store. You simply enumerate over each of the points in your list and write out the X and Y components to the stream. These statements are wrapped in the using keyword, so the objects are disposed (and closed) immediately when you’re done with them.
Running the game now lets you continue to add new x marks and save the current state of the marks when you exit; however, you never read them back in, so you need to fix that. Add this override to your code (this happens when your game first starts up).
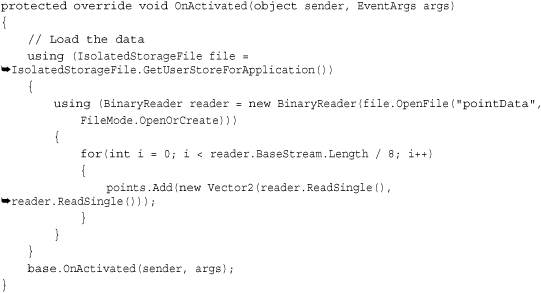
In this call, you essentially reverse what you did when you saved the data. You once again create your IsolatedStorageFile object, but instead of creating a new file, you open an existing file. Naturally, you use the same name you used earlier when you saved the data. If you notice, in this example, you use the FileMode.OpenOrCreate option when opening the file. This opens the file if it exists or creates a new one if it does not, and you do this so you don’t have to worry about an exception trying to open a file that doesn’t exist. If you use the FileMode.Open option instead, the method throws an exception if that file does not exist.
Instead of using the BinaryWriter helper class you used during the save operation, you can instead use the BinaryReader helper class to get that data out. Because you know that you are writing pairs of floats from your vectors, you can calculate how many points are in this file by taking the total length (in bytes) and dividing by eight (two floats that are four bytes each). You then add each new point into your point list.
With that, when you start up the application, all of the points you had drawn on the screen before you exited appear back where you left them!
The IsolatedStorageFile Object
At a basic level, this small example actually covers everything you need to do in a game to save state. However, it doesn’t give a great in-depth discussion of the features of the IsolatedStorageFile object.
You’ve seen the OpenFile method and the CreateFile method, although the CreateFile method is simply a helper method that calls OpenFile with the FileMode.CreateNew option passed in. These methods each return a Stream object that you can use however you want. Well, that’s not entirely true. One of the overloads of OpenFile enables you to pass in a FileAccess enumeration that enables you to specify whether you want the file to be opened for Read, Write, or ReadWrite. If you’ve passed in FileAccess.Read to your OpenFile method, you cannot write to the stream that is returned, for example.
There are other things you can get from this object. If you need to know the amount of available space remaining for your files, you can use the AvailableFreeSpace property. If you want to completely delete everything in the store for your game, use the Remove method. That’s a dangerous operation, though, so make sure you want to delete everything!
If you want to delete a single file rather than your entire store, use the DeleteFile method. For example, if you want to delete the file you created during the previous example, call file.DeleteFile("pointsData").
You might notice that this store looks much like a file system. There are methods such as CreateDirectory and CreateFile. Having the isolated store mirror a file system enables you to store your data in a hierarchy if you have the need to do so. For example, if you store a high-score list for every level in your game, you might envision a list of directories for each level with each directory containing a file called highscore.txt that contains the high scores for that level. There’s nothing stopping you from creating a bunch of files called level1highscore.txt, level2highscore.txt, and so on, but the option to have directories is there if you want to use it. With the ability to create a directory, the ability to remove it via the DeleteDirectory also exists.
If you imagine a scenario where you save the data for a particular character in your game and that character can be named by the player, you might be tempted to store the data in a file of that user-defined name. Because you don’t know what that name is, you need a way to enumerate files (and directories) within your store, and luckily you can do that with the GetDirectoryNames and GetFileNames methods.
With the basics of the IsolatedStorageFile object understood, there is one more scenario in which you can use this concept, and that is tombstoning, which is discussed in depth in Appendix D,“Dealing with Tombstoning.”
Although the isolated storage functionality exists on all the platforms that XNA runs on (and is part of the Reach profile), it lacks some of the features users have come to expect when running on some platforms, such as Xbox 360. Next, you’ll learn how to access those features!
XNA Game Studio Storage
If you used previous versions of XNA Game Studio, this next section should be familiar. It is the updated version of the storage API that shipped for the last few releases. Although it is more complicated than the version you just saw, it also has more features. First, emulate what you did originally in your Windows Phone 7 project by allowing the user to draw x marks on the screen, save, and reload them. Create a new Xbox 360 Game project.
Recreating the Project on Xbox
Because you need to use the storage api, as well as various IO functions, update the using statements at the beginning of your new game1.cs code file:
using System.IO;
using Microsoft.Xna.Framework.Storage;
You need the sprite font again to render the data, so add a new sprite font to your content project named Font. Include the variables for your list of points and the following font:
List<Vector2> points;
SpriteFont font;
Add the initialization of the list in the Initialize overload:
points = new List<Vector2>();
Also, include the creation of the sprite font in your LoadContent overload:
font = Content.Load<SpriteFont>("font");
To render your points, add the following code before the base.Draw call in your Draw overload:
spriteBatch.Begin();
foreach (Vector2 position in points)
{
spriteBatch.DrawString(font, "x", position, Color.White);
}
spriteBatch.End();
The code that you used to add new points to the screen in the Windows Phone project unfortunately does not work here. There is no touch screen for your Xbox 360! So instead, let users input points with the controller by allowing them to move a cursor around the screen and then pressing the A button to add points. To implement this simple feature, add a couple new variables to your project:
Vector2 currentPos;
GamePadState lastState;
The first variable is the current position of the onscreen cursor, and the second is the last frame’s state of the controller. Initialize the current position variable in your initialization method as well:
currentPos = Vector2.Zero;
Note
Yes, it is true that you don’t need to do this initialization (because the variable is by default initialized to zero), but it’s a good habit to initialize everything in your initialization methods to ensure that objects have the correct values.
To draw the cursor on the screen so users can see where they will place points, add the following line to your project before the End call on spriteBatch:
spriteBatch.DrawString(font, "*", currentPos, Color.Red);
To allow the user to update its position, add the following code to the Update method:
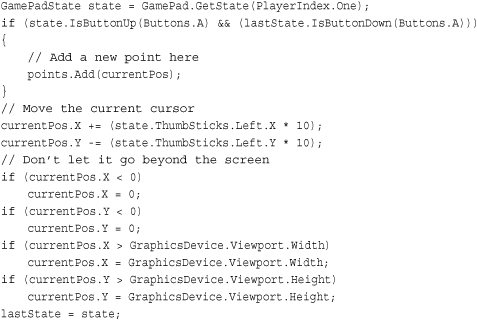
Note
This code assumes you have a controller plugged in and registered as player one. A real game handles this more appropriately.
The code here is pretty self-explanatory; it adds a new point to the list (at the current position) if the A button was pressed in the last frame and released in this frame. It increments the X member of the current position by how much you press the left thumbstick (multiplying by 10 makes the cursor move faster). It does the same thing with the Y member, except it decrements instead because the Y axis on the stick goes from 1 to –1. It then does some basic bounds to ensure that the cursor stays within the viewport, and stores the last state of the gamepad.
With that portion of the code done, save the data when you exit and restore it when you launch.
Devices and Containers
Let’s take a few moments to discuss the StorageDevice, because it is one of the sources of the most common mistakes when dealing with storage on the Xbox. The Xbox 360 provides a number of places to store data. You might have a hard drive, you might have one or more memory units, and now you can even have USB memory sticks attached. Each one of these is considered a device and can be used to store data for your games. Notice an example of a list of devices in which to choose in Figure 14.2.
Figure 14.2. Devices on an Xbox 360

Each device can have a wide variety of containers in it, and much like on the phone, each game has all of its data segregated from all other games. When navigating to the system memory blade in the Xbox 360 dashboard, you can see how much data each game is storing, such as in Figure 14.3.
Figure 14.3. Game data on an Xbox 360

StorageContainer objects are the equivalent of the IsolatedStorageFile object you used previously. The big difference is that a game can have multiple containers, where each game is limited to a single isolated storage store. As you can see in Figure 14.4, this single game has three distinct storage containers in it.
Figure 14.4. Multiple storage containers per game
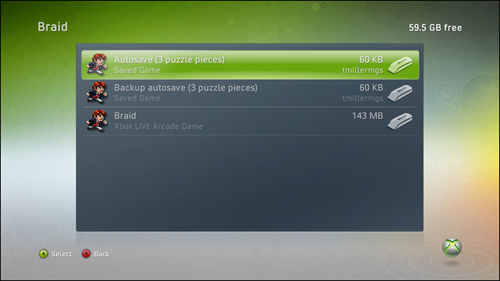
When you view this screen on the dashboard, it shows the containers that were created for the game, not the files themselves. Each container can contain many files and folders just like the isolated storage files could earlier this chapter.
Getting a Device
Getting the device to save your data to is quite error prone. What makes this situation so easy to get wrong is how the user chooses where to save the data. It is expected that all Xbox games enable the user to choose where to save data, so the API has to enable him or her to do so. The problem arises because the system requires the game to continue to run (and to continue to draw) in order to display the Guide and enable the user to choose the device, but the API to pick the device blocks whatever thread on which it is running. If the thread happens to be the same one drawing, your game hangs. What’s even worse though, if you have only a single device on the system, the Guide does not show at all. This means you can write code that hangs your game without even knowing it, which is what many people unfortunately do.
The API to get the device follows the common .NET async pattern, which is a hint to developers that this API needs to be performed asynchronously. With that small preamble out of the way, let’s implement data storage for this example. First, declare a variable for your device:
StorageDevice storageDevice;
Now, you might wonder why you are going to store the device for this example when you didn’t at first with the phone example. This is because obtaining the device can possibly force a UI popup to appear, and you don’t want to ask the user multiple times, “Hey, where do you want to store this data?” So long as the device remains valid, you should continue to use it.
Now, create the device. Because this should be done at startup, do the loading of the data if it exists then as well. Add the following code to your game’s Initialize method:

This was certainly much more in depth (and complicated looking) than the isolated storage version! Looks are a little deceiving though, because the majority of the complication is handling the async pattern that is used to both get the device and the container. Note that when you use the AsyncCallback (such as this example), the callback happens on a separate thread from the one on which you called the method. This enables the code to work if the Guide pops up because the main thread is not blocked. After you have a container, the code is identical to the isolated storage code you wrote previously.
Again, you might ask yourself why you’re doing this in the constructor for this example, when during the phone example you did it in the OnActivating override. Unlike the phone, which doesn’t have the concept of the game not the focus (since it is killed), the Xbox 360 does. When your game is not focused, it gets the Deactivated event, and when it regains focus it gets the Activated event. Showing the Guide deactivates the game while it is up, and then reactivates it when it goes away. So essentially, if you use that override, you get stuck in an endless loop of creating the device.
Now, if you run the game, it doesn’t actually run—you get an exception. The exception text is quite descriptive, telling you that you need a GamerServicesComponent. This is discussed in depth in the next chapter, so for now, do what is needed to get the example running. Now add the following to your components collection in your game’s Initialize method:
Components.Add(new GamerServicesComponent(this));
Now when you run the example, it shows the Guide if you have more than one device available like you see in Figure 14.5. If you have a only single device available, it is automatically chosen for you.
Figure 14.5. Choosing your storage device

Note
Notice also how you check whether the device returned is null. This is because the user can easily press the B button on the dialog and cancel choosing a device. In a real game, you want to send a warning about this and confirm that a user wants to continue without saving. Here, continue without saving.
Also, notice that the first parameter is a string in BeginOpenContainer calls. This is the friendly name of the container that users see when they look at the containers in the dashboard (as seen in Figure 14.4). This is, of course, the name of the container you open, so use the same string to get the same container again.
A common use for the containers is to separate data logically. For example, you might have each saved game stored in its own container. This gives the user the capability to manage the save game from the system user interface without being in the game.
Before getting into the details of the API, let’s finish the example. Save the data before you leave the game, but this time use the following code for the OnExiting override:
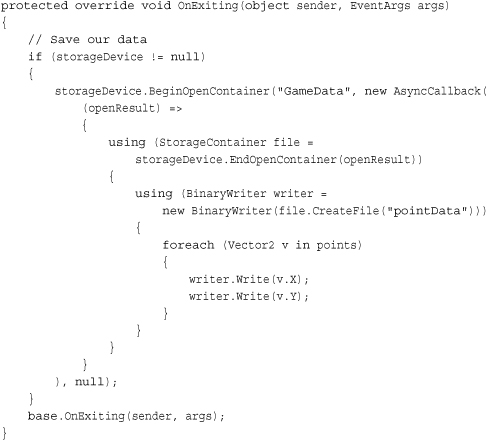
This is similar to before, in that you open the same container if your storage device isn’t null, and then use the same code to write out the points you used earlier. Running the game now enables you to place points on the screen, exit, and run the game again to see them show back up.
Looking at the API
Now that you have the basic functionality down, let’s look at the API a bit more in depth now. The StorageDevice has the two static methods you already used as well as a single event called DeviceChanged. Proper handling of this event can be crucial for your game.
Imagine that your player starts the game and chooses to save on the memory unit. Halfway through the game, the user pulls the memory unit out for some reason. Now you can no longer save, and worse yet, your game might crash! The DeviceChanged event is fired when any device is changed. To update this example to handle this case, add the following code to the end of your Initialize method:

When the event is fired, make sure that you already have a device selected and whether it is still connected via the IsConnected property. If it is no longer connected, set your device to null (because your code already handles that scenario) and inform the user that you are turning off automatically saving. You can handle this in other ways; for example, you can allow the user to choose a new device instead. The user should never have an unexpected loss of data though, so at a minimum you need to warn him or her, which is what this example did.
The BeginShowSelector method actually has four overloads as well. There are two pairs of similar overloads; one in each pair takes a PlayerIndex to specify which user selects the device, while the other does not. In the overload used in this example, any user can select the device when the Guide pops up, and the data is stored in such a way that any user on the console can see the data. If you use the similar overload that included the PlayerIndex as the first parameter, a few things happen.
First, only the user who matches the player index is allowed to select the device. This can easily lead your players to consider your game has locked up if you aren’t careful. For example, if you always assume that the first player is signed in and use PlayerIndex.One as the parameter to this method, but the only player signed in to the console is player two, he or she is never able to get out of this dialog without signing in to the first player.
Note
Virtually all games have a Push Start to Begin screen to detect which player is actually controlling the game.
When using a PlayerIndex, only the player can see the data. Much like how each game’s data is segregated from any other game’s data, all of the player data is separate as well.
The other two overloads each contain two new integer parameters: sizeInBytes and directoryCount. The first one is the total size of the data you plan on writing to the device, and the second is how many directories you will create. If you know this data before you create the device, using these parameters enable the user to select a device that doesn’t have enough free space on it. If you do not use these parameters, the system lets you select any device.
The StorageDevice also has a few instance members. It has three properties, including the IsConnected property you saw previously (which as the name implies, tells you if it’s connected). You can also use the TotalSpace property and FreeSpace property to get information about how much data the device can hold. It also has a DeleteContainer method, which takes in the name you passed in when opening it.
As mentioned earlier, the StorageContainer object is similar to the IsolatedStorageFile object, and they contain basically the same methods, so you can look back at the IsolatedStorage section to see those if you like. The container does contain two properties that the isolated storage file does not, namely the read-only DisplayName, which is what you used to create it with, as well as the StorageDevice that was used to create it.
Loading Loose Files from Your Project
One last thing you can do with storage is to load random loose files that you might need for your games. Although it’s probably a better idea to use the Content Pipeline for the majority of things, there are times when using a loose file directly is useful. To see an example of this, add a new text file to your game project (do not use your content project) called data.txt. Add the following data to the file:
20 30
10 20
321 123
401 104
333 333
17 412
To make sure that the properties for this file are set correctly so it is deployed with your application, select the file in your project and view its properties. Ensure that the Build Action property is set to Content, and the Copy to Output Directory property is set to Copy if Newer. You use this data to create a new set of points to draw, which of course needs another variable to keep track of this new data:
List<Vector2> contentPoints;
Next, to initialize the variable and read the data, add the following to the end of your Initialize method:

The important part of the snippet is the TitleContainer.OpenStream method. It opens loose files that you’ve included in your project and returns a stream containing the file’s data. After you had that stream, simply read each line individually, split the line into i the two numbers, and add them to your new collection.
Finally, update your Draw overload to draw the new set of points. You can use a different color so you know which ones are read from the file. Add the folwoing code to your Draw method before the End call to spriteBatch:
foreach (Vector2 position in contentPoints)
{
spriteBatch.DrawString(font, "x", position, Color.Black);
}
This is quick and easy loading and reading a loose file. With that, you learned the basics for implementing datai storage within your games.
Summary
Storage is something gamers simply take for granted, and is many times forgotten by the developer, but its wise use is absolutely crucial to having a good experience. In this chapter, you learned the basics for using the storage APIs to save and restore state. You also learned about the nuances the different flavors of storage APIs available bring to the table.
The next chapter looks at some Xbox LIVE services available to XNA games.