Chapter 10. Having Fun with Avatars
In November of 2008, the Xbox 360 added a feature to enable users to add a stylized cartoonish character representation of themselves to their Xbox Live account called an Avatar. The avatars can be extensively customized by a user. There are numerous body sizes, shapes, and features to choose from. In addition, users have the capability to choose the clothing or costume for their avatars. There is a standard set of clothing items available to everyone in addition to items that are available only by unlocking them in games or purchasing them from the avatar marketplace.
In this chapter you will learn about:
• How to use animation and render an avatar
• Lighting avatars
• Playing multiple animations at once
• Blending between animations
• How to place objects onto avatars
• Using avatars with render targets
• How to create and use custom animations
XNA Game Studio 4.0 provides easy-to-use APIs that enable you to animate and render the avatar for the players in your game or to generate random avatars for users within your game. Avatars provide an easy way to add characters to your game without requiring an artist to create numerous character models. They also provide a level of user customization to your game that users find enjoyable.
Avatars are a popular feature used in many of the top Xbox Live Indie games.
Introduction to Avatars
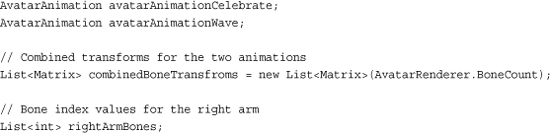
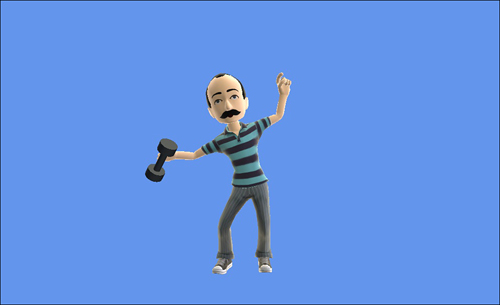
The avatar APIs in XNA Game Studio 4.0 provide a high-level abstraction that provides the capability to animate and render avatars with a simple API. The process of loading and managing the models and textures used to draw the avatars is hidden from the developer. Figure 10.1 shows what a avatar looks like.
Figure 10.1. Example of a player’s avatar

The avatar functionality is included in the Microsoft.Xna.Framework.Avatars assembly, which is available to the Xbox 360 and Windows platforms. Although the assembly is available on Windows, it is not possible to draw avatars on Windows. The Windows APIs are provided to minimize the amount of platform-specific defines needed in your code.
Accessing Avatar Information Using AvatarDescription
An avatar has many customizable components from gender, height, size, clothing, and accessories. Each user has his or her own AvatarDescription that stores all of the customizable choices the user has made when building the avatar. The AvatarDescription contains an internal opaque data buffer that stores all of these choices. The AvatarDescription is used to tell the AvatarRender which model assets and textures should be used for a specific avatar.
Accessing a Gamer’s AvatarDescription
The AvatarDescription class provides an asynchronous method BeginGetFromGamer to access the AvatarDescription for any type that inherits from the Gamer base type. The most common scenario in your game is to load the AvatarDescription for one of the SignedInGamer players in your game.
Let’s see how to access an AvatarDescription from a SignedInGamer. First, add a member variable to your games class to store the AvatarDescription.
AvatarDescription avatarDescription;
Next, in the games constructor, add the following two lines of code.
Components.Add(new GamerServicesComponent(this));
SignedInGamer.SignedIn += new EventHandler<SignedInEventArgs>(SignedInGamer_SignedIn);
The first line adds the GamerServiceComponent to the game’s Components list. This ensures that the GamerServicesDispatcher is regularly updated as the game runs. The GamerServicesComponent is discussed in more detail in Chapter 15, “Gamer Services.”
The second line creates a new event handler that is fired anytime a player signs into the game. Even if a player is signed into Xbox when your game launches, the SignedInGamers collection will not populate for a number of frames. You can poll the collection yourself, but signing up for this event ensures you are notified anytime a player signs into the console.
The next bit of code to add is the new SignedInGamer_SignedIn method that is called when the SignedIn event fires. Add the following method to your game class:
void SignedInGamer_SignedIn(object sender, SignedInEventArgs e)
{
// Only handle player one sign in
if (e.Gamer.PlayerIndex == PlayerIndex.One)
{
AvatarDescription.BeginGetFromGamer(e.Gamer, LoadGamerAvatar, null);
}
}
For this example, you want to request only the first player’s AvatarDescription, so check the SignedInEventArgs PlayerIndex property to see whether this event was fired for the first player. If you have the correct player, you then kick off the BeginGetFromGamer asynchronous method. BeginGetFromGamer is passed the instance of the Gamer object and a AsyncCallback method that you will implement.
To implement the LoadGamerAvatar AsyncCallback method, add the following method to your game’s class.
void LoadGamerAvatar(IAsyncResult result)
{
// Get the AvatarDescription for the gamer
avatarDescription = AvatarDescription.EndGetFromGamer(result);
// Is the AvatarDescription valid
if (avatarDescription.IsValid)
// Use the AvatarDescription and load AvatarRenderer
}
In the callback method, first call EndGetFromGamer method, which returns AvatarDescription. After the AvatarDescription has been returned, it is possible that the user did not have a valid avatar set for his or her profile. In that case, the IsValid property returns false. On Windows the returned AvatarDescription always returns false for IsValid.
Creating a Random AvatarDescription
Along with the players’ avatars, you might also want to display more avatars to represent other nonpayer characters in your game. In that case, you can create random avatars.
To create a random AvatarDescription, the static CreateRandom method is provided.
AvatarDescription description = AvatarDescription.CreateRandom();
This creates either a random female or male avatar that your game can then use. If you want to specify a gender for the avatar, you can use the CreateRandom overload, which takes an AvatarBodyType enumeration argument. The AvatarBodyType enumeration has two values of Female and Male.
AvatarDescription description = AvatarDescription.CreateRandom(AvatarBodyType.Female);
The AvatarDescription.BodyType property can be used to determine the gender of an existing AvatarDescription. It returns the AvatarBodyType for the already created AvatarDescription.
The AvatarDescription.Height property returns a float value representing the avatar’s height in meters. This is the size of the avatar skeleton from the bottom of the feet to the top of the head. This does not take into account any type of hat or other clothing item that might be on the head.
Constructing an AvatarDescription from a Byte Array
The AvatarDescription class provides a third way to create a new instance of the type. It provides a constructor that takes the opaque description as a byte array. This constructor can be useful in a couple of scenarios. The first is to enable the player to select random characters in your game and then save his or her selection so the same avatar can be used across play sessions.
To obtain the byte array from the existing AvatarDescription, use the following Description property:
byte[] opaqueBlob = avatarDescription.Description;
AvatarDescription copyAvatarDescription = new AvatarDescription(opaqueBlob);
The second scenario where the byte array constructor is useful is for customizing the nonplayer character avatars in your game. For example, you have a shopkeeper in your game that you want to customize to have a beard and top hat. This can be accomplished by first customizing the avatar in the dashboard avatar editor. Then, load the AvatarDescription for that player. Next, use the debugger to print out the Description property to the debugger. Figure 10.2 shows the AvatarDescription in the debug window.
Figure 10.2. Description property in the debugger

You can then copy, paste, and format the values into a byte array in your source code. This hard-coded array can then be used to create a new instance of the AvatarDescription.
Note
Xbox Live Indie Games prohibits utilizing avatar clothing and other assets that have been unlocked or purchased through the avatar marketplace unless they are outfitted on the player’s avatar. So if you are creating a custom avatar for a nonplayer character, you are restricted in using only the built-in avatar assets and can’t use items you purchased from the avatar marketplace.
The Changed Event
AvatarDescription provides an event called Changed. This event can fire while your game is running in the event that the user has updated his or her avatar.
Loading Avatar Animations with AvatarAnimation
There are a number of built-in animations that enable you to quickly animate an avatar in your game. The animations that are provided were created for use in the Xbox dashboard and consist of idle animations along with some expressive animations like celebrate and clap.
To add an animation to your game, the first thing you need is a new member variable in your game to hold the animation. Add the following member variable to your game:
AvatarAnimation avatarAnimation;
Next, in the game’s LoadContent method, you can load the following celebrate animation:
// Load celebrate animation
avatarAnimation = new AvatarAnimation(AvatarAnimationPreset.Celebrate);
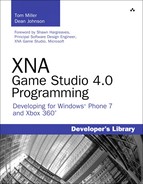
The AvatarAnimation constructor takes an AvatarAnimationPreset enumeration to specify which animation to load. Table 10.1 shows all of the built-in animation types that are defined by the AvatarAnimationPreset enumeration.
Table 10.1. AvatarAnimationPreset Enumerations

Updating the Animation
There are two methods that you can use to update the current playback position of the animation. The first and easiest way is to use the Update method. The Update method takes a TimeSpan for the current frame’s elapsed time and a boolean value that indicates whether the animation should be looped when it reaches the end of the animation.
To update the animation, add the following to your game’s Update method:
// Update the animation with the elapsed frame time
// Set the looping parameter to true
avatarAnimation.Update(gameTime.ElapsedGameTime, true);
The gameTime.ElapsedGameTime TimeSpan is used for the current frame’s length. This updates the animation in sync with how fast your game is updating. The value of true is passed for the loop argument so that the animation loops when it reaches the end of the animation.
The second method for updating the avatar’s playback location is to set the value explicitly. The AvatarAnimation CurrentPosition property is a TimeSpan value that represents the amount of time from the start of the animation. This value can be set to any valid range from 0 to the end length of the animation. The length of the animation can be retrieved by using the Length property of the animation.
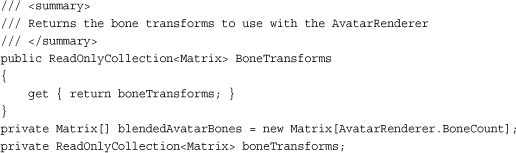
Transforms and Expression of the Animation
The animation returns two sets of values for the current playback position. The first is the location for each of the bones in the avatar skeleton. The BoneTransforms property returns a ReadOnlyCollection of Matrix values for each of the bone positions and orientations.
The second set of animation values are for the textures to use for the avatar’s face. Although the body uses skeletal animation to transform the vertices of the avatar, the face is made up of textures for the eyes, eyebrows, and mouth. The AvatarAnimation provides the Expression property to return an AvatarAnimation structure.
The AvatarAnimation structure provides properties for the LeftEye, RightEye, LeftEyebrow, RightEyebrow, and Mouth. Each of these represents the texture to use for the corresponding facial feature.
Table 10.2 shows the AvatarEye enumeration values.
Table 10.2. AvatarEye Enumerations

Table 10.3 shows the AvatarEyebrow enumeration values.
Table 10.3. AvatarEyebrow Enumerations

Table 10.4 shows the AvatarMouth enumeration values.
Table 10.4. AvatarMouth Enumerations
Avatar Animation Functionality Though an Interface
Although the built-in avatar animations are convenient, you might want to provide your own custom animations or to programmatically generate animations using IK. The IAvatarAnimation interface is provided to enable you to create your own custom avatar playback systems that work with the avatar system.
The IAvatarAnimation interface exposes four properties: BoneTransforms, CurrentPosition, Expression, and Length. It also exposes one method: Update. The built-in AvatarAnimation type implements the IAvatarAnimation interface so you can combine your animation playback system with the built-in animations.
You learn more about implanting a custom animation playback system that uses the IAvatarAnimation interface later in this chapter.
Drawing the Avatar Using AvatarRenderer
Now that you have loaded the AvatarDescription and have an AvatarAnimation to play, you just need models and textures for the avatar and draw them to the screen. This is precisely what the AvatarRenderer type does.
To draw the avatar in the game, you need to add a member variable to store the AvatarRenderer. Add the following member variables to your game class:
AvatarRenderer avatarRenderer;
Matrix world;
Matrix view;
Matrix projection;
In the game’s LoadContent method, create an instance of the AvatarRenderer from one of the previous AvatarDescription instances you created previously.

After creating a new instance of the AvatarRenderer, set default values for the world, view, and projection matrices. By default, the avatar faces in the negative Z direction, so set the world matrix to rotate around the Y axis.
If you are using the asynchronous AvatarDescription.BeginGetFromGamer method, then you can load the AvatarRenderer in the AsyncCallback method that you pass to BeginGetFromGamer.
The last bit of code is to draw the avatar. In your game’s Draw method add the following lines of code:
// Set the world, view, and projection matrices
avatarRenderer.World = world;
avatarRenderer.View = view;
avatarRenderer.Projection = projection;
// Draw the avatar to the current render target
avatarRenderer.Draw(avatarAnimation);
Before you draw, first set the World, View, and Projection matrices on the AvatarRenderer instance. You can simply call the Draw method passing in any AvatarAnimation or other type that implements the IAvatarAnimation interface.
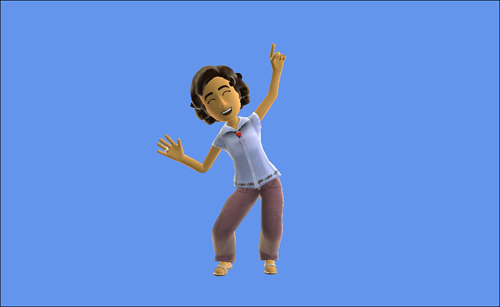
Running the sample should look like Figure 10.3.
Figure 10.3. Avatar rendering animated with the celebrate animation

Drawing While Loading an Avatar
Although the AvatarRenderer constructor is not asynchronous and it returns immediately the loading, the geometry and textures that make up the avatar can take a few frames. During that time, if you call the Draw method, notice an animated swirling pattern like that shown in Figure 10.4.
Figure 10.4. Avatar loading effect

If you don’t want to display the loading effect, you can use the overload of the AvatarRenderer constructor that takes a boolean value for the useLoadingEffect parameter. Passing in false causes the loading effect to not display while the avatar is loading.
Deterring the Current State of the AvatarRenderer
At times, you might want to query the state of the AvatarRenderer to see whether it has completed loading. The State property can be used to determine the current state of an AvatarRenderer instance. The return value is an AvatarRendererState enumeration that can have three values of Loading, Ready, and Unavailable. The Loading and Ready states are self-explanatory. The Unavailable state is a special case that occurs in a couple of situations. The first is on Windows when any AvatarRenderer instance returns Unavailable because avatars can’t be rendered on Windows. The second situation is when the models and textures that make up the avatar are corrupted on the Xbox and can’t be downloaded.
Note
When avatars were first introduced, their proportions were not close to those of a real person. For example, their arms were too short. To help support player mapping between their avatar and their body using Kinect, the proportions of the avatars were updated to better match those of a human. The new avatars are referred to as V2 avatars. XNA Game Studio 4.0 utilizes V2 avatars.
Modifying Avatar Lighting
Now that you have been able to load and draw some avatars, it’s time to dig a little deeper so they can better integrate into your game. Your game might take place at night or use some special colors in the lighting of your game. The AvatarRenderer provides the capability to set the ambient light color and one directional light.
Let’s modify the existing sample to update the lighting to use when drawing the avatar. Add the following code to your game’s Draw method before calling the AvatarRenderer.Draw method.
// Set the avatar lighting values
Vector3 lightDirection = new Vector3(1, 1, 0);
lightDirection.Normalize();
avatarRenderer.LightDirection = lightDirection;
avatarRenderer.LightColor = new Vector3(0, 1, 0);
avatarRenderer.AmbientLightColor = new Vector3(0.25f, 0.25f, 0.25f)
First, create a new light direction, which is pointing in the right and up direction. The direction needs to be normalized before setting the LightDirection property on the AvatarRenderer.
Set the color of the directional light to fully green by using the LightColor property.
Finally, set the ambient lighting value to around 25 percent of each color channel by using the AmbientLightColor property.
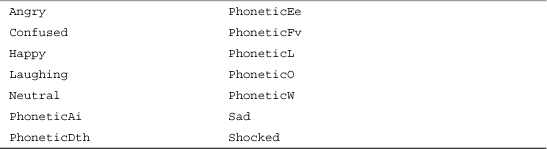
Running the sample now shows a green light on the avatar’s lower left. It should look similar to Figure 10.5.
Figure 10.5. Avatar with modified lighting
Playing Multiple Animations
Although we have been concentrating on the built-in animations, it is possible to customize the animation. One example might be that you want to play a walking animation on the lower half of the avatar while the upper arms of the avatar throw a baseball.
To use two different animations for different portions of the avatar skeleton, identify which bones you want to update with which animation.
Let’s update the existing sample to play back two animations at the same time. Use the celebrate animation for most of the avatar and play the wave animation on the avatar’s right arm.
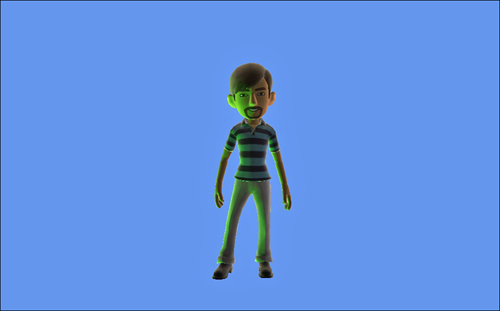
You need an additional AvatarAnimation and some additional member variables in your game. Add the following member variables to your game:
Along with the two AvatarAnimation variables for the celebrate and wave animations, you need two additional variables and a List of matrices that will store the avatar skeleton bone positions. The number of bones is defined by BoneCount constant field. You also need a list of index values for the bones that make up the right arm so you know which index values to update with the wave animation.
Next, in the games LoadContent method, add the following lines of code:
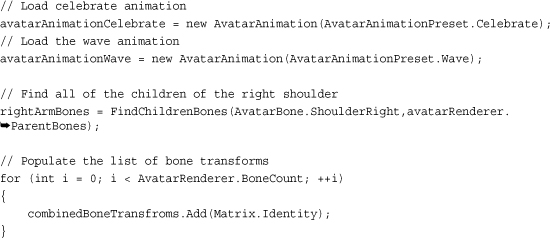
The first two lines load the celebrate and wave animations. Populate the rightArmBones List by calling a helper method FindChildrenBones, which you create next. This helper method finds all of the children for a given AvatarBone. The last portion of code adds some default values to the combinedBoneTransfroms List that you use to draw the avatar.
Create the FindChildrenBones method that returns all of the children for a given AvatarBone.
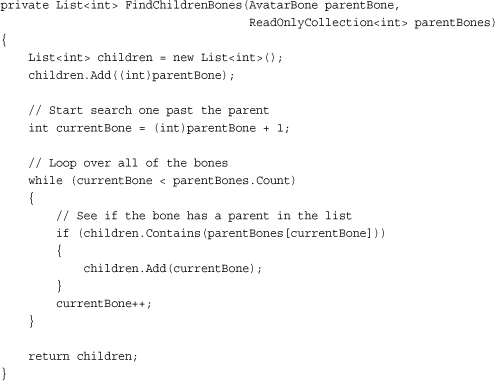
To find all of the children for the given parentBone, you need the collection of parentBones from the AvatarRenderer. The ParentBones property returns a collection of index values that represent the parent for each index location. For example, the AvatarBone.Neck enumeration has an integer value of 14. If you look up the fourteenth item in the parentBones collection, you get an integer value of 5, which is the integer value for the AvatarBone.BackUpper enumeration because the upper back is the parent of the neck.
The avatar skeleton is sorted by depth so the lower index values represent bones that are closer to the root. This also means that you can loop over the list of bones and know that the parent of the current bone has already been processed. This is useful in cases where you want to add all of the parent bones for a given bone. As you loop over all of the bones, check whether the parent index value is already in the list. If it is, then the current bone must be a child of one of the parent bones already in the list.
For each frame, you should update both animations and copy the bone positions to the combinedBoneTransfroms. In your game’s Update method, add the following lines of code:

First, call each animation’s Update method passing in the frame’s ElapsedGameTime and a loop value of true. Copy all of the BoneTransfroms from the celebrate animation. Then, loop all of the rightArmBones index values and copy the bone values from the wave animation into the combinedBoneTransfroms list.
The final change is to update how the AvatarRender draw call is called. In the games Draw method, update the following lines of code:
// Draw the avatar using the combined bone transforms
avatarRenderer.Draw(combinedBoneTransfroms, avatarAnimationCelebrate.Expression);
In this overload of the AvatarRenderer Draw method, it takes a list of the bone transforms and an AvatarExpression. Use the Expression from the celebrate animation and your combinedBoneTransfroms list.
Running the sample now should display the avatar playing the celebrate animation except for the right arm, which is waving as shown in Figure 10.6 below.
Figure 10.6. Avatar playing the combined celebrate and wave animation
Blending Between Animations
Your game will most likely contain more than one animation. If you switch between animations, the location of the bones of the avatar quickly move to their new position and appear to pop from one location to another. What you really want is a way to blend from one animation to another smoothly so that the avatar does not appear to pop from one to the other.
To accomplish this, blend from using one set of transforms to the other over a short period of time. The bone’s position and rotation values need to be interpolated over the time from one animation to the other.
To demonstrate how to blend between two avatar animations, create a new type that you will use to play back the blending avatar animation.
Add a new class to the sample by right-clicking the project and selecting Add -> Class as seen in Figure 10.7.
Figure 10.7. Add new class menu

When the Add New Item dialog appears, enter the name of the new class called AnimationBlender.cs and select Add as in Figure 10.8.
Figure 10.8. Add New Item dialog

Our new class needs to be public and implement the IAvatarAnimation interface. Update the class definition for your new class to the following:
public class AnimationBlender : IAvatarAnimation
After you type the interface name, Visual Studio displays a tool tip that can be used to implement the interface with stubs as shown in Figure 10.9.
Figure 10.9. Tool tip for interface implementation

The AnimationBlender contains a two-member variable to hold references to the current and next animation that are blended together. There are two states the AnimationBlender can be in. The first is playing just a single animation, which works just like a normal AvatarAnimation. The second is a blending state where the current animation starts to blend to the next animation and ends when the blend is complete and the next animation becomes the current animation.
Add the following member variables to the new AnimationBlender class:
// The current aniamtion that is playing
private AvatarAnimation currentAnimation;
// The animation to blend to
private AvatarAnimation nextAnimation;
// The total time to blend to the next animation
private TimeSpan totalBlendTime = TimeSpan.FromMilliseconds(300);
// How far along the blend we are
private TimeSpan currentBlendTime;
We also need two variables to store the current blend time and how long the blend from one animation to the other should take.
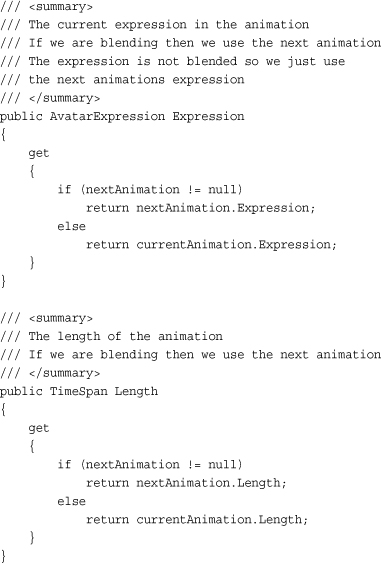
Implement each of the properties exposed by the IAvatarAnimation interface. The first is the BoneTransfroms.
Next, implement the CurrentPosition property.

For the CurrentPosition, use the value from the nextAnimation if you are currently blending; otherwise, use the currentAnimation value. Do the same for the Expression and Length properties.
The constructor is quite simple and takes the initial AvatarAnimation that should be playing. Add the following constructor to the AnimationBlender:

Set the currentAnimation variable and initialize the ReadOnlyCollection of matrices that you return from the BoneTransforms property.
Now you need an animation to call when you start playing a new animation. This kicks off the blend from the current animation to the new animation. Add the following method to the AnimationBlender class:
/// <summary>
/// Starts the process of blending to the next animation
/// </summary>
public void Play(AvatarAnimation animation)
{
// Animation to blend to
nextAnimation = animation;
// Reset the animation to start at the beginning
nextAnimation.CurrentPosition = TimeSpan.Zero;
// Set our current blend position
currentBlendTime = TimeSpan.Zero;
}
First, set the nextAnimation to the one passed into the method. Then, reset the animation’s CurrentPosition so that it is at the start of the animation. This is not required, but is helpful when playing the same animations over and over again. The last line of code resets the currentBlendTime back to zero.
The final method that is required for your AnimationBlender class is to implement the Update method. The Update method is where you update the private bone transforms and perform any blending that is required. Add the following Update method to the AnimationBlender class:


That was a lot code, so let’s take a look at it piece by piece. The first section of code updates the current animation and checks whether there is blending by checking the nextAnimation for null. If there is no blending, the transforms from the current animation are copied to the blendedAvatarBones.
If there is blending, then the nextAnimation Update method is called to update the playback of the animation. The amount of time the blending has been occurring is then updated and the blendAmount is calculated. The blendAmount ranges from 0 to 1 over the course of the blend. If the value is equal to 1 or higher, then you should complete the blend and set the currentAnimation to the nextAnimation.
The final section of code is the blend between the two sets of bones from the animations. Each bone in the avatar skeleton is looped over and the matrix value for the animation frame is broken down into its rotation and translation components. The rotation value is then calculated by taking the Slerp value using the blendAmount. The translation value is then calculated with a linear transformation using Lerp. The rotation and translation are then combined to form the blended bone transform that is saved in the blendedAvatarBones array.
Now that you created the AnimationBlender class, you can use it in the ongoing sample. The game needs an array of AvatarAnimations and an instance of the AnimationBlender. You also need to save the state of the GamePad, so you can track button presses. Add the following member variables to your game class:
AvatarAnimation[] avatarAnimations;
AnimationBlender animationBlender;
GamePadState lastGamePadState;
In the game’s LoadContent method, load the multiple animations that you will use and initialize your AnimationBlender. Add the following lines of code to the LoadContent method:

Next, in the game’s Update method, call Update on the AnimationBlender. Also detect button presses and play different animations depending on which button you press.

The final step is to use the AvatarBlender to draw the avatar. Update the Draw method with the following line to draw the avatar using the blended animation:
avatarRenderer.Draw(animationBlender);
Running the sample now should enable you to press the X,Y, and B buttons to blend between animations. The blended animation should look similar to Figure 10.10 below:
Figure 10.10. Avatar drawn with a blended animation
Interacting with Objects
Sometimes you want the avatar to interact with items in your game. If you have a baseball game, you might want the avatars to be able to hold a baseball bat and throw a baseball. The avatar bones returned from the avatar animations and the values expected by the AvatarRenderer.Draw method are in local bone space. This means that the bones are relative to their parent bone and the bind pose for the avatar. To find the location of the avatar’s hand to place a baseball, find the world space position of the bone that represents the avatar’s hand. Then, use this bone to place the baseball model.
Let’s see how this works by creating an example of an avatar lifting a hand weight. Start with the previous code from this chapter that draws a random avatar.
For additional member variables, add the following member variables.
// Avatar bones in world space
List<Matrix> bonesWorldSpace;
Model handWeight;
Matrix handWorldMatrix;
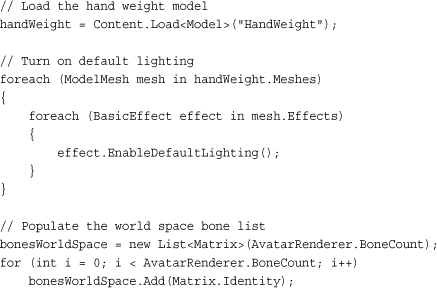
The bonesWorldSpace stores the world space values for each of the bones that make up the avatar skeleton. You also need variables for the hand-weight model and the world matrix used to draw it.
In the LoadContent method, load the model and populate the list of bones in world space. Add the following lines of code to your game’s LoadContent method:
Next, in the game’s Update method, calculate the world space transforms for the avatar animation. Add the following to your game’s Update method:

Before you convert the bone transforms into world space, check that the AvatarRenderer.State property is set to Ready so you can verify that the avatar and its skeleton have completed loading. Then, call the ConvertBonesToWorldSpace method passing in the AvatarRenderer and AvatarAnimation we want to find the world space position of. After calculating the world space transforms, use the AvatarBone.SpecialRight bones transform for the world matrix for the hand-weight model. The SpecialRight bone is a piece of the avatar skeleton that is located near the inside of the forearm in front of the hand. It is a good bone to use when you want to place objects in the avatar’s hand.
To implement the ConvertBonesToWorldSpace helper method, add the following method to your game:
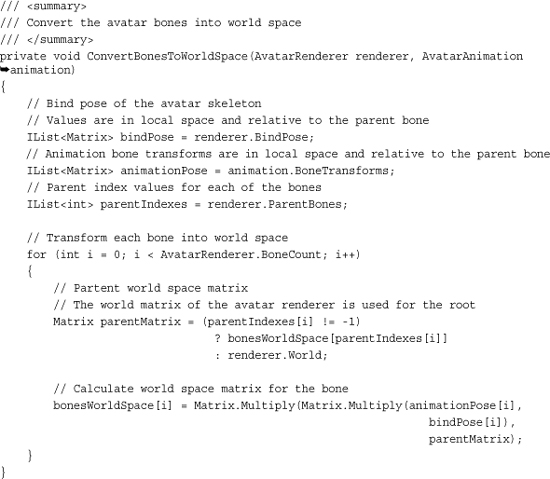
To calculate the bone’s position in world space, you first need the bind pose of the avatar. The animation frames are relative to the bind pose transforms, so you need both the animation transforms and the bind pose transforms. Each of the bones is also relative to its parent bone, so you also need to multiply the transform by its parent world space matrix. For the root node, use the World property of the AvatarRenderer because this is the location in world space of the avatar. Again, you can loop over the bones linearly as you calculate the world space transforms because you know the parent bones are calculated before any of the children.
Finally, you can draw the hand-weight model using the world space transform you calculated. Add the following lines of code to your game’s Draw method:
// Draw the hand weight model
handWeight.Draw(handWorldMatrix, view, projection);
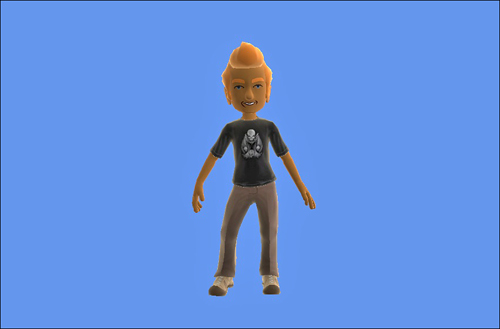
Running the sample displays an avatar with the weight model in his or her right hand (see Figure 10.11).
Figure 10.11. Hand weight drawn at the avatar’s hand location
2D Avatars Using Render Targets
Although the avatars render in 3D, it is possible to use them within your 2D game easily. One method to do this is to draw the animating avatars to a render target and then use the texture from the render target as you would any other 2D texture in your game. You can even build sprite sheets from the avatar animations.
Let’s create a sample that shows how to render an avatar to a RenderTarget and then display the texture as a sprite. Start with the existing sample that displays a random avatar animation. For an additional member variable to store the RenderTarget, add the following member variable to your game’s class.
RenderTarget2D renderTarget;
To initialize the RenderTaget so it is ready to be set on the device, add the following to the LoadContent method in your game:
![]()
You also want to change the projection matrix to use an aspect ratio of 1 because the width and height of the texture are equal.
projection = Matrix.CreatePerspectiveFieldOfView(MathHelper.PiOver4,
1, 0.01f, 200.0f);
The last portion of code changes the way you render the avatar in the game’s Draw method. Update the game’s Draw method to contain the following code:

First, set your render target and clear the render target to transparent. You clear to transparent to be able to composite the texture with other textures in your game. Then, draw the avatar as you would normally by setting the World, View, and Projection transforms before calling the Draw method. This draws the avatar to the render target.
The render target is then set to null to switch back to the backbuffer. The backbuffer is then cleared to CornflowerBlue before the SpriteBatch is used to draw the render target to the screen.
If you run the sample now, notice that the the texture with the avatar appears in the upper right-hand corner of the screen. Because the rest of the texture is transparent, it is difficult to tell you are using a render target. You can change the clear color when clearing the render target to show that you are in fact drawing the avatar to the screen using a texture that is created using a render target. Figure 10.12 shows the avatar drawn to the screen using a render target.
Figure 10.12. Avatar drawn to the screen using a render target

Custom Avatar Animations
Although the built-in animations presets provided by AvatarAnimation are a convenient way to animate the avatar, you will want to utilize custom animations in your game. If your game requires more than the avatar to just stand around, you need to use custom animations to do movements like walk or throw a ball.
Creating the Custom Animation
Custom animations require an artist to animate the avatar rig in a 3D content creation package. The avatar rig is available on the XNA Creators Club Online site at the following URL:
http://create.msdn.com/en-US/education/catalog/utility/avatar_animation_rig
The rig comes in a few versions for a number of different 3D content creation packages such as Maya, 3D Studio Max, and Softimage Mod Tool. After you download the rig, read the corresponding readme file contained within the download. This file instructs you on how to load the rig project file in the 3D content creation package of your choice. It is important that you follow the instructions in the readme file; otherwise, you might run into issues later when you are loading or exporting animations.
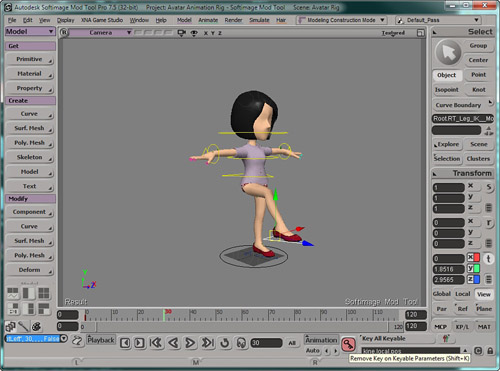
After you have the avatar rig loaded in a 3D content creation package of choice, you need to create the animation. Depending on the 3D content creation package you are using, this occurs in different ways. In most cases, the animator sets keyframes for the bone positions across a timeline. Please refer to documentation or tutorials for your specific 3D content creation package on how to animate a rigged character. Figure 10.13 shows the avatar rig loaded and animated using the Softimage Mod Tool.
Figure 10.13. Avatar animation rig loaded into Softimage Mod Tool
After the animation is complete, it needs to be exported into an FBX file that you will load using a custom processor similar to how you loaded a skinned animation in Chapter 6, “Built-in Shader Effects.” To export the animation, follow the instructions found in the readme file that was included in the rig download file.
There are a number of custom animations available on the XNA Creators Club Online site at the following URL:
http://create.msdn.com/en-US/education/catalog/utility/avatar_animation_pack
Building the Custom Animation Type
The AvatarRenderer requires a set of bone transforms to set the positions of all the bones that make up the avatar each frame when rendering. When you load the custom animations, you will load a list of keyframes for each of the bones in the avatar. The custom animation uses the keyframes to determine which bone transforms to set at the current time in the animation.
Create three types that are used in both the content pipeline process you build and at runtime by your game. The first type you create stores the data associated with each keyframe. The second type stores the list of key fames and other data associated with an animation. The third type is the custom animation itself, which implements the IAvatarAnimation interface and can be used just like any other AvatarAnimation by your game.
Before you create new types, let’s create the project that they will be built in. Right-click the solution and select Add -> New Project. In the Add New Project dialog, select the Windows Game Library project type and give the project the name CustomAvatarAnimationWindows and click the OK button as shown in Figure 10.14.
Figure 10.14. Add New Project dialog with a Windows Game Library selected

Now with your new project created, add your new types. Right-click the project and select Add -> Class. This creates a new C# code, which you should rename Keyframe. After renaming the file, double-click to open the file in the editor.
Although you created a new class, you really want the keyframe to be a structure. To do this, update the class definition to be a public structure like the following line:
public struct Keyframe
The keyframe structure is simple and contains only three members for the bone index of the avatar, the time when the keyframe occurs, and a matrix value of the transform for the bone at the time. Add the following lines of code to the keyframe structure:

Along with the three members for the bone index, time, and transform, you also include a helpful constructor that you will use when you create the keyframes in the content processor.
Now you need a type to hold the animation data that is saved out when you run the custom processor. Next create another new class. This time, rename the file CustomAvatarAnimationData.cs and add the following code:
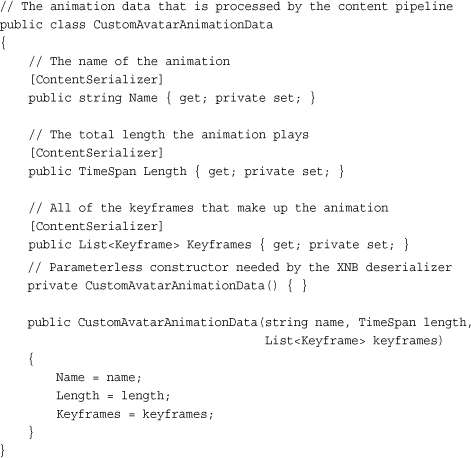
The first property of the type is the Name of the animation. The next is a TimeSpan property that specifies the Length of the animation. The main portion of the animation data is the list of Keyframe objects. You also provide two constructors. The first is a parameter-less constructor, which is required to desterilize the object because the object needs to be constructed before the properties of the object are set. The second constructor is provided for coding convenience and sets the Name, Length, and Keyframes properties.
Now that you have the basic data that is stored in the custom animation class, you can create the actual custom animation type. Create a new class and change the name of the file to AvatarCustomAnimation.cs. The AvatarCustomAnimation class inherits from the CustomAvatarAnimationData type and implements the IAvatarAnimation interface. Update the class definition to look like the following:
public class AvatarCustomAnimation : CustomAvatarAnimationData, IAvatarAnimation
To implement the properties of the IAvatarAnimation, add the following properties to the AvatarCustomAnimation class:
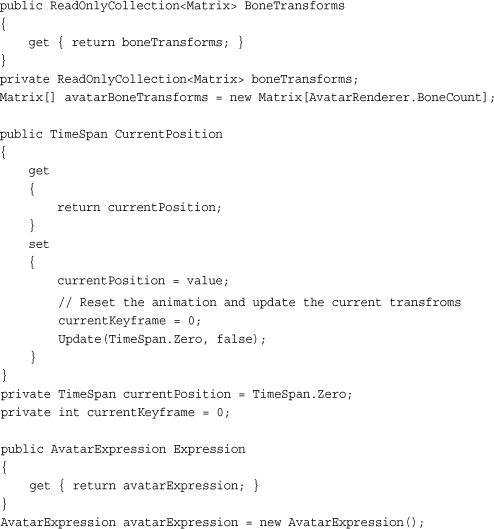
Like the AvatarAnimation, the BoneTransforms and Expression are used by the AvatarRenderer to set the current bone positions and expression when drawing the avatar. The animation does not contain the expression data, so just set the expression to a new instance of AvatarExpression.
To add the constructor that initializes the custom avatar animation, add the following constructor to the AvatarCustomAnimation:
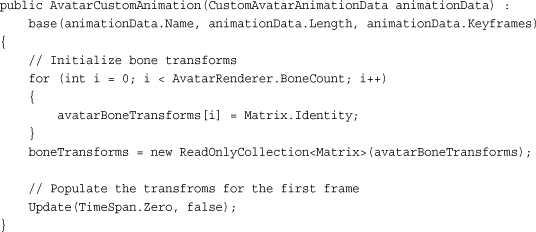
The constructor calls the base CustomAvatarAnimationData constructor to set the Name, Length, and Keyframes. Next the avatarBoneTransforms array is initialized to the Identity. Finally, call the Update method to have it set up the animation for playback in case the animation is used to render an avatar before the developer calls the Update method for the first time.
Add the following Update method to the AvatarCustomAnimation class:


The Update method first updates the currentPosition with the elapsed time. It then check whether the animation has passed the end of the animation. If looping is used, then currentPosition is set back to the start of the animation; otherwise, it is set to the end Length of the animation. If the animation is run backwards, then check whether the currentPosition is less than TimeSpan.Zero and set the correct currentPosition before you finally call the UpdateBoneTransforms method.
Finally, implement the UpdateBoneTransforms method, which sets the current bone transforms to use based on the current keyframe time. Add the following method to the AvatarCustomAnimation class:
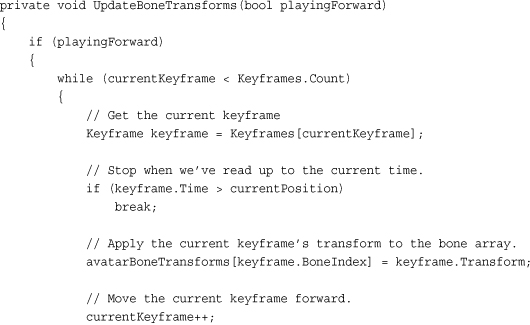
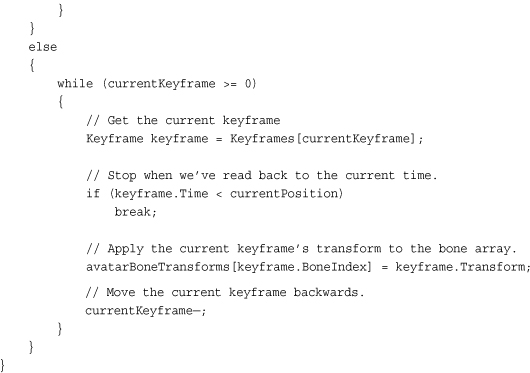
UpdateBoneTransforms finds the current animation keyframes to use for the avatar bone transforms. The list of Keyframes is looped over starting at the currentKeyframe index. The loop stops when a keyframe’s Time property is greater than the currentPosition in the animation or when there are no keyframes left.
Creating the Content Processor
Now that you have the types that make up the avatar’s custom animation, create the custom content processor that converts the model’s animation data into the format that you want at runtime. This is similar to the processor you wrote in Chapter 6, “Built-in Shader Effects” for the SkinnedEffect.
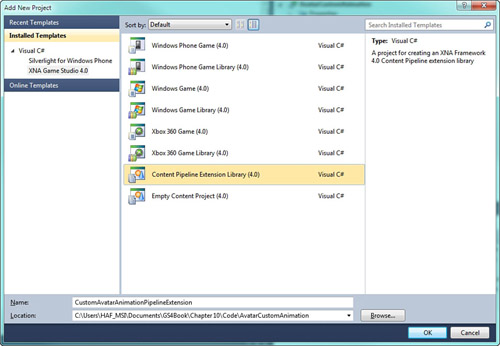
First, create a new pipeline extension project. Right-click the solution and select Add -> New Project. In the Add New Project dialog, select the Content Pipeline Extension Library project type and name it CustomAvatarAnimationPipelineExtension. Click OK as shown in Figure 10.15.
Figure 10.15. Add New Project dialog with the Content Pipeline Extension Library project selected
Next, add two assemblies to the new content pipeline extension project. Right-click the References list and select Add Reference as shown in Figure 10.16.
Figure 10.16. Add Reference menu

Click the Projects tab and select the CustomAvatarAnimationWindows project that you previously created and click OK (see Figure 10.17).
Figure 10.17. Adding project reference

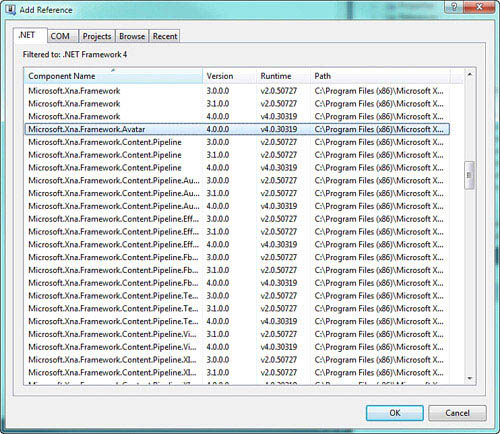
Select the add reference menu again, but this time select the .NET tab. Scroll down, select the Microsoft.Xna.Framework.Avatar assembly, and click the OK button (see Figure 10.18).
Figure 10.18. Adding reference to Microsoft.Xna.Framwork.Avatar
You need these two assemblies when you write the custom processor. The project file reference to the custom avatar types needs to be a Windows project because the processor will run on Windows during the build. Even if the content is built for the Xbox 360, the content project needs to reference Windows libraries.
Now you are ready to start writing the custom processor. First, add the following two namespaces to the list already defined in the processor file:
using Microsoft.Xna.Framework.GamerServices;
using CustomAvatarAnimation;
This enables you to use the AvatarRenderer and the custom animation types you created previously.
You now need to update the processor class definition and display name. Update the default processor class with the following class definition:

Use the ContentProcessor attribute to make this type as a content processor and to define the DisplayName that will be used within the Visual Studio content item property menu. The CustomAvatarAnimationProcessor class inherits from ContentProcessor, which is a generic abstract class that takes the input and output types as the generic parameters. NodeContent is the input type that is passed into the processor. You will create and return your CustomAvatarAnimationData type.
The processor contains a single field member to store a list of Matrix transforms that make up the bind pose of the avatar rig. Add the following member variable to the CustomAvatarAnimationProcessor:
// The bind pose of the avatar
List<Matrix> bindPose = new List<Matrix>();
The ContentProcessor defines a Process method, which converts the input type, for example, a NodeContent into the output type that is the CustomAvatarAnimationData. To override and provide an implementation for this method, add the following method to the CustomAvatarAnimationProcessor class:


This is a long method, so let’s take a look at it piece by piece. The first thing you do is call the FindSkeleton method to location where in the input node tree the skeleton exists. The skeleton is where you find the animation data that you need to use. If you are unable to locate the skeleton data, throw an exception because there is nothing you can do with the content file.
Next, you pass the skeleton into a method called CleanSkeleton. The skeleton is exported from the avatar animation rig that contains bones that are not used at runtime, so remove them. Also, clean up some of the naming that might be used in the rig. If you remove a bone from the skeleton, make sure you don’t process the keyframes from the bone later in the processor.
Now, you have a clean skeleton hierarchy, but you really want a flattened list of bones that match what is expected by the AvatarRenderer. This list of bones is sorted by the depth of the bone in the hierarchy and within a level they are sorted by the name of the bone. You call the FlattenSkeleton method to convert the NodeContent skeleton hierarchy into the sorted flat list you want. Check that the number of bones returned from the FlattenSkeleton method equals the number of bones in the AvatarRenderer using the BoneCount constant value.
Now that you have the real list of bones, save their transform value. The transform set on each of the bones is called the bind pose. This is the starting location of the animation rig before the animator changes the rig to create the animations. The animation keyframe transforms are relative to this starting position called the bind pose. You loop over all of the bones and add their transforms to the bindPose list.
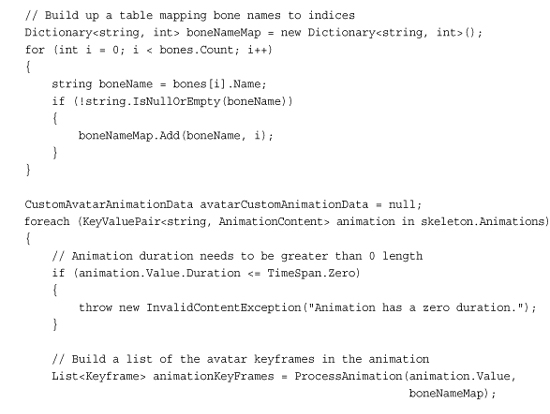
When you process the animation keyframes, you will have the string name of the bone they transform. The custom avatar animation needs the index value of the bone. To be able to find the bone index, create a Dictionary of string and int values that store the name of the bone and the index of the bone. This enables you to quickly look up the index of a bone for a given string name. To populate the Dictionary, loop over the flat list of bones and add the name of the bone and the index value to the Dictionary.
The final state of the Process method is to convert the animation data into the format, which is a list of keyframes that you will use to construct the new CustomAvatarAnimationData object.
Loop over the animations that are attached to the skeleton. The ProcessAnimation method is called passing in the AnimationContent and the boneNameMap Dictionary you created. A list of Keyframe values returns that is then used to construct the new CustomAvatarAnimationData before returning it from the Process method.
The Process method called into a number of helper methods that you now need to create. The first is the FindSkeleton method. Add the following method to the CustomAvatarAnimationProcessor class:
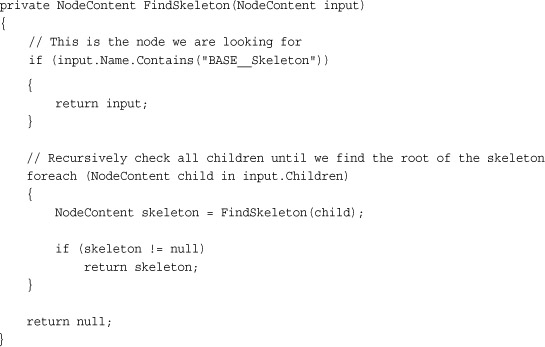
The root of the skeleton in the avatar rig is called BASE__Skeleton. Check whether the current NodeContent has the same name. If you have not found the root of the skeleton, loop over all of the children of the current node and recursively call the FindSkeleton method for each of the children.
To flatten the skeleton hierarchy, implement the FlattenSkeleton method. Add the following method to the processor:


To flatten the skeleton, create a list of NodeContent instances called bones. This is the final list that you return from the method. You also need a list that stores the NodeContent instances that are at the same depth in the skeleton hierarchy and have the same level. The final list needs to be sorted by level and then by name within the level.
Create a loop that continues until the current level contains no bones. The first level is the root so it contains only the single item. As you process each level, sort the bones in the level, and then add the children of the current level into a list for the next level. Continue this looping until there are no children left to process. The resulting list is correctly sorted for use with the AvatarRenderer.
The CleanSkeleton method is used to remove bones that are not needed at runtime and to fix the names of the bones. Add the following method to the CustomAvatarAnimationProcessor class:
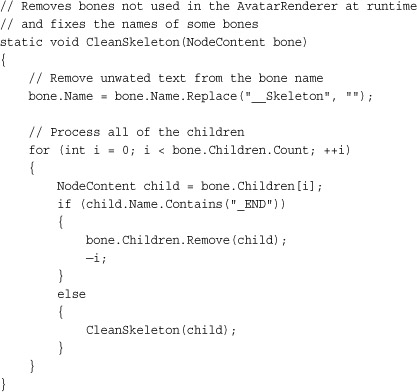
Loop over each of the children bones looking for any bone that contains _END. You don’t need these bones, so remove them from the hierarchy.
The final two methods are responsible for converting the animation data from the content pipeline format AvimationContent into a list of Keyframe objects that you use within the custom animation. Add the following two methods to your CustomAvatarAnimationProcessor class:


The ProcessAnimation starts by creating a new list of Keyframe instances that you use to store the newly created Keyfame values. Loop each of the Channels in the AnimationContent. An AnimationChannel contains all of the keyframes for a specific bone in the skeleton over the course of the animation.
As you loop over the animation channels, don’t process any of the channels for the bones that include _END in their name. These were the bones that you removed when you flattened the skeleton, and you don’t need them in the animation.
Store the bone index for each keyframe in the animation. To get the bone index, perform a lookup into the boneMap Dictionary. After you have the bone index, create the new Kayframe object using the index, the keyframe’s Time, and a transform matrix that you create using the CreateKeyframeMatrix method.
Adding the Custom Animation to Your Game
Now that the processor is done, add a reference to the CustomAvatarAnimationPipelineExtension project to the content project. Expand the AvatarCustomAnimationSampleContent project. Right-click the References list and select Add Reference. Select the Projects tab and select the CustomAvatarAnimationPipelineExtension project. Next, add the animation you built to the content project. Right-click the AvatarCustomAnimationSampleConent project and select Add -> Existing Item. Locate the animation fbx file that you created in your 3D content creation package and click the Add button.
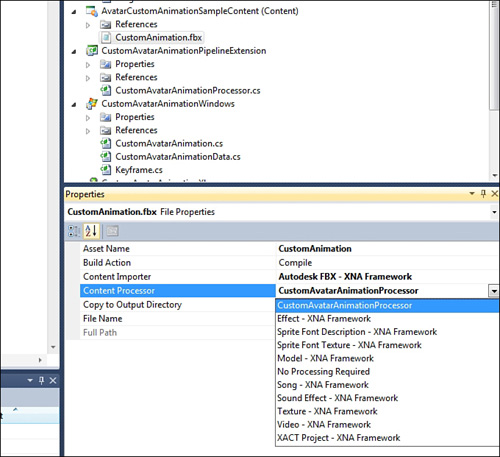
With the new content item added to the content project, we n change the processor to use when building the content item. Click the animation fbx file in the content project and locate the properties panel. Under the properties panel, in Content Processor, click the drop-down and select CustomAvatarAnimationProcessor as shown in Figure 10.19.
Figure 10.19. Selecting the CustomAvatarAnimationProcessor content processor
The sample project, AvatarCustomAnimationSample, is an Xbox 360 project, but it should use the types you created previously in the CustomAvatarAnimationWindows project. To use these types, build them as a library for the Xbox 360. Fortunately, this is a common scenario and an easy way to create the Xbox 360 version of the library. Right-click the CustomAvatarAnimationWindows project and select the Create Copy of Project for Xbox 360 menu option as shown in Figure 10.20.
Figure 10.20. Creating copy of a project for Xbox 360

After the new project is created, rename the project CustomAvatarAnimationXbox. Your AvatarCustomAnimationSample project now needs a reference to the new project, so expand the AvatarCustomAnimationSample project and right-click the Reference list. Select the Add Reference menu item. Click the Projects tab and select the CustomAvatarAnimationXbox project.
Updating Your Game to Use the Custom Animation
You can use the random avatar example that you created at the beginning of this chapter. You need to make only a few minor updates to use the new custom animation type.
First, add the namespace you used for the custom animation types by adding the following line to your game class file:
using CustomAvatarAnimation;
Next, you need a member variable to store the custom animation. Add the following member variable to your Game class:
AvatarCustomAnimation customAvatarAnimation;
To load the AvatarCustomAnimation, add the following lines to your LoadContent method:
// Load the custom animation
CustomAvatarAnimationData animationData =
Content.Load<CustomAvatarAnimationData>("CustomAnimation");
customAvatarAnimation = new AvatarCustomAnimation(animationData);
The fbx file is converted into a CustomAvatarAnimationData using the custom content pipeline processor. Then, use the ContentManager to load the file. You can then create a AvatarCustomAnimation instance using the CustomAvatarAnimationData.
Now, you can use the AvatarCustomAnimation just like you use an AvatarAnimation. In the game’s Update method, call the animations Update method. Add the following to your game’s Update method:
customAvatarAnimation.Update(gameTime.ElapsedGameTime, true);
The final step is to use the animation with the AvatarRenderer Draw method. Add the following to your game’s Draw method.
avatarRenderer.Draw(customAvatarAnimation);
Running the sample now shows a random avatar playing back your custom animation. Figure 10.21 shows the avatar playing the custom animation created for this sample.
Figure 10.21. Custom animation playing on the avatar

Summary
We have covered a large amount of information about the avatar library provided by XNA Game Studio 4.0 and built several samples. We discussed the basics of using the AvatarDescription, AvatarAnimation, and AvatarRenderer APIs to more advanced samples such as animation blending and how to load and play back custom animations.
You now have the power to utilize avatars in your own Xbox Live Indie game, so create an awesome new avatar gaming experience.