Chapter 13. Turn Up the Volume
Let’s turn up the volume and add some volume to your game. There are multiple ways in which a gamer can add audio to his game, including playing back prerecorded wave files and generating audio dynamically while the game is running. Audio is an essential part of your game and can even play a part in your title’s game play.
In this chapter you learn:
• Loading and playback of sound effects
• Adjusting sound effect pitch, pan, and volume
• Microsoft Cross-Platform Audio Creation Tool (XACT)
• Recording audio using a microphone
• Generating dynamic audio
Playing Sound Effects
Now that your game looks stunning with all of the new fancy graphics techniques you learned, it is time to round out your game with some sound effects and music. Notice that although graphics make your game look nice, something is missing and as a player of the game you are not quite as engaged as you know you can be. Sounds play an integral part in our lives and as such can play a huge role in how gamers perceive a game.
As you learn in this chapter, adding sound effects and music to your game is simple using XNA Game Studio. Determining when and where to use the right sound effects and music is not as easy, and time and care should be put into the sound effect and music selection in your game. Often, those who are new to creating games overlook the sound design of a game. What you find is that all of the effort you put into making the game sound great is paid back in immersion and emotion the game provides.
XNA Game Studio provides the capability to play back sounds for a number of different sources: sound effects and music saved to files, sounds recorded through a microphone, and sounds generated dynamically through programming. In this chapter, we discuss each of these along with a tool called the Microsoft Cross-Platform Audio Creation Tool (XACT).
Using SoundEffect for Audio Playback
The simplest way to play audio is to use the SoundEffect class. A SoundEffect contains the shared resources needed to play audio such as the wave data that makes up the sound. Load the SoundEffect by using the content pipeline similar to how you load a texture or other resources you have seen so far.
SoundEffect provides two mechanisms when playing audio. The first is fire and forget, which provides an easy-to-use API to play an audio file. The second is instanced-based playback where you request a SoundEffectInstance that enables you as the developer to have more control over the playback of the audio file.
Loading from a File
The first step to play an audio file is to add the file to your content project for your game. Right-click your content project and select Add Existing Item. Then, navigate to an existing audio file. XNA Game Studio supports audio files in WAV, WMA, and MP3 formats.
The first bit of code you need is a member variable that holds the SoundEffect that you load. Add the following lines of code as a member variable to your game:
// Store our SoundEffect resource
SoundEffect soundEffect;
Now you need to load the SoundEffect using the content pipeline. You can do this by calling the Load method on the ContentManager of the Game class using SoundEffect as the generic parameter and the asset name as the only parameter:
// Load the SoundEffect resource
soundEffect = Content.Load<SoundEffect>("beep");
Fire and Forget Audio Playback
Now that you have loaded the resources for the audio file, you can use the first mechanism for sound playback called fire and forget. It is called fire and forget because after you call play, you don’t need to manage the playback of the audio stream. The audio file plays from the start of the file until the end of the file. Although this limits the control you have as a developer on how the playback occurs, it is simple to use.
To play the SoundEffect using fire and forget, call the Play method:
soundEffect.Play();
The Play method returns a boolean value that specifies whether the sound is able to play or not. If Play returns true, then the sound plays. If false returns, there are too many sounds currently playing, so it cannot play.
The Play method also contains an overload with three parameters to control the volume, pitch, and panning of the playback:
soundEffect.Play(1.0f, 0.0f, 0.0f);
The first parameter is a float value that determines the volume of the sound. The value can range from 0, which indicates no sound, to 1.0, which means the sound should be full volume with respect to the master volume setting. Use the MasterVolume static property of SoundEffect to set the master volume setting for all SoundEffects. The MasterVolume values range from 0 to 1 with 1 as the default value.
The second parameter is a float value that determines the pitch that the sound plays in. The pitch value ranges from –1, which lowers the pitch by one octave, to 1, which raises the pitch by one octave. A value of 0 plays the sound as it is stored in the file.
The third parameter controls the pan of the playback. Panning determines how much of the playback occurs from the left and right speakers. The values rage from –1, which comes from only the left speaker, to 1, which comes from only from the right speaker. A value of 0 plays the sound as it was loaded from the file.
Note
You can save files with the audio playing from only one of the sides. If the file is saved with the audio source already panned to one side or the other, a value of 0 still contains the original panning.
SoundEffect also exposes two properties that are useful. The first is the Duration property that returns the length as a TimeSpan of the SoundEffect. The other is Name that returns the name of the SoundEffect.
Playback Using SoundEffectInstance
The other method to play back sounds requires an instance of the sound effect. The SoundEffectInstance provides the capability to control the playback of a single audio stream from a SoundEffect. Create a SoundEffectInstance by calling the CreateInstance method on the SoundEffect. A SoundEffect can create many instances. Each instance provides a number of controls that enable more advanced playback scenarios.
SoundEffectInstance provides methods to Play, Pause, Stop, and Resume playback. The Play method takes no parameters and works similar to the SoundEffect.Play method. It starts the playback of the SoundEffectInstance at the current play location. If the sound is paused, calling Play resumes playback from where the sound was paused. The Resume method is similar and resumes playback from the current sound location.
The Pause method does what its name suggests and pauses playback at the current playback location where it can be started again later by calling the Play or Resume methods.
The Stop method stops the sound playback immediately and sets the playback location to the start of the sound. Stop provides an overload that takes a boolean value to specify if the playback should stop immediately. If this value is set to false, the playback stops only after it reaches the end of the sound. This is useful when you want to allow the sound to complete but stop any looping that occurs.
Use the State property to determine the current state of a SoundEffectInstance. It returns a SoundState enumeration that contains the values Playing, Paused, or Stopped.
Looping Audio Playback
When a SoundEffectInstance is set to loop, the sound continues to play until it is paused or stopped. After the current sound location reaches the end of the duration, the current position sets back to the start where playback continues causing the sound playback to loop until it is paused or stopped.
To set a SoundEffectInstance so it loops, set the IsLooped property to true. After the property is set to true, the sound loops when it is played. You can set the IsLooped property only before Play or Resume methods are called on the instance. After Play or Resume are called on an instance, the IsLooped property can’t change. Otherwise, an InvalidOperationException is raised. To go from playing a specific sound with looping behavior back to not looping another, SoundEffectInstance must be created.
Adjusting the Pitch, Pan, and Volume of Playback
The Pitch, Pan, and Volume properties can be used to adjust their values. These work in the same way as the SoundEffect.Play overload method, which takes volume, pitch, and pan as arguments. . Pitch and Pan are float values that must be between –1 and 1, whereas Volume must be between 0 and 1.
3D Audio Positioning
In most 3D games and applications, the sounds should come from a source in the game. Jet engine noise should sound like it comes from the direction of the engines, the gun fire noises should come from the direction of an enemy, and car horns should sound like they come from a nearby passing car. We perceive that these sounds come from different positions in the world even though they come from a stationary set of speakers. This simulation occurs because different speakers output different amounts of the sound, giving the impression that the audio source is a specific direction from the player. The volume of the sound can also create the illusion that a sound is close or farther away.
SoundEffectInstance allows for an AudioEmitter and AudioListener by using the Apply3D method. The AudioEmitter type describes the location, direction, and velocity of the object that is the source of the sound that is played back using the SoundEffectInstance. To create a new instance of an AudioEmitter, use the default parameterless constructor:
AudioEmitter audioEmitter;
To set the current position of the AudioEmitter using the Position property, set the location to the position of the object emitting the sounds. If you use a Matrix to store the position and orientation of an object in your game, use the Translation property of the matrix to get the position of the object. The AudioEmitter also contains properties for the Forward and Up vectors. Use these vectors to determine the direction that the emitter moves along with the Velocity property. These properties allow for the sound coming from the AudioEmitter to simulate the Doppler effect.
The Doppler effect, in regards to audio, has to do with the change in an audio emitter’s frequency when the position and velocity of the object change in relation to the listener of the audio waves. As an object moves toward the listener, the sound waves compress, causing the frequency to increase from the source sound. After the object passes the listener, the audio waves stretch, causing the frequency to lower.
AudioEmitter provides a DopplerScale property. Use this property to scale the Doppler calculation. The default value is 1.0. Lowering this value decreases the influence of the Doppler on the final sound output. Increasing the value increases the Doppler effect on the final sound output.
Note
SoundEffect also provides two static properties that affect the Doppler calculation. Use DopplerScale and DistanceScale to change the influence of the Doppler calculation.
The AudioListener represents the location of the emitter sound. To create an instance of the AudioListener, use the default parameterless constructor:
AudioListener audioListener;
Similar to the AudioEmitter, the AudioListener provides properties for the current Position, Forward, and Up vectors, and the Velocity the listener moves. These properties are used in conjunction with the emitter to determine the final audio output.
After you create the AudioEmitter and AudioListener, you can call the Apply3D method to update the 3D positioning information used by the SoundEffectInstance:
soundEffectInstance.Apply3D(audioListener, audioEmitter);
Adding SoundEffectInstance to Your Game
Now that you learned how the SoundEffectInstance works, you can add more advanced audio playback to your game.
The first thing to add to the game is some local variables to store the SoundEffect, SoundEffectInstance, AudioEmitter, and AudioListener:
// Store our SoundEffect resource
SoundEffect soundEffect;
// Instance of our SoundEffect to control playback
SoundEffectInstance soundEffectInstance;
// Location of the audio source
AudioEmitter audioEmitter;
// Location of the listener
AudioListener audioListener;
Next, load the audio file that is used for the source of audio. In the LoadContent method, add the following lines of code:
// Load the SoundEffect resource
soundEffect = Content.Load<SoundEffect>("beep");
soundEffectInstance = soundEffect.CreateInstance();
audioEmitter = new AudioEmitter();
audioListener = new AudioListener();
You just loaded the sound effect from the file. Then, create a new SoundEffectInstance that is used to control the playback. An AudioEmitter and AudioListener are also created with their default constructors.
In the Update method, you control the playback of the SoundEffectInstance. The first controls you add are for basic sound playback of playing, pausing, stopping, and resuming:
// Play the sound
if (currentKeyboardState.IsKeyDown(Keys.Space) &&
lastKeyboardState.IsKeyUp(Keys.Space))
soundEffectInstance.Play();
// Pause the sound
if (currentKeyboardState.IsKeyDown(Keys.P) &&
lastKeyboardState.IsKeyUp(Keys.P))
soundEffectInstance.Pause();
// Stop
if (currentKeyboardState.IsKeyDown(Keys.S) &&
lastKeyboardState.IsKeyUp(Keys.S))
soundEffectInstance.Stop();
// Resume
if (currentKeyboardState.IsKeyDown(Keys.R) &&
lastKeyboardState.IsKeyUp(Keys.R))
soundEffectInstance.Resume();
Use the Space, P, S, and R keys to control the Play, Pause, Stop, and Resume methods, respectively. Check the last keyboard state to ensure you don’t get repeat keyboard presses. Otherwise, when users press the key, the Play or other methods are called multiple times until users release the key.
Next, use the L key to control whether the instance should loop or not. If the L key is pressed before the first time, the SoundEffectInstance plays, and then the sound loops until it is stopped or paused. As mentioned before, if you set the IsLooped property after the instance has already been played, the InvalidOperationException is raised. As a developer, you need to determine whether a sound needs to loop before playing the sound. Add the additional lines of code to the Update method to add the looping behavior:

Next, add controls to set the Pitch, Pan, and Volume of the SoundEffectInstance:
// Change Pitch
if (currentKeyboardState.IsKeyDown(Keys.Q))
soundEffectInstance.Pitch = -1.0f;
else if (currentKeyboardState.IsKeyDown(Keys.W))
soundEffectInstance.Pitch = 0.0f;
else if (currentKeyboardState.IsKeyDown(Keys.E))
soundEffectInstance.Pitch = 1.0f;
You can use the Q key to lower the pitch to the lowest value of –1.0f and use the E key to set the pitch to the highest value of 1.0f. Use the W key to reset the pitch to the recorded value from the loaded SoundEffect file by setting the pitch to a value of 0:
// Change Pan
if (currentKeyboardState.IsKeyDown(Keys.Z))
soundEffectInstance.Pan = -1.0f;
else if (currentKeyboardState.IsKeyDown(Keys.X))
soundEffectInstance.Pan = 0.0f;
else if (currentKeyboardState.IsKeyDown(Keys.C))
soundEffectInstance.Pan = 1.0f;
You can use the Z key to pan the sound all the way to the left by using a value of –1.0f. Use the C key to pan the sound all the way to the right by using a value of 1.0f. Use the X key to center the playback to the recorded values from the loaded file:
// Change Volume
if (currentKeyboardState.IsKeyDown(Keys.B) &&
soundEffectInstance.Volume <= 0.99f)
soundEffectInstance.Volume += 0.01f;
else if (currentKeyboardState.IsKeyDown(Keys.V) &&
soundEffectInstance.Volume >= 0.01f)
soundEffectInstance.Volume -= 0.01f;
Use the B and V keys to raise and lower the volume of playback, respectively. Check the value of the Volume property to ensure the values stay within the required bounds.
Finally, change the position of the audio source by updating the AudioEmitter.Position property and setting its value on the SoundEffectInstance. Add the following lines of code inside the Update method:
You can use the Right and Left arrow keys to move the audio emitter’s position in the X coordinate. Use the Up and Down arrow keys to move the emitter’s position along the Z coordinate. Update the SoundEffectInstance by calling the Apply3D method passing in the AudioListener and AudioEmitter.
Note
Calling Apply3D is required anytime you adjust the AudioListener and AudioEmitter, if you want those changes to affect the audio playback. Just changing the values of AudioListener and AudioEmitter without calling Apply3D does not change the SoundEffectInstance playback even if Apply3D has already been called.
Microsoft Cross-Platform Audio Creations Tool (XACT)
The Microsoft Cross-Platform Audio Creations Tool (XACT) is a powerful graphical audio-authoring tool that enables you to manage large numbers of source wave files and to control their playback in the game. Using the XACT graphical interface, you can load existing wave files, group the files, and layer them with effects. The provided XNA Game Studio APIs can trigger their playback.
Although the XACT tool provides several features, we cover the basics of the graphical interface and the XACT APIs to enable you to get started using the tool.
Note
XACT is available only for the Windows and Xbox 360 platforms. The Windows Phone is not supported.
Opening XACT
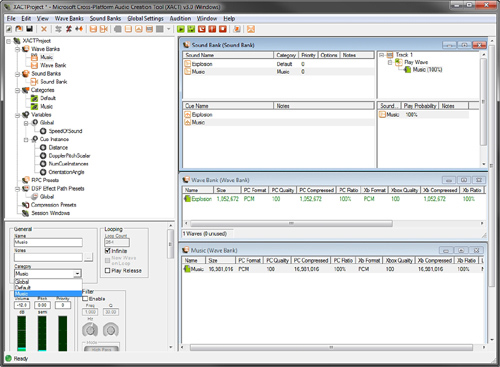
You can find the XACT tool under the Microsoft XNA Game Studio 4.0 program files menu under the Start menu. Select the Tools: folder, and then click the Microsoft Cross-Platform Audio Creation Tool (XACT) menu item. This launches the XACT tool, which looks like Figure 13.1.
Figure 13.1. XACT graphical interface

The XACT graphical interface contains many menus, icons, and options. We cover the different areas as they are needed in the following examples.
Creating a New XACT Project
In the XACT tool, select File, then New Project. The New Project Path dialog box displays. Because we use the XACT project in our game’s content pipeline, it is often easy to use the content folder of the game to store the XACT project file. Locate the content project folder for your game, and then enter a name for your XACT project and make sure it ends with the .xap extension. Click the Save button.
Adding a Wave File to the XACT Project
The starting elements of an XACT project are wave files that must be loaded from source recordings. In the following example, you load a single wave file and then play back the sound using the XACT APIs provided in XNA Game Studio.
First, you need a wave bank to load the source wave files into. A wave bank is a collection of wave files that are grouped together. To add a new wave bank, click the Wave Banks menu and select New Wave Bank. A new entry displays under Wave Banks in the XACT project tree with the default name “Wave Bank”. You can change the default name by clicking the wave bank in the tree or by right-clicking the wave bank and selecting Rename. A wave bank menu also displays in the right side of the XACT workspace. Your XACT workspace should look like Figure 13.2.
Figure 13.2. Wave Bank window in the XACT tool

Next, you need to add the first sound bank to the project. A sound bank is a collection of wave banks. To add a new sound bank, click the Sound Banks menu and select New Sound Bank. Just as with the wave bank, the new sound bank is added to the XACT project tree, but this time, the new item displays logically under the Sound Banks tree node. The new sound bank has a default name of Sound Bank, but you can change the name by clicking on the sound bank or by right-clicking the sound bank and selecting Rename. The sound bank window is also added to the XACT workspace to the right.
The workspace might be getting cluttered now, so the wave bank and sound bank windows might be overlapping. XACT provides a nice window-ordering option to organize your windows automatically. Click the Window menu option to display the windowing options. Select Tile Horizontally from the drop-down menu. The sound bank and wave bank windows should now organized as shown in Figure 13.3.
Figure 13.3. Sound and wave bank windows
You can now add the source wave files to the project. Right-click the Wave Bank in the XACT project tree and select Insert Wave File(s). In the open file dialog box, choose a wave file and click the Open button.
To hear the newly added wave file play, launch the XACT Auditioning Utility. This tool can be found in the same Tools folder under Microsoft XNA Game Studio 4.0 as the XACT tool is located. Launching the XACT Auditioning Utility should bring up a console window like the one in Figure 13.4.
Figure 13.4. XACT Auditioning Utility

To listen to the wave file you just added to the wave bank, right-click the entry and select Play.
Note
If you receive and error message that says, “Could not connect to a Windows auditioning server,” verify that you have started the XACT Auditioning Utility tool.
Finally, you need to set up a cue. The developer uses the cue to play back a sound or a group of sounds. The cue is stored and accessed from the sound bank.
The quickest way to add a cue is by dragging a wave from the wave bank onto the cue section of the sound bank windows, which is in the lower left corner (see Figure 13.5).
Figure 13.5. XACT windows after dragging wave to the cue window

After you drag the wave file and create the cue, notice there are a number of new items that display in the sound bank window. Because a new sound has been created, by default, it is created with the same name as the wave. The sound is displayed in the top left of the sound bank window. After selecting the sound entry, there is a track listing to the right of the window. Each sound can contain a number of tracks. In this case, a single track is created that plays the wave from the wave bank. Below the sound bank is the cue window that you dragged the wave to. A new cue is created using the same name as the wave that was used to create it. As we discussed, the cue is used in the game code to control the playback of the sounds. So, a cue is required if you want to cause the sound to be played in your game. A cue is made up of multiple sounds from the sound bank entries in the window above it. Because the cue is created by using the dragging shortcut, the sound of the same name is added to the cue. By right-clicking the cue, you can select the Play menu option to hear the cue play.
Note
Without using the cue-dragging shortcut, multiple steps are required to set up a new cue for playback. First, you need to create a new sound, add a track to the sound, and then add the wave to the track. Next, create a new cue and add the sound to the cue.
Now you are ready to switch over to the code to show you how to play the cue you just created. Save your project and open XNA Game Studio.
Sound Playback Using Cue
It’s time to play the cue you just created in the XACT tool. You need to add the XACT project you created to the content project of your game. Just like adding other types of content, it is easy to add the XACT project. Right-click the content project and select Add, and then click Existing Item. Then, select the .xap XACT project file in the dialog box and click the Add button. Building the content project now should show that three files are built from the single .xap file. XACTProject.xgs is the audio engine file and is named after the project name that was used for your XACT project. The Wave Bank.xwb file contains the data from the wave bank of the same name. If you renamed the wave bank in your XACT project, this file uses the name you used for your wave bank. The Sound Bank.xsb file contains the data from the sound bank in your XACT project. Like the wave bank, the name of the file is the same as you used for the sound bank in the XACT project and is set to whatever you named your sound bank.
In your game, add the following member variables for the AudioEngine, SoundBank, WaveBank, and Cue:
AudioEngine audioEngine;
SoundBank soundBank;
WaveBank waveBank;
Cue cue;
The AudioEngine is used to perform necessary updates to the underlying audio system. The AudioEngine.Update method is required to be called once per frame to ensure the audio playback stays up to date and is not stalled. The other three variables for the SoundBank, WaveBank, and Cue are the code counterparts to the ones created in the XACT project.
To load the files that were built by processing the XACT project through the content pipeline, add the following lines of code to your games LoadContent method:
// Load file built from XACT project
audioEngine = new AudioEngine("Content\XACTProject.xgs");
waveBank = new WaveBank(audioEngine, "Content\Wave Bank.xwb");
soundBank = new SoundBank(audioEngine, "Content\Sound Bank.xsb");
// Get an instance of the cue from the XACT project
cue = soundBank.GetCue("Explosion");
Finally in the games Update method, check to see whether the spacebar is pressed. If the spacebar is pressed, the cue plays:
// Play the cue if the space bar is pressed
if (currentKeyboardState.IsKeyDown(Keys.Space) &&
lastKeyboardState.IsKeyUp(Keys.Space))
{
cue.Play();
}
// Update the audio engine
audioEngine.Update();
After playing the sound, call the AudioEngine.Update method to ensure it is called each frame.
A Cue has similar playback methods as SoundEffectInstance, such as Play, Pause, Resume, and Stop. There is also an Apply3D method, which takes an AudioListener and AudioEmitter.
After Play is called on the Cue, it can’t be called again. You can call Pause and then Resume, but calling Play again will cause an InvalidOperationException. To play the sound more than once, create a new Cue instance by calling the SoundBank.GetCue method. Each Cue returned from GetCue is its own instance. This also means you should not call GetCue unless you need a new instance since it will allocate memory.
You can use the SoundBank.PlayCue method to just play a cue and have no other controls on the cue similar to how fire and forget sound effects work. You can use the following code to play a cue without creating an instance of a Cue:
// Play cue without cue instance
if (currentKeyboardState.IsKeyDown(Keys.P) &&
lastKeyboardState.IsKeyUp(Keys.P))
{
soundBank.PlayCue("Explosion");
}
Streaming
Some wave files are large, especially the wave files that are used to play back music in your game. By default, the wave files used in the XACT project are loaded into memory at runtime. This can cause problems if your file is quite large because the file might not fit into memory or it might take up more space than what you would like. Streaming is set at the wave bank level for all of the wave files contained within the wave bank.
Let’s add some streaming music to the previous XACT sample. Open the XACT project you created previously. Add a new wave bank and call it Music. Select the new wave bank in the XACT project tree. The properties of the wave bank display in the lower left window. In the Type section, select the Streaming button. It should be highlighted a green color (see Figure 13.6).
Figure 13.6. Setting wave bank to streaming
To add the music source files to the wave bank, right-click the wave bank and select Insert Wave File(s). Select your music file in the dialog window and click the Open button. Now that the source wave file is added to your streaming wave bank, you need a cue to use for playback. Like you did before, drag your music wave into the sound bank’s cue window to create the cue for your music wave.
Finally, you change the sound that was created for the music cue to mark it as background music. Setting a sound category to Music allows users on the Xbox 360 to play their own music library over your game’s music. This allows the user to hear the sound effects in your game but to override the music to what they are playing using the media playback provided on the Xbox 360.
To change the sound category, select the music sound entry that you just created in the sound bank. In the lower left, select the Category drop-down and select Music (see Figure 13.7). Next, select the Infinite checkbox under the Looping section to have the sound continually play until it is stopped. Save the XACT project, so you can add the music to your previous code sample.
Figure 13.7. Setting sound category to Music
You need two additional member variables to add streaming music to the previous example. Add the following two member variables:
WaveBank streamingWaveBank;
Cue musicCue;
Like before, you need to load the wave bank. After the other audio loading in the games LoadContent method, add the following lines of code:
// Load streaming wave bank
streamingWaveBank = new WaveBank(audioEngine, "Content\Music.xwb", 0, 4);
// The audio engine must be updated before the streaming cue is ready
audioEngine.Update();
// Get sue for streaming music
musicCue = soundBank.GetCue("Music");
// Start the background music
musicCue.Play();
The overload of the WaveBank constructor takes an additional two arguments. The first is the offset into the wave to start. In most cases, you want to start at the beginning, so a value of 0 should be set. The last parameter is the packetsize, which determines the size of the streaming buffer used internally to store the file as it is loaded. It is in units of DVD sectors, which are 2,048 bytes each. The minimum value must be 2. The higher the number, the larger the memory buffer, which allows for smoother playback. You can test different values to determine the minimum value that smoothly streams the music in your game.
After creating a new streaming wave bank, you must call the AudioEngine.Update method to play a cue that contains the streamed data from the wave bank.
The last two steps are to get the Cue from the SoundBank and to call the Play method to start the background music. Now your game has streaming background music that can be overridden by the player.
Dynamic Sound Effects
Not all sounds have to come from a prerecorded file. New to XNA Game Studio 4.0 are the capabilities to record microphone data using the new Microphone class and playback of dynamic sound effect data using the new DynamicSoundEffectInstance class.
Recording Audio with a Microphone
The new Microphone type is supported on all of the XNA Game Studio 4.0 platforms. On Windows, this is any of the recording devices recognized by Windows including the Xbox 360 headset. Make sure the microphone is set up in Windows before trying to record using the XNA APIs. Xbox 360 supports the headsets along with the Xbox 360 wireless microphone. Windows Phone 7 supports reading the built in microphone as well as Bluetooth headsets.
Enumerating Microphones
To enumerate all of the recording devices available to your game, you can use the Microphone.All property. This returns a ReadOnlyCollection of Microphone objects. Use the Microphone.Name field to determine the friendly name of the recording device. For example, the Xbox 360 wired headset connected to the Xbox 360 wired controller on a Windows 7 machine returns Headset Microphone (Headset (XBOX 360 For Windows)).
You can use the Microphone.IsHeadset property to determine whether a recording device is a wired headset or a Bluetooth hands-free headset.
Most of the time, you will not want to enumerate all of the recording devices and will just want to use the default Microphone that the user or platform has selected. You can use the Microphone.Default property to easily select the preferred default recording device for the particular platform.
Microphone microphone = Microphone.Default;
The Microphone has a specific state, which is returned by the Microphone.State property. The state is returned as a MicrophoneState enumeration, which has the values of Started and Stopped. The Microphone starts its State in the Stopped state. To start the recording process, you must call the Microphone.Start method. After the Microphone starts recording, it gathers buffered data that can then be used for playback. Use the Microphone.Stop method to stop the gathering of recording data.
Reading Microphone Data
After the Microphone starts, the internal buffer starts to fill up with the recorded values received from the recording device. The internal buffer size of the Microphone is exposed by the Microphone.BufferDuration property. This property can be used to read and set the buffer duration to use for recording. The value is specified as a TimeSpan and must be between 100 and 1000 milliseconds.
Note
The Microphone.GetSampleDuration method can be used to determine the TimeSpan a given sample buffer size supports.
The game needs a byte array buffer to store the data returned from the Microphone. To determine the size of the buffer, the Microphone.GetSampleSizeInBytes method calculates the required buffer size given a TimeSpan. The buffer should be large enough to hold all of the data the Microphone returns. If you use the Microphone.BufferDuration property as the parameter passed to GetSampleSizeInBytes, the size returned is equal to the internal buffer size:
int bufferSize = microphone.GetSampleSizeInBytes(microphone.BufferDuration);
byte[] buffer = new byte[bufferSize];
Now you have a buffer to read the Microphone data. While the Microphone is recording, an internal buffer continually updates with the latest data from the physical recording device. Access this internal buffer by using the Microphone.GetData method. This method returns the current buffer since the last GetData call. You can access the buffer in two different ways. You can read the current buffer each frame, which returns a varying amount of data depending on how long the last frame took:
int returnedData = microphone.GetData(buffer);
In this case, the GetData method returns the size of data updated in the buffer.
Note
A GetData overload enables you to specify an offset and size to use when filling the provided buffer.
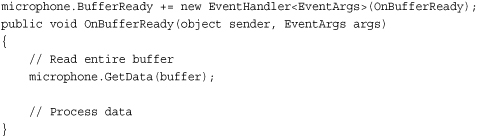
The other way to use the GetData method is to only request the data after the internal buffer is full. The Microphone.BufferReady event is raised after the internal buffer is full and a full read can occur. In the BufferReady event handler, you can call GetData to access the full internal buffer, which is the same size as your created buffer if you used the BufferDuration as the parameter to the GetSampleSizeInBytes method:
Playback Using DynamicSoundEffectInstance
Now that you know how to select a microphone, start recording, and read the recorded buffer data, let’s play back the audio as it is recorded from the Microphone.
To play the recorded buffer data, use the new DynamicSoundEffectInstance class. DynamicSoundEffectInstance is derived from SoundEffectInstance. Like SoundEffectInstance, it allows for basic playback controls such as Play, Pause, Stop, and Resume. It also has properties for the Pitch, Pan, and Volume.
Add the following member variables to your game class to store the Microphone, buffer to store the recorded data, and DynamicSoundEffectInstance to play the recorded data:
Microphone microphone;
byte[] buffer;
DynamicSoundEffectInstance dynamicSoundEffectInstance;
In the game’s Initialize method, add the following lines of code:

After DynamicSoundEffectInstance constructor takes two parameters, the first sampleRate takes the sample rate in Hertz of the audio content that passes to the DynamicSoundEffectInstance. The second parameter channel takes an AudioChannels enumeration value of Mono or Stereo. Because the microphone records in mono, use the Mono enumeration.
After you create the DynamicSoundEffectInstance, play the sound. The sound continues to play as you keep passing new buffer data to the instance.
Finally, you need to implement the OnBufferReady method that you passed to the Microphone.BufferReady event:
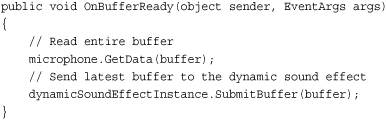
This event will be called whenever the internal Microphone buffer is full and is ready to be read. The buffer is then read using the Microphone.GetData method, which fills the buffer you created. The new buffer then needs to be passed to the DynamicSoundEffect.SubmitBuffer method so playback continues.
Note
If you change the Pitch of the DynamicSoundEffectInstance while using the microphone as the source, the recording rate differs from the playback rate. Playback falls further and further behind if you lower the Pitch, or it stops and waits for more data, causing a pop sound if you raise the Pitch. Either way, it makes your voice sound cool—so try it out!
Generating Dynamic Sound Effects
Along with using the Microphone to generate dynamic data to playback, you can also create the buffer dynamically. This means your game can create new and interactive sounds that are driven by user input or interesting algorithms. Because creating dynamic audio data could be a book by itself, we cover just the basics of how to generate some simple data. Feel free to experiment and research how to create new and interesting dynamic sound effects.
What we perceive as sound is actually changes in air pressure that cause bones in our inner ear to vibrate. This vibration is what we call sound. To generate sound, we need to create this change in air pressure. Most electronics use speakers to generate the change. Speakers convert a digital signal into sound by vibrating a diaphragm, which in turn vibrates the air around us.
The data that you generate also needs to cause a vibration. There are many different ways to generate vibration waves, but one of the easiest is using the sine wave.
Now let’s generate some tones. Add the following member variables to your game:
const int SampleRate = 48000;
DynamicSoundEffectInstance dynamicSoundEffectInstance;
byte[] buffer;
int bufferSize;
// Frequency to generate
double frequency = 200;
// Counter to mark where we are in a wave
int totalTime = 0;
The SampleRate is the amount of samples that play in a second. The frequency is the amount of times the speaker vibrates per second. The faster the frequency, the higher pitch the tone sounds. Use the totalTime value to store where in the sine wave you are currently. The sine wave oscillates between –1 and 1 over the source of a period of two Pi.
Next in your games Initialize method, add the following lines of code:
// Create new dynamic sound effect and start playback
dynamicSoundEffectInstance = new DynamicSoundEffectInstance(SampleRate,
AudioChannels.Mono);
dynamicSoundEffectInstance.BufferNeeded += new
EventHandler<EventArgs>(OnBufferNeeded);
dynamicSoundEffectInstance.Play();
// Calculate the buffer size to hold 1 second
bufferSize =
dynamicSoundEffectInstance.GetSampleSizeInBytes(TimeSpan.FromSeconds(1));
buffer = new byte[bufferSize];
The previous code creates a new DynamicSoundEffectInstance with the previously defined SampleRate and only a single Mono audio channel. Use the BufferNeeded event to signal when the DynamicSoundEffectInstance is in need of more data to playback. Finally, start the instance by using the Play method.
Calculate the bufferSize by using the GetSampleSizeInBytes method to determine how much data is needed for a single second.
The final section of code is what generates the tone buffer to play. Add the following method to your game:
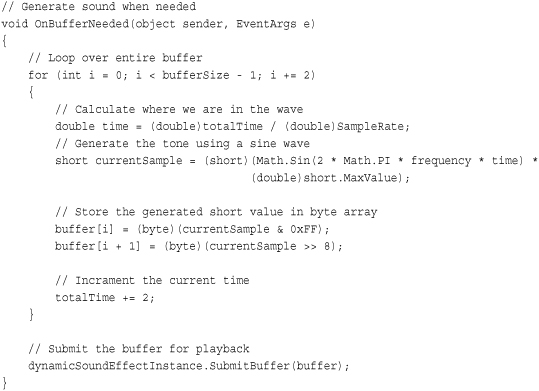
To generate the tone, loop over the entire buffer. Although the buffer is in bytes, the data for each channel of the DynamicSoundEffectInstance is 16 bits or a short. Because you use Mono, each loop covers two of the bytes in the buffer.
In each iteration of the loop, the short value for the sine wave is calculated. This calculation takes into account both the current time and the frequency. The time has to take into account how many samples occur per second because you want the frequency value to also be in hertz. The short value calculated from the Math.Sin method is in the range of –1 to 1. Because you want the value between the minimum and maximum values for a short, multiply the value by short.MaxValue.
The generated short value then needs to be broken into the high and low order bytes so it can be added to the buffer array. The time value is then incremented by two because you move through the array by two.
The final step is to call SubmitBuffer on the DynamicSoundEffectInstance to supply it with the latest buffer. If you run the sample code, you hear a nice solid tone.
Although the sine wave is a simple example of how to generate dynamic sound effects, it is the building block for many more complex effects. Spend some time trying to generate other types of sound waves and even mix them together.
Summary
Your game should be much louder now. We covered the different ways to play audio in XNA Game Studio 4.0. We covered loading individual sound effect files and using the SoundEffect APIs to play them back. We covered using the properties of the SoundEffectInstance to change how the sounds are played back, changing the Pitch, Pan, Volume, and changing their position in 3D space.
We also covered how to use the XACT tool to add wave banks, sound banks, and cues to your game. We demonstrated how to stream and mark audio as music so you can play large music files that the game player can override with his or her own music selection.
Finally, we covered dynamically generated audio. We showed how to use the Microphone to read an audio buffer and how to use the DynamicSoundEffectInstance to play back the recorded buffer. Then we generated audio using a sine wave to play a solid steady tone.