Chapter 15. Gamer Services
What exactly is in the mystical namespace called Gamer Services? At the most basic level, it is system services provided either by the platform itself or by the Xbox LIVE system. This is why you see things such as the Guide class in this chapter (provided by the system), as well as profile information and other various Xbox LIVE features. In this chapter, you will learn about:
• The Guide Class
• Gamers
• Profiles
Unfortunately, more than any other chapter in this book (that isn’t platform-specific), this chapter has the most platform differences. When needed, platform differences are mentioned during the course of the chapter.
GamerServicesComponent
One of the first platform differences is the requirement (or lack thereof) of having a GamerServicesComponent in your application. Well, that’s not entirely true—a GamerServicesComponent is never required, but the tasks it performs are required on some platforms.
This component does two major things that you could also do on your own, but this just simplifies it some. First, it calls GamerServicesDispatcher.Initialize, which is required before calling the other method it automatically calls for you, GamerServicesDispatcher.Update. On Xbox 360 and the Windows platforms, you must call both Initialize at the start of your app, as well as Update every frame for all Gamer Services functionality to work, including the Guide class. On the Windows Phone 7 platform, you do not have to call these methods to use the Guide class, but you do have to use the other components in the Gamer Services namespace. This is important as you find out later.
Now, the easiest way to have the correct methods called for you without you having to think about it is to add a GamerServicesComponent to your game’s Components list. This is commonly done by adding a new component to your components collection during initialization:
Components.Add(new GamerServicesComponent(this));
If you’re creating an Xbox 360 or a Windows game, add a component similar to this to your game if you’re using Gamer Services. Do not add this component if you are using Windows Phone 7 and using only the Guide class.
Guide Class
If you’re tackling this book in the order the chapters are in, you’ve already used the Guide a few times. In Chapter 12, “Adding Interactivity with User Input,” you used the onscreen keyboard API from the Guide. You also used the message box API briefly in the previous chapter, although without much explanation. For now, let’s go through each of the APIs that work across all the platforms XNA supports. First, create a Windows Phone 7 game project.
Trial Mode
Trial mode is, in short, awesome, and it is required if you plan on selling your game. A well-designed trial mode can be the difference between someone buying your game and not. Far too many developers don’t take enough time to make a good trial experience and their game suffers for it.
The default trial mode experience is different depending on which platform you target. For example, in order to implement a trial mode for a game you plan on publishing via Xbox LIVE Indie Games on Xbox 360, you don’t have to do anything, and the system handles everything for you. Granted, it won’t necessarily be a very good trial, but it will be a trial mode nonetheless! Conversely, the system does essentially nothing for you for a Windows Phone 7 project, aside from notifying you when you are and are not in trial mode. This means that for a good trial mode (and upsell opportunities), you need to implement them yourselves.
Of course, being in trial mode also means different things to the system as well. Xbox LIVE Indie Games cannot use multiplayer features in trial mode, but there is nothing stopping a Windows Phone 7 game from doing so.
So after all that, what is trial mode exactly anyway? It is the mode that your game is running in when the user has not purchased the game yet. Both of the currently available publishing pipelines (for Windows Phone 7 and Xbox 360) require you to have a trial version of the game (that is free to play) so users have an idea of what the game is like and if they want to play it more, or better yet, to buy it.
The major goal of any trial mode is to convert people who are playing your game from a free customer to a paid customer. You need to convince them that what they are playing is so great that they need to pay whatever price you deem your creation worth. Luckily, you have a lot of latitude in defining that.
One of the first things you need to know is whether or not you are actually running in trial mode. This is easily determined by looking at the Guide.IsTrial API call. In a published game, the API returns true if the game is currently running in trial mode (for example, has not been purchased). It returns false if it is not running in trial mode (for example, it has been purchased). This is pretty cut and dry, and for all published games, you can be assured it is correct and react accordingly.
Note
IsTrial can take up to 60ms to return on Windows Phone 7 projects, so do not call this every frame on those types of projects.
One of the problem’s you run into during development is how you can actually test that your trial code is working correctly. Again, the differing underlying systems provide different levels of support for testing trial modes. For example, on the Xbox 360, after you deploy your game, you can launch it in trial mode for testing via the system UI, like you see in Figure 15.1.
Figure 15.1. Picking startup mode for your game on Xbox 360 during development
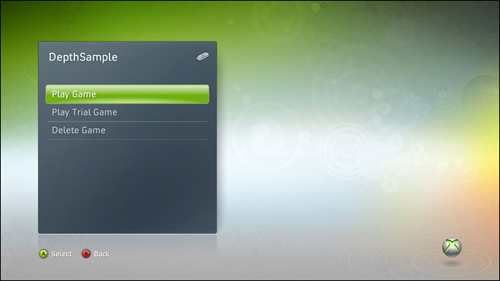
However, on Windows Phone 7, there is no way to launch the game in trial mode via the system UI, and even if there were, there isn’t a way to actually debug your code while trial mode is running (a problem shared by Xbox). During debugging, the default state of the game is considered unlocked because the majority of your game code and work is done for the case where trial mode is set to false.
Knowing this, there is an added property on the Guide class to help with this, named SimulateTrialMode. In order to turn on trial simulation, this property needs to set before the first Update call. In the new project, add the following line in the game’s constructor:
Guide.SimulateTrialMode = true;
This tells the runtime that you want to simulate the trial mode, which forces a game that is not in trial mode to return true from the IsTrial property. This ensures that IsTrial returns true until you either turn off via SimulateTrialMode, or when you simulate purchasing of the game.
Note
After a game’s trial status has gone from IsTrial being true to IsTrial being false, from trial simulation, purchasing, or any other mechanism, it never returns to the state where IsTrial returns true unless the application is exited and restarted.
You’re probably thinking to yourself, wait a minute, simulate purchasing of the game? As mentioned earlier, the best trial modes are an introduction to the game with the hope of getting your customer to purchase it. This implies that you need a way to enable the user to actually do just that. To show how this works, let’s simulate it via one of the gestures in the touch class, so add the following to your game’s constructor as well:
TouchPanel.EnabledGestures = GestureType.Tap | GestureType.Hold;
You use only one of these for now, but add them all now so you don’t have to change it later. Now, add the following code to your Update method to handle the gestures:

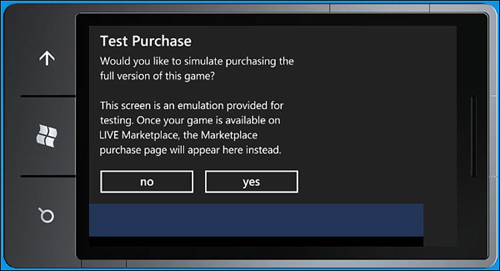
The important piece here is the Guide.ShowMarketplace call, which is where you have the opportunity to sell your game. For a game that has already been released, this brings up the system user interface to enable customers to purchase your game. If they do so, they switch immediately to the purchased version (IsTrial returns false). In debugging builds, this call instead shows a simple message asking if you would like to simulate the purchase of the game, much like you see in Figure 15.2.
Figure 15.2. Simulate purchasing of a game
Note
The check for IsTrial here isn’t necessary, because the ShowMarketplace call silently no-ops if you are not in trial mode; it was added for completion sake.
The ShowMarketplace call is intended to be a fire and forget it type of method. You don’t need to check its return (it has none), and the only exception it will ever throw is if you pass an invalid value to its parameter. For Windows Phone 7 projects, the parameter should always be PlayerIndex.One, and for Xbox projects, it should be the index of the player who is initiating the purchase screen. Depending on what happens during the call, the value of IsTrial might change, and that is what your game should key on.
An example of a good trial mode with upsell is a simple game with multiple levels. You can allow players to play the first five levels in the trial mode and when they finish those levels, bring them to a new screen saying that they could continue the game right now by purchasing the full game and using the ShowMarketplace API to take them there.
As was mentioned earlier, the system handles everything (including upsell) for your game on Xbox 360. There is a strict time limit on all trial games (exactly 8 minutes as of this writing, but is subject to change at any time), and when the time limit expires a new screen appears on top of the game enabling users to continue if they purchase the game, or to exit the game. This screen obscures the majority of the game behind it (the entire title safe area, plus some), and no input is routed to the game when that screen is up. The Guide.IsVisible property also begins to return true.
This brings us to the next property available on the Guide, IsVisible. This returns true if the guide is currently visible (for example, your game is obscured), and false otherwise. For example, change the Clear call in your Draw method to the following:
GraphicsDevice.Clear(Guide.IsVisible ? Color.Black : Color.CornflowerBlue);
Now, if you run your application and hold the screen down to make the gesture fire, when the simulate purchase screen is up, the entire screen turns black, rather than the faded CornflowerBlue. The most common usage of this property is to ensure you don’t attempt to load another dialog when one is already obscuring your game, which you see in a few moments.
The last property we talk about in this section is the IsScreenSaverEnabled property, which you can add to your project in the constructor:
Guide.IsScreenSaverEnabled = false;
The name of the property is a bit misleading, but what it does is quite simple. It enables (or disable) the system from thinking the user has stopped playing it. On the Xbox 360, this manifests itself by dimming the screen; on Windows Phone 7, it manifests itself by engaging the lock screen. If you had an area of the game where you expect long periods of time without user interaction (for example, playing a very long cut scene on Xbox, or a game that is controlled completely by the accelerometer on the phone), you should set this property to false so the system doesn’t kick in and dim the screen or lock it. You shouldn’t carelessly set this property to false all the time though.
Note
The IsScreenSaverEnabled property is application specific, not system wide, so even if you set it to false and exit the game, it reverts back to the system setting after the application quits.
The last method that we discuss in this section is a common way to show simple messages. The marketplace simulated purchase uses this API behind the scenes, and you used it in previous chapters as well. As you probably surmised, this API is ShowMessageBox. This API follows the standard .NET async pattern, so it is actually split into two separate APIs, BeginShowMessageBox and EndShowMessageBox. Add a new case statement into the gesture code in your Update method:

The first parameter to the BeginShowMessageBox API is the title of the message box, followed by the actual text of the message to be displayed. Next is an array of strings that represent the text that the buttons for the message box will have. For Xbox, this array must have at least one member in it, and up to a maximum of three, and on Windows Phone, it needs to have either one or two members. After the buttons are listed, the next parameter controls which button is the default selected button. This parameter has no effect on Windows Phone projects. Lastly, is the MessageBoxIcon parameter that controls the icon the message box displays on Xbox, and the sound it makes on Windows Phone.
After the async call finishes, call the EndShowMessageBox method to get the button that was pressed. It returns the index of the button name or null if the message box was cancelled (by either the B button on Xbox or the Back button on Windows Phone).
This overload of BeginShowMessageBox enables anyone to use the dialog. However, on Xbox 360, if you want a specific player to be the only one who can respond to the dialog, use the other overload that includes the PlayerIndex parameter and pass the index of the player you want to control the message box in the parameter.
Now the Bad News
Some of the functions in the Guide class are not available on Windows Phone 7 because they have no equivalent system UI, so it makes a bit of sense for them to be missing. However, a few functions in the Guide and everything else in Gamer Services (and this chapter) do not work on Windows Phone 7 unless you are a partner Xbox LIVE game. If you don’t know what that means, then unfortunately you are probably not one. The API calls still exist on the platform and work if you have a partnership agreement with Microsoft, but if you do not, you get an exception trying to initialize the GamerServicesDispatcher (even if via GamerServicesComponent). This is the reason that the Guide methods on the phone do not require these components.
Platform-Specific Guide Functionality
Although the rest of these APIs work on Windows, they’re there only to help debug Xbox functionality. So for the rest of this chapter, you deal with Xbox projects. First, create a new Xbox Game project.
If you remember from earlier in this chapter, you need to initialize Gamer Services before doing anything else on Xbox. So, add the following to your Initialize overload:
Components.Add(new GamerServicesComponent(this));
Notifications
As you move on to platform-specific features, a good place to start is notifications. You’ve probably seen quite a few notifications pop up while you were playing on your Xbox, from when you first sign in to Xbox LIVE, to when you get an achievement, to when you see your friends logging on. They’re ubiquitous on the platform! The XNA runtime includes two separate APIs to control the behavior of these notifications as well.
The first is the Guide.DelayNotifications method. This takes a single parameter that is a TimeSpan for how long you want to delay the notifications, up to a maximum of 120 seconds (two minutes). If you pass in a larger delay, the maximum is used. This method ensures that key portions of your game (for example, a cut scene) are not interrupted by the notifications. After the delay is over, the system delivers the notifications in the order they were received.
Note
You cannot call DelayNotifications continuously. The system needs time to deliver notifications.
The other is a property called Guide.NotificationPosition, which dictates where the notification shows up on the screen. There are nine different areas where the notifications can show up: top left, center or right; bottom left, center, or right; or middle left, center, or right. The default location is the bottom center, but you are free to move it elsewhere.
Other Players
One of the great features of Xbox LIVE is the capability to interact with your friends, even if you aren’t actually playing a game with them at the time. To update your new game project to show off some of these features, add a new variable to your game:
GamePadState lastState;
Use this to easily detect button presses. You should also add a quick helper method to check for the presses, so you don’t have to repeat the same code pattern multiple times:

Now, add the following code to your Update method to see the next system interface call:
GamePadState state = GamePad.GetState(PlayerIndex.One);
if (!Guide.IsVisible)
{
if (WasButtonPressed(Buttons.A, state, lastState))
{
Guide.ShowFriends(PlayerIndex.One);
}
}
lastState = state;
Note
Again, in this example, and the rest of the examples in this chapter, you use PlayerIndex.One as your player. In a real game, ensure that this parameter is a valid player index.
With this code, when you press and release the A button on your controller, it shows the system user interface for your friends, as in Figure 15.3. Use this in a game menu to show your friends.
Figure 15.3. The system’s friend user interface

You can also ask someone new to be your friend by using a call such as the following:
Guide.ShowFriendRequest(PlayerIndex.One, otherPlayer);
This is where the otherPlayer parameter is of type Gamer (which is discussed later in this chapter). This brings up the system user interface to enable the user to send a friend request to the other person specified by otherPlayer. Because this is the system UI providing this, all features of requesting a friend are here, including attaching voice and text messages. When your game has individuals playing a multiplayer game in a public session, it gives your players an opportunity to request to be friends with the people they enjoyed playing with.
A similar system screen to the friends is the list of players you’ve recently played online with. You can add support for this screen by adding the following to your Update method before storing the previous state:
if (WasButtonPressed(Buttons.X, state, lastState))
{
Guide.ShowPlayers(PlayerIndex.One);
}
Of course, what if you play with someone who was a total jerk, and saying inappropriate things, and generally being a bad person. Xbox LIVE enables a player to submit feedback on other players. If you show a list of players within your game, you might want to give your players a chance to submit feedback on others. You can do so with the following API:
Guide.ShowPlayerReview(PlayerIndex.One, otherPlayer);
This API brings up the system screen for submitting player review, and like the earlier example uses a parameter of type Gamer, which is discussed shortly in this chapter. Perhaps you don’t want to submit feedback on a player; you just want to see more information about him or her. Then you use the following API to enable you to see his or her gamer card:
Guide.ShowGamerCard(PlayerIndex.One, otherPlayer);
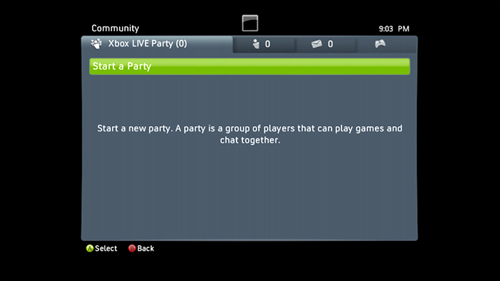
One of the more recent features with Xbox LIVE is the concept of parties, in which you can be in a group (or party) of people where you can chat and interact, even if you are all playing different games. You can add the following call to your Update method to see the party screen as shown in Figure 15.4:
if (WasButtonPressed(Buttons.B, state, lastState))
{
Guide.ShowParty(PlayerIndex.One);
}
Figure 15.4. The system’s party user interface
You can also see the party session system screen, which enables you to invite your party members to your games by using the following API:
Guide.ShowPartySessions(PlayerIndex.One, otherPlayer);
There are also other ways to invite other players to your party later this chapter. You can also use one of the guide methods to invite other players to your current session (which you learn more about in the next chapter), but the API call is the following:
Guide.ShowGameInvite(PlayerIndex.One, listOfPlayers);
Note
There is another overload for ShowGameInvite that takes a string that is the session identification for use in mobile games if you happen to be an Xbox LIVE partner.
This sends an invite to your current session to all players in the list you passed in. You learn about sessions and inviting and playing in them in the next chapter.
Messaging and Signing In
Unlike the message box API discussed earlier, which simply shows a message on your local screen, there are two other APIs that enable you to send messages to other players over the Xbox LIVE service. To see what messages you currently have, add this code to your project in the Update method:
if (WasButtonPressed(Buttons.Y, state, lastState))
{
Guide.ShowMessages(PlayerIndex.One);
}
This pops up the system screen with your messages as seen in Figure 15.5. You can also use the following API to show the system screen enabling you to send a message to someone else:
Guide.ShowComposeMessage(PlayerIndex.One, "Hello", listOfPlayers);
Figure 15.5. The system’s message user interface
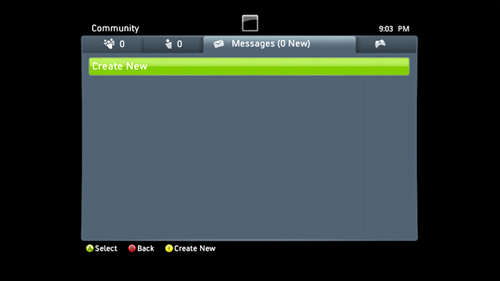
The text you pass into the method pre-populates the message (and it must be fewer than 200 characters). You can also pass in null as the list of players to have the system show the select gamertag screen before the message is sent.
Lastly, what if you detect that no one is signed in, or not enough people are signed in for your game (you learn how to determine this in the next section)? To tell people to sign in to the game, add the following code to your Update method:
if (WasButtonPressed(Buttons.LeftShoulder, state, lastState))
{
Guide.ShowSignIn(4, false);
}
This shows the sign-in system screen. The first pane tells the system how many panes to show for the sign in, and valid values are 1, 2, and 4. With a value of 1, a single sign-in pane shows up for one person to sign in. With a value of 2, you have two panes side by side enabling players to sign in. With four, you have a square of panes available for signing in. The next parameter determines which type of profiles can sign in. If the value is true, only profiles that are online enabled can sign in. If it is false, everyone can sign in. If it is true, local players can still sign in as guests of an online account. With these parameters, the screen appears as it does in Figure 15.6.
Figure 15.6. The system’s sign-in user interface

Gamers and Profiles
Now it’s time to move on to gamers and profiles. Rather than starting an entire new project, let’s just remove the four checks to the WasButtonPressed method in your Update overload. You should also add a new SpriteFont object called font to your Content project because you draw text in a few moments. Then add the following variables:
SpriteFont font;
Gamer lastGamer;
GamerProfile lastGamerProfile;
Texture2D gamerPicture;
Load the font in LoadContent as usual:
font = Content.Load<SpriteFont>("font");
Now, you need to do something with the players that are currently signed in, so first add the following code to your Initialize method to set all the rest of your variables:

The SignedInGamer class has two static events to detect when players are coming and going, namely the SignedIn and SignedOut events. In this example, you hook the SignedIn event and store the gamer that signed in to your variable. Each gamer also has an associated profile, which you store here using the async pattern call. There is also a synchronous GetProfile method you can call instead, but using the async pattern is the correct way to retrieve the profile. Lastly, store the profile’s gamer picture into a newly created Texture by using the GetGamerPicture method, which returns a stream.
Note
Anyone who is signed in when the game launches receives a SignedIn event fired. You do not need to special case startup.
Next, replace your Draw overload with the following:
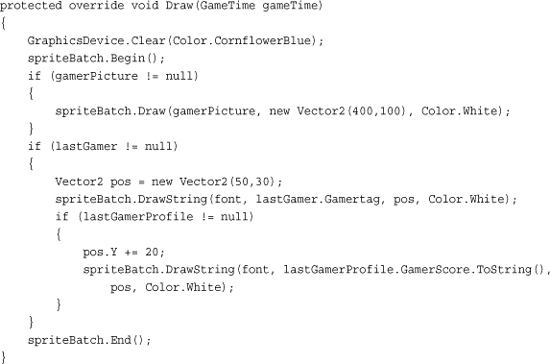
Here you simply use each of the variables you defined so far to display some information. First, draw the gamer picture onto the screen if the texture has been created, then draw the gamer tag of the profile after the gamer is stored, and finally draw the gamer score from the profile. Because the SignedIn event is hooked and storing the data for anyone that logs in, if you log in someone new while this example is running, the data onscreen changes to the new player.
You can also use the gamer in earlier Guide methods that required a gamer class. As an example, adding the following code to your Update method shows the gamer card of the signed-in profile as seen in Figure 15.7:

Figure 15.7. Showing a user’s gamer card

Before moving on, let’s take a moment to look at the other pieces of information stored in these objects. The Gamer object is an abstract class, so it has a few derived classes, but it only has a couple extra members directly on itself. It has the DisplayName property, which many times is simply the GamerTag, but can be something different. It also includes the Tag property for you to do with what you want. Finally, it has the unsupported LeaderboardWriter property. This property is available only for Xbox LIVE partners.
The GamerProfile object has quite a few things you haven’t looked at yet though, mostly around portions of the players’ profiles (imagine that). It has the GamerZone property, which can be Family, Pro, Recreation, Underground, or Unknown. You can also get the Motto property to view a player’s motto, which can be empty if he or she hasn’t set it. You can see the player’s Reputation by checking that property, which is a float value between 0.0f and 5.0f representing the number of stars of reputation that player has. The float values enable you to have fractional stars as well.
You can also use the TitlesPlayed property to determine how many games a player actually played, along with TotalAchievements to see how many achievements he or she earned. Finally, you can use the Region property to determine what region a player is located. This covers all the basic properties for these objects.
Note
In this example, you use the event to display data about the last person who was signed in; however, there is a static collection of SignedInGamer called SignedInGamers that enable you to view the collection of gamers currently signed in as well.
Remember that the Gamer class is abstract, which means that the object you are currently using is one of the derived classes; namely, the SignedInGamer object itself. This class has much more data than the abstract Gamer, so update your variable to declare it of the following type instead:
SignedInGamer lastGamer;
One of the things on this object are several methods dealing with achievements. Unfortunately, these methods are available only for partner Xbox LIVE games. There are plenty of other members you can actually use though.
For one, you can detect whether players are signed in to live via the IsSignedInToLive property. This is always false for local accounts, but it can be false for Xbox LIVE accounts as well if they aren’t actually connected to Xbox LIVE. You can also see which controller is paired with this gamer by checking the PlayerIndex property.
You can detect whether gamers are in a party by checking the PartySize property. If it is greater than zero, then they are in a party. If players are guests of a signed-in Xbox LIVE account, then the IsGuest property returns true. If you need to know whether a certain microphone is the headset for one of your gamers, you can use the IsHeadSet property to detect that as well!
GameDefaults
A feature often overlooked on Xbox is the fact that gamers can set up a list of defaults for various options in games that they play. Good games know which of these options make sense for them and set the default for a player to what they request. This is found in the GameDefaults object of the GameDefaults property.
There are quite a few Boolean properties available to check including AccelerateWithButtons, AutoAim, AutoCenter, BrakeWithButtons, InvertYAxis, ManualTransmision, and MoveWithRightThumbStick. For example, in a racing game with both an automatic and manual transmission, the default for a gamer is automatic if ManualTransmision is false, and manual transmission otherwise.
The other defaults are more than Booleans. You have both PrimaryColor and SecondaryColor, which are returned as colors (or null). The ControllerSensitivity property is an enumeration that is either High, Medium, or Low. Similarly, the GameDifficulty property is an enumeration that can be Hard, Normal, or Easy. Lastly, the RacingCameraAngle is an enumeration that can be Back, Front, or Inside.
Your game needs to be aware of these properties and set the initial values for a gamer to respect him or her.
Presence
The Presence property is one of the more interesting things you can use. This property enables you to set a well-known string that anyone can see to let others know where a person is in game play. The property itself is a GamerPresence object that has two properties, PresenceMode that is an enumeration of a series of predefined strings, and PresenceValue that is extra data used for some of the strings. For example, make the following call in your code:
lastGamer.Presence.PresenceMode = GamerPresenceMode.OnARoll;
Now, when someone else looks you up online (via http://xbox.com or Xbox 360), your profile includes the following:
XNA Creators Club
creators.xna.com
On a roll
If this game is published on Xbox LIVE Indie Games, the first line changes to “Xbox LIVE Indie Games” and the second is your game’s title. The third line is always the presence string specified by the PresenceMode property. Some of the values of PresenceMode enable you to add extra data; namely, Stage, Level, Score, CoopStage, CoopLevel, VersusScore. This enables you to have the presence string say something like “Playing Stage 3.” Although updating your player’s presence isn’t a requirement, it certainly adds to the polish of your game and is highly recommended.
Privileges
Proper handling of the Privileges property is required. These represent the various things gamers may or may not be able to do. Perhaps they are Silver subscribers, or perhaps they are children whose parents have set up restrictions on their ability to play. Regardless of the reason, you should always obey the privileges. If you don’t, the system still disallows the action, but it can be a very poor user experience, or worse, a crash.
Privileges come in one of two forms. They either return a Boolean, in which case the privilege is either allowed or disallowed, or they can return a GamerPrivilegeSetting, which has three choices: Blocked (they have no access to this feature), Everyone (they have full access to this feature), or FriendsOnly (they have access to this feature only with friends).
The first privilege is AllowOnlineCommunication, which dictates whether a gamer can have any type of online communication (text, chat, video, and so on). Check this privilege before allowing someone to communicate with someone else (such as with the Guide.ShowComposeMessage method).
Next is AllowOnlineSessions, which essentially dictates whether a gamer can play multiplayer games. A good example of using this privilege is to either not show the multiplayer option or show it but have it disabled in your game. A best practice is to include some status text informing the player why the multiplayer is disabled.
After that is AllowPremiumContent, which is mainly used for Xbox LIVE partner games. If you want to restrict your game based on this, you can. The AllowProfileViewing privilege dictates whether the gamer is allowed to view other players’ profiles, so you do not allow them to call Guide.ShowGamerCard, for example, if this privilege is not available.
Next is AllowPurchaseContent, which dictates whether the gamer is allowed to spend money to purchase content. This is another place where some best practices can go a long way. If the gamer is not allowed to purchase, don’t give him or her the option, disable the option, and don’t call Guide.ShowMarketPlace.
The last two privileges are AllowTradeContent and AllowUserGeneratedContent. These two can be tricky. For example, if your game enables the creation of levels, and you can share those levels, that is both user-generated content and trading content. This is extremely difficult for the system to detect (and impossible in many cases), so ensure that your game handles these correctly.
With Friends Like This...
Because some of the privileges require you to know whether someone is a friend in order to determine whether an action is allowed, there must be an easy way to figure this out. Of course, there is! Use the IsFriend method, which returns true if the gamer you pass to it is your friend and false otherwise.
What if you want to see all of your friends though? Well, use the GetFriends method, which returns to you a collection of all your friends. However, because it is possible that some of your friends are not signed in locally, the SignedInGamer object doesn’t work for your collection of friends. Instead, it is a collection of FriendGamer, which has quite a few different members.
You can check the status of your friends via a number of different properties such as IsOnline (to check whether they’re actually signed in), IsAway (perhaps they fell asleep playing a game), IsPlaying (to check whether they’re playing a game), IsBusy (just in case they’re busy), and IsJoinable (to check whether they’re playing a game that can be joined).
You can use the FriendRequestReceivedFrom property to determine whether you received a friend request (it returns true if you have, and false otherwise). Conversely, you can use the FriendRequestSentTo property to see whether you have sent a friend request.
Just like you can set your presence, you can also see your friend’s Presence, although it is returned as the actual string because it can be from any game, including games that are not XNA games. You can also use the HasVoice property to determine whether your friend has the voice capability.
Lastly, if you sent an invite to your friend (which you learn more about in the next chapter), you can get status of that as well. If he or she accepts the invite, the InviteAccepted property returns true. If your friend rejects it, the InviteRejectedProperty returns true (and InviteAccepted remains false). You can also use the InviteSentTo property to determine whether you actually sent an invite to that friend. It returns true if you have, and false otherwise. You can also see whether ’he or she invited you via the InviteReceivedFrom property, which returns true if he or she sent you an invite, and false otherwise.
Summary
Although the term Gamer Services is a bit of a misnomer, there is quite a bit of great information here. You learned about the system user experiences available, as well as how to interact with many of the Xbox LIVE services and information about the profile’s signed in to your console.
In the next chapter, you can learn how to put it all to use by creating some multiplayer networking code.
