Chapter 12. Adding Interactivity with User Input
Interactivity is the distinguishing factor between games and other forms of entertainment. User involvement and interaction is what makes a game different. Games allow for interactivity by using some type of user input, such as a keyboard or a gamepad, and then changing what is displayed on the screen based on that input. This chapter focuses on how to access the user input from a number of devices.
In this chapter, you learn:
• Access input data from the keyboard, mouse, and gamepad
• Handling multitouch screen input and gestures
• Reading accelerometer and location service data
Using Input in XNA Game Studio
Up to this point, we have demonstrated how to display fancy two-dimensional (2D) and three-dimensional (3D) graphics for your games. It is time to make your games truly interactive. Without user input, your game is more of a screen saver or video than it is a game. Designing and implementing good user input enables the game player to feel immersed in the virtual world you create. Throwing together poorly designed and implemented user input leaves players frustrated and causes controllers to be thrown across the room.
Remember that XNA Game Studio 4.0 supports Windows, Xbox 360, and Windows Phone. XNA Game Studio provides the capability to interact with a large number of different input devices across all of these platforms. We cover how to poll and understand the state of all devices including the keyboard, mouse, Xbox 360 gamepad and controllers, and multitouch screens. Although not directly part of XNA Game Studio, we also cover the use of Windows Phone-specific features including accelerometer, location service, and phone vibration.
Digital and Analog Input
There are two types of values when dealing with user input analog and digital. Digital input allows for two specific states. Examples of digital input are the keys on a keyboard or the buttons on the Xbox 360 gamepad. The keys or the buttons are either pressed or they are released. Analog input allows for a much wider range of values often expressed in float values from –1 to 1 or 0 to 1. Examples of analog input are the mouse location or the thumb stick location on the Xbox 360 gamepad.
Polling versus Event-Based Input
There are generally two mechanisms to handle user input polling and input events. With polling, input devices are queried or polled for their current state. The state is then preserved in some type of object such as KeyboardState or MouseState. These states do not change as the input device itself changes. To get the latest state, the input device needs to be polled again. Often the states of the current and previous frames are required when handling user input utilizing polling.
Because of the game loop nature of update and draw that games utilize, XNA Game Studio APIs utilize polling methods to query the current state of each of the input devices. The input devices are generally polled at the start of the update phase of the game loop. The user input along with the elapsed time that has occurred since the last update call is then used in game play logic such as moving the players’ characters.
Event-based input systems are utilized more in application development. For example, within a Silverlight application, you can create an event that fires when the mouse is clicked. The event code fires only when that condition occurs and your code does not need to poll the mouse. This works well in applications that utilize an event-based application model and generally don’t have continuous loops running as in games.
The Many Keys Of A Keyboard
The keyboard is one of the most widely used input devices for games. Because almost every Windows PC has a keyboard along with the mouse, they are the standard input devices for Windows PC gaming. With well over 100 keys, the keyboard has the most input buttons of any input device supported by XNA Game Studio. You use keyboards in games for controlling movement and for game scenarios with a large number of actions. For example, in a real-time strategy game, a player can use the keyboard to issue commands to units in the game much quicker than if the player had to click an onscreen icon.
Keyboard input is not limited to just the Windows platform. XNA Game Studio also supports reading keyboard input on Xbox 360 and Windows Phone. The Xbox 360 supports two types of keyboard devices. Users can plug USB keyboards directly into Xbox 360 as they would an Xbox 360 gamepad. The USB keyboard then works normally as if it were attached to a Windows PC. The other keyboard available on the Xbox 360 is the chatpad. The chatpad is a mini keyboard that attaches directly to the bottom of an Xbox 360 gamepad.
Note
Chatpad input is available only on Xbox 360. Although Xbox 360 controllers work on Windows, the chatpad keyboard input does not.
Most players do not have a chatpad or keyboard attached to their Xbox 360, so when developing your game for Xbox 360, you should not require these input devices.
XNA Game Studio also supports keyboard input on some Windows Phone devices. Some Windows Phone devices come with a hardware keyboard. Not all devices have a hardware keyboard, so your game should not require keyboard input if targeting the Windows Phone platform.
Reading Keyboard State
As we have discussed, reading input devices in XNA Game Studio is a matter of requesting the current state of the device. That state can then be used for updating actions in your game. In XNA Game Studio, the keyboard is represented by the Keyboard class. The main method the Keyboard class contains that we use is Keyboard.GetState(). This method returns the current state of the keyboard. The keyboard state is stored in the KeyboardState structure. Table 12.1 contains the methods exposed by the Keyboard type.
Table 12.1. Methods of KeyboardState

To read the current state of the keyboard, use the following line of code:
KeyboardState currentKeyboardState = Keyboard.GetState();
Reading Xbox 360 Chatpad Input
Because each Xbox 360 gamepad might have a chatpad attached, it is possible that more than one player can enter keyboard input. To read the keyboard input for a specific player, use the Keyboard.GetState(PlayerIndex playerIndex) overload and specify the player index.
Now that the current state of the keyboard is saved into the KeyboardState structure, you can read what keys were pressed at the time that Keyboard.GetState() was called. KeyboardState contains a number of methods to determine the current state of a specific key. To check whether a specific key is currently pressed, use the KeyboardState.IsKeyDown(Keys key) method. This method takes an enum value of the type Keys. The Keys enum contains all of the readable keyboard keys using XNA Game Studio. Keys contains values for normal alphanumeric keys you expect such as the letter A or the number 1. The Keys enum also contains values for more rarely used keys that exist only on some keyboards such as the application launch and media buttons. To determine whether a specific key is currently pressed, use the following lines of code:
if (currentKeyboardState.IsKeyDown(Keys.A))
{
// The A button on the keyboard is pressed
}
Note
User input and handling often, but not always, occurs in the game’s Update method. Reading the current state of an input device can happen anywhere in your game code.
If the player presses the A key over multiple frames, the IsKeyDown method will continue to return true. This means that the previous bit of code continues to be true and does not require that the player press the key each frame. IsKeyDown returns true if the key was pressed when the state was polled using Keyboard.GetState. It does not express if the key was pressed in a previous frame. This can become a problem because often in games, it is desirable for an action to happen only once per key press. If you want an action to happen only once per key press, you need to store the KeyboardState in a previous frame.
In your game class, define the following member variable:
KeyboardState lastKayboardState;
At the end of the Update method where you have read the current state of the keyboard, set the last frame state to the current state:
lastKeyboardState = currentKeyboardState;
This preserves the previous frame’s keyboard state so you can use it in the following frame. To determine whether a key is pressed in the frame, use the IsKeyDown method along with the IsKeyUp method exposed by KeyboardState:

Because you know the key is pressed in this frame and is not pressed in the previous frame, you know it is pressed in this frame for the first time and you can execute the appropriate action.
KeyboardState provides an indexer overload that enables you to determine the KeyState for a particular key. The following lines of code check the state of the spacebar key:
KeyState spacebarState = currentKeyboardState[Keys.Space];
if (spacebarState == KeyState.Down)
{
// Spacebar is pressed down this frame
}
else if (spacebarState == KeyState.Up)
{
// Spacebar is up this frame
}
KeyboardState provides the capability to return an array of the Keys pressed. The following lines of code get an array of Keys and loops over them:
Keys[] pressedKeys = currentKeyboardState.GetPressedKeys();
foreach (Keys key in pressedKeys)
{
// Game logic to handle each key
}
Moving Sprite Based on Keyboard Input
Now that we covered how to read the current state of the keyboard and can determine whether a key is pressed or released, let’s move a sprite around the screen using the keyboard. First, you need to declare some member variables to store your sprite texture, the sprites position, and the last keyboard state:
Texture2D spriteTexture;
Vector2 spritePosition;
float spriteSpeed = 100f;
KeyboardState lastKeyboardState;
Next, load a texture to use as your sprite. In the game’s LoadContent method, add the following line of code:
spriteTexture = Content.Load<Texture2D>("XnaLogo");
Now, you are ready for some keyboard input. In the game’s Update method, you need to store the current state and move the sprite’s position based on the arrow keys, as follows:
// Store the current state of the keyboard
KeyboardState currentKeyboardState = Keyboard.GetState();
// Move the sprite position based on keyboard input
if (currentKeyboardState.IsKeyDown(Keys.Left))
spritePosition.X -= spriteSpeed * (float)gameTime.ElapsedGameTime.TotalSeconds;
if (currentKeyboardState.IsKeyDown(Keys.Right))
spritePosition.X += spriteSpeed * (float)gameTime.ElapsedGameTime.TotalSeconds;
if (currentKeyboardState.IsKeyDown(Keys.Up))
spritePosition.Y -= spriteSpeed * (float)gameTime.ElapsedGameTime.TotalSeconds;
if (currentKeyboardState.IsKeyDown(Keys.Down))
spritePosition.Y += spriteSpeed * (float)gameTime.ElapsedGameTime.TotalSeconds;
// Store the keyboard state for next frame
lastKeyboardState = currentKeyboardState;
Whenever the arrow keys are pressed, you move the sprite in the appropriate direction. Notice that “up” corresponds to moving the sprite in the negative Y direction because values for Y increase when moving down the screen.
When you move the sprite, you don’t move by a constant value. Take the elapsed game time into account. Each frame can take a different amount of time to complete. If a constant movement amount is used to update the position of the sprite, it might appear to shudder as it moves across the screen. Correct this using the GameTime.ElapsedGameTime property. You previously used the elapsed time in total seconds. This means pressing the right arrow for one second moves the sprite 100 pixels to the right no matter how many frames happen over that second.
Note
Older PC video games didn’t always take into account the elapsed time when animating and moving sprites. As computing power of PCs increased, these games were able to run faster and so did the animations and speed of the games, making some of the game unplayable.
Finally, you need to display the sprite on the screen using the position you have been updating. To display the sprite, add the following lines of code to your game’s Draw method:
spriteBatch.Begin();
spriteBatch.Draw(spriteTexture, spritePosition, Color.White);
spriteBatch.End();
Now if you run your game, you can control the sprite on the screen using the keyboard arrow keys. Congratulations—you have created your first XNA Game Studio interactive game. This simple game should look similar Figure 12.1.
Figure 12.1. Sprite controlled by user keyboard input

Onscreen Keyboard
If your goal is to gather user text input, the Keyboad class is not the best solution. If you try to implement text entry using the Keybord state APIs, you run into a number of issues such has handling the current shift state of the keyboard and making sure to call GetState quick enough that you don’t miss a single key press. The Keyboad API is not designed for text entry (see Figure 12.2).
Figure 12.2. Onscreen keyboard in the Windows Phone emulator

For text entry, use the Guide.BeginShowKeyboardInput method. If you are familiar with C#, notice that BeginShowKeyboardInput is an asynchronous method. This means that when you ask to show the keyboard, this method quickly returns but that does not mean the keyboard has been shown or that the user has entered text into the keyboard. For your game to continue running, it needs to handle a method that takes a number of frames to return. BeginShowKeyboardInput returns an IAsyncResult object. This object is used each frame to check on the state of the call to BeginShowKeyboardInput. If the IsCompleted property of the result is true, that means the call has completed and that you can request the string from the keyboard input. This is done calling Guide.EndShowKeyboardInput passing in the result. The method returns the string the user entered. The string might be null because the user can cancel the onscreen keyboard.
To add the onscreen keyboard to your game, store the async result over multiple frames. You also need to store the string returned. Add the following members to your game class:
IAsyncResult keyboardAsyncResult;
string message = "";
We cover the Guide.BeginShowKeyboardInput method, sometimes called gamer services, later in the chapter. The important point to know now is that your game constructor needs to initialize gamer services on Windows and Xbox 360 to use the onscreen keyboard. This is done by adding the GamerServicesComponent to the Components list of your game. On Windows and Xbox, add the following line of code at the end of your game’s constructor:
Components.Add(new GamerServicesComponent(this));
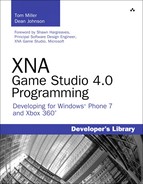
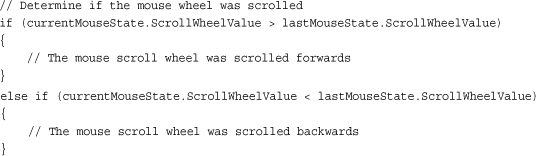
Next, check for a spacebar press. If the user presses the spacebar and the onscreen keyboard is not already visible, you start to display the keyboard. Add the following lines of code to your game’s Update method:
if (keyboardAsyncResult == null &&
currentKeyboardState.IsKeyDown(Keys.Space) && lastKeyboardState.IsKeyUp(Keys.Space))
{
keyboardAsyncResult = Guide.BeginShowKeyboardInput(PlayerIndex.One,
"Title",
"Description",
"Default Text",
null, null);
}
In the previous code, check the keyboard async result to make sure you are not already waiting for a previous call. Then, if the spacebar is pressed, you make a call to BeginShowKeyboardInput. The first parameter is the PlayerIndex you want to have control of the onscreen keyboard. This can be only PlayerIndex.One for the Windows and Windows Phone platforms, but on Xbox 360, up to four players can play a game and you might want player three to enter his or her character’s name. In this case, player three should be the one controlling the onscreen keyboard. The next three parameters are string values representing the title, description, and default text to display. We cover the last two values a little later.
Now that you asked for the keyboard to display, it should display when the user presses the spacebar. But when a user enters text or cancels the keyboard, the return value is thrown away. To get the result of what the user enters into the keyboard, you need to call Guide.EndShowKeyboardInput. Calling this method blocks until the previous call to BeginShowKeyboardInput completes, so first check whether the call is complete. After the code you just added, place the following lines of code:
// Check to see if the result has completed
if (keyboardAsyncResult != null && keyboardAsyncResult.IsCompleted)
{
message = Guide.EndShowKeyboardInput(keyboardAsyncResult);
if (message == null)
{
// String is null since the user canceled the input
}
keyboardAsyncResult = null;
}
Notice that the EndShowKeyboardInput call takes the IAsyncResult from the BeginShowKeyboardInput call and returns the string entered by the user. This string can be null if the user canceled the onscreen keyboard.
In the previous code, you use the IAsyncResult from the BeginShowKeyboardInput call to check whether the call completed each frame. Instead of checking the status of each frame, you can use an AsyncCallback method that is called after the method completes. To use the callback method, add the following method to your game:

After the BeginShowKeyboardInput is complete and the user has entered text, this method is called. Similar to the previous example, you then call EndShowKeyboardInput and check the resulting string. To have BeginShowKeyboardInput use the callback, change the call to look like the following:
You no longer need to store the IAsyncResult because the StoreKeyboardResult method is called after the user has completed entering text.
The last parameter of BeginShowKeyboardInput is used to pass in an object to be stored in the IAsyncResult.AsyncState property. This can be useful when you need a specific object after the operation is completed. For example, if you are asking a user to enter his or her character name and you want to store the result in your game’s specific Character class, you can pass the user’s instance of that Character class into BeginShowKeyboardInput and when the call completes, use the IAsyncResult.AsyncState property to access the instance of the Character class.
Precision Control of a Mouse
The mouse is one of the most accurate input devices supported by XNA Game Studio. It is used for a variety of tasks in games from selecting units and giving orders in a real-time strategy game to targeting and shooting weapons in first-person shooters and selecting moves in a chess game. Although the mouse APIs are available across all XNA Game Studio platforms, they don’t behave the same across all platforms. On Windows, the mouse APIs perform as you expect giving you the current state of the physical mouse plugged into your PC. On Xbox 360, there is never mouse input because the Xbox 360 does not support mouse input. In this case, the mouse state always contains default values with a position at 0, 0 and no buttons pressed. On Windows Phone, there is also no physical mouse device, but because all Windows Phone devices must support multitouch, the mouse state is returned as the location and state of the first finger detected on the multitouch screen.
Reading Mouse State
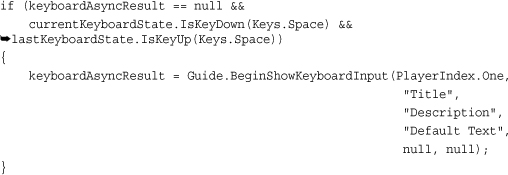
Reading the current mouse state is similar to reading keyboard state. The Mouse class provides a static GetState method that returns the current mouse state stored in a MouseState structure. Table 12.2 contains the properties exposed by the MouseState structure.
Table 12.2. Properties of MouseState
To read the current mouse state, add the following line of code to your game’s Update method:
MouseState currentMouseState = Mouse.GetState();
Note
The GetState method supports reading only one mouse device, unlike the Keyboard.GetState method that we discussed previously.
Now that you have stored the current state of the mouse, you should also store the previous frame’s mouse state in the same manner as you did for the keyboard. You can use this previous state to determine whether a button is clicked in a specific frame or held down over multiple frames. Declare the following member variable in your game:
MouseState lastMouseState;
At the end of your game’s Update method, add the following line of code to store the previous frame’s mouse state:
lastMouseState = currentMouseState;
The MouseState structure contains both analog data for the mouse and scroll wheel position and digital data for the mouse buttons. To retrieve the current position of the mouse, use the MouseState.X and MouseState.Y properties. These properties return the current position of the mouse on the screen. On Windows, if you are in windowed mode, the mouse can travel outside of the client bounds of the window. In this case, the mouse position is relative to the origin of the window’s client area in the top left corner. If your mouse moves outside the client area, you receive negative values or values outside of the size of the client area depending on the direction you move outside of the client bounds. To store the current mouse position, use the following lines of code:
// Store the current mouse position
Vector2 mousePosition;
mousePosition.X = currentMouseState.X;
mousePosition.Y = currentMouseState.Y;
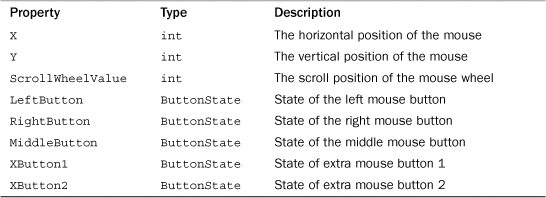
Along with the mouse position, you can also read the current mouse wheel using the MouseState.ScrollWheelValue property. This is an integer value of the current mouse wheel position. This position is accumulated while your game runs. If you want to determine whether the wheel is scrolled on this frame, you need to check whether the value in the current frame is greater or less than the previous frame. Use the following code to determine whether the mouse scroll wheel is scrolled forwards or backwards in the current frame:
The MouseState structure contains five button properties to determine whether up to five different buttons on the mouse are pressed. Not all mice have five buttons. Similar to the keyboard’s KeyState, the ButtonState returned by these properties has two values. In the case of the button, these values are Pressed and Released. To determine whether the left mouse button is pressed, use the following lines of code:
// Determine if the left mouse button is pressed
if (currentMouseState.LeftButton == ButtonState.Pressed)
{
// Left mouse button is pressed
}
Similar to the keyboard, if you want to determine whether a button is clicked in the current frame and has not been held down, you need to also check the previous frame’s mouse state and verify that the button is not pressed.
// Determine if the left mouse button was pressed this frame
if (currentMouseState.LeftButton == ButtonState.Pressed &&
lastMouseState.LeftButton == ButtonState.Released)
{
// Left mouse button was pressed for the first time this frame
}
Note
By default on Windows, the mouse is hidden when it is over the client area of the window. To view the mouse position while it is over the client area of the window, set the IsMouseVisible property of your game class to true.
Moving Sprite Based on Mouse Input
Now that you know how to retrieve the current state of the mouse device, let’s use this state to move, rotate, and flip a sprite on the screen. First, you need to declare the following member variables to store the sprite texture, position, rotation, and if the sprite is flipped horizontally or vertically on the screen:
Texture2D spriteTexture;
Vector2 spritePosition;
Vector2 spriteCenter;
MouseState lastMouseState;
float rotation;
SpriteEffects flipOptions;
Next, load a texture to use as your sprite and set the sprite’s center based on the texture width and height. In the game’s LoadContent method, add the following lines of code:
spriteTexture = Content.Load<Texture2D>("XnaLogo");
spriteCenter.X = spriteTexture.Width / 2.0f;
spriteCenter.Y = spriteTexture.Height / 2.0f;
Now, update the current position, rotation, and flip values based on the current input of the mouse. In your game’s Update method, add the following lines of code:
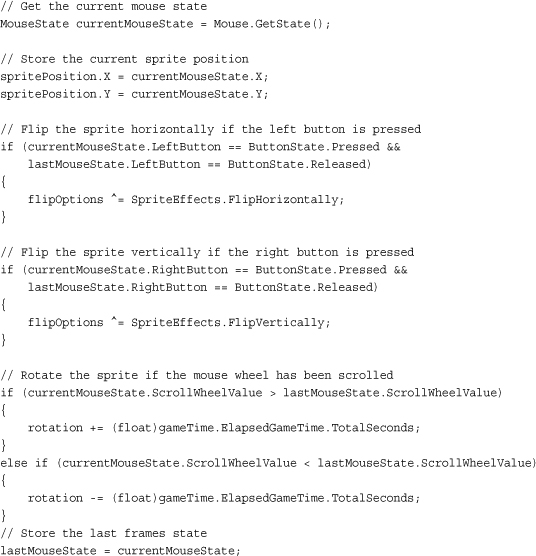
Now that you updated the sprite’s position, rotation, and flip values, you can draw the sprite on the screen. In your game’s Draw method, add the following lines of code:

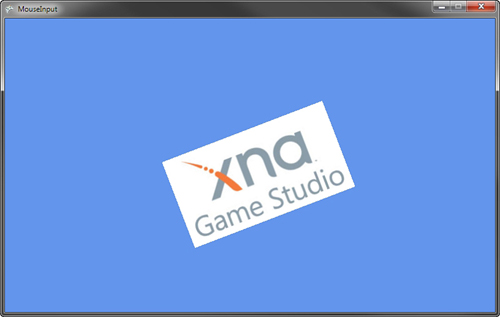
The sprite now draws on the screen and updates its position, rotation, and flip, responding to mouse input (see Figure 12.3).
Figure 12.3. Using mouse input to move and rotate sprite
Setting the Mouse Position
Sometimes it is necessary to set the current position of the mouse on the screen. To set the position of the mouse, use the static Mouse.SetPosition method. This method takes the screen space integer X and Y values. To set the mouse to a location with the values of X: 400 Y: 240, use the following line of code:
Mouse.SetPosition(400, 240);
Setting the Mouse Window Handle
On Windows, the mouse state depends on the window it is attached to. By default, the mouse is set to be the game window that is created by your Game class. You might have to set the window manually if you are creating tools that use multiple windows. In this case, set the Mouse.WindowHandle property to the window you want the mouse attached to.
Xbox 360 Gamepad
The Xbox 360 gamepad is the controller that is included when you purchase an Xbox 360. It comes in both a wired and wireless model with several colors available to choose from (see Figure 12.4).
Figure 12.4. Xbox 360 wireless controller
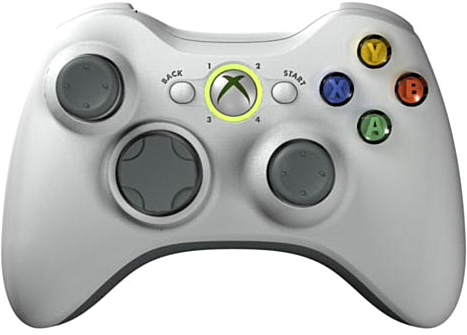
The Xbox 360 gamepad features several analog and digital inputs, including face buttons, a direction pad, two thumb sticks, two triggers, and the circular Xbox 360 guide button in the center. The guide button is reserved and input from it is not available through the XNA Game Studio APIs. Along with input, the Xbox 360 gamepad also offers the capability to give force feedback to the user in the form of two vibration motors in the controller. The Xbox 360 gamepad can be used with a Windows PC. Wired controllers can plug directly into the PC using the USB connection. Wireless gamepads require a PC wireless receiver designed for the Xbox 360 wireless controller. Windows Phone does not support the Xbox 360 gamepad.
Note
When you create a new XNA Game Studio project, look at the Update method. It contains code that checks whether the Back button has been pressed and if it has to call exit on the game.
Although Windows Phone does not support the Xbox 360 gamepad, there is one exception. The physical back button on Windows Phones is reported as the Back button on the controller for PlayerIndex.One.
Reading Gamepad State
Just as with keyboard and mouse input, the gamepad input is read by polling the current state of a gamepad. The GamePad.GetState method is used to return the GamePadState structure, which can then be used to determine what buttons are currently pressed and the location of the thumb sticks and triggers. Tables 12.3 and 12.4 contain the methods and properties exposed by the GamePadState structure.
Table 12.3. Methods of GamePadState

Table 12.4. Properties of GamePadState

To read the current state of a gamepad, add the following line of code to your game’s Update method:
GamePadState currentGamePadState = GamePad.GetState(PlayerIndex.One);
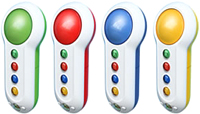
The GetState method requires a PlayerIndex. In this case, we request the first player’s gamepad state. The Xbox 360 gamepad features four lights around the center guide button that displays the gamepads current PlayerIndex.
Reading Gamepad Buttons
Now that you have the current state of the gamepad, you can check whether any of the buttons are pressed by using the GamePadState.Buttons property. Buttons returns a GamePadButtons structure, which contains properties for all of the buttons supported by gamepads. These properties all are of the ButtonState type, which is the same used for the mouse buttons. Table 12.5 contains the list of properties exposed by the GamePadButtons structure.
Table 12.5. Properties of GamePadButtons

Gamepad State Packet Numbers
If you call GamePad.GetState in a tight loop, you might receive the same state more than once. If you are concerned that you might call GetState too quickly, check the PacketNumber property on each GamePadState to verify that the numbers are different. States with the same PacketNumber represent that the device state has not updated.
To determine whether the GamePad buttons are pressed, add the following lines of code to your game:

Some of these buttons are straightforward. The letter buttons A, B, X, and Y correspond to the face buttons on the right side of the controller with the same letter. The Back and Start buttons are to the left and right of the guide buttons in the center of the controller. The LeftShoulder and RightShoulder buttons are the thin buttons on the top left and right of the gamepad. The LeftStick and RightStick are buttons that set when a player depresses the left and right stick into the controller. The GamePadButtons structure also contains a property called BigButton. This button is available on a different type of Xbox 360 gamepad called the Big Button controller. We talk about the Big Button controller along with other types of controllers later in this chapter.
Reading Gamepad Direction Pad
Along with the face buttons, the Xbox 360 gamepad offers digital input from a directional pad on the left side of the controller. The GamePad.DPad property returns a GamePadDPad structure, which contains ButtonState properties for the Up, Down, Left, and Right directions. Table 12.6 contains a list properties exposed by the GamePadDPad structure.
Table 12.6. Properties of GamePadDPad

To determine whether the directions are pressed, use the following lines of code:

It is important to use else if conditions only on directions that are opposite from one another. It is possible to have two directions pressed if they are next to each other. For example, a user can press Down and Right at the same time.
Reading Gamepad Thumb Sticks
The gamepad has four analog states: two for the left and right thumb sticks and two for the left and right triggers. To read the state of the thumb sticks, use the GamePadState.GamePadThumbSticks property. The GamePadThumbSticks structure contains two properties: Left and Right both of which return Vector2 values. The Vector2 value represents the thumb stick displacement in the X and Y directions. These floating points range from –1.0 to 1.0. Table 12.7 contains a list of properties exposed by the GamePadThumbSticks structure.
Table 12.7. Properties of GamePadThumbSticks

To read the current X and Y position of the left thumb stick, use the following line of code:
Vector2 leftThumbStick = currentGamePadState.ThumbSticks.Left;
Reading Gamepad Triggers
Finally, the last type of gamepad state are the triggers. To read the current trigger position, use the GamePadState.Triggers property. It returns a GamePadTriggers structure, which contains two float values in the Left and Right properties. Each triggers value is from 0.0, which indicates not depressed, to 1.0, which indicates that the trigger is fully depressed. Table 12.8 contains a list of the properties exposed by the GamePadTriggers structure.
Table 12.8. Properties of GamePadTriggers

To read the current position of the right trigger, use the following line of code:
float rightTrigger = currentGamePadState.Triggers.Right;
Moving Sprites Based on Gamepad Input
Now let’s get the sprite moving around on the screen again. This time, you use the gamepad as your input device. Use the left thumb stick to move the sprite around on the screen. The A and X buttons flip the sprite horizontally and vertically. The direction pad’s up and down buttons scale the sprite up and down. First, declare member variables to hold the sprite’s texture, position, and other values. In your game class, add the following member variables:
Texture2D spriteTexture;
Vector2 spritePosition = new Vector2(200, 200);
Vector2 spriteCenter;
float spriteSpeed = 100f;
GamePadState lastGamePadState;
float rotation;
float scale = 1.0f;
SpriteEffects flipOptions;
Next, load a texture to use as your sprite and set the sprite’s center based on the texture width and height. In the game’s LoadContent method, add the following lines of code:
spriteTexture = Content.Load<Texture2D>("XnaLogo");
spriteCenter.X = spriteTexture.Width / 2.0f;
spriteCenter.Y = spriteTexture.Height / 2.0f;
Now, add logic to the game’s Update method to read the current gamepad state and set the sprite’s position, rotation, scale, and flip orientation. In your game’s Update method, add the following lines of code:

The only remaining bit of code you need now is the sprite’s draw code. In your game’s Draw method, add the following lines of code:

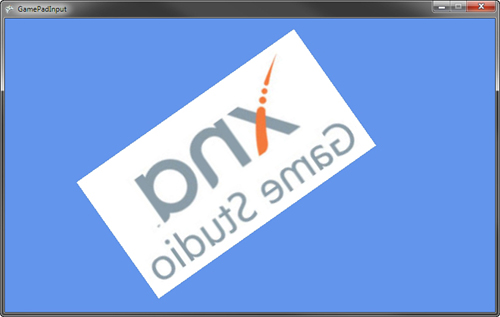
Run the resulting game. The gamepad controls the sprite’s position, rotation, scale, and flip orientation (see Figure 12.5).
Figure 12.5. Moving, rotating, and scaling sprite using gamepad input
Thumb Stick Dead Zones
When you request the state of the gamepad, by default, a dead zone is applied to the thumb sticks. The thumb sticks on controllers do not always return directly to the center resting position when released. If you use the raw values of the thumb sticks, your game continues to read thumb stick values other than 0. This can cause the game character to move when the user is not pressing the thumb stick. The GamePadDeadZone enum defines three types of dead zones. The default used when calling GetState is IndependentAxes, which compares each axis separately to determine whether the values should be set to 0. The Circular dead zone uses the X and Y positions in combination to determine whether the values should be set to 0. The last type is None, which causes GetState to return the raw values from the thumb sticks. Use None to implement your own dead zone processing.
Other Types of Controllers
Up to this point, we have focused on the Xbox 360 controller gamepad, but the XNA Game Studio APIs support a number of different gamepad types. To determine the type of gamepad, use the GamePad.GetCapabilities method to return a GamePadCapabilities structure.
The type of gamepad is defined by the GamePadType property. It returns a GamePadType enum value for the many different types of gamepads. Table 12.9 contains the enumeration values for GamePadType.
Table 12.9. GamePadType Enumerations

Using the GamePadType, you can determine whether the gamepad is the default controller or whether another type of gamepad is connected. This is helpful for games that require specific controllers, such as the DancePad or DrumKit. For racing games and flying games, the Wheel and FlightStick gamepad types can be used by a player. Your game logic is most likely that you want to handle user input differently from a Wheel than an Xbox 360 controller. To determine whether player two’s gamepad is a Guiter, use the following lines of code:
GamePadCapabilities gamePadCapabilities =
GamePad.GetCapabilities(PlayerIndex.Two);
if (gamePadCapabilities.GamePadType == GamePadType.Guitar)
{
// Player two is using a Guitar
}
Along with the GamePadType, the GamePadCapabilities contains many properties that enable you to determine whether the controller supports specific buttons, thumb sticks, or triggers.
The big button controller has a unique BigButton along with four smaller A, B, X, Y buttons (see Figure 12.6). This controller is great for trivia games where users want to quickly hit a big button to ring in their answer. The four other buttons can then be used to specify their answers.
Figure 12.6. Big Button controllers
Is the Gamepad Connected?
What happens if you read the state of a gamepad that is not connected? Although XNA Game Studio supports up to four PlayerIndex values when calling GamePad.GetState, it does not mean that four gamepads are connected. To determine whether a gamepad is connected, use the GamePadState.IsConnected property. This is a simple boolean value that tells you whether the gamepad is connected or not. To determine whether player four’s controller is connected, use the following lines of code:
GamePadState currentGamePadState = GamePad.GetState(PlayerIndex.Four);
bool playerFourConnected = currentGamePadState.IsConnected;
Note
The GamePadCapabilities structure also contains a IsConnected property that can be used to determine whether the gamepad is connected.
Multitouch Input For Windows Phones
The final type of input device supported by XNA Game Studio APIs are multitouch displays available on all Windows Phone devices. The multitouch APIs are supported on all Windows Phones.
Multitouch devices are unique in that the user can directly touch the display screen and seem to be actually touching and interacting with the images on the screen. This provides an intimate level of interaction that is common on hand-held devices.
Note
XNA Game Studio 4 is not the first version of XNA Game Studio to support multitouch. The Microsoft XNA Game Studio 3.1 Zune Extensions provides similar APIs for Zune HD devices.
Multitouch devices are represented in XNA Game Studio using the TouchPanel class type. There are two ways you can read multitouch data from the TouchPanel.
The first is to poll the current state of the TouchPanel using the GetState method. This returns a number of touch locations where the user has made contact with the multitouch display. All Windows Phone devices support at least four touch locations at a minimum. After you determine the current touch locations, you can use that information to move, rotate, or scale graphics on the display.
The second way to read multitouch data is to utilize gestures. A gesture is an action that is performed by the user that can occur over time and must be processed to determine which gesture the user intended to use. For example, the user can drag his finger across the screen.
Reading the TouchPanel Device State
Just like the previous input device APIs, the TouchPanel provides a state-based API that allows the current state of the multitouch device to be polled at regular intervals. This state can then be used to perform in game actions. Use the TouchPanel class to read the current state of a multitouch device. The GetState method returns a TouchCollection that contains all of the current touch locations. Table 12.9 and 12.10 contain a list of methods and properties for the TouchPanel object.
Table 12.9. Methods of TouchPanel

Table 12.10. Properties of TouchPanel

To return the current collection of touch locations, add the following line of code to your game’s Update method:
TouchCollection currentTouchState = TouchPanel.GetState();
The TouchCollection contains all of the touch locations that are currently pressed or were released since the last frame. To read each TouchLocation, you can loop over the TouchCollection and read each of the locations properties:
// Loop each of the touch locations in the collection
foreach (TouchLocation touchLocation in currentTouchState)
{
// The uniquie ID of this locaiton
int touchID = touchLocation.Id;
Vector2 touchPosition = touchLocation.Position;
TouchLocationState touchState = touchLocation.State;
}
The Position and State can then be used by your game to make interactive game play decisions. Table 12.11 contains a list of the properties exposed by the TouchLocation structure.
Table 12.11. Properties of TouchLocation

Each touch location contains three properties. Use the Position property to determine where on the screen the TouchLocation is located. Each TouchLocation can be in any of four states. Pressed means this specific TouchLocation was just pressed by the user. Moved means that this specific TouchLocation was already tracked and that it has moved. Released mean that the TouchLocation that was being tracked is no longer pressed by the user, and he or she released his or her finger. Invalid means the TouchLocation is invalid and should not be used. Use the TouchLocation.State property to determine the current state of a returned location. The final property Id is used to give each TouchLocation a unique ID that can be used to determine whether two locations across GetState calls are the same point. The index of the touch location in the TouchCollection should not be used as the identifier because the user can pick up a finger but leave others pressed.
Note
If a user touches the screen and then his or her finger slides off the screen, the TouchLocation for that finger changes state to Released.
Determine Number of Touch Points
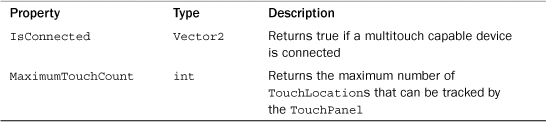
The TouchPanel class contains the TouchPanel.GetCapabilities method and returns TouchPanelCapabilities a structure. Table 12.12 contains the properties exposed by the TouchPanelCapabilities structure.
Table 12.12. Properties of TouchPanelCapabilities
To determine the number of touch points the device supports, use the following lines of code:
// Query the capabilities of the device
TouchPanelCapabilities touchCaps = TouchPanel.GetCapabilities();
// Check to see if a device is connected
if(touchCaps.IsConnected)
{
// The max number of TouchLocation points that can be tracked
int maxPoints = touchCaps.MaximumTouchCount;
}
After you have determined that a touch device is connected, use the MaximumTouchCount property to read how many TouchLocation points that the TouchPanel can track at a time.
Note
Windows Phone games should never require more than four touch points to play the game. More than four can be used if they are available, but they should not be required to play the game successfully.
TouchPanel Width, Height, and Orientation
By default, the width, height, and orientation are set for the TouchPanel. If your game supports autorotation, the orientation of the touch panel is automatically updated to match the graphics. TouchPanel does provide three properties to read their current values but also enables you to override their values. In most cases, this is not useful, but it can be useful if you require your input in a different scale than the display resolution. If your display is 480 wide and 800 tall but you want TouchLocation positions that range from 400 wide to 500 tall, you can use the following lines of code:
TouchPanel.DisplayWidth = 400;
TouchPanel.DisplayHeight = 500;
Moving Sprite Based on Multitouch Input
It is time to get the sprite moving around the screen again. This time, you use your newly learned multitouch APIs. Use the first touch location to move the sprite around the screen, and use the second touch location to rotate and scale the sprite. First, you need member variables to store the sprite texture, position, center, rotation, and scale. Add the following lines of code to your Game class:
Texture2D spriteTexture;
Vector2 spritePosition;
Vector2 spriteCenter;
float rotation = 0;
float scale = 1;
Next, load a texture to use as your sprite and set the sprite’s center based on the texture width and height. In the game’s LoadContent method, add the following lines of code:
spriteTexture = Content.Load<Texture2D>("XnaLogo");
spriteCenter.X = spriteTexture.Width / 2.0f;
spriteCenter.Y = spriteTexture.Height / 2.0f;
Now, read the current state of the TouchPanel and update your sprite. Add the following lines of code to your game’s Update method:

In the previous code, notice that you loop over the first two touch locations. Each location is used only if its state is set to Pressed or Moved. Released and Invalid points are not used. The first touch point is used to set the sprite’s position on the screen. The second point is then used to determine the amount to scale and rotate the sprite. To determine the scale amount, create a vector from the second touch location to the first touch location. The distance of this vector is then calculated. The final scale divides this distance by the width of the texture to achieve the proper scale value. To determine the rotation of the sprite, find the angle of the line formed between the first and second finger and the unit X vector. You can then find the cosine of the angle between these two vectors by using the vector dot product. The vector dot product is equal to the cosine of the angle between them multiplied by the length of each vector. To simplify, make sure both vectors have a length of one also known as unit length. The Vector2.UnitX vector already has a length of one, so you don’t need to normalize it. The vector formed by the two touch locations is normalized. This sets the vector’s length to one and creates a direction vector. Now that both vectors have a length of one, the cosine of the angle between them can be found by just using the vector dot product. To get the final angle, take the arccosine of the dot product. This gives you the angle between the vector formed by the two touch locations and the unit X vector in radians.
Finally, draw the sprite to the screen using the values you determined. To draw the sprite to the screen, use the following lines of code in your game’s Draw method:
// Draw the sprite
spriteBatch.Begin();
spriteBatch.Draw(spriteTexture, spritePosition, null, Color.White,
rotation, spriteCenter, scale, SpriteEffects.None, 0);
spriteBatch.End();
Reading Gestures from the TouchPanel
Gestures provide a richer and higher level abstraction than the raw state data you can access by reading the TouchPanel state. Gestures are performed by the user over time and require that the system continuously process user input to determine whether an enabled gesture has been performed. TouchPanel provides the capability to define which gestures should be tracked by using the EnabledGestures property and the GestureType enumeration flags. By default, the TouchPanel has no gestures enabled because gesture processing requires additional CPU processing. You should limit which gestures you enable to the minimum you currently need to keep the processing cost to a minimum.
Table 12.13 contains the enumeration values for GamePadType.
Table 12.13. GestureType Enumeration

Enabling the gestures you want to respond to is a simple as combining multiple GestureType flags using the TouchPanel.EnabledGestures static property. The following lines of code enables two gestures:
TouchPanel.EnabledGestures = GestureType.Tap | GestureType.FreeDrag;
The gesture system then continuously checks for the tap and free drag gestures while the game runs. In our game’s input logic code, you then need to check to see whether any gestures have been detected. This is done by calling the TouchPanel.IsGestureAvailable static property. This property returns true at least one gesture is ready to be processed. The TouchPanel.ReadGesture method is then used to read the next gesture in the queue and remove it from the queue.
The following code reads all of the available gestures from the TouchPanel.

After each GestureSample is read, the game can use the gesture input to take some type of action. A GestureSample is a structure that holds all of the data relevant to a gesture. Using a switch statement is helpful to determine which type of gesture is used and to take different game actions based on the gesture.
Table 12.14 contains the properties exposed by the GestureSample structure.
Table 12.14. Properties of GestureSample
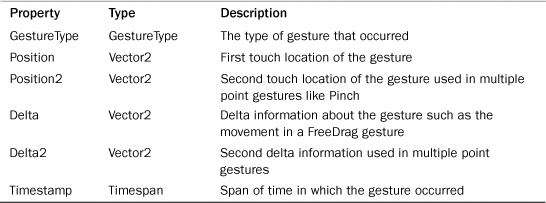
Depending on the type of gesture, the different property values of the GestureSample can be used when taking action within your game. For example, if you use the Flick gesture in your game to scroll the map, you might care about only the Delta property so you would know which direction the flick occurred in and with how much velocity. In other situations, you might care about the position of the gesture when using the DoubleTap gesture for selection. In that case, you would use the Position property.
Displaying GestureSample Data
Now that you have learned how to enable and read gestures let’s create a simple application that displays the last five gestures and all of their corresponding GestureSample properties.
First, you will need a List to store all of the processed gestures in so you can print them later when drawing. Add the following member variable to your game:
List<GestureSample> gestures = new List<GestureSample>();
Next, in your games Update method, add the following lines of code:
// Loop while there are still gestures to read
while (TouchPanel.IsGestureAvailable)
{
// Add each to the stack
gestures.Add(TouchPanel.ReadGesture());
}
This continuously reads all of the available gestures and adds them to the List for later processing.
Now in your games Draw method, add the following lines of code to loop over all of the gestures and write their values.

In the previous code, we loop over the List of GestureSample structures in reverse order and write out each of the properties. We then check the size of the list so that we can remove any gestures that would not be displayed on the screen.
Running the sample shows results similar to those seen in Figure 12.7.
Figure 12.7. Gesture sample that displays gesture properties

Windows Phone Sensors and Feedback
Now we talk about APIs that are specific for Windows Phone devices. These APIs are part of the Microsoft.Devices.Sensors and System.Device.Location namespaces and require that you add a reference to your project. To use the APIs, perform the following steps for your game:
- Locate the Solution Explorer in Visual Studio.
- Right-click your project and select Add Reference (see Figure 12.8).
Figure 12.8. Project right-click menu displaying the add reference

- Locate and select the System.Device assembly from the list of assemblies under the .Net tab, and press Add.
- Repeat Steps 1, 2, and 3 to add the Microsoft.Devices.Sensors assembly.
- Repeat Steps 1, 2, and 3 to add the Microsoft.Phone assembly.
- At the top of code files, include the following lines of code after the existing using statement:
using Microsoft.Devices.Sensors;
using System.Device.Location;
Now you are ready to use all of the great sensors and location services that are available on Windows Phone devices. These include the accelerometer to read the acceleration changes that occur to the phone, location services to enable you to determine the phone’s position on the planet, and APIs to cause the phone to vibrate.
Because the following APIs are specific to Windows Phone devices, they are not available on all of the other platforms supported by XNA Game Studio. If you build a multiplatform game and want to share code, you need to write the Windows Phone-specific code blocks in #if WINDOWPHONE blocks:
#if WINDOWS_PHONE
// Your Windows Phone specific code
#endif
Acceleration Data using the Accelerometer
All Windows Phone devices provide access to an accelerometer sensor. An accelerometer is used to measure force changes to the phone device from gravity or by forces exerted by the user. The accelerometer sensor is sensitive enough to determine when the user tilts the device slightly. It also works great to detect when the user shakes or swings the phone.
Reading Acceleration Data
To read acceleration data, you need to construct a new instance of an Accelerometer. The Accelerometer class is used to start, stop, and read back changes that occur to the accelerometer while it is currently running. Create a member variable to store the Accelerometer in your game class:
Accelerometer accelerometer;
This stores the instance across your game class so you can access the accelerometer in other parts of the game. To create an instance of the Accelerometer in your game’s Initialize method, add the following line of code:
accelerometer = new Accelerometer();
Unlike the XNA Game Studio input type, the Accelerometer uses an event-based model to return new data from the accelerometer. Data is returned by subscribing to the Accelerometer.ReadingChanged event and implementing an event handler method in your game. To subscribe to the ReadingChanged event, add the following lines of code after your previous line to create the instance of Accelerometer:
accelerometer.ReadingChanged += new
EventHandler<AccelerometerReadingEventArgs>(accelerometer_ReadingChanged);
Now, implement the accelerometer_ReadingChanged method that is called when the accelerometer receives new data. Add the following method to your game class:
public void accelerometer_ReadingChanged(object sender, AccelerometerReadingEventArgs e)
{
Vector3 accelerometerReading;
accelerometerReading.X = (float)e.X;
accelerometerReading.Y = (float)e.Y;
accelerometerReading.Z = (float)e.Z;
// Update velocity
spriteVelocity.X += accelerometerReading.X * spriteSpeed;
spriteVelocity.Y += accelerometerReading.Y * spriteSpeed;
}
The reading change event converts the AccelerometerReadingEventArgs parameter to something more useful for your game, which is a Vector3. In the previous case, you just used a local variable. In your game, you want to store this data or change another variable over successive calls.
To have the accelerometer start reading data, you must call the Start method. In the example, we start the accelerometer right away in the game’s Initialize method. For your game, you should not start to read accelerometer data until it is needed. For example, you don’t need to start the accelerometer when the game starts unless you use the accelerometer in your menus. Wait until your level starts before starting the accelerometer. Add the following lines of code after you set the ReadingChanged in your game’s Initialize method:
try
{
accelerometer.Start();
}
catch (AccelerometerFailedException e)
{
// Accelerometer not supported on this platform
// We are going to exit.
Exit();
}
The Start method throws a AccelerometerFailedException if the accelerometer is not supported on the platform or if you have already called the Start method. In the previous code, we exit the example game. In your game, you should determine what the best course of action is.
Now that the accelerometer has started, your game should start to revive reading changed events whenever the phone’s accelerometer detects changes.
When your game is not using the accelerometer, you should call the Stop method to help save battery life and to help your game’s performance. For our example, we use the Game classes OnExiting method to put the call to the Stop method. The default game template does not create an override for OnExiting, so you need to add the overridden method to your game class. In your game class, add the following method:
protected override void OnExiting(object sender, EventArgs args)
{
try
{
accelerometer.Stop();
}
catch (AccelerometerFailedException e)
{
// Do nothing since we are already exiting
}
base.OnExiting(sender, args);
}
Similar to the Start method, the Stop method can also throw an exception. The AccelerometerFailedException is thrown when the accelerometer fails to stop or if it is already stopped.
Moving a Sprite Based on Accelerometer Data
Now that you have the basics of getting accelerometer data, let’s do something more fun and exciting. Like the previous examples, you move a sprite based on the user input, but in this case use the accelerometer data.
To build on the previous code example, you need some member variables to hold the sprite texture, position, and velocity. Add the following member variables to your game’s class:
Texture2D spriteTexture;
Vector2 spritePosition;
Vector2 spriteVelocity;
float spriteSpeed = 50.0f;
int screenWidth = 480;
int screenHeight = 800;
Next, load a texture to use as your sprite. In the game’s LoadContent method, add the following line of code:
spriteTexture = Content.Load<Texture2D>("XnaLogo");
Next, update the sprite’s velocity based on the returned acceleration data. To do this, update the accelerometer_ReadingChanged method you implemented previously. Add the following lines of code to the method:
// Update velocity
spriteVelocity.X += accelerometerReading.X * spriteSpeed;
spriteVelocity.Y += accelerometerReading.Y * spriteSpeed;
The sprite’s velocity is now updated based on the accelerometer reading changes and then scaled.
Now, create the sprite update logic that changes the sprite position based on the current velocity. In your game’s Update method, add the following lines of code:
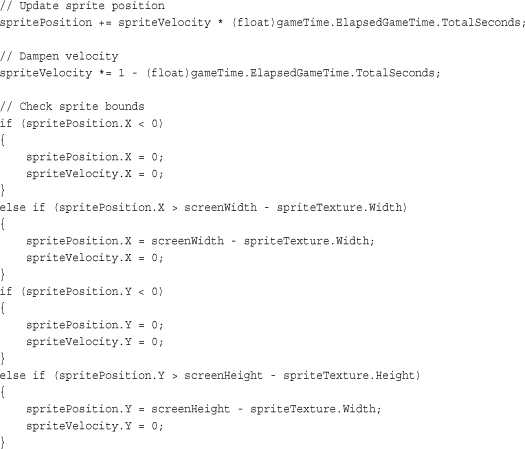
After you update the sprite’s position, you dampen the velocity so it slows over time. Then, check the bounds of the sprite so it can’t travel off the screen. Otherwise, it permanently flies off the screen. When the sprite hits one of the walls, set the velocity for that direction to 0 to enable the sprite to move easily off the wall.
The final step is to draw the sprite. To do this, add the following lines of code to your game’s Draw method:
// Draw the sprite
spriteBatch.Begin();
spriteBatch.Draw(spriteTexture, spritePosition, Color.White);
spriteBatch.End();
Autorotation and Acceleration Data
XNA Game Studio games on Windows Phone support autorotation that enable you as a developer to select which orientations work best for your game. Autorotation can cause a couple of challenges when creating a game that uses the accelerometer.
The first issue is that if your game supports multiple orientations and you expect the user to move and tilt the phone, it could cause the orientation of the game to switch when the user does not intend to change orientations. It is problematic if the screen rotates in the middle of playing a flight simulator evading incoming missiles. To address this concern, you can limit your supported orientations and test that the accelerometer actions you expect your users to use don’t trigger the orientations during normal game play. If you find that the orientations are triggered, you can set the supported orientations to just a single orientation and enable users to change the orientation using a menu option in your game.
The other issue is that when your game changes orientations, the acceleration data does not change. If your game supports multiple orientations, your game needs to take into account the current orientation and how that maps to the accelerometers X,Y, and Z coordinates.
Locating a Windows Phone with the Location Service
The Windows Phone provides the capability to enable you to take your games on the go. Games are no longer just played at your home on your Xbox 360 or Windows PC. Because phones are so portable, the phone could be anywhere in the world. This brings some new and interesting opportunities for games. Having a portable and connected game device enables you to design games that take the current location into account. You could also use it to find other players of the game who are nearby. The accuracy of the location information while affected by several environmental factors can be quite accurate within a few meters.
Reading Location Data
Use the GeoCoordinateWatcher class to report the phone’s current location. You need an instance of the geo coordinate watcher along with the latest coordinate received and the current status. Add the following variables to your game’s class:
GeoCoordinateWatcher geoWatcher;
GeoCoordinate currentCoordinate;
GeoPositionStatus geoStatus;
Similar to acceleration data, the geo coordinate data is returned though an event-based model from GeoCoordinateWatcher. You subscribe to two events. Use the StatusChanged to tell you the current state of the location services. After you start the location service, the status can change and this event gives you information about the state the service is currently in. The PositionChanged returns when the location service detects that the phone moved to a new location. Create an instance of the GeoCoordinateWatcher and subscribe to these events. Add the following lines of code to your game’s Initialize method:

When you create the instance of GeoCoordinateWatcher, you can pass in a GeoPositionAccuracy enum value of High or Low. This tells the geo coordinate watcher which accuracy should be used when returning position changed locations. The MovementThreshold property is in meters and refers to the distance the phone needs to travel before the position changed event is fired. Setting this value too low can result in many position changed events caused by noise in the determined location of the device. Finally, call Start to start the geo coordinate watcher. Just like the accelerometer, you should call Start only after you are ready to receive data because it lowers the battery life of the device. You should also call Stop whenever you are finished tracking the user’s location.
Now that the StatusChanged and PositionChanged events are set, implement the geoWatcher_StatusChanged and geoWatcher_PositionChanged methods to handle these events. Add the following methods to your game class:

Now, store the current location coordinate each time the location is updated. GeoCoordinate provides number properties that contain data about the phone’s current location. The Latitude and Longitude properties can be used to return their respective positions on the Earth. The Altitude property returns the current altitude in meters. The Course property returns the current direction the phone is moving in. The property returns a double value between 0 and 360 degrees. The Speed property returns the current speed of the phone in the course direction. The final two properties, HorizontalAccuracy and VerticalAccuracy, return accuracy of the current coordinate. You can use these values to determine whether you want to use a given point depending on the accuracy needs of your application. To display these properties, add the following code to your game’s Draw method:

The previous code requires that you have already added a SpriteFont to your project and it is loaded into the spriteFont variable.
Providing User Feedback using Vibration
The Xbox 360 gamepad is not the only device that supports force feedback using vibration. The Windows Phone provides the capability to start the vibration motor inside the Windows Phone device. The VibrateController type provides both a Start and Stop method for controlling the vibration of the device. The Start method takes in a TimeSpan for the duration you want the device to vibrate. Although the vibration stops after the given TimeSpan, you can also call the Stop method to stop the vibration before the duration has expired. To add vibration to your game, you first need an instance of the VibrateController. You can obtain an instance by using the VibrateController.Default property. Add the following member variable to your game’s class:
VibrateController vibrateController;
In your game’s Initialize method, add the following line of code:
vibrateController = VibrateController.Default;
Now all that is left is to start the vibration motors on the device. Use the following line of code to have the device vibrate for three seconds:
vibrateController.Start(TimeSpan.FromSeconds(3));
If you need to stop the vibration that you have already started, call the Stop method using the following code:
vibrateController.Stop();
Summary
As you can learned from this chapter, there are many types of input devices and data available to your game especially if you are creating a game for a Windows Phone device. We covered how to read input from all of the input devices supported by XNA Game Studio from keyboards and mice to all of the different types of gamepads available for the Xbox 360 and Windows PCs. We also covered the new multitouch APIs available for Windows Phone devices. Finally, we covered the Windows Phone specific sensors that are available for both XNA Game Studio games and Silverlight applications on Windows Phone devices.