Chapter 16. Multiplayer Networking
Single player games can provide a very rewarding story experience, but nothing brings out competition more than playing a game against other real human beings from across the world. Some of the top selling games of all time offer compelling multiplayer experiences that extend the amount of time players continue to come back and replay their game.
In this chapter you will learn about:
• Setting up for networking development
• Creating a network session
• How to find and join a network session
• Building a game lobby
• Sending player invites
XNA Game Studio 4.0 provides real-time synchronous multiplayer networking APIs for Windows and Xbox 360 that use the Xbox LIVE service.
Using GamerServices functionality from a Windows Phone 7 game requires that the game’s author be part of the Xbox LIVE Registered Developer Program.
Multiplayer Games
Multiplayer games enable the game player to enjoy the cooperation or competition from other players. Before computer networks were popular, this was normally done by enabling multiple players to play on a single television screen. Games can enable both players to be displayed on the screen at the same time and place or can offer multiple points of view by splitting the screen into multiple areas called split screen.
Many gamers today enjoy the availability of high speed Internet access. Personal computers and gaming consoles can connect over the Internet to enable multiple players to be connected together while playing their games.
XNA Game Studio 4.0 provides the capability to create, find, and connect to network sessions between Windows PCs using Games for Windows LIVE and Xbox 360s using Xbox LIVE. The networking APIs that you will use are part of the Microsoft.Xna.Framework.Net assembly and use the namespace of the same name. If your Windows or Xbox 360 project does not currently reference the Microsoft.Xna.Framework.Net assembly, then add the reference now. You need the reference of the samples for the remainder of this chapter. You can also add the using statement for the Microsoft.Xna.Framework.Net namespace to your Game class. Add the following line of code to your C# file that contains your Game class:
using Microsoft.Xna.Framework.Net;
Getting Ready for Networking Development
Building a multiplayer networked game requires that you have more than one machine that is running your game. One common development scenario is to build your game to run on both Xbox 360 and Windows. Because XNA Game Studio supports building your project for both of these platforms, you can create your game, deploy the game to your Xbox, and run the Windows version at the same time.
Running an XNA game that uses networking during development has some requirements for the gamer profile that is playing the game. On Xbox 360, the gamer profile must have an XNA Creators Club membership. Because the same membership is required to do XNA development on Xbox 360, you should already have that requirement out of the way. The other requirement on Xbox 360 is an Xbox LIVE Gold membership to connect a Player or Ranked session over the Internet. Only a Silver membership is required if you use SystemLink, which enables multiple machines to connect over a local area network—that is what you normally do when developing your game.
On Windows, only a local Games for Windows LIVE is required for building a game using SystemLink. If you use a profile that has a Silver or Gold account, you also need an XNA Creators Club membership. Because you will develop over SystemLink, you should not need a second XNA Creators Club membership. Use a local account or you will get an exception.
To use the networking APIs in XNA, initialize GamerServices. Like you did in Chapter 15, “Gamer Services,” add the GamerServicesComponent to your game.
Add the following code to your Game class constructor:
graphics = new GraphicsDeviceManager(this);
graphics.PreferredBackBufferWidth = 1280;
graphics.PreferredBackBufferHeight = 720;
Content.RootDirectory = "Content";
// Initialize GamerServices
Components.Add(new GamerServicesComponent(this));
If you run the game on Windows, the game runs Game for Windows LIVE (see Figure 16.1).
Figure 16.1. Game starting Games for Windows LIVE
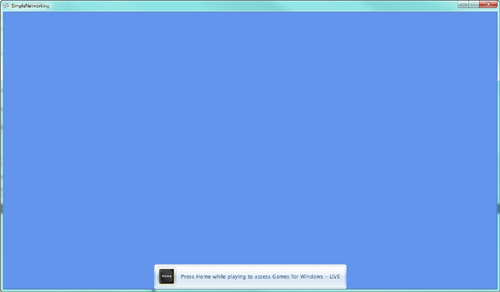
Press the Home key to bring up the guide in Game for Windows LIVE (see Figure 16.2).
Figure 16.2. Games for Windows LIVE guide

If you already have a profile signed, sign the profile out so that your screen looks like Figure 16.2.
Now, create a local profile. To do this, select Create New Profile located in the middle button area of the guide.
Note
You can use the keyboard, mouse, and Xbox 360 controller to interact with the Game for Windows LIVE guide. In this chapter, the samples assume you are using a wired Xbox 360 controller plugged into your PC.
After you click the Create New Profile button, scroll down to Create a Local Profile link and click the link (see Figure 16.3).
Figure 16.3. Creating a local profile in Games for Windows LIVE

Complete the process to create the new local profile. You can select to have that profile auto login when you start, which saves you time while you are develop the game and saves you the step of having to sign in the local profile every time you start the game.
Main Menu and State Management
The sample consists of multiple text menu screens and a game play screen that consists of moving the player’s gamertag around. Depending on the current state of the game, you will want to display a different menu and update a different set of logic. To do this, use a simple enumeration that tracks the game’s current state.
Outside the Game class but within the same file and namespace, add the following enumeration:
// Different states the game can be in
public enum GameState { MainMenu, CreateSession, FindSession, GameLobby, PlayingGame };
As you can see from the GameState enumeration, the sample game contains five different states. As you progress through this chapter, you implement the update and display logic for each of these.
During the course of the game, you will want to display some text for a short period of time. Use this for a number of notifications including when a player joins or leaves a session. Use a new structure that contains the message and the time remaining to display the text. Add the following structure to your game:

The Game class needs a few member variables. You need to hold the current state that you created an enumeration for and you need a list of the game messages to be displayed. Add the following member variables to your Game class:

In addition to the gameState and gameMessages, create variables for the SpriteFont you will use, the GamePadState for the current and last frame, and a new Random generator that you will use within the game.
In your game’s LoadContent method, load the SpriteFont you plan to use for the text in the sample. Create a new SpriteFont in the content pipeline and set the text size to 24. Add the following to the LoadContent method:
spriteFont = Content.Load<SpriteFont>("SpriteFont1");
Add the following code to your game’s Update method:
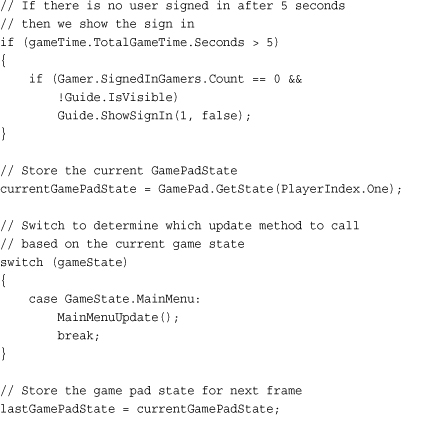
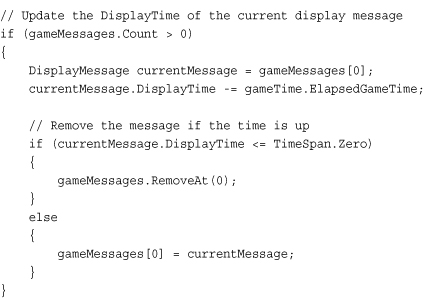
Check whether any user is currently signed in. If a user is not signed in after 5 seconds, call Guide.ShowSignIn, which displays the sign-in dialog in the guide. Use a switch statement to call the appropriate update method depending on the current gameState value. Right now, you have only the MainMenuUpdate method, but as you progress through the chapter, you add more for each of the different GameState values. The last part of the Update method loops over the gameMessages to determine whether any of them need to be removed so they are no longer displayed.
Add the MainMenuUpdate method that will handle user input and logic when our sample is at the main menu. Add the following method to your Game class:
// Update method for the MainMenu GameState
private void MainMenuUpdate()
{
// Exit the game
if (ButtonPressed(Buttons.Back))
Exit();
}
The main menu update does not do much now, but later you add the capability to create and find a session. If the user presses the Back button, you exit the sample.
To check for a single button press in many of your menus, use a helper method that you can add to your Game class.

The ButtonPressed method returns true if the button was pressed on this frame and does not allow for multiple button presses.
To call the draw methods for the different menu screens in the sample, add the following to your game’s Draw method.
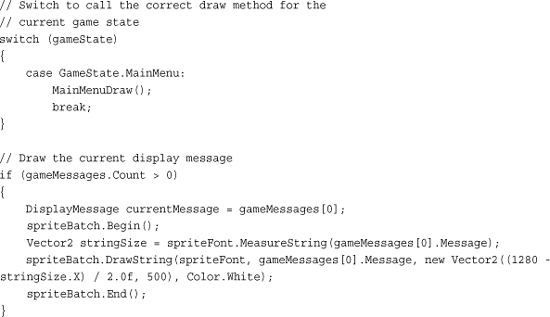
For now, you just call the MainMenuDraw to draw the main menu. Later in the chapter, you add draw methods for all of the value of GameState. The Draw method also displays the current DisplayMessage at the bottom of the screen.
To implement MainMenuDraw to display the text for the main menu, add the following method to your Game class.

The main menu text is simple and displays the menu title and three menu options for creating a session, finding a session, and exiting the game.
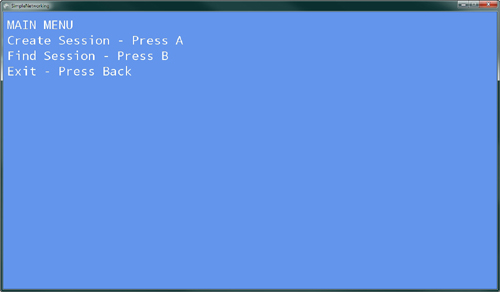
Running the sample at this point should just display the simple main menu. The A and B buttons won’t do anything yet because you have not wired them in your MainMenuUpdate method. Pressing the Back button exits the sample.
The sample should look like Figure 16.4.
Figure 16.4. Main menu screen
Creating a Network Session
Although your main menu has text that says, “press A to create a session,” pressing the button does not do anything. To change this, add the following lines of code to the MainMenuUpdate method:
// Create a new session
if (ButtonPressed(Buttons.A))
gameState = GameState.CreateSession;
This causes oyur game to change to the CreateSession state after the user presses the A button.
Because the game is in CreateSession state, add to the switch statements in the Update and Draw methods so they know what to do while you are in this state.
In the game’s Draw method, add the following to the switch statement:
case GameState.CreateSession:
CreateSessionDraw();
break;
The CreateSessionDraw handles drawing the menu screen when the game is in the CreateSession state. Add the CreateSessionDraw method to your game.

In the game’s Update method, add the following lines of code to the switch statement:
case GameState.CreateSession:
CreateSessionUpdate();
break;
While the game is in the CreateSession state, call the CreateSessionUpdate method to run the update logic for the state. Add the following method to your Game class:
// Update method for the create session method
private void CreateSessionUpdate()
{
// Move back to the main menu
if (ButtonPressed(Buttons.Back))
gameState = GameState.MainMenu;
// Create a new session with different
// using different values for GameType
else if (ButtonPressed(Buttons.A))
CreateSession(GameType.Deathmatch);
else if (ButtonPressed(Buttons.B))
CreateSession(GameType.CaptureTheFlag);
else if (ButtonPressed(Buttons.X))
CreateSession(GameType.FreeForAll);
}
CreateSessionUpdate checks for button presses to create different game types by calling the CreateSession method, which you create in a moment. The GameType is an enumeration that you create for the game. Add the following enumeration to your game:
public enum GameType { Deathmatch, CaptureTheFlag, FreeForAll };
Before you implement CreateSession, you need an additional enumeration and some fields added to your game. Add the following enumeration to your game:
public enum SessionProperties { GameType, MapLevel, OtherCustomProperty };
When you create a session, you can provide a number of integer values that will define what type of session to create. A helpful way to keep track of integer values is to use an enumeration. In this case, create SessionProperties, which defines three types of properties.
You also need to add a member variable to store the NetworkSession. The NetworkSession object is what you use to manage the active session and to send and receive data over the session. You can think of a session as the connection of your machine with the other machines. There are times that gamers join and times where they leave, but there is always a host to the session that controls the current state of the session. If the host leaves the session, the session is over unless host migration is turned on. In that case, a new host is selected. Add the following member variable to your game:
// The network session for the game
NetworkSession networkSession;
Now you can create the CreateSession method that creates a new session given a GameType. The GameType is passed in depending on the selection the player has made from the create session menu screen.

Before you create the session, check whether you need to dispose of an already existing session.
When you create a session, you provide a set of NetworkSessionProperties. These properties define how the session is used. For example, your game might have multiple types of multiplayer games, different levels, or other values that define what is happening in the session. These values are important because they are used when you search for available sessions. The values can also be displayed in the search results when players are looking for a session to join.
The different values of the SessionProperties enumeration are used to index into the NetworkSessionProperties. We give some simple values for the MapLevel and OtherCustomProperty just to show you how this is done. If this was a real game, you would use the player’s map selection and other logic to drive these values.
Now you are ready to create the NetworkSession. The Create method takes a number of parameters and has a few overloads. The first value is the NetworkSessionType to create. As the name of the enumeration implies, this is the type of network session to create. There are four main types of sessions.
The first type of NetworkSessionType is Local. As the name implies, the NetworkSession is local only to a single machine. This is useful if you create a networked game but then want to use the same networking code for your split screen game.
SystemLink is the type of NetworkSessionType that you are using in this sample and is most likely what you will use while in development. It enables multiple machines that are on the same local area network to connect to each other.
PlayerMatch and Ranked are Xbox LIVE sessions that enable gamers to play across the world together.
The second parameter to the NetworkSession.Create method is the number of local gamers that participate in the session. Your game can allow for multiple players on the same console to join other players in a networked game. When you join a session, you and any other local gamers take up multiple spots in the session. In the sample, we set this value to 1 for just a single local user.
The third parameter is the max number of gamers for the entire session. XNA games can support up to 31 maximum players per session. Although 31 players are possible, determine what makes sense for your game and what type of performance you get with multiple players in the session.
The fourth parameter is the amount of private slots. A private slot is one that can be filled only by an invite from a player in the session. This is helpful for times where players are trying to have a game with their friends and don’t want other players to join.
The final parameter is the NetworkSessionProperties that you created earlier. The Create method returns to you a new NetworkSession.
Note
NetworkSession.Create can block for a number of frames. XNA provides asynchronous BeginCreate and EndCreate methods to prevent your game from skipping frames.
After creating the NetworkSession, set the AllowJoinInProgress to true. This property enables players joining the session to do so even if the game has already started. Notice later in the chapter that joining a session can take place in the lobby or while playing the game. If you don’t want to allow players to join the game while it is ongoing, you can set AllowJoinInProgress to false, which keeps them from connecting to the session.
Now that the new NetworkSession is created, register for a number of helpful events that will occur during the lifespan of the NetworkSession.
The GameStarted and GameEnded events fire when the session starts and ends a game. A game is different than a session. A session is the connection of the players while a game represents a play session. For examples, you and your friends can stay in one session while you play multiple games that start and finish over and over again. These events are raised when the NetworkSession.StartGame and NetworkSession.EndGame methods are called. Add the following two event handlers to your game:
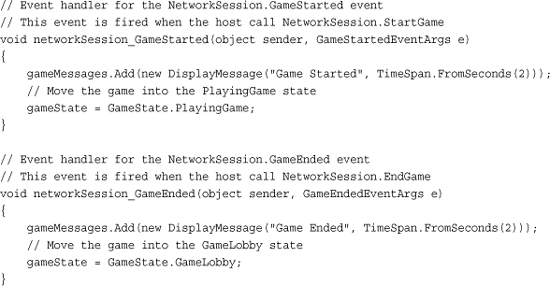
When the game starts or ends, print a message and set the next GameState.
The GamerJoined and GamerLeft events fire when a gamer joins or leaves the session. Even the host gets the GamerJoined event. Add the following two event handlers to your game:

For both the GamerJoined and GamerLeft events, you print a message with the Gamertag. The GamerJoined handler also adds a new GameObject to the Tag property of the Gamer. The Tag property enables you to store any type of object on an instance of a Gamer. You use a simple class called GameObject, which stores the current position of the player. In your game, you can store all of the players’ current state in this type.
Define the GameObject class in your game using the following code:
// Each gamer in the session will have their own GameObject
public class GameObject
{
public Vector2 Position
{ get; set; }
public GameObject(Vector2 position)
{
Position = position;
}
}
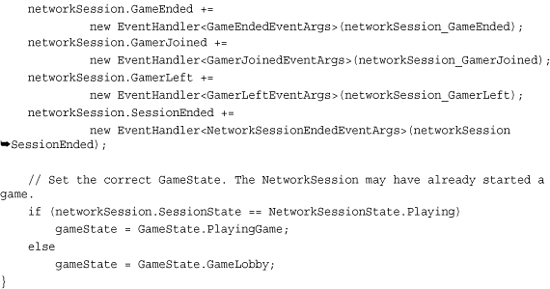
The final event SessionEnded is fired when a player leaves the session. Add the following event handler to your game:
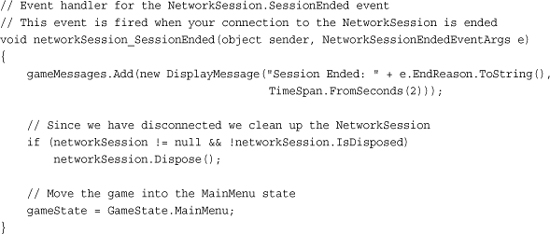
After the session ends, dispose of the NetworkSession and set the gameState to go back to the MainMenu.
After the CreateSession has completed, you are in the GameLobby state waiting for others to join and for the game to start.
Running the game now should enable you to go to the create session screen and see something similar to Figure 16.5.
Figure 16.5. Create session menu screen

The NetworkSession needs to be updated to allow for data to be sent and received to all of the players in the session. To do this, call NetworkSession.Update. In the game’s Update method, add the following code:
// Update the network session we need to check to
// see if it is disposed since calling Update on
// a disposed NetworkSession will throw an exception
if (networkSession != null && !networkSession.IsDisposed)
networkSession.Update();
If the session is not null and has not been disposed, call the Update method.
Building a Game Lobby
With the session created, you move into the game lobby that lists the players in the session and whether they are ready to play the game until the host starts the game.
The game is in GameLobby state, so add to the switch statements in the Update and Draw methods so they know what to do while you are in this state.
In the game’s Draw method, add the following to the switch statement.
case GameState.GameLobby:
GameLobbyDraw();
break;
The GameLobbyDraw method draws the current players in the session and their current ready and talking state. Add the following method to your game:

GameLobbyDraw first draws the menu title of GAME LOBBY and instructions on how to mark your ready status by pressing the A button and how to exit by pressing the Back button. If the machine is the host, then instructions on how to start the game are also displayed.
It then loops over all of the NetworkGamer instances in the session by using the AllGamers property of the NetworkSession. You then write out their Gamertag and whether they are ready and whether they are talking. Every gamer can mark whether he or she is ready to play the game or not. This is just a status indication and does not prevent the host from starting the game.
In the game’s Update method, add the following to the switch statement.
case GameState.GameLobby:
GameLobbyUpdate();
break;
The GameLobbyUpdate method enables players to exit the lobby and mark whether they are ready to play or not. If the machine is also the host, then you also allow for the host to start the game. Add the following method to your game:

NetworkSession provides a property called LocalGamers, which contains SignedInGamer references for all of the players in the session that are local to the machine. Because you know that there is only one local player in the session, you can use the 0 index. If you allow multiple players, check which controller pressed a button and update the correct index. Setting the IsReady property sends the state to all of the players in the session.
If the host presses the Start button, then the game starts by calling the NetworkSession.StartGame method. When the game begins, the GameStarted event fires and the event handler updates the current GameState to PlayingGame.
Running the game now enables you to create the session and join the lobby, which should look similar to Figure 16.6.
Figure 16.6. Game lobby menu screen

Playing the Game
Now that the game has started, take the local users’ input and update the position of their GameObject to move across the screen. Then, send the local players’ state to all of the players in the session and read any state that has been sent to you from other players. The game is quite simple—draw the players’ Gamertag at their position.
Because the game is in PlayingGame state, add to the switch statements in the Update and Draw methods so they know what to do while you are in this state.
In the game’s Draw method, add the following to the switch statement:
case GameState.PlayingGame:
PlayingGameDraw();
break;
Now add the PlayingGameDraw method to your game using the following code:
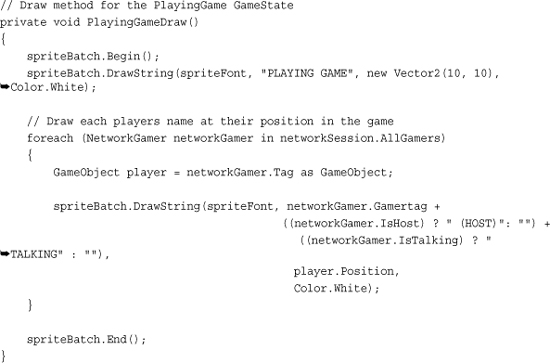
The PlayingGameDraw method loops through all of the NetworkGamer instances in the NetworkSession.AllGamers collection, which contains all of the players in the session. The Gamertag of each gamer is draw to the screen at the position stored in the GameObject for the gamer. If the gamer is the host or is talking, display text next to the Gamertag that shows those values.
To send and receive data, you need two additional member variables for your game. Add the following member variables to your game:
// PacketWriter and PacketReader used to send and recieve game data
PacketWriter packetWriter = new PacketWriter();
PacketReader packetReader = new PacketReader();
The PacketWriter and PacketReader are helper classes that help with sending and receiving data across the NetworkSession. Use these to write and read each player’s state.
In the game’s Update method, add the following to the switch statement.
case GameState.PlayingGame:
PlayingGameUpdate(gameTime);
break;
The PlayingGameUpdate method is responsible for updating the game state for each of the local players and sending their state to all of the players in the session. The state of the other players in the session is read and their GamerObject is updated to their current state. Add the following method to your game:


First, PlayingGameUpdate checks whether the player has pressed the Back button asking to quit the game. If the current machine is the host, then NetworkSession.EndGame is called, which fires the corresponding event that sends everyone in the game back to the lobby. If the player is not the host, then dispose of the NetworkSession and set the state to return back to the MainMenu.
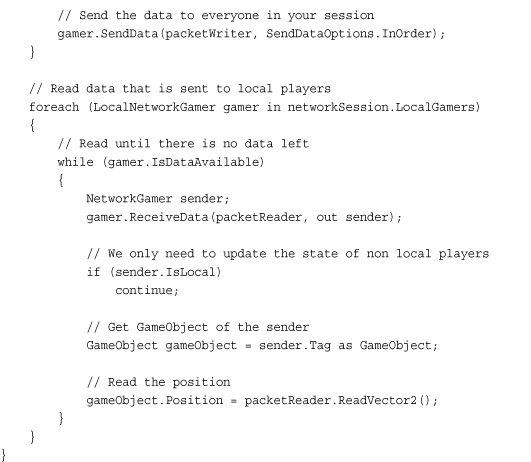
Next, all of the LocalGamers are looped and the GameObject.Position value is updated using the GamePad input. After the position of the local gamer is updated, the new position is written to the PacketWriter and set to everyone in the session using NetworkSession.SendData.
There are a number of overloads to SendData—the one in this sample takes two parameters. The first is the data to send which takes the PacketWriter. The second defines how the data should be sent using the SendDataOptions enumeration.
The Internet is a like a major highway with a lot of traffic. That traffic can be moving fast or can get into traffic jams. There are also multiple routes from one point to another. When you send data across the network, the data is broken down into packets. Each packet is sent from your machine to another across the network. Depending on the network conditions, some packets can get lost and never get to the recipient; others might get stalled and get behind packets sent after themselves.
SendDataOptions enables you to specify how you would like the data to be handled. XNA can guarantee that packets be delivered by checking whether the other machine receives the packet and sending the packet again until it is received. As you can imagine, this creates more overhead because there is more data sent that ensures the packets are received. If you want to guarantee that the packets are received, use the Reliable option. XNA can also guarantee that the packets are received in order. If you want the packets to arrive in order, then use the InOrder option. You can also specify ReliableInOrder, which guarantees the data is both in order and is delivered. If you aren’t concerned about lost packets and data order, use the SendDataOptions.None option.
Note
An overload of NetworkSession.SendData enables you to specify a specific NetworkGamer to send the packets to.
Now that the data is sent, read the data that was sent to your local gamers. Remember that the LocalGamers are looped. The LocalNetworkGamer.IsDataAvailable property is used to check whether there is more data to read for a specific LocalNetworkGamer. LocalNetworkGamer.ReceiveData is called to read the data sent from other players. ReceiveData takes two parameters. The first is the PacketReader and the second is the NetworkGamer who sent the data.
The sender is checked to see whether it is local to the session using the IsLocal property. If it is a local gamer, then you don’t need to update the position because you would have already done so previously. If the data came from another player in the session and was not local, then the GameObject for that player is updated with the position read from the PacketReader.
Note
There are multiple ways you can set up your game to send data across the network. This sample uses a technique called peer to peer, which sends all of the data from each user in the session to all other players in the session.
Another way you can send the data is called client-server model. With client-server, there is one machine that contains the current state of the game and sends that state to all of the other machines in the network called clients. Each client talks only to one machine, which is the server.
Now that you are sending and receiving data, the game is ready to be played. Running the sample now should enable you to create a session and start the game from the lobby. Figure 16.7 shows the host playing the game alone.
Figure 16.7. Host playing the game

If you press the Back button, you quit the game and are returned back into the lobby as shown by Figure 16.8.
Figure 16.8. Quitting a game back to the lobby

Searching for an Available Network Session
So now you can create a NetworkSession and start the game, but you are missing the capability for other players to join your game. You need to search for the available network sessions and then join one of the sessions. After you join, you have already created the code to handle playing and quitting the game.
To wire up the find session logic, add code to the MainMenuUpdate method to check for the B button that is pressed.
// Find a session
if (ButtonPressed(Buttons.B))
FindSession();
When the player presses the B button at the main menu, start the search for a session to join.
To store the collection of AvailableNetworkSession objects so that you can pick the one you want to join, add the following member variable to your Game class:
// List of sessions that you can join
AvailableNetworkSessionCollection availableSessions;
Now you need to implement the FindSession method, which populates the AvailableNetworkSessionCollection and switches out GameState to the FindSession menu screen. Add the following method to your Game class:

FindSession first checks whether there is a current active NetworkSession and calls Dispose on the session if it is active.
As you did when you created the NetworkSession, create a NetworkSessionProperties object. This time, the properties are used to search for a specific session. You don’t need to specify all of the properties. For example, you don’t set a GameType value so the sessions returned can be of any GameType.
To generate the list of AvailableNetworkSession instances, call the NetworkSession.Find method. Find takes three arguments. The first is the NetworkSessionType just like you used for the Create method. The second is the number of local players that will be joining you in the session. Specify just 1 for this example. Finally the third and final argument is the NetworkSessionProperties to use in the search.
The resulting AvailableNetworkSessionCollection contains all of the AvailableNetworkSession instances that match the properties and have room for you to join.
Note
Like the NetworkSession.Create method, the NetworkSession.Find also has asynchronous versions called BeginFind and EndFind.
The last thing FindSession does is set the gameState to GameState.FindSession to display the find session menu screen.
Add to the switch statements in the Update and Draw methods so gamers know what to do while you are in this state.
In the game’s Draw method, add the following to the switch statement:
case GameState.FindSession:
FindSessionDraw();
break;
Now, add the FindSessionDraw method to your game using the following code:
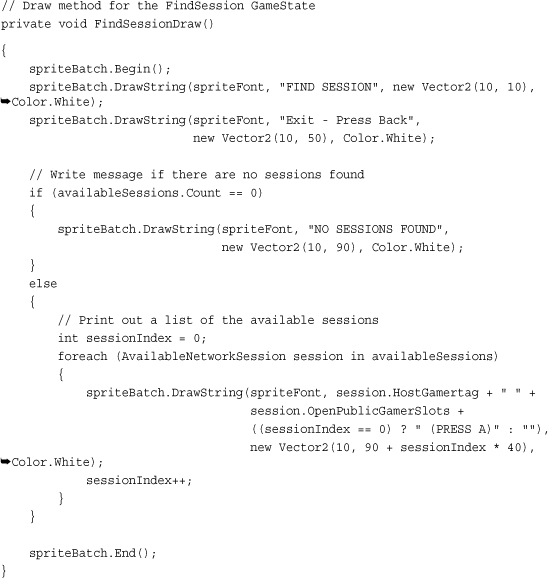
The FindSessionDraw method loops over all of the AvailableNetworkSession instances in the AvailableNetworkSessionCollection and writes out the host Gamertag and how many gamer slots are available.
AvailableNetworkSession provides many properties that expose information about the NetworkSession that you can join. HostGamertag returns the string Gamertag for the host of the session. This might not be the person who started the session because the session might support host migration. CurrentGamerCount, OpenPrivateGamerSlots, and OpenPublicGamerSlots return the total gamers in the session, and the amount of open private and public slots to join. The SessionProperties property returns the NetworkSessionProperties used to create the session. Finally, the QualityOfService property returns an instance of QualityOfService, which tells you how well you can connect to the AvailableNetworkSession.
The QualityOfService class provides helpful measurements that enable you to see how well the connection of the machine is to the AvailableNetworkSession. QualityOfService provides a number of properties including AverageRoundtripTime and MinimumRoundtripTime, which returns the average and minimum amount of time it takes for the machine to take to the host of the NetworkSession. The BytesPerSecondDownstream and BytesPerSecondUpstream properties are the estimated download and upload bandwidth from the machine making the call to the host of the NetworkSession.
Next, update the game’s Update method with another condition in the switch statement to handle updating while you are in the FindSession state. Add the following to the switch statement in the Update method:
case GameState.FindSession:
FindSessionUpdate();
break;
Now, add the FindSessionUpdate method to the Game class:
// Update method for the FindSession GameState
private void FindSessionUpdate()
{
// Go back to the main menu
if (ButtonPressed(Buttons.Back))
gameState = GameState.MainMenu;
// If the user presses the A button join the first session
else if (ButtonPressed(Buttons.A) && availableSessions.Count != 0)
JoinSession(0);
}
To keep the sample simple, you don’t handle selecting all of the available network sessions and just pick the first one. In your game, take user input to move some type of selection to enable the user to select which session to join.
Now you come to the point where you need to run the sample on multiple machines. You need one machine to create the session and another to search for available sessions.
Open another instance of Visual Studio and open the same solution file. If you have not already created an Xbox 360 version of the project, you should create a copy of the project for Xbox 360.
In one of the instances of Visual Studio, launch the Windows version of the sample project. Have the player create a session and wait at the lobby. In the other instance of Visual Studio, launch the Xbox 360 version of the sample project. Select the find session menu option. Now you should see something similar to Figure 16.9 showing the available sessions.
Figure 16.9. Find session menu screen

Joining an Available Network Session
Finally, implement the JoinSession method, which joins one of the available network sessions, registesr for session events, and sets the next GameState. Add the following method to your game:
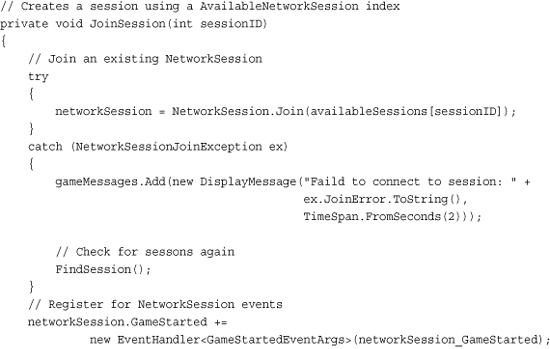
The JoinSession method that you added to your game takes the index value into the availableSessions collection to use when joining the session. The NetworkSession.Join method takes a single argument, which is the AvailableNetworkSession to join. Join can throw a NetworkSessionJoinException if for some reason the session is not joinable anymore—for example, if the session becomes full between searching for available sessions and trying to join the session. If you receive the exception, you search again and print an error message.
After joining the session, you have a valid NetworkSession similar to when you created the session, so register for all of the same events. Finally, set the current gameState depending on whether the session you are joining is already playing the game or is in the lobby.
Note
As with the NetworkSession.Create and NetworkSession.Find methods, NetworkSession.Join also has an asynchronous version BeginJoin and EndJoin.
Running the sample now should enable you to create a session on one machine and join that session from another. The lobby should look similar to Figure 16.10.
Figure 16.10. Game lobby with multiple players

Both players can set their ready state, which should update on both machines. If the host presses the Start button, the game begins. In the game playing state, both players can move their name around the screen (see Figure 16.11).
Figure 16.11. Two players moving their names around the screen

If the host presses the Back button, the game ends and all players move back into the lobby. If the host presses the Back button again, the session ends and all players return to the main menu (see Figure 16.12).
Figure 16.12. Host exiting the session sends all players to the main menu

Sending Player Invites
Xbox LIVE enables you to connect with players from around the world. While playing a game, you might want to invite your friends to join you. You might also receive invitations from others to join their game. Adding support for game invites is tremendously easy with XNA Game Studio.
In the GameLobbyUpdate method, add the following code:
// Invite other players
if (ButtonPressed(Buttons.X) && !Guide.IsVisible)
Guide.ShowGameInvite(PlayerIndex.One, null);
Guide.ShowGameInvite shows a list of the player’s friends to invite to the current game.
Now, you need to register for the NetworkSession.InviteAccepted event, which fires after a player accepts the invite.
// Register for the invite event
NetworkSession.InviteAccepted +=
new EventHandler<InviteAcceptedEventArgs>(NetworkSessionInviteAccepted);
Finally, implement the NetworkSession_InviteAccepted method.
void NetworkSession_InviteAccepted(object sender, InviteAcceptedEventArgs e)
{
if (networkSession != null && !networkSession.IsDisposed)
networkSession.Dispose();
if (!e.IsCurrentSession)
networkSession = NetworkSession.JoinInvited(1);
}
First, NetworkSession_InviteAccepted disposes of any NetworkSession that might be active. Then, check to make sure you are not already in the session before you call the NetworkSession.JoinInvited method. This method takes the number of local gamers that are joining. Now, your game is ready for game invites.
Note
If the account you are using is not an Xbox LIVE account, then the Guide.ShowGameInvite method throws an exception because local players can’t send invites.
Party Invites
A party allows for up to eight players to group together no matter which game they are playing. The players in the party can chat with each other even while playing different games. This is great if you want to chat with a friend while you play separate games.
While you are playing a game, you can view available network sessions of your party members that you can join. To display the list of sessions you can join, add the following to the MainMenuUpdate method:
// Show a party sessions the player can join
if (ButtonPressed(Buttons.Y) && !Guide.IsVisible)
Guide.ShowPartySessions(PlayerIndex.One);
You can also invite the players in your party to your game session. To show the party screen from your game, add the following to the GameLobbyUpdate method:
// Show the party screen
if (ButtonPressed(Buttons.Y) && !Guide.IsVisible)
Guide.ShowParty(PlayerIndex.One);
Simulating Real World Network Conditions
As expected, the conditions and speed that the network traffic performs in your game is slower than what you are currently seeing. Your connection from your PC to your Xbox 360 over your local area network is close to perfect. The physical distance is low and the amount of other traffic your packets have to deal with is relatively low. Out in the wild, Internet conditions can vary greatly. Your connection to another machine has a higher latency and you can experience packet loss.
Developers have a difficult time handling these conditions unless they could simulate them within their development environment. NetworkSession provides two properties that enable the developer to simulate real-world network conditions.
The NetworkSession.SimulatedLatency property is a TimeSpan, which is a simulated latency between the machines in the session. Games running on Xbox LIVE games are expected to handle latencies of 200 milliseconds while still enabling the game to be playable.
The NetworkSession.SimulatedPacketLoss property is a float value in the rage of 0 for no packet loss to 1 for 100 percent packet loss. Xbox LIVE games are expected to handle packet loss around 10 percent or a value of 0.1f.
Summary
Now you can take advantage of using Xbox LIVE and Games for Windows LIVE in your games. You learned how to create, find, and join network sessions and how to invite others to come play with you in your session.
We also covered how to simulate the real-world conditions of networks by showing you how to set the latency and packet loss for a session.
In the next chapter, you learn about dealing with media.