Appendix C. Windows Phone 7 Launchers and Choosers
Windows Phone 7 has a wide variety of operations that are useful to use in your game and applications. Luckily, the system provides a large number of these to you in the form of what are called tasks. In this appendix, you learn about the tasks available on Windows Phone 7, including:
• Sending emails
• Picking contacts
• Making phone calls
• Playing video
• Using marketplace
Launchers
Conceptually, a launcher and a chooser are the same thing. The only difference is that choosers can return data back to you, whereas launchers are normally something you launch but don’t expect any data back from. There are currently ten available launchers and six available choosers. Throughout this chapter, each is discussed.
Let’s make a quick example to show off each of these tasks, so go ahead and create a new Windows Phone Game project. Add a new sprite font to your Content project named Text. Also add a movie to your project, not your Content project but the main project. You can add the samplemovie.wmv from the downloadable examples if you’d like. After the movie is added, change the property Copy to Output Directory to Copy if newer. Then, add the following variables to your Game class:
string _currentString = "Waiting for something...";
private Rectangle[] ButtonList = new Rectangle[16];
private const int ButtonSize = 100;
Texture2D _gray;
Texture2D _chosenPhoto;
The string is used to give basic status updates (and it’s why you need the sprite font). Because there are 16 different tasks you can perform, the array of rectangles is used as a simple button mechanism. The gray texture is what you use to render your pseudo buttons, and the last texture is what you use to render the picture that the user chooses in the tasks that enable them to do so. With that, you can add the following code to your Game constructor:
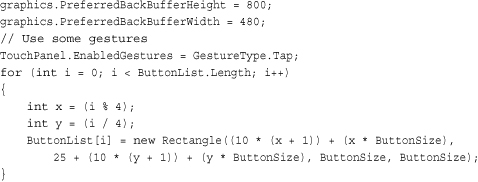
At first, you set the resolution to switch to portrait mode because many of the tasks appear that way anyway, and it makes the example look better. You will be using the Tap gesture to register your button clicks, so you enable that. Finally, you create your button rectangles in a 4×4 grid. You still need to create your texture and load the sprite font, though, so add the following to LoadContent:
_gray = new Texture2D(GraphicsDevice, 1, 1);
_gray.SetData<Color>(new Color[] { Color.Gray });
font = Content.Load<SpriteFont>("Text");
You haven’t done anything with the tasks yet, but let’s get the other boiler plate code so the rest of the chapter is focused solely on the tasks. Replace your Draw method with the following:
protected override void Draw(GameTime gameTime)
{
GraphicsDevice.Clear(Color.CornflowerBlue);
spriteBatch.Begin();
foreach (Rectangle r in ButtonList)
{
Rectangle border = r;
border.Inflate(1, 1);
spriteBatch.Draw(_gray, border, Color.Black);
spriteBatch.Draw(_gray, r, Color.White);
}
// Draw the chosen photo if it exists
if (_chosenPhoto != null)
{
spriteBatch.DrawString(font, "Current photo:",
new Vector2(20, 500), Color.White);
Vector2 v = font.MeasureString("Current photo:");
spriteBatch.Draw(_chosenPhoto, new Rectangle(20,
(int)v.Y + 505, 200, 200), Color.White);
}
spriteBatch.DrawString(font, _currentString,
new Vector2(10, 5), Color.White);
spriteBatch.End();
}
First, render your gray texture into your button rectangles, but notice that you also render a slightly larger black rectangle first. The Inflate method increases the size of the rectangle. This gives you a small border around the pseudo buttons. Next, render the currently chosen photo if it happens to exist below all of the buttons. You then render some extra text for basic status updates, and you’ve now got your basic framework setup and can start learning about the tasks. Running the application now would show you something similar to Figure C.1.
Figure C.1. The basic framework for the tasks example
You’ll need a helper function to detect which button you’ve pressed, so add that now:
int GetButton(GestureSample gesture)
{
for (int i = 0; i < ButtonList.Length; i++)
{
if (ButtonList[i].Contains((int)gesture.Position.X,
(int)gesture.Position.Y))
{
return i;
}
}
return -1;
}
This helper goes through each button rectangle in your array, and if the position of the gesture you’ve passed in is contained within that rectangle, it returns its index into the array. This enables you to detect individual button presses and react to them. Now, it’s time to start looking at the actual tasks. Start with the launchers, as they do not have any need to return data. Add the following to the Update method:
while (TouchPanel.IsGestureAvailable)
{
GestureSample gesture = TouchPanel.ReadGesture();
switch (GetButton(gesture))
{
case 0: // Phone caller
{
PhoneCallTask phone = new PhoneCallTask();
phone.DisplayName = "Jenny";
phone.PhoneNumber = "1-800-867-5309";
phone.Show();
}
break;
default:
// Do nothing
break;
}
}
Simply look for the Tap gestures, and if you find one, see if it pressed a button (although you’re currently only looking for one button). If something else was tapped, you simply ignore it. Because this is a phone after all, one of the first tasks you might want to do is to have your game ask the player to make a phone call. This could be trash talking at its finest! Notice a similar pattern to all of the launchers. After you create the object, you might set a few properties, and then call Show. In this case, you can set the DisplayName and the PhoneNumber properties. You get this information from another task later when we discuss choosers.
Note that simply invoking this launcher won’t make a phone call, however. The user has to actually initiate that action, so when you run this now, it simply asks the user if he’s like to call the person specified, much like you see in Figure C.2.
Figure C.2. Making a phone call

After your player has called someone to gloat over his victory, perhaps you’d like to send him to your web site? Hook up the web launcher to the second button by adding the following case statement:
case 1: // Web task
{
WebBrowserTask web = new WebBrowserTask();
web.URL = "http://developer.windowsphone.com";
web.Show();
}
break;
The only property here is the URL that you want to navigate to. This launches the web browser and navigates to the specified URL. However, maybe you want your game players to tell all their friends how awesome your game is. You can have them send an email by using the email launcher. Add the following case statement for the Next button:
case 2: // Send email
{
EmailComposeTask email = new EmailComposeTask();
email.Subject = "This is my game!";
email.Body = "This game rocks.";
email.Show();
}
break;
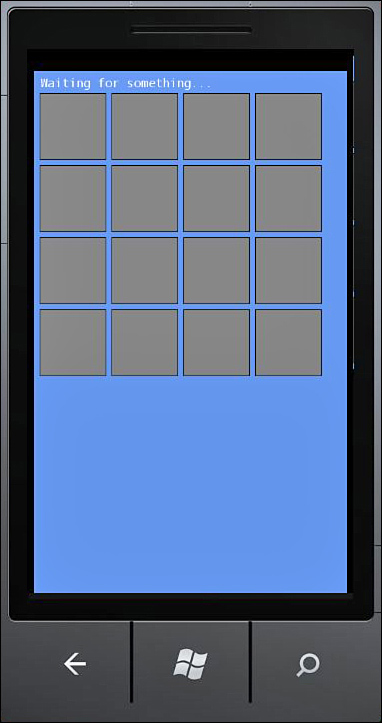
In the example, you use two of the four properties available: the Subject and Body. These are used to autopopulate the text of the email message. You can also set the To and Cc properties to have recipients already in the email as it launches. Of course, even though email is nice, this is a mobile phone, and sending a text message is much more modern. You can do this by adding the following case statement:
case 3: // SMS Compose task
{
SmsComposeTask sms = new SmsComposeTask();
sms.Body = "Sending you a text from my awesome game";
sms.To = "John Doe";
sms.Show();
}
break;
Much like the earlier tasks, the Body is the content of the message, where the To property dictates the recipient. Just like the phone-calling task, invoking this doesn’t send the message directly without the user initiating it either, as seen in Figure C.3.
Figure C.3. Sending a text message
The next four tasks are related to the marketplace. Because you want to ensure your games and applications have the best marketplace visibility, these tasks can help with that, and they can even direct people to your other applications! First is the details page, so add the following case statement:
case 4: // MarketplaceDetailTask Task
{
MarketplaceDetailTask market = new MarketplaceDetailTask();
market.ContentType = MarketplaceContentType.Applications;
market.Show();
}
break;
The details launcher includes two properties: the ContentType, which can be either Applications or Music, and the ContentId, which is the unique identifier for a piece of content on the marketplace. This enables you to go to the detail page of any game you’d like, although by default, it goes to your own. You should make the Next button go to a particular hub, so add the following case statement:
case 5: // MarketplaceHubTask Task
{
MarketplaceHubTask market = new MarketplaceHubTask();
market.ContentType = MarketplaceContentType.Applications;
market.Show();
}
break;
The only property here is to choose which hub you want to go to by picking the ContentType, and you can choose only Applications or Music, as before. Picking Applications takes you to that hub, much like you see in Figure C.4.
Figure C.4. Visiting a marketplace hub

The marketplace also enables users to submit reviews for the games and applications that they play. You can use the task in the next case statement to enable the user to go to the review page (and even submit his own) right from your game:
Of course, you might want to send them to the marketplace to search for other games you’ve made! In this case, you use the following task found in this case statement:

Once again, you can choose the ContentType you are interested in, and this time you can also include the SearchTerms you want to look for. If you only want results from things you care about (say your games), make sure your search is specific enough to find only those! Perhaps you have a unique developer name or something. Searching through the marketplace is nice, but what if you want to enable users to search anywhere? You can assign that task to the Next button with this case statement:
case 8: // Search Task
{
SearchTask search = new SearchTask();
search.SearchQuery = "XNA Game Studio";
search.Show();
}
break;
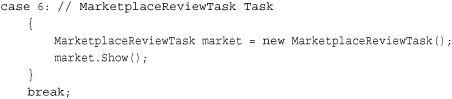
The only property here is the SearchQuery, which is what the search box is prepopulated with (and the initial search results are based on). This is the same as hitting the Search button on the actual phone itself and looks like what you see in Figure C.5.
Figure C.5. Searching
The last of the launchers (tasks without any return values) is the one to host media and it is the reason you added the movie to your project when you first created it at the beginning of this chapter. You can hook that up to the Next button with the following case statement:

You probably have more control with this task than any of the others. First, you can control explicitly which portions of the playback controls you wish to allow the user to have access to via the Controls property. This can range from None, to All, to everything in between. Next, you need to inform the launcher where the media will comes from by the Location property. You can choose None if your media is somewhere external to the phone (say a website), whereas you choose Data if the media is stored within your application’s isolated storage file. If the media is part of your package (like it is in this example), choose the Install option. Finally, you need to pass in a URI to the actual Media before calling the Show method.
Choosers
The rest of the tasks all have a mechanism in which they can return data back to you. They each do it through the same way—a Completed event that is fired. The first task you look at is the photo chooser, so add the following case statement:

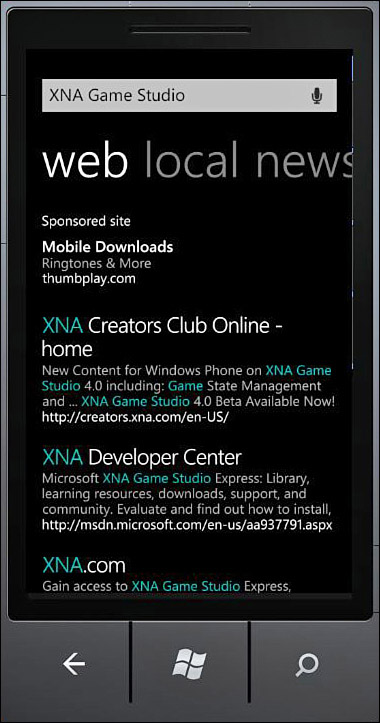
There are a few properties you can set here before the Show method. The ShowCamera property enables you to specify whether you allow a new picture to be taken and returned (by passing in true), or if it must already exist in the picture list (by passing in false). You can use the PictureWidth and PictureHeight properties to specify the maximum size of the image (it is cropped beyond these limits). Finally, you have the Completed event.
In this event, if the TaskResult is OK, then use the ChosenPhoto property to create the _chosenPhoto object that is rendered in your scene as you see in Figure C.6. If the user cancels the task without choosing a photo, update the status text signifying that. You also use the OriginalFileName property in the results in your status text.
Figure C.6. Rendering after picking a photo
The next task is remarkably similar, except it only enables you to get the picture from the camera, rather than the stored pictures. Using the following case statement for the Next button shows this:
The next two tasks are both related to email addresses and can give you the information you needed earlier to use in other tasks. The first one lets you choose a contact and returns that contact’s email address. Add the following case statement:
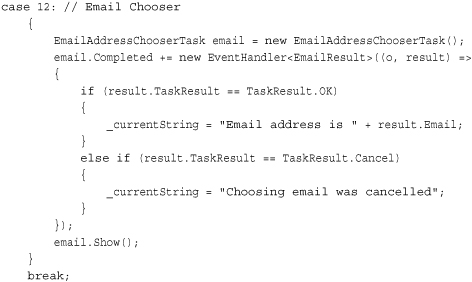
If the user chooses a contact, you print the Email address as part of the status text. If you want to allow them to add a new contact based on an Email address instead, you can do that with the following:

Here, you specify the Email address you want to create the contact for before calling Show. The next two tasks are virtually identical to these two, just with phone numbers replacing emails. You can see these by using the following:

That completes the list of built-in tasks that ship with Windows Phone 7.
Tasks That Cause Tombstoning
Tombstoning is discussed in depth in Appendix D, “Dealing with Tombstoning,” but because some of these tasks can cause Tombstoning, it should be mentioned here. The following tasks can cause your application to be tombstoned:
• PhoneCallTask (only if advanced options are used)
• WebBrowserTask
• EmailComposeTask
• SmsComposeTask
• MarketplaceDetailTask
• MarketplaceHubTask
• MarketplaceReviewTask
• MarketplaceSearchTask
• SearchTask
• SaveEmailAddressTask
• SavePhoneNumberTask
Notice that this is 11 of the 16 available tasks. It just goes to show your application needs to handle tombstoning correctly!
Summary
Many common operations that the Windows Phone platform supports are exposed to application and game developers via tasks. This appendix has covered each of these tasks in depth, so you now have the knowledge to use them in your games!