In the previous chapter, you made sure that everything is configured correctly. The last thing you need to do is release actual versions of your binaries. That is what you will learn how to do in this chapter.
You will start by looking at release definitions. A release definition is similar to the build definitions you saw in Chapter 3. You can even use the same build tasks in your release definitions. There is, however, one welcome addition: environments. These environments make it possible to deploy or deliver the same release to different (development) environments. You will see how that works in detail later in this chapter.
As part of releasing your app to a specific environment, you will also learn how to distribute to specific groups or even users. Furthermore, I will show you how you can complete the pipeline by deploying to the actual app stores. You will see how to add tasks to VSTS and configure them in such a way that you can send your app right from VSTS to an app store and distribute them to your ultimate targets: the consumers.
Creating a Release Definition
Let’s dive right back into VSTS for this. Up until now you have been looking at the Build section of VSTS. But as I have pointed out before, there is a separate Releases section. When you first go there, no releases have been defined yet, as shown in Figure 8-1.
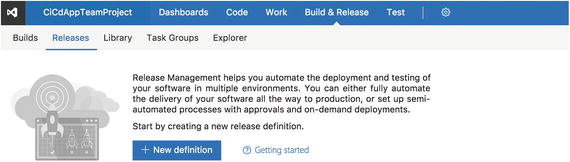
Figure 8-1. Releases section in VSTS
You’ll see a good summary of what you can do with release management in VSTS .
Let’s just follow the suggestion and click the “New definition” button. Like when creating a build definition , you can choose between several templates that help you get started. As you go through the list, you will notice how it has templates only for Azure-related releases. Of course, Azure is a likely candidate to release to, and since it is another Microsoft product, rolling out to the Azure platform is a breeze.
However, it is not what you are after; you want to go to HockeyApp and eventually even the app stores. So, pick the empty definition at the bottom of the list and proceed. Figure 8-2 shows the screen that follows. Note that you need to choose a source, and that source is in the form of a build definition . If you open the list, you will see all the build definitions that you have created in the selected team project. This means you cannot have a release definition without having a build definition.
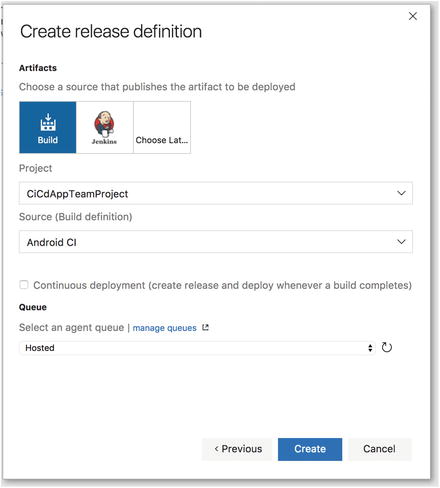
Figure 8-2. Configuring a release definition
It is actually not that strange when you think about. Continuous delivery has value only if it is powered by an automated build. If you were to upload binaries yourself, you would still get some benefits, but it would defeat the purpose of continuous delivery. By connecting a build definition to this release definition, the release will automatically know where any artifacts that you provide are available.
In addition to linking the build definition, there are some other minor things that you can configure right away. Specifically, there is a check box to make this release continuous. By selecting it, whenever the linked build definition is triggered and completes successfully, the release definition will be triggered right after that.
Lastly, you again can see the agent queue that is to be used. This time it’s not for building but for releasing. As I mentioned earlier, in the release definition you can use the same tasks as in the build definition. That means the agent should have the capabilities to run those tasks as well. If you are only going to push files to a third party, no special capabilities are required. In that case, you can safely use the Hosted agent queue. As you might recall, the hosted agents are the Azure virtual machines that are preconfigured for you. If you use them, you will be charged via the monthly build minutes you have available in your account.
For now, I will keep the configuration as it is and just click the Create button to generate the new build definition.
When that is done, you will be taken to the empty release definition . If you did choose a template earlier, some steps will already be there. Figure 8-3 shows you the newly created release definition. You can think of release definitions like build definitions with different environments at a level above the build steps. So, each environment can have its own steps.
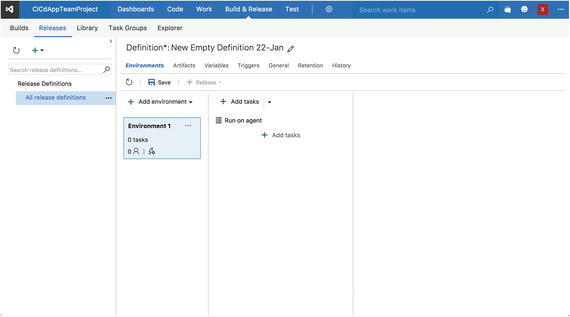
Figure 8-3. Empty release definition
On the left side of the screen you will see a list of all the release definitions that are defined for this team project. Since there are none right now, nothing is shown here. On the right side is where the magic happens. The right side of the screen is divided into three columns. From left to right there are the environments, the build steps , and the selected build step configuration.
The build steps column also has the ability to divide steps that are to be executed on the release agent or on the server that you are releasing to. You can create different phases for that, and you can also create multiple phases so you could run something on the agent, then on the server, and then on the agent again. However, at the time of this writing, the server phase has only one build task available: Manual Intervention. The only thing it does is pause the process and notify users to act. Since it is not applicable to releasing apps, I will be describing steps only on the agent.
Environments are traditionally the test, acceptance, and production environments. In most basic form, for instance, you would have a web application, and you take the artifacts from a build and release it to a server by a file copy. That would be one environment. If that succeeds and you are ready for the next step, you would roll on through to the acceptance environment. You would take those same artifacts, copy them to another server or at least another instance, and that is that. The same would go for production. That is exactly what you can do with the environments in release definitions. In one environment add all the steps that are needed to deploy the app to a server, and in the next environment repeat the process or maybe add or skip a few steps.
This is a powerful tool. Not only can you automate the whole process, you can also build a chain of command. You can define users or groups from within your VSTS account, which must give their approval before (or after) releasing a build. Once it is approved, the process will be repeated and deployed to the next environment. Because everything is automated, you can also build in some sanity checks already so you do not have to bother with them yourselves. For instance, when a deploy has been executed successfully to the staging slot, you could run a simple test script to log in and see whether the basic functionality of your application still works. Only then will staging be swapped to production. Or what about executing load tests? When your web application has been deployed, run a load test on it to see whether it still has the performance that you are targeting. The possibilities are endless.
However, for apps it is all less comprehensive. An app is not a public application that runs on a server and that you can just execute scripts upon. You would need to have the actual binaries, like with Test Cloud. So, deploying for apps comes down to different stages of audiences that you distribute them to. Therefore, the environments will be just HockeyApp (or could be HockeyApp multiple times targeting different users), and the final environment will be an app store. You will learn how you can target different groups of people in the next section. For now you’ll look at how you can configure a first deploy to HockeyApp.
As a starting point, add a task to the current environment by clicking the Add Task button in the center column, as depicted in Figure 8-3. On the Deploy tab, find the task named HockeyApp; this is part of the extension you installed in Chapter 7. Add it to the release definition and close the pop-up window. Figure 8-4 shows the result of this action.
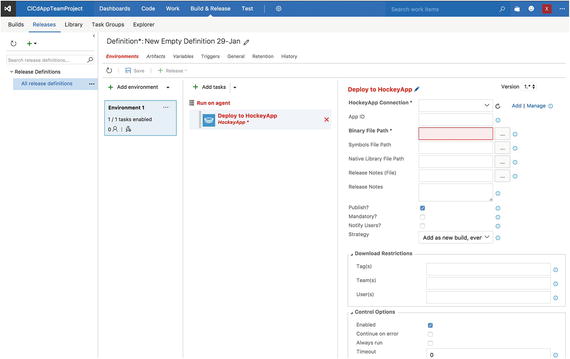
Figure 8-4. Adding the HockeyApp task to the build definition
Again, this looks and works exactly the same as for build definitions . Notice the red text and box, indicating that you have not filled in mandatory data for this task. Let’s work through that data from top to bottom.
The first field is HockeyApp Connection. This is where you select the connection you made in the previous chapter. From the drop-down box, select the right connection, and that is it. If you have not made the connection yet, you can do so from here by clicking the Add or Manage button.
Next is App ID . Remember that you had to note your app ID while you were looking at the HockeyApp dashboard of your app? This is the place to fill it in. The app ID is platform specific, so make sure you have the right one for the right build here. If you insert the iOS app ID linked to the Android build definition, you will probably get some weird errors. If you are not sure, go back to the HockeyApp dashboard for your app and find the app ID again.
The Binary File Path field is where you select the executable binary file. For iOS, this is the .ipa file, for Android it’s the .apk file, and for UWP it’s the .appxbundle file. You can use a minimatch pattern here. So, **/*.apk is allowed. If you want to enter a full path here, note that it must be relative to the artifact folder. If you are not sure what it should be, click the browse button next to it.
This is the bare minimum of information that is needed to create your first release. Before you create a release, let’s go over the rest of the fields as well, so you know what they are there for.
Symbols File Path is the field where you can specify the path to the debug symbols. Although it is not required, I recommend adding it. By adding the debug symbols, your crash reports will be a lot more understandable. If you did not upload them for some reason, you can still add them through the HockeyApp portal if you want. But keep in mind that the debug symbols are linked to this specific set of source code files and binaries. So, you cannot upload debug symbols from another build. For iOS, you should upload the .dSYM file, for Android the mappings.txt file, and UWP uses the .pdb files. You can also include them through a minimatch pattern.
With Native Library File Path , you can also publish native libraries that you might have used. This is some advanced stuff, and I have not needed it to date, so I will skip over this one for now.
The next two fields have to do with release notes. To let your users know what has changed since the last time, you can use release notes to inform them. You can do this either by including a text file and entering the path in the first box or by providing text that you supply in the second box. Ideally, in the latter case, you would do it through a variable or get them from somewhere, instead of doing it manually, which kind of defeats the purpose of automating all this. The easiest way to do this is to include a file in your project, which you edit with the newest information. When using a file, a minimatch pattern is allowed. When using a file, separate the release notes for each platform. Although you are working on a Xamarin app and most of the code should be shared, you will reach a point where you have fixed something for one platform and not the other. This way, you can ensure that each platform has its own useful release notes.
Note
When both the file path to the release notes and the text box with the release notes are filled, the file with the release notes will take precedence over the entered text.
Below the release notes you’ll see a few check boxes.
Publish: This allows this version to be downloaded right away. You could also upload a new version and not allow people to download it by not publishing it. This comes in handy, for instance, when you want to release it at a certain point in time later.
Mandatory: You can mark this version as mandatory. The user cannot use an older version anymore; users are forced to update to this version in order to continue using it.
Notify Users: With this you can determine whether you want to notify your users by e-mail that a new version is available. If it is only a minor upgrade, you might want to choose not to spam your users and let them find out for themselves. If it is an important update, you might want to notify them.
Lastly there is the Strategy box . Whenever you upload a version with the same build number, this setting decides what to do. Do you want to replace the version available on HockeyApp , or do you want to ignore the duplicate build number and just deploy it to HockeyApp as a new release? Both options have some pros and cons. When reporting test results, it can be useful to know the build number, so when you have duplicates, you still do not know which exact version the user is talking about. The same goes for replacing the build: how do you know the user has the new or old version with this build number? If you ask me, I say you should try to avoid duplicate build numbers altogether.
The other fields will be described in the next section about deploying to specific users or groups.
You can give the environment a useful name by clicking the environment label. For now, I will stick with HockeyApp. One thing that is different from build definitions is how you name your definition. Build definitions allow you to (re)name it when you save it; for release definitions a name is already suggested. Change it to something meaningful by clicking the pencil behind the current name above the release tasks. Now save the definition and you are ready to release! In Figure 8-5 you see the filled-in HockeyApp task with all the information I have described. In my case, I have configured the Android release.
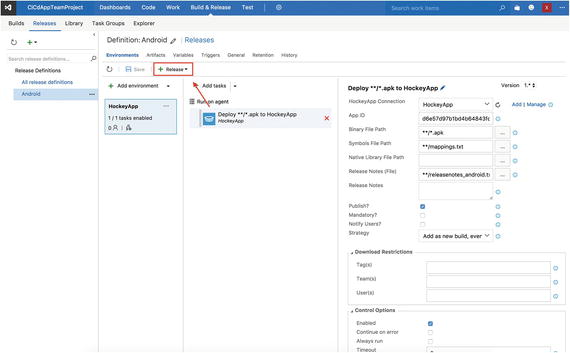
Figure 8-5. Your first release definition , ready to go
To create a release and see whether everything is configured correctly, click the Release button marked by the arrow in Figure 8-5. You have the option here to either create a release right now or create a draft release. You want to release right now, so choose the first option. In the pop-up screen that comes up, you need to configure some things. This is needed because you are triggering this release manually. If it was triggered automatically, VSTS would know everything that is needed in this form and would create a release for you. You will learn how to do this later on in this chapter.
Figure 8-6 shows the pop-up that appears. The only thing you really need to configure here is which artifacts are linked to this release. As you learned earlier, a release definition is always linked to a build definition. Because of this link, you can easily select a build number representing these artifacts from the drop-down. Again, when this release is triggered automatically by a build definition, it is apparent that the artifacts from that build are the ones to use for a release, so this will not be necessary. Choose a build from the drop-down (preferably the last one) and click the Create button. After you do, a small bar will be shown that lets you know the release has been created. You can click its name to navigate right to it or find it on the release’s overview screen.

Figure 8-6. Triggering a manual release
On the screen of the current deployment for this release, you can follow the progress. You will see a list of environments (only one in your case right now), and behind that is a small status box. It will go from Not Deployed to In Progress to Succeeded. If something should go wrong, the status will change to Failed, and the screen will show what went wrong below the environments.
In addition, there is some more information such as which work items are related, when a release was triggered and completed, and so on. You can see a deployment in progress in Figure 8-7.

Figure 8-7. Deployment to HockeyApp in progress
Tip
Your deployment might fail if the release notes file and/or debug symbols files are not found. Even while they are not mandatory to supply, when you do fill in these files, the files must exist.
After the deploy succeeds, you can go to HockeyApp, and in the app dashboard you should now see the version that you have just deployed. Congratulations, you have just created your first automated release!
You will look at the HockeyApp side of this release later in this chapter; for now let’s go back to the release definition and look at some more configuration in-depth.
Just like the build definitions, release definitions have several sections. They are actually quite similar. If you look at Figure 8-8, under the definition name and above the configuration part of the screen, you’ll see the sections Environments, Artifacts, Variables, and so on.
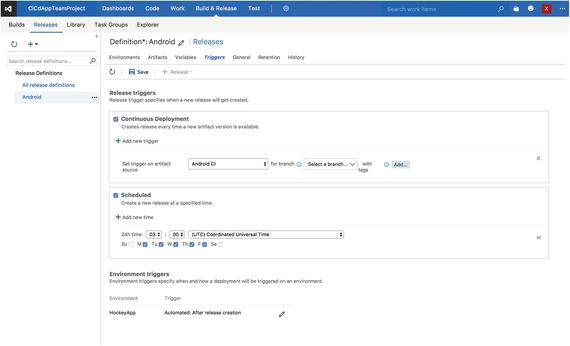
Figure 8-8. Triggers in a release definition
I will not discuss all of them in detail, but I will give a brief description of each.
Environments: This is the part that you have already handled. Here you can configure everything that has to do with how the release flows through different environments.
Artifacts : Here you can configure to which build definition this release is linked to. For more advanced scenarios, you can link multiple build outputs to one release and work with them.
Variables : In this section, you can configure variables, just like the ones in build definitions. There is, however, one addition. Here you can make use of variable groups. These groups are nothing more than a container for a set of variables. For instance, if you use variables specific to your HockeyApp account, you can create a variable group, configure all the variables there, and link the group to multiple releases. That way, you do not have to duplicate variables and their values. Note that variable groups work only within one team project .
Triggers: Figure 8-8 shows this section. Again, this is similar to the build definition triggers. The scheduled trigger is identical. The Continuous Deployment trigger creates a trigger that links directly to a build definition. Whenever a build definition is triggered (either through a schedule or through a continuous integration trigger), this release will be triggered right after that. You can fine-tune it a bit more by selecting a branch and/or tags that the trigger should respond to.
General: Under the General section there is just one setting: the name that is given to a release. By default the format is Release-$(rev:r), which literally spells out the word Release- and postfixes it with an incrementing number, which is the revision. You can change it to whatever you like and use (built-in) variables.
Retention: With the settings under Retention you can influence how long the artifacts for this release are saved.
History: Lastly, on the History tab you can see who made which changes in this release definition when. This is an audit log of every change that is made in this definition.
Most of these sections and settings are self-explanatory or you have already learned about them in previous chapters about build definitions. In the next section, you will look at how to add multiple environments and build an approval structure so users can roll out the release to different environments.
Building a Chain of Command Between Environments
Let’s go back to the release definition and into the Environments section. Earlier, when you configured the environment, one environment was already there. Now you are going to add a new environment by clicking the “Add environment” button above the list of environments. When you do, there are two choices : clone the selected environment or create a new one. With the first option, an exact copy is made with a new name, while the second option gives you the option to select another template to start from, which you can then configure from scratch. For the sake of speed, let’s clone the one you have already.
In either case, you are presented with a screen where you can configure some options already. These options have to do with predeployment approval and the trigger. Just keep the default settings and finish the process. You should now have two environments with identical configurations, only their names are HockeyApp and Copy of HockeyApp. You can rename them if you want, but you will look at how to name them with more meaningful names in the next section of this chapter when you are going to deploy to specific users and groups.
When you take a look at the squares that represent your environments, you will notice three dots in the upper-right corner, next to the name of the environment. When you click the dots , a context menu appears and presents you with a couple of options. Clicking the first option, “Assign approvers,” presents you with a pop-up screen, as shown in Figure 8-9. In the pop-up screen , you can also reach the sections for the other options in the context menu.
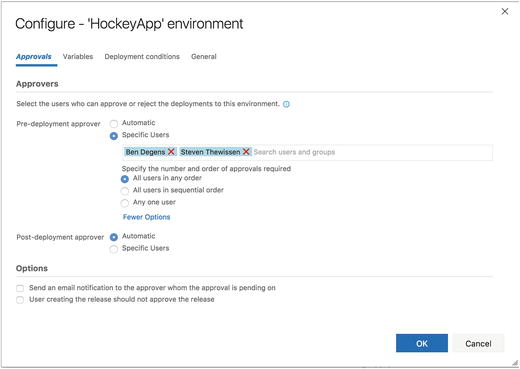
Figure 8-9. Configuring approvals for your environment
The first tab of this screen is where you can configure the approvals. While the configuration is easy, it is very powerful. The default configuration is to approve a deploy to the selected environment automatically. This means that a deploy is automatically executed on this environment, and when it is successfully done, it will also be automatically be approved and repeated on the next environment if there is one.
However, if you want to have some approval or chain of command in place, you can do so. In either the pre- or post-deployment, you can select the radio button for specific users. When you do, you can add one or multiple users (these users must be in your VSTS account and the current team project).
After adding the users, you give them some more control over how the approval process should go. You can select whether it is enough that one of the users needs to approve and whoever is fastest wins. The other options specify that all users must approve. The nuance in this is that they can do it in any order, or it can be in the specific order that you put the users in the text box.
In my case, all users must approve in any order, but Ben and Steven both have to give their go-ahead on this.
You can create numerous scenarios. Imagine that you work at a company with dedicated testers. With this functionality, you can create a first environment that sends the app to HockeyApp and in that group are the developers. Deploying could be done automatically triggered from an integration build on the main branch. With this a new test version is released, and the developers (or a specific subset) get it first to see whether anything is wrong. But then it halts. In the post-deployment (or pre-deployment of the next environment), one or more developers have to approve. When they do, the deployment is repeated, but this time it will be made available to the testers. They can run their scripts, do everything to make sure that the quality of your app is still guaranteed, and then give their approval as well. Another environment could be to deploy it to an actual app store. This way, the developer does not have to remember to prepare a (separate) release.
At the bottom, there are some more options; one is for notifying the people that the approval is dependent upon by e-mail. The other option says that the user creating the release (or, the user triggering the release by doing a commit, etc.) cannot be an approver as well. With this, you can guarantee that other people have looked at this new release as well. By enabling this option, you prevent that one stubborn developer who thinks he can do it all by himself from pushing out a release by himself.
Since the concept of variables has been handled already, I will skip that for this screen. Also, the General section has options that are easy to understand, so lastly I will show you what configuration is available on the “Deployment conditions” tab. Figure 8-10 shows this screen.

Figure 8-10. Configuring deployment options
In this screen, you can configure conditions that must be met before a release will commence. With the trigger condition, you can specify whether a release is triggered automatically. If it is, you can schedule it or let it run after a successful deployment to the previous environment.
Under Options, you can determine the behavior when multiple releases are running at the same time. You can have them deployed simultaneously or consecutively, or you can take only the most recent release and deploy that one.
Note
All these options are tied together. Before you start setting up different environments and releases, create a plan on when and how you want to release versions and who should approve of them. VSTS does a good job of guiding you through the different options and warning you of any implications, but it is still good to know what you are doing.
When a release is triggered, you will see the different environments that are in your release definition. Figure 8-11 shows this status.
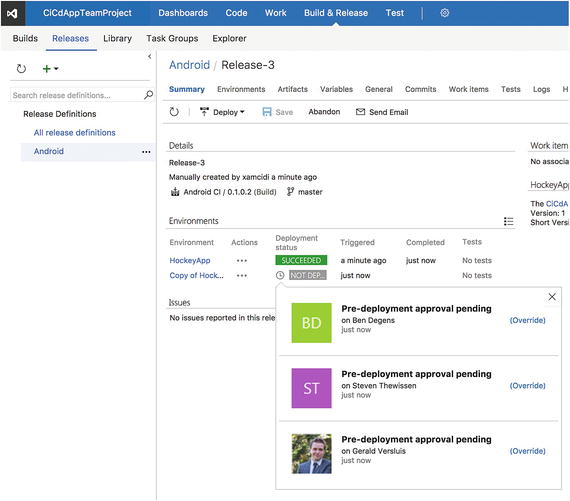
Figure 8-11. Awaiting approval for release to the next environment
If one of these users logged in under their account (I am logged in under another account in this screenshot), they would have the ability to approve or deny this release right here. Depending on the configuration, they would also have had an e-mail message notifying them that action is required. Approval can also be done directly from that e-mail and several other places that indicates the status of this release.
When approving a release, you can defer the release to the next environment , and you can specify a date and time in the future. At this date and time the next step in this release will commence.
When all conditions are met, the process is repeated for that environment with the same artifacts as before.
All this time I have been talking about approving the version, but what happens when you reject one? Nothing exciting I’m afraid. You can reject a release and add some comments as to why you came to that decision. If someone has set an alert on this action, they will be notified, but it is recommended that you as the person with the authority to reject actually take the action for a follow-up. Create one or more work items to fix the issues that you were experiencing and wait for another release to come along.
Deployment to Specific Users or Groups
One scenario that fits perfectly into the multiple environments functionality is to bring your app to specific users each time. That is something that can easily be done with HockeyApp.
As I described earlier in this chapter, you might want to identify different groups to which you can add users. For instance, for projects I am working on, I mostly create three groups : developers, testers, and management. When a version is released, first it goes to the developers. This is just a sanity check, making sure the build still works when the code is signed and running on a physical device. When everything seems all right and the approval process has been satisfied, it rolls out to the testers.
They unleash their scripts and regression tests, and if everything is to their satisfaction, they approve this version and let it flow through to management. Of course, if a version is not approved, it will be rejected, rework will commence, and the whole process starts over.
To learn how you do this, let’s take a look at the HockeyApp dashboard, as shown in Figure 8-12.
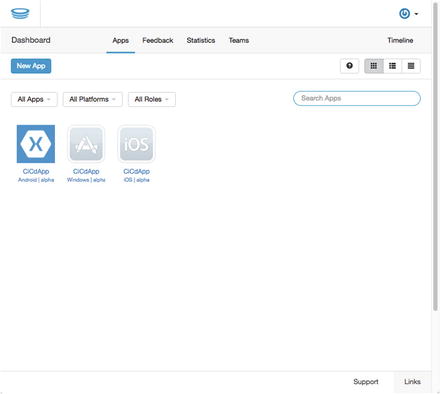
Figure 8-12. HockeyApp dashboard with your apps
In the upper bar, you can see a couple of options: Apps, Feedback, Statistics, and Teams. It is the last one that you are interested in. When you click Teams for the first time, you will get some introduction text about how you can use this feature. That is exactly what you are going to find out!
Also on this screen is a button you can click to create a new team, as shown in Figure 8-13. A team is nothing more than a name and the users who belong to it. So, name your teams appropriately; in my case I start with the developers . If you have users to put in this group right now, you can invite them by entering their e-mail addresses in the right box and pressing the Enter key.

Figure 8-13. Creating a new team in HockeyApp
From here there are two possibilities: you add a new user or you add an existing user who is already known in your HockeyApp account. For the latter group, nothing much will happen, except that they are added to this group.
New users need to create a HockeyApp account, so they will receive an e-mail message no matter what. You can choose to send the same message to existing users as well, to let them know they are now in the new group. You can also add a personal message, but this is not required.
After each user you can specify the role that user should have. These roles were discussed in Chapter 7. There is, however, one more role available here: Manager. This role can do everything a Developer can but can also manage teams.
The last thing you can configure here are tags. A tag is just another way to categorize users. Tags can be created by just typing some text in the input box. Whenever you type a comma or space, your tag is created. When your tag is already in the system, it will be presented to you by a suggestion box. Later you can specify users by their tags. Personally, I haven’t used tags a lot. But if you can find a use for them, go right ahead!
Note
The user creating the group is automatically added as a Manager and cannot leave the group. Consequently, he or she will receive notifications about all releases to each group, which can become a lot. You can change this in your account settings, but you cannot leave the group or change your role.
When the team is created, you will be brought back to the overview page of all teams, where your newly created team should now be visible. If you want to make the rest of the teams now, go right ahead.
After you create all the teams you want, you need to gather the team ID . To get it, navigate to a team and look at the URL. It should look something like this: https://rink.hockeyapp.net/manage/teams/90168/edit . As you may have guessed, the number in this URL is the ID for this team. Gather all the IDs of all the teams you want to use for your releases. These IDs are used to uniquely identify them. By entering the ID in VSTS, you create a link to this particular group. This way, VSTS knows to which group the new app version must be made.
While you are here, go to the Apps section for a group. You need to link one or more apps to one group. If you do not do this, the users cannot download it. Make sure you check all the apps that you want to associate to this group of people.
Now, you go back to VSTS and into your release definition. Select the first environment and after that the HockeyApp task. There is a section in the configuration that you did not handle yet, when you were here before. You can see it in Figure 8-14.

Figure 8-14. Configuration for tags, users, and teams in HockeyApp
With the knowledge you now have, you know what you can do with these fields. For the teams and users, you need the IDs of those entities. Getting the user ID is roughly the same as getting a team ID; navigate to a user and find the ID in the URL.
You can configure multiple users or groups by separating them with comma, for example, 1234, 5678, 90168.
For tags, it works the same, only you input the tags as they are.
You can enter values in each of the fields, but when you do, please note that only users who meet all the criteria are targeted. For each environment, you can enter the users or groups that you want to target for that version. Combined with setting who can approve these releases within VSTS, this makes for a flexible and powerful system to deliver your versions to your users.
To make things a bit more transparent, you can now rename your environments and have them reflect the user group that the environment targets along with the platform it is released to.
Release to the App Store
The ultimate goal is to release the app to the respective platform’s app store. This is something that is not supported by default. Luckily, the VSTS marketplace comes to the rescue!
Just like you did for HockeyApp, find these extensions in the marketplace and add them to your account: Windows Store Automation, Apple App Store, and Google Play. There are some variations available, but they should all work similarly. I will now show you how to configure the task for each store. Since I have been releasing the Android app up until now, I will start with configuring the Google Play Store. However, I will not explain how to set up release definitions in detail because they are all the same except for a few details.
Google Play Store
In the release definition you have used so far, I will add one last environment, which will release the app to the Google Play Store. In this environment, I will add the task that you just installed from the marketplace, and immediately you will see some red fields coming up, indicating you have some work to do, as shown in Figure 8-15.
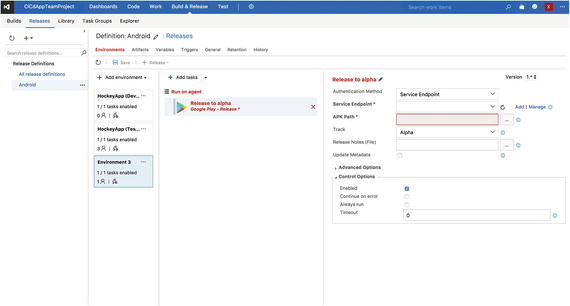
Figure 8-15. Configuring the release task for Google Play Store
Just like you had to do for HockeyApp, you need to set up a service endpoint for the Google Play Store. Before you do this, you need to go into your Google Developer Console account and set up an API key .
So, head over to the Developer Console on https://play.google.com/apps/publish/ . Log into your account and find the Settings tab in the left menu. In the screen that now appears, select API access, and a screen like Figure 8-16 should be visible. There is some information on security that you need to consider, so read it carefully and make sure you are understanding what you are doing.

Figure 8-16. Creating a API key for your Google Play Store account
You now need to create a project on the Google Developer Console . You can do this automatically by clicking the “Create new project” button. After a bit of processing, there should be a linked project available.
On the same page, near the bottom, a service account will be listed. These accounts are ideal to communicate on behalf of an application or system rather than an end user. First, click the View in Google Developer Console link after the entry, which will take you to a new page, as shown in Figure 8-17.
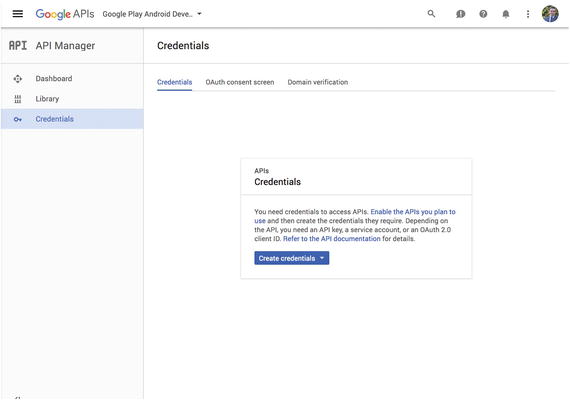
Figure 8-17. Generating the API key credential
Click the “Create credentials” button and choose “Service account key” from the drop-down menu that appears. On the next screen, select the service account from the drop-down menu (there should be only one), make sure the Key type is set to JSON , and click the Create button. A JSON file will be downloaded, which contains the private key you can use to connect to the Google Play Developer Console .
Back in the API access settings, click the “Grant access” button and make sure the role is set to Release Manager . Save these settings, and you are good to go.
The last thing you need to do is create the app entry in your Google Play account. Go back to the “All applications” tab and click the “Add new application” button. This process should be self-explanatory, and you probably have created some apps before, so I will not go through this in detail. Most important is that the package identifier (the reversed domain, for example com.yourdomain.app) corresponds with the one you configured in your AndroidManifest.xml file. That is the way the .apk file is linked to the app entry in the Google Play Developer Console. The downside is that you need to upload at least one .apk file with the same package identifier to this app entry; there is no way to preconfigure the package identifier other than to upload an .apk file. To be clear, it is not possible to provide the first version this way.
With all the prerequisites covered, let’s go back to VSTS and finish the configuration there. Right behind the Service Endpoint field click the Add button. In the pop-up that comes up you can configure the endpoint right away. Enter a descriptive name and open the downloaded JSON file . In the file, find the values behind private_key and client_e-mail. Fill out the e-mail field with the value from client_e-mail and the private key in the other field. Make sure you do not copy the quotes, but do copy everything from beginning to end in case of the key. For an example, see Figure 8-18. Save the configuration, and that is that.
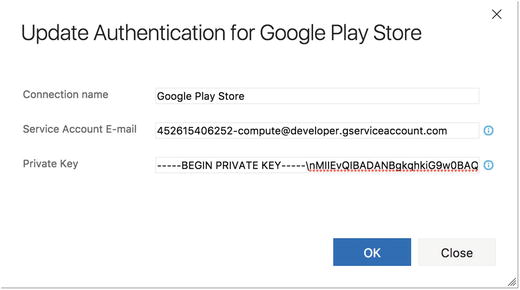
Figure 8-18. Sample service endpoint configuration for Google Play
Tip
You can use the downloaded JSON file as an authentication method. In that case, check in the file as part of your repository, and point the configuration of the Google Play task to that file.
The next thing you need to configure is the path to the .apk file. Like with all the other boxes to supply files , you can work with variables and minimatch patterns, so make sure you enter a path that points to your signed and zipaligned .apk file.
The last important thing here is the Track field. In the Google Play Store, you have multiple tracks: alpha, beta, production, and rollout (short for staged rollout). You can have different versions of your app in each track, so you can offer them to a certain set of users of your choosing. Basically, this functionality is the same as that of HockeyApp, so you can also choose to deploy to the Google Play Store immediately and let your users get their versions through there. I think alpha, beta, and production speak for themselves, but rollout needs a bit of explaining. With rollout, you can specify a percentage of your users (from 5 to 50 percent), which are then selected randomly to receive the new version you specify.
In Figure 8-19 you can see that I have added yet another environment. This one contains a task to promote my app in the Google Play account. This way, you do not have to upload the .apk file again, but you can promote the current .apk file from one track to another. The only thing you need is the package identifier in this case.
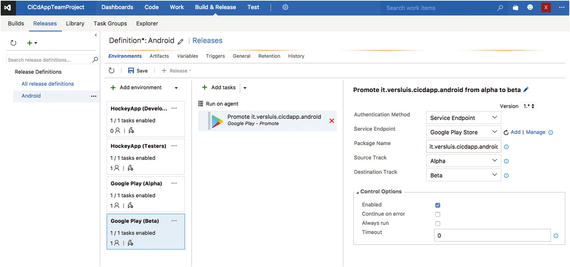
Figure 8-19. Finalizing the release definition for Android
If you save this and create a new release, you should be able to get your first version to the Google Play Store !
Of course, this is just one example of how to orchestrate it; there are limitless variations to think of yourself. How you set this up is up to you and the requirements you have.
Tip
The release task for Google also allows you to send the metadata along with the binary of the app. The metadata includes all the screenshots, store descriptions, and so on. This way you can also make this part of your repository and update it right from your IDE. For more information on how to do this, check out the documentation of the extension at https://marketplace.visualstudio.com/items?itemName=ms-vsclient.google-play .
Windows Store
For the Windows Store, I will repeat roughly the same process. The easiest way to get this up and running is to clone the previous release definition and just edit the app IDs, group IDs, and so on. The most important part when you clone a definition is to not forget to change the reference to the build definition under Artifacts.
The biggest change will happen, of course, when you get to the step where you are going to deploy to the Windows Store. If you have cloned the release definition, delete the task for that app store and add Publish to Windows Store instead. The result will look something like Figure 8-20.
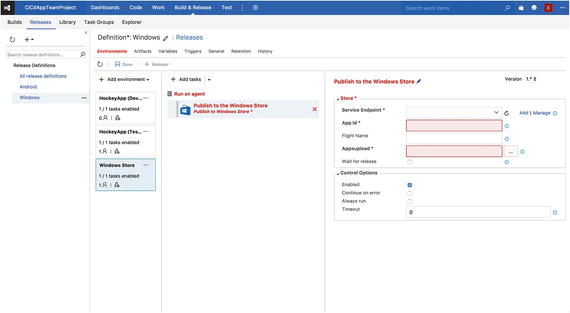
Figure 8-20. Adding the Windows Store task
The first thing you need to do is set up the service endpoint for this app store. To do this, you need to have your Windows Store Developer account backed by an Azure Active Directory (Azure AD) . This process can be started from the developer account dashboard. Log into it, go to the account settings, and continue to “Manage users.” Here you can link your account to any Azure AD you have already set up or create a new one right there. For more details on the how to do this, take a look at the documentation by Microsoft: https://docs.microsoft.com/en-us/windows/uwp/publish/manage-account-users .
When you have this set up, you need to get three things to create the service endpoint : a tenant ID, a client ID, and an API token. After you have associated the Azure AD, go back to the “Manage users” page and click Add Azure AD Applications. Follow the instructions on the screen and add the application that represents the app or service that you will use to access the app submissions, in this case VSTS. Make sure that you assign the Manager role to it.
Again, return to the “Manage users” page, click the name of the application that you have just added, and copy the fields in the Tenant ID and Client ID boxes. Finally, click the “Add new key” button and make note of the key that is presented to you. Take a good look; you will get to see it only once.
With this data, go back to VSTS, create the service endpoint, and make sure it is selected.
Just like for the Google Play Store, you cannot submit your first version of the app through VSTS. You need to have an entry in your developer account already. To do this, go into your account and on the dashboard click the “Create a new app” button. After you have completed the process, when you go into the app, you can see the app ID in the URL. It should look like this: https://developer.microsoft.com/en-us/dashboard/apps/PBF330VJ289 . Take this app ID and put that in the right field as well.
The last mandatory field is the Appxupload field , which needs to be the path (or minimatch pattern) to your binaries that need to get uploaded to the account.
Note the Flight Name field . A flight is Microsoft’s way of creating different tracks to deploy your app to only a specific set of users.
Tip
Just like for the Google Play Store task, you can provide the metadata along with the binaries of your UWP app. You can find more about how to do this and all the documentation for this task on the extension page at https://marketplace.visualstudio.com/items?itemName=MS-RDX-MRO.windows-store-publish .
Apple App Store
With two down, you just have one left, the Apple App Store. Contrary to some other Apple-related processes, this one is easy to implement.
Like before, clone another definition or create a new one. I will just clone a previous one, update the necessary HockeyApp IDs, and start replacing the actual app store task. Make sure you link it to the right artifacts when you clone the definition yourself. After adding the environment for it and adding the Apple App Store Release task, your screen should look similar to Figure 8-21.
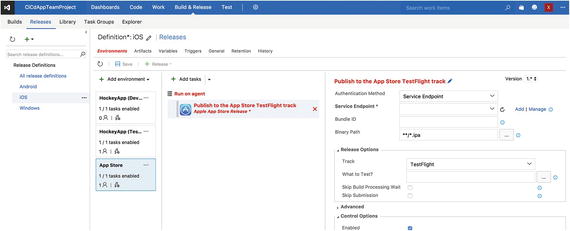
Figure 8-21. Configuring the Apple App Store Release task
You can choose to add another service endpoint or connect with your user name and password. However, configuring the endpoint just consists of your user name and password.
After creating and selecting the connection, there are a few routes to take. They depend on whether you want to deploy to TestFlight or production.
If you deploy to TestFlight , your configuration basically is done now. If you want, you can configure a file that contains text that is provided to the user on what to test. Of course, you should make sure that Binary Path contains a valid path or minimatch pattern that points to the .ipa file that is to be distributed. Just like the Google Play task, there is also a task to promote your version, but for the App Store just one promotion is possible: from TestFlight to production.
The other path is to deploy to production right away. To do this, set the Track field to Production. When you do, the Bundle ID field will become mandatory, although it will not appear that way in the UI. Make sure you fill it with the bundle ID that you have specified in your app (which is formatted like the reverse domain).
When switching to the production track, a number of new options appear. While none of them is required, there are some handy functionalities. Like the other stores, you will also have the ability to upload metadata and screenshots along with your binary file. There are also some switches to automatically submit the app for review and release it automatically after it is successfully reviewed. These are all options that should be familiar to you if you have released an app in the App Store before.
To read all about the abilities of this extension, check the documentation page: https://marketplace.visualstudio.com/items?itemName=ms-vsclient.app-store .
Before you can start uploading your version to the App Store, you need to register your app with the store . You can do this through your iTunes Connect account. To do this, log into your account and click the plus button. Fill out the form to create the necessary app record. You should already have created the App Bundle to create the required certificates for building your app in the first place, as described earlier in this book.
If you need any more help on this subject, check out the Apple documentation at https://developer.apple.com/library/content/documentation/LanguagesUtilities/Conceptual/iTunesConnect_Guide/Chapters/CreatingiTunesConnectRecord.html .
There is one last thing that is different from the other two release definitions when releasing to those app stores. Because Apple always uses some very specific techniques that are tied to Mac hardware, you need to run this release definition on the Mac build agent you installed in Chapter 2. Note that this is necessary only when you want to release to the App Store. If you just want to release to HockeyApp, you can use the hosted build agents.
If you have the Mac build agent already set up, it is not hard to let this definition run on it as well. In the column where you add the tasks to an environment, click the “Run on agent” link above the list of tasks. In the right pane, the configuration for the agent comes up. Make sure you set “Deployment queue” to the queue where the Mac agent resides. In my case, that is the Default queue. Reference Figure 8-22 to see how to set it.

Figure 8-22. Configuring the release definition to run on the Mac build agent
Note
At the time of this writing, two-factor authentication is not supported. If you want to use VSTS to deploy to the App Store , you must disable it.
Final Thoughts
With releasing your apps to the actual stores, your pipeline is complete. You should now have learned everything you need to set up a complete automated building and deployment system. How you want to set things up depends on you. Just be prepared; you will have a lot of trial and error ahead of you before you get it right.
Just try to start small. Go for one platform at first, make it build automatically, then deploy it to HockeyApp, and work from there. Start expanding your builds with tests and more platforms and then deploy to multiple environments and more users. In the beginning, it will feel like you do not gain much time from it, but as you go, you will get the hang of it. And remember, not only time is to gain here, but more important factors are stability and repeatability. Eliminating the human factor (which is more often than not the weakest link in automation systems) is also something you want—no more repetitive tasks and no more making the same mistake repeatedly when releasing an app.