In the previous chapter, you learned how to set up a build for each platform. You also already started with some more advanced topics such as signing your application. Now that you have seen how you can create a successful build with just the bare minimum, it is time to take a look at adding some more functionality.
In this chapter, you will learn how you can add versioning in the mix, run unit tests as part of your build definition, and customize the triggers for a build to meet your requirements. These steps are not absolutely necessary but are useful additions to your development pipeline.
Besides the build steps described in this chapter, there are a lot of others that are available and useful. Since there are numerous steps and developers can even now add their own, it is impossible to describe them all here. Also, no two development pipelines will be the same. It all comes down to the requirements you and your company have in regard to your app. Therefore, think of these as examples. After you have gotten these steps into your build definitions, you are probably good to go to figure out the rest by yourself.
Versioning
One of the things you certainly want to do is versioning because it is helpful to know which version someone is using when they provide you with feedback. That way, you create more traceability between your binaries and the code you have produced. This makes it easy to detect when a bug turns up which versions are affected. Also, making version numbers visible to end users can help them identify to you in which version a bug is found.
As you might expect, versioning is something that is platform-specific. Not only the file where you need to specify the version number differs, but it’s also important to know how the different platforms handle version numbers. Therefore, I will describe the concept of the version numbers per platform and then tell you how you can incorporate versioning into your build definitions. But before I do that, I will cover the part of versioning that all platforms have in common.
Preparations
One thing that all platforms have in common is that the version number is simply determined by a string in a file. In fact, that is a good thing because you can easily replace the value as part of your build definition. The best way to do so is by replacing the value with a regular expression.
There are multiple build steps available to help you with this. The one I will be using is Colin’s ALM Corner Build & Release Tools from Colin’s ALM Corner . This is a third-party extension not supported by Microsoft but is really good nonetheless. You will have to get this one from the marketplace, so go to the shopping bag icon in the upper right of the blue bar and simply search for it by name. Click the Install button to add this extension to your VSTS account. Depending on whether you are logged in, you can choose to install it directly. When you have multiple VSTS accounts you can access, you will first have to choose which account you would like to install it. Figure 4-1 shows you the installation screen for this extension.

Figure 4-1. Installing the new extension to your VSTS account
After you have successfully installed the extension, you are ready to implement the version numbers in your projects.
iOS
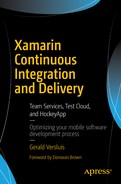
The version number of an iOS app is determined in the info.plist file . If you have never heard of this file before, this is the file that holds all the metadata for your iOS app. Strings to ask permission to sensors, whether your app can run on iPhones or iPads, and which iOS version to use are all specified in here. And, version numbers are specified here. Figure 4-2 shows a portion of the info.plist file, which shows the part about the version number.
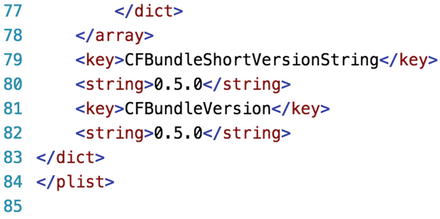
Figure 4-2. Specifying the version in the info.plist file
As you can see, Apple uses two fields to specify the version number. While they have an extensive and official definition, it comes down to this: CFBundleVersion is used for development builds, and the CFBundleShortVersionString value is used as the official version for release builds. There is also some difference in how the version number is formatted or what the numbers mean. For more information, please refer to the official Apple documentation at https://developer.apple.com/library/content/documentation/General/Reference/InfoPlistKeyReference/Articles/CoreFoundationKeys.html .
About the CFBundleShortVersionString key, Apples says the following:
The release version number is a string composed of three period-separated integers. The first integer represents a major revision to the app, such as a revision that implements new features or major changes. The second integer denotes a revision that implements less prominent features. The third integer represents a maintenance release revision.
For simplicity, you will keep the values in the CFBundleShortVersionString and CFBundleVersion fields equal.
To achieve this in VSTS, there are two things you need to do: specify a version number format in VSTS and replace the part (or parts) in the info.plist file. The first part is easy; go into your iOS app build definition, select the Options tab, and in the “Build number format” field you will find how the version number is determined with each build. It defaults to a format that is primarily based on today’s date. It can easily be replaced with 1.0$(rev:.r). This will result in a version number like 1.0.1 or 1.0.99. As you have learned, a field starting with a dollar sign is a variable. In this case, it is the revision number; with each build, this number is incremented. The part in front of the variable is a static value that is just inserted as is. Of course, if you are just starting with an app, you could start the version number with 0.1.0 to indicate it is a beta or even alpha version. You can compose it any way you want and use other built-in variables, as long as you make sure the resulting string consists of three positive integers separated by two periods. For my example app, I will start with 1.0.1.
You might wonder in which build definition you need to add this. Once again, that is totally up to you. Maybe you or your company already has some policy about versioning; then just try to follow that. If you do not, maybe it is time to start thinking about it.
My guideline is to use a unique version number for all versions that go to users who are not me. That means it isn’t necessary to implement this in your continuous integration build since that checks only if all builds and your tests still work. If your CI version does not build, you will know. You do not need a version number for that.
Once you are in the build definition, click the Add Task button, find the new step named Version Assemblies , and click Add. Figure 4-3 shows the result of adding it to your build definition. You can now start configuring it to work for your iOS build.
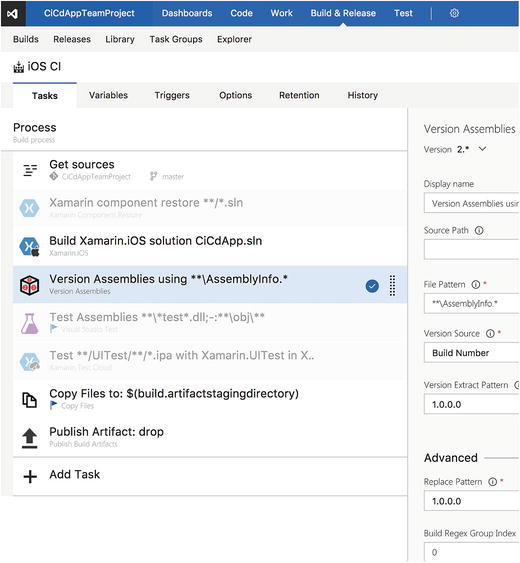
Figure 4-3. Version assemblies step added to the iOS build definition
The first input field wants to know where to search for the Info.plist file. You can enter the path directly or browse to it in your repository by clicking the browse button after the field. Find the root of your iOS project and select it. Note that the actual file is not to be selected here; only the containing folder or the folder that you want to use as the root should be selected.
In the File Pattern input box, you can specify the file or files to look for, relative from the root path you specified earlier. If you have selected the root of your iOS project, you can enter /Info.plist. Note that you can use minimatch to search for a file (or files) and that all fields are case-sensitive for non-Windows environments. Since you will build this on your Mac build agent, make sure you get the casing, as well as the slashes in the path, right. For Windows paths, the backslash should be used (); for Unix (and thus Mac) operating systems, the forward slash (/) should be used.
The last thing you need to configure is the pattern you want to search for in these files, in your case, the Info.plist. The pattern that you are going to search for is (?:d+.d+.)(d+). This translates into a search for any numbers in this file that are in a 1.1.1 format. The 1 can be substituted with any positive integer. So, make sure the value in the Info.plist file is set to a value like this. The actual value does not really matter as it is being replaced by this build step.
Figure 4-4 shows the final configuration for iOS in the case of my CiCdApp sample app.
Figure 4-4. Configuration to version the iOS app
Note
Between starting to write this book and finishing it, there has been an update to the Version Assemblies task. If you look at Figure 4-4 in the top-left corner you can see a flag icon and a version. Every task now has a version, and you get to choose which version of the task you want to use; the flag icon indicates a newer version is available. In this example, I am still using 1.* even though version 2.* is available. Version 2.* has some minor changes, such as some preconfigured regex patterns. The configuration as I am describing here is also still possible with version 2 of this task.
When you now trigger a new build, in the output you should see how many matches have been found for the regular expression and whether they have been successfully replaced.
The only downside to all this is that whenever you feel like something more major happened in your code, you have to go into your build definition and increase the version number manually. There is no real alternative to this since you cannot programmatically determine whether any major functional changes were made.
Android
For Android, the concept is about the same; however, the version number is now in a file called AndroidManifest.xml and it works slightly differently internally. Like Apple, Google uses two fields for the version number. There is a versionCode field, which is a positive integer that is to be incremented and can be evaluated by systems to determine whether one version is newer than another. There is also the versionName field. Typically, this is filled with a value like 1.0.1 as a version number. But it is a string value, so it could also be 2.1.0-alpha or a codename like Nougat or Marshmallow. The versionName field has no other purpose than to be displayed to the end user. Figure 4-5 shows how these fields are represented in the AndroidManifest.xml.

Figure 4-5. AndroidManifest.xml file showing the versionName and versionCode fields
Furthermore, Google says this about the version numbers for your Android app:
Typically, you would release the first version of your app with versionCode set to 1, then monotonically increase the value with each release, regardless whether the release constitutes a major or minor release. This means that the versionCode value does not necessarily have a strong resemblance to the app release version that is visible to the user (see versionName, below). Apps and publishing services should not display this version value to users.
Read more about the versioning of Android apps on the documentation page, which can be found at https://developer.android.com/studio/publish/versioning.html .
The way you are going to configure this is to just increment the versionCode field for each build by using the same revision variable that you used in your iOS builds. For the versionName field you will just use the major.minor version number notation.
Go into the Android build definition, click Add Task, and find the Version Assemblies step again. Please refer to Figure 4-3 to see what it should look like. In the first input field, start looking for the folder that contains the AndroidManifest.xml file in your Android project. In the second field, fill in the AndroidManifest.xml file name. Please note the casing because it is case-sensitive. Take a look at Figure 4-6 to see what my configuration looks like.

Figure 4-6. Configuring the versioning of your Android app
To finish the configuration here, you just need to specify the regular expression options to figure out what you want to replace. In Build Regex Pattern, enter this pattern: (?:d+.d+.d+.)(d+). As you can see, there are two sets of parentheses, meaning there are two groups in there. This effectively means you will break up the build number, which you will set in a moment, in two parts. This is exactly what you will work with on the Advanced tab.
In the Build Regex Group Index field, enter the value 1. This means you will be using the last part between parentheses as the value you are replacing with.
Furthermore, to ensure you replace the right part, you will specify it including a versionCode= prefix. So, in Regex Replace Pattern enter versionCode="d+. This will look for the versionCode attribute trailing with a positive integer value. This is going to be replaced with the revision part of your build number. Since you are including the versionCode=" prefix in the replace pattern, you also have to add it back in there. To do this, fill in versionCode=" in the Prefix for Replacements field.
The final thing to do here is set the build number format on the Options tab. Head over there and fill the “Build number format” field with a version number similar to 1.0.0$(rev:.r). If you match this to the pattern you saw earlier, you will see that the value in the revision variable is the value in the second part of the regular expression. This is the number that is incremented with each build, and this is the number you will use as the versionCode for your Android app.
The versionCode field will be left intact this way. So, here you can put in your own version number and manually increment every time you think a major change has been made. You can also add another regular expression step to have the value change with the VSTS build number accordingly. I will leave versionName as is and just increment the versionCode value. This will result in version numbers like 1.0 (4), where 1.0 is the value from versionName and 4 is from versionCode.
UWP
Like in other areas, the UWP app is a bit easier than the other ones. The version number for UWP apps consists of four positive integer numbers separated by periods. Microsoft specifies the following about the UWP version number on its web site:
Each package you provide must have a version number (provided as a value in the Version attribute of the Package/Identity element in the app manifest). The Windows Store enforces certain rules related to version numbers, which work somewhat differently in different OS versions.
There are some different rules for Windows 8/8.1 apps, but I will focus on just the requirements for Windows 10 apps. It is important to note up front that the last digit must be 0 because it is reserved for the Windows Store. For all information on the versioning of Windows apps, please refer to the documentation on the Microsoft web site at https://msdn.microsoft.com/en-us/windows/uwp/publish/package-version-numbering .
The version number is stored in the Package.appxmanifest file, in an attribute that is called simply Version, specified in the Identity node. Figure 4-7 shows the content of the manifest file with the Version field.
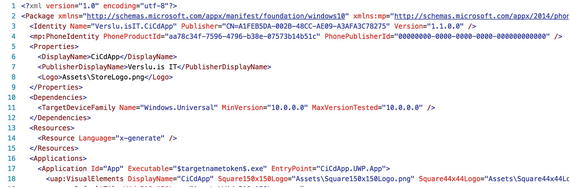
Figure 4-7. Version field in the Package.appxmanifest file
To make sure you can replace the value in this field, you need to enter a version number with four digits, in example, 1.0.0.0. This can be done either directly in the file or from the editor when you double-click the file from within Visual Studio.
When you have checked in this file, you will go to VSTS and add the Version Assembly step to your Windows build definition. The process is similar to the Android app. In Source Path, navigate to the folder where Package.appxmanifest is located and in the field named File Pattern enter the file name. The regular expression you will use is d+.d+.d+.d+, in which you can recognize the four-positive integer pattern separated by dots. Lastly, go into the Advanced tab and set Regex Replace Pattern to Version="d+.d+.d+.d+. This makes sure you only replace the value that is directly after the Version= prefix. To make sure the value that you are replacing it with will produce a valid XML attribute, make sure Prefix for Replacements is filled with Version=".
Figure 4-8 shows this configuration.
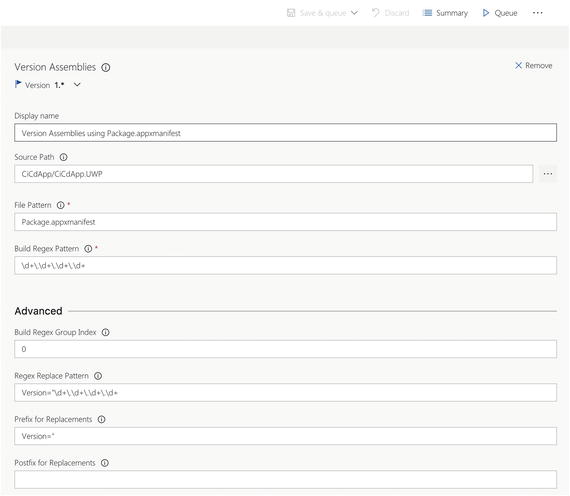
Figure 4-8. Configuring the versioning of your UWP app
Now head over to the Options tab and fix the build number format. Set it to 1.0$(rev:.r).0. As you have learned, this results in a version where the third decimal is the one that is incremented automatically. As you may recall from the start of this paragraph, the last number must be a 0, as determined by Microsoft.
Save all the new settings, and when you now trigger a build for your Windows app, it will result in a correctly versioned app.
Different Types of Build Definitions
Throughout this book I will use just one build definition, which is the continuous integration (CI) one. Like I have mentioned, there is no one right way of composing a build definition. It is all a matter of your own (or your company’s) requirements. It is totally up to you which components you specify in one definition or what you do or do not as a whole.
However, here are a few pointers:
Keep your build times as short as possible: One of the big advantages of automated building is that you get feedback as early as possible. You will know in a matter of seconds (a few minutes at most) if something is wrong and needs to be fixed. This becomes even more important when working on one project with multiple people; when a build fails, other people cannot commit code until it is fixed.
Break up build definitions by responsibility: This supports the previous point. If you try to do everything in one build definition—building, testing, uploading artifacts—the feedback cycle grows larger. Especially Test Cloud runs can become lengthy if you choose popular devices or your tests become more extensive. Lastly, sometimes it is just impossible to do everything from one build. As you will learn in the next chapter, Test Cloud can require a special build that would not be accepted by the iOS App Store. For that reason alone, you need separate build definitions.
Note
When you go with separate build definitions, you probably want to have some kind of dependency between them. When build A fails, B should not be able to start, for instance. At the time of writing, this kind of behavior is not supported in VSTS. There is a ticket for it on the VSTS UserVoice ( https://visualstudio.uservoice.com/forums/330519-team-services/suggestions/2165043-provide-build-configuration-dependencies-in-tfs-bu ), but there is no ETA for when it will be fixed.
Start small: As I’ve mentioned, it will take a few tries before you get your project to build the first time, especially when you are applying it to an already existing project. In itself that already proves the usefulness of continuous builds; you will immediately come across some stuff that makes it hard to build the project on another machine than your own. That is not something you want. Ideally, your code can be pulled down from the repository and buildable from the very first moment. After you get the hang of it, try to expand with the next step and the next. After that, start breaking up your different build definitions.
Do not release every version: The fact that you can do continuous delivery does not mean that you must do it every time. When I just started with all this, I thought, “This is awesome; I get a testable version of every change I make.” And so it happened: I created my build definition and started working. Down the road, two colleagues joined my and started committing code as well. With the build definitions still in place, I now got 10 to 15 versions every day, with every tiny fix that was committed. Needless to say, that was not what I intended to do.
Use the Clean option: In VSTS there is the option to clean your working folder before a build commences. With this option the source/binaries are removed first. By enabling this option, you make sure that no files are left behind, making the build possible only on that machine. When you are using hosted build agents, the necessity for this option is not that high, as the whole machine is cleaned for you. By having a clean machine every time, you are ensured that you do not have any dependencies on something that exists only locally.
Typically, you want to have these build definitions with their respective triggers:
Continuous integration: This is one you always want. It does not have to do with anything more than just building the code and reporting if it worked. You can also include unit testing in this definition, as long as the tests do not take too long. The trigger for this build should be whenever code is committed, in every branch.
Test: When your tests take longer (like Test Cloud tests), put them in a separate definition. You can have it triggered, for example, every night or let it be triggered by another build. Being triggered by another build is not something that is supported by default, but there are extensions for this available in the marketplace.
Distribute: This definition is just for getting out test versions. Not only does this build a binary, it will also deliver artifacts, which will result in a distributable version. When working with Git, you could work with the branch filters to let this definition get fired only when something is committed to the master branch. You will learn how to do this in the next section of this chapter.
I will cover this in more depth in Chapter 10.
Triggers
I mentioned triggers a little earlier, but I will cover them in a bit more detail here. If you go to the Triggers tab within a build definition, you will see that you have basically two options: Continuous Integration and Scheduled. As you probably know by now, the first will trigger a build every time you commit code, and the second will trigger a build at a set time (or times). There is, however, a third option, which is not visible here or in the user interface. A trigger can also be called by the VSTS REST API. With the API, you can trigger a build yourself programmatically or with a third-party system. This can also be referred to as a web hook, which describes the concept of triggering an action with a POST request to a certain endpoint.
In this case, a POST request to the VSTS servers holding information on the build that you want to trigger, is all that is needed. A use case for this might be that you want to use a GitHub repository but want to use the build capabilities of VSTS. In this case, you can use an API call to notify VSTS of the fact that code has been committed to the GitHub repository, thus triggering a build with the new source code.
Continuous Integration
Let’s take a closer look at the continuous build trigger. In Figure 4-9 you see the screen that is used to configure the continuous trigger.
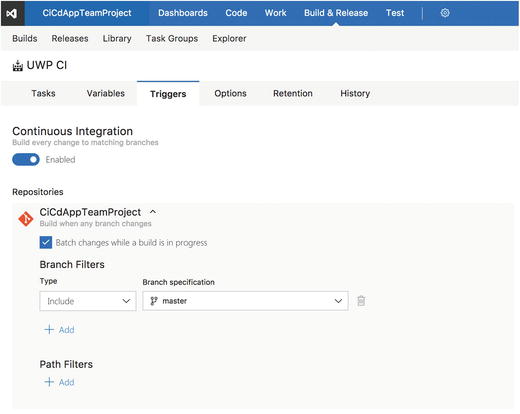
Figure 4-9. Continuous integration trigger configuration
I will walk you through the available options here, from top to bottom. With the “Batch changes” check box, you can do just that. When you have a large team that commits a lot of changes, this check box changes the build’s behavior a bit. When a build is running, no new build will be queued until it is done, disregarding the outcome. This means all the changes by you or your team made while a build was in progress will be batched, and a new build with all those changes will be triggered only when the previous build is done. If this check box is unchecked, new builds will just be queued with each change that comes in, and they will all be handled in the order they came in.
The most important part is in the bottom part of the screen. Here you can select branches (in case of Git) and folders that are to be included or excluded for this trigger. The branch filter option should be straightforward. You can specify branches that should or should not be monitored for this build definition. So, imagine you have a build definition that builds a beta version. And, you are working with feature branches. You probably want to exclude these since you are still working on them, but you want to include the main branch. Whenever you commit something to a feature branch, nothing happens, at least not with this build definition. But when you commit to the main branch, it will build your code and produce a beta version. Please note this is true for this build definition. For your continuous integration definition, you could include all branches.
Also, to exclude—or include, of course—you can use wildcards. If you want to exclude all feature branches, you can just specify to exclude feature-*, and all the branches with that prefix will be excluded.
The path filter does the same but for folders. Here you can specify whether certain folders—within the branches you have selected above it—are to be excluded or included. Let’s go back to the previous example. When you do commit something to the main branch but it is in a folder that contains the back-end API project, you do not want to trigger a build. But if you are committing code to a shared library project, you do want to trigger a build.
With these filters, you gain fine-grained control over whether a build should be triggered or not and ultimately the build results in a distributed version .
Scheduled
Another possibility to trigger a build is doing it at a scheduled time . Figure 4-10 shows the options for scheduled triggers.
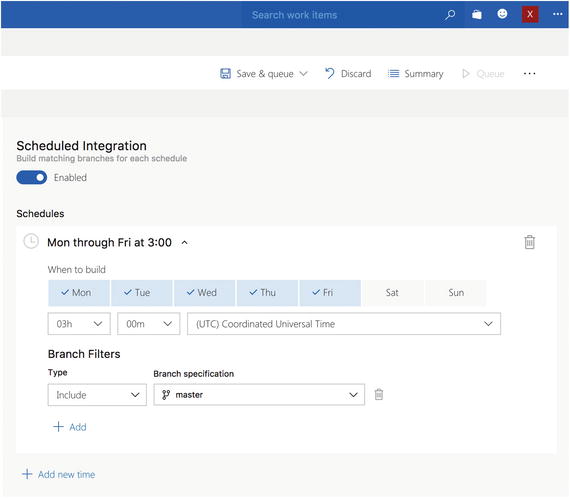
Figure 4-10. Scheduled trigger configuration
One recurring schedule is already configured for you. On all workdays a build is being triggered at 03:00 UTC. You can customize this to trigger it on only the days you want at a specific time. You can also create multiple schedules. For instance, if you want to trigger a build for your local team only on Mondays at night, you create a trigger and select just Monday at the time you want with your local time zone. But maybe you have a team working in another country in another time zone, so you add another trigger in their time zone, also at night but now for Friday. It is all up to you!
Just one thing to note: you can filter branches here, but the filters you specify will be evaluated for all the time triggers you specify earlier. So, you cannot have one trigger with a specific filter and have a second trigger with another filter.
One thing you might have noticed in the figures is that the continuous and scheduled triggers both have check boxes. This means you can have them both configured at the same time. Also, please note that the settings for one trigger do not affect the other one.
VSTS REST-API
The final way of triggering a build is through the VSTS REST-API. A lot of source control services (for instance, GitHub) have functionality to create an API call for you. In the specific case of GitHub, it even has deeper integration, and you can also see the build result status directly for your GitHub repository. However, these API endpoints can be called by any piece of code or program.
Because this book is more about the actual builds and distribution, calling the API is beyond the scope of this book. If you want more information on this, you can refer to the documentation at https://www.visualstudio.com/docs/integrate/get-started/rest/basics .
Final Thoughts
In this chapter, you took a deep dive into build definitions. Besides just building your code, you also learned how you can version the assemblies that you produce. Especially in an enterprise environment where you deliver your apps to a group of testers, having a good versioning system in place is crucial since the testers will want to report on it.
Furthermore, you looked at how you can trigger builds and fine-tune those triggers. By composing the right filters, you prevent unnecessary builds and versions that might not contain the code you want.
The number of tasks that apply to mobile apps is still (relatively) limited, but there are of course some other useful use cases that I can think of, one of which is the use of SonarQube. SonarQube can assist you with measuring the quality of your code in many ways. Or you might want to incorporate your ReSharper coding standards to see how everyone is doing with those.
Before I go into the release management part of VSTS, you will first look at Xamarin Test Cloud. In the next chapter, you will learn what Test Cloud is, how you can benefit from it, and how to add it to your builds.