Before getting your hands on all the goods, there are some logistics you have to take care of first. You will need Visual Studio Team Services (VSTS), which is where all of your processes will start from. VSTS also consolidates your results into one convenient and clear overview for you.
If you already have a VSTS account, you can use that one. If you do not have one, you will find out how to set one up in this chapter. While some other accounts may be necessary, you will set them up in later chapters when necessary.
Setting Up a Visual Studio Team Services Account
To set up a VSTS account, you will need a Microsoft account. Creating one is beyond the scope of this book but should be pretty straightforward. Visit https://www.microsoft.com/account to get one. You should just have to click through a few screens, entering your information, like you would expect from any Microsoft product.
Once you have a Microsoft account, go to https://www.visualstudio.com/team-services/ . If you want to see for yourself what VSTS has to offer, you can scroll through all the information there. But what you are after is the button in the top right called Free Account .
Like I promised, the account is absolutely free, which is pretty amazing once you find out what it has to offer you. Of course, free always means free to some extent.” There are limits. For instance, you can invite up to five people to work with you on one account, so when your team grows to more than that, you will be charged for each user you want to add.
Note that if you or the person you want to add to your account is lucky enough to have a (company) Microsoft Software Developer Network (MSDN ) subscription, that user will not count toward the limit of five. Therefore, if your company has a Microsoft partnership with an accompanying MSDN subscription, you can probably use VSTS without worrying about the user limit.
Further, there are some other limits that have to do with the computing minutes you can spend on load testing and hosted, automatic building. For more information about this, refer to the information available at https://www.visualstudio.com/team-services/pricing/ .
At the time of this writing, paid accounts start at $30 per month, which gives you ten users on your account. This, however, does not remove the limit for shared services such as build agents, and so on. These can be purchased separately, and prices per month could rise very quickly. However, since I’ve been using VSTS, I have not had a need for a paid account.
Let’s get back to creating your account. In Figure 2-1 you see what the web site looks like at the time of this writing. Web sites do tend to change from time to time, so what you see might differ from Figure 2-1, specifically, the position of the Free Account button .

Figure 2-1. Visual Studio Team Services web site, where you can sign up for an account
After clicking the Free Account button, you will need to log in with your Microsoft account, after which a new screen will appear, as shown in Figure 2-2. On this screen, the most important thing you must do is pick a name for your VSTS account. The name will result in your own subdomain on the visualstudio.com domain .

Figure 2-2. Configuring your VSTS account
A meaningful name will probably have to do something with you or your company. Of course, the name has to be available. Also, keep in mind that this will be the place where you will host multiple projects and apps, so do not name it after a single project.
For this book I will use the name xamcicd, which stands for Xamarin Continuous Integration and Continuous Delivery.
You will also notice that you have to choose between Git and Team Foundation Version Control (TFVC ). While this seems like an important choice, you can use them both within one VSTS account. You can choose per project which one you want to use, so this is more like a default setting to get you started.
Moreover, you can set the region where the VSTS account and repositories will be hosted. While this is a technicality, it can be important if you are concerned with privacy laws and how your code is protected under these laws. Another factor is latency. If you choose a region that close to you, responses will be much faster. For instance, when you choose a region on the same continent, the ping time will be mostly between 30 to 50 milliseconds. When you choose a region halfway across the world, this could easily be 300 to 500 milliseconds.
If these are things you value, please be sure to check out what the consequences could be when hosting in different regions. To help you choose, Microsoft has provided a information page here: https://azure.microsoft.com/en-us/overview/datacenters/how-to-choose/ .
If you do not want to check up on this right now, your best bet is to choose the closest region to your own, which is the most likely to have laws similar to yours and will perform the best.
After clicking the Continue button, your account will be set up for you, and if everything is in order, you will be welcomed into your new account. Congratulations, you have created your free account!
To start, the VSTS team sets you up with a sample project to explore all the possibilities, called MyFirstProject. Let’s take a look at where you can find what. First, close the welcome screen with the X in the upper right so you can do some exploring on your own. If you have ever worked with recent versions of Team Foundation Server, it should all look pretty familiar to you.
While an extensive explanation of everything that VSTS has to offer you is beyond the scope of this book, I will quickly go over the basics so you will not lose your way and so you will learn where to find certain features. As you will see, I will describe the different features by the tabs found in the upper part of the screen, as shown in Figure 2-3.

Figure 2-3. High-level tab structure in VSTS
While you go through the tabs, there will be some balloons that pop up to help you get started. Feel free to follow them and discover what can be done.
Another thing you might come across is preview functionality. The VSTS team has stepped up its game with continuous delivery. VSTS now deploys a new version every three weeks (at the time of this writing; it could be even faster by the time you read this), and it sometimes offers you a peek into the future. Here and there you will find messages asking you if you want to enable some preview functionality.
This also has an effect on this book. The screenshots I am showing have all the latest preview bits. Therefore, some screens might look different in your account .
Project Overview
The project overview screen is the first screen you will see in every project. When there is no code or activity in the project yet, the screen will give you some information on how you can get started. When working with Git, it will tell you how you can clone the repository or add existing code to it.
Once you have started a team project, this screen will function as an overview of the team project. If you have worked with Git before, you might know about the README.md file. VSTS supports these now out of the box. This enables you to give any developer who lands here a proper introduction to what they might find. Also, on the right is information about the number of commits, builds and releases, and so on. Figure 2-4 shows the screen from the sample project I will be using in this book.
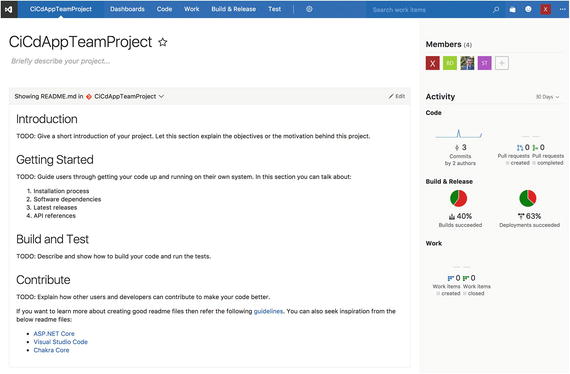
Figure 2-4. Project overview screen in VSTS
Dashboards
Every project has at least one dashboard . Figure 2-5 shows you what a typical dashboard screen looks like. In this case, I have filled it with some sample data so you can get an idea of how it could look like in real life. With the dashboard you can get a quick overview of everything that is going on within your project.
Figure 2-5. The customizable dashboard for a typical project
Specifically, the dashboard consists of widgets that you can add, arrange, and even develop yourself. Also, you can create multiple dashboards for one project. For example, you could create one for your work items, one for the test results, and of course one for your automated builds and releases. This way you can add several dashboards, each with its own purpose or audience.
Code
On the Code tab, you can find all the code and repositories that are associated with this project. As mentioned, this can be either Git or Team Foundation Version Control repositories. Not only can you browse through the current code here, but you can also explore all the changesets that have been checked in, show the differences between two files, work with branches, and manage your pull requests if you are using Git.
This is basically where your repository for this project lives.
Work
If you also want to keep track of your progress or your backlog, you can do that in VSTS as well. On the Work tab, you can find everything for that. Here you can also work with Scrum, Agile, Capability Maturity Model Integration (CMMI ) , and other templates, and you can even create your own if you require a specific method.
In Figure 2-6, you will see a backlog with the sample data I have imported.
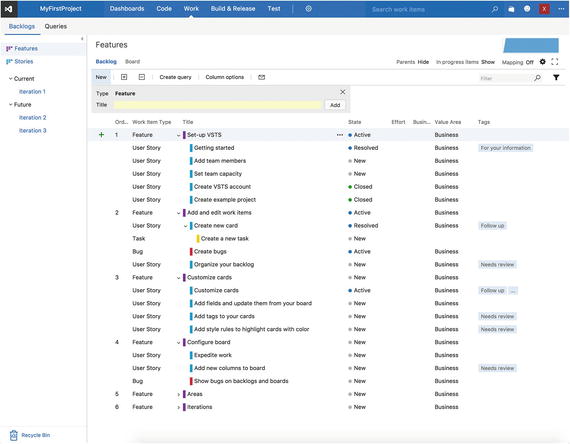
Figure 2-6. The backlog of a sample project in VSTS
There are several levels that you can—but do not have to—work with. As you can see, you have a Feature level, which contains low-detail features of your application. Beneath that are Story levels, which are the high-detailed user stories complete with acceptance criteria, the value area, estimated effort, and so on. And even below that you will see the tasks that can be executed by the development team.
Of course, inside all these items there are a lot of fields that you can use and customize. You can add and remove fields as you like, mark them as mandatory, and create your own way of working as you like. The same goes for the detail levels. Do you not want to use the Feature level? Just check it off in the settings and it will not be there. VSTS is flexible and powerful!
As you use more features of VSTS, the traceability between your work and code will improve greatly. Whenever new code is checked in, you can associate it with one or more work items and/or user stories. As of that moment, they are linked, and you can always trace a piece of code back to the person who checked it in and the items they are working on at that moment.
If you have any builds, releases, or tests associated, they will get linked as well, and likewise, you can trace everything back to everywhere.
Build & Release
The Build & Release tab is where the focus is on in this book. On the Build & Release tab is everything you need to set up automated builds and releases. Within VSTS, builds and releases are similar in terms of how to define them. You will learn more about this throughout the book.
Builds
You can define how a build procedure should look in a build definition. A build definition contains all the information to create a build of a certain set of code. It consists of steps that have to be taken, which vary from basic steps like “Restore NuGet packages” or “Build solution MyFirstProject.sln” to more advanced ones like “Run this PowerShell script” or “Copy a file to this file share.” As mentioned, the most necessary steps are already there, but there is also a marketplace available where you can get even more. How to find the marketplace and install something from it is something you will learn about in Chapter 4.
The build definition also contains one or more triggers on which this build definition can act. You can set it to Continuous Integration, which triggers a new build every time new code comes in, or Scheduled. The latter enables you to specify a custom schedule, including defining the time zone, on which a build should be triggered. This is ideal for creating a nightly build, for instance.
Furthermore, a build definition lets you include or exclude certain branches or folders. Also, you can work with variables, and you can configure a retention period for the resulting artifacts of your builds.
Releases
To release a version of your app, you can use release definitions. These are similar to build definitions. You can even use the same steps that you use in build definitions, and vice versa. For instance, does your release require you to build some code later in the project? No problem! Do you want to perform a load test after releasing your app to a staging slot? Possible!
In theory, you could even skip release definitions altogether and just add a step that uploads your app to HockeyApp immediately. So, why would you use release definitions? They offer the chain of command that I discussed earlier.
The only thing separating a release definition from a build definition is the Environments column and approval process. In this column, you can create as many environments as you like that all have their own set of steps to go through. Also, a release definition offers you the possibility to appoint certain users or groups of users that have to sign off on the release. This can be done before the release is executed or after it is done executing. So, imagine that you have an app ready and it hits the release definition. This definition has two environments: HockeyApp and App Store.
When a release triggers, it will automatically be pushed to HockeyApp. I have configured this to notify the tester in my team who can download this version on a physical device and start doing whatever a tester does.
Whenever the tester is confident about the quality of the release, the tester can then go into VSTS and the release will be sitting waiting for approval. When it’s approved, the same release will go through to the next environment, which is the app store in this case. So, you take the same version of this app, which you now know satisfies your quality expectations, and upload it to the app store. The developer is not even involved anymore and does not even have to know about it. Pretty cool, right ?
Customizing Builds and Releases
There are some options in the release definition you can configure as well. For instance, I said there can be approval before or after a release, but you can also appoint one or more users who have to approve. This can be done sequentially or in any order, or it can be that the first user to approve signs off on this release and the process continues.
This makes for some powerful scenarios and can take a lot of work out of the hands of a developer. Not to mention, you do not need to share the precious HockeyApp or app store credentials with everyone; they are configured securely in VSTS.
Having said all this, one thing should stand out: VSTS is a very flexible system. This also means there is no one right way to do builds or releases. How you want to arrange a build or release is entirely up to you. You can have as many build and release definitions in one project as you like, which all have their own triggers and steps to take.
When I first started using VSTS, I created one build definition that would trigger a build every time someone checked in a piece of code. Every build would then result in a new version I could test, delivered to me through HockeyApp. When I had it all working, I was so happy! But when I started to get 10, 20, and 30 versions a day, I started to get a little less happy. So, I quickly broke up the different definitions and put some well-thought-out triggers in place to get only relevant updates while staying continuously informed on the quality of the code.
Test
Lastly, there is the Test tab, which of course has everything to do with testing. Not only can it show you information about the test results, it provides you with some pretty good tools to create test scripts and support you with exploratory testing.
It lets you create extensive test plans that can be executed on all kinds of different environments, whether automated or manual. The findings can be recorded instantly, and these results will also become part of the traceability between code, work items, and developers. You can also perform load tests with it. To make this even more useful, there is integration available with Apache JMeter.
The test suites of VSTS have some additional costs and are not applicable to mobile apps at this moment.
Setting Up a Team Project
While the MyFirstProject tab is helpful for taking a first look at all that VSTS has to offer, at some point you will want to make a project of your own.
There are multiple ways to do this, but one that is always available is to click the VSTS icon in the upper-left corner to open a drop-down menu and select “New project.” Figure 2-7 shows you what the menu looks like.
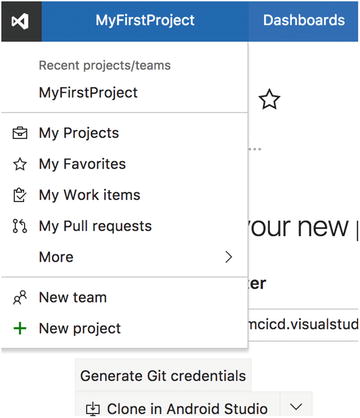
Figure 2-7. The drop-down menu where you can create a new team project, among other things
This is also the menu where you can switch between different projects you have created over time and access more general account settings .
When you click the “New project” option, you will be presented with a screen that lets you configure your new project, as shown in Figure 2-8. The most obvious options are the project name and description. Underneath those you can choose the template that you want to use. This influences the way your work items are presented to you and the fields they contain. As mentioned, you can even create templates of your own. If you have done this, they will show up in this list as well.

Figure 2-8. Configuring a new team project
As you may recall, I told you about how you can use Git and TFVC mixed in throughout the same account. Here is where you can specify which one to use. While TFVC is still sufficient in most cases, you can’t get around Git anymore, which is something Microsoft has realized as well. Basically, both provide you with source control, but Git has a lot of advantages over TFVC. Even more important, if you want to connect with third-party services, the better option is Git because it is more widely supported. You will take a look at services you might want to connect to in the appendix.
When you have configured everything to your liking, click Create and wait for VSTS to tell you that your project is ready. You have now successfully created your own team project to work with !
Setting Up a Mac Build Agent
One thing that is not provided by Microsoft is the ability to build iOS projects. While this is supported, you will need a Mac to convert these projects into their native platform binaries. This is simply because Apple develops the SDK for the Mac platform, and even if you could get it running on another platform, Apple has incorporated into its license that you must compile your iOS apps on a Mac using the development IDE Xcode . Another restriction Apple has included in its macOS license is that you cannot run it virtually. However, only the SDK files are needed; you do not need to have Xcode open whenever you start compiling your app.
Tip
Whenever you update Xcode, you might need to accept a new version of the end-user license agreement (EULA). This is needed for Xamarin to be able to compile your apps. So, whenever you run into some strange behavior, open Xcode to be sure everything works and the EULA is accepted.
Long story short: you will need a physical Mac machine if you want to build iOS apps. If you want to do this in an automated way, you have two options: buy a (cheap) Mac that you dedicate to building your source code or subscribe to a service that does this for you.
The latter can, for instance, be done with a service like MacinCloud ( www.macincloud.com/ ). It offers a dedicated machine that you can use for just this purpose. It has various pricing plans, including a pay-as-you-go one. While this is a pretty good option if you want to try it first without investing too much money up front, it also has one main disadvantage: you do not get full control. You will not get administrative privileges on the machine, and you will not be able to install any software updates you might need.
So if Xamarin updates its SDKs and you integrate them into your app, you will have to wait for MacinCloud to update its Xamarin installation so your app will build on its systems successfully.
Before covering the solution I will use throughout the rest of this book, I should mention that there is in fact a way to use a hosted Mac machine for free. For this, you can resort to the services of Bitrise, which you can learn more about in Appendix A.
To be complete and assuming you want to be in full control of your build process, I will describe the more flexible—but more expensive—option, which is to buy the cheapest Mac you can find (of course, a more expensive one will work as well) and set that up as a build agent.
The Mac will not need too much computing power because it will only wait for a request to come in from VSTS, receive the source files, build the app, and send back the results. These are not the most intensive tasks a computer can do, so any Mac that can run the latest macOS should be able to function as an extension to your VSTS setup.
The only real requirements are that it is connected to power, it is connected to the Internet with a good network connection, and it is always on. You probably want to install some remote network controlling tool on it so you can access it without a screen or mouse and keyboard attached to it physically.
Setting up the agent is then really simple; actually, everything you need is right at your disposal from within VSTS.
From within any project in VSTS, find the cogwheel in the upper navigation bar. If you click it, you will be taken to the settings page. Then find the “Agent queues ” tab. Here you will see that there are already three queues at your disposal (Figure 2-9): Default, Hosted, and Hosted Linux Preview.

Figure 2-9. Agent queues in VSTS
The concept of agents and queues probably requires a bit of explanation. As part of the free VSTS account, you also get 240 build minutes in the hosted queue. This means this pool with agent machines is made available to you on Azure, but you share the pool with everyone else who has a VSTS account. Do not worry; this does not mean you have to wait endlessly for someone else to complete his build, but it does mean you do not have any control over it. It is set up with all the requirements you could think of in terms of the .NET ecosystem. (You can find a complete list of the installed SDKs and tools installed on the hosted machines at https://www.visualstudio.com/en-us/docs/build/admin/agents/hosted-pool#software .)
Whenever you queue a build (or when this is done automatically), it will find the first available agent machine that is able to build your project.
Because you have a specific requirement for building iOS apps, which is not provided in Azure or in any other way, you need to provide an agent to fulfill this requirement yourself.
If there are any other requirements you have that cannot be satisfied by the free, hosted agents, you can set up an agent for that as well, but note: another limitation of the free VSTS account is that you can have one self-hosted agent linked to your VSTS account. Of course, you can have many more, but only if you are willing to pay for an account.
You can, however, do it the other way around: you can use your one Mac machine to serve as an agent for multiple VSTS accounts. For this you just copy the agent binaries to another folder and run another instance with its own working folder, and so on. It will not be described in-depth here, but it might be useful to know that it can be done.
Another limitation if you are using the hosted agents is that you have the 240 minutes each month as mentioned earlier. So if you have one build definition that takes ten minutes each time, you can execute it 24 times. Of course, the minutes you spend on your Mac will not count toward that limit because you use your own hardware.
Also, unless you have a large number of projects or unless they start to get really big, you will not hit the limit any time soon. Luckily, you can specify an agent pool per build definition so you can balance your load between the different application types.
Let’s get back to setting up things on your Mac. On that Mac navigate to the “Agent queue” tab and click the “Download agent” button in the left side above the list of available queues. After doing that, a page will appear that walks you through the process, as shown in Figure 2-10. If you do it on the Mac, it has already detected that and selected the right tab for you.
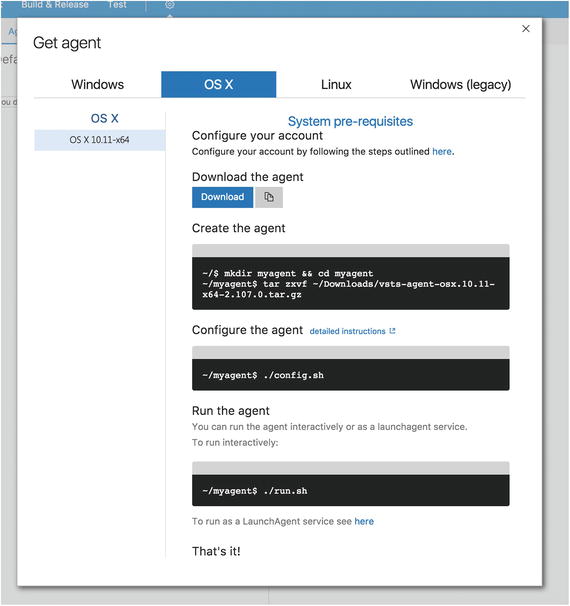
Figure 2-10. Instructions on how to set up your Mac build agent
Depending on your preference, you can run it as a stand-alone application, which is probably a good scenario to start from, but it is recommended to eventually run it as a LaunchAgent, which is the Mac equivalent of a Windows service. The agent will start automatically when the system is restarted.
Just follow the instructions provided by VSTS. It basically comes down to downloading the agent, running it, and entering the right connection information for your VSTS account. That is it!
If everything works out, you will see the agent in the “Default queue” list on the “Agent queues” tab shown in Figure 2-9.
While the connection is now made between your on-premise build agent and your online VSTS account, you still need to load it with the necessary tools to build your iOS apps, which is exactly what you will do in the next sections.
Note
To be able to compile your app, the source code needs to be transferred to the agent that is going to perform the build. In the case of hosted build agents, this means you are sending your code up to Azure to machines that you do not control. While Microsoft handles your source with care, it is something to consider discussing with your client.
Installing Xcode
As you probably know, Xcode is the development suite from Apple that allows you to develop iOS applications with either Objective-C or Swift. Xcode is mandatory to compile an iOS app even if you are using Xamarin.
As Xcode is not installed by default in a fresh macOS installation, you have to install it yourself manually. Luckily this is not a hard thing to do. Just find the App Store on your Mac and search for Xcode. Figure 2-11 shows the Xcode page in the App Store. In the top-left corner click the Install button; you may have to log in with your Apple ID.
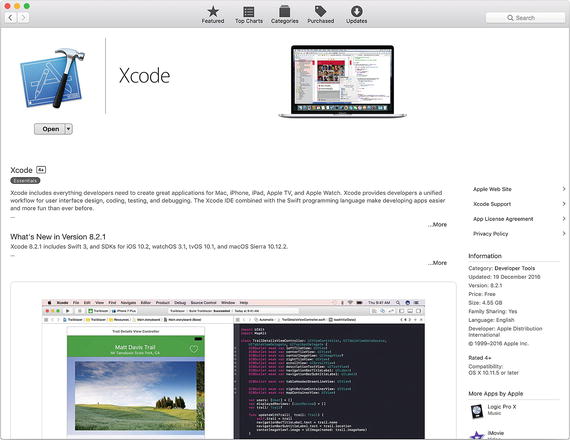
Figure 2-11. App Store Xcode listing on the Mac build agent
Depending on your Internet connection, it might take a while to download and install because it is a few gigabytes in size.
Once it has downloaded and installed successfully, make sure you start it at least once to accept the EULA. After that, this should be the last you will see of Xcode. If at any point a new iOS version comes out, you need to update Xcode. To do this, go back to the App Store and find the screen with software updates. Just click Install from there and wait for it to download and install. After that, again start it once to make sure everything went fine and accept any update agreements if needed .
Because Xamarin uses Xcode and the iOS SDKs that are associated with that, whenever you need support for older (or newer) SDKs, turn to Xcode. Without getting into the workings of Xcode, it is good to know that this is at the base of your app compilation. So, whenever you run into something that won’t compile and you cannot figure out why, do not forget there is a Mac machine somewhere out of view doing the hard work for you, where you should see whether there is something to be updated or configured.
Installing Xamarin
The last thing you need to provision on your Mac build agent is Xamarin. If you have made it this far, this will be a walk in the park.
Because Xamarin is free since Microsoft took over, you can head over to the Xamarin download web site ( https://www.xamarin.com/download ), again from your Mac machine, and download the installer from there.
After it is done downloading, run it and install it; you will be guided through the process with an easy-to-use wizard that will download all the prerequisites as needed. I suggest you download and install everything, including the Android SDKs. This means you can use your Mac to build iOS projects, which is your main objective, but it also means your Mac enables you to build your Android projects as well, which saves you free VSTS build minutes.
When you need to update your Xamarin installation, just go into your Mac, start Xamarin Studio, and have it check for updates. Just like that, you can update your agent to the latest version if you are required to do so.
If you were already running the VSTS agent, you should probably restart the LaunchAgent or restart the whole machine altogether to make sure it has detected the new Xamarin installation.
Tip
When you want to build your Android apps on the Mac and you are running the build agent as a service, you might run into a problem like I did. The error message will say something like “ANDROID_HOME not set.” When installing the Android SDKs, they are installed into your user account, while the service account will run on a machine account. Therefore, the Android SDKs will not be found on the system when building. To overcome this problem, take a look at this StackOverflow page: http://stackoverflow.com/questions/37890362/android-home-not-set-vsts-agent-running-as-service-on-os-x .
Final Thoughts
In this chapter, you learned how to set up your own free VSTS account. I went over the basics with you to give you an idea of everything that is possible with this powerful suite. Besides build and release management, on which we will be focusing, there is a lot more to explore, and I invite you to take some time to do so if you have not done that already.
With the basic understanding of VSTS in hand, I have established the prerequisites needed to get to the ultimate goal: automated builds and releases for your app.
In the next chapter, you will start looking at creating builds. You will learn what build definitions are in detail, what they do, and how you can start assembling your own.