Now that you have seen all that you can do, it is about time we part ways. But before we do, there is one more thing that I want to share with you. In this chapter, I will give you some ideas about where to go from here. What other things are there to incorporate in your pipeline, and how can you optimize your development process even more?
That is exactly what you will learn in this chapter. Each section will describe something that you can do to work more efficiently when using continuous integration and delivery with Xamarin apps.
Different Build Definitions
In Chapter 3 I mentioned that breaking up your build definitions into several definitions, each with its own purpose, is probably a good idea. The following are a couple of build definition variants that you can use. But remember to choose the ones that suit your requirements and do not implement any just because you feel it is a best practice. Also, this is not a complete list of different builds; it is intended merely to give you some ideas.
Continuous integration: For a continuous integration build it is important that the time to complete the build is as short as possible. Therefore, try not to do too many tasks in a CI build definition. It is not necessary to version the assemblies or upload artifacts, as you will not use them. The CI build’s main concern is to check whether the code still builds. In other words, you want to see whether code checked in by every member of your team still compiles. The only thing, besides building your code, that should be in the definition are unit tests. A continuous integration build will be triggered with each commit by a member of the team.
Nightly: Nightly builds have been around for some time now. These builds are done every night (as the name might have given away) and typically do produce artifacts. Because the version could potentially be used and tested, you should increment the version number on it. If you are working with developers in different time zones, nightly might be an ambiguous term, so you will have to make some compromises. Because the build is triggered once every night and no one is actually waiting for its results, a nightly build is a good build definition to enrich with some more automated tests. In this build, you can include the Xamarin Test Cloud tests, regression tests, and/or integration tests.
Canary: The term canary build comes from the time when coal miners would take a canary with them to detect toxic gases in the mines. When the canary died, they would know that they had to get out of the mine. The same concept goes for canary builds, except no one dies. Ideally. With a canary build you push out new (maybe experimental) code to a subset of users. This can be a small percentage of the total users you have. This way, you can safely test some new functionality on them, without affecting the whole group. This build definition is a regular build that increments your version number and generates artifacts, but it is probably triggered by a specific branch that has the canary code.
Feature: You can also create a build per feature. You might decide not to include feature branches in your CI builds because they will affect only a small number of people or maybe just one person at all, but you want to let someone know that their build is failing. To do this, you can create a definition just for feature branches. With the filter capabilities of VSTS that were described in Chapter 4, this should be easy to do. As for the tasks in these definitions, they are probably identical to the ones in a CI build because you want to know the results of the build as soon as possible.
Per platform: To keep your builds fast and the feedback as on target as possible, you probably want to create a separate definition per platform. If you commit code to the iOS app, the results of a build of the Android app are not important to you at that time. Of course, when you are building Xamarin apps, this can get mixed up rather quickly because when you commit code to the shared portion of both apps, you do want to have them build both. This is something you can do with the filters explained in Chapter 4. With the folder filters, you can trigger a build depending on which folder code is committed. Setting this up correctly may take some thought, but when done right, it can be powerful.
Distribution: Lastly, you can have a build that is linked directly to a release definition. This build will do everything it needs to deliver releasable artifacts, swap tokens, increment version numbers, and so on. Finally, the artifacts are uploaded, and a release will be triggered. Depending on what your other builds look like, you might want to do the last, full-blown test run on this to make sure everything is all right. This build could be linked to a commit on the master branch, so only when a merge happens from developer to master will you be presented with a new increment of your product.
I hope these different build definitions will give you some ideas on how to design your automated pipeline even better. Ideally, it should be a mix of different definitions to ensure the quality of your product from end to end. And you are the only one who knows how to do that best, so go try it for yourself! Just remember nothing is written in stone, so try something that you think will work, and if it doesn’t work out as you would have hoped, fine-tune it until it does.
Expanding Your Build Definitions
You can expand your build definitions in a lot of ways. Up until now you have simply added tasks to build your code, increment the version number, and trigger tests on Test Cloud. Something that is not uncommon is the usage of tokens or API keys . These keys might differ depending on the environment you are connecting to; think of a Bing Maps token, for instance. Or, even more common is the URL you are connecting to in order to reach the back end of your application. You surely want to change that address between your development and production environments. This is something that can be done with automated builds, of course.
Tip
One way to make values such as URLs more dynamic is to use configuration files. Since Xamarin does not have app.config files like other .NET applications, you should provide your own mechanism. A great one is provided by Adam Pedley in this blog post: https://xamarinhelp.com/configuration-files-xamarin-forms/ . After implementing this configuration, you can replace the values with custom tasks called tokenization tasks. They just replace one token with another.
Another thing you might want to consider is checking the quality of your code while building. I discussed using SonarQube in Chapter 4. With this in place you can measure all kinds of cool stuff about your code. Another alternative or addition to this could be incorporating ReSharper. With ReSharper you can see whether your coding standards have been breached. Also, you can get some recommendations about where your code can be optimized. If you do not know ReSharper, there is also a plug-in for Visual Studio that is worth looking at. In addition, someone has made the power of ReSharper available in VSTS through the marketplace.
Whenever you think, “This is something I change or switch manually when releasing,” you should see whether you can find a way to automate it through VSTS . Just try to take it one step at a time and gradually expand all your definitions with meaningful tasks.
The VSTS marketplace is a good place to browse and get some inspiration. Just see what is out there and think about whether and how you can put something to use for your own projects. Tasks are added every day, so by the time this book is in your hands, there should be a lot to choose from.
Feature Flags
A question that is much heard when implementing continuous delivery is, “What if a feature is so big that it cannot be completed before a deployment/delivery is done?” This is a valid question, and some features are bigger than others, but most will probably take up some time. Depending on your situation, the next deployment or delivery might be only a couple of hours away, so even if your feature is not that big, you might find yourself lacking time.
To overcome this challenge, you can use feature flags (also referred to as feature toggles). This concept describes a method where you “hide” certain features until they are complete. Only then you flip a switch—called a flag—so the functionality for that feature is available to the user.
The implementation of this can vary. There are even some frameworks to help you with the concept of feature flags, but in the simplest form it can be a Boolean that you evaluate to see whether a piece of code is in effect. In addition, you can flip those Booleans . The easiest way to do this is to set the value of your Boolean for a specific feature to true in your code and push that to the repository. A more advanced scenario would be to have the values of the feature flags in a configuration file so you can change their states on the fly. Even beyond that there is the possibility of administering a value remotely.
Depending on your requirements and situation, you can choose to implement different forms of this. As a single developer, you probably will not need to use this advanced functionality, but as your project and team start to grow, you will want to start looking into feature flags.
Tip
The Launch Darkly service provides you with the tools needed to get started using feature flags. It is easy to incorporate and has cool features to not only flip switches but also roll out feature flags to a certain percentage of users. This service is not free; it starts at $79 a month. For more information on this service, you can go to https://launchdarkly.com/ .
For more information, as well as some warnings on how (not) to use feature flags, take a look at this article written by Martin Fowler: https://martinfowler.com/articles/feature-toggles.html .
Receiving Alerts
A lot of power of a continuous integration pipeline comes from the short feedback cycles, as you saw in Chapter 1.
Microsoft has built in a powerful alerting mechanism in VSTS , making it possible to receive alerts about almost anything. To get started with it, find the Notifications section in your VSTS dashboard, as shown in Figure 10-1.

Figure 10-1. Notifications overview in VSTS
Here you can configure all kinds of alerts—not only alerts that have to do with builds succeeding or failing but also work items assigned to you. With this functionality, you can be sure that you will be informed about everything each step of the way. Whenever a trigger that you have defined here is invoked, you will get an e-mail message in your inbox right away.
Tip
At the time of writing this book, there is a functionality called Out of the Box notifications that is available in preview. With it, you can set up notifications for everyone in your VSTS account with one click, or you can let them do it themselves. When you enable it, everyone will be provided with meaningful notifications. These notifications include but are not limited to feedback on a build that you have triggered, notices when you are requested for a code review, and notifications on the status of a pull request.
Without this out-of-the-box functionality you need to set up each notification manually. By the time you are reading this book, this might have been enabled by default. Regardless, you can still configure custom notifications with Out of the Box.
The Human Factor
This book focuses mainly on the tools and techniques that are available to you to establish a powerful and comprehensive automated build pipeline. But like most IT systems, the weakest links are the humans involved in the process. This section will focus on that.
To make sure that the quality of your product remains the best it can, you can use a whole lot of tools to support you. These tools are there when you are developing, when you have committed your code, and when a binary has been released. In this book, you have looked at some of them, and they can help you make the most out of it. Yet, it is still you—the developer—who must do the heavy-duty work. As your team starts to grow, the effort to make everything go smoothly will grow with it. Suddenly you find yourself dependent on someone else to finish a certain feature or produce a new version. While everyone is undoubtedly doing the best they can, it will help to create a few ground rules when working in a team.
Check-in early, check-in often: If you want to make life easier on yourself, check in your code more often than not. This will prevent painful merge processes, and with the CI builds in place, you will get confirmation each time that your code still plays well with code checked in by others. This means checking in your code multiple times a day, and if by itself it does nothing, hide it with a feature flag. I would even go as far as to say that if your code is not checked in, it does not exist. Other people cannot anticipate code that is not there for them to see, so make sure it is there and it builds. Of course, wherever I say check in, you should read commit in terms of Git.
Do not check in any code that does not build: All code that you commit should build. This may sound trivial, but saying it out loud makes it happen and makes people feel more responsible. To enforce this rule, you can use some features of Git such as pull requests and branch policies. I will talk about those later this chapter.
Do not check-in code after a build breaks: To prevent one disaster from happening after another, do not attempt to save your code after someone else has broken the build. Not only does it make it worse when you do, but with this rule you also create a necessity to fix the build as soon as possible. By setting this rule you effectively say when the build is broken, everyone will stall in their work. This way, the person responsible for breaking the build will feel more obligated to fix it and fix it fast. And of course, they will be more cautious next time.
No code without tests: Everyone is convinced that you should have unit tests, but actually creating them and keeping them current is something that doesn’t always happen. By coming up with a rule that no code is checked in without accompanying tests, you obligate everyone to do so. This way all code has at least one test, and thus the code quality should go up.
No commits after 4 p.m.: It is a natural thing to check in your code right before you go home for the day, especially when you’re going on vacation the next day. But the next day when your colleagues discover that the code you have committed does not work as intended or does not even build at all, they have two choices: either ignore it and wait for you to come back or—what is most likely to happen—fix it for you because they cannot wait for you to come back. That is not a responsibility that you want to delegate to your colleagues. If you have code that is nearing completion at the end of the day, it is nothing that cannot wait until tomorrow to be merged into the branch. Make sure you check in your code at a time when you can verify the results.
Every commit should be able to go to production: Every time that you commit code , just think to yourself, “What would happen if this code goes to production?” By doing so, you will make sure that the code you produce will not behave badly in the hands of the customer. So, either the code works perfectly or you should consider hiding it with a feature flag or some other feature.
Like I stated earlier, most of these rules are based on a commitment made by you and your team members. This, however, does not mean you cannot use some tools or other means to accomplish them.
One way to do this is to implement code reviews. Before any code is checked in definitively, you could ask someone to review the code that you have produced. The code should be ready to merge with the rest of the code and thus include all tests, and so on. One or more team members will take a look at your code and provide you with some constructive feedback. Whenever everyone is happy with the result, the code can be merged.
A great way to do this when you are using Git is by using pull requests . A pull request is basically an inquiry to another member of your team to allow your code to be pulled into the main branch. This way, you make sure that at least one person has had the opportunity to look at your code before it becomes part of the repository.
But you can take it even further than that. With the latest features regarding Git in VSTS , you can implement branch policies . This is a powerful feature that can give you fine-grained control over what code is merged into a branch, and by whom.
It also takes some work out of your hands. For instance, one of the configuration options lets you trigger a build definition whenever a pull request is done. So, when someone sends a pull request to a branch, a build of your choosing is triggered, and you will know whether it integrates or not. On top of that, you can demand that the build that is triggered is no older than a specific number of hours. If the build passes that limit and the pull request is not merged, a new build should be requested and pass before the pull request can be merged at all. By doing this, you are making sure that the code in the pull request is still compatible with the code that has been merged in the meantime.
There are a lot of other options that you can configure to do this, and they will only grow in the feature. Figure 10-2 shows the configuration screen for a branch policy .
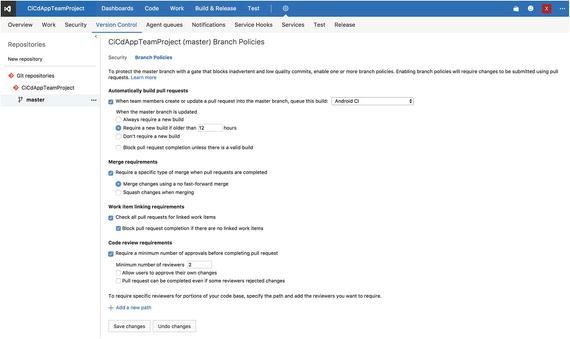
Figure 10-2. Configuring a branch policy
Combined with the rights management you can set on the repository, you can set who has power over the master branch. Imagine a scenario where you put all your lead developers and/or architects in a separate group and give them rights to perform merges on the master branch. Then you implement a branch policy like the one shown earlier, and suddenly there is no way past the lead developer or architect to get code to production anymore. This effectively means that at least one trained, experienced pair of eyes has looked at it.
The last option that I want to point out to you is at the very bottom of the screen. You can configure paths within your repository to which you can assign specific reviewers. When you have your back-end code and your app code in one repository, you can assign someone from the mobile team and the API team who will be requested to take a look whenever code is committed to that specific portion of the repository.
Final Thoughts
I hope you have enjoyed reading this book as much as I have enjoyed writing it. I know it is a cliché to say, but it is a cliché for a reason. This is the first book I have written, and I have learned a lot from it while enjoying the process at the same time. I hope that I have been able to teach you a thing or two as well.
With this book I sought to provide you with everything you need to get a head start on using Xamarin continuous integration and delivery. Not every product feature is etched out in stone yet, and I am sure that by the time this book hits the stores there will be more power available to you than what I have described here. That is why I have focused not only on technique but also on some concepts that have to do with continuous integration and delivery. This way, you will know what is out there in the world to optimize your software development process, and let’s be honest, this will save you from a lot of the frustration that comes from doing repetitive jobs such as releasing software.
If you can’t figure something out, want some advice, or just want to tell me your thoughts about this book or anything in it, please do not hesitate to find me and reach out. You can do so on Twitter by my handle @jfversluis or e-mail me on [email protected].