Now that you have seen how to set up your VSTS account and you have learned some global things about how to use it, it is time to dive a bit deeper.
This chapter will start with a more in-depth look of what VSTS has to offer you, especially in the building and releasing area. After that, you will learn how to create your first build definition.
I will demonstrate all this with an example app that I have created for this book. The code of this app is not relevant and will not be shown in the book because it does not do anything of interest. It was merely to show you some real-life screenshots of how VSTS works.
Introducing Visual Studio Team Services
As you now know, VSTS is a lot more than just a code versioning system. While this book will focus mainly on the automatic building and releasing parts of the tool, I will go a little deeper into some other aspects as well to give you a better understanding of how certain features work together.
The sample app I have created is named CiCdApp, and the team project I have created for this app is called CiCdAppTeamProject. Your naming is, of course, entirely up to you; I have chosen these names so you can easily distinguish when I am talking about the app and when I am referring to the team project.
I am going to assume that you know how to add your project and code to a team project because this is beyond the scope of this book, so I’ll skip ahead and assume you have your code stored in your team project. If you do not know how to do this or want to access some more in-depth documentation on VSTS, please refer to https://www.visualstudio.com/en-us/docs/overview .
You can now go into the Code section of VSTS and see everything that is stored right now, as shown in Figure 3-1.
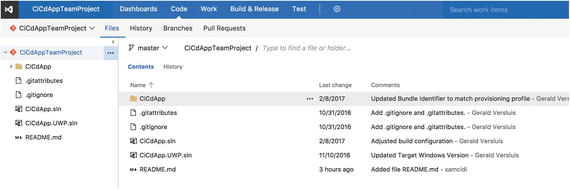
Figure 3-1. All the code stored in the Git repository on VSTS
The situation in Figure 3-1 may differ a bit if you do not use Git for your code versioning. On the left side you can see the folder structure of the repository for this team project. You can navigate through this folder structure like you would in any other Microsoft product: you click the nodes to open files/folders, and on the right side you click a file to view its contents.
From this view you can also get the history of your files. Here you can see all the commits that have been done, all the way back to when you started using VSTS. You can see what comments were entered, who did the commit when, and what files were changed and/or added. If files were changed, you can view the difference between versions, whether the difference is between commits or between a specific commit to the current version.
You can also see all the different branches that have been made. Note that this is specific to using Git. Again, you can see the history, commits, and differences between all kinds of files, and the possibilities will probably grow as Microsoft adds features. Figure 3-2 shows you what the screen looks like when browsing through previous commits.
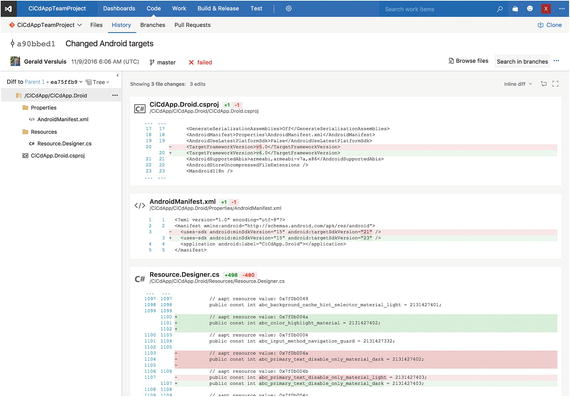
Figure 3-2. Comparing files between commits in VSTS
Another feature specific to Git as a versioning system is a pull request. For example, say you take the code from a specific branch in the repository that was created by a colleague and branch it, meaning you create your own copy of that code. Then you start working on improvements or extensions. Whenever you are happy with the result, you can do a pull request to the original author, meaning you request that the original author “pull in” your changes. This stimulates working together on the same codebase and crowd-sourcing the development of code in a simple and conflict-free way; you can even translate this to GitHub and have every developer in the world join in.
These pull requests can be managed directly from the VSTS web interface, whether you want to create a pull request or accept incoming pull requests by others. While you are doing so, you can compare between commits and branches and see whether you should merge the changes into your repository.
Microsoft is continuously working to make VSTS an even better product, so you will continue to see more features added over time.
Creating a Build Definition
Let’s get started on what this book is all about: creating automated builds. As you may recall, this is done by putting together build definitions in VSTS. A build definition contains everything needed to create a build from a set of code. It has all the steps that the code needs to undergo, the triggers on which code will be built, and which repository the code needs to come from.
Before looking at how you can construct one yourself, there are a few things you need to understand. The first thing you need to know is that there is not one way to create them all. Every developer and every company will create definitions differently. There is no best way to trigger a build that is pushed to HockeyApp, and there are no rules that you have to abide by when defining when to run tests. It all comes down to how you want to set it up. Because the VSTS build and release engine is very flexible and thus powerful, it all depends on what you or your company’s requirements are. In fact, you will not get all of this right on the first try. Implementing an automated build will be an evolving process, so start small and build it out from there to see what works for you.
When I first started with all this, I was so psyched that I set up a trigger to create a build with each check-in of code I did. Once that completed, I would send it off to a release and have that deliver me a new version through HockeyApp. Once that was done, I thought, “This is awesome—just what I needed.” After a while, two good friends of mine joined the project and started to add code, which was awesome, but after I gradually started to get 10, 15, and 20 new versions every day, I started to realize that maybe it was a bit much!
Also, do not think that once you have set up an automated build that you are done with it forever. Although you can probably use it for a while once you have it right, over time you will gain some new insights, new requirements, or want to add even more features to your build.
Another tool you need to understand is Xamarin. Although Xamarin does a great job in unifying the way to create one app for three (or more) platforms, do not be mistaken: in the end, it will have to produce three different app binaries. Xamarin enables you to create multiplatform apps easily, but it cannot create one app that is accepted by Apple, Google, and Microsoft. You will still need to compile an .ipa, .apk, and .appx file for each app store, respectively. That’s why I recommend creating a separate build definition for each platform. Also, keep in mind that a Xamarin.Forms app is still composed of a Xamarin.iOS project and a Xamarin.Android project. The concept of Xamarin.Forms is just a NuGet package that you can install to make life easier for yourself and to share the UI code across platforms.
It’s time for some action! Go into your team project (CiCdTeamProject in my case) and click the Build & Release tab. Since you have not created a definition yet, you will see a screen similar to Figure 3-3.
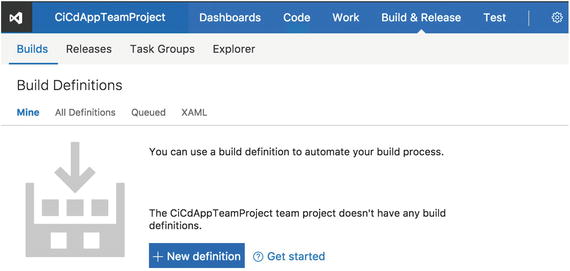
Figure 3-3. This is the screen to start your first build definition
Before you learn how to create actual build definitions for the specific app platforms, you will look at some basics.
Build Definition Templates
Click the “New definition” button to create a new build definition. Like you would expect from a Microsoft product, you are presented with a wizard-like interface that offers you a number of templates to start with, as shown in Figure 3-4. When you scroll through the list, you will see that a lot of the most used application types are already taken care of, including Xamarin.iOS and Xamarin.Android apps.
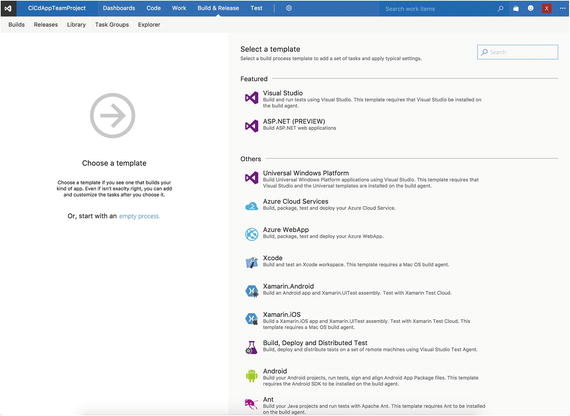
Figure 3-4. The templates to choose from when creating a build definition
However, the Windows app seems to be missing. Don’t worry—it is not missing. The Windows app is supported by default because it relies on the .NET framework to begin with, so everything that is needed is already in VSTS.
For now, let’s look at the Visual Studio template. When you select it and click the Apply button that appears, the template is then applied, and you will be taken to some predefined steps of the build definition, as shown in Figure 3-5. .
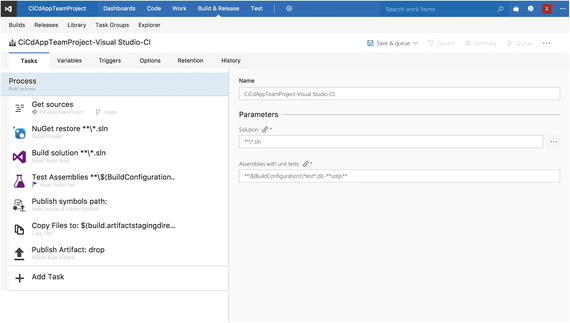
Figure 3-5. Your first build definition
VSTS will automatically assume you are creating a CI build and will name your definition appropriately based on the team project you are in and the template you have selected. If you want to change this, you can do so in the Process section, also visible in Figure 3-5.
Right under the name, you will see the Parameters section. These are the parameters that can be used throughout the definition. They are useful when you want to centralize some of the configuration for this build on one tab
I’ll take a moment to explain what else you are seeing in this screen. The page can be divided in roughly three parts: tabs on the top to navigate to different sections of your build definition, the left part where your build tasks are, and the right part where you can do additional configuration for the selected build step.
While going through the configuration, if you forget something important, VSTS will warn you by showing a red exclamation mark at the task where something is wrong. Going into the task will drill down to the configuration, and any fields that you might have forgotten or contain an illegal value will be indicated to you in red.
If you need any information on a certain option, click the i icon.
Build Tasks
Your build definition is made up of these build tasks. With them you tell VSTS what to do with your code in the linked repository. If you take a look at the steps in Figure 3-5, from top to bottom you see that the NuGet packages are restored, and then all solutions in this repository are built. If any DLLs with tests can be found, they will be executed. So much for the building part!
The binaries that are compiled are referred to as artifacts. So, the last three steps in the list will collect the debug symbols, copy all the resulting files to the so-called artifact staging directory, and then publish all files in the staging directory. Publishing here means that the files will be copied to the end station where you want them to be. That can be either a file share where a tester can get them or the VSTS account, where the files will land on a (secure) shared location where they can be used in a release definition.
This seems like a lot to take in, right? No worries—I’ll cover most of the tasks in more detail throughout the book. There are a lot of default build tasks in there; in addition, Microsoft has added a Marketplace for these tasks, so every developer is now able to create their own. By the time you read this, a lot more tasks will be available to you.
You can add new build tasks with the Add Task button at the bottom of the task list, as shown in Figure 3-6. Also notice the link at the top, which directs you to the marketplace.
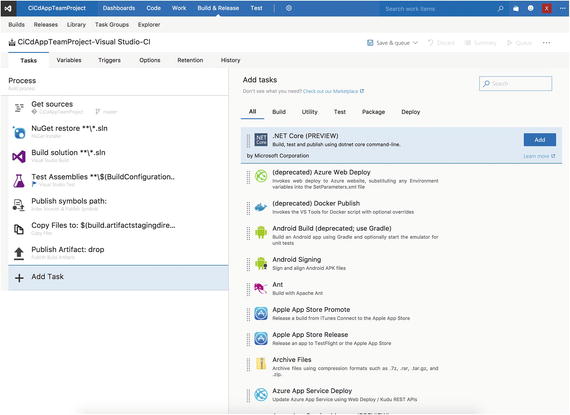
Figure 3-6. Adding a build task to your build definition
To add tasks to your build definition, just click the Add button after each step you want to insert. The screen will not close after you do, so you can go through all of them, adding as you go.
Let’s go back to the build definition screen. Remember how I told you that the right side of the screen is for configuring the selected build step? If you look again at Figure 3-5 and you click any of the tasks under “Get sources,” you will notice a section called Control Options. This section appears in every step. It lets you control some basic settings that apply to every build step. For instance, you can specify how long the step can take at maximum by setting a timeout, whether it is enabled, that it should always run whether errors occur or not, and whether the build should continue if an error occurs in a certain step.
All the other settings differ per type of step. I will not go over the rest right now; you will see the most common ones when you start creating your own per-platform definitions later in this chapter.
Repository
A build definition has a linked repository; this can be the repository that you created in VSTS, a repository on GitHub, any other external Git repository, or even a Subversion one. All the settings for the repository can be found under “Get sources,” as mentioned earlier. When you first create a build definition, it will get linked with the repository within the team project, but you can configure some extra options afterward. Figure 3-7 shows some repository settings.
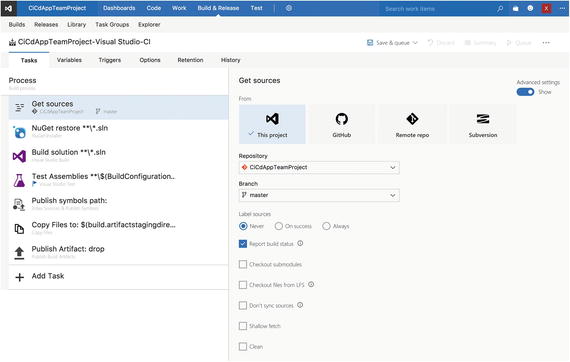
Figure 3-7. Configuring your repository
Besides being able to configure what repository you want to use, you can specify a specific branch that you would like to build. Also, you have the option to clean the build folder before a new build is made.
You also have the option to apply a label to the commit that is being built. While you probably will not use it with a continuous build, a label can come in handy when creating builds that are handed over to testers or even users. Labels can then help you identify what code was in the version of your app that was delivered to them. This can be really helpful when you are trying to track bugs or unusual behavior in a specific version. Please note this label will mark the source in a certain state. This will not be the version number for your app, although it can be if you configure it that way. How to update the version number of your apps is something you will learn about in the next chapter.
Below the label setting there are some more advanced features that I will not go into right now. Note that these are all Git-specific features. If you selected a TFVC repository, this screen may look different and have its own set of options. Also, as Microsoft is implementing more and more Git features, there may already be more options by the time you read this book.
Variables
Variables are another helpful feature. As a developer, you can probably guess what they do. With variables, you can specify a static name with which you can access a variable value. These variables are available across your entire build definition, in every step. So, they are especially handy when you have to use the same value more than once.
Another scenario where variables play an important role is with sensitive values. As you will learn later, apps need to be signed before they can go to an app store. To do this, you need to supply a password for the keystore or certificate. As you can imagine, you do not want to put a password in e-mail or have them in plain sight for anyone to see. You might not even want your team members to know this password.
Therefore, Microsoft has implemented secure variables. When you look at Figure 3-8, you will see a password field at the end of the list. You can provide a name and value and then click the lock icon in the value field to obscure the value. When you do this (and then save), the value is securely stored and can be used by VSTS but cannot be reverted to the human-readable form.
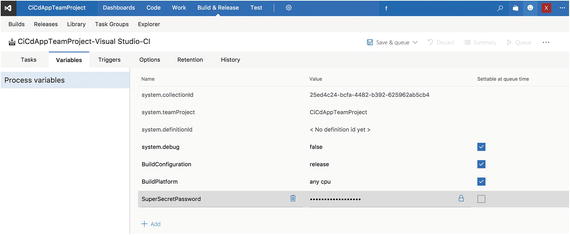
Figure 3-8. List of variables that can be used within your build definition
While you are looking at the lock icon, you will also notice the check box at the end of each line. With this check box you can configure whether the value can still be changed at queue time when you manually trigger a build. This means that when you queue a build, you will first get a screen with the list of variables that you can supply with a different value, once. So, the value you put here will be the default; when you change it at queue time, it will then build with that value, but it will not be saved.
Tip
There are predefined variables to use as well. These include values about a specific build, for example, who triggered it, what the build number is, and so on. They also include values for the build agent that is building it, such as the agent name or home directory, for example. To see the list of predefined variables you can use, refer to https://www.visualstudio.com/en-us/docs/build/define/variables#predefined-variables .
If you want to put a variable in build step format, you can use this format: $(variablename). For example, if you wanted to use the SuperSecretPassword variable in a build step, you would use $(SuperSecretPassword). Variables can be used in any input field within build definitions. When the build runs, the variable will be replaced with the actual value.
Similar to variables are parameters. Parameters lack the ability to be secret and cannot be set at queue time. At the time of writing, the only use seems to be to access values of your choice from one screen that are scattered throughout tasks. To do this, go to the setting you want to access on the Process tab, click the information icon after the label, and click the Link button.
Triggers
Triggers define how the build will start. You can define here whether your build is a continuous one or a scheduled one, or both. If you look at Figure 3-9, you notice that you can use both triggers at once for one build definition. .
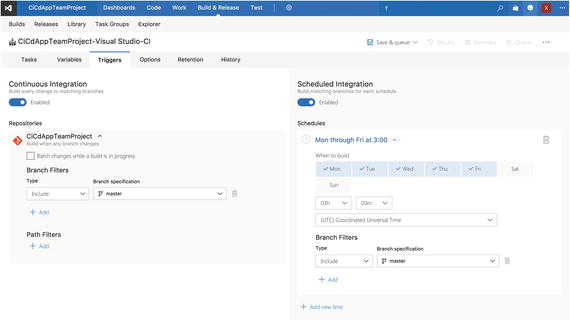
Figure 3-9. Ways to trigger a build in VSTS
The continuous integration build will fire every time you or someone else commits something to the repository. You have some options to filter by branch and/or folder. With this setting you can narrow down what triggers a build
Imagine you have a repository that holds your apps but also your back-end project. If you click the CI check box and leave it at that, every commit to the apps will also trigger a build for your back end, or vice versa. This is probably not what you want because your build definitions will serve specific purposes, and thus it would be useless to build a project if nothing changed in there. With the brand and folder filters, you can fine-grain the trigger for this build definition.
The scheduled build works as advertised. You can specify one or more times when a build should be triggered automatically. This can be useful for nightly builds. Again, here you can include or exclude specific branches.
Other Options
There are a few tabs and options that I have not covered yet, such as the Options, Retention, and History tabs. While these can contain useful information, they are not crucial to creating builds. Shortly, the Options tab gives you some basic configuration possibilities, including configuring the agent queue to be used. Retention lets you specify how long artifacts that you have created and results of a build are to be saved. History shows you an audit log of who changed what in this specific build definition.
Again, they are useful, and I will handle bits and pieces of them while we go, but I will not describe them in as much detail as the rest.
Now that you have a basic understanding of all the features that are here, it is time to start looking at creating your first build definitions and queueing an actual build!
Also, in the upcoming sections, I will talk about signing your bits in order to be able to distribute your apps. Remember that you can (and should) create different types of build definitions to support different scenarios. With this in mind, you can imagine that when you’re creating a CI definition whose purpose it is to prove your new code still builds, you do not need code signing. You are not going to distribute the version resulting from that build; you only use it to detect build errors and run (unit) tests automatically. The only reason I am explaining it in this chapter is so that it makes more sense and that you will know how to do it when engineering a more distributive definition.
iOS
Now let’s get started on what it is really about: creating a build definition for your apps. You will start with iOS. Remember what I told you earlier: while Xamarin does a terrific job at developing your app once and distributing it on multiple platforms, when it comes down to building and distributing, it will still produce separate apps.
When you go back to the build definition overview screen (hover over Build & Release and click Build), you will see the screen shown in Figure 3-3. If you have saved any build definitions, you will see a different screen listing them.
Either way, click the button to create a new build definition, and when the screen pops up to choose a template, this time choose the Xamarin.iOS one. After you have confirmed your choice, you will see that VSTS has set you up with the bare steps again. They are a little different from the ones you saw earlier. Figure 3-10 shows what your screen should look like.

Figure 3-10. The default Xamarin.iOS template
You now know that red means you need to do some configuration. Let’s go through the default steps first and see whether you can get this to work.
The first step is to restore Xamarin components. If you have been working with Xamarin, you may know that it has its own component store. The store offers free or paid ready-to-use components such as barcode scanners, connectors for cloud services, UI components, and much more.
If you have used these components in your app, you must enable the step to restore Xamarin components. If so, you also need to provide the user name (your e-mail address) and password of your Xamarin account. Of course, don’t forget to select the enabled box. Since my sample project is not using any components, I will leave it as disabled for now. When you do not enable the step, you can also ignore the red input fields.
The most important step here is the “Build Xamarin.iOS solution” step, so let’s take a look at it. When you select this step, the configuration shows up as depicted in Figure 3-11.
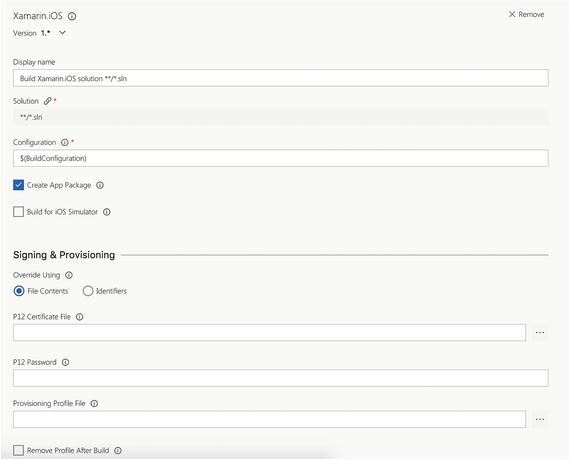
Figure 3-11. Configuring the Build Xamarin.iOS solution
The first (and actually only) thing you need to do is specify which solution to build. There are a few ways to go about this. If you have only one solution or if you have multiple and want to build them all, you can enter **/*.sln. This is called a minimatch pattern. With a minimatch pattern, you can use wildcard characters to select certain files. With the **/*.sln pattern, it will find all the .sln files in any subfolder and build them one by one. If you wanted to build a solution under the MyApp subfolder, you would specify it like this: **/MyApp/*.sln.
You can also use this pattern for copying files. In that case, you do not necessarily need to specify an extension, so you can copy all kinds of files. For more about advanced examples, check out https://github.com/isaacs/minimatch/blob/master/README.md and https://realguess.net/tags/minimatch/ . You can also specify the exact solution name or hit the browse button after the input field to select the right file from the repository. Remember from talking about variables that you can mix variables in here as well.
By default, the Solution field is linked to a parameter. So, either change the value on the Process tab or unlink the field by clicking the information icon after the label and clicking the Unlink button. You can now edit the value directly.
Let’s start simple: select the “Build for iOS simulator” box, click “Save & queue,” and then click Save for now. Before you can give it a try, there are two things you still need to do. Go to the Triggers tab and enable the continuous integration trigger. After that, go to the Options tab. Remember what you learned about the build agents and queues? For this to work, you need to have the Mac build agent in place (you already saw how to do this in the previous chapter). So, select the agent queue that you have put the Mac in; in my case, I had to switch from Hosted to Default. Hit Save once more and confirm the save action.
Now for an exciting moment: you will trigger your first build! Click the Queue button; the screen in Figure 3-12 appears.

Figure 3-12. Queuing a manual build
At the bottom of this screen you can edit the values for the variables that are marked to be editable at queue time. Above that there are some other things you can do. You can switch between agent queues; since this is correct already for this example, you leave it alone. Below that you can switch to another branch and specify a certain commit that has to be used while building. Remember, everything you edit here will not be saved; it will be used only for this build. Change the BuildConfiguration variable to Debug for now, and whenever you are ready, click Queue to start the build.
If your Mac is set up correctly, the build should start, and you should see a console-like window. If it is not set up correctly, you will probably see a message like in Figure 3-13.
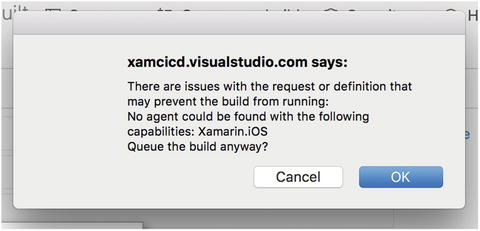
Figure 3-13. Error while triggering an iOS build
This can mean roughly one of two things: your Mac is not connected to VSTS for whatever reason or your Mac is connected but is not installed with the right prerequisites. Since it will be no use to try to trigger a build, cancel everything until you get back to the VSTS main screen. Now find the cog wheel and under that go to the “Agent queues” option. Check to see whether your Mac build agent shows up under the queue where you would expect it. If it does, check to see whether it is online. Also, you can check on the machine to see that you have installed Xamarin correctly and that you have set up the VSTS build agent software. Since there are numerous causes for an error, it is impossible to troubleshooting everything is beyond the scope of this book.
I will assume that everything is set up properly and when you clicked OK, the screen shown in Figure 3-14 appeared.

Figure 3-14. Output from your successful build
Hooray, your first iOS build is created! There is still some stuff to be done, though. Remember how you ticked the box that said to build it for the simulator? That was necessary so you did not need to sign your binary right away.
If you have published apps before, you probably know that the executable code that you are delivering should be signed. This way, you prove that it was you who created this, and it implements some security that way. Apple requires the use of certificates to sign your .ipa file.
Note
This next part is focused on developers who are part of an individual or organizational Apple Developer Program. Some steps might differ when using an Apple Developer Enterprise Program. You will also need to have the Team Agent or Admin role within the account to be able to follow along.
Getting the files needed for code signing your app is a bit tricky for iOS. I will try to describe it as clearly as possible, but you might have to repeat the steps a few times before you get them right.
Apple requires an app to be loaded with a provisioning profile. This profile consists of files that have two components: code-signing information and information about the app identity. This profile also has some information about the distribution mechanism that you use and which devices the app can be installed on.
No matter how you plan to distribute your app (HockeyApp, TestFlight, or something else), you need to create a distribution provisioning profile. With this profile, you can sign your application, and it will be prepared for release. The profile will contain your App ID and a certificate. I will now explain to you how to create the right profile for use with your build pipeline.
First, navigate to the Apple Developer Member Center ( https://developer.apple.com/ ), click the Account button, and log in to your account. Once you are logged in, go to the Certificates, Identifiers & Profiles section. Figure 3-15 shows the screen you should see.

Figure 3-15. Certificates, Identifiers & Profiles screen in Apple Developer Member Center
Under Certificates, select Production and click the plus button in the upper-right to add a new certificate. You are now presented with a screen that asks you what type of certificate you need. If you have been running and debugging your app, chances are that you have been here before and have chosen a development certificate. This time, however, you need the App Store and Ad Hoc option, so select that and proceed to the next step by clicking the Continue button at the bottom.
In the screen that comes up, you are asked to create a certificate-signing request (CSR). This basically means you need to create a certificate from your Mac to identify yourself. The instructions on how to do this are displayed on the screen. If you follow them, you should be able to complete this yourself. When you do so successfully, you will then have a .certSigningRequest file. Continue to the next screen where you must upload this file. Do as told by the portal: upload the file, click the Generate button, and finally download the generated certificate (.cer) file to your Mac. Double-click the file to install it into the Mac OS Keychain; you can put it in the login keychain.
Once installed and with the Keychain window still open, you have to locate it yourself. To do this, enter the name that appears in the Name column in the Apple portal, which is probably your own name. Over time, after you are a member for a while and some certificates start to expire, you might have more than one option. In that case, find the one that has an expiration date of today plus one year. See Figure 3-16 for how I located my certificate.

Figure 3-16. Locating the installed certificate
Expand the certificate like I did in Figure 3-16 and select both options (without the public key if it is there); this is important. Right-click with both the certificate and the private key still selected and select the “Export 2 items…” option from the context menu. In the save dialog, give the certificate a proper name and ensure that it is a .p12 file. When you save the file, you will be prompted for a password. Enter a password that you will remember because you will need it later. It does not really matter what the password is; it will be used in your VSTS build task configuration to be able to access the certificate.
Now for the second part. You still need to create a mobileprovision file. If you have not done so, create an App ID. To do this, go back to the screen shown in Figure 3-15 and in the left menu choose App IDs under Identifiers. Click the plus button in the top-right corner and follow the instructions on the screen. Enter a name with which the file will be identified in the portal and then configure the actual App ID. A prefix is already in place and identifies the team you are part of, even if you have an individual account. The suffix can be either explicit or a wildcard. Either way, it is recommended that the identifier is a reverse-domain-name-style string, for example, com.versluis.app. If you choose to create an explicit ID, it will be usable for only one app, so you’ll probably use this type of naming convention. When choosing the wildcard option, you could enter something like com.versluis.*. This way, you can use it for all your apps, as long as they start with com.versluis. Configure one of the options and proceed. Select any app service that you might want to use, click Continue, and follow the instructions to complete the App ID configuration. Make sure that this is the same ID that you configure in your iOS project. Your binary and the files needed for signing your app are linked together with this ID.
Once that is done, go back to the overview screen of Figure 3-15 once more, and this time select Distribution under the Provisioning Profiles header. Click the plus button in the top right to start the procedure. In the first screen, shown to you in Figure 3-17, you have to choose whether you are going to create a test version profile or the production one. If you are to create a test version, choose the iOS App Development option. If you want to distribute through the iOS App Store, choose the App Store option. The steps after this one are almost identical, except for the fact that when you create a development profile, you have to choose which devices are included. The devices you select at that point are the only devices that can run the test version. If you want to add more testers, you have to add the device ID in this portal (under Devices), generate a new profile, download it, and add it to your repository. I will explain how to do this later in Chapter 8.
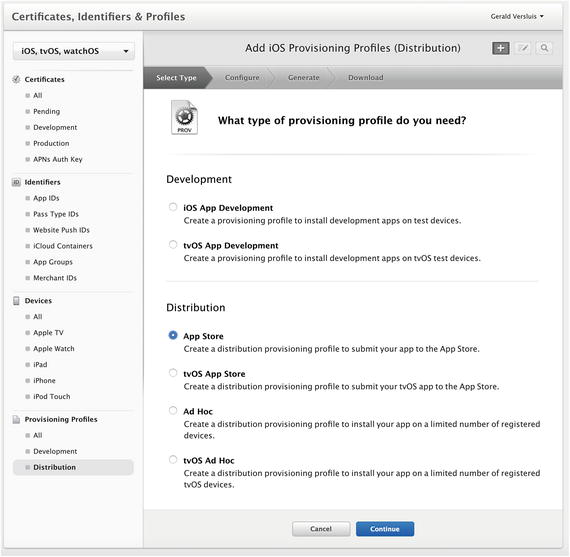
Figure 3-17. Creating a provisioning profile
In the screen that follows, choose the App ID you have just created (or created before) and click Continue. In development mode you now get to choose the devices to be included. In the screen that follows, select the certificate that was generated earlier. You can recognize it by the date that appears under it when there is more than one option. After choosing one and proceeding, give the profile a meaningful name and proceed to the final step. Here you can download the file to your computer, which should produce a .mobileprovision file.
Note the location of the provisioning profile, which you will be using in a moment.
Tip
If you need a more detailed guide on how to create a provisioning profile, please refer to the Xamarin documentation at https://developer.xamarin.com/guides/ios/deployment,_testing,_and_metrics/app_distribution/app-store-distribution/ .
First get these files (the .p12 and .mobileprovision files) into your repository. It is up to you where you put them. You can put them either at the proper platform project level or at the solution level; it does not matter, as long as they are in the repository somewhere.
Let’s take another look at the build definition, as shown in Figure 3-11, specifically the section named Signing & Provisioning. There are two ways to sign and provision your app: through file contents and through identifiers. If you choose file contents, you can specify the necessary files for signing the .ipa file. This can be done stand-alone; you only need the password that you provided when exporting the .p12 file. If you choose identifiers, you only have to specify some keys, and while building, the VSTS build agent will look for the required signing information on your Mac. This is probably not what you want, because this would require you to go into your Mac and download all the new signing information for each app you add in the Apple portal. Therefore, choose to use the file contents.
Now that you have the files in your repository, you can add them to your build definition. Go into your build definition and find the step to build the app. Select the Signing & Provisioning section in that step.
Figure 3-18 shows the result.

Figure 3-18. Configured code signing for the iOS app
There are a couple of things going on here. First, note how I unchecked the Build for iOS Simulator box again; you do not need this anymore. You want to build for actual devices now.
The most important part is going on in the section directly below that. With the browse buttons that appear after the input fields, navigate to where you put the code-signing files and select them. Then in the P12 Password field, you can either enter the password directly or, as you learned earlier, make it a variable and secure it like that.
Another thing you need to do is to go to the Variables tab and set BuildConfiguration to AppStore. This is the configuration you need to use to create distributable binaries. Save the build configuration and trigger another build.
If everything is set up correctly, this build should now succeed as well. If it does not, there are numerous scenarios possible; it is impossible to describe them all here. There are, however, two likely scenarios that I will mention.
The first is that you are getting errors about other projects in your solution, rather than the iOS one. In this case, the most obvious fix is to create a separate solution with only the projects necessary for your iOS app and build that instead.
The other common error to turn up states something like “No iOS signing identities match the specified provisioning profile (…).” In this case, there is something mixed up with the files you have generated in the Apple portal. Double-check that you have created the right certificate and provisioning file. Also check that the App ID you have in your provisioning file matches the one in your info.plist file. Figure 3-19 shows an example of the App ID in the Visual Studio designer for the info.plist file. This is available under the project properties for your iOS app. The value you are after is in the Identifier field.

Figure 3-19. App ID in the info.plist file shown in Visual Studio
Notice that the error message might have a random hash at the end, something like SD67HJS. This is your account ID with Apple and should not be part of your App ID.
The good news is that the iOS build is the hardest to get right. If you got it to work, the rest will be fairly easy.
Android
You can now turn to Android. Go back to the general build screen and add a new build definition, this time with the Xamarin.Android template. Go with the default options for now, unless you now think you know what you’re doing. Eventually you should see the screen in Figure 3-20.

Figure 3-20. A fresh Xamarin.Android build definition
Like the iOS template, this also has a “Restore components” step. Since I have already handled this, I will skip it for now. Also, the NuGet step is trivial and should just work, so let’s go directly to the building step. It seems a bit more extensive than the iOS one, and you do have some more options, but actually nothing new is going on here. If you do not have any specific configuration needs, you do not even have to touch this at all. One thing that does stand out is the fact that you are not building a solution in this build definition; instead, you are building a project. Make sure that your project is configured right by going to the “Build solution **.*/test*.csproj” step and disabling it for now. You can actually queue a new build right now, so let’s do that. If everything builds successfully, you have produced your first .apk file!
But just like the iOS binary file, this one must be signed before you can distribute it. Luckily, this process is a bit easier than with Apple. On Android, you only need a file that is called a key store. To create a key store, you have several options. The hardest one is to open up a console; the easiest one is to follow a wizard, which is available in both Visual Studio and Xamarin Studio. I will be describing the process with Visual Studio, but the Xamarin Studio steps should roughly be the same.
Within Visual Studio, first set your build configuration to Release and right-click your Android project. In the context menu, click the Archive option. This will bring up the screen shown in Figure 3-21. It will immediately start creating an archive for you as well, but do not worry about that. If you were to create an Android distributable manually, this is how you would do it.
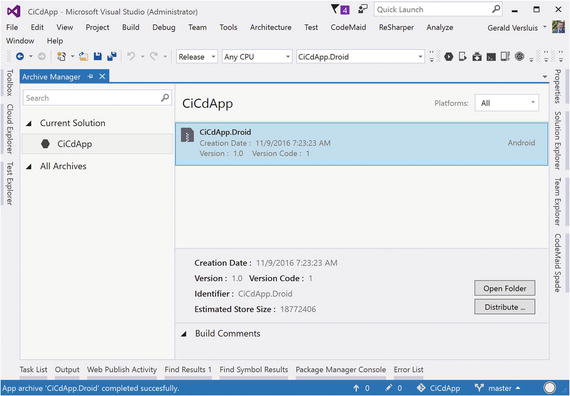
Figure 3-21. Archive screen in Visual Studio
Click the archive that was just created and then click the Distribute button, which will bring up a new screen that shows you all the signing identities you already have. If you have distributed Android apps before, there are probably some entries already in here.
Click the button with the plus sign near the bottom. Figure 3-22 shows you what screen pops up and how you should fill it out.
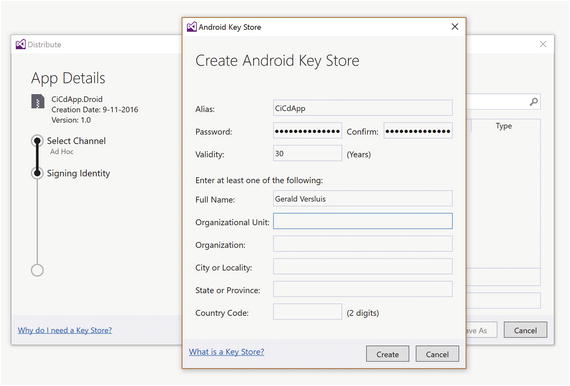
Figure 3-22. Creating a new signing identity
The alias is totally up to you and just a trivial name you reference it by. The password is going to be used to ensure that you can use only this key store to sign the app. Remember it for now because you will need to enter it in the build definition. When you have entered all the required fields, click the Create button; your new key store should show up in the overview. When you double-click the new entry, a screen pops up with all the details about it, and at the bottom there is a View in Explorer button. Take the file that has been created (only the .keystore file is needed) and add it somewhere to your repository so you can use it in your build definitions.
To make the signing work for Android as well, go back to the build definition and select the signing step. As you can see in Figure 3-23, I have put my key store file under the Signing folder just like I did for iOS. .

Figure 3-23. Completing the code-signing step for Android
Select the Sign the APK box and fill out the path to the key store file. Make sure to start at the root of your repository and use the full path. To finish, enter the password in the corresponding fields (the same password has to be provided in two separate fields) and provide the alias that you came up with just now.
Lastly, also check the Zipalign check box. While not completely necessary, this is highly recommended. If you want to distribute this version to the Android Play Store, your binary should be zipaligned. This is a specific Android optimization for the resulting .apk file. According to Google in the Android documentation, it does the following:
zipalign is an archive alignment tool that provides important optimization to Android application (APK) files. The purpose is to ensure that all uncompressed data starts with a particular alignment relative to the start of the file.
When you create this build definition, you let it use the hosted agent pool. You should be able to build the Android app on both the shared build agent and your own build agent. While you have configured the Mac build agent primarily for the iOS builds, the Mac should have all prerequisites to build the Android project as well.
There are a few reasons to choose your Mac build agent over the hosted one. First, when building your own agent, it does not count toward the limit that you have for build minutes on the free VSTS account. More important, the hosted agents have a default configuration, and that is what you have to work with. If you have any special requirements, you cannot use the hosted agents. Also, if you want to use a beta or alpha update to do a build or, the other way around, if you are not ready to update yet, that is all up to you because the environment is yours to configure. As for the hosted agent, it gets updated whenever Microsoft decides to do so.
Last but not least, debugging a failing build is a bit easier on the Mac. Because you have access to the file system and all the logs, it is a lot easier to see what is going on.
Universal Windows Platform (UWP)
The UWP app should be a real breeze. Since UWP is a Microsoft technology like VSTS, this is by far the easiest definition to configure. However, you do need to do some preparation, which has to do with signing your app for distribution.
Signing a UWP project is done with a .pfx certificate. In a default project there should be a *_TemporaryKey.pfx file (* is a wildcard; the name can vary), which can be used for test purposes but not for distributing. In Figure 3-24 you can see a UWP project with a couple of .pfx files.

Figure 3-24. UWP project with multiple .pfx certificates
You can create a new, distributable certificate by right-clicking the project and selecting Store and then Associate App with the Store. You will also notice the Create App Packages option; you can use this option to create packages manually. Since you want to automate it here, choose the first option.
A new screen will pop up, as shown in Figure 3-25. In this screen, you can choose the app name that you want to associate with your UWP project. By associating it, a new certificate will be created and assigned to your app. When building the app, it will automatically be signed with that same certificate. You can create an app name from the developer portal at developer.microsoft.com or you can do it right here from this screen.

Figure 3-25. Associating your project with an app name
Once you have done this, there is one important thing to note. By default, when using Git, .pfx files are ignored and will not be committed to your repository. So, you have to explicitly add the .pfx files to version control and commit your changes. If you do not do this, you will receive errors while building from VSTS since it will not be able to find the files.
If you have done this, go back to VSTS. Once more, go into the build screen and create a new build definition, this time selecting the Universal Windows Platform template. See Figure 3-26 for reference. Leave all the options at their default and let VSTS generate the basic build definition for you. Now you should be able to try to trigger a build that should succeed! It’s as easy as that.

Figure 3-26. The UWP build definition
If the build is not successful right way, the most probable cause is that it is trying to build other platform apps as well that cause errors. The easiest way to solve this, which I have already mentioned a couple of times, is to break up your platform projects into their own solutions.
Another common cause could be that signing still is not working. Double-check to see whether the certificate file is in the repository.
When you look a bit closer at the actual build solution step, you see that it comes with some MSBuild arguments. This specifies for which platform a build is made. Actually, when you look at the value of the parameter, you can see that there are three platforms. These three builds will result in one .appxupload file, which can be used for distribution.
Note that you should build this solution on the shared agent queue since building UWP apps is not supported on a Mac.
Final Thoughts
Now that you know how to create different types of build definitions for each platform, play a bit for yourself. There are several optimizations that can be done. You could, for instance, create separate solution files for each collection of projects you want to build. Or you could implement different build configurations to achieve the same thing. Also, you could implement more steps to slowly but steadily expand your build definition. Do not add too much at once, so that if a build fails, you know where to look.
There is a good chance that your first build did not succeed the first time; this is perfectly normal. It can be a tedious job to pinpoint what exactly went wrong. The logs are bulky, and you will need to do some digging to get the actual errors out. To help you with this, error messages are shown in red, and the logs can be reviewed per build task that is executed.
Everyone will go about this differently, but what works for me is to go back to Visual Studio, select the same build configuration as the one you are trying to build in VSTS, and select the same solution or project that you have configured in VSTS. Since Visual Studio and VSTS are both using the same build engine (MSBuild), they should produce the same results.
Keep in mind that this is not necessarily true depending on the errors that you are getting. For instance, if you forgot to commit a file to the online repository, it will build locally, but it will not build in VSTS. So, always ask yourself what the differences could be between your local machine and VSTS to trace the source of your error. This is how you can prevent the “It works on my machine” syndrome.
In the next chapter, you will look at some more advanced scenarios and features.