In addition to regular unit tests, there are numerous other types of tests that can be useful in their own way, such as automated UI tests. You could, of course, write a lot of test scripts and go through them each time you release a version. If your app is small and you are the only developer, that could work fine. But as your app starts to grow, you are supporting more and more platforms, and as your development team grows, doing these kinds of tests becomes undoable by hand.
Luckily, this is something that can be automated. Xamarin does a great job with this. You can create test scripts right in the code and run them automatically locally or send them over to Test Cloud and have them run for you on actual physical devices.
A First Look at Xamarin Test Cloud
Xamarin Test Cloud was first introduced in 2014. At that time, it launched with support for more than 1,000 physical devices. Xamarin also conducted a survey that pointed out that more than 80 percent of developers were relying on manual testing. At the same time, 75 percent of those developers declared that the quality of an app is the top priority when developing one. Thus Test Cloud was born.
In a warehouse in Denmark, Xamarin now has more than 2,000 physical (non-jail-broken) devices for you to test with, while still adding roughly 100 each month. These tests run fully automated, and the results can be incorporated into your favorite systems.
All the results come with all the details you, as a developer, want to know when a test fails. Statistics about memory, duration, and CPU usage are right there. But as an image speaks more than a thousand words, you can also see full-frame screenshots of every step of the way. Xamarin is even working on being able to show you a short video clip of the steps leading up to the failure of your test. And if all of this was not enough already, Xamarin has announced a feature that gives you the ability to get control over one specific device. So, when your app shows a bug only on a Micromax Canvas Knight Cameo running Android 4.4.2, you can upload your app, “grab” that device, and start a remote debug session on it.
All of this makes for a tremendous powerful test suite. Think about it: Android alone has 24,000 unique device types, and iOS has 20 hardware and OS configurations per this Test Cloud data sheet: http://cdn1.xamarin.com/webimages/assets/Xamarin-Test-Cloud-Datasheet.pdf . If you want to cover 75 percent of the market share in the United States alone, you will need about 134 devices. I do not know about you, but I do not have the money or the time to do that.
Enough about how wonderful Test Cloud is. “Surely, it is not all that perfect,” I hear you thinking. It pretty much is, but it cannot do everything. There are a few limitations: you cannot work with anything Bluetooth related, there is no camera support, and testing only happens over Wi-Fi. Most importantly, currently there is no support for Windows Phone.
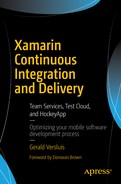
Also, it is a bit expensive. Contrary to most of the other products I describe in this book, Test Cloud has no free tier to start from; it does offer a 30-day free trial, though. After that, prices start at $99 per month for unlimited apps on one concurrent device for one hour a day. This means if your test takes ten minutes to complete, you can do six tests and then must wait another day to complete another six. If you wanted to have more concurrent devices (for instance, two), you could run two tests side by side and do it in half the time, effectively giving you the ability to run more tests in less time. See Figure 5-1 for the explanation on the Xamarin web site.
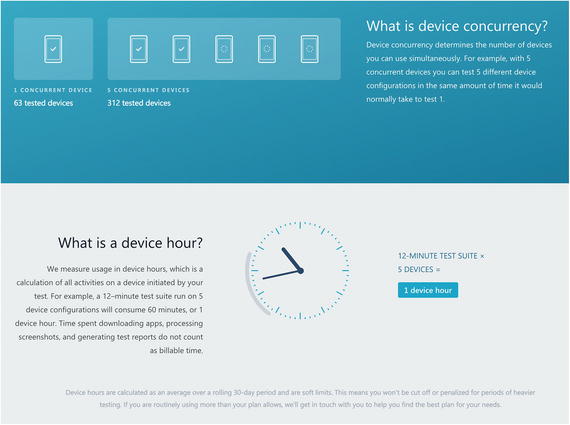
Figure 5-1. Explanation of concurrency and device hours on the Xamarin Test Cloud web site
For $380 per month, you will get three concurrent devices and five hours per day, and there are plans that give you even more.
As mentioned, this can come across as a bit much if you are just a single developer working from home. But as your app starts to grow and you find yourself spending more and more time hunting down bugs whenever a user reports them, you will soon find this is well worth the money. If you are an MSDN subscriber, you get a 25 percent discount. Also, if you enroll in Xamarin University, you will get some “free” hours to spend.
If you do have some test devices lying around, you can also run tests locally. This way you can still benefit from some time gained while doing automated regression tests. (Although this is possible, it will not be described in this book.)
All this greatness can be integrated in the continuous pipeline, as you will see later, and the best thing is it is not even exclusively for Xamarin apps! If you have apps lying around written in Java or Swift or whatever, you can also test them automatically using Test Cloud.
Creating UI Tests
Creating the actual tests can be done in several ways. First there are three techniques supported: Calabash, Appium, and Xamarin.UITest.
Calabash is based on Cucumber, a Ruby testing framework. Therefore, the tests are written in Ruby.
Appium is a web-driver-based test framework; it was introduced to Test Cloud halfway through 2015. It supports multiple language bindings including Java, JavaScript, Python, and PHP, so you can write your tests in any of these languages.
Xamarin .UITest is based on NUnit and has full IDE support in Visual Studio and Xamarin Studio. The things you can do are the same in both frameworks, which can make the choice for one framework over the other hard. In the end, it is just a matter of taste and whatever you feel most comfortable with. In the Xamarin documentation at https://developer.xamarin.com/guides/testcloud/choosing-a-framework/ , you will find a simple flowchart to help you with your decision, as shown in Figure 5-2. Appium is not shown, but where it says Calabash you could substitute Appium.

Figure 5-2. Making a choice on the testing framework (source: Xamarin documentation)
Basically, if your app is also a Xamarin app, you should use Xamarin.UITest. This will make it easier to start writing tests because everything will be in C#. Also, if you want to run the tests locally and not in Test Cloud, this is the choice for you.
If your app is written in Java, Objective-C/Swift, or even a hybrid app, you should choose Calabash. No special tooling is required; you can write tests in Ruby in your favorite text editor or Ruby IDE and upload the script as part of your CI builds.
For the remainder of this chapter, I will assume you are building a Xamarin app, and thus I will use the Xamarin.UITest framework. As a bonus, you can then also use the Xamarin Test Recorder. At the time of writing, this tool is in preview. It does what it sounds like: it record tests. Normally you would write the tests by hand by using Visual Studio or Xamarin Studio, and then you would spend some time on figuring out how to reach that one control. Test Recorder helps you with this. With Test Recorder, you can run your app as you normally would—on either the emulator or a physical device—and as you go through your test script, all the steps are written for you in C# code. The only thing that remains when you have recorded all the steps is to add the assertions.
There are some requirements when you want to use the Test Recorder. For more information on this, please refer to the Xamarin documentation page at https://developer.xamarin.com/guides/testcloud/testrecorder/ .
If you want to follow along with the rest of this chapter, make sure you have signed up for Test Cloud. It should be a pretty straightforward process. Just go to https://www.xamarin.com/test-cloud and either start a free trail or sign up for a plan immediately.
Creating a test consists of roughly two steps: creating a test run, which defines the devices and OS versions you want to run the tests on, and the UI tests, which are the actual test scenarios and steps that define a test.
Creating a Test Run
A suite of multiple tests is called a test run. To create one, log into your Test Cloud account. When you do, you will be presented with a dashboard screen, which should look like Figure 5-3.

Figure 5-3. Test Cloud dashboard
When you log in for the first time, you will see some sample apps. These can be helpful when exploring Test Cloud for the first time. If you want to see what is down the road, click around in them a bit. You will see how the test results are presented and what the possibilities are without having to upload your own app.
Whenever you are ready, click the New Test Run button in the top bar. In the screen that pops up, you have to choose whether you will be creating an Android or iOS test run. When you have decided, you will be taken to the next screen where you get to choose the devices that you want the tests to run on. For this example, I have chosen the iOS path, but I assure you the Android process is the same, except for the devices you get to pick.
The list of devices is actually easy to work with. You can sort it by the following:
Estimated wait time: Since Test Cloud works with physical devices, there is only a limited number of devices available. As the number of users is growing, there will be some waiting before your test can commence if the device of your choosing turns out to be a popular pick. With this option, you can select the devices that have a short queue time.
Availability: With this option, you sort the devices by how generally available they are. The more people who own a device, the higher it will be on the list. This way you can easily target the most popular devices.
Name: This one should be self-explanatory; it just arranges the list of devices from A to Z.
OS version: When you choose this option, you will rearrange the list by version of the OS, with the newest first. Note that prereleases are not supported. Only versions that have been released to the public are available. So, you cannot use Test Cloud to test your app on prerelease versions.
Figure 5-4 shows the screen where you can select and sort devices .
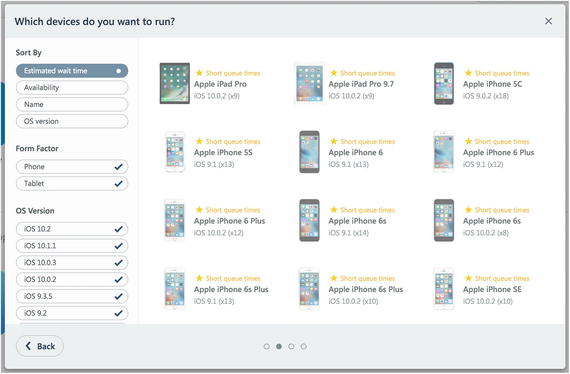
Figure 5-4. Choosing the devices to run your tests on
In addition to sorting, you can filter the list of devices. Check or uncheck a specific form factor or hide certain OS versions or hardware.
Whenever you see a device that you want to include in the test cycle, simply click it and then click the next one to select that one as well. Select at least one device to proceed. There is no upper limit; I have tried selecting more than 100 devices and Test Cloud continued without any problems. Just remember your device hours and concurrency. This means if you write a test that takes 1 minute, you will be able to run it on a maximum of 60 devices each day on the first tier, and thus you never can run your test on all 100 devices.
Whenever you are happy with your selection, click the Next button, which takes you to a screen where you need to configure the last part. Here you can connect this test run to a certain series with which you can basically divide your test runs into a category. You can then not only trigger a certain test run but also a series that can contain multiple test runs.
The other thing you can configure here is which system language your selected devices should have. Before the test run commences, the devices’ language will be set to the one you have set here .
From there you go to the last screen. While you would expect at this step something gets saved into your Test Cloud account, that is not the case. Instead, you will be presented with some command-line commands, as shown in Figure 5-5.
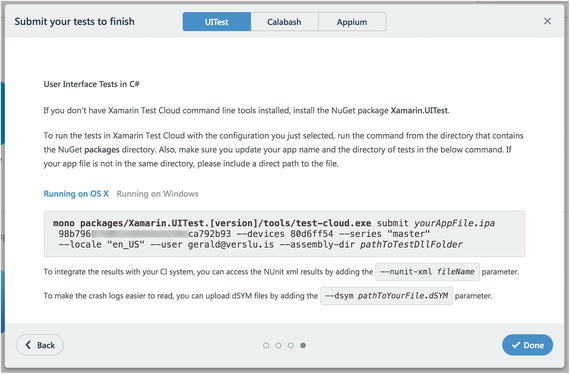
Figure 5-5. Final screen of creating a test run
So, when you reach this screen, do not just click the Done button because you will have to go through the whole procedure again. Instead, copy the whole command to somewhere for later use.
If you look at it closely, you can figure out all the different ingredients that you have used before. Most importantly, there is the devices switch: -devices 80d6ff54. This hash resembles the device configurations that you have selected, and this is the one you need later in order to specify on which devices you will run your tests.
The other important thing here is the hash after yourAppFile.ipa, which is obscured in Figure 5-5. This is your API key. You will need this later.
With all this in place, you now have everything to start writing actual tests, which is what you will do in the next section .
Creating a App UI Test
Before I will show you how you can create UI tests with the Xamarin.UITest framework, I will expand my CiCdApp a little bit so that there is something to test. If you are not interested in how the testing applies to my sample project but rather would like to link it to your own, you can skip the next section and go right to “Write Your Tests.”
Expanding the Sample App
To show you how Test Cloud works, I will create a simple interface for my app so you can look at the basic concepts. For my app, I will be using Xamarin.Forms, but most of the procedures should be identical. I will try to point out where the process differs and why.
Up until now my app was not much more than an empty shell to demonstrate continuous integration and building. To show you how creating tests work, I will add a little bit more body to my application. In the MainPage.xaml file, I will add one text box and two buttons; one button will add some text into the text box, the other button will not do anything. In XAML, it will look like the following:
<?xml version="1.0" encoding="utf-8" ?><ContentPage xmlns="http://xamarin.com/schemas/2014/forms"xmlns:x="http://schemas.microsoft.com/winfx/2009/xaml"x:Class="CiCdApp.MainPage"><StackLayout VerticalOptions="CenterAndExpand"HorizontalOptions="CenterAndExpand"><Entry x:Name="MyTextEntry" AutomationId="TextEntry" /><StackLayout Orientation="Horizontal"><Button Text="It's all good" x:Name="MyGoodButton"AutomationId="GoodButtonForTextEntry"Clicked="MyGoodButton_OnClicked" TextColor="Green" /><Button Text="BOOM" x:Name="MyBadButton"AutomationId="BadButtonForTextEntry" TextColor="Red" /></StackLayout></StackLayout></ContentPage>
Notice how I have given all the controls a name, but also I have specified the AutomationId attribute. This attribute was introduced with Xamarin.Forms 2.2.0; before that, the StyleId property was commonly (mis)used. The purpose of this property is to easily identify a control and access it within your tests. You will learn how you do this in the next paragraph.
This piece of XAML results in the interface shown in Figure 5-6. Here you see the output with a green button and a red button under a text box. The green button represents a successful test; the red button represents a failing one. Of course, since the app is built with Xamarin Forms, the Android and UWP projects will show similar output.
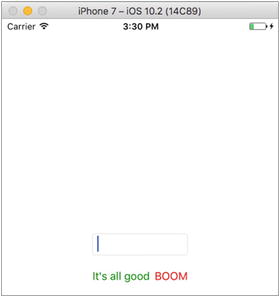
Figure 5-6. The expanded sample app
Also, notice the event handler attached to the green button. This has some basic code to set the value of the text box, like so:
private void MyGoodButton_OnClicked(object sender, EventArgs e){MyTextEntry.Text = "TADA!";}
Handling events and referencing controls from the code-behind is not a best practice and should be avoided in favor of testability and reusability, but since we are not focusing on the actual tests here, this will suffice for this example.
The other (red) button will should enter a text in the input field, but we do not implement this functionality on purpose to create a failing test.
This concludes the expansion of my sample app so I can show you the basics of writing a UI test for Test Cloud, which you will do in the next section.
Write Your Tests
There are a few things I need to cover before you can run your tests. The first step applies only to your iOS project; install the Xamarin.TestCloud.Agent NuGet package. To make sure the Calabash library is initialized, also go into your AppDelegate.cs file and add this piece of code:
#if ENABLE_TEST_CLOUDXamarin.Calabash.Start();#endif
The position does not matter; I tend to add it at the beginning. If you are a more experienced developer, you probably know what this does. With a compiler directive, you specify that this piece of code will be included only if the ENABLE_TEST_CLOUD constant value is in your project’s current configuration properties. If you are using Visual Studio, this means whenever you switch the build configuration (i.e., to Debug or AppStore), you will see this piece of code light up when the constant is defined in your project properties for this configuration.
Note
Make sure the ENABLE_TEST_CLOUD compiler directive is not enabled in the build configuration that you use to create an App Store build. The Test Cloud Calabash libraries use some private Apple APIs, which will not pass the App Store review process.
To see which constants are defined, go to your iOS project, right-click, and choose Properties. On the Build tab, you will find what you are looking for. Figure 5-7 shows this tab with the current constant values.
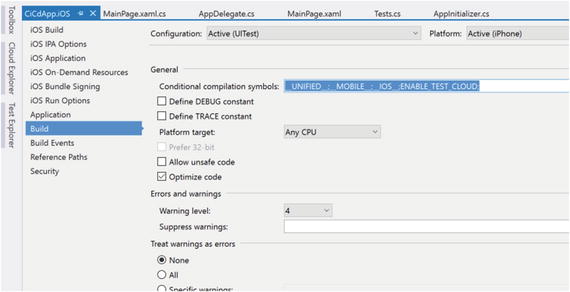
Figure 5-7. Build tab of the iOS project
In the “Conditional compilation symbols” box, you can define your own symbols. In newer versions of Xamarin Studio and Visual Studio, the Test Cloud flag should already be there. With this, you can include (or exclude) certain pieces of code based on a certain build configuration. People can debate whether this is a good way to do this, but personally I do not think so; however, for this kind of use case, it is useful.
As you can see in Figure 5-7 I have created a separate configuration for the UI tests. This configuration has the ENABLE_TEST_CLOUD flag, and thus the Calabash library is linked and executed. You will learn more about using this in the next chapter.
While you are in the iOS project properties, go to the iOS IPA Options tab and make sure the check box “Build ad-hoc/enterprise (IPA) ” is selected. This will build an actual .ipa file. This is the executable file for iOS devices, which you will need to run your tests with.
After completing this, you can add the actual test project to your solution. Right-click your solution, click Add, and choose New Project. See Figure 5-8, which shows the new project screen. You can find the UI Test App template under multiple categories; they are all the same. The most obvious place is Test. If you look at the other options here, you can see test projects for unit tests as well as UI test projects specifically for iOS and Android. My sample CiCdApp, however, is a Xamarin.Forms app, so I will choose the cross-platform one. Writing tests should not be any different; only the selection of (UI) controls will be a bit different, as you will see in a little bit.
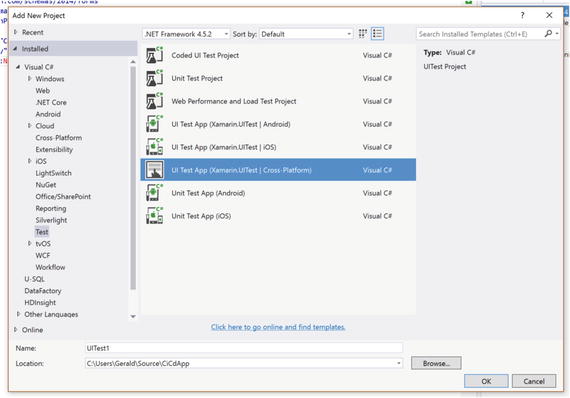
Figure 5-8. Adding the UI Test App project to your solution
After naming and adding the new test project to your solution, you see it pop up in the Solution Explorer in Visual Studio. It consists of two files: AppInitializer.cs and Tests.cs. As you may expect, these files contain global app configurations and concrete test cases, respectively.
Before getting into these files, there is one thing you need to do to prepare your test project, and that is to reference your app projects. In the newly created test project, click the References node and then choose Add Reference. In the screen that comes up, check the iOS and/or Droid project and close it with the OK button.
In the AppInitializer.cs file you can tweak the configuration of the overall test app. This includes enabling the local screenshot functionality, taking screenshots when running a test locally, configuring an IP address for your device, and interacting with other apps on the device. The default configuration will do fine for now; this just does the basic configuration based on the platform you are running the tests for.
Tip
Taking screenshots increases your device time a bit, which can start to add up as your tests grow. You can declare a global variable with which you can easily enable or disable the screenshot functionality.
The Tests.cs file contains concrete tests. Take a look at Figure 5-9 for the generated code in this file.
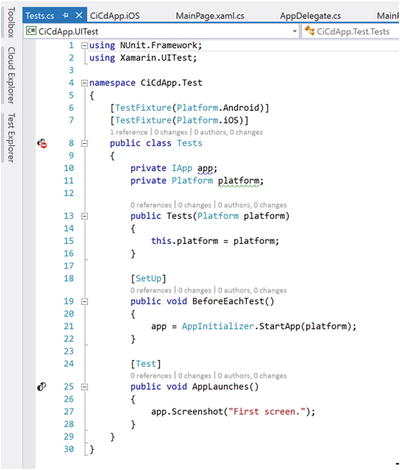
Figure 5-9. Default generated test code
A few things should stand out. Let’s start from the top. Above the class declaration you see two TestFixture attributes. A test fixture is a group of tests (it can also be just one) that logically fit together. What logical means is up to you. You could group them by platform, type of functionality, and so on. To do this, just create a new class, give the class a name you can easily identify it with, and apply a new TextFixture attribute with a value you can identify this set of tests with.
If you look a bit further to the other attributes, you see SetUp and Test attributes above two methods within the class. The SetUp attribute denotes a method that will be run before each test method. With the default code shown in Figure 5-9 before each test, the IApp instance is initialized again. This happens so that values and states remembered in that instance do not influence other tests. If there is any other code that should be initialized before each separate test, put it here.
The IApp instance contains all kinds of ways to interact with the UI. With this object, you can simulate tapping controls, swiping, scrolling up and down, and much more. The instance also provides access to information about the device and gives you the ability to print something to the logs .
Note
The IApp instance does not mean the actual running app. The running app will remain the same. For instance, when you look at the CiCdApp sample when you click the button, the text will stay in the text box until it is cleared. The app will not be restarted or cleared in between the different tests.
Each method that is marked with the Test attribute is a test run. One method will translate to one test in Test Cloud. For the test methods, the Arrange-Act-Assert pattern is advised. If you have worked with testing before, this will sound familiar.
There are not any real technical implications; this is just a way of writing your tests. You first write some code, which is needed as preparation for this specific test; then you arrange everything for your test case. The next step is to do the actual calls for your test, so you act. Here you execute the actual logic.
Finally, you match the actual results with the results you are expecting, which is where you assert the outcome. With one or more assertions, you check each condition, for example, whether the value in the text box changed, whether the user navigated to the next page, and so on.
This is the pattern I will be using in the upcoming tests. For clarity I will distinguish the three sections by comments in each test method. This is something I tend to do in real life as well to increase readability for the next developer who looks at these tests.
Let’s take a look at writing some simple tests. I will enrich the Tests.cs file with some extra tests, which you can find here:
[Test]public void AppLaunches(){// Not a real test, just here to have some first referenceapp.Screenshot("First screen.");}[Test]public void Press_Good_Button_And_Pass_Hooray(){// Arrange// Nothing to arrange for this test// Actapp.Tap(e => e.Marked("GoodButtonForTextEntry"));app.Screenshot("Test TADA! entered");// AssertAssert.AreEqual("TADA!", app.Query(e =>e.Marked("TextEntry")).First().Text);}[Test]public void Press_Bad_Button_And_Fail_Boo(){// Arrangeapp.ClearText("TextEntry");// Actapp.Tap(e => e.Marked("BadButtonForTextEntry"));app.Screenshot("Text should not be entered");Assert.AreEqual("TADA!", app.Query(e =>e.Marked("TextEntry")).First().Text);}
In this code snippet I have shown only the test methods; the rest of the code in that class has not been changed. I will cover the test methods briefly; they should be pretty straightforward.
The AppLaunches test is just there to provide a starting point. You will receive a screenshot of the first screen, and that is it. If that does not fail with any exceptions, the test will pass.
There are two other tests here, and the method names describe what the test does and what result is expected. Although in this case they could be more descriptive, this is a common thing to do when writing tests. The Press_Good_Button_And_Pass_Hooray method is already modeled with the Arrange-Act-Assert pattern. Since there is nothing specific to arrange, you can skip that and go right to acting. In this case, you should find the green button and tap it. This is done with this line: app.Tap(e => e.Marked("GoodButtonForTextEntry");. As mentioned earlier, you know that the app variable holds an instance of the IApp object and can be used for interactions with your controls. Inside the Tap method, you can see a lambda expression to find the right control. While you can locate controls in any way you want, I find the easiest way is to use the AutomationId I have specified with all my controls. If you have set the AutomationId property, you can find it with the Marked method, or you can even leave the Marked method out and use the shorthand app.Tap("GoodButtonForTextEntry");. After it is tapped, you can take another screenshot so you can verify the outcome visually. The final step is to assert.
The Assert object is a static object that has all kinds of functions to compare values. In this case, with the line Assert.AreEqual("TADA!", app.Query(e => e.Marked("TextEntry")).First().Text); you check your expected value (TADA!) against the actual value in the text box. You obtain a reference to this control, again with its AutomationId value (in this case TextEntry), and just get the value out of the Text property. If they are equal, the test will succeed. My last test, called Press_Bad_Button_And_Fail_Boo, basically does the same thing; however, the button will not enter any text in the text box. Since you do expect it to according to the assert statement, you know beforehand this test will fail.
Before you send these tests to Test Cloud for processing, there is one more important thing to note. The AutomationId property I have been using a lot now is a very Xamarin.Forms-specific concept. Traditional Xamarin projects do not enrich the controls available with AutomationId, and this attribute by itself does nothing, not even in Xamarin.Forms. Remember, all that Forms does is “translate” abstract controls to the native controls on that platform.
Because of this, you must pass the value you use to identify a control, which you keep in the AutomationId property, to a property in the native control as well. This should be a property that is available in all controls. For iOS, the best choice is AccessibilityIdentifier; for Android it’s ContentDescription. At this time, Xamarin does not make this translation for you, and maybe it never will in order to keep it flexible and a choice for you to make. However, Xamarin has defined these two native control properties as the equivalents of the AutomationId property. Because of that, the Marked method to identify a control looks at these native properties.
To get the values into the right native properties, you must add some extra code to your apps.
For iOS, go into your AppDelegate.cs file and find the FinishedLaunching method. This is the method where you also added the Test Cloud initialization code. At this point, add the following piece of code after the Forms.Init(); line:
Forms.ViewInitialized += (object sender, ViewInitializedEventArgs e) => {if (!string.IsNullOrWhiteSpace(e.View.AutomationId)){e.NativeView.AccessibilityIdentifier = e.View.AutomationId;}};
This hooks into the event handler on a very high level, triggering whenever a View object is initialized. When that happens, you set the iOS native property AccessibilityIdentifier to the value of AutomationId in your Forms control. Depending on how complex your UI is, you might want to wrap this in the ENABLE_TEST_CLOUD compiler directive so it is executed only whenever you create a Test Cloud build.
Something similar is needed for Android. Here you go to the MainActivity.cs file again, and in the OnCreate method you add the following piece of code, also after the Forms.Init() method:
Xamarin.Forms.Forms.ViewInitialized += (object sender, Xamarin.Forms.ViewInitializedEventArgs e) => {if (!string.IsNullOrWhiteSpace(e.View.AutomationId)){e.NativeView.ContentDescription = e.View.AutomationId;}};
If you are not using Forms but building an app with traditional Xamarin, you can just go ahead and fill the AccessibilityIdentifier and ContentDescription properties directly.
With what you have learned, you now know all the basics to go and write your own tests! I could elaborate a lot more on all the methods that are available or sum up all the best practices, but that is enough material to fill a book on its own. Since I am focusing on CI and CD, I will not handle all of it here. I do hope that I have shown you how easy testing is to set up and how powerful tests can be. If you want to dive into the topic deeper, a good starting point is the Xamarin documentation at https://developer.xamarin.com/guides/testcloud/introduction-to-test-cloud/ .
Tip
Earlier I mentioned the Test Recorder application. This application can help you write your UI tests a lot quicker. Test Recorder runs alongside your emulator or physical device and turns all the interactions you do with your app into UI test code. The only thing that remains is to add the arrange and asserts to complete your test cases. Since you only have to click through your app, you can even have your tester do it!
Running Your Tests in Test Cloud
Now that you have some tests, let’s see if they work!
As you may recall, there are two different ways you can run the tests: locally on an emulator or physical device or by sending them to Test Cloud. When you run tests locally, it goes without saying that they will not eat into your device hours, and you can run them as much and as long as you like. But, if you run them on an emulator, this will not necessarily represent a physical device. While you can incorporate your devices you have lying around in your building pipeline, this is probably not something you want. If you did that, you would have to maintain the device, install updates, and make sure it still works from time to time—all stuff that you do not want to be bothered with.
I will be focusing on running the tests on Test Cloud. There are a few ways of uploading your tests. In the remainder of this chapter, I will cover how to upload a test manually and look at the results. In the next chapter, you will learn how to integrate these tests as part of your automated builds.
The first way to upload is through the command line. Remember the command that you got presented with on the Test Cloud dashboard when you were creating a test run? That is the command you can use now. Find the test-cloud.exe executable in the packages folder of your solution and gather your app’s .ipa and/or .apk file and the folder that contains your test DLL. Then invoke the command you saved earlier in a terminal window. This can be done from either Windows or Mac. In Figure 5-10 you will see what it looks like to upload and run tests in a terminal window on the Mac .
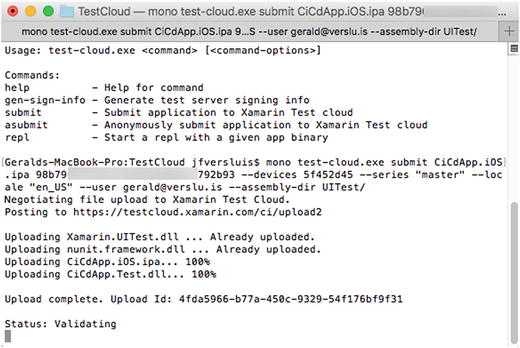
Figure 5-10. Uploading the tests through the command line
Besides the options that are shown in Figure 5-10, there are a couple more you can use to influence the process. For instance, you can run only a specific category. To get help for this tool, just type mono test-cloud.exe help.
Right after uploading the test, it will be run on Test Cloud. If you were to go into the dashboard now, you would see your test show up there.
Another way of doing this is through the IDE. Both Visual Studio and Xamarin Studio have options in the context menu of the testing project to send all the needed files to Test Cloud. Under the hood it executes these commands for you, but it looks a bit more user-friendly.
After examining the output in the console window for a while, the status should change to something that states your tests are being executed. When you now go to the Test Cloud dashboard, you will see your app show up, and when you click it, the test runs for this app. In Figure 5-11 you can see how the test is being executed right now.

Figure 5-11. Test being executed on Test Cloud
After a few test runs, you will see a summary of all the results. Test Cloud will show you how many tests are executed each run, how many passed or failed, what the app size was, and how much memory was used .
When the test is complete, it will show up in this screen; also, the results will be visible in the terminal window. Click the test to view the detailed results for this run. Figure 5-12 shows the screen.
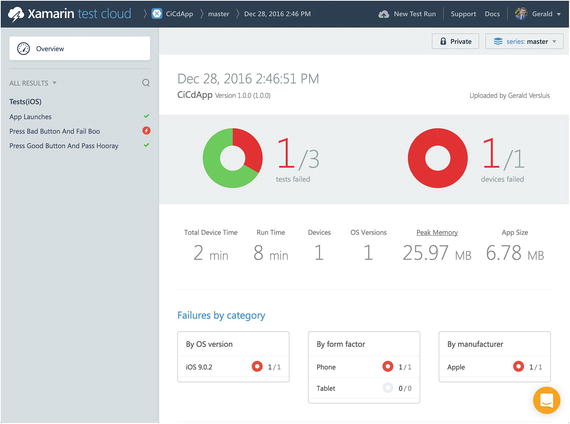
Figure 5-12. Results of the first test run
In this screen on the left, you see all the different tests that you have defined in your test fixture. I will get back to those in just a second. The right part of the screen shows an overview of this run. There are convenient diagrams and numbers that sum up how it went. In this case, you see that one test out of the three have failed, and thus one out of one device failed. Right underneath you see how much device time you have used up on how many devices, and so on.
Below that, there is some more data that is categorized by OS, form factor, and other criteria.
On the left, you see the different tests. You can see the method names that you gave them, and Test Cloud even replaced the underscores with spaces for readability. You can also see in one glimpse which of these tests failed. When you click one of the tests, you will see all the steps that are taken in this test .
When you click the failed test, you will see the test device appear on the right along with some technical details about it. Take a look at Figure 5-13, which shows this screen.
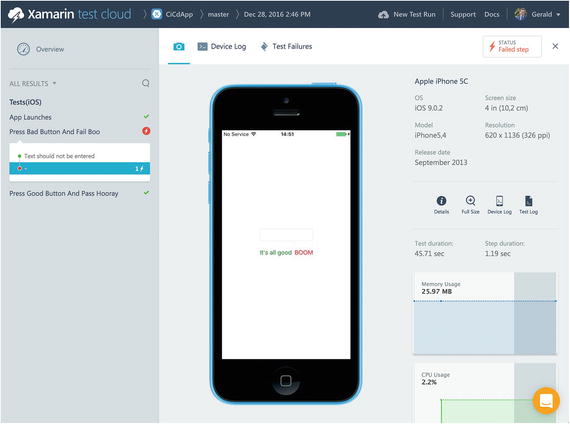
Figure 5-13. Detailed result of a test
To diagnose what exactly went wrong, you can go to the Test Failures tab. This shows the outcome of the assert statement, in this case: “Expected string length 5 but was 0. Strings differ at index 0. Expected: “TADA!” But was: <string.Empty>.” So, now you know what went wrong, or maybe what went right with a wrong test.
If you need to examine in more detail what seems to be going wrong, you can also go into the device or test log.
Whenever you have multiple devices selected for this test run, you will see all the selected devices on the right side along with a red icon on the top right to indicate whether that test failed on that specific device. You could then zoom in to the view, which is shown in Figure 5-13.
In this chapter, you saw how to write tests and run them on Test Cloud. I hope you get to play with Test Cloud for a bit and you get as enthusiastic about it as I am. You will soon find out how powerful it is. I distinctively remember one of the first test cases I wrote. It was a single page with a button near the bottom of the page. At the time, I had an iPhone 6, and it all worked perfectly and looked nice. I decided to write some tests for it to see how it would act on other devices and form factors. For my test run, I selected a variety of devices ranging from iPhone 4 devices up to iPhone 6 Plus devices. It was such a simple screen that I did not expect much from it. To my big surprise, on some devices it failed!
Upon inspection, it turned out that the test failed on devices with a smaller form factor, and I looked into what went wrong according to the logs. It said something along the lines of “Unable to tap element.” Time to look at the screenshots! I noticed that the button on the bottom was not visible. Curious as to what was going on, I fired up the project on a simulator and immediately noticed what was wrong. I forgot to add a scroll to it, so on smaller form factor devices the user was not able to reach the button. Hence, the app could not be interacted with, and I would have never noticed without these tests .
If you think about this for a second, this is really powerful. I wrote the tests for interacting with my app in code, and in code the control could be found. But the tests and Test Cloud simulate interactions so well that they also notice when something is off-screen and cannot be reached by a real-life user.
Final Thoughts
I hope you are as enthusiastic about Xamarin Test Cloud as I am. This is really a unique service. With a (relatively) small investment, you are able to test your app on devices that you did not even know existed. You will get a grip on regression within your code and locate bugs on specific devices with different operating system combinations. The best part is that it is not solely for Xamarin apps!
In this chapter, you learned what Test Cloud is and how you can start writing tests for it. You learned how to upload your app to Test Cloud and run a test on it. While this is working great, your goal is to automate as much as possible. That is what you will be looking at in the next chapter, where you will see how you can run tests as an integral part of your build.