
In the earlier chapters of this book, you learned how to set up automated builds and how to enrich them with tests. Starting in this chapter, you will learn about continuous delivery.
Now that you know how you can build your code automatically and have several quality assurance methods in place, you can step up your game. Continuous delivery is the logical extension of everything you have learned so far. An application is basically nothing until it is in the hands of users, so distributing it to them and getting their responses is extremely important.
I remember the first time I launched an app to a store. A lot of work went into it, and I was finally happy with how everything looked and functioned, so I submitted it. It was a Windows Phone app, and at the time, reviews were not in place yet, and HockeyApp was not born. So, when I got an e-mail that my app was now online and everyone could download it, I was pretty thrilled. How many people were downloading it? Did it work the way I intended? What was going on? But as you might imagine, it stayed quiet. Then (and even now) the download numbers came in delayed by a day or more, and people, certainly strangers, are not always inclined to provide you with (constructive) feedback.
To get any feedback at all, I messaged some friends and family members to get some kind of response. Within a few minutes I got word that the app crashed right at startup. My mind was going into overdrive; how can that be? I tested it, even on a physical device. I had no clue at the time. That is when I learned that a tool like HockeyApp is indispensable. Not only can you get feedback right away, but when things go wrong, you also can find out what is going wrong and where to look for it.
If, like me, you have distributed or deployed software before, you probably know it can be a repetitive, meticulous, and sometimes tedious job. This is not what humans are great at. But since distributing and deploying involves computers and systems tied together, they are perfect candidates for automation.
In this chapter, you will take a look at HockeyApp, the distributing service now owned by Microsoft. I will give you a quick overview of everything it offers you, and then I will cover all the prerequisites you need to send your app from VSTS to HockeyApp. Since I am focusing on Microsoft technologies, HockeyApp will be the focus, but of course there are other options such as Bitrise and Fastlane. The appendix of this book describes a few alternatives to HockeyApp.
A First Look at HockeyApp
The services of HockeyApp have been around for about a decade now. The core functionality is the distribution of apps, but HockeyApp has also ventured into the world of metrics, crash reports, and user feedback.
When Microsoft acquired HockeyApp in 2014 and Xamarin in 2016, HockeyApp and Xamarin Insights had some overlap in functionality. While HockeyApp was focusing on distribution and crash reporting, Insights was more about metrics, following a user’s path throughout the app, and crash reporting. You can imagine that these two products combined can be a powerful tool for a business or developer to track an app out in the wild.
At the time of this writing, the transition from Insights to HockeyApp is not complete yet; customers lucky enough to have an Insights account can continue to use it, but Insights is not accepting any new customers. However, you can sign up for HockeyApp right now, just without the great-looking statistics that Insights has to offer.
But the transition does not stop there. At the end of 2016 Microsoft announced Visual Studio Mobile Center. In time, this will be the hub for everything mobile. Here you can distribute your app, as well as see your Test Cloud results and even establish an automated CI/CD pipeline in a very user-friendly way. Mobile Center, however, will not replace VSTS; it will be more like a stepping stone to the fully featured VSTS. You can learn more about Mobile Center in the appendix.
To see what HockeyApp has to offer, you will look at its four main functionalities: distribution, crash reports, feedback, and user metrics. Then you will start preparing for the continuous delivery part of things and start defining your apps in HockeyApp.
Distribution
Getting your app to your end users or testers is important. As you may remember, one of the main things you want to achieve here is to have the shortest feedback cycle possible. This way you will know when something is wrong early on so it is easier to fix.
Going through the hoops of distributing can be a troublesome process. You have to go to each vendor’s separate app store, upload your binary, and maybe wait for the company to review it; at every step there are multiple things that can go wrong. This can be a serious delay in your development cycle.
Also, each app store has its own set of features. For example, while Google has multiple ways to recruit testers and put them in separate target groups, Apple has only internal and external testers who must be invited manually. Google has A/B testing, but Apple and Microsoft do not have anything like that.
To provide a unified way for you to distribute your apps, HockeyApp was born. HockeyApp allows you to upload new versions of your app and distribute them instantaneously. Because distribution happens outside of the regular app stores, you can push your app to your end users or testers right away.
Also, HockeyApp has extensive user and group management . You can divide people into groups, work with tags, and assign people different roles such as developer, member, or tester, each with their own permissions.
Developers can add apps, change all the details, and upload new versions; basically, they are the admins.
Members can view all the data of the app but not edit it. They can, however, answer to feedback that comes in from users.
Testers can download and install the app and test it.
If you have developed for iOS before and worked with test versions, you might know that you need to collect the device ID for each device that you want to include in your testing. This ID is known as the unique device identification (UDID). When you collect a new UDID, a new build must be created and rolled out. While the last part is not going away, you still need to create a new build whenever you add a new UDID, but HockeyApp does help you with collecting the device ID. Whenever a user creates an account on their device, with Safari, the UDID will be collected automatically. This is a great gain since finding the ID can be a hard process for the user.
Note
For an easy alternative way to collect a UDID, please refer to Chapter 9.
Recruiting testers is something HockeyApp can facilitate for you as well. There are basically two ways of approaching your audience: by invitation or by letting them sign up themselves. If you invite the users, you automatically have full control over which specific person you invite and when. In the other case, you set up a public site to which users can navigate and sign themselves up. You still have some control over the maximum number of testers and whether you have to approve their application first. With this method you can set up a full public test if that is what you are after.
All in all, HockeyApp has a lot of great features that can help you get your app out there. You will see its features in a bit more in detail later in this chapter when you set up your apps.
Crash Reports
Another thing that HockeyApp can be used for is crash reporting. Implementing is simple; just install the HockeyApp SDK, maybe add one line of initialization, and that is it!
Whenever an unhandled exception happens, HockeyApp will catch it and turn it into a crash report for you. Not only does it inform you that a crash happened, it will also supply you with the full symbolicated stack trace. But it does not stop there; if the data is available, it will also tell you to which user it happened and what the device specifics are. This way, you have all the information available to fix the bug even before a user has reported it to you.
Automatically, you get statistics about crashes. You can see how many of your users are impacted, when the first and/or last occurrence was, and more. With this information, you can prioritize your bugs and see whether a certain bug was fixed.
The great thing about all these products now being owned by Microsoft is that the integration is profound. For instance, you can set up a link with a bug tracker system so that whenever a crash occurs, it will result in a bug report in the bug administration that you already have in place. The integrations are not limited solely to Microsoft products, however. You can also create a link to Jira, GitHub, Mantis, Trello, and many more products.
Feedback
When your app is on the devices of the users or testers, you probably want to know what they think. The most obvious way to collect feedback from your users is by just letting them send you an e-mail. This will work fine with just a handful of users, but in a company environment or when you have larger numbers of users, administering feedback through e-mail is not the most efficient way.
HockeyApp can help you with that. You can collect feedback through various ways: through the download portal, from right within your app, and via e-mail. The power of collecting your feedback through HockeyApp lies within the aggregation of it. All feedback is available to you through the web interface in an ordered manner. You have the ability to respond to it, at which point the feedback is transformed to a discussion and you can interact with the user about it.
This functionality is useful not only in test versions of your app but maybe even more so in the version that is out in the app stores. Usually your testers are people you know, and they will cut you some slack. When your app is generally available, people will not hesitate to give you a single-star review whenever they do not like something. From there, it is hard to come back.
Just like the crash reports, feedback can have a direct relationship with items in your ticket-tracking or bug-tracking system. You can set up integration with VSTS with just one check box, but a variety other environments are available as well.
The end users are the most important part, and they always know best, so make sure they can reach you in the easiest way possible.
User Metrics
With all the data being gathered by HockeyApp, there are a lot of metrics that can be deduced from it. You can see how many people downloaded your app, how many crashes there were, the number of active users per day or month, and so on.
One functionality that has been ported from Xamarin Insights to HockeyApp is the ability to track specific events. Basically, you add a line of code to identity a certain event, and whenever a user triggers that piece of code, it will report to HockeyApp that the event was triggered. This way, you can measure how often a certain feature is used or even introduce some simple A/B testing to your app.
This functionality can end up collecting data that is privacy-sensitive, so make sure you make it clear to your end users what data is being collected and why.
Setting Up Your App for Delivery
Now that you have seen what HockeyApp can do for you, it is time to get your hands dirty. There are two ways to set up your app within HockeyApp; you can either upload a binary you have or create an app definition and supply a binary later. I will cover the latter option here. If you choose to have a binary and work from there, the procedure is identical for the most part, but some details about your app like the name and icon are already filled in for you.
If you have not already done so, sign up for an account at HockeyApp and make sure you are logged in. With a free account, you will be able to add up to ten apps. Do not let Xamarin fool you into thinking you are just building one app; when it comes to distributing your app, it will still be counted as a separate app for each platform. So, if you have one app that is targeting iOS and Android, it counts as two apps. After those ten apps, you will have to upgrade your account. Participating in testing does not count toward this limit; testing can be done for an unlimited number of apps.
When you are logged in and at your HockeyApp dashboard, you can start adding the first definition. I will explain how to add the iOS app first. Figure 7-1 shows you the HockeyApp dashboard.
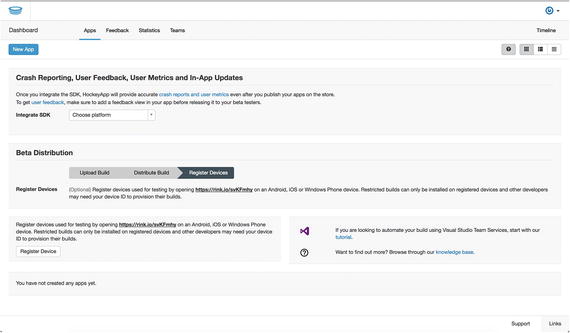
Figure 7-1. HockeyApp dashboard when no apps are defined yet
iOS
To start defining the iOS app, or all the apps for that matter, click the New App button in the upper-left corner of the screen. In the pop-up screen that appears, you can either upload an .ipa file or define the app manually by clicking the link in the last bullet. Figure 7-2 shows this screen.

Figure 7-2. The screen to start defining your app
After you have clicked the link, you will be taken to a new screen where you must provide some basic information for your app.
If you open the drop-down for the platform, you will see that there are more platforms supported than just iOS, Android, and UWP. You can also define macOS apps or even custom ones for a platform that is not defined in HockeyApp. Since you are adding an app for iOS in this example, you will choose that as a platform.
Next is Release Type. This indicates at what stage this app resides; as such, the options here are alpha, beta, enterprise, and store. All the variants except for store can be distributed through HockeyApp. The release type is not much more than a label. This way, you can have different versions of the same app being tested by different groups of people. Another way to go about this is to change the release type as your app matures; this is up to you.
Note
If you want to have multiple release types simultaneously, each one will count as a separate app within HockeyApp.
Mostly this is just a label shown to the end user, indicating what to expect from your app, so do not worry too much about it.
The last thing you need to do is specify a title for your app; this can be different from the name of your app, but I recommend keeping this the same to avoid confusion. Also, you need to supply the bundle identifier. This is the unique identifier for iOS apps, which usually is a backward domain like com.geraldversluis.myawesomeapp. To link the binaries correctly to the definition in HockeyApp, make sure the identifier correspond between your Visual Studio configuration and the value you enter herein HockeyApp. After you have filled in everything correctly, save the changes to make your new app definition final.
After some processing, you will be brought to your app’s dashboard page, as shown in Figure 7-3.

Figure 7-3. Dashboard of your newly created app
On the first page, you see some basic data about your app. When you start distributing or incorporating the HockeyApp SDK into your app, you will also start seeing some statistics about your app on this page.
Furthermore, this is the starting point to all kinds of other information and actions for your app. There are a few references to versions. Your app can consist of multiple versions, each having its own set of statistics. This way you have traceability whenever a crash occurs. You can always link it back to a specific version, which correlates with a specific commit of code. Also, the feedback and crashes that are collected are tied to a specific version.
For iOS apps, you must collect the UDID of each device that you want to include in your test, as I mentioned earlier. Whenever you do, you must create a new build and upload it to HockeyApp. Only then the newly added devices are able to download and install the version.
From HockeyApp you can see which device IDs are included in a specific version, and these can be traced back to the users who have signed up.
If you look back to the page shown in Figure 7-3, you will see a field marked App ID . Make sure you note the app ID somewhere because you will need it in the next chapter. Each app will have a separate app ID; this is the way VSTS knows to which app the build should be added.
For now, this is all the configuration you need for your iOS app definition . Let’s take a look at how you can integrate the HockeyApp SDK into your code.
Adding the SDK to your app is as simple as just adding the right NuGet package to the project. To add it, go to Visual Studio, right-click the iOS project, and choose Manage NuGet Packages. In the screen that comes up, search for HockeySDK.Xamarin. The result should resemble Figure 7-4.
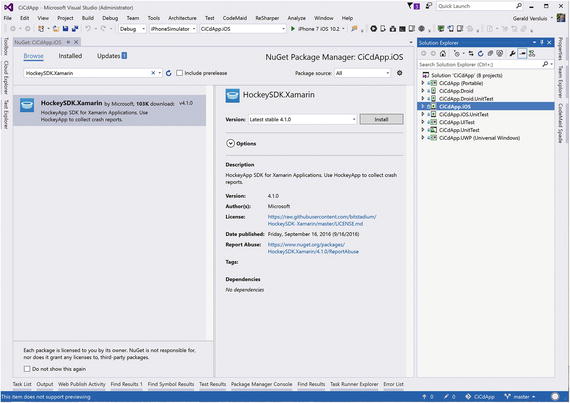
Figure 7-4. Installing the HockeyApp SDK to the iOS project
Install it to the project and wait for the process to complete.
To initialize the SDK, you must tell it to which app ID it corresponds. To do this for iOS, go into the AppDelegate.cs file and add these lines to the FinishedLaunching method :
var manager = BITHockeyManager.SharedHockeyManager;manager.Configure("Your_App_Id");manager.StartManager();
Of course, do not forget to set the right app ID in your own code. This will give you the collection of crashes and metrics automatically. If you do not want to collect metrics or make it dependent on some kind of setting you make available to the user, you can disable it by adding the line manager.DisableMetricsManager = true ; before the StartManager method call.
Android
Adding the Android app is mostly repeating the same exercise as you did for iOS. Go back to your dashboard by clicking the HockeyApp icon in the top left and click the New App button again. The screen shown in Figure 7-1 should come up like before.
Just like with the iOS app, you will set the app up manually. The screen shown in Figure 7-5 will appear and is identical as the screen you saw before. This time, as the platform choice is Android, you will see that you now must enter a package name instead of the bundle identifier for iOS.

Figure 7-5. Entering the details of your app
The package name is like the bundle identifier ; it is also formatted as a reverse domain. In my case, it is identical to the one in iOS.
As you know now, the value in the Release field is just a classification. Since the development of the apps for each platform will go hand in hand because we are leveraging Xamarin.Forms, they will both start off at the alpha stage.
When the Save button is clicked, you will be redirected to the dashboard page for this app.
Also, take note of the app ID, as you will need it later.
To incorporate HockeyApp into your code, go to Visual Studio and find the same package as you did for iOS. Then go to the NuGet management of your project and install the HockeySDK.Xamarin package. (The NuGet package management screen was shown in Figure 7-4.)
To initialize the package on Android, you need only one line of code. In your MainActivity.cs file , add the following line in the OnCreate method: CrashManager.Register(this, "Your-App-Id");.
For the SDK to work correctly, you also need to set some permissions. The permissions needed for the HockeyApp SDK are ACCESS_NETWORK_STATE, INTERNET, and WRITE_EXTERNAL_STORAGE. You can set these by going to the project properties in Visual Studio, selecting the Android Manifest tab, and selecting the appropriate boxes. See Figure 7-6.

Figure 7-6. Setting permissions on the Android app for the HockeyApp SDK
Universal Windows Platform
For Universal Windows, you repeat the same steps as you did for iOS and Android. This time the platform will be Windows, though. The bundle identifier is less strict than for iOS and Android. Since UWP apps do not have an identifier like that, just fill in some unique identifier of your choosing. To keep it similar to your app, it is best to enter the namespace of your app.
Save the new definition and observe the app ID in this app’s dashboard page.
Also, integrating the HockeyApp SDK is similar to the apps on Android and iOS. However, for UWP you do not install the HockeySDK.Xamarin package but instead the HockeySDK.UWP package.
To initialize the SDK in your UWP app, you need to add a single line of code to the constructor of your App class, which can be found in the App.xaml.cs file. Add this line of code there, and you should be good to go: Microsoft.HockeyApp.HockeyClient.Current.Configure("Your-App-ID");.
Lastly, you need to set the right permission for your app. Double-click the Package.appxmanifest file and on the Capabilities tab make sure you select the Internet (Client) check box. See Figure 7-7.
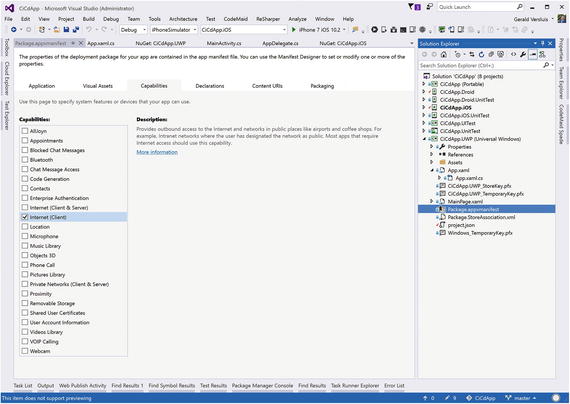
Figure 7-7. Setting UWP app permissions for the HockeyApp SDK
Remember that in the free tier of HockeyApp you can have only two apps. If you have already configured the iOS and Android apps, you may have difficulty adding this one as well. Either upgrade your account or make a choice about the platforms you want to use HockeyApp for at this time.
Setting Up VSTS for Delivery
Now that everything is set up on HockeyApp’s end, there is some configuration to be done in VSTS. The integration with HockeyApp is not yet available in VSTS by default. Luckily, the VSTS marketplace can help you out.
Before you head over to VSTS, go to your account settings in HockeyApp by pointing to your avatar in the top-right corner and selecting Account Settings from the drop-down. In the resulting screen, find API Tokens in the left-side menu. Here you can create multiple API keys for various purposes. Figure 7-8 shows the screen to do this.
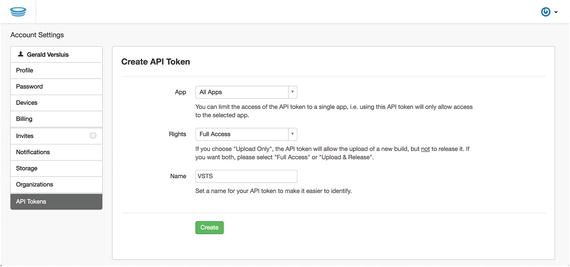
Figure 7-8. Generating a new API key for HockeyApp
There are a few settings available to limit the access the resulting API key will have. For this purpose, which is to create a connection between VSTS and HockeyApp, it is easiest to allow access to all apps and give full access. If you are worried about giving too many rights, you can create an API key for each app and take a closer look at the rights that are given out. Finally, give the API key a descriptive name, most likely a description of where it is used.
Click the Create button. You can see the resulting API key in the overview below this form. Hold on to it for a little bit; you will need it later.
To add the HockeyApp connection, log into your VSTS account and go to the marketplace by clicking the shopping bag icon in the upper-right corner. Search for the HockeyApp extension like I did in Figure 7-9.

Figure 7-9. Finding the HockeyApp extension in the marketplace
Click it to go to the details screen and install it whenever you are ready. This is done by clicking the Install button and selecting the appropriate account on which you would like to install it. If you are not logged into VSTS at the time, you are asked to do so.
After it is installed, go back to VSTS and go to your team project’s settings. You can reach the settings by clicking the cogwheel icon or by selecting Services from the drop-down menu to land in the right place immediately. On the left side of the screen, click the New Service Endpoint button and choose HockeyApp, as shown in Figure 7-10.
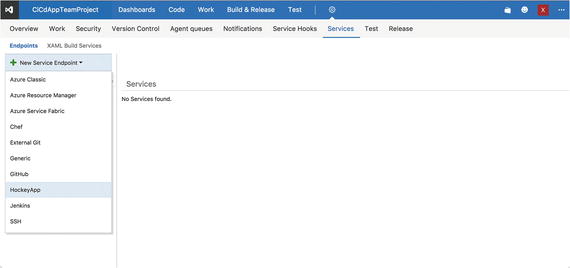
Figure 7-10. Creating a link with your HockeyApp account from VSTS
After clicking the HockeyApp option, a pop-up will be shown asking you for a name and API key. The name is totally up to you; it will probably be just HockeyApp, or maybe you would like to add some extra information in here. If you work for multiple clients and you are going to have more connections to different HockeyApp accounts, you probably want to mention to which client this connection belongs.
The API key is the one you just got from your HockeyApp account. Paste it in the right field and save the connection. By doing this, you have created a connection between your VSTS account and HockeyApp account. What you can do with it you will see in the next chapter.
Getting Crashes and Feedback from HockeyApp in VSTS
If you want to collect crashes and/or feedback as work items in VSTS, you need to configure a connection from HockeyApp to VSTS as well. This must be configured on a per-app basis. You can configure to which team project the app is related, in which area the work item is created, and if you want to create work items for crashes, feedback, or both.
For example, if I wanted to set this up for my UWP app, I would go to my definition for this app in HockeyApp. Click the Configure link under Bug Tracker in the dashboard. This is the option marked in red in Figure 7-11.
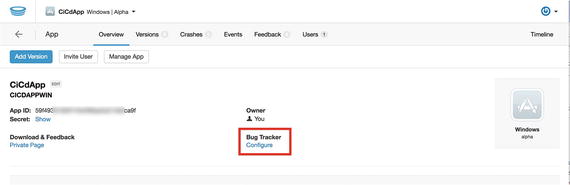
Figure 7-11. Configuring the bug tracker link in HockeyApp dashboard
In the list of options find VSTS (of course, if you use another system, feel free to use that) and click Configure. You now have to accept the rights you are giving HockeyApp for doing things in VSTS. Inspect the rights that are requested and what they do closely and accept them if you feel comfortable with it. If you do not, this functionality will not be available to you.
After accepting the authorization of HockeyApp with VSTS, you will be taken back to the settings of your app, and you can finish the configuration. If the projects in your account are not showing up, click the Load Projects button and select the team project in which the work items should be created. Figure 7-12 shows the screen for this.
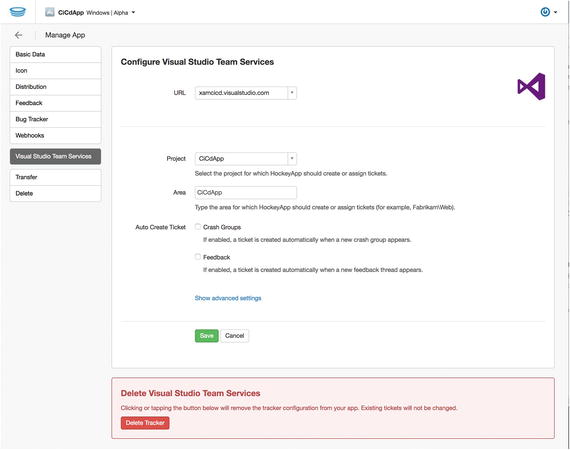
Figure 7-12. Configuring the connection to VSTS for creating work items
Furthermore, you can configure a separate area for the work items to be assigned to. If you are going to use this functionality, I recommend creating an area for each platform. Then configure that platform area here so you can distinguish the crashes and feedback per platform.
Finally, select the boxes for which you want to have work items created. If you select the ‘Crash Groups’ box, you can also configure a threshold. You can configure it to create a work item when the crash happens a certain number of times or just set it to zero to have the crash added on the first occurrence.
To do a quick test at this point, go to the Feedback tab within your app and create a new discussion. Give it some title and body and send it. Now when you go to VSTS, you should be able to find it as a task. It also works the other way around; if you go to the feedback page in HockeyApp, you will see it has the Tracked status, meaning it has been sent over to VSTS. When you click that tag, you will be taken to the linked work item right away.
In Figure 7-13 you can see how a work item has been created by a feedback message that I composed myself.

Figure 7-13. A feedback message transported from HockeyApp to VSTS
Final Thoughts
In this chapter, you worked with HockeyApp. You learned that it can be used for a variety of things besides just distributing your app. It is also good at collecting crash reports, gathering user feedback, and providing usage analytics. After that, you started preparations on your apps. You saw that the bundle identifier or package name is a vital part of creating the definitions within HockeyApp. Make sure these are identical on both HockeyApp and your project platforms.
Lastly, you learned how to prepare your VSTS account to use HockeyApp. You installed the HockeyApp tasks for releasing your app, and you linked your accounts together to enable even more integrations such as receiving feedback right in your VSTS account.
In the next chapter, you will start looking at releasing your apps through the configuration you have done here.