
In Chapter 7, you made your first acquaintance with HockeyApp. You learned about the features at a glance, and if you followed along with the instructions, you have installed the SDK into your app. Then, in Chapter 8, you saw how to work with different target groups and deploy a version specifically to them.
In this chapter, you will take a closer look at what HockeyApp has to offer you. To start, you will learn how to install your app on a device, distributed through HockeyApp. This will help you understand what end users will see and how they can work with it.
After that, you will see how all the data that is collected can work to your advantage. You will, again, start with the end user and see how feedback can be collected. Subsequently, the rest of the chapter will be about data that is gathered without the user’s intervention. This data includes error reports, custom events that you can specify yourself, and user statistics. While there are already a lot of settings in place regarding the privacy of the user, with HockeyApp it is still possible to gather some sensitive information without the user knowing it. Therefore, make sure that you include a clear privacy statement; it is also a good idea to provide some functionality for the user to opt in or opt out of gathering all this data. Depending on where you are releasing the app, this may even be required by law.
To be able to distinguish unique users without collecting details about a user, a unique user ID (UUID) is generated by HockeyApp. This UUID is not affiliated with any of the user’s details and is not reused across different apps. There are some details that are stored on the HockeyApp servers in the United States. The data that involves the user includes country and language, but there is also some device data such as device type and OS version. This data is not considered personal identifiable information (PII) . If you want more information on the how and why of HockeyApp data collection, please refer to https://support.hockeyapp.net/kb/app-management-2/what-data-is-collected-with-the-hockeysdks-2 . Also, the HockeyApp SDK is open source, so you can inspect what is going on yourself.
Installing Your App on a Device
Installing your app through HockeyApp should be an easy-to-understand process. Since end users are its target audience, everything is explained in detail. The thing about users, however, is that they do not always read very well. To be able to support your users while they are acquiring your app, you will take a look at this process.
There are basically two scenarios possible: you invite the users yourself and they sign up through the e-mail they get, or you set out a public recruitment and users sign up through a link.
In my experience, the first scenario is far more common, especially in a corporate environment where you are part of the development team and you have some testers. Therefore, I will explain only this scenario. The process of providing a public link is mostly identical.
In the previous chapter, you learned how you to add users to groups. When the user is not already in the HockeyApp account, an invitation will automatically be sent. Of course, you are not obligated to use groups. You can use individual users just as well.
To do that, log into HockeyApp and navigate into the app that you want to invite a user for. This means you need to know what kind of phone they are using. Since you are inviting the user, you probably know who it is and what platform they are using. When in the app dashboard, click the Invite User button in the upper bar, as shown in Figure 9-1. In my case I have gone into the iOS app .
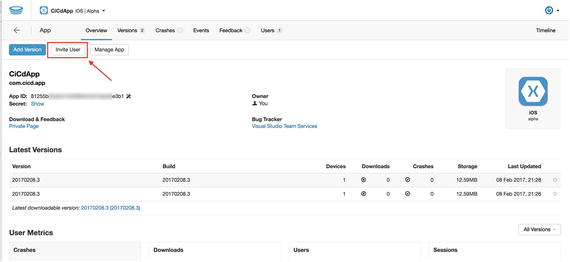
Figure 9-1. Inviting a user to the iOS app
The screen that appears next is similar to the screen when you add someone to a group, but you invite just one user here. Follow the instructions on the screen; most importantly, enter their e-mail address and select their role. You can also assign tags to this user and enter an optional custom message for them. After you have filled out the form to your liking, save it, and the user will be informed by e-mail.
Note that if you want the same user to be part of multiple apps, you must invite them for each app separately.
Figure 9-2 shows the e-mail that the user will receive. There will be slight variations for the different platforms, and the iOS e-mail will have some further instructions on how to register the device. This is so the UDID is collected easily, and by letting the user follow these instructions, the device ID is automatically coupled to their account. To inform the user on the process, there is a note at the bottom of the e-mail . The only thing that remains now is for you to include the ID in the provisioning profile and create a new build. Only then will this user be able to install the app.
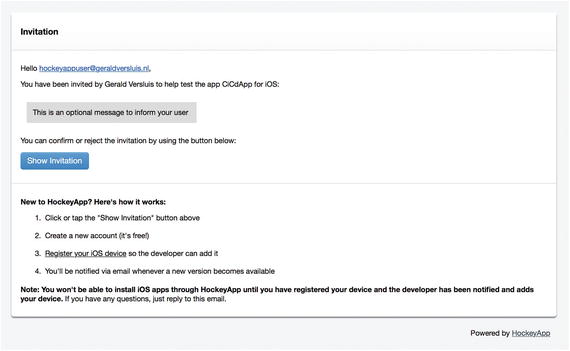
Figure 9-2. The e-mail the user receives after being invited
In the shaded box near the top the user will find the custom message you have provided, if you have provided one.
When users click the Show Invitation button , they are taken to the login page of HockeyApp. If they already have a HockeyApp account, they can log in with that. When they do, their account will be associated with your app, and they will be able to use it from within the account they already had. The other option is that they have to register for a new account. The result will be the same.
Let’s take a look at what the user gets to see when you collect the device ID. Once again, there are multiple ways to get there. The user can either click the link at the bottom of the e-mail or navigate to the URL . The URL is https://rink.hockeyapp.net/ and should be reached through the iOS device and with the Safari browser. Any other browser will not work. This is because of the way the ID is collected, which can be done only by installing a configuration profile on the iOS device. While this may sound quite heavy, in reality it really is not that bad. The only thing the profile can do is collect the ID and nothing more. Because other configuration profiles can have a lot more features, Apple has restricted installing these profiles solely through Safari.
When users navigate to the URL, they will be presented with a screen that provides them with instructions on how to proceed and what to expect. Figure 9-3 shows this screen.
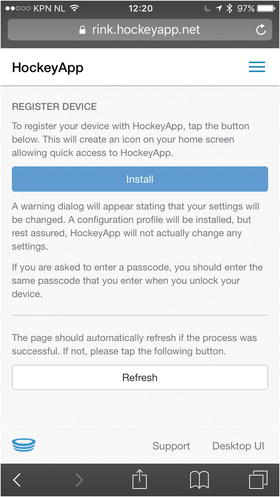
Figure 9-3. Collecting the iOS device ID
After clicking the Install button, the user will be taken to the iOS Settings app and the actual profile. This is where the user must decide to go through with it or not. If they want their ID to be collected automatically, they would be required to install the profile. Some details about the profile are listed, such as who the issuer is and what it does. The user can click into the details to learn more before installing it.
Figure 9-4 shows the screen to install the profile . The user can click either Install or Cancel.
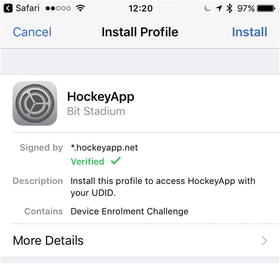
Figure 9-4. Reviewing the profile and installing it on the device
Tip
If users are not comfortable with installing the profile, then there is the possibility of supplying the UDID manually. The web site http://whatsmyudid.com/ provides an example way of finding the UDID with iTunes. You could give this URL to the user and have them report the ID themselves.
After the user has chosen to install the profile, they will be taken back to Safari , and their device details will be visible. If they were signed in at the time, the details (and thus device ID) are linked to their account. If they were not signed in, the details will be linked after signing in at that point.
This process is similar for Android and Windows, but those platforms do not need any special collection of device IDs. The details about the devices being used are still collected, so you can still see what device or devices are being used by users. If a user wants to add another device to their account, just have them go to the install URL again and log in to associate the device with them.
Another good thing to know is that you do not need to invite users via their HockeyApp account e-mail . If it turns out they already have an account, they can accept the invitation and log in with their existing account; the app will be associated with that account instead.
The only thing that remains is for the user to being able to see the apps they have access to and install them. For iOS, an icon was put on the home screen when the profile was installed. This is nothing more than a shortcut to the HockeyApp portal, which can also be reached manually by going to https://rink.hockeyapp.net . This should again be done from Safari , because only Safari can install apps from the browser. For UWP, you can also download the app straight from the web portal or even the notification e-mail received when a new version is available. For Android, an app is available in the Google Play Store to access the portal, but you can also access it through the Web.
Note
When you receive errors while installing an app on iOS saying that the app cannot be downloaded at that time, make sure the device ID is in the provisioning profile. That is the main reason for errors in my experience. You can inspect which devices are currently in the provisioning profile of a specific version by going to the HockeyApp dashboard of that version and finding the Provisioning heading. There you can click through to an overview of all the associated devices.
Collecting Feedback
Now that you have seen how users look at HockeyApp and they have installed your apps, you can start looking at what they can do to help you. The one thing they can do is provide you with feedback. Of course, this can be done in a wide variety of ways: e-mail, social media, face to face. But to be as efficient as possible, it is best to collect feedback in a unified way. HockeyApp provides you with this. And not only does it help you with collecting the feedback, it also integrates with VSTS and can create a ticket when you receive feedback.
There are two ways of receiving feedback through HockeyApp: from inside the HockeyApp portal and by e-mail. When enabling the feedback collection , an e-mail address is created for you. When a message is received at that e-mail address , it will be reported as feedback to this particular app. The address, however, is not one you can easily remember. It will look something like this: [email protected]. To get around this, you can create an e-mail address yourself, like [email protected], and set up a forward on it to the HockeyApp address.
The collection of feedback is something that is to be configured per app. To enable it, go into the app dashboard and click the Manage App button , as shown in Figure 9-5.
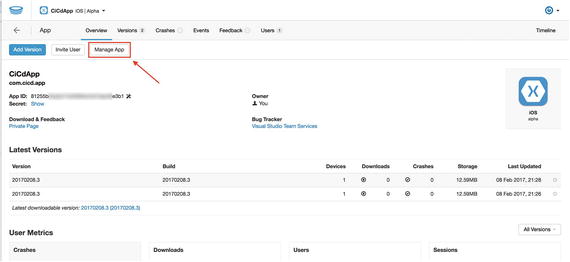
Figure 9-5. Configuring the app settings
In the settings, there is a section about the feedback, where you will notice that collecting feedback is enabled by default. This is where you can find the e-mail address that is set up for you. If you choose to disable the feedback collection , you can configure an e-mail address to be used as the reply-to address for invitation e-mails and update notification e-mails. This way, when a user sends feedback directly to one of those e-mails, it will not be lost. Just remember that with the feedback collection disabled, the user will not be able to provide feedback through HockeyApp directly.
Lastly, when you have feedback either enabled or disabled, you can configure a link to an external support system. If you use some other system to collect user feedback, enter the URL here, and it will be shown to the user in the feedback section.
When feedback collection is enabled, people can log into the HockeyApp portal and switch to the feedback section. This is shown in Figure 9-6.
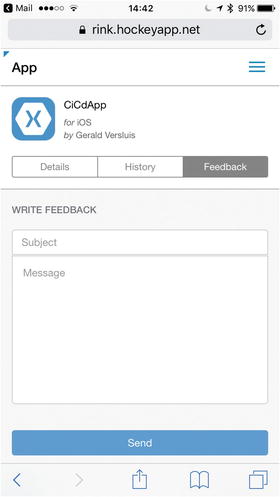
Figure 9-6. Collecting feedback from the HockeyApp portal
When a user fills out this form or sends an e-mail to the configured address, you will receive a new feedback item in your dashboard along with a notification in your e-mail inbox.
On the Feedback tab of your app, you will now see a new entry. All feedback entries are treated as conversations. In the overview, you will have all feedback items that are entered by users, as shown in Figure 9-7. Here you can see who submitted the feedback , when they submitted it, how many messages are in the conversation, and what the status is. Right from the overview you can change the status of the conversation.
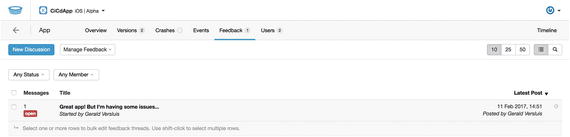
Figure 9-7. The feedback overview
You can also click an item and go into the conversation to see what is going on.
When inside a conversation, there are a number of things you can do. You can set the status, just like from the overview, but in addition, you can assign a member of your team to this item. This way, you can let the rest of your team know that the issue has been seen and is being worked on.
Furthermore, you can add a response to the message from this screen. By doing this, the user is notified, and if your message requires it, they can respond. This can be a way to engage your users and try to clear up whatever issue they might have. Another thing that can make your users happy is to keep them informed on the progress. That is another thing you can do from right here. Figure 9-8 shows the detail screen.

Figure 9-8. Details of a feedback entry
Not only messages from users will be shown in the discussion, but it also acts as a timeline. Whenever the status of the ticket changes, this will be reflected by a message in this discussion view.
If you have configured a bug tracking system to be attached to this app and enabled the creation of tickets, a ticket should appear in your bug tracking system. Depending on the bug tracking system, the synchronization will be both ways. For instance, when you change the status in the HockeyApp portal or in VSTS, it will be updated in the other system as well.
Tip
For a more integrated experience, you can also add in-app feedback. The HockeyApp SDK provides you with a way to add the feedback collection right in your app so the user does not have to leave the app to send you a message. To read more about this, refer to https://support.hockeyapp.net/kb/client-integration-cross-platform/how-to-integrate-hockeyapp-with-xamarin#feedback .
Basic Error Reporting
Besides letting the users provide their own feedback, there are also some ways to send feedback from the app with more technical details. In most cases, this can be many times more helpful than what the user reports. A lot of users will just write, “The app does not work; I click x and it crashes, while I expect it do to y.” But sometimes they don’t even provide you with that much detail. They are not to blame; most of the time they are not technical people, and they do not know any better. However, this is too little information to solve their problem. Also, when the user comes to you with bugs, most of the time you are too late already. Especially while building apps, users are very critical. If it crashes once, it can be forgiven, but when it happens again, your app is soon deleted, and it will be hard to persuade the user to come back. Most of the time when a user does report a bug, you are already too late. The majority of people will not bother to send you any feedback and just delete the app.
Therefore, it can be helpful to detect errors even before the users do. Of course, most of the errors should be filtered out with automated builds, unit tests, and UI tests, but not everything can be detected that way. Because of this, it is important to have error reporting in place. HockeyApp provides this for you in an easy-to-use way.
By default, when installing the SDK , error reporting is enabled. This means that when an unhandled exception occurs, it is saved to the file system and sent back to your HockeyApp account the next time the app is started. To account for the user’s privacy, HockeyApp has already built in a prompt to inform the user about what is happening. This prompt, shown in Figure 9-9, asks the user if the report can be sent back to the developer. They can also choose to allow it always.
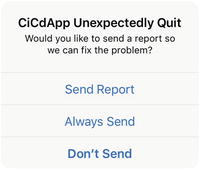
Figure 9-9. Allowing the app to send a report
In Chapter 7 you saw how to integrate the SDK in your apps, and there is nothing extra you have to do to get this running. However, this functionality should be your last resort. While it is great to get a report of an unhandled exception, because it means an error has been identified that you did not spot earlier and you can fix it, ideally you want to catch all the exceptions and handle them gracefully.
An unhandled exception in the app ecosystem means the app will terminate without notice, and the user will be surprised for a second, requiring them to restart the app and enter any data they did before. To do it right, you want to catch the exception, notify the user something went wrong and how they can recover (if they can at all), and move along.
If you have been developing apps with Xamarin and used the HockeyApp predecessor, Xamarin Insights, you might know that you can report handled exceptions. Unfortunately, at the time of this writing, HockeyApp does not support that kind of functionality. There have been some messages on the support forum stating that this functionality will come, but no time frame has been given.
Tracking Custom Events
Besides getting crash reports, you might want to track a user’s behavior throughout a session in your app. This can help you gain useful insights on how users are actually using your app, rather than thinking you know how they use your app.
This functionality can be useful to figure out all sorts of things: how many users defeat a level in your game, how often is an in-app purchase transaction started, was the purchase actually made, and how long a certain request takes. These are things that you could track.
The service to track all this was available in Xamarin Insights, and you could even identify users and sessions and follow them every step of the way. The implementation of this in HockeyApp is not quite there yet. You will get aggregated data of the events, but you will not be able to drill down into it and see all the details.
As I mentioned earlier, the responsibility of not collecting privacy sensitive data lies with you. This is probably the most important functionality to be careful with. As you will see in a little bit, it is easy to supply custom data with events. It can be convenient to collect some user-specific data to help you identify a problem or contact a user for more information. Although this can be tempting, be cautious about it. At least inform your users if you are doing so and, better yet, provide them a way to opt out.
The custom event tracking is part of the user metrics functionality of HockeyApp (which is what you will look at next), and thus enabling or disabling this will affect both the event tracking and collecting user metrics. For iOS , the functionality is enabled by default. If you want to disable it, you can do so with the following code in your AppDelegate.cs file:
// add the HockeyApp namespaceusing HockeyApp.iOS;// in your FinishedLaunching-method add:var manager = BITHockeyManager.SharedHockeyManager;manager.Configure("$Your_App_Id");manager.DisableMetricsManager = true;manager.StartManager();
It is important that you set the DisableMetricsManager property before you start the manager.
For Android , it is the exact opposite. It will be disabled by default, and you will have to enable it yourself. This functionality for Android is available only from API level 14 and up. To enable the custom events in Android, add this code in your MainActivity.cs file:
// add the HockeyApp namespaceusing HockeyApp.Android.Metrics;// in your main activity OnCreate-method add:MetricsManager.Register(Application, "$Your_App_Id");
You can now start tracking your custom events. These events consist of a string identifier, which you can make up yourself. They should be self-describing, should be unique, and should have meaningful names. Make sure they do not look too similar and you know what they do when you read them. There are a few limits to this. The name is limited to lowercase and uppercase letters, numbers, underscores, dots, spaces, and hyphens.
Note
It is important to stick to the naming conventions. Not doing so will result in a silent failure and your event will simply not show up in the dashboard.
Also, there is a rate limit; you can send up to 350 unique event names per app, per week. However, one (unique) event has no limit on its occurrence. As a normal user, you should not hit that limit anytime soon, so you do not have to worry about that.
To create a new event, just make up the name and implement it in your code. The first time it occurs, it will start showing up in your dashboard. Before you start implementing an event, ask yourself what the main goal is. Maybe you want to identify a problem, you want to track performance, or you are interested in business goals. Decide on how you can measure the things you need and start implementing the gathering of information on it.
As I mentioned, it is your responsibility to not collect any sensitive data on your users.
To track an actual event, you can use the following code for iOS :
var manager = BITHockeyManager.SharedHockeyManager;manager.MetricsManager.TrackEvent (eventName);
Or you can use this code for Android , which is quite similar:
HockeyApp.Metrics.MetricsManager.TrackEvent (eventName);Some overloads are available that allow you to send additional data along with your custom event. This is done with key/value pairs in a dictionary. Here’s an example of this for iOS:
manager.MetricsManager.TrackEvent("Sample_Event",new NSDictionary { { "key", "value" } },new NSDictionary { { "ExecutionTime", 1.0 } });
The first dictionary contains values that you want to supply for reference. In the second dictionary, you can add measurement data. It does not really matter what data you put in which dictionary, but if you use this code, the measurement data will be shown nicely.
When this event is now triggered from the app, it will show up in the HockeyApp dashboard, which is shown in Figure 9-10. Here you can see an overview of the last events that occurred. When you select one, the bottom half of the screen will reflect some more statistics about it. You can see how often the event was invoked, how many unique users it was invoked for, and what percentage of your total users that is.

Figure 9-10. Your custom events in the HockeyApp dashboard
The thing that stands out is that the details you have supplied additionally are not available from the dashboard. At the time of this writing, this functionality is not available from within HockeyApp. It can, however, be accessed through Application Insights. Application Insights is very much like HockeyApp but more focused on web applications. It is available through Azure , and you will need to set up a bridge between the two. You can learn more about this at https://azure.microsoft.com/en-us/blog/access-hockeyapp-data-in-ai-with-hockeyapp-bridge-app/ .
This concludes the topic of custom events. I hope this will be expanded more in the near future to make it even more valuable than it is now.
Analyzing Usage Statistics
From the HockeyApp dashboard of your app, you have direct access to some of the statistics that are available to you. These metrics are an overview of all the versions that you have in HockeyApp; however, you can filter them on a per-version basis. Figure 9-11 shows what these metrics look like.
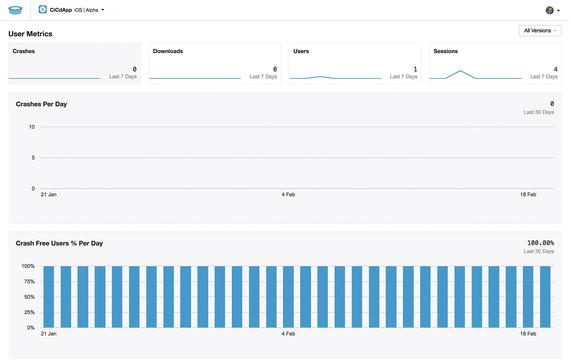
Figure 9-11. Inspecting user metrics
The graphs are mainly focused on how many crashes, downloads, users, and sessions there have been in the past week. With this data, you can quickly see whether your app is being used (and therefore tested) at all and how it is holding up. By clicking one of the four graphs at the top, you get some drill-down data on the screen. When clicking downloads, for example, you will be provided with a graph showing you the number of downloads per day.
If you use HockeyApp as a closed system for your testers and developers, you probably have less interest in these statistics. But when your app is available as an open test version, this is where you can see whether users are finding their way to it.
There is also some data available from within a crash report. Besides all the details that you can see about the crash, you can see how many users are impacted or how often the crash occurs per day.
With this data, you can make decisions on the priority of your bug. On projects I have worked on, these numbers became part of the service level agreements (SLAs) . When a bug affected more than a certain percentage of users, there was no extra sign-off required; I just fixed it. It is also an awesome instrument to see whether regression on your work is happening. When you are convinced a bug is resolved, the numbers should go down over time. If they do not, you know something is still going wrong.
Finally, you can see what devices are affected. Maybe the problem only happens on these devices or maybe your user base just happens to use these devices the most, but in any case with these statistics you can gain some insight on this.
Figure 9-12 shows the numbers associated with a crash report; this image is provided by HockeyApp . (The numbers on my sample applications are too low to get the message across.)

Figure 9-12. User metrics in a crash report (image courtesy of HockeyApp)
Throughout the HockeyApp dashboard there are some more places where charts and graphs are available to you. They all provide you with meaningful data in the given context. Per version there is also a Statistics section in the top bar.
In the Statistics section, you can see some facts about that specific version, such as which users have downloaded it, what devices they installed it on, and so on.
Update Distribution
One last thing you can do with the HockeyApp SDK is to update your distribution. In other words, you can notify users that an update is available. This works for either ad hoc or enterprise distribution as well as app store distribution. The only difference is that in the latter case you will only get a notification that an update is available. For ad hoc or enterprise distributed apps, you can also show the release notes of the new version right away and let the user download it from the alert directly.
This functionality is disabled by default. For me personally, I do not really like apps that notify me of new versions. That is what the app store is for, and if users want to update, it should be their choice. I can imagine that people would be annoyed that an alert is shown to them when they just want to quickly look up something in your app. Also, if you have a steady update cycle (because you have an automated pipeline now), this means you will alert your users maybe even every week. That is not desirable in my opinion. I could see some use for this in enterprise environments where you want to have more control over the version that your users are using, but then again the enterprise app store probably has some mechanism in place to force users to install an update.
If you want more information on this, see this documentation page: https://support.hockeyapp.net/kb/client-integration-cross-platform/how-to-integrate-hockeyapp-with-xamarin#updated-distribution .
Final Thoughts
In Chapter 7, you made your first acquaintance with HockeyApp; in this chapter, you looked a bit closer at what it can do for you. First, I showed you what HockeyApp looks like from a user’s perspective. It can be helpful to know what the end users are seeing when they turn to you for help. You also saw how you can get to your app and install it onto a device.
Furthermore, you saw how user feedback is collected, again from the user perspective but also where it shows up in the HockeyApp portal for you to work with. Besides collecting feedback, you can also gather usage statistics and analyze them from the dashboard.
To learn more about the ways the user goes through your app, you can implement custom events. With these events, you can identify certain actions or measure how long operations take. This can be helpful to see what works for your audience or where you should improve loading times, for instance.
This chapter concludes the hands-on part of this book. In the next chapter, I will discuss how you can optimize the continuous integration and delivery pipeline even more. I will be giving you some ideas to think about when expanding your build definitions. Also, you will learn how the behavior of your developers is also important in all this, how you can get information to come to you instead of having to look for it, and how you go about using features that are not done yet.