In the previous chapter, you learned how to add a test project to your solution, write UI tests, and run them in Test Cloud. While this is a great step forward already, ideally you want to have tests run as part of your automated build pipeline. By adding the instructions to your build definitions, you can benefit even more because you do not have to worry about running the tests yourself. The results will be presented to you automatically.
This chapter will cover how to integrate triggering tests into your continuous integration. Maybe even more important, you’ll learn how you can aggregate the results so you can collect feedback as early as possible. Specifically, you will learn how to integrate the Test Cloud tests that you created in the previous chapter. Also, you will look at how you can create some simple unit tests to go along with them and run those as well.
Integrating Test Cloud as Part of Continuous Integration
To show you how to integrate Test Cloud, I will continue to use my CiCdApp project as an example. I have committed all the code that I created in the previous chapter, so it is available in the repository.
Go to VSTS and take a look at the build definitions you have created so far. As you may recall from Chapter 3, there were already steps in your build definition to run Test Cloud tests, but you disabled them for the time being. Go into the iOS build definition and find the Test Cloud step. When you take a closer look at the configuration on the right side of the screen, you will suddenly see a lot of familiar fields. Figure 6-1 shows the screen with this configuration.

Figure 6-1. Configuration of the Test Cloud task
Let’s go through all the fields from top to bottom.
App File: The binaries are your app, so this setting is your .apk or .ipa file for Android and iOS, respectively. You can work with the minimatch pattern and select multiple files this way. Note that for each binary that is found, a test run will be fired. So, make sure only one is submitted so it will not eat up precious device time. For example, you can do this by cleaning your build folder before you start.
Tip
If you are looking for an easy way to clean your folders before a build, go to the Repository tab and select the Clean option. You will be able to configure whether the folder should be cleaned and whether the source and output folders should be cleaned.
dSYM File: This is only for iOS applications. Building an .ipa binary also results in a .dSYM file containing the debug symbols. With this file, more informative stack traces can be generated when your application crashes. Although it is not necessary to provide this file, it can be helpful to do so.
Team API Key: This is the API key that you are identified with at Test Cloud. Together with your e-mail, this is your user name and password combination.
User Email: As mentioned, this is your user name and the account that you log in with on the Test Cloud dashboard.
Devices: As you may recall from Chapter 5, there was a hash generated for the devices you selected to run your tests on. This field is where you enter that hash.
Series: In Test Cloud, you could have created different test series. If you want to run a specific series, this is where you can configure it. For now, leave it at the default value.
Test Assembly Directory: This is the directory in which the assemblies reside that contain the tests. This will be the output folder of your test project.
As you might have noticed, these values correspond with the command-line parameters you got from Test Cloud when you were constructing your test run. Fill in the right values in this task and save it.
Under these basic configuration fields there are some more in the Advanced section. You can leave these settings at their default values for now. The most notable is the check box at the bottom: “Publish results to TFS/Team Services.” By selecting this box, you retrieve the results from Test Cloud and embed them right here in VSTS. You will see what that looks like a little later in this chapter.
If you have created a separate build configuration, you need to change that on the Variables tab. In my case, I will set the BuildConfiguration value to UITest.
Note
While I will now incorporate the Test Cloud task into my CI build, this may not be what is right for you. When your tests start to grow and the running time increases, you might want to create a separate definition to send your app to Test Cloud. Maybe even more important, the CI build is ideally triggered with each (small) change in your code. When you send each change through Test Cloud, your device hours might run out fast. For brevity, I just incorporate running tests in Test Cloud into my existing build definition.
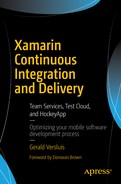
After saving all the changes, it is time to see whether everything is configured correctly. Trigger a build with the “Queue new build…” button and sit back to watch what happens. When the build is triggered and the log window comes up, examine the part where the Test Cloud step is executed. Look at Figure 6-2 for the output of my build.
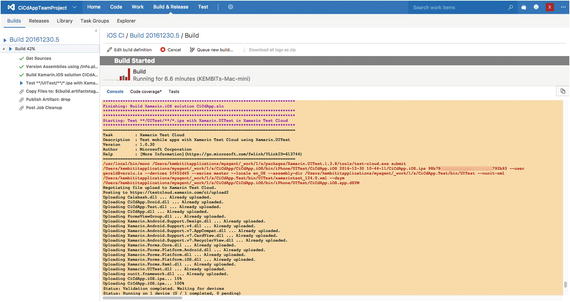
Figure 6-2. Log output from Test Cloud
When you look closely, you will notice that the output is the same as the output from your command-line upload process. The explanation for this is simple: the same tool is being used by VSTS.
Tip
One error that is likely to occur here is this: “The .ipa file does not seem to be linked with Calabash framework.” This is referring to the code to initialize the Calabash framework, so the code in your ENABLE_TEST_CLOUD compiler directive has not been executed. Make sure you ran the right build configuration and that you are uploading the right .ipa file.
After the test has finished, wait for the rest of the build to complete to inspect the outcome.
Since I did not fix my test, you can expect the same result as earlier: two tests will pass, and one will fail. This is exactly what happened when running this build.
Also, I left the check box on to gather the test results in VSTS , so let’s take a look at that. Figure 6-3 shows how these results are visualized.
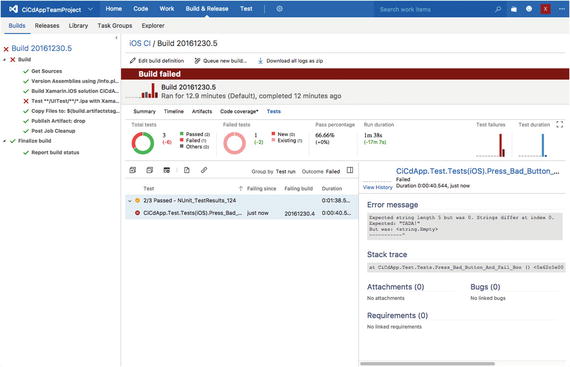
Figure 6-3. Summary of the gathered results from Test Cloud
What is really great about having the test results gathered is that you can see what went wrong right in VSTS . There is a summary of all tests, and you can see in one glance how many tests succeeded and how many failed, how much time they took, and some more data around that. If you also have unit tests or any other tests that can report their results to VSTS, the results are aggregated here. This enables you to gather all information about the quality of your app right here from one dashboard.
When you click a specific test, you will be presented with the results for that test. As you saw in the previous chapter, there was an error message with the failing test. This same message is presented to you, but this time within VSTS.
The only thing lacking in VSTS is the ability to look at the screenshots that are taken or the details per device. There are some VSTS extensions in the marketplace that provide you with these, and the integration probably will be implemented in the future.
Tip
If you want your build not to fail but to be set to Partially Succeeded when one or more tests fail, go to your build definition and Test Cloud task and select the check box “Continue on error.”
Integrating Unit Tests
Like every good developer, you have, of course, numerous unit tests in your projects as well. (Right?) You can easily run these as an integral part of your builds. No special extensions are needed for this; the ability is already built into VSTS. At least, it is when you use the MSTest, NUnit, or xUnit engine to create and run your tests. All of these are supported in VSTS and popular for various reasons.
To get you on the right path, let’s take a quick look at how to create some simple unit tests and integrate them into your builds.
There are multiple sorts of unit tests that you can incorporate in respect to Xamarin apps. If you are using Xamarin.Forms (or even if you are not but you do have a shared code base library), you can use a “normal” unit test project.
For traditional Xamarin apps or if there is some platform-specific code that you need to test, there are special unit tests projects for each platform. I will quickly go over all the options together and show a small example for each scenario.
Unit Testing Shared Code
First let’s take a look at writing tests for the shared code. To have something to test, I have added another page to CiCdApp , but more importantly I have added a page model. If you are familiar with the Model-View-ViewModel (MVVM) pattern , you will know that each page has a corresponding page model that contains all the properties and logic for a certain view.
The page and page model I have added to my Portable Class Library (PCL ) project are named CalculatorPage and CalculatorPageModel. They will contain simple logic to add and multiply two numbers, as well as giving you the answer to life, the universe, and everything. Since these are unit tests and not UI tests, I will be focusing on the page model.
Before discussing the code that I have created for this, I will zoom in a bit on the PCL project I just mentioned. If you have developed Xamarin apps before, you might have heard about so-called shared projects and PCL projects. These types of projects are the ways to share code for Xamarin apps . Describing the differences in detail would be beyond the scope of this book, but for clarity I will briefly describe the basics.
A PCL project will compile into a DLL file, while a shared project is nothing more than a folder with code that is shared between the platform projects. When compiling the code in a shared project, the code will become part of the platform project and is an integral part of the assembly.
The Portable Class Library was a first attempt by Microsoft to create a cross-platform library with which you can share code. For a while it was only cross-platform between Microsoft platforms, but with the support in Xamarin, it became more popular because it now actually supports multiple platforms. In time, .NET Standard Libraries will probably replace the PCL or at least become more popular.
The biggest difference between the two lies in the support for features of the .NET framework. With shared projects, you have access to all features of the .NET framework. You can differentiate code for the separate platforms with compiler directives. In a PCL project, you specify the platforms that you want to support, and the features of the .NET framework that are available to you are dependent on that selection. You will get support only for the functionality that is available on each platform that you want to support. Of course, there are ways to implement platform-specific code for PCL projects as well.
Each solution has its pros and cons, and basically it comes down to a matter of taste because both solutions achieve the same result. I personally tend to like the PCL projects. The code is more separated and is easier to reuse. It just feels cleaner.
Tip
For more information on ways to share code and the details on Shared projects and PCLs, please refer to the Xamarin developer documentation on this subject: https://developer.xamarin.com/guides/cross-platform/application_fundamentals/code-sharing/ .
Now that you have learned about what a PCL is, let’s take a look at the page model I have added. The implementation looks like this:
public class CalculatorPageModel{public ICommand AddCommand { get; private set; }public ICommand MultiplyCommand { get; private set; }public ICommand AnswerToEverythingCommand { get; private set; }public int ValueA { get; set; }public int ValueB { get; set; }public int Result { get; set; }public CalculatorPageModel(){AddCommand = new Command(Add);MultiplyCommand = new Command(Multiply);AnswerToEverythingCommand = new Command(AnswerToEverything);}private void Add(){Result = ValueA + ValueB;}private void Multiply(){Result = ValueA * ValueB;}private void AnswerToEverything(){Result = 1337;}}
As you can see, there is nothing exciting going on here, but it gives you some code to write tests for.
Now you just add a regular unit test project to your solution. In Figure 6-4 you can see the Add New Project screen where you can select the Unit Test Project template.
Figure 6-4. Adding the unit test project to the solution
After Visual Studio does some generating, you will have a bare setup of a unit test fixture in the UnitTests1.cs file. If you look a bit closer, you will notice the structure is much like the Test Cloud test structure. The naming convention on the attributes is a bit different, but the way you write tests is the same.
In the following code block, you will see how I defined test cases for my methods in the page model:
[TestClass]public class CalculatorUnitTests{private CalculatorPageModel _pageModel;[TestInitialize]public void Initialize(){_pageModel = new CalculatorPageModel();}[TestMethod]public void AddTest(){// Arrange_pageModel.ValueA = 20;_pageModel.ValueB = 22;// Act_pageModel.AddCommand.Execute(null);// AssertAssert.AreEqual(42, _pageModel.Result);}[TestMethod]public void MultiplyTest(){// Arrange_pageModel.ValueA = 6;_pageModel.ValueB = 7;// Act_pageModel.MultiplyCommand.Execute(null);// AssertAssert.AreEqual(42, _pageModel.Result);}[TestMethod]public void AnswerToEverythingTest(){// Arrange// Nothing to arrange for this test// Act_pageModel.AnswerToEverythingCommand.Execute(null);// AssertAssert.AreEqual(42, _pageModel.Result);}}
As I just mentioned, there are a few different terms here: TestFixture is now a TestClass, SetUp is now a TestInitialize, and Test is now a TestMethod. Other than that, the concepts are the same. You will notice that in the initializer method I create a reference to the page model. This method—just like the method marked with the SetUp attribute in the UI tests—will be executed before each test. This way, you get a fresh state of the page model so one test does not influence the other. Also, just like the UI tests, you can follow the Act-Arrange-Assert pattern for the unit tests as well.
The body of the test methods should be pretty straightforward. However, I did make a mistake. In the page model, I return the number 1337 as the answer to life, the universe, and everything, but of course this should be 42. (Obviously!) So, you will know this test will fail. The other tests should pass.
When you right-click the unit test project, there is the option Run Unit Tests to run all the tests in the project; you can also do this per class or even per test method. When you run them, the projects will be built, and the Unit Test Sessions screen will pop up showing you the progress of the selected tests. Figure 6-5 shows you the output of the tests I have created.

Figure 6-5. Output of the test run
As expected, one test failed, and it tells you exactly why. I will not fix it now, so you can see the output in VSTS as well. As your test cases are becoming more complex, you might want to debug it to see whether your test is wrong or your code is wrong. In the same context menu where you first started these tests there is also the option Debug Unit Tests . With these options you can set breakpoints like you regularly would and step through your code, analyzing what is going wrong.
The true power of your test lies with running them in an automated and continuous fashion. Because unit tests should be small and can execute within seconds, they can and should be part of your continuous integration build. This way, you receive feedback about the quality of your code as soon as possible.
To achieve this, just go to your build definition and add a new step. Find the Visual Studio Test step and add it to your definition. You should add this after your main project or solution has been built since the tests cannot be run when the project does not build at all.
There are some options for you to configure, but with the default configuration you should be able to get started.
In Figure 6-6 you see the added step and configuration . There are two things that should be noted in the configuration. The first thing is the value in the first field, Test Assembly . With this field, you specify the assembly or assemblies in which your tests are. You can work with minimatch patterns to locate them. By default, VSTS should pick up all assemblies with test in them, excluding the ones under the obj folder. As you might remember from the previous chapter, the Test Cloud assemblies also have test in them, so make sure you exclude them as unit tests. That is why it’s a good idea to name your projects differently so you can distinguish them by name.
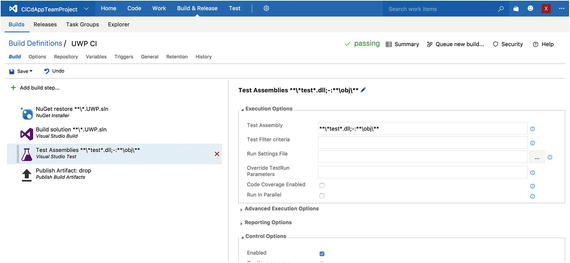
Figure 6-6. Adding unit tests to your build definition
The second thing you might want to do is select the Code Coverage Enabled check box . With this enabled, it will also collect data about the code coverage. This means it will tell you how much of your code is tested by the unit tests that are found; the closer you get to 100 percent, the better. As you may recall from the UI tests, you can select the “Continue on error” box here as well to not fail your build when one or more tests fail but rather have the build marked as Partially Succeeded.
All results, including the data on the code coverage, are consolidated in the results of a build, right in VSTS, just like you saw with the UI tests. Looking at Figure 6-7, you see a similar screen with tests results as in the previous chapter with Test Cloud.
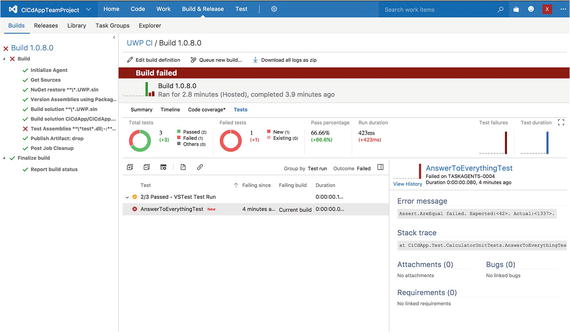
Figure 6-7. Unit test results in VSTS
If you combined these types of tests in one build definition, the results would be aggregated here and the combined output would be shown.
Unit Testing Android- and iOS-Specific Code
For unit testing a traditional Xamarin app or some platform-specific code you might have, special templates are available in Visual Studio. If you look back at Figure 6-4, you can also see templates specifically stating Unit Test App for both Android and iOS.
When you add one of these to your solution, you will notice that it differs a bit from regular unit tests. Where regular unit test projects output a library containing your tests, these projects are actual apps. Figure 6-8 shows you my Solution Explorer window in Visual Studio after adding the Android and iOS unit test projects.

Figure 6-8. Solution Explorer window with the all the current projects
When you examine the contents of these projects, you will see that they have everything in there to be fully qualified apps, which can be run on an emulator. Besides that, there is one file in there: the TestSample.cs file .
Running these tests is done through a test runner by default. This means that if you run these projects, you are presented with an app that can run the tests for you and provide you with the results. Before you take a look at that, let’s take a quick look at the content inside the test classes. Since they are identical in each platform, just one is shown here:
[TestFixture]public class TestsSample{[SetUp]public void Setup() { }[TearDown]public void Tear() { }[Test]public void Pass(){Console.WriteLine("test1");Assert.True(true);}[Test]public void Fail(){Assert.False(true);}[Test][Ignore("another time")]public void Ignore(){Assert.True(false);}[Test]public void Inconclusive(){Assert.Inconclusive("Inconclusive");}}
Once again, you see test fixtures that are similar to what you have seen before. Better yet, the attributes you can work with are the same ones as the tests you wrote for Test Cloud.
Note
The traditional Xamarin unit tests are based on the NUnitLite (Android) and Touch.Unit (iOS) frameworks. There are other testing frameworks out there (for example, xUnit) that can also be used for unit testing Xamarin apps.
To show you how to run the tests, I will just use these sample ones for now. Set either one of these platform unit test projects as the startup project and run it like you would run your app normally. Figure 6-9 shows both the iOS Simulator and the Android emulator side by side with the test runner app.
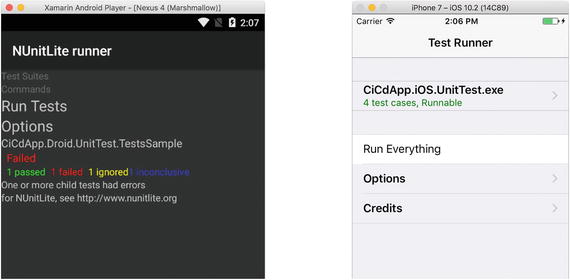
Figure 6-9. Test runner on Android (left) and iOS (right)
This app searches within the same binary to see whether there are any tests available and lists them within the test runner interface. From there you can select one or more tests and run them from inside the app. Also, the results are presented to you so you can examine the outcome.
While the test runner will suffice for running the tests locally, it imposes a problem when implementing this way in an automated pipeline environment. You cannot run an app, fire the tests through there, and fetch the results from an emulator window.
These tests can be automated, but it takes some effort. Also, for Android it is easier than iOS. For more information on how to set this up, please refer to https://spouliot.wordpress.com/2012/04/02/touch-unit-automation-revisited/ for iOS and https://developer.xamarin.com/guides/android/troubleshooting/questions/automate-android-nunit-test/ for Android.
Other Test Types
When you scroll through the other build steps available to you in VSTS, you will notice that there are other types of tests available. Although they are useful, they are not suitable to use with mobile applications. The kinds of tests you will find are load testing, performance testing, and functional tests. The latter does, in fact, do the same as Test Cloud, but targeting mostly web applications and even desktop applications.
Like with a lot of mobile apps, you will probably have some form of API back end to feed your app with data. For these kinds of applications, you can still set up a continuous pipeline and have them tested and deployed in an automated way.
Tip
There are a lot of good resources for more general continuous integration and delivery and the processes around them. One in particular that also focuses on Microsoft technologies is DevOps on the Microsoft Stack by Wouter de Kort.
Final Thoughts
In this chapter, you learned how to incorporate UI tests as part of your automated builds. The results are conveniently reported in VSTS where you can inspect them in a unified and clear way.
In addition, you looked at how to write some basic unit tests and make them part of your build definitions. When multiple types of tests are executed in one build definition, the results will be aggregated so you do not have to look in more than one place to gather the results. For Xamarin.Android and Xamarin.iOS projects, platform-specific unit tests projects are available; however, they are not well suited to run in an automated fashion. Because of this, I recommend you use the regular unit test project whenever possible. If the design of your projects is done right, you should be able to implement it even on traditional Xamarin projects.