17. Customize Your Reading Experience with the iBooks and News Apps
In this Chapter
![]() Using iBooks to access the iBook Store and shop for eBooks and audiobooks
Using iBooks to access the iBook Store and shop for eBooks and audiobooks
![]() Reading eBooks and listening to audiobooks using the iBooks app
Reading eBooks and listening to audiobooks using the iBooks app
![]() Customizing your information-gathering and reading experience with the News app
Customizing your information-gathering and reading experience with the News app
Thanks to Apple’s iBooks app, you can easily acquire and read eBooks, listen to audiobooks, plus view PDFs on any iOS mobile device (or Mac).
If you have a Mac, iPhone, or an iPad, iBooks uses iCloud to sync your eBook, audiobook, and PDF library (and related eBook and audiobook bookmarks) between computers and iOS mobile devices that are linked to the same iCloud account. As a result, all your compatible content is available to you, regardless of which Mac or iOS device you’re using. You can begin reading or listening on one device, and then pick up exactly where you left off on another.
Anything having to do with shopping for, downloading, installing, and then reading or listening to eBooks or audiobooks (that have been acquired from the Apple’s iBook Store) is handled with the iBooks app.
The iBooks app has four main purposes:
![]() It’s used to access Apple’s online-based iBook Store. From iBook Store, you can browse an ever-growing collection of eBook titles (including traditional book titles from bestselling authors and major publishers that have been adapted into eBook form). Although some eBooks are free, most must be paid for.
It’s used to access Apple’s online-based iBook Store. From iBook Store, you can browse an ever-growing collection of eBook titles (including traditional book titles from bestselling authors and major publishers that have been adapted into eBook form). Although some eBooks are free, most must be paid for.
![]() Tip
Tip
As with purchases from the iTunes Store or App Store, eBook and audiobook purchases made from iBook Store are charged to the credit or debit card associated with your Apple ID. You can also pay for iBook Store purchases using prepaid iTunes gift cards.
![]() It’s used to transform your smartphone or tablet into an eBook reader. iBooks offers many features that make reading eBooks on your iOS device a pleasure. For example, when you stop reading and exit the iBooks app (by pressing the Home button), the app automatically saves the page you’re on using a virtual bookmark, and then later reopens to that page when you restart the iBooks app. (Similar functionality is offered when listening to an audiobook. The app automatically remembers where you paused the playback.)
It’s used to transform your smartphone or tablet into an eBook reader. iBooks offers many features that make reading eBooks on your iOS device a pleasure. For example, when you stop reading and exit the iBooks app (by pressing the Home button), the app automatically saves the page you’re on using a virtual bookmark, and then later reopens to that page when you restart the iBooks app. (Similar functionality is offered when listening to an audiobook. The app automatically remembers where you paused the playback.)
![]() Note
Note
You are allowed to install copies of your eBooks and audiobooks on all computers and devices that are linked to the same iCloud account, so you do not have to purchase the same content multiple times.
![]() It’s used to acquire and listen to audiobooks. To find and purchase audiobooks, access iBook Store, tap the Featured or Top Charts icon, and then tap the Audiobooks tab to see a listing of available audiobooks. Tap the Categories option and then choose an audiobook category to narrow your search, or use the Search field to find the title you’re looking for.
It’s used to acquire and listen to audiobooks. To find and purchase audiobooks, access iBook Store, tap the Featured or Top Charts icon, and then tap the Audiobooks tab to see a listing of available audiobooks. Tap the Categories option and then choose an audiobook category to narrow your search, or use the Search field to find the title you’re looking for.
![]() It can be used to import, view, and manage PDFs that are sent to you via email or text message, that you import from a cloud-based service (using the Files app, for example), or that you create using an app installed on your mobile device, such as Safari, Notes, or Microsoft Word.
It can be used to import, view, and manage PDFs that are sent to you via email or text message, that you import from a cloud-based service (using the Files app, for example), or that you create using an app installed on your mobile device, such as Safari, Notes, or Microsoft Word.
![]() What’s New
What’s New
When viewing any web page with Safari, to create a PDF from it, tap the Share menu and then tap the Create PDF icon. To export the PDF to iBooks, tap the Share icon again, but this time tap the Copy to iBooks icon.
Customizing iBooks Settings
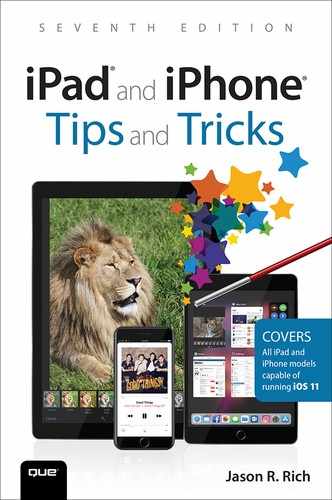
To customize settings related to iBooks, launch Settings and tap the iBooks option (shown in Figure 17.1 on an iPad Pro). There are a variety of options you can adjust by turning on or off the virtual switches associated with each feature.
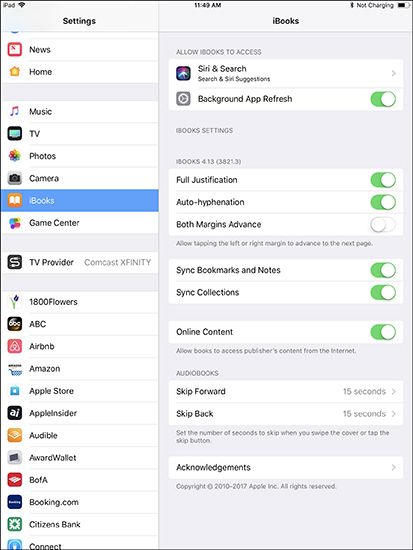
FIGURE 17.1
Use Settings to customize a handful of options related to the iBooks app.
![]() Tip
Tip
At any time, an eBook’s content can be updated by the book’s author or publisher. By turning on the Online Content option in Settings, your iPhone or iPad can update eBooks you’ve already acquired if new content becomes available. Alternatively, from the iBooks app, tap the Purchased icon, and then tap the Updates option. Tap the Update button associated with each book that’s listed to download that free update.
iBooks enables you to store and manage a vast library of eBooks, audiobooks, and PDFs on your iOS device. How much content you can store within the device is limited only by the storage capacity of the device itself. Plus, all your iBook Store purchases automatically are saved to your iCloud account. Thus, from your iCloud account, you can easily redownload eBook and audiobook titles you’ve previously purchased when you want to access a particular title that is not currently stored on your device.
![]() Tip
Tip
To save internal storage space, only keep eBooks or audiobooks you’re actually listening to stored locally within your iPhone or iPad. The rest are stored in the cloud (via iCloud), and you can access them anytime you want as long as an Internet connection is available.
Organizing Your Personal Library
When you launch iBooks, the main My Books screen is displayed (shown in Figure 17.2 on an iPad Pro). If it’s not displayed, tap the My Books icon at the bottom of the screen. You see the thumbnails of the eBook and audiobook covers in your digital library.
![]() Note
Note
Audiobooks display a headphones icon in the lower-left corner of the cover image thumbnail.
![]() Note
Note
With the Blurb photo book service, you can create custom printed photo books using your digital images, you can pay a few dollars more to create an iBooks-compatible eBook. Visit www.blurb.com for more information.
Tap the Collections menu near the top center of the screen to determine which titles are displayed. In Figure 17.2, the menu is labeled as All Books, which is the currently selected option. Other categories include Books, Audiobooks, or PDFs.
Select the All Books option to display all content currently stored on your mobile device.
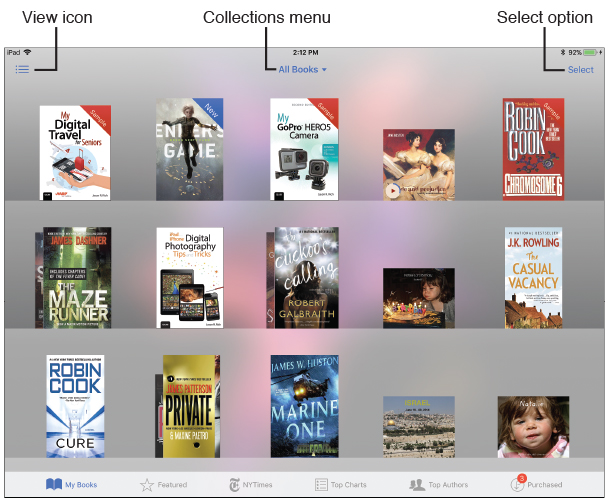
FIGURE 17.2
Tap the My Books icon at the bottom of the iBooks screen to see your virtual bookshelf, which displays your library of eBook and audiobook titles.
![]() Note
Note
When you have not yet opened a newly acquired eBook in iBooks or audiobook, a blue-and-white New banner displays on its cover thumbnail on the Library screen. If you’ve only downloaded the free sample for a book, a red-and-white Sample banner is displayed as part of the eBook’s cover thumbnail.
![]() What’s New
What’s New
If a book in your library is part of a series, tap the thumbnail to see the thumbnail for the next title in the series. That thumbnail is labeled with a blue-and-white Next banner in the corner (see Figure 17.3).

FIGURE 17.3
iBooks displays the next eBook or audiobook in a series.
To view all content you’ve acquired, including titles stored in your iCloud account but not currently stored on your actual iPhone or iPad, tap the Purchased icon, select Books or Audiobooks option, and then tap the Not on This iPhone (iPad) tab. Titles in this list have an iCloud icon, which indicates they’re not currently loaded on the device (see Figure 17.4). Tap the iCloud icon to download them to the device you’re using.
To change how the eBooks and audiobooks are displayed on the Library screen, tap the View icon (located in the top-left corner of the screen). This allows you to toggle between the virtual bookshelf view and a listing view. The listing view displays each book’s title and author, along with a tiny thumbnail of the cover artwork. When viewing the list view, tap the Bookshelf, Titles, Authors, or Categories tab at the top of the screen to quickly re-sort your titles.
Tap the Collection menu (displayed at the top-center of the screen) to manually sort your eBook, audiobook, or PDF library into separate collections, each of which can have a custom name (see Figure 17.5)
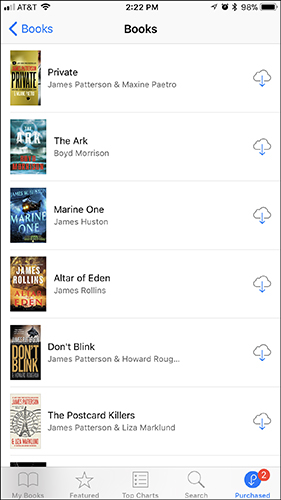
FIGURE 17.4
Quickly view all eBooks or audiobooks you’ve purchased and that are stored within your iCloud account but aren’t stored on your device.
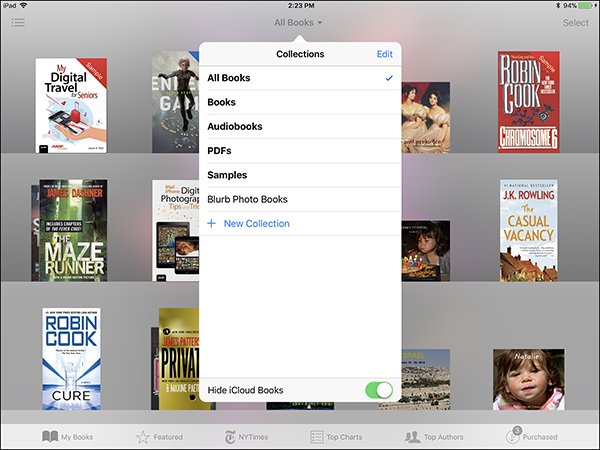
FIGURE 17.5
Tap the Collections menu to create new collections or sort your content library by collection type.
To create a new collection, tap + New Collection on the Collections menu (refer to Figure 17.5). Next, create a custom name for the Collection, and tap Done when you’re finished typing.
After you’ve created additional collections, you can move content into a specific collection and organize titles in that collection. To move an eBook, audiobook, or PDF into a specific collection, return to the main Library screen and tap the Select option. Next, tap one or more thumbnails that you want to transfer from the default All Books collection into a specific collection. As each eBook, audiobook, or PDF is selected, a blue-and-white checkmark icon appears in the lower-right corner of its thumbnail.
Tap the Move icon, and when the Collections menu opens, tap the name of the collection you want to move the selected content into.
![]() Note
Note
When you transfer PDFs into the iBooks app, those files are automatically placed in a specific collection, called PDFs.
To delete eBooks stored on your iPhone or iPad (but keep them in your iCloud account), from the Library screen, tap the Select option (refer to Figure 17.2), tap the content thumbnails you want to delete, and then tap the Delete option.
![]() Tip
Tip
An Internet connection is needed to load eBooks or audiobooks into the iBooks app from iBook Store or your iCloud account. However, after content is loaded into the app, you no longer need an Internet connection to actually read an eBook or listen to an audiobook.
Navigating the iBooks App
Along the bottom of the Library screen on an iPhone are five command icons (see Figure 17.6). Here’s how to use several of these options to find the eBooks or audiobooks you’re looking for from Apple’s online iBook Store:
![]() My Books—Tap this icon to access the Library screen and view your personal content collection. Place your finger near the center of the screen and swipe down to make a Search field appear at the top of the screen. Use this tool to find any eBook or audiobook in your library by typing a keyword, title, search phrase, or author’s name.
My Books—Tap this icon to access the Library screen and view your personal content collection. Place your finger near the center of the screen and swipe down to make a Search field appear at the top of the screen. Use this tool to find any eBook or audiobook in your library by typing a keyword, title, search phrase, or author’s name.
![]() Featured—Access the iBook Store and browse through books that Apple considers to be “featured” titles. An Internet connection is required.
Featured—Access the iBook Store and browse through books that Apple considers to be “featured” titles. An Internet connection is required.
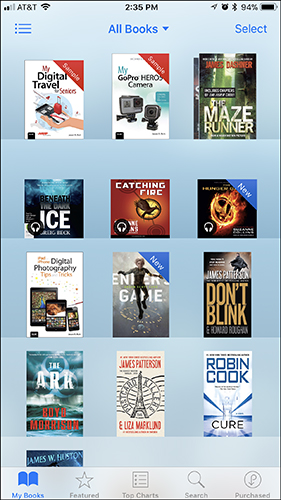
FIGURE 17.6
Use the command icons at the bottom of the screen to find different types of content.
![]() Tip
Tip
After tapping the Featured button, scroll to the bottom of the screen to access the Apple ID [your username] button, the Redeem button, and the Send Gift button. Tap the Apple ID button to manage your Apple ID account. Tap the Redeem button to redeem iTunes gift cards and add credit to your Apple ID account. Tap Send Gift to send someone you know an eBook as a gift. You must know the recipient’s email address to do this.
![]() Top Charts—Tap this option to display the bestselling eBooks or audiobooks in the iBook Store. Near the top of the screen, Books, Audiobooks, and Top Authors tabs are displayed. Tap the Books tab to discover multiple charts, including a chart for Paid eBooks and Free eBooks. Tap the Audiobooks tab to search for audiobooks. Tap the Top Authors tab to view an alphabetical listing of popular authors who have books available from iBook Store.
Top Charts—Tap this option to display the bestselling eBooks or audiobooks in the iBook Store. Near the top of the screen, Books, Audiobooks, and Top Authors tabs are displayed. Tap the Books tab to discover multiple charts, including a chart for Paid eBooks and Free eBooks. Tap the Audiobooks tab to search for audiobooks. Tap the Top Authors tab to view an alphabetical listing of popular authors who have books available from iBook Store.
![]() Search—Tap the Search option to reveal a Search field, within which you can type any book title, author name, keyword, or search phrase that helps you locate a specific book. Tap any listing to view the description for that book.
Search—Tap the Search option to reveal a Search field, within which you can type any book title, author name, keyword, or search phrase that helps you locate a specific book. Tap any listing to view the description for that book.
![]() Purchased—Tap this option to quickly find and reload any eBook or audiobooks you’ve previously purchased or to update existing content (if applicable).
Purchased—Tap this option to quickly find and reload any eBook or audiobooks you’ve previously purchased or to update existing content (if applicable).
On any model iPad, there are six command icons (see Figure 17.7). The NYTimes icon enables you to browse the Fiction and Nonfiction bestsellers list from The New York Times.
![]() Note
Note
These same The New York Times charts are available on the iPhone. To access NYTimes charts, tap the Top Charts option, and then scroll down to the New York Times Fiction or New York Times Non-Fiction heading. Then tap the See All option to view the complete chart.
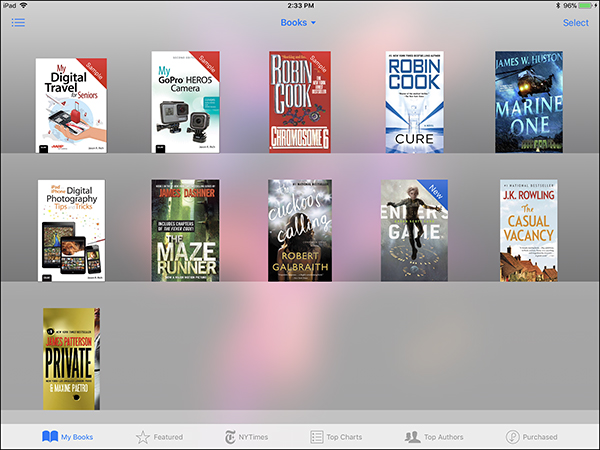
FIGURE 17.7
The command icons on the iPad screen include options to access The New York Times bestseller lists and lists of books by top authors.
![]() Tip
Tip
When accessing the Featured, NYTimes, Top Charts, or Top Authors section of the iBook Store on any iPad, the Search field is in the top-right corner. On the iPhone, tap the Search command icon at the bottom of the screen to access the Search field.
The My Books, Featured, Top Charts, and Purchased command icons at the bottom of the iPad screen serve the same purpose as they do when you’re using the iPhone version of iBooks.
![]() Tip
Tip
You can customize what you see after you tap the Top Charts icon to show titles from a specific category or genre. To choose a specific Top Chart listing, first tap the Categories option and select a specific category.
![]() Note
Note
You can download and read eBooks acquired from sources other than the iBook Store using iBooks; however, the eBooks must be a compatible file format. The iBooks app works with PDFs (or eBooks in PDF format), as well as eBooks created in the industry-standard ePub format.
Navigating the iBook Store
When you’re looking for something specific in the iBook Store, use the Search field to enter an eBook title, author’s name, subject, or keyword that’s associated with what you’re looking for. Entering a specific book title reveals very specific search results. However, entering a keyword related to a topic or subject matter reveals a selection of content suggestions that might match what you’re seeking.
Tap any listing to reveal a more detailed description of a particular eBook or audiobook. As you review a description, look carefully at its ratings and its written reviews.
Learning about Content from its Description
A typical eBook or audiobook listing includes the book’s cover artwork, its title, and the author. An eBook or audiobook’s description, however, is divided into several sections. Tap the Details, Reviews, or Related tab to view all information pertaining to a specific book.
![]() Note
Note
Using iBook Store to shop for eBooks is similar to using the App Store to acquire apps or using the iTunes Store to acquire TV shows, music, or movies. Each title has a detailed description screen, ratings and reviews, and a sample of the content, which you can download for free into the iBooks app. Figure 17.8 shows a typical eBook description screen.
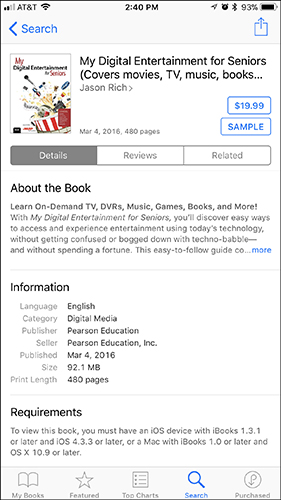
FIGURE 17.8
Read a detailed description of an eBook or audiobook before making your purchase and downloading it.
Use the Share icon at the upper-right corner of an eBook or audiobook’s description to share details about the content with others. In the Share menu, there is also a Gift button. Tap this to purchase and send the eBook as a gift for someone else. To send a gift, you need to know the recipient’s email address.
![]() Tip
Tip
You can preview an eBook or audiobook before paying for it. As you’re looking at a book’s description, tap the Sample button to download a free sample of that book. The length of the sample varies. It is usually between a few pages and a full chapter. For audiobooks, you can listen to a sample (usually several minutes’ worth of material) prior to making a purchase.
Tap the Reviews option to access the iBook Store Ratings chart, which showcases the book’s average star-based rating and how many ratings the book has received. You can also see this average star-based rating broken down by how many stars (from one to five) the book has received from your fellow iBook Store customers. Below the star-based ratings are more detailed, text-based reviews written by other iBook Store customers.
Purchasing an eBook or Audiobook
To quickly purchase and download an eBook or audiobook, tap its price button (which displays the price of the content). After you tap a price button, confirm your purchase decision by entering your Apple ID password; then the download begins. If your iOS mobile device is equipped with a Touch ID sensor, approve your acquisition using a fingerprint by placing your finger on the Touch ID sensor. If you’re using an iPhone X, you use the Face ID feature by looking at the phone’s screen when prompted to confirm the purchase.
If you’re downloading a free eBook, the button label is Free rather than a price. Tap Free and then tap the Get Book button.
It typically takes about 30 seconds to download a full-length eBook to your iPhone or iPad, depending on the speed of your Internet connection and the size of the eBook’s digital file. (Downloading an audiobook takes a bit longer, due to its larger file size.) As soon as the content is downloaded and ready to read or listen to, the book’s front cover artwork is displayed as part of the Library screen in the iBooks app.
Customizing Your eBook Reading Experience
To begin reading an eBook you’ve acquired and downloaded, from the Library screen, tap a book cover thumbnail to open the eBook.
While reading eBooks, you can hold the iPhone or iPad in portrait or landscape mode. Then, as you’re reading, tap anywhere on the screen to make the various command icons and buttons appear (see Figure 17.9).
![]() Tip
Tip
Tap the Library button to automatically save your location in an eBook and return to the Library screen.
Tap the Table of Contents icon to display an interactive table of contents for the eBook you’re reading. Then tap any chapter number or chapter title to immediately jump to that location in the book. Or, near the top center of the Table of Contents screen, tap the Bookmarks option to see a list of manually saved bookmarks you have previously set as you were reading that eBook. Tap the Notes tab to review the notes you’ve manually added to pages as you were reading.

FIGURE 17.9
A sample eBook page (on an iPad Pro) with the iBooks command icons displayed.
![]() Tip
Tip
Whenever you tap the Back (<) option while reading an eBook (refer to Figure 17.9), or press the Home button to return to the device’s Home screen, your current location in the book is automatically bookmarked and saved.
You also can manually add a virtual bookmark to as many pages in the eBook as you want. To do this, tap the Bookmark icon (refer to Figure 17.9) in the top-right corner of the screen. When you tap the Table of Contents icon and then tap the Bookmarks tab, you can see a complete list of manually placed virtual bookmarks in the eBook so you can return to any of those pages quickly.
To exit the Table of Contents screen and return to reading your eBook, tap the Resume option.
Three command icons appear to the right of the eBook title. Tap the AA icon to reveal a pop-up window (see Figure 17.10). It offers a screen brightness slider and a small and large A button, which are used to instantly decrease or increase the font size in the book you’re reading.
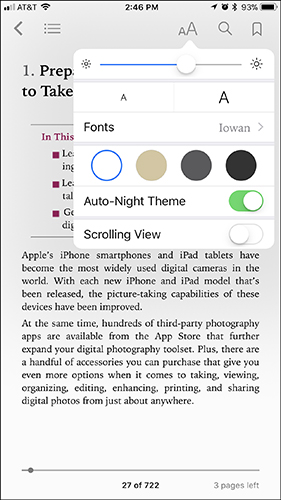
FIGURE 17.10
Customize the look of each page by choosing a font, font size, and theme.
Tap the Fonts button to change the text font, or tap one of the Themes buttons (the colored circles) to change the theme used to display the text (and the background color) for the eBook you’re reading. Choose the theme that is best suited for the lighting available and is also visually pleasing to you.
Turn on the virtual switch associated with Scrolling View if you want to view an eBook as a single, vertically scrolling document rather than in the format where you virtually turn the pages.
If you turn on the virtual switch associated with Auto-Night Theme, your iPhone or iPad measures the ambient light in the area where you’re reading, and then automatically turns on the Night theme if you’re reading in a dark or dimly lit area.
Tap the Search icon (refer to Figure 17.9) to display a Search field. Use this feature to locate any keyword or search phrase that appears in the eBook you’re currently reading.
As you’re reading (unless you have the Scrolling View feature turned on), turn the page by swiping your finger from right to left (horizontally) across the screen to move one page forward, or swiping your finger from left to right to back up one page at a time.
![]() Tip
Tip
To turn the page, you can also tap the right side of the screen to advance or the left side of the screen to go back. However, if you have the Both Margins Advance option activated (which you can do in Settings), tapping either margin advances to the next page.
At the bottom of the screen is the page number in the eBook you’re currently reading, as well as the total number of pages in the eBook. The number of pages remaining in the current chapter is displayed to the right of the page number (refer to Figure 17.9).
![]() More Info
More Info
As you’re reading an eBook, hold your finger on a single word to see a selection of available reading tools: Copy, Lookup, Highlight, Note, Search, and Share.
Use your finger to move the blue dots on either side of the word to expand the selected text to a phrase, sentence, paragraph, or entire page.
Tap the Look Up tab to look up the definition of a selected word. (Internet access is required to use this feature.)
Tap the Highlight tab to highlight the selected text. You can choose the color of your highlights, or you can underline the selected text by tapping the yellow circle icon that’s above the word. Tap the white circle (with a red line through it) to remove highlights, or tap the Note icon to create a new note.
When you tap the Highlight option, you’re given the option to choose a highlight color. The last highlight color you selected determines the color of the sticky note that appears when you tap the Note option. This enables you to easily color-code your highlights and notes.
If you tap the Note tab on an iPad, a virtual sticky note appears on your device’s screen, along with the virtual keyboard. Type notes to yourself about what you’re reading. When you’re finished typing, tap anywhere on the screen outside the sticky note box.
When you’re using an iPhone and you tap the Note tab, the sentence related to the selected word is displayed. Below it, you can type text using the virtual keyboard. Tap Done to save the note.
On both the iPhone and iPad, a sticky note icon appears in the margin of the eBook. You can later tap this icon to read your notes or annotations.
Tap the Search tab to enter any word or phrase and find it in the eBook. A search window appears below the Search field. References to each occurrence of your keyword or search phrase are displayed by chapter and page number. Tap a reference to jump to that point in the book.
Listening to Audiobooks Using the iBooks App
After you’ve purchased and downloaded an audiobook, the thumbnail is shown on the Audiobooks Collections screen. To begin listening to the audiobook, tap its thumbnail.
A new screen opens to show the audiobook thumbnail and various controls. The Play/Pause icon is displayed below the image (see Figure 17.11). Tap Play to begin playing the audiobook; the button changes to the Pause button, which you can tap to pause the playback. Tap the Rewind 15 or Fast Forward 15 buttons to rewind or fast forward the playback by 15 seconds.
![]() Note
Note
When you pause an audiobook or exit the iBooks app, a bookmark is automatically saved so you can continue listening from where you left off. Your place is maintained whether you resume listening on the same device or use another Mac or iOS mobile device that’s linked to the same iCloud account.

FIGURE 17.11
Use the audio playback controls offered by the iBooks app when listening to audiobooks.
Tap the Playback speed (1x) icon to change the playback speed from normal speed (1x) to .75x, 1.25x, 1.5x, or 2x. Tap the moon-shaped Sleep Timer icon to access the Sleep Timer menu and set the audiobook to stop playing after a certain amount of time. A variety of options (from 5 minutes to 1 hour, plus a custom time option) are available.
Tap the Share icon to share details about the audiobook you’re listening to with other people. Tap the Table of Contents icon to see an interactive chapter-by-chapter table of contents for the book. To go to a specific chapter, tap its listing.
Tap on the Back (<) button to return to the Library screen.
![]() Tip
Tip
Once an audiobook begins playing, you can exit the iBooks app while the audio continues playing. To pause the audiobook playback while using another app, relaunch the iBooks app from the Home screen, App Switcher, or Dock, or access the Music controls with Control Center. Alternatively, use the “Hey Siri” feature, and say, “Hey Siri, pause the audiobook.”
Using Other Reading Apps
Although Apple has worked out distribution deals with many major publishers and authors, the iBook Store does not offer an eBook edition of every book in publication.
![]() Tip
Tip
In some cases, eBook titles are available from Amazon.com or Barnes & Noble (BN.com) but not from the iBook Store. Or if Amazon.com, BN.com, and iBook Store offer the same eBook title, the price for that eBook might be lower from one of these other online-based booksellers.
So, if you’re a price-conscious reader, it pays to shop around for the lowest eBook prices. Just because you’re using an iPhone or iPad does not mean you must shop for eBooks exclusively from the iBook Store.
Perhaps you previously owned a Kindle or Nook eBook reader before purchasing your iPhone or iPad and have already acquired a personal library of eBooks formatted for that device. If you want to access your Kindle or Nook library from your iPhone or iPad, download the free Kindle or Nook Reading apps from the App Store.
These apps prompt you for your Amazon or Barnes & Noble account information to sync your purchased content to the app. To purchase new Kindle- or Nook-formatted eBook titles, you must visit Amazon.com or BN.com using Safari or your primary computer. After you make your purchase, your eBooks can be automatically synced to the Kindle or Nook app on your device.
![]() Note
Note
If you enjoy audiobooks, Audible.com (which is owned by Amazon) offers the largest selection of audiobook content in the world. Download the free Audible app to listen to audiobooks acquired from Audible.com. Visit www.audible.com to set up an account, and then purchase or acquire audiobooks from this service.
Staying Informed Using the News App
The News app that comes preinstalled with iOS 11 is a powerful yet easy-to-use information and news gathering tool.
Apple has teamed up with some of the world’s leading newspapers, magazines, and news organizations, as well as bloggers, website operators, online publications, and content providers, to offer a single app that gathers articles together and formats them into a highly personalized, nicely formatted digital publication that provides only articles, information, and news that covers exactly the topics you’re interested in.
Best of all, this personalized digital news feed is updated and available 24/7, and it is completely free. The app takes a few minutes to initially set up, but after this process is completed, the News app gathers content on your behalf from various sources and presents it to you on your iPhone’s or iPad’s screen. (An Internet connection is required.)
You can customize the News app in several ways:
![]() You can “subscribe” to specific publications and read selected articles published by those sources for free.
You can “subscribe” to specific publications and read selected articles published by those sources for free.
![]() You can select topics of interest to you and have the News app gather information related to those topics from many different sources.
You can select topics of interest to you and have the News app gather information related to those topics from many different sources.
![]() You have the option to choose keywords or phrases. The app then gathers articles and news stories that contain those specific search terms.
You have the option to choose keywords or phrases. The app then gathers articles and news stories that contain those specific search terms.
![]() What’s New
What’s New
Apple now has a team of Apple News Editors who create a Spotlight feature that provides a daily, curated collection of news and articles that covers a wide range of topics. To read these articles, tap the Spotlight icon at the bottom of the News app’s screen.
You can also have this collection of Spotlight articles emailed to you as a free daily briefing. To subscribe, tap the Spotlight icon, scroll to the bottom of the page, and tap Sign Up to Get News in Your Inbox. When the pop-up window appears, tap the Sign Up button.
The News app works with iCloud, so after you set up the app to personalize your news feed, the content the app collects automatically syncs across all your iOS mobile devices and Macs. (Your Mac must have macOS Sierra or macOS High Sierra installed to work with the News app.)
Each time you launch the News app and tap the For You icon, the date and local temperature is displayed at the top of the screen, followed by headings that allow you to access Top Stories and Trending Stories, as well as news related to topics you’ve expressed interest about. The news topics are sorted by topic.
The News app requires Internet access to collect articles and content. However, you can manually select articles to be saved for offline viewing at your convenience.
To save an article, tap the Share icon, and then tap the Save icon that’s displayed within the Share menu (see Figure 17.12). On the iPhone, the Share icon is along the bottom of the screen; on an iPad, it’s in the top-left corner. Then the Save icon appears within the Share menu.
When you want to access your saved articles, launch the News app and tap the Saved icon, which is in the bottom-right corner of the screen. A listing of your saved articles is displayed. Tap an article’s listing to read it, or swipe from right to left across the listing and then tap the Delete button to delete it.

FIGURE 17.12
Tap the Share icon followed by the Save icon to store articles for later review.
Customizing the News App
Launch the News app from the Home screen, and then invest a few minutes in customizing the app. From the Welcome to News screen, tap the Get Started option.
From the Pick Your Favorites screen, scroll through the displayed list of news organizations, newspapers, magazines, websites, and other content providers and choose those you’re interested in by tapping their respective thumbnails. Choose at least one of the displayed options, which include CNN, ESPN, The New York Times, and The Wall Street Journal.
Tap the Continue option. Based on your initial selections, the For You screen is formatted with content of interest to you. However, using additional tools in the app, you can further customize the content you are presented with on an ongoing basis. Tap the Following icon at the bottom of the screen to further customize the app.
![]() Tip
Tip
Get alerted of breaking news stories by adjusting the Notifications options for the News app. One way to do this is from within the News app; tap the Following icon. Then scroll to the bottom of the screen and tap the Manage Notifications option.
From the Notifications menu within the News app (see Figure 17.13), tap the virtual bell icon associated with specific channels and content providers the app is following on your behalf. To be alerted of important (general) news, tap the bell icon associated with News Editors’ Picks or News Top Stories.
To determine how these notifications will be presented to you, launch Settings, tap the Notifications option, and then tap the News option. Turn on the virtual switch associated with Allow Notifications, and then determine the form those notifications will take (such as audible alerts or onscreen Banners or Alerts).
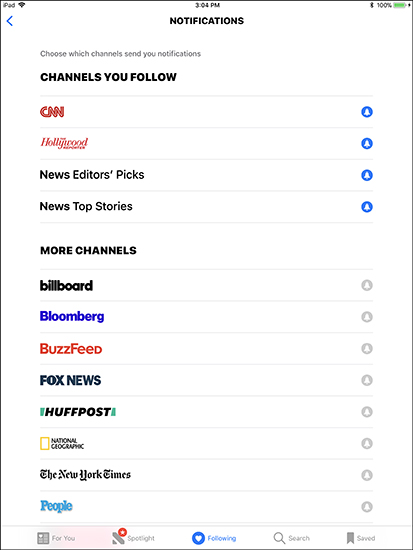
FIGURE 17.13
Receive an audible alert and notification on your iPhone or iPad when breaking news articles are published.
Navigating the News App
Along the bottom of the News app screen on both the iPhone (shown in Figure 17.14) and iPad are five command icons. Here’s a summary of what each tool is used for:
![]() For You—Tap this icon to read your personalized digital publication (news feed) that’s continuously updated with content of direct interest to you. Articles are collected in real time from a wide range of online-based sources and content providers.
For You—Tap this icon to read your personalized digital publication (news feed) that’s continuously updated with content of direct interest to you. Articles are collected in real time from a wide range of online-based sources and content providers.

FIGURE 17.14
Use the command icons at the bottom of the screen to navigate the News app.
![]() Spotlight—Read a curated collection of articles compiled daily by the Apple News Editors.
Spotlight—Read a curated collection of articles compiled daily by the Apple News Editors.
![]() Following—Based on specific topics and content categories, discover new sources and content providers that you’re interested in having the News app follow for you. New sources and content providers are continuously being added, as are specific topics available in each main content category. From the Following screen (see Figure 17.15), tap the + Browse icon for a source listing to add it to your For You feed.
Following—Based on specific topics and content categories, discover new sources and content providers that you’re interested in having the News app follow for you. New sources and content providers are continuously being added, as are specific topics available in each main content category. From the Following screen (see Figure 17.15), tap the + Browse icon for a source listing to add it to your For You feed.
![]() Search—In the Search field, enter a topic, subject matter, keyword, name, company name, industry, hobby, area of interest, or anything else you want the News app to gather articles about on your behalf.
Search—In the Search field, enter a topic, subject matter, keyword, name, company name, industry, hobby, area of interest, or anything else you want the News app to gather articles about on your behalf.
![]() Saved—As you read specific articles in the For You news feed, if there’s an article you want to save for later reference, tap the bookmark-shaped Save icon associated with it to save that article for offline viewing.
Saved—As you read specific articles in the For You news feed, if there’s an article you want to save for later reference, tap the bookmark-shaped Save icon associated with it to save that article for offline viewing.
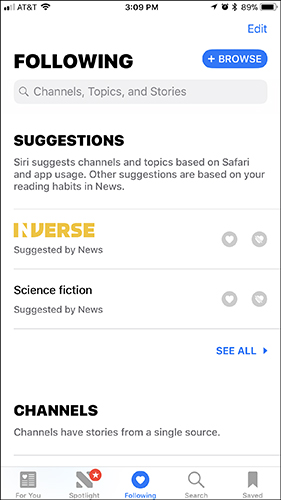
FIGURE 17.15
From the Following screen, choose which news sources, topics, and channels you want displayed within your customized For You news feed.
![]() Note
Note
Using your iPhone’s or iPad’s Internet connection, the News app gathers content on a continuous basis and displays the most current information first. As newer content becomes available, older content disappears from your news feed, unless you manually save specific articles.
Reading Articles
After setting up the News app, launch it whenever you have time to browse or read the collected articles in your personalized news feed. To do this, tap the For You icon. All the articles collected by the app are displayed on a single screen in a digital newspaper-style format.
Each article listing in your feed includes a headline, cover photo (when applicable), the first sentence or two from each article, the source of each article, and when it was published (see Figure 17.16). Articles are sorted by category (such as Science Fiction).
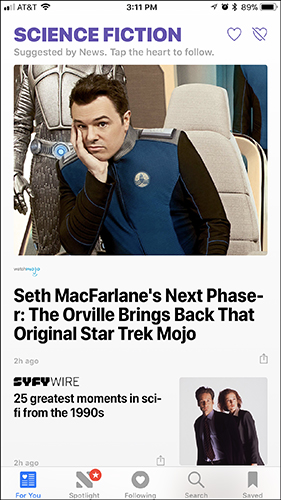
FIGURE 17.16
Your news feed (shown here on the iPhone) is populated with article listings that the News app collects for you.
To read an article in its entirety, simply tap its preview listing. Otherwise, keep scrolling down to view all the articles in your current news feed. Keep in mind, your news feed is updated continuously as new content is published. The articles toward the top of your news feed are the most current.
![]() Tip
Tip
To view, add to, or modify your collection of Favorite topics and content sources, tap the Following icon. If you want to delete a source (so the News app stops following it for you), tap Edit, and then tap the – icon displayed to the left of the listing for the source you want to remove.
Expanding Your Collection of Sources and Content Providers
At any time, to discover new sources and content providers that the News app can follow on your behalf or to add new topics of interest, tap the Following icon, tap the + Browse button, and then scroll through the list of publications and content providers.
When you come across one or more sources that you want the News app to begin following, tap its listing. The heart-shaped icon in the top right of the thumbnail turns red. Tap Done to add the selected news sources to your For You news feed.
![]() Tip
Tip
To find articles, content, or news stories based on a specific keyword or phrase, tap the Search icon. In the Search field, type the word or phrase that relates to what you’re looking for.
From the listing of search results, tap the Add (heart-shaped) icons associated with the articles of interest. Search results are sorted into sections labeled Top Result, Stories, Channels, and Topics.
After selecting any of the search results for the News app to follow, tap Done. Now, when you tap the For You icon, your news feed is updated with content from the added sources.
![]() Note
Note
A topic is content about a specific subject matter that you’re interest in, regardless of the publisher. A channel is content offered by a specific publisher or content producer, such as The New York Times, CNN, or 9to5Mac.
![]() Tip
Tip
When you’re reading an article in the News app, tap the Share icon associated with the article to share that article with others or export it to a compatible app. You also can add it to your Safari Reading List for offline viewing later (refer to Figure 17.12).
Subscribing to Digital Editions of Newspapers and Magazines
Instead of using the News app to read select content from newspaper and magazine publishers, you can download the proprietary app for that publication from the App Store. Then you can purchase complete single issues or a subscription to that publication to download and read all content from the digital edition of the publication.
Launch the App Store and, in the Search field, enter the name of any newspaper, magazine, or digital publication to find, download, and install the proprietary app available for it.
After downloading and installing the publication’s free app, launch that app and use in-app purchases to acquire individual issues or a paid subscription.
![]() Tip
Tip
The Texture app (available from the App Store) allows you to pay a flat monthly fee (as low as $6.99 per month) for unlimited access to current and past digital issues of more than 200 popular, consumer-oriented, and special interest magazines.
The optional Zinio app boasts that it has become the world’s largest magazine newsstand. From this app, you can purchase individual issues (or ongoing subscriptions) to the digital editions for more than 6,000 magazine titles, plus read selected articles for free. Single issue prices for magazines range from $0.99 to $9.99 each.