3. Take Advantage of iOS 11 Features for the iPad
In this Chapter
![]() Discover what’s new in iOS 11 that’s exclusive to the iPad and iPad Pro
Discover what’s new in iOS 11 that’s exclusive to the iPad and iPad Pro
![]() Use multiple apps simultaneously
Use multiple apps simultaneously
![]() Drag and drop content between apps
Drag and drop content between apps
![]() Work with the Apple Pencil and Smart Keyboard
Work with the Apple Pencil and Smart Keyboard
The way you can interact with an iPad or iPad Pro has greatly improved with iOS 11, regardless of which apps you typically use. Some of the new or improved iOS 11 features that make an iPad more efficient to work with include
![]() A redesigned Dock and Control Center
A redesigned Dock and Control Center
![]() Better multitasking capabilities
Better multitasking capabilities
![]() Easier ways to transfer content between apps using drag and drop (or copy and paste)
Easier ways to transfer content between apps using drag and drop (or copy and paste)
![]() The ability to mark up or annotate content using the Apple Pencil (on an iPad Pro)
The ability to mark up or annotate content using the Apple Pencil (on an iPad Pro)
![]() Keyboard shortcuts when using an iPad Pro with an optional Smart Keyboard
Keyboard shortcuts when using an iPad Pro with an optional Smart Keyboard
When you combine these features with the apps you’re already using (or soon will be using) on your tablet, you’ll quickly discover that the experience of using an iPad is closer than ever to working with a notebook computer without losing the convenience of the touchscreen display. This chapter covers some of iOS 11’s newest features that are specific to iPads—and in some cases, exclusively to the latest iPad Pro models.
![]() Note
Note
The iPad offers a 9.7-inch Retina Display, whereas the iPad mini 4 features a 7.9-inch LED-backlit Multi-Touch display. On the upside, these models are less expensive than higher-end models, but they also lack some of the newer technologies built into the latest iPad Pro models.
The latest iPad Pro models offer a 10.5-inch or 12.9-inch Retina Display, a faster processor, multiple built-in speakers, as well as other technologies that make these models considerably more advanced. As a result, iPad Pro models can function more like laptop computers when handling common computing tasks, such as word processing, spreadsheet management, working with PDF documents, or managing emails. iPad Pro models also work with the optional Apple Pencil ($99.00) stylus and optional Smart Keyboard ($149 to $169, depending which iPad Pro the keyboard will be used with). If you want to be able to handwrite, draw, or annotate content on your tablet’s screen an iPad Pro model is worth checking out.
All iPad and iPad Pro models come in several case colors and system configurations. For example, you have options in terms of the amount of internal storage the tablet contains, as well as whether the iPad (or iPad Pro) can connect to the Internet via only Wi-Fi or also via a 4G (LTE) cellular data connection.
![]() Note
Note
Many of the features discussed in this chapter apply to all iPad models. Some, however, are exclusive to the latest iPad Pro models.
![]() Tip
Tip
To quickly compare current iPad and iPad Pro models before making a purchase, visit www.apple.com/ipad/compare. After you purchase an iPad (or iPad Pro), you can’t add features to upgrade it, so make a decision based on what you anticipate your future needs will be.
For example, if you plan to store a massive number of high-resolution digital photos, large document and data files, as well as a library of HD video content on your tablet (including television shows and movies), choose a model with plenty of internal storage space.
Getting to Know the Customizable Dock
Chapter 2, “Customize Your iPad or iPhone,” introduces the newly redesigned Dock (see Figure 3.1). In addition to the Dock changes, the Control Center is more powerful and versatile than ever. For example, you can place your finger on any app icon on the iPad’s Home screen and drag it onto the Dock so it becomes more easily accessible, especially if you’re working with multiple Home screen pages.

FIGURE 3.1
The newly redesigned Dock on the iPad.
![]() Tip
Tip
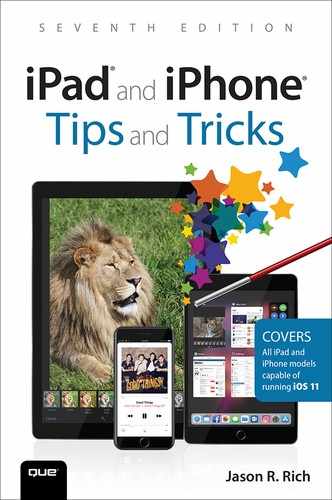
To see a list of recently accessed files that an app in the Dock has used, press and hold your finger on that app icon. For apps that are compatible with this feature, you see a list of recently accessed files (see Figure 3.2). Tap any of the file listings or image thumbnails to launch the app and continue working with that file.
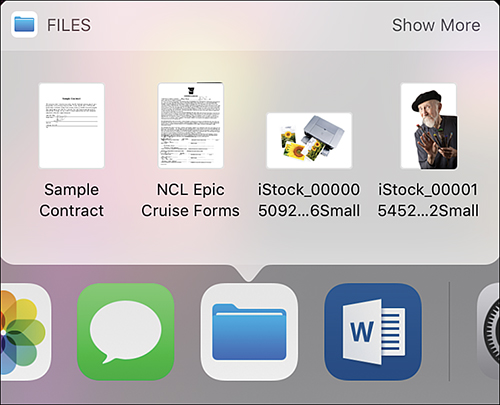
FIGURE 3.2
Certain apps allow you to use the Dock to quickly access files you’ve recently worked with.
If you’re working with a photo in the Photos app, and you want to quickly send the image to someone else using the Messages app, place and hold your pointer finger from your right hand on the image thumbnail. Using your left hand’s pointer finger, simultaneously swipe upward from the bottom of the iPad’s screen to make the Dock appear.
Next, use the finger on your right hand to drag the selected image thumbnail directly over the Messages app icon. Select which message conversation the image should go in, and place the image thumbnail into the Send field for that conversation. Tap the Send icon to complete the process.
The redesigned Dock, which is consistent no matter which Home screen you’re on, holds more apps than previous versions. The right side of the Dock includes icons for recently used apps and, if applicable, icons representing apps you were just using on another iOS mobile device or Mac (which means you can use the device you’re using now to quickly pick up where you left off on some other device). This takes advantage of iOS 11’s Handoff feature that’s covered in Chapter 6, “Sync, Share, and Print Files Using AirDrop, AirPlay, AirPrint, and Handoff.”
To manually add an app icon to the Dock, locate it on the Home screen, place your finger on it, and then drag it to the desired location on the left side of the Dock. To remove an app icon from the Dock and return it to the Home screen, place and hold your finger on the app icon and drag it up and out of the Dock.
To delete an app from the Dock (or the Home screen), place and hold your finder on the app icon until all of the compatible app icons start to shake. The apps you can delete from your tablet altogether have an X in the top-left corner. Tap the X on an app to delete that app from your tablet. (You can always reinstall it at a later time, for free, from the App Store.) Keep in mind that not all apps that come preinstalled with iOS 11 can be deleted. Refer to Chapter 2 for more information on how to customize your Home screen, delete apps, and organize apps into folders.
![]() What’s New
What’s New
Using any iPad, to access the redesigned Control Center and App Switcher while using any app, place your finger near the bottom of the screen and swipe up. Instead of a quick swipe to access the Dock, keep moving your finger up in one steady motion until the App Switcher and Control Center appear (see Figure 3.3).
Alternatively, press the Home button twice in quick succession to access the App Switcher and Control Center screen.
If you’re using an iPhone, press the Home button twice in quick succession to access the App Switcher. To access the Control Center, place your finger near the bottom of the screen and swipe up. Remember, if you’re using an iPhone X, the finger gestures to access the Home screen, App Switcher, Control Center, as well as other iOS 11 features are different. Refer to Chapter 1, “Discover iOS 11 and the Newest iPads and iPhones,” for more information.
From the App Switcher, you can instantly switch between apps that are currently running on your tablet; just tap the enlarged app thumbnail for the app you want to use. Scroll left or right to view all apps that are running.
To close an app altogether (but not delete it from your iPad), place your finger on an app thumbnail in the App Switcher and swipe up.
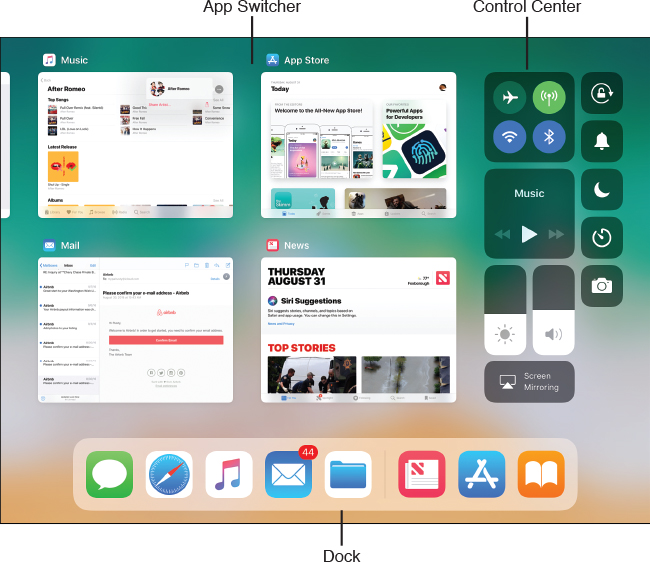
FIGURE 3.3
Take a look at the new appearance of iOS 11’s Control Center and App Switcher.
Introducing the Redesigned Control Center
If you have swiped up to access the App Switcher and Control Center, but you don’t see the Control Center, swipe to the left to access the Control Center. Here, you’ll see a handful of icons and sliders you can use to access or work with some of iOS 11’s most popular features. For example, you can turn on and off Airplane Mode, AirPlay, Wi-Fi, and Bluetooth. You can also control the Music app, adjust the iPad screen’s brightness, adjust the master volume control for the tablet, and turn on or off Screen Mirroring.
The icons displayed on the Control Center control the screen’s rotation lock, Silent mode, Do Not Disturb mode, and flashlight; access the Timer features of iOS 11; allow you to launch the Camera app; or access the Home app’s Favorites buttons (used to control smart appliances and lighting in your home). As you learned from Chapter 2, what’s displayed on the Control Center is somewhat customizable from within Settings.
![]() Note
Note
Refer to Chapter 2 to learn more about how to use the App Switcher and Control Center with any iPad or iPhone model.
![]() Tip
Tip
Regardless of what you’re doing on your iPad or iPad Pro, if you want to quickly return to the Home screen, either press the Home button, or do a five-finger pinch gesture on the tablet’s screen. Start by separating your fingers on your right hand and placing them on the tablet’s screen. Next, quickly draw your fingers together as if you’re grabbing something. The app you were using continues running in the background, but you instantly jump to the Home screen.
Accessing and Managing Files
People use cloud computing and online-based file storage/sharing services for a wide range of purposes. You already know that iCloud integration is built directly into iOS, however, not everyone uses iCloud for all of their file storage/sharing needs.
![]() Note
Note
You’ll learn more about using iCloud with your iPad or iPhone from Chapter 7, “Use iCloud and the Files App.”
In iOS 11, the iCloud Drive app, which was previously used to access and manage files stored within your iCloud account, has been replaced by the new Files app.
The Files app does more than integrate with iCloud; it also offers a centralized place to access and share files stored on other supported cloud-based services, including Dropbox (www.dropbox.com) and Box (www.box.com).
The new Files app grants you access to your iCloud Drive, Dropbox, and/or Box account(s), so you can easily access and share files stored in the cloud and transfer files between cloud-based services with ease. Other third-party apps that allow files to be stored in the cloud, can easily be set up to work with the new Files app. The list of cloud-based services and third-party apps that the Files app works with is continuously expanding.
![]() Note
Note
To work with the Files app and access cloud-based content, your iPad or iPhone must have Internet access via a Wi-Fi or cellular data connection. If you know you’ll be in an area with no Internet access, make sure to download the content while you still have Internet access.
Finding Your Files Stored in the Cloud
There are several ways to locate files stored within cloud-based services that are compatible with the Files app.
![]() Tip
Tip
You can set up your iPad’s Spotlight Search feature to help you find files stored in the cloud via the Files app. Launch Settings, select the Siri & Search option, tap Files app, and then turn on the virtual switch associated with Search & Siri Suggestions. (Like many features built into iOS 11, this also works on the iPhone.)
To manually find a file, launch the Files app from the Dock and then follow these steps:
1. On the left side of the screen, below the Browse heading, tap the cloud service you want to access, such as iCloud Drive (see Figure 3.4).
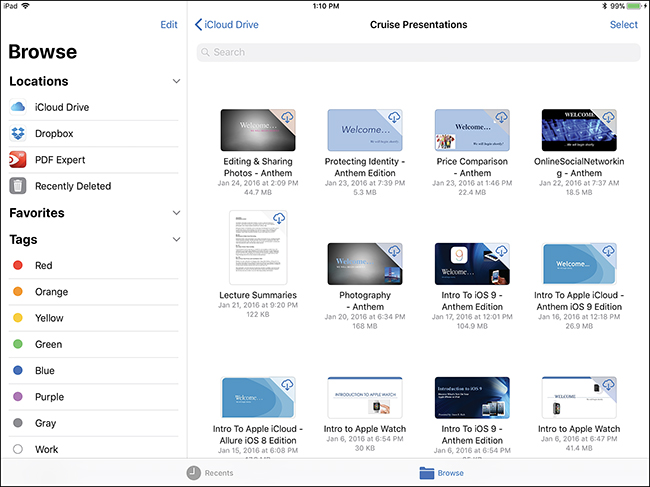
FIGURE 3.4
Select which cloud-based services you want to access from the Files app.
2. At the bottom of the screen, tap the Recents option to see your most recently accessed files, or tap on the Browse option (refer to Figure 3.4) to view a directory of files, folders, and subfolders.
3. Open the appropriate folder or subfolder by tapping its thumbnail or listing, and then locate the file(s) you want to open, view, share, or work with.
![]() Tip
Tip
Displayed near the top center of the screen are command tabs that allow you to configure how the files are displayed. If you access iCloud Drive, for example, your sort options include Name, Date, Size, or Tags.
4. A preview of the selected file displays within the viewer. You’re now able to manage or work with the selected content. See the next section, “Managing Files and Folders from the Files App” for details.
As you’re looking at the file directory for the cloud-based service you’ve selected, tap the Add Folder icon in iCloud Drive to create a new folder or subfolder. You can then add files to and rearrange files in the folder by dragging and dropping, using the Copy and Paste commands, or using the Duplicate and Move commands.
To use the File app’s Search tool to find a file stored in the cloud, follow these steps:
1. On the left side of the screen, below the Browse heading, tap the service you want to access.
2. Displayed along the top of the screen is a Search field. Within this field, type what you’re looking for, such as a filename, keyword, date, or tag.
3. Tap the Search key on the virtual keyboard to display search results. In Figure 3.5, the Files app is accessing an iCloud Drive account.
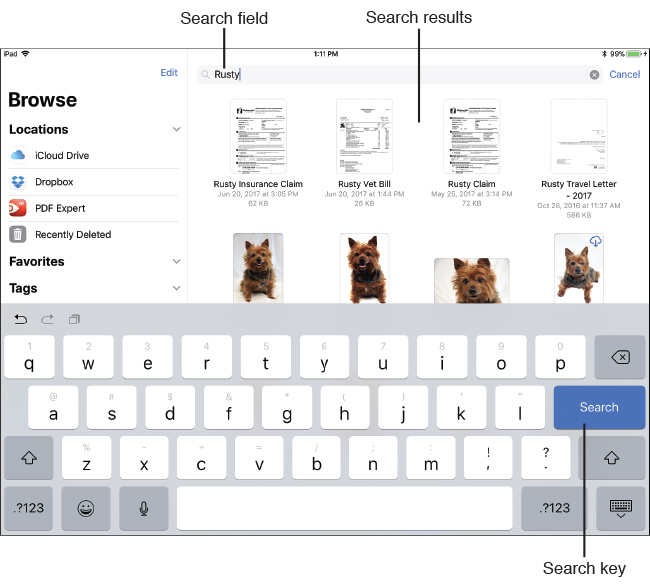
FIGURE 3.5
Use the Search tool within the Files app to locate files and content stored online.
4. Tap the icon or listing that represents the search result you want to open, preview, share, or work with.
5. Tap the Markup/Annotate icon (if applicable) to write or draw on the file, or tap the Share icon to open the Share menu.
Managing Files and Folders from the Files App
Using the Files app, once you select any file, photo, or document that’s stored within the cloud, you see a preview of the selected content. At this point, you have two or three options, depending on the file type (see Figure 3.6).
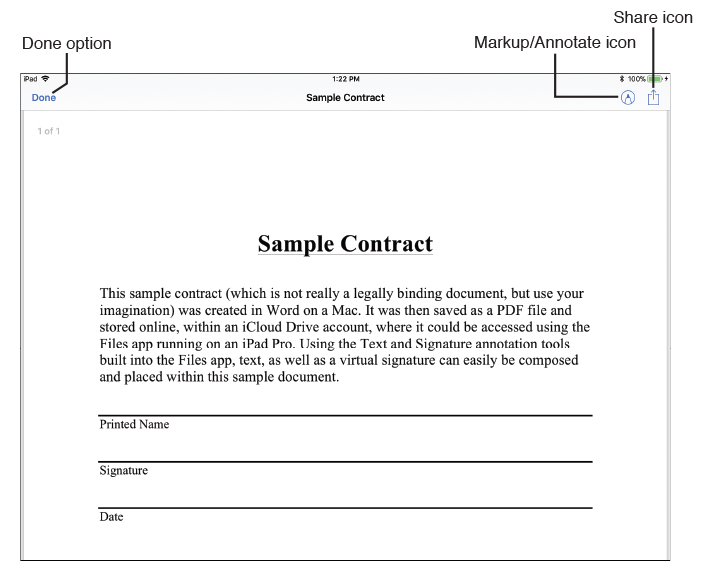
FIGURE 3.6
A PDF is being previewed within the Files app.
![]() If the file type you selected is a graphic file (such as a photo) or a PDF, you can mark up or annotate the file by tapping the Markup/Annotate icon.
If the file type you selected is a graphic file (such as a photo) or a PDF, you can mark up or annotate the file by tapping the Markup/Annotate icon.
![]() Tap the Share icon (see Figure 3.7) to share the file with other people via the Internet (using Messages, Mail, Facebook Messenger, or another compatible app) or AirDrop. You can also use the Share menu to import the file into a compatible app that’s installed on your tablet. For example, if the file is a Word document, tap the Copy to Word icon. If it’s a PDF, select the Copy to PDF Expert icon, if you have this optional app installed.
Tap the Share icon (see Figure 3.7) to share the file with other people via the Internet (using Messages, Mail, Facebook Messenger, or another compatible app) or AirDrop. You can also use the Share menu to import the file into a compatible app that’s installed on your tablet. For example, if the file is a Word document, tap the Copy to Word icon. If it’s a PDF, select the Copy to PDF Expert icon, if you have this optional app installed.
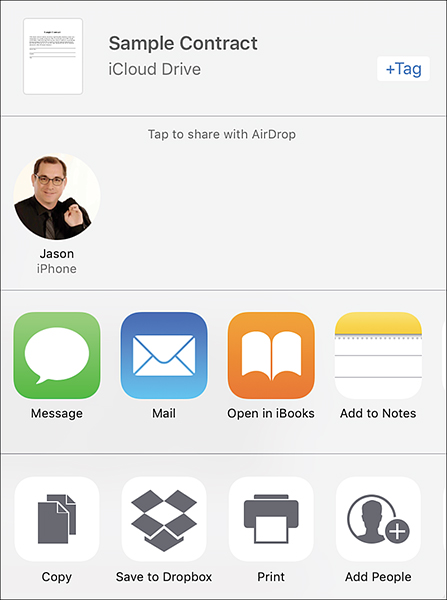
FIGURE 3.7
The Share menu in the Files app offers a handful of ways to work with files.
![]() Tip
Tip
The Copy and Print command icons are in the bottom row of the Share menu (refer to Figure 3.7). The Print command works if you have an AirPrint-compatible (wireless) printer linked with your iPad. The Copy command enables you to place the selected content into the tablet’s clipboard and then paste (import) it into another compatible app.
![]() To exit out of the preview screen, tap Done in the top-left corner of the screen.
To exit out of the preview screen, tap Done in the top-left corner of the screen.
When you’re previewing a file, the command icons along the top of the screen disappear after a few seconds. To make them re-appear, tap anywhere on the screen.
To simultaneously manage multiple files from the Files app, launch the app, and select the cloud service you want to access. Tap the Select option in the top-right corner of the screen, and then tap the appropriate files or folders. A circle icon appears within each selected file and folder thumbnail. One at a time, tap on the folder(s) or file(s) you want to select.
As soon as at least one file or folder is selected, the Duplicate, Move, and Delete options become active along the bottom of the screen, as does the Share option, when applicable (see Figure 3.8):
![]() Use the Share command to access the Share menu.
Use the Share command to access the Share menu.
![]() Tap Duplicate to make a copy of the selected file (or files) and folder, and then place them in another directory or move them to another service that’s accessible from the Files app. The original files and folders stay in their original location, while copies of the selected files and folders are placed in the newly selected location.
Tap Duplicate to make a copy of the selected file (or files) and folder, and then place them in another directory or move them to another service that’s accessible from the Files app. The original files and folders stay in their original location, while copies of the selected files and folders are placed in the newly selected location.
![]() With the Move option, you can move the location of the selected files or folders somewhere else. The files aren’t copied, and they do not remain in their original location.
With the Move option, you can move the location of the selected files or folders somewhere else. The files aren’t copied, and they do not remain in their original location.
![]() Use the Delete option to delete the selected files or folders. Deleted files and folders are removed from the tablet and the cloud-based service, so they’re no longer available to you from anywhere.
Use the Delete option to delete the selected files or folders. Deleted files and folders are removed from the tablet and the cloud-based service, so they’re no longer available to you from anywhere.
![]() Tip
Tip
If you delete content accidently and want to retrieve it, tap the Recently Deleted option, which is under the Browse heading. Tap the Select option, and then choose the files you want to restore. Tap the Recover option to restore the selected files and place each of them back in their original folders. Keep in mind, though, that files moved to the Recently Deleted folder do not stay there forever.
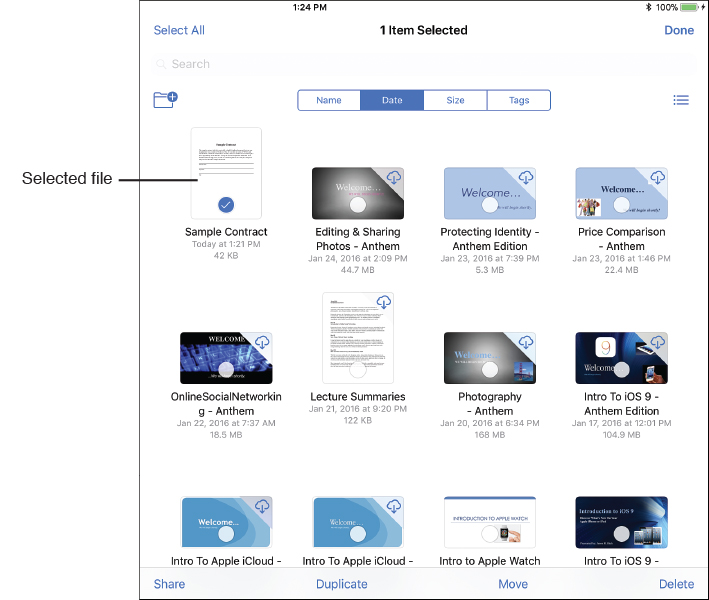
FIGURE 3.8
Use the Duplicate, Move, or Delete options at the bottom of the screen to manage the selected content within the Files app.
Adding Tags to Files and Folders
The Tags option, which is listed under the Browse heading, enables you to color-code files and folders and then sort and display content by color. You can also add one or more text-based tags to a file or folder.
To add a tag to a file or folder, select it by tapping its thumbnail icon to preview it, and then tap the Share menu. Tap the +Tag option, which is at the top of the Share menu to the right of the filename and then choose the tag you want to associate with the file or folder (see Figure 3.9).
You can create your own text-based tags, which you can then use to search for files.
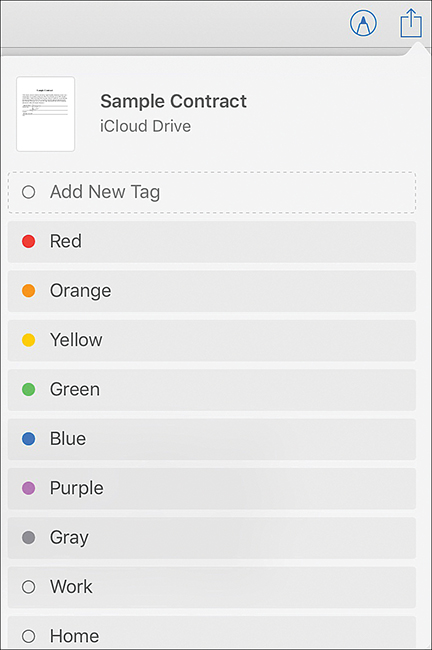
FIGURE 3.9
Make content easier to identify, sort, and locate by adding a color-coded or text-based tag.
To create a new tag from scratch, open any file that you want to assign a tag to, and then tap the Share menu. Next, tap on the +Tag option. From the Tags menu, tap the Add New Tag option and type a title for the tag. (You can also associate a color with it.) Tap the Add Tag button to save the tag and begin using it. This newly created tag is added to the Tag menu, which means you can just tap it in the list to add it to other files.
Annotating and Marking Up Files
When you select a PDF or a graphic file to preview in the Files app, the Markup/Annotate icon is displayed near the top-right corner of the screen. If you’re using a regular iPad, use your finger as a stylus to write or draw on the screen. However, if you’re using an iPad Pro, the Apple Pencil works extremely well with these tools for added precision.
After you tap the Markup/Annotate icon a collection of annotation and markup virtual writing and drawing tools are displayed along the bottom of the screen (see Figure 3.10):
![]() Undo—Tap to erase the last thing you did.
Undo—Tap to erase the last thing you did.
![]() Redo—Tap to restore what was removed when you tapped the Undo command.
Redo—Tap to restore what was removed when you tapped the Undo command.
![]() Pen —Select this tool and then choose your virtual ink color by tapping one of the color icons, which are also along the bottom of the screen.
Pen —Select this tool and then choose your virtual ink color by tapping one of the color icons, which are also along the bottom of the screen.
![]() Highlighter—Just like a real highlighter, this virtual tool is ideal for drawing attention to text within a PDF. Select the Highlighter tool and ink color, and then use your finger or Apple Pencil to draw over text.
Highlighter—Just like a real highlighter, this virtual tool is ideal for drawing attention to text within a PDF. Select the Highlighter tool and ink color, and then use your finger or Apple Pencil to draw over text.
![]() Pencil—This is the thinnest and most precise writing tool. Select it and then choose your virtual ink color.
Pencil—This is the thinnest and most precise writing tool. Select it and then choose your virtual ink color.
![]() Eraser—Tap anything you’ve already drawn or written to erase it.
Eraser—Tap anything you’ve already drawn or written to erase it.
![]() Dotted-Line—Select this option to draw using a dotted line.
Dotted-Line—Select this option to draw using a dotted line.
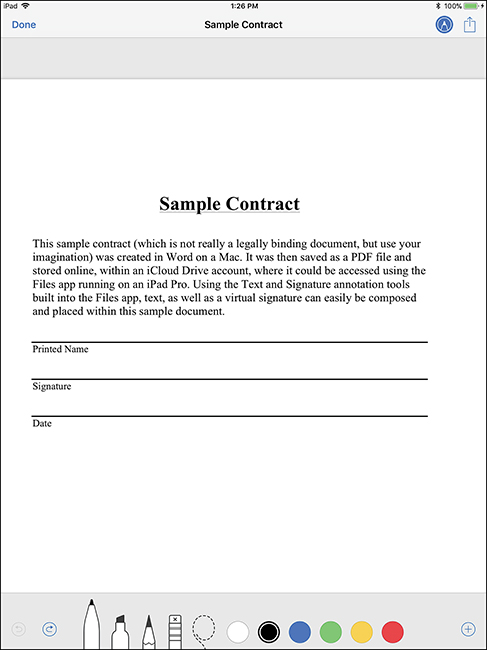
FIGURE 3.10
The markup and annotation tools offered by the Files app work with graphic files, digital photos, and PDFs.
Tap the + icon in the bottom-right corner of the annotation screen to access a menu for adding additional content. Options include Text (to add typed text), Signature (to create and then paste your virtual signature into the file), Magnifier (used to zoom in on one area of the image or file you’re previewing), and Shapes/Arrows (add, resize, and position a square, circle, dialog box, or arrow).
![]() Tip
Tip
When working with the Apple Pencil on an iPad Pro, after selecting a virtual writing or drawing tool, the harder you press down on the screen with the stylus, the darker and thicker the virtual ink will be.
Keep in mind that these markup and annotation tools are available to you while previewing a file directly from the Files app. If you select a file, tap the Share button, and then open it within the Notes app (or another compatible editing app or a PDF editor app), you have access to a much broader selection of powerful markup, annotation, and drawing tools.
One use for the markup and annotation tools built into the Files app is to compose and store your virtual signature, and then paste that signature into documents or files as you’re previewing them. This is extremely useful if you need to sign a PDF of a contract or if you want to add a digital signature to a letter you’ve composed before sending it out.
To create and place a digital signature, follow these steps:
1. Launch the Files app and open any graphic or PDF.
2. Tap the Markup/Annotation icon.
3. Tap the + icon in the bottom-right corner of the screen.
4. Select the Signature option from the menu.
5. In the New Signature window (see Figure 3.11), use your finger or the Apple Pencil to write your signature on the designated signature line. If you’ve previously saved a signature, you have the option to select it.
6. If you like the appearance of the signature, tap the Done option to save it. To redo the signature, tap the Clear option and then rewrite the signature.
7. Your signature appears within a box in the center of the tablet’s screen. Place your finger in the center of this box and drag it to the location where you ultimately want the signature to appear (see Figure 3.12).
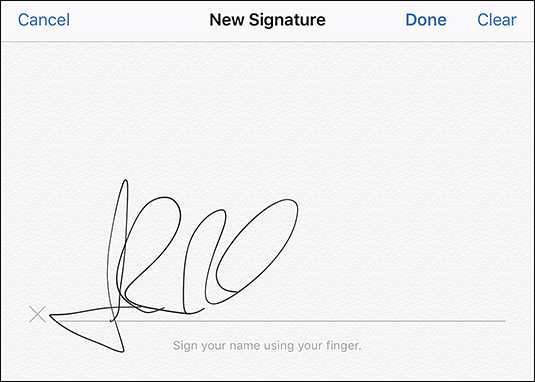
FIGURE 3.11
Handwrite your personal signature on the iPad’s screen using your finger or the Apple Pencil.
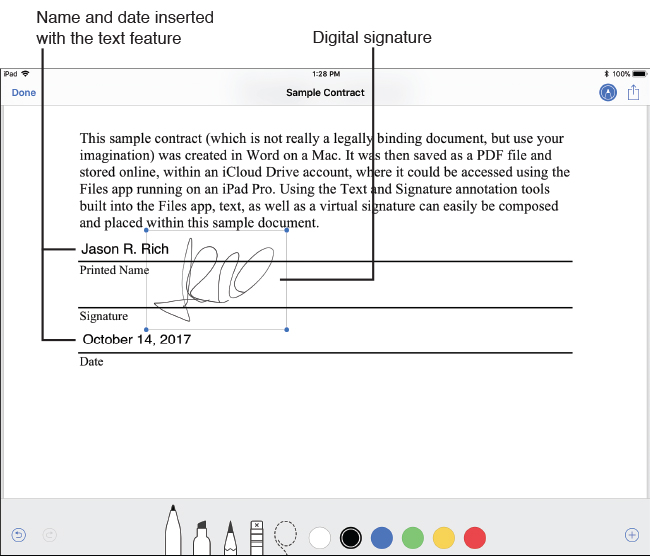
FIGURE 3.12
Resize and position your virtual signature exactly where you want it to appear within the file you’re working with.
8. Place your finger on one of the blue dots at the corners of the box to resize the signature by dragging it in or out at a diagonal.
9. Tap Done in the upper-right corner to save changes you’ve made to the file. The file is uploaded to the cloud-based service it came from. From within the Files app, tap on the Share icon to share the now signed file with others via text message, email, or AirDrop, for example, or to export the file into another app.
![]() Tip
Tip
After you create a signature once, it is stored within the Files app. Later, when you access the Signature feature, you can select the saved signature or create a new one.
Multitasking with the iPad
iOS 11 has dramatically improved the multitasking capabilities of the iPad (particularly the iPad Pro models); you can run two apps simultaneously on the screen. It’s now easier than ever to drag and drop, copy and paste, or move content quickly between compatible apps.
To launch and use two apps at once (see Figure 3.13), from the Home screen (or App Switcher), launch the first app you want to use, such as the Photos app (shown on the right in Figure 3.13). Place your finger near the bottom of the screen and swipe up to see the Dock. Place your finger on the icon for the second app you want to use (Safari, on the left in the figure), and drag it up and toward one side of the screen. The second app launches.
At this point, the window for the second app is floating on the screen. You can drag this app window right or left. To hide this second app window, drag it off the side of the screen. To make it reappear, drag it back onto the screen by placing your finder near the right or left edge and swiping inward, toward the center of the screen.
While the second app window is floating, place your finger on the horizontal bar near the top of the window and drag it down slightly to activate the split-screen mode, where the two apps are running in fixed windows. It’s then possible to move the divider bar between the two apps left or right, depending on how much of the screen you want each app to occupy. In Figure 3.13, the two apps are each using half of the iPad Pro’s screen.
Notice that a horizontal app divider bar appears between the two apps. Place your finger on the gray bar located in the center of this divider line and drag it left or right to increase or decrease the size of the second app window.
To replace one of the two apps with another, access the Dock, and drag a new app icon into one of the two app windows.
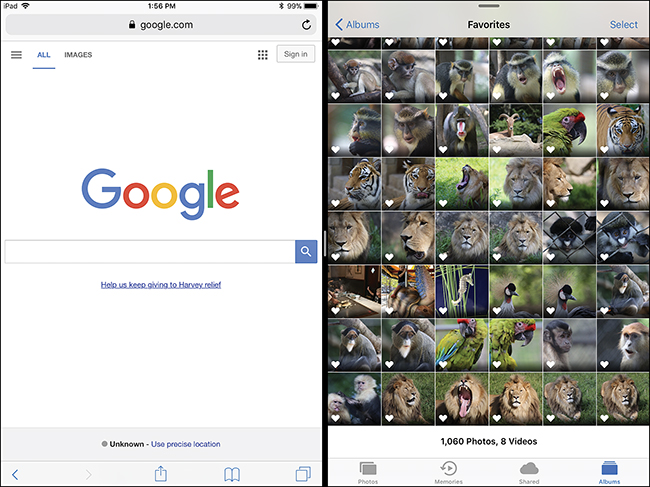
FIGURE 3.13
Work with two apps simultaneously and transfer content between them. Shown here are Safari (left) and Photos (right).
![]() What’s New
What’s New
When you have two apps running simultaneously, you can access the App Launcher and then access two different apps that you want to use simultaneously. From the App Switcher, you can switch between different screens, each with two apps running simultaneously, as shown in Figure 3.14.
![]() Note
Note
Not all iPad apps are compatible with multitasking (split-screen) mode, although more and more app developers are incorporating this functionality into their respective apps. Of the apps that support this feature, not all allow you to drag and drop content across the screen, from one app to the other. Again, this is functionality that is being added to more and more apps over time.
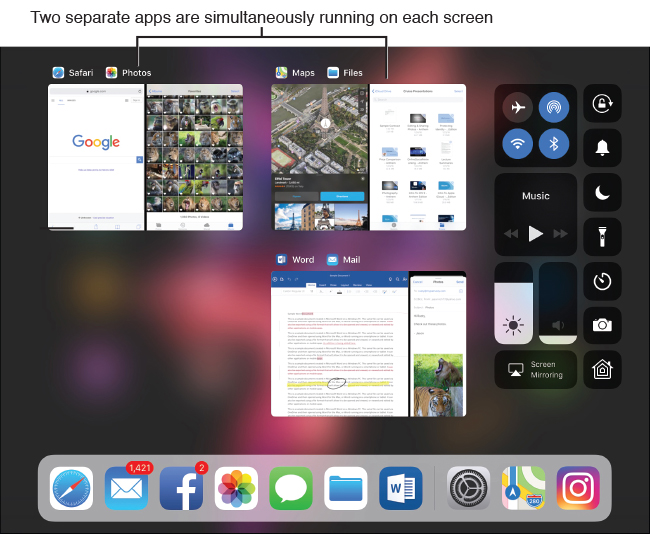
FIGURE 3.14
From the App Switcher, you can access two or more separate screens, each with two apps simultaneously running in each using Split Screen.
Multitasking with the Files App
As you’re working with one app, such as the Notes app, you can simultaneously open the Files app, acquire a photo or another type of file from the cloud, and then drag and drop it into the Notes app in a matter of seconds. Here’s how to do this:
1. Launch an app, such as Notes. Open or create a document.
2. Place your finger near the bottom of the iPad’s screen and swipe up to make the Dock appear.
3. Place your finger on the Files app icon and drag it up and to the right (or left) to launch the app in multitasking (split-screen) mode. Two app windows are displayed on the screen simultaneously.
4. Within the Files window, locate the file (a graphic, for example) you want to import into the Notes document. Place your finger on the file’s icon and drag it to the location within the Notes app (on the opposite side of the screen) where you want the image to be.
5. The original file remains stored in the cloud, but a copy is downloaded and transferred to the document you’re working with.
6. To close the Files window, place your finger on the divider bar between the app windows, and drag it to the side where the Files app is situated.
![]() Caution
Caution
This drag-and-drop feature works with many other apps—for example, you can drag pictures from Photos into an email that you’re composing. However, not all apps support this feature.
When you place your finger on the selected content and attempt to move it to the other app window, a green and white plus-sign icon will appear in the top-right corner of the thumbnail of the file you’re moving. If this plus-sign icon does not appear, the two apps are not currently able to support the drag-and-drop feature, or you’re attempting to drag and drop an unsupported file type.
Using the Apple Pencil with the iPad Pro
For iPad Pro users, the Apple Pencil ($99.00, www.apple.com/apple-pencil), which looks and feels just like a traditional pencil, has become a “must have” accessory if you want to be able to write, draw, annotate, markup, or sign content within documents, files, or photos. The Notes app, for example, allows you to handwrite notes or draw directly on the screen, and a handful of third-party note taking apps also transform your tablet into a digital notebook or sketchbook. When it comes to photo editing or marking up photos, the Apple Pencil allows many editing and image enhancement tools to be utilized with greater precision than using your finger. For iOS 11, Apple Pencil support has been added to a wide range of apps, including Microsoft Word and Excel.
![]() Tip
Tip
Apple Pencil is pressure sensitive. When you use a regular writing instrument, if you press harder, you draw thicker or darker lines; the same is true of Apple Pencil. This accessory is extremely precise and works with virtually zero lag time.
The first time you attempt to use the Apple Pencil with your iPad Pro, you need to pair it with your tablet. This process takes less than one minute. Follow these steps:
1. From the Home screen, launch Settings.
2. Tap Bluetooth within the main Settings menu.
3. When the Bluetooth submenu is displayed, remove the top of the Apple Pencil to reveal its Lightning connector and place it into the Lightning port located at the bottom of your iPad Pro.
4. Tap the Pair button in the Bluetooth Pairing Request window that appears.
5. The Apple Pencil is displayed below the My Devices heading within the Bluetooth menu. To the right of the listing it should say Connected.
6. If you haven’t already done so, leave the Apple Pencil connected to the iPad Pro for five to six minutes to fully charge the internal battery for the stylus.
7. When you’re ready to use the Apple Pencil, remove it from the iPad Pro’s Lightning port and replace the white cap. The Apple Pencil now works with all compatible apps.
![]() Note
Note
The Apple Pencil works for approximately 12 hours per charge (which takes about six minutes). However, a 15-second charge keeps the Apple Pencil operational for about 30 minutes.
![]() Tip
Tip
To discover third-party apps that work with Apple Pencil (in conjunction with your iPad Pro), launch the App Store app. Tap the Search option and then type Apple Pencil Apps in the Search field. Scroll through the app preview listings to discover hundreds of compatible apps for writing, taking notes, drawing, editing photos, signing documents, handwriting musical scores, completing crossword and Sudoku puzzles, and more.
Understanding Keyboard Shortcuts
For the 10.5-inch and 12.9-inch iPad Pro models, Apple offers an optional, full-size Smart Keyboard that doubles as a protective screen cover for your tablet. The Smart Keyboard uses an innovative Smart Connector to link directly with the tablet using magnets, and it’s powered by the iPad, so there’s no pairing, battery charging, or setup involved. When the Smart Keyboard is connected to the iPad Pro, it works just like a traditional computer keyboard, and it helps the tablet function more like a laptop computer. Any app that works with the virtual (on-screen) iPad keyboard also works with the Smart Keyboard.
For the 10.5-inch iPad Pro, the Smart Keyboard is priced at $159.00. For the 12.9-inch iPad Pro, the Smart Keyboard is $169.00.
In addition to being thin and lightweight, which makes it easy to transport, the Smart Keyboard uses iOS 11 and app-specific keyboard shortcuts. These shortcuts allow you to work faster and more accurately. Most of these shortcuts make use of the Command key, followed by a number or letter. Many are identical to what you might already be accustomed to using on a Mac. To learn more about Smart Keyboard shortcuts, visit https://support.apple.com/en-us/HT205237. Table 3.1 lists some popular keyboard shortcuts.
Table 3.1 Popular Smart Keyboard Shortcuts
Command |
Keyboard Shortcut |
Access the App Switcher |
Command + Tab |
Bold Text |
Command + B |
Copy |
Command + C |
Cut |
Command + X |
Home Button |
Command + H |
Italic Text |
Command + I |
Paste |
Command + V |
Search |
Command + Space |
Select All |
Command + A |