1. Discover iOS 11 and the Newest iPads and iPhones
In this Chapter
![]() Learning about the latest iPhone and iPad models and what each offers
Learning about the latest iPhone and iPad models and what each offers
![]() Discovering how to use some basic iPhone and iPad functions
Discovering how to use some basic iPhone and iPad functions
![]() Interacting with your iOS mobile device
Interacting with your iOS mobile device
As of late 2017, Apple’s lineup of iOS mobile devices included a handful of new iPhone and iPad models, all of which run iOS 11. The operating system includes many useful new features, built-in functions, and preinstalled apps that allow the mobile devices to work more seamlessly with cloud-based services, including iCloud.
iPad Pro users will see the biggest advancements when upgrading from iOS 10 (or an older version) to iOS 11. Thanks to the improved Multitasking mode, App Switcher, and Dock, working with two apps simultaneously on the same screen and dragging and dropping content between apps is easier than ever.
In a nutshell, the latest iPad Pro models (with a 10.5-inch or 12.9-inch Retina display) have taken a giant step closer to functioning like a full-featured notebook computer, especially when you use them with the optional Apple Pencil and Apple Smart Keyboard.
To compare the technical specifications and features offered by Apple’s current lineup of iPad, iPad mini, and iPad Pro models, visit www.apple.com/ipad/compare.
Meanwhile, the current lineup of iPhone models includes the iPhone 8 (which has a 4.7-inch Retina HD display), the iPhone 8 Plus (which has a 5.5-inch Retina HD display), and the completely redesigned iPhone X (which has a 5.8-inch Retina HD display). These new iPhones feature wireless charging, along with other new built-in technologies that broaden the capabilities of these smartphones, making them more powerful and convenient to use.
Older iPhone models, including the iPhone 7, iPhone 7 Plus, iPhone 6s Plus, iPhone 6s, and iPhone SE continue to be available, and all run iOS 11.
![]() More Info
More Info
To see a technological comparison between the iPhone 8, iPhone 8 Plus, and iPhone X, visit www.apple.com/iphone/compare. Click the See All Models option near the top-center of the browser window to include a summary of technical specifications for the older, but still available, iPhone models.
Discovering What’s New with the iPhone X
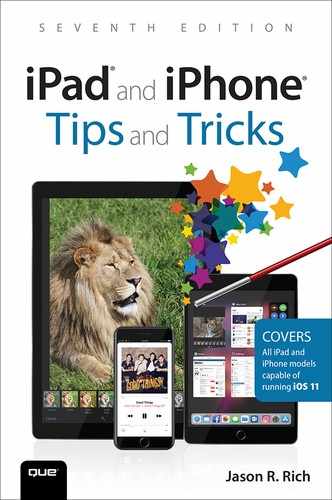
For the tenth anniversary of the iPhone, Apple’s iPhone X offers a complete redesign of the smartphone. It includes the fastest processors and most advanced technologies included within an iPhone to date.
As you can see from Figure 1.1, the Home button (with its Touch ID sensor) has been removed, and the front-facing camera has been improved, allowing for secure and accurate face recognition as a way to unlock the phone and confirm online and Apple Pay purchases.
![]() Note
Note
If you’re a veteran iPhone user, you’ll have to get used to not having a Home button when using the iPhone X. Instead, you’ll need to become accustomed to a selection of new on-screen finger gestures for navigating the phone and working with apps. For other features and functions, you need to use the iPhone X’s Side button.
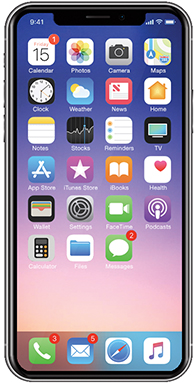
FIGURE 1.1
The redesigned iPhone X is the most technologically advanced iPhone ever released. It’s available in a silver or black casing, with either 64GB or 256GB of internal storage.
On most iPhones, a user can swipe up from the bottom of the screen, or swipe down from the top of the screen, to access certain features, such as Notification Center or Command Center, and use the Home button to handle a variety of tasks.
On an iPhone X, however, when placing your finger near the top or bottom of the screen, it now matters where on the screen you start the motion when you initiate a swipe.
Getting Ready to use Your New iPhone or iPad
If you’re upgrading your iPhone or iPad from an older model to a newer one, the initial setup and activation process for the new device has been streamlined, thanks to iOS 11. You can take advantage of the Automatic Setup option, which combines retrieving your content from your iCloud account and wirelessly transferring information (including your personal settings and preferences, along with your iCloud Keychain data) between your older iPhone or iPad and your new one. Be prepared to place your old device next to the new one during the Automatic Setup process.
Attention Android phone users! If you’re switching to an iPhone from any Android-based smartphone (running the Android 4.0 or later operating system), first of all, what took you so long? Second, Apple provides an app-based tool to seamlessly and wirelessly migrate your data and content to the iPhone.
On your Android device, download and install the free Move to iOS app from the Google Play Store and follow the on-screen prompts to transfer your contacts, message history, camera photos and videos, web bookmarks, email account information, and calendar/scheduling information.
![]() Note
Note
Need help migrating to a new iPhone or iPad? Within 90 days of purchasing the new device (or within two years, if you acquired AppleCare+), visit the Apple Store and be sure to bring along both your new and old smartphones or tablets to receive free assistance. If you go on a different day than the day when you purchase the new iPhone or iPad, you need to make a free appointment with an Apple Genius. Visit https://getsupport.apple.com.
Charging Up and Getting Ready to go
Your iPhone or iPad comes with a built-in battery that has up 12 hours of battery life; battery life depends on the iPhone or iPad model, and how you use it throughout the day. To ensure your smartphone or tablet will be ready to use whenever you need it, get into the habit of keeping its battery charged.
On older iPhone or iPad models, you have several options for charging the iPhone or iPad’s battery:
![]() Use the white USB cable that came with your iOS mobile device to connect your iPhone or iPad to your computer.
Use the white USB cable that came with your iOS mobile device to connect your iPhone or iPad to your computer.
![]() Connect a power adapter to the USB end of the white cable that came with your device, and then plug in the power adapter to an electrical outlet. Plug in the Lightning connector end of the cable to the bottom of your iPhone or iPad.
Connect a power adapter to the USB end of the white cable that came with your device, and then plug in the power adapter to an electrical outlet. Plug in the Lightning connector end of the cable to the bottom of your iPhone or iPad.
![]() Connect an optional external battery pack to your iPhone or iPad, either directly to its Lightning port or with the white USB cable that came with the device.
Connect an optional external battery pack to your iPhone or iPad, either directly to its Lightning port or with the white USB cable that came with the device.
![]() Invest in an optional car charger that’s compatible with your iPhone or iPad, so you can recharge the battery and use the mobile device while you’re driving, without consuming battery power.
Invest in an optional car charger that’s compatible with your iPhone or iPad, so you can recharge the battery and use the mobile device while you’re driving, without consuming battery power.
![]() What’s New
What’s New
When using an iPhone 8, iPhone 8 Plus, or iPhone X, you’re also able to take advantage of its wireless charging capabilities, which means you’ll need to acquire a Qi-compatible charging pad.
Apple will introduce the optional AirPower wireless charging mat sometime in 2018 (which will work with the latest iPhones, AirPods, and Apple Watch series 3). To learn about third-party companies, like Belkin ($59.99, www.belkin.com/us/p/P-F7U027) and Mophie ($59.95, www.mophie.com/shop/wireless-charging-base), that make Qi wireless charging products that are currently available, visit www.qiwireless.com.
Apple is also currently working with cafes (like Starbucks), airports, hotels, and restaurants to have charging pads installed into tables and publically accessible locations, which will make it very convenient to recharge the battery of your compatible iPhone.
The battery-life indicator is displayed in the top-right corner of the screen. When this icon is solid green, the battery is fully charged. As the battery depletes, the battery icon becomes white.
![]() Note
Note
When a lightning bolt icon appears to the right of the battery life indicator, the device is connected to an external power source and is charging. You can continue using your iPhone or iPad while it’s charging.
If the battery drains before you plug it into an external power source, your iPhone or iPad automatically shuts down (powers off) and will not be functional again until it’s plugged in to charge. However, no information or content is lost if the device turns off due to a dead battery.
![]() Tip
Tip
In addition to the battery icon, you can adjust a setting so that the percentage of battery power remaining displays to the immediate left of the battery icon. Launch Settings, tap Battery, and then turn on the virtual switch associated with Battery Percentage.
When your iPhone’s battery is running low but you don’t immediately have a way to recharge it, extend the life of the battery by turning on Low Power mode. To turn on this feature, launch Settings, tap Battery, and then turn on the virtual switch associated with Low Power mode (see Figure 1.2).
As soon as you turn on the Low Power Mode feature, certain features and functions that typically consume a lot of battery power are deactivated, allowing you to extend the life of the battery and continue to use your device a bit longer.
To make it easier to access the Low Power Mode feature, add it to the Control Center. How to customize the Control Center is covered in the next chapter.
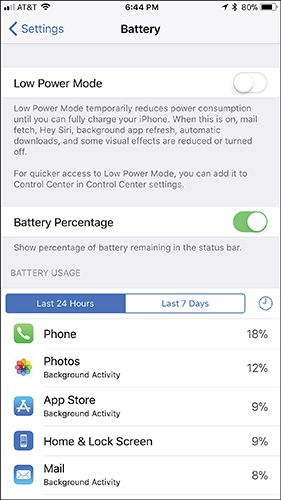
FIGURE 1.2
Adjust the battery percentage display and the device’s Low Power mode from this Battery submenu within Settings.
Turning Off or Putting to Sleep the iPhone or iPad
Your iOS mobile device can be turned on, turned off, placed into Sleep mode, or placed into Airplane mode.
![]() Turned on—When your phone or tablet is turned on, it can run apps and perform all the tasks it was designed to do. The touchscreen is active, as is its capability to communicate. To turn on the iPhone or iPad when it is powered off, press and hold the Side button for about 5 seconds, until the Apple logo appears on the screen. Release the Side button, and then wait about 15 seconds while the device boots up. When the Lock screen appears, you’re ready to begin using the iPhone or iPad.
Turned on—When your phone or tablet is turned on, it can run apps and perform all the tasks it was designed to do. The touchscreen is active, as is its capability to communicate. To turn on the iPhone or iPad when it is powered off, press and hold the Side button for about 5 seconds, until the Apple logo appears on the screen. Release the Side button, and then wait about 15 seconds while the device boots up. When the Lock screen appears, you’re ready to begin using the iPhone or iPad.
![]() Note
Note
Depending on which iPhone or iPad model you’re using, the location of the Side button varies. On older iPhone models, this button was referred to as the Sleep/Wake button, and is located on the top-right corner of the smartphone.
![]() Turned off—When your iPhone or iPad is turned off and powered down, it is not capable of any form of communication, and all apps that were running are shut down. The device is dormant. To turn off your phone or tablet, press and hold the Side button for about 5 seconds, until the Slide to Power Off banner appears on the screen. Swipe your finger along this red-and-white banner from left to right. The device shuts down.
Turned off—When your iPhone or iPad is turned off and powered down, it is not capable of any form of communication, and all apps that were running are shut down. The device is dormant. To turn off your phone or tablet, press and hold the Side button for about 5 seconds, until the Slide to Power Off banner appears on the screen. Swipe your finger along this red-and-white banner from left to right. The device shuts down.
![]() Sleep mode—To place your iPhone or iPad into Sleep mode, press and release the Side button once. To wake up the device, press the Side button (or the Home button on all devices but the iPhone X). In Sleep mode, your device’s screen is turned off, but the phone or tablet can still connect to the Internet, receive incoming calls (iPhone) or text messages, retrieve emails, and run apps in the background. Notification Center also remains fully operational, so you can be alerted of preset alarms. Sleep mode offers a way to conserve battery life when you’re not actively using your phone or tablet.
Sleep mode—To place your iPhone or iPad into Sleep mode, press and release the Side button once. To wake up the device, press the Side button (or the Home button on all devices but the iPhone X). In Sleep mode, your device’s screen is turned off, but the phone or tablet can still connect to the Internet, receive incoming calls (iPhone) or text messages, retrieve emails, and run apps in the background. Notification Center also remains fully operational, so you can be alerted of preset alarms. Sleep mode offers a way to conserve battery life when you’re not actively using your phone or tablet.
![]() Note
Note
By default, your iPhone or iPad goes into Sleep mode and auto locks after 5 minutes. To adjust this time interval or turn off the Auto-Lock feature, launch Settings, tap the Display & Brightness option, and then tap the Auto-Lock feature. Your options include the ability to activate Auto-Lock after 2, 5, 10, or 15 minutes, or never.
Another way to place any iPad into Sleep mode is to place an optional Apple Smart Cover (or compatible cover) or Apple Smart Keyboard (which doubles as a Smart Cover) over the screen (the iPad Cover Lock/Unlock option must be turned on from the General menu in Settings). In Sleep mode, an iPad “wakes up” for an incoming call (when used with iOS 11’s Handoff feature), a FaceTime call, or an incoming text message.
![]() Airplane mode—This mode enables your device to remain fully functional, except it can’t communicate in any way using a cellular (3G/4G/LTE) connection. The iPhone cannot make or receive calls, and neither the iPhone nor iPad can send or receive text/instant messages via a cellular network. Apps that do not require Internet access to function normally. So, if you’re aboard an airplane, you can switch to Airplane mode and continue reading an eBook, playing a game, word processing, watching a movie that you’ve downloaded from the iTunes Store, or working with a wide range of other apps. After switching into Airplane mode, you can turn Wi-Fi Internet access and Bluetooth functionality back on yet keep the cellular connection turned off. This is useful if you’re traveling abroad and don’t want to incur international cellular roaming charges, or if you’re aboard an airplane or a cruise ship that offers Wi-Fi service.
Airplane mode—This mode enables your device to remain fully functional, except it can’t communicate in any way using a cellular (3G/4G/LTE) connection. The iPhone cannot make or receive calls, and neither the iPhone nor iPad can send or receive text/instant messages via a cellular network. Apps that do not require Internet access to function normally. So, if you’re aboard an airplane, you can switch to Airplane mode and continue reading an eBook, playing a game, word processing, watching a movie that you’ve downloaded from the iTunes Store, or working with a wide range of other apps. After switching into Airplane mode, you can turn Wi-Fi Internet access and Bluetooth functionality back on yet keep the cellular connection turned off. This is useful if you’re traveling abroad and don’t want to incur international cellular roaming charges, or if you’re aboard an airplane or a cruise ship that offers Wi-Fi service.
![]() Tip
Tip
To turn on or off Airplane mode, launch Settings, and tap the virtual switch for Airplane mode. Alternatively, launch Control Center, and then tap the Airplane mode icon.
Once the device is in Airplane mode, keep in mind that you can quickly re-enable Wi-Fi or Bluetooth, if needed, by tapping their respective icons in Control Center (see Figure 1.3).
When the iPhone or iPad is in Airplane mode (or turned off altogether) you’re able to recharge its battery a bit faster, but you won’t be alerted about incoming calls and text messages, for example, until the phone is taken out of Airplane mode or turned back on.
You can also place an iPhone or iPad into Do Not Disturb mode. This mode automatically routes incoming calls directly to voicemail. You can customize the Do Not Disturb feature to allow certain people to reach you when you otherwise want to be left alone.
FIGURE 1.3
Turn on/off Airplane Mode, Wi-Fi, or Bluetooth from the redesigned Control Center by tapping on the appropriate icon.
![]() Tip
Tip
To activate and customize the Do Not Disturb feature, launch Settings and tap the Do Not Disturb option. From the Do Not Disturb submenu, turn on the Manual or Scheduled virtual switch, based on how you want this feature set up.
To later turn on or off the feature, access Control Center and tap the crescent moon–shaped icon.
When turned on, a moon icon is displayed on the iPhone or iPad’s status bar, and all calls and alerts are silenced. You can turn on or off this feature at any time, or you can schedule specific times you want Do Not Disturb to be activated, such as between 11:00 p.m. and 7:00 a.m. on weekdays. To do this, turn on the Scheduled feature.
If you set the Alarm Clock feature in your iPhone or iPad via the Clock app or using Siri, this feature continues to work, even with Do Not Disturb turned on.
When your iPhone is turned off, all incoming calls are forwarded directly to voicemail, and it is not possible to initiate an outgoing call. Likewise, incoming text messages, FaceTime calls, and other communications from the outside world cannot be accepted when an iPhone or iPad is turned off. Instead, when you later turn on the device, notifications for these missed messages are displayed in the Notification Center, in their respective apps, and potentially on the Lock screen, depending on how you set up Notification Center.
![]() What’s New
What’s New
It’s a good idea to limit notifications your iPhone generates while you’re driving, especially if your smartphone is not connected to a vehicle via CarPlay. To do this, from the Do Not Disturb submenu within Settings, tap the Activate option below the Do Not Disturb While Driving heading. You can set this feature to activate automatically when you’re in a moving car, or you can opt to manually activate it from Control Center or the Do Not Disturb submenu within Settings.
Upgrading from iOS 10 to iOS 11
Anyone who purchased an iPhone or iPad before September 19, 2017 needs to upgrade to iOS 11. The easiest way to do this is to use your mobile device to access any Wi-Fi hotspot, or your wireless home network, to establish a high-speed Internet connection. Then, from the device’s Home screen, launch Settings.
![]() Tip
Tip
Before upgrading your iOS mobile device from iOS 10 (or earlier) to iOS 11, be sure to create a backup of your iPhone or iPad using the iTunes Sync Backup feature or the iCloud Backup feature. After you install the iOS 11 operating system, all your apps, data, and personalized device settings will automatically be fully restored.
Next, tap the General option from the main Settings menu, and then tap the Software Update option. If your device is running any version of iOS 10 (or earlier), a message indicates that an operating system upgrade is available. Follow the onscreen prompts to download and install the latest version of iOS 11 for free.
The upgrade takes between 20 and 30 minutes, depending on which iPhone or iPad model you’re using, its internal storage capacity, the Internet connection speed, and how much information is currently stored on your device.
Every few months, Apple updates the iOS to add new features to your iPhone or iPad. When a free iOS update is available, a message appears on your device’s screen and a Badge icon appears in the Settings app icon on your Home screen.
Interacting with Your iPhone or iPad
If you’re a veteran iPhone or iPad user, you already know that Apple’s iOS mobile operating system enables you to interact with your mobile device using its touchscreen. Data entry, for example, is typically done using the virtual keyboard displayed on screen when it’s needed. Based on the type of information you’re entering and the app you’re using, the keyboard’s layout adapts automatically.
When you’re not using the virtual keyboard, much of your interaction with the iPhone or iPad is done through a series of taps, swipes, and other finger gestures on the Multi-Touch display.
![]() Note
Note
iPad Pro users can interact with their tablets using the optional Apple Pencil ($99, www.apple.com/apple-pencil), which enables users to write or draw directly on the tablet’s screen with extreme accuracy.
Using the Touchscreen
To navigate your way around iOS 11 on your iPhone or iPad, you need to learn a series of basic taps and finger gestures.
![]() Note
Note
The iPhone 6s and all subsequent models offer the 3D Touch feature, which includes two touchscreen gestures called Peek and Pop.
When you’re accessing the Home screen or using a growing number of compatible apps, if you press and hold your finger firmly on an icon or item, you can get a quick glimpse of what tapping or holding down your finger would reveal. Then, if you want to access that content, press a bit harder on the screen to “pop” into it.
For example, if you’re using the Mail app and looking at your Inbox, which displays a listing of incoming messages, you can gently hold your finger on a message to preview it (“peek”), and then if you want to open the message and work with it, press your finger down a bit harder to “pop” it open.
This also works on the Home screen. Many apps offer quick access to the most common features of the app by pressing firmly on its icon. For example, if you hold your finger on the Camera app icon, a menu that enables you to quickly take a selfie, record a video, record a slow-mo video, or take a photo is displayed.
As you learn more about iOS 11’s features throughout this book, you’ll discover how to use them by executing the necessary taps, swipes, pinches, and other finger gestures.
When you turn on the device or wake it from Sleep mode, virtually all of your interaction with the smartphone or tablet is though the following finger movements and taps on the device’s highly sensitive Multi-Touch display:
![]() Double-Tap—Used to zoom in/out in certain apps, or center the content you’re viewing on the screen in some apps.
Double-Tap—Used to zoom in/out in certain apps, or center the content you’re viewing on the screen in some apps.
![]() Drag—Press and hold your finger over an icon or object, and then drag it along the screen to an different location. When using a Move button, for example, you’d use the drag gesture. On an iPad Pro, the Drag gesture is used to move selected content from one app into another app.
Drag—Press and hold your finger over an icon or object, and then drag it along the screen to an different location. When using a Move button, for example, you’d use the drag gesture. On an iPad Pro, the Drag gesture is used to move selected content from one app into another app.
![]() Flick—Press gently on the screen and then move it left, right, up, or down, to scroll or pan.
Flick—Press gently on the screen and then move it left, right, up, or down, to scroll or pan.
![]() Five-finger pinch (iPads only)—To exit any app and return to the Home screen, place all five fingers of one hand on the screen so that they’re spread out, and then draw your fingers together, as if you’re grabbing something. Be sure, however, that the Multitasking Gestures are turned on in the Settings app (found under the General heading).
Five-finger pinch (iPads only)—To exit any app and return to the Home screen, place all five fingers of one hand on the screen so that they’re spread out, and then draw your fingers together, as if you’re grabbing something. Be sure, however, that the Multitasking Gestures are turned on in the Settings app (found under the General heading).
![]() Hold—Instead of a quick tap, in some cases it is necessary to press and hold your finger on an icon or onscreen command option. When a hold action is required, place your finger on the appropriate icon or command option, and hold it there with a slight pressure. There’s never a need to press down hard on the smartphone or tablet’s screen. (Hold works with all iOS mobile devices running iOS 11, and is different from the Peek and Pop gestures that are exclusive to the newer iPhone models).
Hold—Instead of a quick tap, in some cases it is necessary to press and hold your finger on an icon or onscreen command option. When a hold action is required, place your finger on the appropriate icon or command option, and hold it there with a slight pressure. There’s never a need to press down hard on the smartphone or tablet’s screen. (Hold works with all iOS mobile devices running iOS 11, and is different from the Peek and Pop gestures that are exclusive to the newer iPhone models).
![]() Pinch—Using your thumb and index finger, perform a pinch motion on the touchscreen to zoom out when using certain apps. Or “unpinch” (by moving your fingers apart quickly) to zoom in on what you’re viewing on screen when using many apps.
Pinch—Using your thumb and index finger, perform a pinch motion on the touchscreen to zoom out when using certain apps. Or “unpinch” (by moving your fingers apart quickly) to zoom in on what you’re viewing on screen when using many apps.
![]() Pull-down—On all iPhone and iPad models, except the iPhone X, quickly swipe your finger down from the very top of the iPhone or iPad’s screen. This causes the Notification Center to appear. You can hold the device in portrait or landscape mode for this to work.
Pull-down—On all iPhone and iPad models, except the iPhone X, quickly swipe your finger down from the very top of the iPhone or iPad’s screen. This causes the Notification Center to appear. You can hold the device in portrait or landscape mode for this to work.
The pull-down gesture is also used to access iOS 11’s enhanced Spotlight Search feature. Use a pull-down gesture that starts in the middle of the iPhone or iPad’s Home screen to access the improved Spotlight Search feature.
One use of Spotlight Search is to quickly find any information that’s stored in your mobile device or to perform a web search.
Enter a keyword or search phrase into the Search field, tap the Search key on the virtual keyboard, and then tap one of the search result listings to access the related data or content by automatically launching whichever app it relates to.
![]() Swipe—A swipe refers to quickly moving your finger along the screen from right to left, left to right, top to bottom, or bottom to top, in order to scroll left, right, up, or down, depending on which app you’re using.
Swipe—A swipe refers to quickly moving your finger along the screen from right to left, left to right, top to bottom, or bottom to top, in order to scroll left, right, up, or down, depending on which app you’re using.
![]() Swipe Up—At any time, you can swipe your finger in an upward direction on most iPhone models (starting at the bottom of the screen) to make the redesigned Control Center appear. From here, you can access a handful of functions. On any iPad, use the swipe up gesture from the bottom of the screen to access the redesigned Dock.
Swipe Up—At any time, you can swipe your finger in an upward direction on most iPhone models (starting at the bottom of the screen) to make the redesigned Control Center appear. From here, you can access a handful of functions. On any iPad, use the swipe up gesture from the bottom of the screen to access the redesigned Dock.
![]() Tap—Tapping an icon, button, or link that’s displayed on your device’s screen serves the same purpose as clicking the mouse when you use your main computer.
Tap—Tapping an icon, button, or link that’s displayed on your device’s screen serves the same purpose as clicking the mouse when you use your main computer.
![]() Touch and Hold—When working with text created using the virtual keyboard, press and hold your finger on the screen over a letter or word to see a magnified view and be able to manually move (reposition) the onscreen cursor.
Touch and Hold—When working with text created using the virtual keyboard, press and hold your finger on the screen over a letter or word to see a magnified view and be able to manually move (reposition) the onscreen cursor.
![]() Tip
Tip
For iPad users, iOS 11 works with a two-finger gesture. This enables you to more accurately move the cursor around on the screen (in some apps), which is useful when editing text or highlighting text to select, copy, cut, and then paste, for example.
To move the cursor on the screen, place two fingers next to each other over the cursor or text you want to highlight and drag your fingers slowly around on the screen. The onscreen cursor follows your movement.
On all iPhone and iPad models, except the iPhone X, you’re able to return to the Home screen anytime by pressing the Home button once, regardless of which app is being used.
![]() Tip
Tip
Apple continues to make navigating around your favorite apps with taps, finger gestures, and swipes easy. For example, on any screen where you’re scrolling downward, such as when you’re surfing the Web with Safari, tap the time that’s displayed at the top center of the screen to quickly return to the top of that page or screen.
Meanwhile, if you’re typing something on any iPhone and don’t like what you typed, instead of pressing and holding the Delete key to erase your text, simply shake the smartphone in your hand for a second or two to “undo” your typing. Be sure to turn on the Shake to Undo feature by launching Settings and tapping Accessibility.
![]() Tip
Tip
When you’re using one of the more recently released iPhone models, double-touch (use a gentle tap, as opposed to pressing) the Home button, and everything that’s displayed on the screen shifts downward, so you can more easily reach it with your thumb. Plus, as you’re reading emails, you can use your thumb (on the hand you’re holding the iPhone with) to swipe left or right across an Inbox message listing to manage that incoming message.
Working with the Home Button
Here’s how to use some of the Home button’s main functions when using iOS 11 on any iPhone or iPad model (except the iPhone X):
![]() Activate Siri—Press down and hold the Home button for two seconds from the Home screen or when using any app.
Activate Siri—Press down and hold the Home button for two seconds from the Home screen or when using any app.
![]() Access the App Switcher—From any app (or from the Home screen), quickly press the Home button twice. Press the Home button again (or select an app) to exit the App Switcher.
Access the App Switcher—From any app (or from the Home screen), quickly press the Home button twice. Press the Home button again (or select an app) to exit the App Switcher.
![]() Exit an app and return to the Home screen—When using any app, press the Home button once to exit it and return to the Home screen. Keep in mind that in most cases this does not shut down the app; it continues running in the background.
Exit an app and return to the Home screen—When using any app, press the Home button once to exit it and return to the Home screen. Keep in mind that in most cases this does not shut down the app; it continues running in the background.
![]() Reboot the device (without deleting any of your apps or data)—On older iPhone models and on all iPads, press and hold the Home button simultaneously with the Side button for about five seconds until the Apple logo appears on the screen.
Reboot the device (without deleting any of your apps or data)—On older iPhone models and on all iPads, press and hold the Home button simultaneously with the Side button for about five seconds until the Apple logo appears on the screen.
![]() Note
Note
When using an iPhone 7 or iPhone 8 series phone, to reboot the device, press and hold the Side button simultaneously with the volume down button located on the side of the smartphone, as opposed to the Sleep/Wake and Home button on other iPhone and iPad devices (except the iPhone X).
![]() Return to the main Home screen—When viewing any of the Home screens on your mobile device, press the Home button once to return to the main Home screen.
Return to the main Home screen—When viewing any of the Home screens on your mobile device, press the Home button once to return to the main Home screen.
![]() Wake up the device from Sleep mode—Press the Home button once when your iPhone or iPad is in Sleep mode. If the device is powered down, press and hold the Side button for several seconds instead.
Wake up the device from Sleep mode—Press the Home button once when your iPhone or iPad is in Sleep mode. If the device is powered down, press and hold the Side button for several seconds instead.
Use the Touch ID that’s built in to the Home button of compatible devices to unlock it, confirm a payment using Apple Pay, or when making a content purchase from the App Store, iTunes Store, iBook Store, or within a participating app. Touch ID can also be used to grant you access to certain apps that otherwise require a password, such as a banking or credit card app.
![]() Note
Note
For iPhone X users, instead of using Touch ID to scan a fingerprint, the Face ID feature is used in conjunction with the phone’s front-facing camera for digital face recognition.
![]() Tip
Tip
On the iPhone 7 and iPhone 8 series that have a Touch ID sensor built into the Home button, you can customize how the button feels when you press it. To do this, launch Settings, tap the General option, and then tap the Home Button option. The 1, 2, and 3 circular icons are displayed; each represents a different feel for the Home button. Tap one at a time to experience the difference when you press the Home button, and then select the one you like best. Tap Done to save your selection.
Interacting with the iPhone X
Following are some of the new iPhone X finger gestures and uses of the Side button that have replaced the uses of the Home button:
![]() To access the Home screen using an iPhone X, place your finger near the bottom of the screen and swipe up.
To access the Home screen using an iPhone X, place your finger near the bottom of the screen and swipe up.
![]() To utilize Multitasking mode and access the App Switcher, place your finger near the bottom of the screen and swipe up. However, instead of removing your finger from the screen at the end of the swipe, hold it in place for about a second.
To utilize Multitasking mode and access the App Switcher, place your finger near the bottom of the screen and swipe up. However, instead of removing your finger from the screen at the end of the swipe, hold it in place for about a second.
![]() To access Control Center while using the iPhone X, place your finger near the top-right side of the screen and swipe down.
To access Control Center while using the iPhone X, place your finger near the top-right side of the screen and swipe down.
![]() To access Siri, either use the “Hey Siri” command, or press and hold the Side button for about two seconds.
To access Siri, either use the “Hey Siri” command, or press and hold the Side button for about two seconds.
![]() To quickly launch the Wallet app and access Apple Pay (to make a payment in a retail store, for example), quickly press the Side button twice, and then look at the iPhone X’s screen (to utilize Face ID) and authorize the purchase.
To quickly launch the Wallet app and access Apple Pay (to make a payment in a retail store, for example), quickly press the Side button twice, and then look at the iPhone X’s screen (to utilize Face ID) and authorize the purchase.
Using the Virtual Keyboard
Whenever you need to enter data into your iPhone or iPad, you almost always use the virtual keyboard that pops up on the bottom portion of the screen when it’s needed. The virtual keyboard resembles a typewriter or computer keyboard; however, certain onscreen keys have different purposes, depending on which app you’re using.
When you’re using an app that involves numeric data entry, such as Numbers or Excel, the layout and design of the virtual keyboard can change dramatically.
![]() Note
Note
More information on how to use the updated QuickType virtual keyboard displayed on an iPad is covered within Chapter 3, “Take Advantage of iOS 11 Features for the iPad.”
Use these tips to more easily work with the virtual keyboard:
![]() Divide the virtual keyboard in half (iPad)—Make it easier to type on the virtual keyboard with your two thumbs while holding the device. To split the keyboard (see Figure 1.4), hold down the Hide Keyboard key that’s located in the lower-right corner of the virtual keyboard, and select the Split option. Alternatively, use the index fingers on your right and left hand simultaneously, place them in the center of the virtual keyboard when it’s visible, and then move them apart.
Divide the virtual keyboard in half (iPad)—Make it easier to type on the virtual keyboard with your two thumbs while holding the device. To split the keyboard (see Figure 1.4), hold down the Hide Keyboard key that’s located in the lower-right corner of the virtual keyboard, and select the Split option. Alternatively, use the index fingers on your right and left hand simultaneously, place them in the center of the virtual keyboard when it’s visible, and then move them apart.
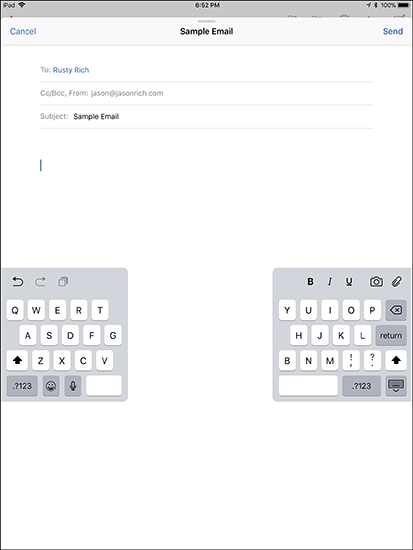
FIGURE 1.4
Especially when holding an iPad in portrait mode with two hands, using the split keyboard makes it easier to type with just your two thumbs.
![]() Undock and move the virtual keyboard (iPad only)—Hold down the Hide Keyboard key (displayed in the lower-right corner of the keyboard) to be given the opportunity to undock or split the keyboard. Select Undock, and then while holding down the Hide Keyboard key, drag the keyboard up or down to reposition it.
Undock and move the virtual keyboard (iPad only)—Hold down the Hide Keyboard key (displayed in the lower-right corner of the keyboard) to be given the opportunity to undock or split the keyboard. Select Undock, and then while holding down the Hide Keyboard key, drag the keyboard up or down to reposition it.
![]() Turn on or off the keyboard’s key click sound—Launch Settings, tap the Sounds option, and then turn on or off the virtual switch associated with Keyboard Clicks.
Turn on or off the keyboard’s key click sound—Launch Settings, tap the Sounds option, and then turn on or off the virtual switch associated with Keyboard Clicks.
![]() Adjust auto-capitalization, autocorrection, check spelling, enable caps lock, predictive, split keyboard (iPad only), and the keyboard shortcuts options—Launch Settings, tap the General option, and then tap the Keyboard option to access the Keyboard menu. Turn on or off the virtual switch associated with each option.
Adjust auto-capitalization, autocorrection, check spelling, enable caps lock, predictive, split keyboard (iPad only), and the keyboard shortcuts options—Launch Settings, tap the General option, and then tap the Keyboard option to access the Keyboard menu. Turn on or off the virtual switch associated with each option.
When using the virtual keyboard, to turn on Caps Lock, quickly double-tap the Shift key (it displays an upward-pointing arrow). Tap the key again to turn off Caps Lock.
![]() Make the virtual keyboard disappear—You can often tap anywhere on the screen except on the virtual keyboard itself, or you can tap the Hide Keyboard key (iPad only), which is always located in the lower-right corner of the keyboard.
Make the virtual keyboard disappear—You can often tap anywhere on the screen except on the virtual keyboard itself, or you can tap the Hide Keyboard key (iPad only), which is always located in the lower-right corner of the keyboard.
![]() Make the virtual keyboard appear—If you need to enter data into your iPhone or iPad but the virtual keyboard doesn’t appear automatically, simply tap an empty data field. An appropriately formatted virtual keyboard displays.
Make the virtual keyboard appear—If you need to enter data into your iPhone or iPad but the virtual keyboard doesn’t appear automatically, simply tap an empty data field. An appropriately formatted virtual keyboard displays.
![]() Make the keys on the virtual keyboard larger—For some people, a larger keyboard makes it easier to type. Simply rotate the iPhone or iPad from portrait to landscape mode. Keep in mind that not all apps enable you to rotate the screen.
Make the keys on the virtual keyboard larger—For some people, a larger keyboard makes it easier to type. Simply rotate the iPhone or iPad from portrait to landscape mode. Keep in mind that not all apps enable you to rotate the screen.
![]() Access emoji/symbols keyboards—Tap the Emoji (smiley face) key, located between the .?123 and microphone keys, to access alternative virtual keyboards that enable you to incorporate hundreds of different graphical emojis into your messages and documents.
Access emoji/symbols keyboards—Tap the Emoji (smiley face) key, located between the .?123 and microphone keys, to access alternative virtual keyboards that enable you to incorporate hundreds of different graphical emojis into your messages and documents.
![]() Use the keyboard with one hand on an iPhone—Adjust the virtual keyboard to make it more accessible when you want to hold and use the iPhone with one hand. Press and hold the Emoji key and from the Keyboard Settings pop-up menu, tap the keyboard icon displayed on the right or left, based on which hand you’re holding your iPhone in.
Use the keyboard with one hand on an iPhone—Adjust the virtual keyboard to make it more accessible when you want to hold and use the iPhone with one hand. Press and hold the Emoji key and from the Keyboard Settings pop-up menu, tap the keyboard icon displayed on the right or left, based on which hand you’re holding your iPhone in.
Creating Keyboard Shortcuts
If there’s a sentence, paragraph, or phrase you need to enter repeatedly when using an app, you can enter that text just once and save it as a keyboard shortcut. Then, instead of typing a whole sentence, you can simply type a three-letter code that you assign to that shortcut, and the virtual keyboard inserts the complete sentence.
To create your own keyboard shortcuts, follow these steps:
1. Launch Settings and tap the General option, followed by the Keyboard option.
2. From the Keyboards menu, tap the Text Replacement option.
3. When the Text Replacement window appears, press the + icon to add a new shortcut.
4. Fill in the Phrase field with the complete sentence (or any text) you want to include, such as, “I am in a meeting and will call you back later.”
5. In the Shortcut field, enter a three-letter combination to use as the keyboard shortcut, such as “IAM” (representing “I am in a meeting and will call you back later”).
6. Now, anytime the virtual keyboard is displayed (when using any app), simply type IAM to input the full sentence.
Using an Optional External Keyboard
If you expect to do a lot of data entry or word processing on your iOS mobile device, instead of using the virtual keyboard, purchase an optional external keyboard that connects to the smartphone or tablet using a wireless Bluetooth connection or the device’s Lightning port.
The Apple Smart Keyboards ($159 or $169, depending on the model, www.apple.com/shop/ipad/ipad-accessories), are available specifically for the various iPad Pro models. These keyboards use a proprietary Smart Connector to attach the keyboard to the tablet using magnets. No pairing is required, and the keyboard is powered by the iPad Pro.
![]() More Info
More Info
For other iPad and iPhone models, Apple (http://store.apple.com), Belkin (www.belkin.com), Logitech (www.logitech.com), and Zagg (www.zagg.com) are a sampling of companies that offer compatible external keyboards. Some of these keyboards are built in to phone or tablet cases that also double as stands.
Using Headphones with the Newest iPhones
Starting with the iPhone 7 series, Apple removed the headphone jack from its smartphones. To compensate for this, you have five options:
![]() Use the iPhone’s built-in speakers to play all audio.
Use the iPhone’s built-in speakers to play all audio.
![]() Invest in wireless (Bluetooth) headphones (or a Bluetooth phone headset), such as the AirPods or PowerBeats3 Wireless Earphones.
Invest in wireless (Bluetooth) headphones (or a Bluetooth phone headset), such as the AirPods or PowerBeats3 Wireless Earphones.
![]() Use the supplied Lighting to 3.5mm Headphone Jack Adapter to plug your existing headphones (with a 3.5mm jack) into the Lighting port on the bottom of your phone.
Use the supplied Lighting to 3.5mm Headphone Jack Adapter to plug your existing headphones (with a 3.5mm jack) into the Lighting port on the bottom of your phone.
![]() Acquire wired headphones with a Lightning Connector. The iPhone 8, iPhone 8 Plus, and iPhone X come with wired EarPods with a Lightning Connector.
Acquire wired headphones with a Lightning Connector. The iPhone 8, iPhone 8 Plus, and iPhone X come with wired EarPods with a Lightning Connector.
![]() Link your iPhone with external, wireless (Bluetooth or AirPlay-compatible) speakers, such as a HomePod.
Link your iPhone with external, wireless (Bluetooth or AirPlay-compatible) speakers, such as a HomePod.
![]() Note
Note
Any wireless (Bluetooth) headphones or headphones with a Lightning Connector that you purchase for your iPhone will also work with any iPad model. As of late 2017, all current iPad models also still have a 3.5mm headphone jack built in.
Keeping it Covered
Apple, along with many independent companies, offers a vast selection of optional, custom-fitted cases and covers for each of the iPhone and iPad models. Some cases include an external keyboard, and others double as a stand for the smartphone or tablet.
Using a case or cover protects your mobile device against damage (especially while you’re on the go), and also enables you to further personalize your device when you choose a case or cover design and color scheme that matches your personality and taste.
Apple’s own cases and covers are available from all Apple Stores, Apple.com, and authorized Apple resellers. Third-party cases and covers can be purchased wherever smartphones and tablets are sold, as well as from Amazon.com and other online-only sellers.
Understanding Applecare+ Coverage
AppleCare+ extends the warranty of your iPhone or iPad from 90 days (which is included with each device purchase) to two years, and includes unlimited telephone and in-person technical support.
Coverage against most types of accidental damage is also included (although a deductible will apply). Loss or theft coverage is not, however, included. Repair prices for a broken iPhone or iPad can be extremely costly without AppleCare+, which can make this a good investment, particularly if you also use the free tech support option.
The cost of AppleCare+ varies according to which model iPhone or iPad you own. If you’re part of the Apple Upgrade Program (www.apple.com/shop/iphone/iphone-upgrade-program), AppleCare+ is included for free each time you upgrade to a new iPhone.
![]() Note
Note
Some wireless service providers, along with independent insurance companies, such as Square Trade (www.squaretrade.com) and Worth Ave. Group (www.worthavegroup.com), offer their own iPhone and iPad insurance plans. Some of these plans include loss or theft coverage for the device, but do not include unlimited technical support from Apple.
![]() More Info
More Info
To learn more about AppleCare+ for the iPhone or iPad, visit www.apple.com/support/products.