16. iOS 11 and Apple Pay Security and Privacy Strategies
In this Chapter
![]() Setting up and using the Passcode feature
Setting up and using the Passcode feature
![]() Unlocking your iPhone or iPad using the Touch ID sensor
Unlocking your iPhone or iPad using the Touch ID sensor
![]() Setting up and using Apple Pay
Setting up and using Apple Pay
![]() Employing additional security and privacy strategies
Employing additional security and privacy strategies
Every day, people rely on their iPhones or iPads to store a vast amount of highly personal information that they wouldn’t necessarily want friends and family, much less cybercriminals to see or have access to. With each new version of the iOS operating system, new and more advanced security features are added to keep unauthorized people from accessing your mobile device and to keep private the information you store within your device.
There are two important things you need to consider when it comes to iPhone and iPad-related security.
![]() It’s your responsibility to turn on and use the majority of the security features that are provided to you. If they remain turned off, or they’re not set up properly, they simply won’t work.
It’s your responsibility to turn on and use the majority of the security features that are provided to you. If they remain turned off, or they’re not set up properly, they simply won’t work.
![]() Human error, not the technology you use, is the most frequent cause of security breaches when it comes to securing your personal information, protecting yourself against identity theft, and keeping yourself from becoming a victim of online-based fraud or crime.
Human error, not the technology you use, is the most frequent cause of security breaches when it comes to securing your personal information, protecting yourself against identity theft, and keeping yourself from becoming a victim of online-based fraud or crime.
This chapter helps you turn on and properly set up some of the most useful security and privacy features offered by iOS 11 on your iPhone or iPad. The chapter also includes strategies you can implement to ensure your private information stays private and the content you choose to share is shared only with the appropriate people.
![]() What’s New
What’s New
If you’re an iPhone X user, you can take advantage of the new Face ID feature to unlock your phone, verify a purchase, or use Apple Pay, rather than using Touch ID to scan your fingerprint.
Face ID uses the phone’s TrueDepth camera system on the front of the device to recognize your face. To use Apple Pay, for example, double-click the side button on the phone to activate Apple Pay and then look at your iPhone X’s screen.
It is still necessary, however, to set up and occasionally use the Passcode feature when working with an iPhone X.
Setting Up the Passcode Feature
The first time you turn on a new iPhone or iPad, part of the setup procedure involves you creating a six-digit passcode that you use to unlock your iPhone or iPad each time you turn it on or wake it up from sleep mode. To keep unauthorized people from picking up and using your mobile device, set up and turn on this feature when prompted to do so.
![]() Note
Note
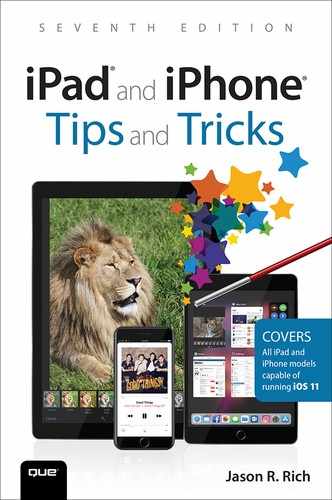
When the passcode feature is turned on, anytime your iPhone or iPad is turned on or woken up from sleep mode, you’re required to manually enter the passcode you’ve created to unlock and use your mobile device (as shown in Figure 16.1 on an iPhone).
If you also turn on the Touch ID option, instead of manually entering the passcode, you’re able to use the Touch ID sensor built into the Home button of your device to scan your fingerprint and unlock your iPhone or iPad from the Lock screen. Refer to Chapter 2, “Customize Your iPad or iPhone” for directions on how to customize the Lock and Home screen of your mobile device. iPhone X users can use the Face ID feature to unlock their phones.
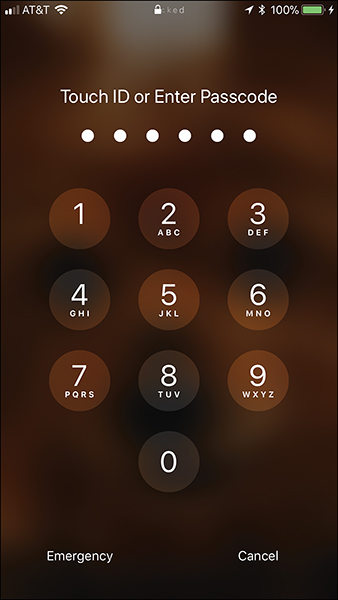
FIGURE 16.1
With the Passcode feature turned on, anyone who turns on or wakes up your iPhone or iPad needs to enter the correct passcode to unlock the device and begin using it.
When you set up your iPhone or iPad, you see the Create a Passcode screen, which prompts you to create and enter a six-digit passcode. Make sure you create a code that you’ll remember, but make it something that won’t be obvious to people who know you. (In other words, don’t use your birthday, anniversary date, spouse’s birthday, pet’s birthday, or child’s birthday.)
Alternatively, tap Passcode Options to choose a different method of securing your device:
![]() Create Alphanumeric Code—Create a passcode using numbers and letters rather than just numbers. For maximum security, choose a code that includes at least eight characters, incorporates numbers and letters, and uses upper- and lowercase letters. Again, don’t choose something obvious, such as the word “password” (which is the most common password that people choose when given the option to create a password).
Create Alphanumeric Code—Create a passcode using numbers and letters rather than just numbers. For maximum security, choose a code that includes at least eight characters, incorporates numbers and letters, and uses upper- and lowercase letters. Again, don’t choose something obvious, such as the word “password” (which is the most common password that people choose when given the option to create a password).
![]() Custom Numeric Code—Create a numeric passcode with any number of digits. You’re not limited to four or six digits.
Custom Numeric Code—Create a numeric passcode with any number of digits. You’re not limited to four or six digits.
![]() 4-Digit Numeric Code—Create a passcode that uses just four digits. Yes, it’ll be easier to remember, but a shorter passcode is also potentially easier for someone else to figure out.
4-Digit Numeric Code—Create a passcode that uses just four digits. Yes, it’ll be easier to remember, but a shorter passcode is also potentially easier for someone else to figure out.
![]() Don’t Use Passcode—Turn off the passcode feature altogether. When you do this, your device doesn’t need to be unlocked, so anyone can pick up your iPhone or iPad and begin using it immediately. Deactivating the passcode feature is not recommended!
Don’t Use Passcode—Turn off the passcode feature altogether. When you do this, your device doesn’t need to be unlocked, so anyone can pick up your iPhone or iPad and begin using it immediately. Deactivating the passcode feature is not recommended!
![]() Tip
Tip
If you suspect someone has discovered your passcode, change it by launching Settings, tapping Touch ID & Passcode, entering your existing passcode, and then tapping Change Passcode. You’re prompted to enter your old passcode and then required to create a new six-digit passcode and enter it twice.
Changing your passcode at least once a month is a good added security measure.
From the Passcode Lock submenu screen within Settings (see Figure 16.2), also tap Require Passcode and make sure the Immediately option is selected. This ensures that anytime your iPhone or iPad is turned off or goes into sleep mode, when it’s turned back on, the passcode is required to unlock the device.
![]() Tip
Tip
After you’ve activated the Passcode feature, also turn on the Erase Data feature. If an unauthorized person steals your iPhone or iPad and fails to enter your current passcode 10 times in a row, your mobile device automatically erases itself, ensuring that the person who has taken possession of your mobile device can’t access your personal information, data, photos, and files.
To turn on this feature, launch Settings, tap Touch ID & Passcode, and then scroll to the bottom of the Passcode Lock submenu screen. Turn on the virtual switch associated with the Erase Data option (refer to Figure 16.2). This only needs to be set up once.
As an added precaution, if you have the Find My feature turned on and your iPhone or iPad is lost or stolen, you also have the option of remotely erasing the content of the device. Read Chapter 7, “Use iCloud and the Files App,” for more information.
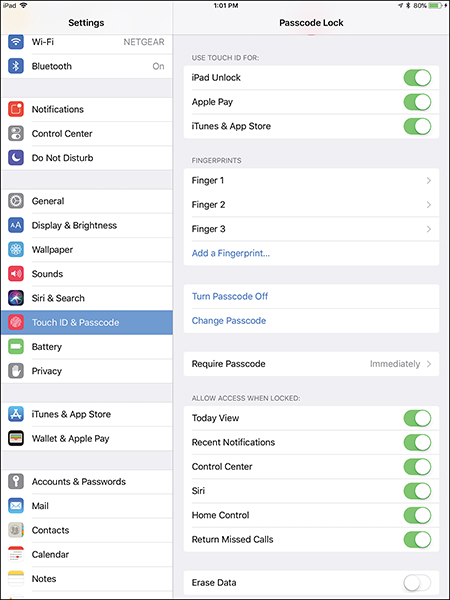
FIGURE 16.2
The Passcode Lock submenu screen within Settings on an iPad Pro.
Setting Up the Touch ID Sensor to Unlock Your Phone
The first time you turn on and set up your new iPhone or iPad (with the exception of the iPhone X), you’re prompted to set up the Touch ID sensor to be able to scan your fingerprint. When you scan your fingerprint, you can use it to unlock your device instead of entering a password. You can also use your fingerprint to authorize Apple Pay purchases.
![]() Note
Note
The Touch ID sensor is only built into the iPhone 5s or later phone models, the iPad Air 2, iPad mini 4, and all iPad Pro models.
During the setup process, if you have an iPhone or iPad that includes the Touch ID feature, it’s a good strategy to scan and store the fingerprint from both of your thumbs, as well as your index finger(s). This allows you to easily reach the Home button with any one of these fingers to unlock the device or authorize a purchase.
Even if you turn on the Touch ID sensor and store your fingerprint, you can still unlock the mobile device using the passcode that you’ve created and stored. Your fingerprint scan is stored internally within your iPhone or iPad, within a separate chip. It’s never shared with Apple or third-parties.
When the Touch ID screen is displayed, tap Continue to scan your fingerprint. When the Place Your Finger screen appears, follow the on-screen prompts to place your finger on the Home button and then lift it repeatedly.
Next, you see the Adjust Your Grip screen. Tap Continue. You’re prompted to repeat the process using the same finger while holding the iPhone or iPad slightly differently. Again, follow the on-screen prompts. When the Complete message appears, your fingerprint is securely stored within your mobile device.
After the initial setup process is complete, you can always add fingerprints for yourself or for other people whom you trust to use your mobile device by following these steps:
1. Launch Settings.
2. Tap the Touch ID & Password option.
3. Enter your passcode when promoted.
4. Under the Fingerprints heading of the Passcode Lock submenu (refer to Figure 16.2), tap the Add a Fingerprint option to add a new fingerprint and then follow the on-screen prompts.
![]() Note
Note
If you’re an iPhone X user, instead of setting up Touch ID to recognize your fingerprint, you set up the Face ID feature, so the front-facing camera can use face recognition to confirm your identity in the future.
![]() Tip
Tip
To rename or delete a stored fingerprint, tap Settings, tap Touch ID & Passcode, and then under the Fingerprints heading tap the stored fingerprint you want to modify. You can rename the fingerprint (such as Thumb-Right Hand, Thumb-Left Hand) or tap Delete Fingerprint to erase that fingerprint from your mobile device. Once you do this, that fingerprint no longer works with the device’s Touch ID sensor.
iOS 11 allows you to determine what a successful fingerprint scan using the Touch ID sensor can be used for. The three options include unlocking your iPhone/iPad, authorizing Apple Pay purchases, and authorizing iTunes Store, App Store, or iBook Store purchases. To turn on or off any of these options, launch Settings, tap Touch ID & Passcode, and then turn on or off the virtual switch associated with each option below the Use Touch ID For heading.
Adjusting the Lock Screen Settings
When you first turn on your iPhone or iPad, or wake it up from sleep mode, the first thing that appears is the Lock screen. Depending on how you set up your device, the device has either limited or no functionality until you unlock the device by successfully entering the correct passcode or using the Touch ID sensor built into the Home button.
To determine what functionality is possible from the Lock screen without first unlocking the device, launch Settings, tap Touch ID & Passcode, and then from the Passcode Lock submenu screen (refer to Figure 16.2), scroll down to the Allow Access When Locked heading. You can turn adjust the virtual switches for the following eight options:
![]() Today View—When turned on, upcoming events stored in the Calendar app for the current day, immediately pending items from the Reminders app, as well as other apps that manage your schedule and appointments are automatically displayed on the Lock screen.
Today View—When turned on, upcoming events stored in the Calendar app for the current day, immediately pending items from the Reminders app, as well as other apps that manage your schedule and appointments are automatically displayed on the Lock screen.
![]() Recent Notifications—When turned on, alerts, alarms, and notifications generated by any apps on your mobile device that were created while your iPhone or iPad was turned off or in sleep mode are displayed on the Lock screen.
Recent Notifications—When turned on, alerts, alarms, and notifications generated by any apps on your mobile device that were created while your iPhone or iPad was turned off or in sleep mode are displayed on the Lock screen.
![]() Control Center—When turned on, you can access the Control Center (and most functionality offered by the Control Center) from the Lock screen without first unlocking the device. Keep in mind that when this feature is enabled, anyone who happens to pick up your device can access the Control Center tools from the Lock screen.
Control Center—When turned on, you can access the Control Center (and most functionality offered by the Control Center) from the Lock screen without first unlocking the device. Keep in mind that when this feature is enabled, anyone who happens to pick up your device can access the Control Center tools from the Lock screen.
![]() Siri—When turned on, from the Lock screen, you can access Siri and issue verbal questions or commands without first unlocking the iPhone or iPad. Some Siri functionality, such as the ability to make calls, is restricted unless the phone is first unlocked.
Siri—When turned on, from the Lock screen, you can access Siri and issue verbal questions or commands without first unlocking the iPhone or iPad. Some Siri functionality, such as the ability to make calls, is restricted unless the phone is first unlocked.
![]() Home Control—When turned on, you can control smart devices in your home (using the Home app) without first unlocking your iPhone or iPad.
Home Control—When turned on, you can control smart devices in your home (using the Home app) without first unlocking your iPhone or iPad.
![]() Return Missed Calls—If someone calls you via a voice call to your iPhone, or a video (or voice) call via FaceTime on your iPhone or iPad, but you don’t answer, a notification of the missed call is displayed on the Lock screen (if you have Notifications for the Phone and FaceTime apps set up to display on the Lock screen). Turn on the Return Missed Calls feature to launch the Phone or FaceTime app and return the missed call without first unlocking your iPhone or iPad.
Return Missed Calls—If someone calls you via a voice call to your iPhone, or a video (or voice) call via FaceTime on your iPhone or iPad, but you don’t answer, a notification of the missed call is displayed on the Lock screen (if you have Notifications for the Phone and FaceTime apps set up to display on the Lock screen). Turn on the Return Missed Calls feature to launch the Phone or FaceTime app and return the missed call without first unlocking your iPhone or iPad.
![]() Reply with Message (iPhone Only)—Anytime you receive an incoming call on your iPhone, you have the option to respond to the caller with a stock text message. For example, the message might say, “I am driving and can’t talk,” or “I’m in a meeting and will call you later.” If you want to be able to send these instant replies from the Lock screen without first unlocking the iPhone, turn on this feature.
Reply with Message (iPhone Only)—Anytime you receive an incoming call on your iPhone, you have the option to respond to the caller with a stock text message. For example, the message might say, “I am driving and can’t talk,” or “I’m in a meeting and will call you later.” If you want to be able to send these instant replies from the Lock screen without first unlocking the iPhone, turn on this feature.
![]() Wallet (iPhone Only)—If you have Apple Pay set up, or you store other types of membership or customer loyalty cards within the Wallet app of your iPhone, enable this feature to be able to quickly open the Wallet app from the Lock screen by double-pressing the Home button. Keep in mind that with this feature enabled an unauthorized person might be able to open the Wallet app, but because his fingerprint is not stored within your phone, he won’t be able to authorize any purchases or view the account numbers for the debit or credit cards you have stored within the Wallet app.
Wallet (iPhone Only)—If you have Apple Pay set up, or you store other types of membership or customer loyalty cards within the Wallet app of your iPhone, enable this feature to be able to quickly open the Wallet app from the Lock screen by double-pressing the Home button. Keep in mind that with this feature enabled an unauthorized person might be able to open the Wallet app, but because his fingerprint is not stored within your phone, he won’t be able to authorize any purchases or view the account numbers for the debit or credit cards you have stored within the Wallet app.
![]() Tip
Tip
The apps installed on your iPhone or iPad, along with a handful of core iOS 11 features are able to generate alerts, alarms, and notifications to get your attention. Based on how you set up your mobile device, this information can automatically be displayed on the Lock screen, which means that anyone who happens to be looking at your device’s screen can see this information.
In addition to the controls offered from below the Allow Access When Locked heading of the Passcode Lock submenu within Settings, you can also adjust the Notifications option(s) related to individual apps.
To do this, launch Settings, tap the Notifications option, and then tap each app listed below the Notification Style heading. If you do not want Notifications for the selected app to be displayed on the Lock screen, be sure to turn off the virtual switch associated with the Show On Lock Screen option.
Taking Advantage of iOS 11’s Restrictions Features
If you have kids, you might sometimes allow them to play a game, listen to music, watch a movie, or access their social media account(s) from your smartphone or tablet. However, you might want to prevent your kids from accessing any other content stored within your device, making online purchases, or using apps that you haven’t approved. You might also occasionally want to allow adult family members or friends to use certain features of your mobile device while keeping everything else private.
The way to do this is to utilize iOS 11’s customizable Restrictions features (which are also sometimes referred to as Parental Controls). To set up Restrictions, launch Settings, tap General, and then tap Restrictions. Tap the Enable Restrictions option. When prompted, create a four-digit passcode. Keep this code private. In other words, do not allow your kids (or the other people who use your iPhone or iPad) to discover this code. When prompted, enter the same code a second time to confirm it.
![]() Caution
Caution
If you forget the Restrictions code, there is no way to recover it and regain full access to your mobile device. You need to erase your device, set it up as a new device, and then manually restore apps and data. If you restore from a backup that was created after the Restrictions feature was activated, when you restore your device, the Restrictions are restored and remain active.
The master Restrictions feature is now enabled. Scroll down the Restrictions submenu screen (see Figure 16.3), and turn on or off the virtual switch associated with each option. When a feature or option is turned on, the other person using your iPhone or iPad is able to use that app or feature. When the virtual switch is turned off, the other person using your mobile device doesn’t have access to that app or feature. For example, if you want someone else to be able to use your iPhone or iPad only to take pictures using the Camera app, turn on the virtual switch associated with Camera, but turn off all the other virtual switches.
FIGURE 16.3
The Restrictions submenu screen within Settings allows you to determine exactly what someone can do while working with your mobile device.
Scroll down on the Restrictions submenu screen to the Allowed Content heading to control what types of content other users can access while using your iPhone or iPad. For example, you can prevent your kids from listening to podcasts or music with explicit lyrics or watching TV shows or movies (from the iTunes Store) that have specific ratings. You can also prevent them from visiting websites featuring adult content or using Siri for anything that involves explicit language. Tap each listing below the Allowed Content heading and select adjustments that you’re comfortable with based on the age of the person who will be using your mobile device or your relationship with them.
Under the Privacy heading of the Restrictions submenu, you can adjust specific iOS 11 and app-related functions that you want to prevent other people from using, such as the ability to access or edit your Contacts app’s database, your Calendar, content within the Reminders app, or the digital photos stored within the Photos app.
In the Allow Changes section of the Restrictions submenu are additional iOS 11-related functions that you can prevent others from altering. At the bottom of this menu are Game Center–related options (which relate to online multiplayer games) that you can prevent other people, such as your kids, from adjusting. For example, you can allow them to play an online multiplayer game, but only with “friends” whom you have preapproved.
Once all of the Restrictions options are adjusted, only a person who knows the four-digit Restrictions code you created has full access to your iPhone or iPad (so don’t share that four-digit code with others!). Other people are limited in terms of what they can do while using your device, based on the Restrictions you’ve imposed.
![]() Tip
Tip
To turn off the Restrictions feature, launch Settings, tap General, tap Restrictions, tap Disable Restrictions, and, when prompted, enter the four-digit Restrictions Passcode you created.
![]() Note
Note
For more information on how to set up specific Restriction-related settings, visit https://support.apple.com/en-us/HT201304.
Customizing iOS 11’s Privacy Settings
One of the great things about iOS 11 is that the apps installed on your iPhone or iPad are designed to interact with and seamlessly share data with each other, and, at times, share information with websites or third parties. However, you have some control over which apps access what information and how that information is shared.
To adjust Privacy-related settings, which includes when and how your iPhone or iPad is able to share your exact location using its built-in GPS capabilities, launch Settings and tap the Privacy option.
On the Privacy submenu (Figure 16.4), there are a dozen main features that you can control, starting with Location Services. Location Services manages the GPS capabilities built into your iPhone or iPad. When Location Services is turned on, your iPhone keeps continuous tabs on your exact location. The location information can be used or shared automatically with apps based on permissions you’ve granted from the Privacy submenu.
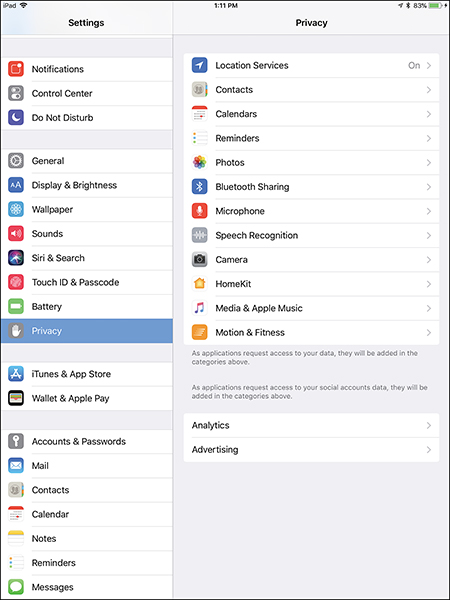
FIGURE 16.4
The Privacy submenu screen within Settings on an iPad Pro.
![]() Tip
Tip
From the Privacy submenu within Settings, tap Location Services and then turn on the virtual switch associated with the Location Services feature at the top of submenu. Then scroll down and adjust which compatible apps will be able to access your location information.
iOS 11 and all of the various apps installed within your mobile device use location information many different ways. The Maps app relies on Location Services to figure out where you are at any given moment and provide accurate, turn-by-turn directions that lead you to your intended destination. The Camera app can use Location Services every time you snap a photo to store the exact location (along with the time and date) where the photo was taken (and can later use this information to organize your images).
When you add a meeting or event location to the Calendar app, your iPhone or iPad can determine how long it will take you to reach your next appointment location, based on your current location, and then suggest the best time to leave (after determining current traffic conditions). If you use the Uber app to call for a ride, it uses Location Services to automatically pinpoint your exact pickup location.
![]() Caution
Caution
One thing to be cautious of is using Location Services in conjunction with social media services, like Facebook, Instagram, Twitter, or SnapChat. As you create a posting or publish a photo online using your mobile device, by default, these services are typically set up to share your exact location as part of your post. This is great if you’re on vacation and want to share with people where you are, but it can be a security risk if you’re posting public messages (that strangers can see) from your home, office, school, or hotel room.
Make sure you understand which apps and iOS 11 features are using the GPS capabilities built into your mobile device. You can check this either from the social media apps you use to manage your accounts or from the Location Services submenu within Settings.
In addition to Location Services, there are other privacy settings that you can adjust for individual apps. Go to Settings and tap Privacy. Then tap each option on the Privacy submenu to determine which apps or online services have access to specific information. For example, if you tap the listing for the Contacts app, you see that apps like Instagram, Facebook, Facebook Messenger, Skype, and SnapChat are able to access your personal Contacts database and use information from your Contacts entries. To terminate permission for specific apps to access your Contacts database, tap the Contacts listing from the Privacy menu and then turn off the virtual switches for the listed apps that you don’t want to be able to access your Contacts database.
Making Payments from Your Mobile Device
If you’re making purchases through the iTunes Store, the App Store to acquire paid apps, or the iBook Store, anytime you approve a purchase, payment is made either using the credit card or debit card you have linked with your Apple ID account or a prepaid iTunes gift card. You need to set up payment information associated with your accounts.
Adding or Updating Payment Details for Your Apple ID
No matter how many Apple devices you have, you need only one Apple ID account. To add or update the debit/card card information associated with your Apple ID account, launch Settings, tap the iTunes & App Store option, tap your Apple ID username near the top of the iTunes & App Store submenu, and then tap the View Apple ID option in the Apple ID pop-up window.
You’re prompted to provide your Apple ID password or sign into the account by scanning your fingerprint via the Touch ID sensor. Tap Payment Information. Choose to use a credit or debit card or to link your Apple ID with a PayPal account (a new option added in iOS 11). If you selected the credit/debit card option, in the appropriate fields, provide your card number, expiration date, and the card’s CVV security code, along with your first and last name and your billing address. Tap Done when you’ve filled in the required fields.
![]() Tip
Tip
You can also manage your Apple ID, look up a forgotten password, change your password, and update payment information from any computer’s web browser. Visit https://appleid.apple.com to do this.
After payment information is linked with your Apple ID, anytime you want to make a purchase from one of the Apple stores, you can approve the purchases simply by providing your Apple ID password or using your device’s Touch ID when prompted.
Setting Up Apple Pay
Apple Pay is an electronic payment service that can be linked with a participating debit or credit card so you can use it in a secure way to make online purchases, as well as purchases from tens of thousands of retail locations across the United States and in a growing number of countries around the world.
There are several reasons why using Apple Pay is more secure than making a purchase using a traditional (plastic) debit or credit card. The merchants don’t see your name or receive your actual credit/debit card number, expiration date, security code, or card PIN. The card issuer processes the payment using an encrypted code. Also, a purchase can be authorized only by you via Apple Pay using the Touch ID sensor to scan your fingerprint. In other words, even if someone steals your device, they can’t access your card details or use the card without your fingerprint scan.
Meanwhile, if your traditional (plastic) credit or debit card is stolen, the thief could use that card to make purchases until you call the card issuer and report the missing card. Unauthorized use of a credit/debit card by someone else, and potential identity theft, is a much lesser threat when you use Apple Pay.
The process for setting up Apple Pay for a particular debit or credit card varies based on the participating bank or financial institution that issued your card. To activate the Apple Pay service on your mobile device, launch Settings, tap the Wallet & Apple Pay option, and then tap the Add Credit or Debit Card option.
![]() Note
Note
To use Apple Pay, your iPhone or iPad must be signed into an active iCloud account.
Follow the on-screen prompts to link your credit or debit cards, one at a time, with Apple Pay. Start by tapping the Continue button from the Apple Pay introduction pop-up window (shown in Figure 16.5). Then, as you’re making a purchase, select which card you want to use, and authorize the purchase by scanning your fingerprint via the iPhone or iPad’s Touch ID sensor (build into the Home button). iPhone X users simply need to look at their phone’s screen at the appropriate time to authorize a purchase.
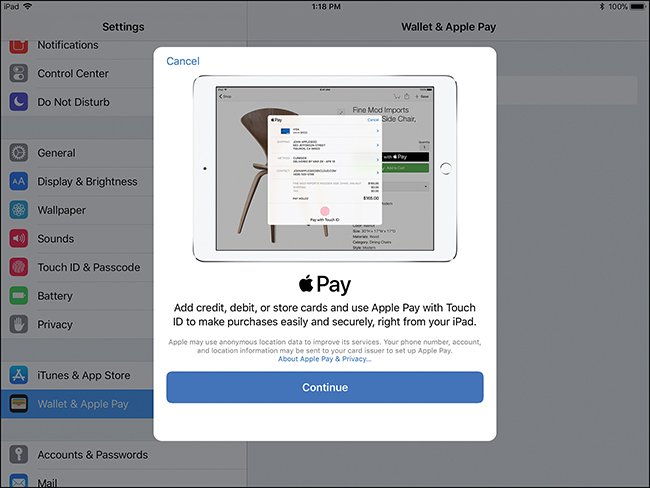
FIGURE 16.5
When linking a credit or debit card with Apple Pay, you can either scan your card using the iPhone or iPad’s built-in camera or manually enter your card information when prompted.
Many of the more recently released iPad Pro and iPad mini models support Apple Pay but only when you use it to make online purchases from supporting websites or when you’re making in-app purchases. You cannot currently make Apple Pay purchases at retail stores using any iPad.
After you store information about at least one compatible credit or debit card in the Wallet app, use the app to make purchases/payments using Apple Pay at participating retail stores, when making in-app purchases (in compatible apps), or when making online purchases (from participating websites).
In a retail store, instead of handing a retail store’s cashier your plastic debit or credit card, you simply need to hold your iPhone close to the cash register or credit card swiper, launch the Wallet app, select the debit or credit card you want to pay with (or use the app’s default card that you preselect), and then place your finger on the iPhone’s Touch ID sensor to authorize the purchase and make your payment (see Figure 16.6).
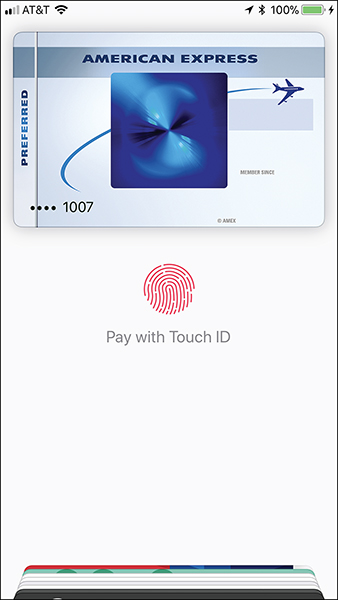
FIGURE 16.6
Select the credit or debit card you want to use (or use what you’ve set as your default card), and then place your finger on the iPhone’s Touch ID sensor (Home button).
Not all debit or credit card issuers (banks and financial institutions) currently support Apple Pay, although the list of supporting card issuers in the United States, Canada, Europe, and Asia-Pacific countries is growing rapidly. To determine whether your card issuer supports Apple Pay, enter your debit or credit card information into the Wallet app, or visit https://support.apple.com/en-us/HT204916.
To view an up-to-date list of retail stores, supermarkets, restaurant chains (and fast food establishments), pharmacies, and hotels, for example, that currently accept Apple Pay, visit www.apple.com/apple-pay/where-to-use-apple-pay.
![]() Note
Note
If you’re using Apple Pay to make a debit or credit card purchase at a retail store, you might be required to enter the PIN associated with the card or provide a signature to complete a transaction. This varies and is determined by your financial institution, the retailer where you’re making the purchase, and the amount of the purchase.
Adding Card Details to the Wallet App
To add one or more credit or debit cards to the Wallet app, which is a process you need to do only once per card, tap the + icon to the right of the Apple Pay heading when you launch the Wallet app (see Figure 16.7). The phone must have Internet access to proceed.
Tap Next in the top-right corner of the Add Card screen. The rear-facing camera of your iPhone becomes active. In a well-lit area, position your plastic credit or debit card within the onscreen frame, and your iPhone automatically scans the card and imports your name and card number into the Wallet app. Confirm the displayed information and tap Next.
![]() Tip
Tip
To manually enter credit or debit card details instead of scanning the card, tap the Enter Card Details Manually option displayed at the bottom of the screen.
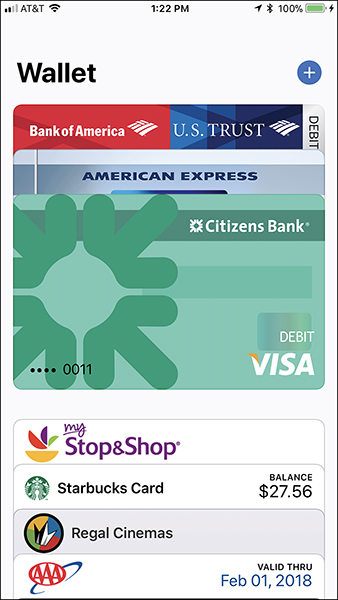
FIGURE 16.7
The Wallet app is used to manage your debit and credit cards that you link with Apple Pay, as well as membership cards and customer loyalty cards from participating companies and organizations, like AAA and Starbucks.
You see the Card Details screen; enter the Expiration Date and CVV security code from your card. At this point, the verification process varies based on the card issuer. Follow the onscreen prompts to complete the verification process.
![]() Note
Note
Some card issuers require you to call the customer service number on the card verification screen to activate your card in the Wallet app for use with Apple Pay.
After the credit or debit card has been verified and activated by your card issuer, a digital version of that card (that displays only the last four digits of the card number) is displayed in the Wallet app. You’re now ready to use that credit or debit card to make Apple Pay purchases. If you want to add additional cards to the Wallet app, repeat this process for each card.
![]() Note
Note
If you have an Apple Watch linked with your iPhone, after adding a new credit/debit card to the Wallet app, you’re asked if you want the new card to be activated on the Wallet app in your smartwatch as well.
![]() Tip
Tip
There are two ways to set the default card, which is the one preselected each time you launch the Wallet app.
![]() Place your finger on one of the virtual cards displayed under the Apple Pay heading, hold your finger down on the screen, and drag that card’s graphic to the top of the pile. A message is displayed stating that the card you selected and placed at the top of the pile is now your default card.
Place your finger on one of the virtual cards displayed under the Apple Pay heading, hold your finger down on the screen, and drag that card’s graphic to the top of the pile. A message is displayed stating that the card you selected and placed at the top of the pile is now your default card.
![]() Launch Settings, tap the Wallet & Apple Pay option, and then tap the Default Card option below the Transaction Defaults heading. Be sure to customize the Shipping Address, Email, and Phone Number fields as well.
Launch Settings, tap the Wallet & Apple Pay option, and then tap the Default Card option below the Transaction Defaults heading. Be sure to customize the Shipping Address, Email, and Phone Number fields as well.
Once you have one or more credit or debit cards stored in the Wallet app, when you’re ready to make a payment at a retail location, launch the Wallet app and select the card you want to use by tapping the graphic for a card displayed below the Apple Pay heading.
When prompted by the cashier, hold the iPhone up to the cash register or credit card swiper, and then place your finger on the iPhone’s Touch ID sensor for a few seconds to authorize the payment. If you’re an iPhone X user, press the iPhone’s Side button twice to activate Apple Pay, and then look at your smartphone’s screen to use the face recognition feature.
![]() Note
Note
When making an in-app or online purchase, you’re prompted to confirm an Apple Pay payment by placing your finger on the phone’s Touch ID sensor.
Once a purchase is finalized, a confirmation message is always displayed on your iPhone’s screen.
There are three ways to launch the Wallet app on your iPhone:
![]() Tap the Wallet app icon from the Home screen.
Tap the Wallet app icon from the Home screen.
![]() From the Lock screen, quickly double-press the Home button, without first having to unlock the phone, to manually launch the Wallet app. Be sure to turn on the virtual switch associated with the Double-Click Home Button option, which is in Settings, Wallet & Apple Pay.
From the Lock screen, quickly double-press the Home button, without first having to unlock the phone, to manually launch the Wallet app. Be sure to turn on the virtual switch associated with the Double-Click Home Button option, which is in Settings, Wallet & Apple Pay.
![]() Customize the Control Center to include the Wallet app icon, and launch the Wallet app from the Control Center. Launch Settings, tap Control Center, tap Customize Control, and then under the More Controls heading tap the + icon associated with the Wallet app. Once the Wallet app is listed under the Include heading, use the move icon displayed to the right of the listing to customize the app icon’s placement within the Control Center.
Customize the Control Center to include the Wallet app icon, and launch the Wallet app from the Control Center. Launch Settings, tap Control Center, tap Customize Control, and then under the More Controls heading tap the + icon associated with the Wallet app. Once the Wallet app is listed under the Include heading, use the move icon displayed to the right of the listing to customize the app icon’s placement within the Control Center.
To delete or edit a credit or debit card stored in the Wallet app, launch Settings, tap the Wallet & Apple Pay option, and then tap the listing for a card that appears below the Cards heading. Scroll to the bottom of the screen and tap Remove Card.
To change the Billing Address associated with the card, tap the Billing Address option.
Using the Wallet App to Manage Reward Cards, Membership Cards, and More
A growing number of retail stores and organizations that have iPhone apps also allow users to manage their reward or membership cards from the Wallet app. For example, Dunkin’ Donuts, Walgreen’s, Panera, and AAA were among the first companies and organizations to support the Wallet app for this purpose. To use this functionality, it is often necessary to also install the app from that company. Following are some other uses for the Wallet app:
![]() Most of the major airlines enable you to store Frequent Flier membership cards in the Wallet app and also manage digital versions of upcoming flight boarding passes.
Most of the major airlines enable you to store Frequent Flier membership cards in the Wallet app and also manage digital versions of upcoming flight boarding passes.
![]() Ticket services, such as Ticketmaster and Live Nation, enable you to store digital tickets you purchase online in the Wallet app and present those tickets at the event.
Ticket services, such as Ticketmaster and Live Nation, enable you to store digital tickets you purchase online in the Wallet app and present those tickets at the event.
![]() Many movie theater chains allow you to prepurchase movie tickets and store them in Wallet, and those that have reward programs also support the Wallet app to store membership card details, so you can view, manage, and redeem reward points earned from within the app.
Many movie theater chains allow you to prepurchase movie tickets and store them in Wallet, and those that have reward programs also support the Wallet app to store membership card details, so you can view, manage, and redeem reward points earned from within the app.
To add membership or reward card details from participating companies and organizations into the Wallet app, launch the app and tap the + icon next to the Passes heading. Next, scan the plastic card into the Wallet app by tapping the Scan Code to Add a Pass option.
Alternatively, import the appropriate information directly from the store or organization’s own iPhone app. Directions for how to do this are supplied in the compatible app.
After you set up Apple Pay to work with the Wallet app and begin storing compatible company/organization reward and membership cards in the app, you’ll quickly discover that not only is Apple Pay more secure than making a purchase using a traditional, plastic credit/debit card, but the checkout process is typically faster, and you can dramatically slim down your actual wallet.
![]() More Info
More Info
To learn more about how Apple Pay and the Wallet app work, visit www.apple.com/apple-pay.
![]() Tip
Tip
To delete a card that’s stored in the Wallet app, view that card with the app and then tap the Info (i) icon in the bottom-right corner of the screen; then tap Delete.
Employing Additional Security and Privacy Strategies
Setting up the Passcode and Touch ID features to unlock your iPhone or iPad are easy security steps you can take to help protect the content that’s stored within your mobile device. The following are additional security-related strategies you can implement to further protect yourself, your identity, your financial transactions, and your activities when using an iPhone or iPad.
Create and Use a Virtual Private Network
If you’ll be surfing the Web, engaging in online shopping, handling online banking, or sending/receiving emails from your mobile device that’s connected to a public Wi-Fi hotspot, one of the easiest ways you can add a strong added layer of protection between yourself and cybercriminals is to install and use a virtual private network (VPN) app on your mobile device. You turn it on anytime you’re connected to the Internet—especially from a public Wi-Fi hotspot. A VPN can work with any type of Wi-Fi or cellular data connection, however.
In some cases, your home or work Internet service provider may provide a VPN, in which case you can configure it to work with your iPhone or iPad. To do this, launch Settings, tap General, and then tap VPN. Tap the Add VPN Configuration option and enter the required information that’s been provided by your Internet service provider (ISP).
Alternatively, you can acquire a VPN app for your mobile device from the App Store. To find one, launch the App Store app, tap the Search icon, and type VPN or Virtual Private Network in the Search field. In many cases, VPN apps are offered for free, but you have to pay a monthly or annual fee for the service. Payment is made via an in-app purchase.
After you’ve installed a VPN app, it configures itself to work with your mobile device, and you can leave it on all the time, if you choose. You also can manually turn it on and off based on where you’re surfing the Web and what online activities you’ll be engaged in.
![]() Note
Note
Norton Wi-Fi Privacy (https://us.norton.com/wifi-privacy), priced starting at $4.99 per month, is just one example of an auto-configuring VPN service that works with the iPhone and iPad.
Adjust the Privacy and Security Settings for Safari
In addition to activating a virtual private network when surfing the Web or handling online activities from your iPhone or iPad, be sure to manually customize the Privacy settings associated with the Safari web browser. Launch Settings, tap Safari, and then scroll down to the Privacy & Security heading.
![]() Note
Note
Read Chapter 13, “Surf the Web More Efficiently Using Safari,” for more information about Safari’s Privacy and Security settings. If you plan to use another web browser on your iPhone or iPad, such as Google Chrome or Firefox, be sure to manually adjust the privacy and security settings associated with the web browser you use.
For example, from the iOS version of the Chrome web browser, tap the Menu icon in the top-right corner of the screen and then select the Settings option. From the Settings menu, tap the Privacy option and adjust the various settings as you deem necessary. Also tap the Content Settings option and adjust those settings as well.
Turn Off Airdrop When You’re Not Using It
As you learned from Chapter 6, “Sync, Share, and Print Files Using AirDrop, AirPlay, AirPrint, and Handoff,” you can wirelessly share certain app-specific content with other Mac and iOS mobile devices using AirDrop. However, if you have AirDrop’s Everyone setting active and you leave AirDrop turned on, when you’re out and about in public, total strangers could potentially send you files, photos, or content without your permission.
As a safety precaution, turn off AirDrop until you’re ready to use it, and then turn the feature off when you’re done. The easiest way to do this is by tapping the AirDrop icon in the Control Center. You can then select one of three options: Receiving Off, Contacts Only, or Everyone (shown in Figure 16.8). Choose the Receiving Off feature when you don’t need to be using AirDrop.
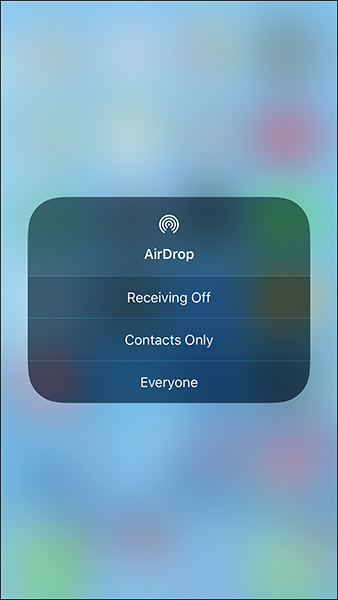
FIGURE 16.8
Select the Receiving Off option when not using AirDrop.
Don’t Use Carplay with Your iPhone in Other People’s Cars
CarPlay, which enables your iPhone to link directly with a vehicle’s infotainment system, is a powerful feature that makes using your iPhone while driving much safer. This is a very useful feature if you link your iPhone with your own vehicle. However, because every car manufacturer utilizes CarPlay differently, do not use this feature to link your iPhone with someone else’s car or a rental car.
In some cases, as soon as a CarPlay link is established, content from various apps installed on your iPhone, including Contacts, Calendar, Music, and Messages, is transferred, synced, and stored within the car’s infotainment system. If this syncing process happens within a rental car, and you return the car without manually resetting the CarPlay feature within the vehicle, your entire Contacts database could be accessible by people who rent that vehicle in the future.
![]() More Info
More Info
For more information about the CarPlay feature, how to set it up, and how to use it with your vehicle, refer to the owner’s manual for your vehicle, check with your dealership, or visit www.apple.com/ios/carplay.
To determine which vehicle makes and models support CarPlay (the list is always expanding), visit www.apple.com/ios/carplay/available-models.
Don’t Ever Share Your iCloud Password
Many of the apps that come preinstalled with iOS 11, along with an ever-growing selection of third-party apps, now sync and share data with your free iCloud account. Because so much personal—and potentially private—information, documents, data, files, content, and photos are being stored in the cloud, it’s important to protect your iCloud account password information and not share it with anyone.
In most cases, your iCloud account username and password is the same as your Apple ID username and password. You should get into the habit of changing this password at least once per month, or more often if you believe your account password has been compromised.
As you learned from Chapter 7, “Use iCloud and the Files App,” in addition to manually storing data, documents, files, and photos within iCloud Drive (which is part of your iCloud account), you can set up iCloud to create and maintain a complete backup of your iPhone or iPad, plus sync app-specific data relating to Photos, Mail (your iCloud email account only), Contacts, Calendars, Reminders, Notes, Safari, News, Home, Game Center, Siri, iCloud Keychain, iBooks, Maps, and other popular apps.
While Apple and iOS 11 strongly encourages iPhone, iPad, Mac, Apple TV, and HomePod users to use iCloud, this is not a requirement. You can select which iCloud features to turn on. To do this, launch Settings, tap your profile photo/Apple ID username, and then tap the iCloud option to access the iCloud Control Panel.
From below the Apps Using iCloud heading, turn on the virtual switches for apps and features you want to use iCloud for. For features you don’t want to use, turn off the virtual switches. Figure 16.9 shows the iCloud Control Panel within Settings on an iPad Pro.
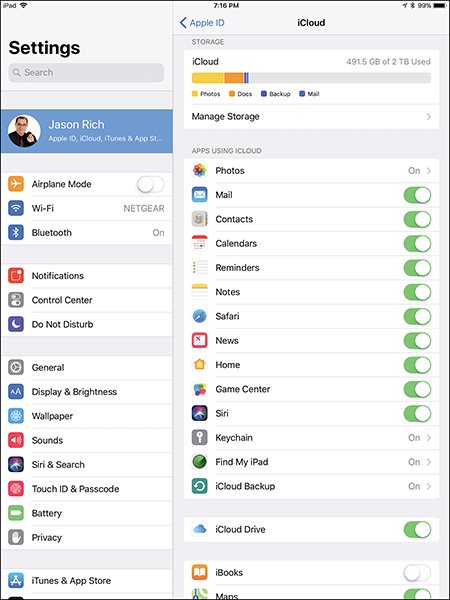
FIGURE 16.9
Determine which iCloud features you’d like to turn on and utilize from the iCloud Control Panel.
For all content to sync between all of your iOS mobile devices and Mac(s), the iCloud Control Panel settings need to be set up exactly the same way on each computer and device, and they need to be linked to the same iCloud account.
![]() Caution
Caution
You can also access online versions of several popular iOS 11/Mac apps by visiting www.icloud.com. When you sign in using your Apple ID/iCloud username and password, the online editions of the apps are populated with the latest version of your app-specific data.
Especially if you’re accessing iCloud.com from a computer that’s not your own, be sure to sign off from the website when you’re done using it. To sign out from the iCloud website, click your username/profile photo in the top-right corner of the browser window, and then click Sign Out.
![]() Tip
Tip
To change your Apple ID/iCloud password, from your iPhone or iPad, launch Settings, tap your Apple ID username/profile photo, and tap Password & Security. When promoted, enter your current Apple ID/iCloud password, and then tap the Change Password option. Follow the on-screen prompts. Alternatively, from any computer’s web browser, visit https://appleid.apple.com.
Turn On the Find My Feature
One of the iCloud features you should definitely turn on right away, if you haven’t already done so, is the Find My feature. As long as this feature is turned on, and your iPhone or iPad is powered on and connected to the Internet, you have the ability to track the exact location of your device if you lose it or it’s stolen. This feature only needs to be turned on once, and it only works when it’s turned on, so make sure to do so before your device gets lost or stolen.
To turn on the Find My feature, launch Settings, tap your Apple ID/iCloud username/profile photo, tap iCloud, and then scroll down within the iCloud Control Panel and tap Find My iPhone or Find My iPad. Turn on the virtual switch for the feature. From this submenu screen, turn on the virtual switch associated with the Send Last Location feature.
When turned on, if your iPhone or iPad battery is about to go dead, one of the last things the device does is transmit its exact location to your iCloud account, so you can access it using the Find My feature.
If you wind up needing to pinpoint the location of your lost or stolen iPhone or iPad, lock down the device, remotely erase its content, or handle a variety of related tasks, you have two options. From any computer’s web browser, visit www.icloud.com/#find, and sign into the website using your Apple ID/iCloud username and password, or from any other iOS mobile device, use the optional (free) Find My app, which is available from the App Store.
Don’t Use iCloud Keychain, Unless You’re the Only Person Using Your iPhone or iPad
If you’re the only person who uses your iPhone or iPad, and you have the Passcode and Touch ID (or Face ID) features turned on, iCloud Keychain is an extremely convenient feature to use because it automatically stores and remembers the usernames and passwords for the majority of websites you visit. The information is synced across all the computers and mobile devices that are linked to the same iCloud account.
For security reasons, iCloud Keychain does not remember passwords for online banking and online finance-related websites, but for online shopping websites you frequent, the app securely stores and remembers the credit card information you use when making purchases from specific sites.
The downside is that if more than one person uses your iPhone or iPad, iCloud Keychain allows others to automatically sign into websites as you, which is why you should turn off the feature if you allow others to use your mobile device.
![]() Tip
Tip
To turn on/off iCloud Keychain, launch Settings, tap your Apple ID username/profile photo, tap iCloud, and tap the Keychain option in the iCloud Control Panel. Turn on or off the virtual switch associated with this feature.
If you use multiple Apple computers and mobile devices, tap the Advanced option and also turn on the Approve with Security Code option. Now, when you activate iCloud Keychain on your other computers or mobile devices for the first time, you’re required to enter an iCloud Security Code that you’ve set. With this feature enabled, even if someone hacks your Apple ID and password, they still need the iCloud Security Code to activate or access your iCloud Keychain information, which is stored as a standalone encrypted file within your online-based iCloud account.
Turn On iCloud’s Two-Factor Authentication
During the initial iPhone/iPad setup process, after you enter your Apple ID and related password (which is also your iCloud username and password), you’re prompted to turn on Two-Factor Authentication, which is an optional feature. When the feature is turned on, anytime you enter your Apple ID and password for the first time on a new computer or mobile device, you’re required to verify your identity with a six-digital authentication code that is automatically displayed on one of your other computers or mobile device’s screen that is linked to the same Apple ID account. The code can be sent to your iPhone as a text message or email. To grant access to your iCloud account from the device you’re using, enter the six-digit code that’s sent to you.
In the future, you’re prompted for a new six-digit verification code if you sign out of your iCloud account from a device, erase your device, or opt to change your Apple ID/iCloud password.
Be Careful with Shared Online Content
You already know that iOS 11 and many of the apps you’ll be using with your iPhone or iPad store, sync, and allow you to share data, documents, photos, and/or files with your online-based iCloud account, or with another cloud-based file storage/file sharing service.
Using the new Files app or the official Dropbox app (if you have a Dropbox account), for example, you’re able to share individual files, or entire folders or subfolders, that are stored online with specific other people. After you share a file, folder, or subfolder with someone else (or with multiple people), those other people have access to that content from their own computer(s) and/or mobile device(s) until you revoke their access.
As a cloud-computing user, it’s your responsibility to keep track of which files, folders, and subfolders you’re sharing with other people and to grant or revoke access to content as you deem necessary. It’s also your responsibility to ensure that you populate folders or subfolders that you opt to share with the correct data, documents, files, content, or photos. Human error is the greatest cause of people accidently being granted access to information they shouldn’t be given access to because the user accidently drag and drops, copies and pastes, or somehow transfers specific files or content into the wrong folder or subfolder.
Each time you opt to share content using the Files app, or any other cloud computing app, double-check that you’ve selected the correct files to share and that you’ve placed them into the correct folder (or subfolder) to be shared. Next, confirm that the file(s), folder(s), or subfolder(s) are set up to be shared with the correct people.
If you often use a particular file-sharing tool, you might want to get into the habit of reviewing your entire cloud-based account once per day, once per week, or, at the very least, once per month, to double-check that all files are stored in the correct places and that you have not accidently granted access to the wrong people to access specific content or files they were not intended to see or have access to.
Don’t Worry About “Ransomware” or Viruses on Your iPhone or iPad
One of the great things about working with an iOS mobile device is that it’s extremely difficult, if not almost impossible, for a hacker or cybercriminal to remotely install a virus onto your iPhone or iPad. That’s the good news!
The bad news is that some more creative hackers have discovered ways to trick iPhone and iPad users into thinking their mobile device has been infected by malware or ransomware. If this happens to you, do not call the phone number that appears on your screen, and do not agree to pay a fee to have the “virus” removed from your smartphone or tablet.
In the majority of cases, the hackers are manipulating the Safari web browser and locking it up, but there is almost always an easy (and free) way to fix the problem. If you run into this type of problem, call AppleCare+ (800-275-2273 or 800-MY-iPHONE), or visit any Apple Store. An Apple Genius should be able to correct the issue quickly.
![]() More Info
More Info
You can find step-by-step directions for how to deal with ransomware pop-ups and web pages on an iPhone or iPad on Apple’s website at https://discussions.apple.com/docs/DOC-8071.
Always use Common Sense
Compared to older versions of iOS running on older model iPhones and iPads, iOS 11 running on newer model smartphones and tablets offers more advanced security tools and built-in protections than ever before, which makes it easier to protect your mobile device, data, content, files, photos, and identity.
In addition to the technology-based tools and resources at your disposal, however, always use common sense! In other words, never give out your Apple ID username and password, your iPhone/iPad passcode, or any other usernames and passwords to other people, especially strangers.
Meanwhile, before you start using any cloud-based service to share private or sensitive information, make sure you understand how the service works and how to customize the various privacy, permission, and security settings.
When you’re using social media—like Facebook, Twitter, Instagram, SnapChat, LinkedIn, Pinterest, or any other online service—be sure to manually set up the privacy and security settings to a level you’re comfortable with. By default, these services are typically set up so when you establish your account, everything about your account, and everything you publish online, is public.
Take the time to determine who you want to see your online postings and photos and adjust the settings of your various social media accounts (using the mobile apps for each account) accordingly. Then as you communicate with your online friends, particularly people you’ve never met in person, never share too much personal information about yourself.
![]() Caution
Caution
When using any social media service, never provide personal information, such as your Social Security number, driver’s license number, account password, debit or credit card details, or too much information about your private life, with people you communicate with online.
If you opt to share “private” photos with other people, keep in mind that with a single tap of the Share button, the person you’ve shared your private photos with can easily make them public or distribute them to whomever they want. This can all be done from a mobile device, so use common sense about what you share online, whether you’re participating in a public forum or communicating with someone privately using social media, email, or the Messages app.
![]() Note
Note
Check out online Chapter 17, “Customize Your Reading Experience with the iBooks and News Apps,” by visiting www.informit.com/tipsandtricksios11.