2. Customize Your iPad or iPhone
In this Chapter
![]() Personalizing your iPhone or iPad by adjusting the options available from within Settings
Personalizing your iPhone or iPad by adjusting the options available from within Settings
![]() Customizing the Lock screen and Home screen
Customizing the Lock screen and Home screen
![]() Customizing and using Control Center
Customizing and using Control Center
![]() Getting to know what’s possible from the Lock screen, Dock, and App Switcher
Getting to know what’s possible from the Lock screen, Dock, and App Switcher
More than ever before, users are able to customize their iPhone or iPad beyond personalizing the appearance of the Lock screen, Home screen, Dock, and Control Center. Now you can control more options within Settings that allow for greater privacy and security.
This chapter focuses on personalizing and customizing your iOS mobile device and gets you acquainted with a selection of the most popular or useful options available from within Settings, Control Center, Notification Center, Spotlight Search, and the App Switcher.
Spotlight Search enables you to quickly find any information or content stored locally within your mobile device or that you have stored within a cloud service linked with the Files app. When necessary, this search tool can also scour the Internet to find information you’re looking for.
One of the ways to access Spotlight Search is from the Home screen. Place your finger near the middle of the screen and swipe down. You see the Search field at the top-center of the screen (see Figure 2.1), along with Siri App Suggestions.
If you make the appropriate adjustments in Settings, you also can access Spotlight Search by swiping to the right on the Lock screen (without first unlocking your device).
On the Spotlight Search screen (and on an iPad’s Dock), iOS 11 displays a few of your most recently used apps, recommendations for apps your mobile device thinks you might want to use next, and apps you were just using on another Mac or iOS mobile device linked to the same iCloud account (when the Handoff feature is active).
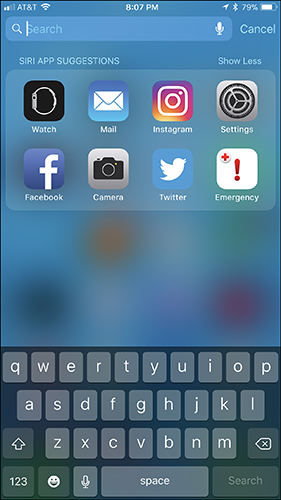
FIGURE 2.1
The Spotlight Search feature is accessible from the Home screen.
Depending on which model iPhone or iPad you’re using, the options available from the main Settings menu (and all submenus within Settings) vary. If you read in this book about an option that’s not listed in the Settings menu or a Settings submenu on your own devices, it typically means that feature isn’t available on the model iPhone or iPad you’re using.
One of the first things you should do when you begin working with a new iPhone or iPad is to launch Settings and invest the time necessary to manually review and customize each of the available options. Once you make changes within Settings, they remain saved and active until you manually alter them.
![]() Note
Note
If apps you install enable you to customize specific features within the app, those customization options often are available to you from within Settings.
![]() Note
Note
To customize iCloud-related functions, including Family Sharing and iCloud Drive, launch Settings, tap your profile photo/username, and then tap the iCloud option to reveal the iCloud Control Panel.
More about using iCloud with your iOS mobile device is covered in Chapter 7, “Use iCloud and the Files App.”
Using the Settings App
You launch Settings by tapping the Settings app icon on the Home screen. The main Settings menu is displayed (see Figure 2.2). In most cases, you need to tap one of the displayed options to reveal a submenu related to a specific iOS 11 feature, function, or app. The menus and submenus are displayed in a hierarchical structure.
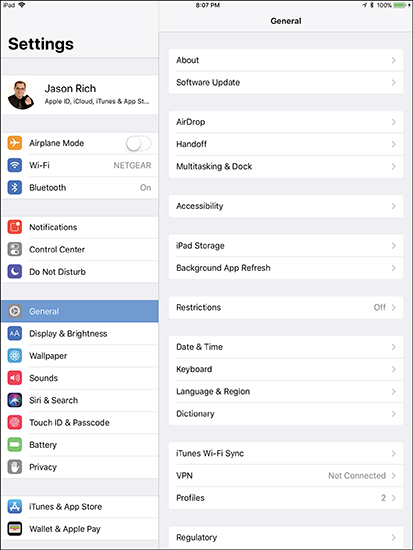
FIGURE 2.2
To launch Settings, tap the Settings icon from the iPhone or iPad’s Home screen.
![]() Tip
Tip
To quickly find a feature or function you want to adjust while in Settings, use the Search field that’s displayed at the top of the main Settings menu. If the Search field isn’t visible, place your finger anywhere on the main Settings menu and swipe down.
Type a keyword associated with the feature or function you’re looking for, such as Wallpaper, Handoff, or Low Power Mode.
![]() Tip
Tip
When a Settings option’s virtual switch is positioned to the right and you see green (see Figure 2.3), that option is turned on. When the switch is positioned to the left, it’s turned off. Tap the switch to toggle its setting on and off.
When a right-pointing arrow (>) is displayed to the right of an option, that feature has a submenu; tap the right-pointing arrow or its listing to open the submenu.
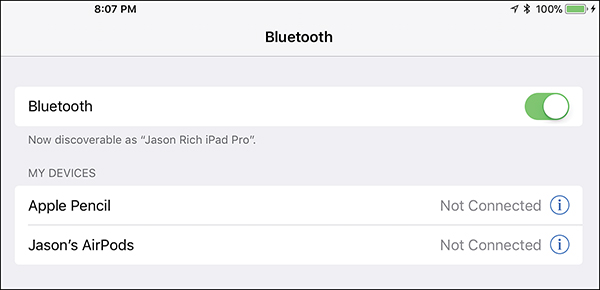
FIGURE 2.3
To turn on a feature, the switch should be positioned to the right and green should be showing.
As you work your way deeper into each submenu, a left-pointing arrow (<) icon appears near the upper-left corner of each submenu screen. It enables you to exit out of each Settings submenu and move a step back toward the main Settings menu. If you’ve made adjustments, those changes are automatically saved when you exit out of the menu or submenu within Settings. If you exit out of a menu or submenu without making any changes, nothing is altered.
On all iPhone and iPad models, except for the iPhone X, press the Home button once to exit out of Settings entirely (and, if applicable, save your changes). If you’re using an iPhone X, use a single swipe up from the bottom of the screen to access the Home screen from anywhere.
The following sections describe the most commonly used options available from the Settings main menu. Remember, these options vary slightly, based on which model iPhone or iPad you’re using and the hardware configuration of that device.
![]() Tip
Tip
To access anything having to do with your Apple ID and iCloud, from the main Settings menu, tap your profile photo/username to reveal the Apple ID submenu. From here, tap iCloud to access the iCloud Control Panel and manage all things having to do with using iCloud in conjunction with the iPhone or iPad you’re currently using. Read more information about using iCloud in Chapter 7.
Airplane Mode
This feature applies to all iPhones and iPads. The Airplane mode option has no submenu; it simply offers one virtual on/off switch. When Airplane mode is turned on, a small airplane icon appears in the upper-left corner of the screen.
Airplane mode shuts down your iPhone or iPad’s ability to communicate in any way (wirelessly) with other devices, a cellular network, or the Internet. Once in Airplane mode, you can then turn Wi-Fi or Bluetooth back on manually, while keeping cellular connectivity turned off.
After your device is placed into Airplane mode, you can still turn on Wi-Fi or Bluetooth after the fact, enabling the iOS device to access the Web via a Wi-Fi hotspot (to use the wireless web access available on some commercial aircrafts, for example), and also communicate with a Bluetooth-enabled wireless keyboard, external speaker(s), wireless headphones, a printer, or phone headset.
![]() Tip
Tip
When you turn on Airplane mode, the Wi-Fi and Bluetooth features of your iPhone or iPad get turned off automatically. You can, however, turn them back on manually while still in Airplane mode. Do this from within Settings or Control Center.
Wi-Fi
When you tap this option, a submenu containing a virtual on/off switch is displayed. When it’s turned on, a listing of available Wi-Fi networks (hotspots) is displayed directly below the Choose a Network heading.
![]() Tip
Tip
When you’re reviewing a list of available Wi-Fi networks, look to the right side of each listing for a lock icon. This indicates that the Wi-Fi hotspot is password protected. Tap a hotspot that does not display a lock icon, unless you possess the password for that network.
Also on the right side of each listing is the signal strength of each Wi-Fi hotspot in your immediate area. When given the option, choose a network with the strongest signal for the fastest web-surfing experience.
To choose any Wi-Fi hotspot listed, tap its listing. In a few seconds, a check mark appears to the left of your selected Wi-Fi hotspot and a Wi-Fi signal indicator appears in the upper-left corner of your device’s screen, indicating that a Wi-Fi connection has been established.
If you select a Wi-Fi network that is password protected, you will see an Enter Password window the first time you tap that network. Using the device’s virtual keyboard, enter the correct password to connect to the network you selected. You will often have to do this when connecting to a public Wi-Fi hotspot offered in a hotel or at a private business, for example.
![]() Tip
Tip
If you leave the Wi-Fi option turned on, your iPhone or iPad can automatically find and connect to an available Wi-Fi hotspot based on whether you have the Ask to Join Networks option turned on or off. When the Ask to Join Networks feature is turned off, your iPhone or iPad reconnects automatically to wireless networks and Wi-Fi hotspots that you have connected to previously, such as each time you return to your home or office.
![]() Note
Note
If you attempt to access a public Wi-Fi hotspot—in an airport, library, or school, for example—you might be required to accept terms of a user agreement before Internet access is granted. In this case, your iOS device says it’s connected to a Wi-Fi hotspot, but until you launch Safari and accept the user agreement terms, your other apps, including Mail, aren’t able to access the Internet.
![]() Caution
Caution
The main drawback to using a Wi-Fi connection is that a Wi-Fi hotspot must be present, and you must stay within the signal radius of that hotspot to remain connected to the Internet. The signal of most Wi-Fi hotspots extends for only several hundred feet from the wireless access point (the Internet router). When you go beyond this signal radius, your Internet connection is lost.
For example, if you want to fully utilize the Maps app for real-time, turn-by-turn navigation directions, you must have a cellular data connection. If you try using this feature with a Wi-Fi connection, as soon as you move out of the signal’s radius, the Internet connection is dropped and your mobile device can’t pinpoint your location or gather related information from the Internet.
Bluetooth
Turn on Bluetooth functionality to use compatible Bluetooth devices, such as an Apple Watch, HomePod, AirPods, any wireless headset (or headphones), an external keyboard (unless it’s an Apple Smart Keyboard), some printers, or wireless speakers.
In Settings, tap Bluetooth, and then turn on the virtual switch in the submenu. The first time you use a particular Bluetooth device with your iOS mobile device, you will probably need to pair it. Follow the directions that came with the device or accessory to perform this initial setup task. Some Bluetooth devices, like AirPods, automatically pair with your iOS device. The pairing process should take less than 15 seconds.
After you’ve paired a device, as long as it’s turned on and in close proximity to your iOS device, and the iOS device has the Bluetooth feature turned on, the two devices automatically establish a wireless connection and work together.
![]() Tip
Tip
If you’re using your iPhone or iPad without having a Bluetooth device connected, and you do not want to use the Handoff feature built in to iOS 11, turn off the Bluetooth feature. This helps extend the battery life of your iOS device.
Cellular
The Cellular submenu includes several settings you can control. When Cellular Data is turned on, your iOS mobile device can access the 3G/4G/LTE cellular data network from the cellular service provider to which you’re subscribed. When this option is turned off, your device can access the Internet only via a Wi-Fi connection, assuming that a Wi-Fi hotspot is present.
Tap the Cellular Data Options listing to turn on or off cellular data roaming. When turned on, Data Roaming enables your iPhone or iPad to connect to a cellular network outside the one you subscribe to through your wireless service provider. The capability to tap in to another wireless data network might be useful if you must connect to the Internet, there’s no Wi-Fi hotspot present, and you’re outside your own service provider’s coverage area (such as when you’re traveling abroad).
![]() Caution
Caution
When your iPhone or iPad is permitted to roam (the Data Roaming option is turned on), you will incur hefty roaming charges, often as high as $20 per megabyte (MB). Refrain from using this feature unless you’ve purchased a cellular data roaming plan through your service provider, or be prepared to pay a fortune to access the Web.
Depending on your service provider, you might be able to transform your iOS device into a personal hotspot so other devices can connect wirelessly to the Internet via Wi-Fi using your iPhone or iPad’s cellular data connection. If your provider allows, this option is available from the Cellular submenu of Settings. Tap the Personal Hotspot option, turn it on, and then set up a Wi-Fi password.
![]() Note
Note
Scroll down within the Cellular submenu within Settings to determine which apps can access your iPhone or iPad’s cellular data connection (as opposed to using only Wi-Fi to access the Internet). When an app listing’s virtual switch is turned on, that app can use a cellular data connection. When it’s turned off, that app must rely exclusively on Wi-Fi Internet connectivity when it’s available.
Notifications
From the Notifications submenu in Settings (see Figure 2.4), you’re able to determine which apps function with Notification Center, and you can determine the other ways in which apps that generate alerts, alarms, or notifications notify you. This applies to preinstalled apps as well as most other apps you install from the App Store.

FIGURE 2.4
All apps that are capable of exchanging data with Notification Center are listed under the heading Notification Style.
Widgets are associated with certain specific apps that get displayed in Notification Center and on the Today screen (see Figure 2.5). When you use an app’s widget, you can quickly manage or handle tasks associated with that app without manually launching the app. When looking at the Today screen, scroll down and tap the Edit button to set up and configure available widgets. Not all apps have widgets associated with them.
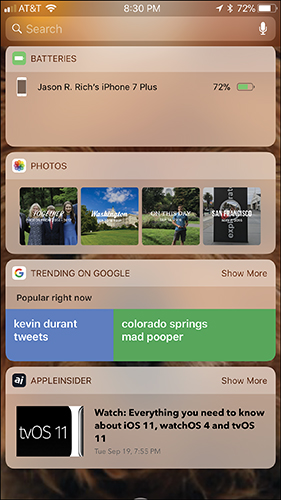
FIGURE 2.5
Widgets give you quick access to app-specific functions and information from the Today screen, which is accessible from the Lock screen or Notification Center.
When you tap the Notifications option in Settings, a listing of all apps capable of generating alerts, alarms, and notifications is displayed below the Notification Style heading. Tap each item to customize notifications for that app (see Figure 2.6).
Later, as you install additional apps onto your device from the App Store, return to this menu to adjust Notifications related to those apps as well.
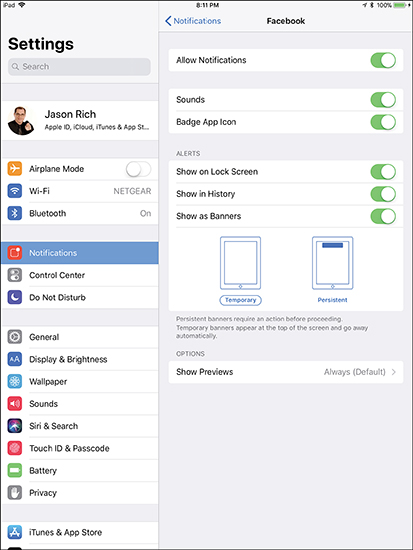
FIGURE 2.6
Customize how each compatible app will get your attention using alerts, alarms, or notifications.
![]() Tip
Tip
When you tap an app in the Notification Style list, the first option is labeled Allow Notifications. When turned on, this app shares information with Notification Center. When turned off, no alerts, alarms, or notifications will be generated by that app.
The following list describes the different types of notification options:
![]() Sounds—Determines whether the app will be able to generate audible alerts or alarms to get your attention. When turned off, the selected app remains silent but can generate on-screen notifications (if you enable those settings).
Sounds—Determines whether the app will be able to generate audible alerts or alarms to get your attention. When turned off, the selected app remains silent but can generate on-screen notifications (if you enable those settings).
![]() Badge App Icon—For compatible apps, when a new alert or notification is generated, a number displays on the app icon on the Home screen. For example, when used with the Mail or Messages app, the Badge App Icon displays the number of new, unread messages you’ve received.
Badge App Icon—For compatible apps, when a new alert or notification is generated, a number displays on the app icon on the Home screen. For example, when used with the Mail or Messages app, the Badge App Icon displays the number of new, unread messages you’ve received.
A badge is a small red-and-white circle in the upper-right corner of an app icon on your device’s Home screen. The badge contains a number that shows you that something relating to a specific app has changed. For example, a badge appears on the App Store app icon when one of more of your apps requires an update.
![]() Show on Lock Screen—Notifications generated by the app are displayed on the Lock screen as well as within the Notification Center. This allows anyone who happens to look at your screen to see notifications, such as the first few lines of an incoming email or text message, or Caller ID information for an incoming call.
Show on Lock Screen—Notifications generated by the app are displayed on the Lock screen as well as within the Notification Center. This allows anyone who happens to look at your screen to see notifications, such as the first few lines of an incoming email or text message, or Caller ID information for an incoming call.
![]() Show in History—Notifications from compatible apps are listed on screens that show your history of using the iPhone or iPad.
Show in History—Notifications from compatible apps are listed on screens that show your history of using the iPhone or iPad.
![]() Show as Banners—Notifications are displayed as one of two types of banners: Temporary and Persistent. When you choose Temporary, the app displays a banner at the top of the screen for each new alert or notification, but the banner automatically disappears after a few seconds. When you choose Persistent, the banner remains on the screen until you manually swipe it away with your finger.
Show as Banners—Notifications are displayed as one of two types of banners: Temporary and Persistent. When you choose Temporary, the app displays a banner at the top of the screen for each new alert or notification, but the banner automatically disappears after a few seconds. When you choose Persistent, the banner remains on the screen until you manually swipe it away with your finger.
![]() Show Previews—A preview of the message or notification is displayed, such as the first few lines of an incoming email or text message.
Show Previews—A preview of the message or notification is displayed, such as the first few lines of an incoming email or text message.
Some apps have additional notification options. For example, the Calendar submenu under Notifications (see Figure 2.7) displays a submenu that enables you to separately customize alerts, alarms, and notifications related to Upcoming Events, Invitations, Invitee Responses, Shared Calendar Changes, and Siri Found in Apps. The submenu that appears for each of these options (see Figure 2.8) enables you to determine where related notifications are displayed, and which alert style should be used.
![]() Note
Note
The Siri Found in Apps option allows you to use voice commands to find content stored within an app. For example, you can ask Siri, “What time is my next meeting?” or “Where is my next meeting?” and Siri accesses the Calendar app to find this information, assuming you’ve granted Siri access to the Calendar app.
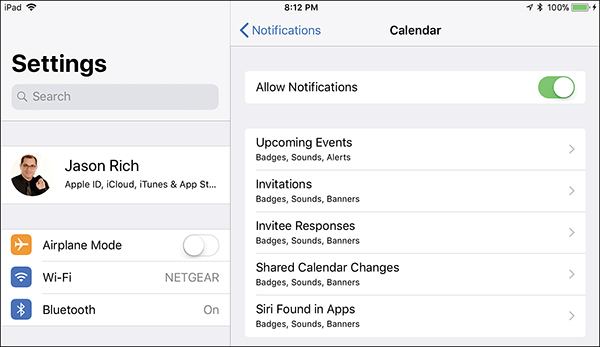
FIGURE 2.7
Depending on the app, there can be several levels of submenus that enable you to customize how each app exchanges information with Notification Center.
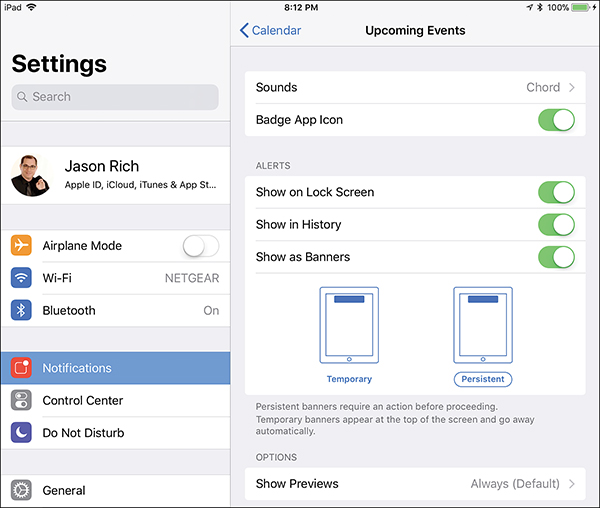
FIGURE 2.8
iOS 11 options give you control over what information is displayed by Notification Center, plus you can choose how, when, and where that information is displayed.
Use these quick tips to manage the Notification Center:
![]() Avoid getting bombarded by excessive notifications from apps that aren’t too important to you by manually setting Notification Center to work only with apps that you deem important. Turn off notifications for all other apps.
Avoid getting bombarded by excessive notifications from apps that aren’t too important to you by manually setting Notification Center to work only with apps that you deem important. Turn off notifications for all other apps.
![]() At the very bottom of the Notification Center settings submenu on the iPhone are two features: AMBER alerts and Emergency Alerts. When turned on, if the government issues an AMBER alert in your area or a message is broadcast over the Emergency Broadcast System, an alert appears on your device.
At the very bottom of the Notification Center settings submenu on the iPhone are two features: AMBER alerts and Emergency Alerts. When turned on, if the government issues an AMBER alert in your area or a message is broadcast over the Emergency Broadcast System, an alert appears on your device.
![]() To protect your privacy, consider setting up Notification Center to refrain from having alerts displayed on your Lock screen. To do this, tap each app under the Notifications Style heading, and turn off the Show on Lock Screen option.
To protect your privacy, consider setting up Notification Center to refrain from having alerts displayed on your Lock screen. To do this, tap each app under the Notifications Style heading, and turn off the Show on Lock Screen option.
![]() The options for available notifications vary by app. For example, for the Messages app, you can assign Notification Center to display message previews on the Lock or Home screens, plus repeat alerts between 0 and 10 times at 2-minute intervals to get your attention.
The options for available notifications vary by app. For example, for the Messages app, you can assign Notification Center to display message previews on the Lock or Home screens, plus repeat alerts between 0 and 10 times at 2-minute intervals to get your attention.
Control Center
The redesigned Control Center (shown on an iPhone in Figure 2.9) grants you quick access to a handful of smartphone- or tablet-related functions and apps. For the first time, you can customize Control Center to display app icons and give you quick access to apps and iOS 11 features/functions you use most often.
To display Control Center, no matter what you’re doing on any iPhone (except for the iPhone X), place your finger near the very bottom of the screen and swipe up.
On the iPad, quickly press the Home button twice to make the Control Center and App Switcher appear. If you’re using the iPhone X, access the Control Center by placing your finger near the top-right corner of the display and swiping down.
From within Settings, however, tap the Control Center option, and then tap Customize Controls to determine which iOS 11 features/functions and which app icons will be displayed within the Control Center (see Figure 2.10).
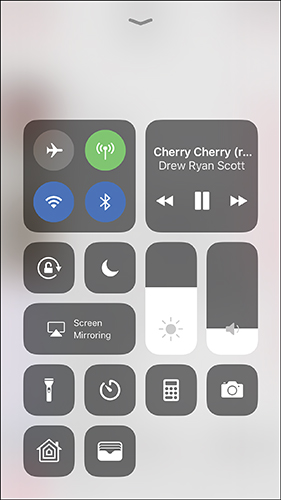
FIGURE 2.9
The redesigned Control Center gives you quick access to a bunch of commonly used features and functions.
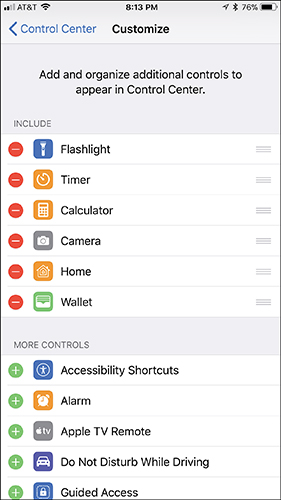
FIGURE 2.10
Use Settings to customize what functions and apps are accessible from the Control Center.
The app icons and iOS 11 features/functions that will be displayed as part of Control Center are displayed below the Include heading. To remove any of these options, tap on the – icon for a listing.
To add a function or app icon to the Control Center, look below the More Controls heading and tap the + icon associated with a specific listing.
Once you’ve added all of the functions and app icons you desire to the Control Center, use the Move icons (the three lines) to rearrange the order in which the tools and app icons are displayed within Control Center.
Do not Disturb
The Do Not Disturb feature, which is discussed in Chapter 1, “Discover iOS 11 and the Newest iPads and iPhones,” enables you to temporarily turn off your iPhone or iPad’s capability to notify you about incoming calls, text messages, and app-specific alerts, alarms, or notifications when the device is in Sleep mode (locked) or while the device is being used. Read Chapter 1 for more information.
General
When you tap the General option in Settings, various additional options become available. For example, from here you can access the Software Update feature to update your iOS whenever Apple releases an update. You also can customize options related to AirDrop, Handoff, CarPlay, and how the Home button is used (on all devices except for the iPhone X). This submenu also provides access to your iPhone or iPad’s Accessibility options, iPhone/iPad Storage options, the Restrictions feature, and time/date, keyboard, and language options (refer to Figure 2.2).
![]() What’s New
What’s New
The Offload Unused Apps option allows your iPhone/iPad to automatically delete apps from your device that you never use, which frees up internal storage space. When this feature is turned on, any app-specific data, documents, or files remain saved.
To turn on this feature, launch Settings, tap General, tap iPhone/iPad Storage, and then tap Offload Unused Apps . The first time you do this, you see a message indicating how much internal storage space can be saved by removing unused apps (see Figure 2.11).
You can always reinstall an app from the App Store, if and when you decide to use it.
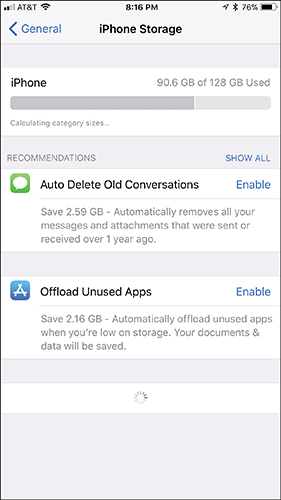
FIGURE 2.11
Use the Offload Unused Apps feature to free up internal storage space within your iPhone or iPad.
![]() Note
Note
A growing number of popular car manufacturers are making their vehicles compatible with the iPhone via the CarPlay feature. Only turn on this feature if you drive a car that’s compatible with it. For privacy reasons, do not use CarPlay in conjunction with a rental car or someone else’s vehicle.
When your iPhone is linked with your vehicle, you can activate Siri, control the Music app, or access other apps while driving simply by pressing the Siri button on your steering wheel or tapping various options displayed on your vehicle’s infotainment center screen.
Every car manufacturer interacts with CarPlay differently, so check the owner’s manual for your car to determine what’s possible. Tap the CarPlay option under the General menu in Settings to customize the feature and link your iPhone with your vehicle, if applicable.
![]() Note
Note
The Accessibility menu option displayed under the General menu of Settings gives you access to an extensive list of customization options that are designed for people with vision, hearing, or physical limitations.
Every so often, you might run into a problem with your iPhone or iPad that results in a system crash or the need to reset specific settings. For example, to restore your iPhone or iPad to its factory default settings and erase everything stored within it, tap the Reset option, tap the Erase All Content and Settings option, and then follow the on-screen prompts.
![]() Tip
Tip
In general, you should refrain from using any of the Reset setting unless you’re instructed to do so by an Apple Genius or a technical support person. If you upgrade to a new iOS mobile device and want to return your old device to factory settings and erase all of your data and content so you can safely give away or sell the device, use the Erase All Content and Settings option in the Reset submenu of Settings.
![]() Caution
Caution
Before using any of the options found under the Settings Reset option, which could potentially erase important data from your iPhone or iPad, be sure to perform a manual iCloud backup or iTunes sync and create a reliable backup of your device’s contents.
Display & Brightness
The Display & Brightness options enable you to control the brightness of your iPhone or iPad’s screen, plus customize the default text size and type style. In general, you should leave the virtual switch for the Auto-Brightness feature turned on and then use the Brightness slider only when you manually need to adjust the screen to accommodate a specific lighting situation.
![]() Tip
Tip
From the Display & Brightness submenu in Settings, you can activate and customize the Night Shift screen viewing feature. When turned on, this feature adjusts the onscreen colors and brightness that are displayed to make viewing the screen less strenuous on your eyes when you’re using the iPhone or iPad at night or in a low-light area.
If you often use your iPhone or iPad at night, while lying in bed before you go to sleep, for example, be sure to turn on the Night Shift feature.
The customization options offered within Settings enable you to auto-schedule the Night Shift feature to turn on at sunset and turn off at sunrise. Alternatively, you can set the specific times this feature automatically turns on and off by tapping the Night Shift listing to access the Night Shift submenu. From the Night Shift submenu, use the Color Temperature slider to manually adjust the warmth of the color palette used when the feature is turned on.
Wallpaper
You can choose a custom graphic to be used as the wallpaper behind your device’s Lock and Home screen. Tap Wallpaper to adjust this.
![]() Note
Note
Your iPhone or iPad has more than two dozen preinstalled wallpaper designs built in, plus you can use any digital images stored in the Photos app as your Lock screen or Home screen wallpaper. Figure 2.12 shows the Choose (Wallpaper) submenu.

FIGURE 2.12
Tap the Choose a New Wallpaper option to select a new graphic or photo to be used behind your Lock or Home screen as a wallpaper.
To change the wallpaper, tap Choose a New Wallpaper. Tap the Dynamic, Stills, or Live thumbnail to reveal iOS 11’s built-in Wallpaper options, or select a photo from an album that’s listed under the Photos heading.
Live wallpapers (available for the latest iPhone models only) animate when you place your finger on them as they’re being displayed in the Lock or Home screen. They work better on the Lock screen where they’re not covered with app icons.
If you choose a preinstalled graphic, follow the on-screen prompts to select and save your options for the Lock or Home screens.
If you prefer, you can use a picture that’s in your Photos app. To select one of your own photos to use as your Lock screen or Home screen wallpaper, tap the Wallpaper option in Settings and then tap Choose a New Wallpaper. Next, tap an album thumbnail to reveal images stored within the Photos app.
Tap the thumbnail that represents the image you want to use as your wallpaper. On the preview screen, use your finger to move the image around on the screen and to zoom in or out. (The Perspective Zoom On/Off option is displayed in the lower-right corner of the preview screen to let you know whether you can adjust the zoom on the photo.)
Tap the Set option to save your selection. Figure 2.13 shows a custom Lock screen on an iPhone, and Figure 2.14 shows a custom Home screen on an iPad.
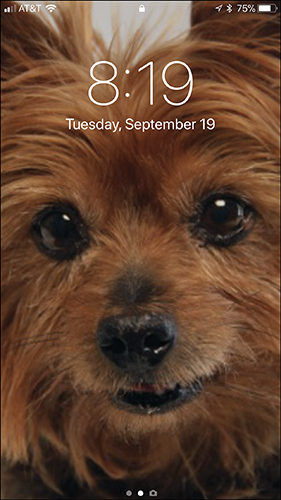
FIGURE 2.13
A newly selected Lock screen graphic, chosen from a photo stored on an iPhone (in the Photos app).
FIGURE 2.14
A still wallpaper selected from within Settings is displayed as the Home screen wallpaper behind the app icons (shown here on an iPad).
![]() Caution
Caution
If the image you opt to use is not sized appropriately for both the portrait and landscape aspect ratio on the iOS mobile device’s screen, the image can appear distorted or not fill the entire screen when you rotate your device.
Sounds
Tap this option to adjust the overall volume of the iPhone or iPad’s built-in speaker (or the volume of the audio you hear through headphones), as well as to turn on or off various audible tones and alarms your phone or tablet generates.
From this menu, you can assign specific audio tones, sounds, or ringtones to specific types of app-specific alerts and alarms. You also can turn on or off the click noise associated with pressing keys on the iPhone or iPad’s virtual keyboard.
Turn on the Vibrate mode so that the iPhone handset shakes instead of or in addition to playing a ringtone. You can control the ringer volume using an onscreen slider and adjust the custom ringtones and audio alerts associated with various features and functions of your iPhone. Your device has a built-in library of different alerts and ringtones, plus you can download additional ringtones from the iTunes Store.
![]() Tip
Tip
Manually adjust the ringer and speaker volume using the Volume Up and Volume Down buttons located on the left side of your iPhone or iPad. Alternatively, you can use the volume controls in the Control Center. Some apps, like Music and TV, also display an in-app volume control slider.
Siri & Search
The Siri feature enables you to communicate with and issue commands to your iPhone or iPad using your voice. From the Siri submenu in Settings (see Figure 2.15), you can fully customize this feature.
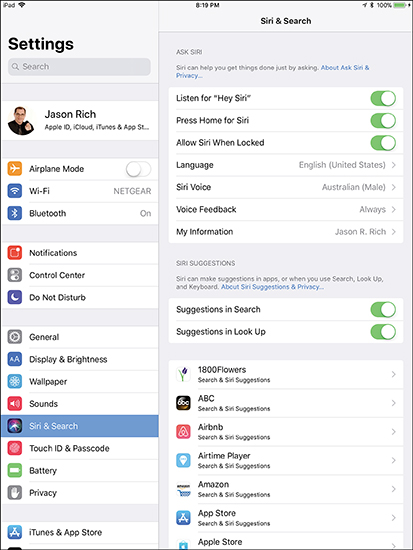
FIGURE 2.15
Customize Siri functionality from the Siri submenu in Settings.
On many newer iPhone and iPad models, Siri can always be waiting for you to say, “Hey Siri,” from anywhere nearby to activate the Siri feature and then issue a spoken command. Otherwise, it’s necessary to press and hold the Home button for about two seconds to activate Siri.
From the Siri submenu within Settings, select the primary language Siri understands, choose between giving Siri a male or female voice, and select Siri’s accent—American, Australian, or British. You can also determine which apps Siri has access to when providing you with information or responses to your queries.
![]() Note
Note
To learn more about how to use Siri, see Chapter 4, “Say It and Make It So Using Siri.”
Touch Id (or Face Id) & Passcode
You need to manually enter your iPhone or iPad’s passcode to access this submenu (see Figure 2.16). Determine whether your device’s Touch ID (Home button sensor) can be used to identify your fingerprint to unlock the device or approve online purchases. Plus, turn on the Apple Pay option to activate Apple Pay on compatible devices. Tap Add a Fingerprint to securely scan and store your fingerprint(s). These fingerprint scans cannot be accessed by Apple or third parties.
Scroll down on the Touch ID & Passcode submenu to access options that enable you to decide which features, if any, will be accessible from the Lock screen (while the device is still locked).
For an added layer of protection against someone hacking into your iPhone or iPad, turn on the virtual switch associated with Erase Data. When turned on, if someone enters the wrong passcode 10 times in a row, the device automatically erases itself. As the device’s primary user, you can later restore the device from an iCloud Backup or iTunes Sync Backup once you recover it.
![]() What’s New
What’s New
If you’re using an iPhone X, when you tap Face ID & Passcode from the Settings menu, you’re granted access to a variety of features for activating and customizing the smartphone’s face recognition feature.
![]() Note
Note
Older iOS mobile devices not equipped with Touch ID or Face ID simply have a Passcode option available to them in Settings.
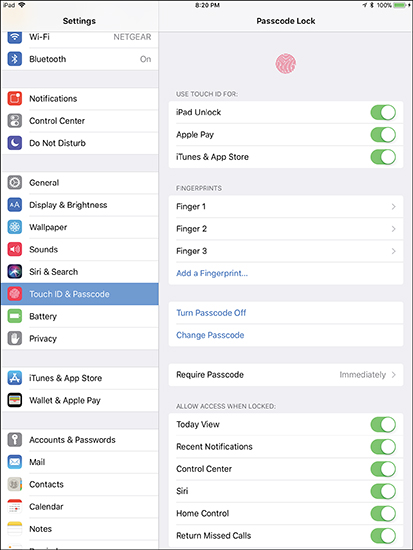
FIGURE 2.16
Customize how the Touch ID sensor will be used on your iPhone or iPad.
Battery
This submenu enables you to display the battery life percentage remaining on your device in the top-right corner of the screen in addition to the Battery Status Bar. From the Battery submenu within Settings, you can also see how individual apps that are running on your iPhone or iPad are affecting the device’s overall battery life. Tap the Last 24 Hours or Last 7 Days tab, and then view the apps listed below the Battery Usage heading if you’re wondering why your iPhone or iPad’s battery is draining too quickly. You can extend battery life by shutting down specific apps and keeping them from running in the background when you’re not using them.
Privacy
This menu option in Settings gives you privacy control in terms of how information is shared between apps and shared with other people. See Chapter 16, “iOS and Apple Pay Security and Privacy Strategies,” for more information about how to best use these tools to protect your privacy and security when using your iPhone or iPad.
iTunes & App Store
Choose which Apple ID account you want to associate with the iPhone or iPad you’re using, and manage that account by tapping the Apple ID option displayed near the top of this menu.
From below the Automatic Downloads heading, determine whether the device you’re using will automatically download content acquired from other computers or mobile devices that are linked to the same iCloud (Apple ID) account. This relates to Music, Apps, Books/Audiobooks, and App Updates acquired from the iTunes Store, iBook Store, and App Store.
Wallet & Apple Pay
If you’re using one of the more current iPhone or iPad models that has a Touch ID sensor built in to the Home screen (or an iPhone X with Face ID), use the options available from the Wallet & Apple Pay submenu to set up the Apple Pay feature and the Wallet app (on the iPhone).
This process involves linking one or more of your credit or debit cards to Apple Pay so that you can authorize purchases when you’re shopping at retail stores, shopping on the iTunes Store, shopping on compatible websites, or making purchases through certain third-party apps.
![]() Note
Note
See Chapter 16 for more information on using Apple Pay with your iPhone and iPad to make secure payments online or at a participating retail store or restaurant.
![]() What’s New
What’s New
Starting in early 2018, Apple Pay will allow users to instantly send or receive cash from other Apple Pay users via the Messages app.
On compatible iPhones, to speed up making payments using Apple Pay in stores, turn on the Double-Click Home Button option. Then from the Lock screen, quickly press the Home button twice to launch the Wallet app and select the stored debit or credit card with which you want to pay. When this option is turned off, you must manually launch the Wallet app from the Home screen.
If you’re using an iPhone X, to quickly activate the Wallet app to make an Apple Pay payment, press the side button twice.
From under the Transaction Defaults heading, choose a default debit or credit card to use with Apple Pay transactions, plus store your default shipping address, email, and phone number. This speeds up the checkout process.
Accounts & Passwords
Access this submenu within Settings to manage each of your email and cloud accounts that are linked with the mobile device you’re using. This includes schedule information that you maintain using a compatible cloud-based application, such as Outlook.com, that can be set up to sync with the Calendar app.
App-Specific Customization
Many of the apps that come preinstalled with iOS 11 allow you to customize features/functions from within Settings. Tap the specific listing for Mail, Contacts, Calendar, Notes, Reminders, Messages, FaceTime, Maps, Safari, News, Home, Music, TV, Photos, Camera, iBooks and Game Center to access a Settings submenu for that specific app.
In subsequent chapters of this book that focus on specific apps, customizing those apps from within Settings is covered in greater detail.
![]() What’s New
What’s New
If you’re a paying cable TV or satellite TV subscriber, from the main Settings menu, tap the TV provider option and select your cable TV or satellite TV provider. You’ll be asked to provide your log-in information for your existing cable TV or satellite TV account.
Once you provide this information, your iPhone or iPad will be able to log you into compatible TV network apps so you have full access to programming you’re entitled to as a subscriber.
For example, you’ll be able to automatically log into the HBO GO app to access on-demand HBO programming if you’re already a paid HBO subscriber.
User-Installed Apps
Other individual apps that you have installed on your iPhone or iPad and that have user-adjustable options or settings available are listed at the bottom of the Settings menu. Tap one app listing at a time to modify these settings.
Working with Control Center
Regardless of what you’re doing on your iPhone or iPad, you can access Control Center to have quick access to popular iOS 11 features and functions, as well as some of the most commonly used apps. Some of the default options available from Control Center include the following:
![]() Airplane Mode—Quickly turn on/off Airplane mode on your iPhone or iPad by tapping on this icon.
Airplane Mode—Quickly turn on/off Airplane mode on your iPhone or iPad by tapping on this icon.
![]() Wi-Fi—Turn Wi-Fi on or off with a single tap, without having to access Settings.
Wi-Fi—Turn Wi-Fi on or off with a single tap, without having to access Settings.
![]() Bluetooth—Turn Bluetooth on or off so that your iPhone or iPad can link to Bluetooth devices it has already been paired with.
Bluetooth—Turn Bluetooth on or off so that your iPhone or iPad can link to Bluetooth devices it has already been paired with.
![]() Do Not Disturb—Manually turn on/off the Do Not Disturb feature after you’ve customized this option in Settings.
Do Not Disturb—Manually turn on/off the Do Not Disturb feature after you’ve customized this option in Settings.
![]() Rotation Lock—Normally, when you rotate your iPhone or iPad sideways, the screen automatically switches from portrait to landscape mode. To prevent this from happening when the phone or tablet is rotated, turn on the Rotation Lock feature by tapping on its icon.
Rotation Lock—Normally, when you rotate your iPhone or iPad sideways, the screen automatically switches from portrait to landscape mode. To prevent this from happening when the phone or tablet is rotated, turn on the Rotation Lock feature by tapping on its icon.
![]() Caution
Caution
With some apps, having the Rotation Lock turned on could prevent you from accessing certain app-specific features or views. For example, turning on Rotation Lock prevents you from using the Week view in the Calendar app on an iPhone.
![]() Flashlight—Use the rear-facing camera flash on the back of your iPhone or iPad Pro as a flashlight. Turn it on or off by tapping the flashlight icon.
Flashlight—Use the rear-facing camera flash on the back of your iPhone or iPad Pro as a flashlight. Turn it on or off by tapping the flashlight icon.
![]() Music Controls—Tap the Play/Pause, Fast Forward, or Rewind icon to control the currently playing music (via the Music app or another compatible app). When applicable, the song’s title and artist is displayed in conjunction with the music controls.
Music Controls—Tap the Play/Pause, Fast Forward, or Rewind icon to control the currently playing music (via the Music app or another compatible app). When applicable, the song’s title and artist is displayed in conjunction with the music controls.
![]() Volume Control—Adjust the volume control for your iPhone or iPad’s built-in speakers or the headphones or speakers linked to your mobile device.
Volume Control—Adjust the volume control for your iPhone or iPad’s built-in speakers or the headphones or speakers linked to your mobile device.
![]() Screen Brightness—Manually adjust the screen’s brightness using this slider.
Screen Brightness—Manually adjust the screen’s brightness using this slider.
![]() Camera—Launch the Camera app.
Camera—Launch the Camera app.
![]() Home App Controls—If you have your iPhone or iPad set up to wirelessly control “smart” devices in your home—such as lighting, the thermostat, or appliances—and the “smart” devices are HomeKit compatible, you’re able to control multiple “smart” devices from the Home app. Press the Home app icon within Control Center to access the Home app’s widget, which offers one-touch shortcuts for managing “smart” equipment.
Home App Controls—If you have your iPhone or iPad set up to wirelessly control “smart” devices in your home—such as lighting, the thermostat, or appliances—and the “smart” devices are HomeKit compatible, you’re able to control multiple “smart” devices from the Home app. Press the Home app icon within Control Center to access the Home app’s widget, which offers one-touch shortcuts for managing “smart” equipment.
![]() What’s New
What’s New
From the Control Center submenu within Settings, you’re able to choose some of the iOS 11 features and app icons that appear in Control Center. Additional options you can add include: Alarm, Magnifier, Notes, Stopwatch, and Text Size.
On an iPhone, you’re also able to add an icon for controlling Low Power Mode, which reduces iPhone battery power consumption when the battery is running low, allowing you to use the iPhone a bit longer before recharging it.
Voice Memos (an audio recording app) and the new Do Not Disturb While Driving feature—which prevents you from using your iPhone for particularly dangerous tasks, such as texting, while you’re driving a car—are also options that can be added to the Control Center.
Organizing Apps in Folders
If you’re like most iPhone and iPad users, you’ll probably be loading a handful of third-party apps on your device. After all, there are well over two million third-party apps to choose from. To make it easier to find your apps on the iPhone or iPad’s Home screen, and to reduce onscreen clutter, you can group app icons together into folders.
From the Home screen, tap and hold down any app icon until all the app icons begin shaking. Drag one app icon on top of another to automatically place both of those apps in a new folder.
You can organize your apps in folders based on categories, like Travel (see Figure 2.17), Games, or Productivity, or you can enter your own folder names and drag and drop the additional app icons into the folders you create. After your app icons are organized, simply press the Home button (on all iOS devices, except for the iPhone X) to save your folders and display them on your Home screen. On an iPhone X, to return to the Home screen, from the bottom of the screen, swipe up.

FIGURE 2.17
On this iPhone, a Travel folder has been created.
To open a folder, tap its icon. Tap any of the contained app icons to launch one of the apps. Figure 2.18 shows a Travel folder that contains a bunch of popular travel-related apps, which have been grouped to make them more accessible.
![]() Note
Note
You can create as many separate folders as you want to be displayed on your Home screens, plus there is no limit to how many apps you can place into each folder.
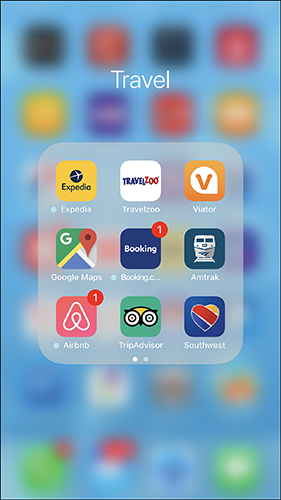
FIGURE 2.18
This Travel folder was created to organize the travel-related apps currently installed on this iPhone. Using folders helps to eliminate clutter on your Home screen.
If you later want to remove an app icon from a folder so that it appears as a standalone app icon on your Home screen, simply press and hold any of the folder icons until all the onscreen icons start to shake. The folder’s contents are displayed.
While the app icons are shaking, simply drag the app icons, one at a time, back onto the Home screen. Each is then removed from the folder. Press the Home button to finalize this action. (On an iPhone X, from the bottom of the screen, swipe up.)
Moving App Icons Around on the Home Screen
To move app icons around and reorganize them on the Home screen, press and hold down any app icon with your finger. When the app icons start to shake, use your finger to drag one app icon at a time around on the Home screen.
Your iPhone or iPad can extend the Home screen across multiple pages. (Switch pages by swiping your finger from left to right, or right to left when viewing the Home screen.)
To move an app icon to another Home screen page, while the icon is shaking, hold it down with your finger and slowly drag it to the extreme right or left, off the screen, so that it bounces onto another of the Home screen’s pages.
The Dock is a customizable selection of app icons that is present on each of the Home screens. On an iPhone, you see the Dock along the bottom of the Home screen. On an iPad, the Dock is displayed on the Home screen, but you can access it anytime by placing your finger near the bottom of the screen and swiping up. Chapter 3, “Take Advantage of iOS 11 Features for the iPad,” explains how to choose which app icons appear on the left side of the Dock.
![]() Tip
Tip
On an iPad, the right side of the Dock holds app icons for the most recently used apps. If you have the Handoff feature enabled, the icon for an app you were using on another iOS mobile device or Mac linked to the same iCloud account is in that area of the Dock, so you can pick up your work on the device you’re using from where you left off on the other computer or mobile device.
![]() Note
Note
From the Dock, you’re also able to launch the iPad’s Multitasking mode, so two apps are displayed on the screen at once. Read Chapter 3 for more information about Multitasking mode.
When you switch pages, the icons displayed on the Dock remain constant. Place your most frequently used apps in the Dock, so that they’re always visible from the Home screen.
As the app icons are shaking on the Home screen, press the black-and-white X in the upper-left corner of an app icon to delete it from your iPhone or iPad.
![]() Note
Note
You’re able to manually delete most of the apps that come preinstalled on the iPhone and iPad, which means you can delete preinstalled apps that you opt not to use. (You can always reinstall deleted apps later.) However, certain apps, like Photos, Camera, Clock (iPhone), App Store, Settings, Wallet, Phone (iPhone), Safari, Messages, and Health (iPhone) can’t be deleted (but you can move them around or place them in folders).
Discovering What’s Possible from the Lock Screen
The Lock screen automatically displays the current time and date, along with the wallpaper of your choice. You can also set it up so app-specific alerts or banners are displayed on the Lock screen when applicable, plus you can decide whether you want the ability to access Control Center directly from the Lock screen.
Controlling what information can be displayed on the Lock screen, which makes it potentially viewable by anyone without requiring they unlock the phone, is one of the ways you’re able to protect your privacy. From within Settings, you can opt to turn off most functionality that displays app-specific Notifications content on the Lock screen, as well as block access to the Today screen (which includes the Spotlight Search field), and the ability to access Control Center, without first unlocking the device.
While viewing the Lock screen, swipe to the left to access the Today screen, which is virtually identical to the Today screen accessible from Notification Center.
This Today screen displays information you configure from within Settings, such as the local weather forecast for your current location or your upcoming appointments (scheduled using the Calendar app). You can also customize it to display a list of recently used apps, news headlines, information about upcoming destinations that use the Maps app, battery details, and access to app-specific widgets.
To choose which app-specific widgets are displayed, scroll down on the Today screen, and tap the Edit button. After unlocking the device, you see the Add Widgets screen, which has a list of available widgets.
Currently activated widgets are listed first. To deactivate any of them, tap the – icon to the left of the listing. To change the display order of the widgets, place your finger on a widget listing’s Move icon (the three lines) and drag it up or down.
Scroll down on the Add Widgets screen to view a list of available widgets that are not yet active. They’re displayed under the More Widgets heading. Tap the + icon associated with any of these widgets to activate it.
Tap Done to save your changes. You can also control the information displayed on the Lock screen from within Settings. To do this, launch Settings, tap the Touch ID & Passcode option (or the Passcode option on older devices), enter your passcode, and then scroll down to the Allow Access When Locked option. Turn on the virtual switches associated with the options you want to have accessible from the Lock screen (refer to Figure 2.16).
Managing Your Customized Notification Center Screen
Access iOS 11’s Notification Center window/screen from the iPhone or iPad at any time by placing your finger anywhere near the top of the screen and swiping down. (If you’re an iPhone X user, swipe down from the top-center of the display.)
![]() Note
Note
Notification Center displays all alerts, alarms, and notifications generated by your device in one place.
The information displayed in Notification Center is divided into two screens, which you can scroll between by swiping from right to left or from left to right. The first Notification Center screen (also known as the Today screen) is shown in Figure 2.19. It displays a Search field at the top. From here, you can locate any information stored in your device or perform an Internet search.
The date and time is also displayed. Scroll down and tap the Edit icon at the bottom of the screen to customize what information is displayed, such as a weather forecast, stock information, upcoming Calendar events, upcoming reminders, or app-specific widgets.
The secondary Notification Center screen displays alerts, alarms, and notifications generated by your mobile device, and the apps you have set up to work with Notification Center. It’s important to customize what information is displayed on this screen by launching Settings, and then tapping the Notifications option.
From the Notifications menu in Settings, tap each app listing to determine which apps will display content within Notification Center.
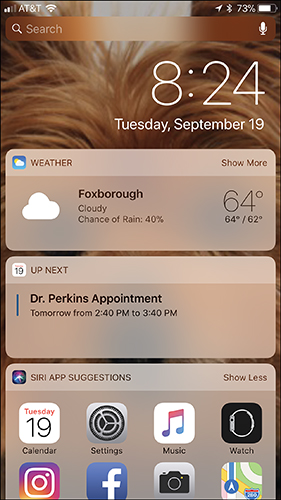
FIGURE 2.19
The Today screen of the Notification Center is customizable and can display a weather forecast, as well as content from other apps or app widgets.
Any listing for an alert, alarm, or notification is interactive. You can tap or swipe the listing to launch the appropriate app and gain immediate access to the information that’s related to what you’re being alerted about.
All alerts, alarms, and notifications are displayed in chronological order, with the newest information displayed first.
To clear all notifications from Notification Center, tap the small X icon displayed to the right of the Earlier Today, Yesterday, or a previous day’s headings, and then tap Clear.
![]() Note
Note
When viewing an item from within Notification Center, swipe sideways (right to left) across a listing to access the View or Clear buttons. If you swipe across a listing from left to right, you see an Open button. Alternatively, tap a listing to open it. When you open a listing, the app related to the notification is launched and the related content automatically is displayed.
Using one of the newer iPhones, press down gently on the listing to use the phone’s 3D Touch capabilities to view a menu of available options. For example, if you’re looking at a message from the Mail app about a new incoming email, use the 3D Touch function to quickly preview the email, and then tap the Trash or Mark As Read option. Press down on the preview to launch the Mail app and further read, respond to, or manage that message.
Using the App Switcher
At any given times, multiple apps will be running on your iPhone or iPad simultaneously, although on an iPhone you can view only one app at a time. On an iPad, when using Multitasking mode, you can view two apps on the screen simultaneously, but many more can be running in the background.
To quickly switch between apps that are running, shut down apps, or take advantage of the Handoff feature to pick up what you were doing on another mobile device or Mac that’s linked to the same iCloud account, use the App Switcher.
To launch App Switches on any iPhone (except the iPhone X), quickly press the Home button twice (from any screen but the Lock screen). On an iPad, the App Switcher and Control Center are displayed on the same screen. Access it by pressing the Home button twice.
![]() Note
Note
When you’re using an iPhone X, place and hold your finger near the bottom center of the screen, swipe up with that finger, and hold your finger in place (on the screen) an extra second.
The App Switcher (shown on an iPhone in Figure 2.20 and on an iPad in Figure 2.21) displays large thumbnails of the apps currently running in the background. To re-launch an app, tap its thumbnail. To shut down an app, swipe up on that thumbnail. You can easily scroll through the app thumbnails using horizontal finger swipes.
On an iPhone, if the Handoff feature is available for a specific app you were just using, a banner for it is displayed along the bottom of the screen. Tap the banner to launch that app on the device you’re currently using to pick up where you left off on a different device.
![]() Note
Note
On an iPad, if the Handoff feature is available for a specific app, that app icon is displayed on the extreme-right side of the Dock (and an iPhone logo is shown in the top-right corner of that app’s icon).
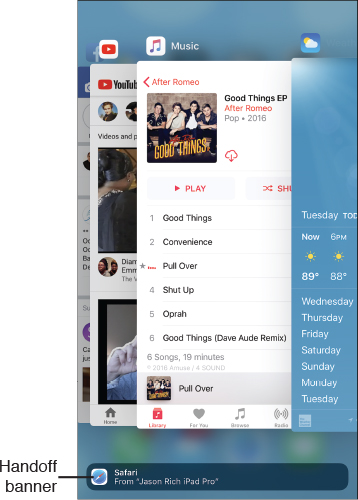
FIGURE 2.20
The App Switcher on the iPhone.
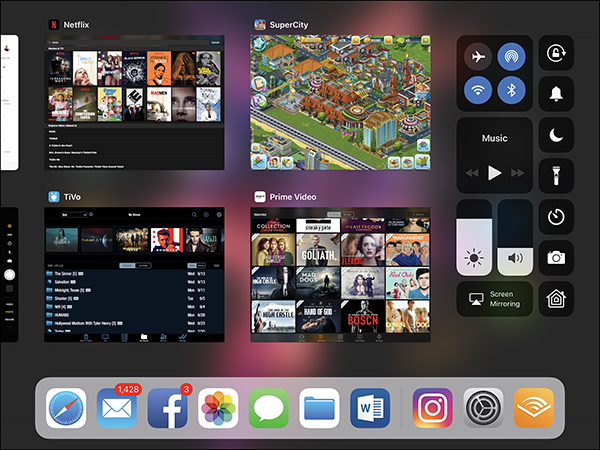
FIGURE 2.21
The App Switcher, Dock, and Control Center are displayed simultaneously on the iPad.