14. Use Calendar, Contacts, Reminders, and Notes
In this Chapter
![]() Getting acquainted with the Calendar, Contacts, and Reminders apps
Getting acquainted with the Calendar, Contacts, and Reminders apps
![]() Creating and collaborating with others using the Notes app
Creating and collaborating with others using the Notes app
![]() Syncing your app data across all your devices and iCloud
Syncing your app data across all your devices and iCloud
Calendars, Contacts, Reminders, and Notes are four core apps that come preinstalled with iOS 11. Each of these apps provides tremendous functionality to iPhone and iPad users.
![]() Note
Note
The Calendar app is used to manage your schedule. The Contacts app is designed to maintain a personal database of your contacts. Notes is a note-taking and content gathering/organizing tool, and Reminders is a list-management app that enables you to easily create to-do lists, shopping lists, or other itemized lists that you need to organize, manage, and remember.
These apps have some common key functionality:
![]() Each app can be set up to automatically sync its data with iCloud, so the content automatically syncs with all your iOS mobile devices and Macs that are connected to that account.
Each app can be set up to automatically sync its data with iCloud, so the content automatically syncs with all your iOS mobile devices and Macs that are connected to that account.
![]() These apps are designed to seamlessly share app-specific data with each other (as well as other apps). For example, the Mail or Maps app can easily look up an email address or physical address of someone in your Contacts database.
These apps are designed to seamlessly share app-specific data with each other (as well as other apps). For example, the Mail or Maps app can easily look up an email address or physical address of someone in your Contacts database.
![]() A version of Calendars, Contacts, Notes, and Reminders is also part of the macOS High Sierra operating system, meaning that fully compatible versions of these apps come preinstalled on all Macs.
A version of Calendars, Contacts, Notes, and Reminders is also part of the macOS High Sierra operating system, meaning that fully compatible versions of these apps come preinstalled on all Macs.
![]() Each of these apps is also available in an online edition. When the apps are set up to sync with iCloud, you’re able to use any computer or mobile device’s web browser to visit www.iCloud.com to access your data. So, if you forget your iPhone at home and it contains your schedule for the day (in the Calendar app), you can still access this information remotely from anywhere.
Each of these apps is also available in an online edition. When the apps are set up to sync with iCloud, you’re able to use any computer or mobile device’s web browser to visit www.iCloud.com to access your data. So, if you forget your iPhone at home and it contains your schedule for the day (in the Calendar app), you can still access this information remotely from anywhere.
![]() You can set up the Calendar and Reminders apps so alerts, alarms, and notifications related to your schedule and lists are consistently displayed as part of the Today or Recent screen via the Notification Center. (To have the information appear on the Today screen in Notification Center, set up and use the app-specific widget. App-specific alerts, alarms, and notifications are otherwise displayed in Notification Center’s Recent screen.)
You can set up the Calendar and Reminders apps so alerts, alarms, and notifications related to your schedule and lists are consistently displayed as part of the Today or Recent screen via the Notification Center. (To have the information appear on the Today screen in Notification Center, set up and use the app-specific widget. App-specific alerts, alarms, and notifications are otherwise displayed in Notification Center’s Recent screen.)
![]() Note
Note
The features and functions offered by the Calendar, Contacts, Reminders, and Notes apps are virtually identical on all iOS mobile devices, as well as on the Mac. However, due to varying screen sizes, the location of specific command icons, options, and menus often varies. After you get to know how each app works in general, you can easily switch between the iPhone, iPad, Mac, and the iCloud.com online-based versions of these apps without confusion.
Customizing Each App in iOS 11
With iOS 11, many options are offered within Settings for customizing your experience using the Contacts, Calendar, Reminders, and Notes apps. Launch Settings, and tap the app name to view that app’s submenu. Then, adjust each option to customize your experience using that app.
Elsewhere in Settings, you can adjust additional app-specific options related to Contacts, Calendar, Reminders, and Notes. For example:
![]() To adjust iCloud-specific settings related to these apps, launch Settings, tap your username/profile photo, and then tap the iCloud option. Turn on or off the virtual switch associated with each app (see Figure 14.1) to activate or deactivate iCloud data syncing functionality for with that app.
To adjust iCloud-specific settings related to these apps, launch Settings, tap your username/profile photo, and then tap the iCloud option. Turn on or off the virtual switch associated with each app (see Figure 14.1) to activate or deactivate iCloud data syncing functionality for with that app.
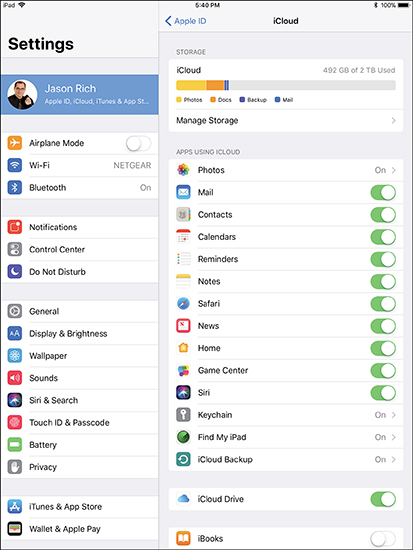
FIGURE 14.1
The iCloud Control Panel within Settings is used to set up compatible apps to sync app-specific data with your iCloud account.
![]() To adjust Notification-related options pertaining to these apps, launch Settings and tap the Notifications option. Then scroll down and tap the app name.
To adjust Notification-related options pertaining to these apps, launch Settings and tap the Notifications option. Then scroll down and tap the app name.
![]() To adjust Location Services options pertaining to these apps, launch Settings, and then tap the Privacy option. Turn on the master Location Services option, and then from the Location Services submenu, tap the app name.
To adjust Location Services options pertaining to these apps, launch Settings, and then tap the Privacy option. Turn on the master Location Services option, and then from the Location Services submenu, tap the app name.
![]() To adjust which third-party apps have access to information stored in your Contacts database or in Calendar, Reminders, or Notes, tap Settings, select the Privacy option, and then tap each app name in the Privacy submenu.
To adjust which third-party apps have access to information stored in your Contacts database or in Calendar, Reminders, or Notes, tap Settings, select the Privacy option, and then tap each app name in the Privacy submenu.
![]() To adjust sounds related to each of these apps, launch Settings, tap the Sound option, and then tap the submenu option related to an app-specific setting. For example, tap Calendar Alerts or Reminder Alerts to select the sound you’ll hear each time the Calendar or Reminders app generates an alert or alarm.
To adjust sounds related to each of these apps, launch Settings, tap the Sound option, and then tap the submenu option related to an app-specific setting. For example, tap Calendar Alerts or Reminder Alerts to select the sound you’ll hear each time the Calendar or Reminders app generates an alert or alarm.
![]() To adjust Siri and Spotlight Search–related functionality related to these four apps, launch Settings, tap the Siri & Search option, scroll down, and tap each app’s listing.
To adjust Siri and Spotlight Search–related functionality related to these four apps, launch Settings, tap the Siri & Search option, scroll down, and tap each app’s listing.
![]() What’s New
What’s New
To add accessibility to the Notes app from the redesigned Control Center, launch Settings, tap the Control Center option, tap Customize Controls, and then from below the More Controls option, tap the + icon associated with Notes.
When the Notes option is listed below the Include heading, use the Notes app’s corresponding Move icon to reposition the Notes app icon within the Control Center. Figure 14.2 shows the Notes app displayed within the Control Center on an iPhone.
Of course, like any other app, you can also launch the Notes app from the Home screen, from the Dock, from Notification Center (if a Notes-specific alert, alarm, or notification is listed), or from the App Switcher. You can also say, “Hey Siri, launch the Notes app.”

FIGURE 14.2
Add Notes to the Control Center for an additional way to quickly launch the app.
Syncing App-Specific Data with Online-Based Apps
To sync your Calendar, Contacts, Reminders, or Notes data with iCloud, Yahoo!, Google, or Microsoft Exchange–compatible software, you need to make a one-time change in Settings for each of your iOS mobile devices, and also on each of your Macs.
Launch Settings, tap your username/profile photo, tap the iCloud option, and then turn the virtual switch associated with Calendar, Contacts, Notes, or Reminders. On a Mac, launch System Preferences, click the iCloud icon, and then add a check mark to the listings for each app.
![]() Note
Note
By setting up app-specific data syncing for Contacts, Calendar, Notes, and Reminders via iCloud, your data is automatically imported into the online version of these apps that are available via iCloud.com.
Unless the iCloud menu from within Settings on each of your iOS mobile devices and the iCloud menu on your Mac(s) is set up the same way—with the same apps turned on—the apps won’t sync data correctly across all of your computers and mobile devices.
To set up these four apps to sync with other services, launch Settings, tap the Accounts & Passwords option, and then tap the Add Account option.
From the Add Account submenu, choose the type of account you want to set up (iCloud, Exchange, Google, Yahoo!, AOL, Outlook.com, or Other). Tap the Other option if you use a scheduling, contact management, list management, or note-taking software that’s not otherwise listed.
When prompted, provide your log in information for the account you’re syncing to. For example, if you want the apps to sync with your Google account, select Google, sign in with the email address associated with your Google account (or your phone number), and then provide your Google account password when prompted.
From the Gmail submenu, turn on the virtual switches associated with Contacts, Calendars, and Notes, if you want your Google account to automatically sync app-specific content with these three apps.
![]() Note
Note
Depending on the type of account you’re setting up your iPhone or iPad to sync with, options for syncing all four apps (Contacts, Calendar, Notes, and Reminders) might not be offered.
![]() What’s New
What’s New
To automatically sync your Contacts database with your Facebook account, assuming you have your Facebook account linked with your iOS mobile device already, launch Settings, tap the Facebook option, and from the Facebook submenu (see Figure 14.3), turn on the virtual switch associated with Contacts.
Do the same for your Facebook Messenger, Twitter, Instagram, Skype, and other social media accounts that are listed within the Settings menu.
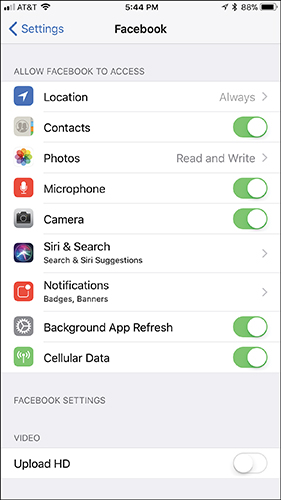
FIGURE 14.3
From the Facebook submenu within Settings, turn on the virtual switch for the Contacts app so your contacts database is shared with your Facebook account.
Getting Acquainted with the Calendar App
With its multiple viewing options for keeping track of the scheduling information stored in it, the Calendar app is a highly customizable scheduling tool. In the Calendar app, any appointment, meeting, activity, or entry that you create and store within the app is referred to as an event.
Because the Calendar app can manage and display multiple color-coded calendars at once, when you create a new event, be sure to choose which calendar it gets stored in. For example, you can maintain separate calendars for Work, Personal, Family, and Travel.
In Calendar, you can also share some or all of your schedule information with colleagues and maintain several separate, color-coded calendars to keep personal and work-related responsibilities—as well as individual projects—listed separately, while still being able to view them on the same screen.
It’s easier than ever to create an event, such as a meeting, and invite one or more people to it via email from within the Calendar app. The Calendar app keeps track of RSVPs automatically.
To invite people to a single event, as you’re creating or editing an event from within the Calendar app, tap Invitees. In the To field, enter the email address for each person you want to invite. (If the invitee is already in your Contacts database, you can simply type that person’s name, and the Calendar app inserts the email address automatically.)
The people invited to an event (and those who RSVP) are displayed as part of the event listing within the Calendar app.
Meanwhile, if you receive an email invite from someone else, when you accept the invitation, the event details are added to your schedule in the Calendar app.
![]() Tip
Tip
When you turn on iCloud’s Family Sharing feature, a separate color-coded calendar, labeled Family, is created by the Calendar app. This calendar can be accessed by up to five other family members. Thus, your teens can add details about their after-school activities, sports practices, or drama rehearsals, and weekend family events can be posted for all to see. Plus, everyone can keep tabs on upcoming vacation dates.
Although the Family calendar data is viewable by anyone with Family Sharing access, events stored in other calendars remain private, or viewable only by people you invite to see the information.
Read more about iCloud Family Sharing in Chapter 7, “Use iCloud and the Files App.”
Controlling the Calendar View
After you launch the Calendar app, choose which viewing perspective you’d like to see. Regardless of which view you’re using, tap the Today option to immediately jump to the current date on the calendar. The current date is always highlighted with a red dot.
From the Home screen of an iPhone that has 3D Touch capabilities, press and hold your finger on the Calendar app icon to show your next upcoming appointment (event), plus access a shortcut for creating a new event. Tap + Add Event to quickly launch the Calendar app and access the New Event screen.
![]() Tip
Tip
If event-related information is displayed in an incoming email, such as an upcoming airline flight reservation or restaurant reservation, the Mail app displays an Add Event banner near the top of the email. Tap this banner (which includes a tiny Calendar app icon) to import the event details from the body of the incoming email directly into the Calendar app as a new event.
On the iPhone and iPad, the Calendar app opens on the last view option that you were using previously. On the iPad, switching between Calendar views is as easy as tapping the Day, Week, Month, or Year tab displayed at the top center of the Calendar app’s screen. On the iPhone, you also have access to a detailed Day, Week, Month, or Year view, as well as a Listing view, which works with the Month or Day view.
![]() Tip
Tip
When the Month calendar view is selected on an iPhone, tap the Listing icon (near the top-right corner of the screen) to display a list of events for the current day (or the day you select). This information is displayed below the month view of the calendar.
When you select the Day view in the Calendar app, the Listing icon shows you all your appointments, hour-by-hour, in a scrollable format that enables you to quickly see your schedule for the previous or upcoming days in addition to the currently selected day.
The Year view shows mini calendars for the entire year. To switch from the Year view to the Month view, tap any month in the Year view.
From the Month view, switch to the Week view by rotating your iPhone from portrait to landscape mode. In other words, hold your smartphone sideways. Also from the Month view, to switch to the Day view, tap a day displayed in the calendar. From the Month view, any day that displays a gray dot in it has event details associated with it.
On the iPhone, from the Month or Day view, tap the Listing icon to view a more detailed and scrollable listing for the selected day’s events.
The Year, Month, Week, and Day views in the iPhone version of the Calendar app can be switched in a hierarchical order. If you’re in the Day view, for example, you can switch back to the Month view by tapping the Back icon (a left-pointing arrow), which is in the top-left corner of the screen.
Whether you’re using the Calendar app on an iPhone or iPad, your Calendar view options include the views described in the following sections.
Day View
This view displays your events individually, based on the time each event is scheduled. When using the iPad version of the app, this information is displayed on a split screen. On the left is an hour-by-hour summary of your day, and on the right is a synopsis of the events for that day.
![]() Note
Note
On the iPhone, the Day view (shown in Figure 14.4) displays a week’s worth of calendar dates near the top of the screen. Below that, the selected date is displayed, followed by an hour-by-hour rundown of your events.
On the iPad, the Day display is split into two sections. The selected date, along with a week’s worth of calendar dates, is displayed at the top of the screen, followed by a summary listing of appointments and events displayed on the left side of the screen. When you tap an event, details about that selected appointment are displayed on the right side of the screen.
Use the Day view of the Calendar app to see a detailed outline of scheduled events for a single day. Swipe your finger to scroll up or down to see an hour-by-hour summary of that day’s schedule.
Swipe right or left along the week’s worth of calendar days to see upcoming or past dates and to view another day’s schedule. Tap a specific day to switch to that date’s Day view.

FIGURE 14.4
The Day view of the Calendar app lets you see your schedule broken down one day at a time in one-hour increments.
![]() Tip
Tip
To quickly find an event, tap the Search icon, and then enter any relevant text to help you find the item you’re looking for that’s stored in the Calendar app. You can also do this with Spotlight Search, or you can make a verbal request using Siri. In the Search field, enter a date, time, name, business, meeting location, or other pertinent information. Tap a search result to view that event listing in the Calendar app.
![]() Tip
Tip
Displayed in the bottom-right corner of the Calendar screen is the Inbox option (refer to Figure 14.4). If there’s a number within parentheses next to the word Inbox, one or more potential event invitations have been sent to you from other people. Tap the Inbox option to view a list of events found in other apps, as well as event invitations from others. Tap Add to Calendar or Ignore for each one.
Week View
The Week view uses a grid format to display the days of the week along the top of the screen and time intervals along the left side of the screen. With this view, you’re given an overview of all events scheduled during a particular week (Sunday through Saturday).
Scroll along the dates displayed near the top of the screen to quickly view your schedule for past or future weeks. On an iPhone, to access the Week view, you need to turn your device sideways to view it in landscape mode.
![]() Tip
Tip
To fine-tune any Calendar app view, tap the Calendars option near the bottom center of the screen. A listing of the separate color-coded calendars that the Calendar app is managing is displayed. Tap a listing to add or remove it from the current Calendar view.
When you remove a calendar from the calendar view, this does not delete any data; it simply hides the events that are stored in that particular calendar from the display.
Month View
This view enables you to see a month’s worth of events at a time. On the iPhone, tap any single day to immediately switch to the Day view and review a detailed summary of events slated for that day. From the Month view, use your finger to scroll up or down to look at past or future months. On the iPad, use the Day, Week, Month, or Year tabs, located at the top of the screen, to switch Calendar views.
Year View
The Year view enables you to look at 12 mini calendars, with minimal detail displayed.
Entering a New Event
Regardless of which calendar view you’re using, follow these steps to enter a new event:
1. Tap the New Event (+) icon in the upper-right corner of the screen. This causes a New Event window to be displayed (see Figure 14.5).
2. The first field in the New Event window is labeled Title. Using the virtual keyboard, enter a title for the event.
3. If a location is associated with the event, tap the Location field, and enter an address or location. Entering information into the Location field is optional. You can be as detailed as you want when entering information into this field.
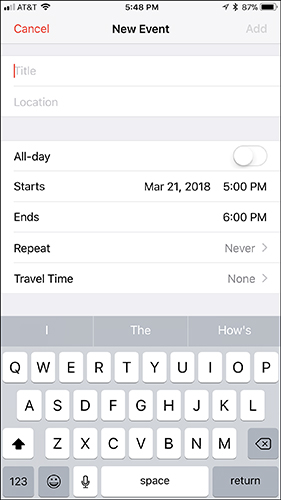
FIGURE 14.5
Add a new event to the Calendar app from the New Event screen.
![]() Tip
Tip
Many apps integrate and share scheduling information with the Calendar app. If you ask Siri a question related to an event’s location, such as “Where is my next meeting?” or “How do I get to my next appointment?” the event’s location information is used.
![]() Note
Note
Many of the fields in the New Event screen are optional; in other words, only fill in the fields that are relevant to the new event you’re creating. However, the more information you include, the more useful Maps, Siri, Spotlight Search, and potentially other apps will be later when you want to refer to event information.
4. If the event lasts for the entire day, turn on the All-Day virtual switch; otherwise, to set the time and date the event begins, tap the Starts field. Use the scrolling Date, Hour, Minute, and AM/PM dials to select the start time for your event.
5. After entering the start time, scroll down and tap the Ends option, and again use the scrolling Date, Hour, Minute, and AM/PM dials to select the end time for your event.
![]() Note
Note
If the new event you’re creating repeats every day, every week, every two weeks, every month, or every year, tap the Repeat option, and choose the appropriate time interval. The default for this option is Never, meaning that it is a nonrepeating, one-time-only event.
6. Turn on the virtual switch associated with the Travel Time option to add between five minutes and two hours of travel time to that event by tapping one of the listed options. So, if this event turns out to be one hour away from your previous event scheduled on the same day, one hour’s worth of travel time can be added to your schedule. However, if you have a specific location entered in the Location field, your iPhone or iPad can calculate the travel time from wherever you happen to be prior to that event.
![]() Tip
Tip
Because the Maps app tracks real-time traffic conditions and integrates with the Calendar app, you’re notified when you need to leave for your next appointment based on the calculated travel time that takes into account current traffic. For this to work, a detailed address for the event must be included in the Location field. You also need to provide a starting location and the mode of transportation you’ll be using—driving, walking (when applicable), or public transportation. The Travel Time feature for the event must be turned on.
7. If you’re managing several calendars in the Calendar app, tap the Calendar option to select in which calendar the new event will be placed. The default calendar is called Home, but you can change this in Settings.
8. Use the Invitees option to invite one or more other people to the event being created.
9. To set an audible alarm for the event, tap the Alert option. The Event Alert window temporarily replaces the Add Event screen. In the Event Alert window, tap the option for how much advance notice you want before the scheduled event. Your options include None, At Time of Event, 5 minutes, 15 minutes, 30 minutes, 1 hour, 2 hours, 1 day, 2 days, or 1 week before the event. Once you tap a selection, you are returned to the Add Event screen.
![]() Tip
Tip
A Second Alert option is also available from the Add Event screen. If you want to add a secondary alarm to this event, tap the Second Alert option and then set it.
10. Tap the Show As option to classify how you want an event to appear in your calendar. The default option is Busy. This is information others can see if you opt to share specific calendars with other people.
11. Tap the URL field to add a website address associated with the event.
12. Tap the Notes field to add text-based notes you want to associate with the new event. You can also paste content from other apps into the Notes field.
13. Tap Add to save the event. If you don’t tap Add, your event information won’t be saved. Tap the Cancel icon to exit without saving any new information.
![]() Note
Note
As soon as you create a new event, that information syncs with your iCloud account and all other computers and mobile devices that you have linked to that account. If you have the Calendar app set up to sync with another scheduling app or online service, your new data syncs with that app.
This near-instant data synchronization also applies if you delete an event.
Using Siri to Enter New Events
Instead of manually entering event information into your iPhone or iPad using the virtual keyboard, or importing/syncing scheduling data from another computer or device, you always have the option to use Siri. Refer to Chapter 4, “Say It and Make It So Using Siri,” for more information.
![]() Tip
Tip
Using Siri, say something like, “When is my next appointment with [name]?” You can also say, “Show me my schedule for Wednesday” or ask, “What’s on my calendar for July 7?” to quickly find an event. If you enter information into the Location field as you’re creating events, you can later ask Siri, “Where is my next meeting?”
Viewing Individual Appointment Details
From any view in the Calendar app, tap an individual event to display the details related to it. When you tap a single event listing, a new Event Details screen opens (see Figure 14.6). Tap the Edit option to modify any aspect of the event listing, such as its title, location, start/end time, alert, invitees, or notes.
At the bottom of an event listing (scroll down), a map showing the event’s location is provided if the Location field has been filled in. Tap this map to launch the Maps app and get detailed, turn-by-turn directions to that event from your current location.
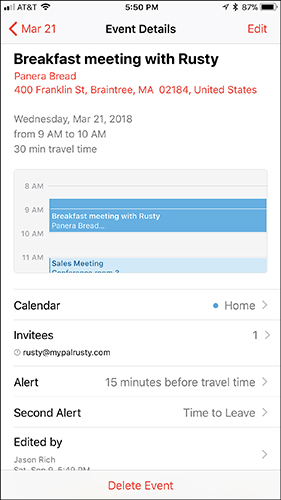
FIGURE 14.6
Detailed information about each event stored in the Calendar app can easily be viewed.
To delete an event entry entirely, tap the red-and-white Delete Event option at the bottom of the Edit window.
The Calendar app works with several other apps, including Contacts and Notification Center. For example, in Contacts, you can enter someone’s birthday into an entry, and that information can automatically be displayed in the Calendar app on a separate Birthdays calendar.
To display birthday listings in Calendar, tap the Calendars button displayed near the bottom center of the screen in the Calendar app, and then tap the Birthdays option to add a check mark to that selection. All recurring birthdays stored in Contacts appear in Calendar.
![]() Note
Note
There are many ways to customize the Calendar app beyond choosing between the various calendar views. For example, you can set audible alerts or use onscreen alerts and banners to remind you of events. You can also display Calendar-related information in the Notification Center or on the Lock screen.
Launch Settings and tap the Calendar option to view the Calendar submenu to make adjustments to the way the Calendar app functions.
![]() Caution
Caution
If you’re traveling in another time zone but enter a new event that will take place in the future after you return to your home time zone, when entering the Start time for the new event, be sure to tap the Time Zone option and select your home time zone. Otherwise, the time you enter for the new event remains in the time zone you’re in and doesn’t automatically adjust when you return home.
Using the Contacts App to Keep Track of People and Companies
The Contacts app stores information pertaining to the people in your life, as well as companies you do business with.
![]() Note
Note
Contacts is a powerful and customizable contact management database that works with many other apps that also came preinstalled on your iPhone or iPad—including Mail, Calendar, Safari, FaceTime, and Maps—as well as optional apps, like the official Facebook and Twitter apps. It’s also fully compatible with Siri and Spotlight Search, along with a growing selection of optional third-party apps.
Your personal contacts database might include people you work with, customers, clients, family members, people from your community with whom you interact (doctors, hairstylist, barber, dry cleaners, and so on), your real-world friends, and your online friends from Facebook, for example.
![]() Tip
Tip
When you’re using an iPhone with 3D Touch capabilities, from the Home screen, press and hold your finger on the Contacts app icon to view a menu that enables you to see the most recent contacts you’ve been in communication with, as well as quickly create a new contact entry or view your own entry in the Contacts database (which is referred to as My Info).
![]() Tip
Tip
Be sure to create an entry for yourself in your Contacts database and populate it with as much information as possible, because many other apps will access this information in the future for a variety of reasons.
![]() Note
Note
As you receive incoming emails, if the sender includes their details in their email and this information is not stored in your Contacts app already, you have the ability to add it. This is also true if the sender updates their contact information and it doesn’t match what’s stored in the Contacts app. In the Mail app, as you’re reading the email, you’re given the opportunity to create a new contact or update the existing contact’s entry in the Contacts app.
For this feature to work, launch Settings, tap the Contacts option, tap Siri & Search, and then turn on the virtual switch associated with the Find Contacts in Other Apps option.
Determining What Information to Store
Chances are, the contacts database that you rely on at your office or on your computer at home can be synced with your iPhone or iPad, and made available to you using the Contacts app. Of course, Contacts can also be used as a standalone app, enabling you to enter new contact entries as you meet people and need to keep track of details about them using your iOS mobile devices.
The information you maintain in your Contacts database is highly customizable, which means you can keep track of only the information you want or need. For example, in each contact entry, you can store a vast amount of information about a person or company, including multiple phone numbers, addresses, and email addresses. Each field is labeled for easy reference. A Contact entry can include someone’s home, work, and cell phone numbers, for example. You can also customize your contacts database to include additional information, such as each contact’s photo, as well as detailed and freeform notes related to a contact.
When you’re using the Contacts app, your entire contacts database is instantly searchable using data from any field in the database, so even if you have a database containing thousands of entries, you can always find a person or company in a matter of seconds, using a wide range of search criteria. Use the Search field in the Contacts app, the Spotlight Search feature, or Siri to find what you’re looking for.
Integrating the Contacts App with Other Apps
After your contacts database has been populated with entries, Contacts works with many other apps on your iPhone or iPad. Here are just a few popular examples:
![]() When you compose a new email message in Mail, begin typing someone’s full name or email address in the To field. If that person’s contact information is already stored in Contacts, the relevant email address automatically displays in the email’s To field.
When you compose a new email message in Mail, begin typing someone’s full name or email address in the To field. If that person’s contact information is already stored in Contacts, the relevant email address automatically displays in the email’s To field.
![]() If you’re planning a trip to visit a contact, pull up someone’s address from your Contacts database, and then quickly obtain driving directions to the person’s home or work location from the Maps app. Within the Maps app enter someone’s name (or a company name) into the Search field and then tap their displayed address.
If you’re planning a trip to visit a contact, pull up someone’s address from your Contacts database, and then quickly obtain driving directions to the person’s home or work location from the Maps app. Within the Maps app enter someone’s name (or a company name) into the Search field and then tap their displayed address.
![]() Activate Siri and request directions to any person or company with an entry stored in your Contacts database. For example, activate Siri and say, “How do I get to John Doe’s house from here?”
Activate Siri and request directions to any person or company with an entry stored in your Contacts database. For example, activate Siri and say, “How do I get to John Doe’s house from here?”
![]() If you include each person’s birthday in your Contacts database, that information can automatically be displayed in the Calendar app and be set up to remind you (in advance) to send a card or gift.
If you include each person’s birthday in your Contacts database, that information can automatically be displayed in the Calendar app and be set up to remind you (in advance) to send a card or gift.
![]() As you’re creating each Contacts entry, include a photo of that person—by activating the Camera app from the Contacts app to snap a photo, by using a photo stored in the Photos app that you link to the entry, or by acquiring profile photos from social media accounts.
As you’re creating each Contacts entry, include a photo of that person—by activating the Camera app from the Contacts app to snap a photo, by using a photo stored in the Photos app that you link to the entry, or by acquiring profile photos from social media accounts.
![]() When using FaceTime, create a Favorites list of people you often engage in video calls with, compiled from entries in your Contacts database.
When using FaceTime, create a Favorites list of people you often engage in video calls with, compiled from entries in your Contacts database.
![]() From the Messages app, access your Contacts database when filling in the To field as you compose new text messages to be sent via iMessage, text message, or instant message. This means that you can simply type the person’s name in the To field, as opposed to their cell phone number or iMessage username.
From the Messages app, access your Contacts database when filling in the To field as you compose new text messages to be sent via iMessage, text message, or instant message. This means that you can simply type the person’s name in the To field, as opposed to their cell phone number or iMessage username.
![]() If you’re active on Facebook, you have the option of adding each contact’s Facebook username to their Contacts entry. To turn on this feature, from Settings, tap Contacts, tap Siri & Search, and then turn on the virtual switch associated with Find Contacts in Other Apps. Next, return to the main Settings menu, tap Facebook, and turn on the virtual switch associated with Contacts. When you turn on this feature, the Contacts app automatically downloads each entry’s Facebook profile picture and inserts it into your Contacts database. This also works with other social media services that are listed within the Settings menu, such as Twitter and Instagram.
If you’re active on Facebook, you have the option of adding each contact’s Facebook username to their Contacts entry. To turn on this feature, from Settings, tap Contacts, tap Siri & Search, and then turn on the virtual switch associated with Find Contacts in Other Apps. Next, return to the main Settings menu, tap Facebook, and turn on the virtual switch associated with Contacts. When you turn on this feature, the Contacts app automatically downloads each entry’s Facebook profile picture and inserts it into your Contacts database. This also works with other social media services that are listed within the Settings menu, such as Twitter and Instagram.
When you first launch the Contacts app, its related database is empty; however, you can create and build your database in two ways:
![]() Sync the Contacts app with your primary contact management application on your computer, network, or online (cloud)-based service, such as iCloud or Microsoft Outlook.
Sync the Contacts app with your primary contact management application on your computer, network, or online (cloud)-based service, such as iCloud or Microsoft Outlook.
![]() Manually enter contact information directly into the Contacts app.
Manually enter contact information directly into the Contacts app.
![]() Note
Note
The Contacts app that comes preinstalled with iOS 11 is 100 percent compatible with and extremely similar to the Contacts app that comes bundled with OS X Yosemite, OS X El Capitan, macOS Sierra, or macOS High Sierra on the Mac. Be sure to set up each version of the app to sync with each other via iCloud, so you always have access to your entire Contacts database.
Viewing Your Contacts
On the iPhone, the Contacts screen displays an alphabetical listing of all entries in your Contacts database. Along the right side of the screen are alphabetic tabs, and a Search field is located near the top of the screen.
![]() Note
Note
If you’ve used the Contacts app previously and it has been running in the background, the last contact entry you viewed is displayed when you relaunch the app.
On the iPad, near the middle of the screen are alphabetic tabs. A listing of all contacts is displayed along the left side of the screen. When a contact entry is selected, it is displayed on the right side of the screen. Displayed in the top-left corner is a Search field. Use it to find any content stored in the Contacts app. Alternatively, use the Spotlight Search feature or Siri to quickly locate information stored in this app.
![]() Tip
Tip
Tap the Search field to quickly find a particular entry by entering any keyword associated with an entry, such as a first or last name, city, state, job title, or company name. Any content in your Contacts database is searchable from this Search field.
You can also tap a letter tab on the screen to see all entries “filed” under that letter by a contact’s last name, first name, or company name, depending on how you set up the Contacts app within Settings.
To see the complete listing for a particular entry, tap its listing from the Contacts screen (iPhone) or Contacts listing (iPad). On the iPhone, a new screen shows the specific contact’s information (see Figure 14.7). On the iPad, the selected contact listing is displayed on the right side of the screen.

FIGURE 14.7
A sample contact entry from the Contacts app displayed on an iPhone.
Based on the information stored in the Contacts database about a particular person, when you view a listing, displayed just below a person or company’s name and photo (if applicable) are up to four active icons: Message, Call, FaceTime (Video), and Mail. The Mail app icon is labeled Mail, Work, or Home, based on how you labeled the email address within the Contacts database.
Tap any of these icons to quickly initiate contact with that person using the method that corresponds to the icon (refer to Figure 14.7).
If an entry does not contain information related to a phone number, iMessage username (or cell phone number), FaceTime (Video) username, or email address, these icons aren’t active for that entry.
Creating a New Contacts Entry
To create a new Contacts entry, tap the New Contact (+) icon. The New Contact screen opens.
![]() Note
Note
As you’re creating each Contacts entry, fill in whichever fields you want. You can always edit a contact entry later to include additional information. The more information you enter, however, the more data the Contacts app is able to share with Siri and other apps running on your mobile device.
The New Contact screen displays several empty fields related to the entry, starting with the First Name field (shown in Figure 14.8).
Some fields, including Phone, Email, and Mailing Address, enable you to input multiple listings, one at a time. So you can include someone’s home phone, work phone, and mobile phone (iPhone) numbers in the entry, for example. Likewise, you can include multiple email addresses, and/or a home address and work address for an individual.
![]() Tip
Tip
One of the available fields when creating a new Contact entry is labeled Add Related Name. Use this field to add the names of your contact’s mother, father, parent, brother, sister, child, friend, spouse, partner, assistant, manager, or other. You can also add your own titles for the Related People field.

FIGURE 14.8
From this New Contact screen, create a new contact and include as much information pertaining to that person or company as you want.
![]() Tip
Tip
You can change the label associated with certain fields (which are displayed in blue) by tapping the field label itself. This reveals a Label menu that offers selectable options for that field. For example, the Label options for the Add Phone field include Home, Work, iPhone, Mobile, Main, Home Fax, Work Fax, Pager, and Other.
When creating or editing contacts, it’s important to associate the correct labels with phone numbers, email addresses, and address data. For each phone number you add to a contact’s entry, for example, it can include a Home, Work, Mobile, iPhone, or Other label (among others). For many iOS 11 functions that use data from your Contacts database to work correctly (including Siri), it’s important that you properly label content you add to each Contacts entry.
If you need to add a label that’s not listed by default, tap Add Custom Label at the bottom of the Label window to create your own label. Tap the label title of your choice. A check mark appears next to it, and you are returned to the New Contact screen.
At the bottom of the New Contact screen is the Add Field option. Tap it to reveal a menu containing a handful of additional fields you can add to individual Contacts entries as applicable.
![]() Note
Note
If there’s a field displayed that you don’t want to use or display, simply leave it blank as you’re creating or editing a Contacts entry.
Each time you add a new mailing address to a contact’s entry from within the New Contact screen, the Address field expands to include a Street, City, State, ZIP, and Country field.
After you have filled in all the fields for a particular entry, tap Done. Your new entry is saved and added to your contacts database. It is then synced with your other computers and mobile devices.
Adding a Photo to a Contacts Entry
To the immediate left of the First Name field is a circle that says Add Photo. When you tap this field, a submenu with two options—Take Photo and Choose Photo—is displayed. If the entry already has a photo associated with it, the Edit Photo and Delete Photo options are also displayed. (You’re able to do this only when editing a Contact entry.)
Tap Take Photo to launch the Camera app from within the Contacts app and snap a photo to be linked to the Contacts entry you’re creating. Alternatively, tap the Choose Photo option. In this case, the Photos app launches so that you can choose any digital image that’s currently stored on your iOS mobile device or iCloud account. When you tap the photo of your choice, a Choose a Photo window displays on the Contacts screen, enabling you to move and scale the image.
![]() Tip
Tip
As you’re previewing the image, use a pinch or reverse-pinch finger motion to zoom in or out, and then hold your finger down on the image and reposition it within the frame.
After cropping or adjusting the selected photo, tap Choose to link the photo with that contact’s entry. The photo you link with an entry is displayed by other apps, like Mail, Messages, and FaceTime, that use the Contacts app data.
If you use an iPhone, or FaceTime on your iPhone or iPad, from the Ringtone option in the New Contact screen, select the specific ringtone you will hear each time that particular contact calls you. Your iPhone or iPad has many preinstalled ringtones. From the iTunes Store, you can purchase and download thousands of additional ringtones.
To do this, as you’re creating or editing an entry, tap Ringtone, and then tap the Tone Store option. An Internet connection is required to find and purchase additional ringtones.
![]() What’s New
What’s New
If a particular contact entry represents someone who is extremely important to you, and you want to be alerted if that person contacts you, even if you have the Do Not Disturb feature turned on, be sure to turn on the Emergency Bypass feature.
As you’re creating or editing an entry, tap Ringtone and then turn on the virtual switch associated with the Emergency Bypass option.
Editing or Deleting a Contact
To edit a contact, tap its listing from the Contacts screen to display the contact details, and then tap the Edit option. Tap any field to modify it. Delete a field by tapping the red-and-white – icon associated with it, and then tap the Delete button that appears to the right of the entry.
You can also add new fields in an entry by tapping any of the green-and-white + icons and then choosing the type of field you want to add.
When you’re finished editing a Contacts entry, tap Done.
![]() Tip
Tip
To delete an entire entry from your Contacts database, as you’re editing a contact entry and looking at the Contact screen for that entry, scroll down to the bottom of it, and tap Delete Contact.
Keep in mind that if you have your Contacts database syncing with iCloud or another contacts database, the contact you delete is removed from all your computers and devices that are connected to the Internet within seconds. There is no “undo” option.
Sharing Contact Entries
From the main Contacts screen that displays your list of contact entries, tap the contact listing you want to share. When the contact’s entry is displayed, tap Share Contact. Next, choose to share the contact’s details with someone else via AirDrop, text/instant message (via the Message app), or email (via the Mail app). For example, if you choose the Mail or Message option, the entire Contacts entry you selected (stored in .vcf format) is automatically embedded in an outgoing email or text/instant message. When you’ve filled in all the necessary fields, tap the Send icon. Upon doing this, you are returned to the Contacts app.
![]() What’s New
What’s New
Individual contact entries can be stored as stand-alone files within the new Files app so that later you can share these individual contact files. Access a Contacts entry and tap Share Contact and then tap Save to Files. Choose where you want to save the individual contact entry (in the industry-standard .vcf file format that can be imported into almost any other contacts database). Tap Add to export the entry. The original entry within the Contacts app remains intact.
![]() Caution
Caution
All information within the selected Contacts entry is shared, including notes, home phone numbers, personal email address, and birthday information. If you don’t want to share all of an entry’s content, do not use the Share Contact feature.
When the recipient receives your email or message and clicks the attachment (the .vcf file), it automatically is imported into their contact management application as a new entry, such as in the Contacts app running on their Mac, iPhone, or iPad.
![]() Tip
Tip
One way to share your current location with a contact is to view that contact’s entry and tap the Share My Location option. You can then choose to share your location for one hour, until the end of the current day, or indefinitely.
Here are some additional quick tips for using Contacts:
![]() If someone shares a Contacts entry with you via email, when you’re viewing the incoming email on your iPhone or iPad, tap the email’s attachment. The Contacts entry that was emailed is displayed in a window. Tap Create New Contact or Add to Existing Contact at the bottom of the window to incorporate this information into your Contacts database.
If someone shares a Contacts entry with you via email, when you’re viewing the incoming email on your iPhone or iPad, tap the email’s attachment. The Contacts entry that was emailed is displayed in a window. Tap Create New Contact or Add to Existing Contact at the bottom of the window to incorporate this information into your Contacts database.
![]() As you’re creating or editing a contact entry, in the Notes field, enter as much information pertaining to that contact as you want using freeform text. You can also paste content from another app into this field using the iOS’s Select, Copy, and Paste commands, and using the App Switcher (or Multitasking mode on an iPad) to quickly switch between apps.
As you’re creating or editing a contact entry, in the Notes field, enter as much information pertaining to that contact as you want using freeform text. You can also paste content from another app into this field using the iOS’s Select, Copy, and Paste commands, and using the App Switcher (or Multitasking mode on an iPad) to quickly switch between apps.
![]() Every field in a contact entry is interactive when you view it. If you tap a phone number, for example, you initiate a call to that person using the Phone app (iPhone). When you tap an address, you can obtain directions to that location via the Maps app or simply see the address displayed on a map. Tap an email address to compose and send an email to that person (via the Mail app). If multiple options are available, such as to call, FaceTime, or message someone from a phone number, a phone, FaceTime, or message icon is displayed.
Every field in a contact entry is interactive when you view it. If you tap a phone number, for example, you initiate a call to that person using the Phone app (iPhone). When you tap an address, you can obtain directions to that location via the Maps app or simply see the address displayed on a map. Tap an email address to compose and send an email to that person (via the Mail app). If multiple options are available, such as to call, FaceTime, or message someone from a phone number, a phone, FaceTime, or message icon is displayed.
Creating and Managing Lists with the Reminders App
Use the Reminders app to easily manage multiple lists simultaneously, and if necessary, add alarms and deadlines to individual list items. Plus, you can be reminded of responsibilities, tasks, or objectives exactly when you need this information, based on your geographic location or a predetermined time and date.
The Reminders app works nicely with Siri, Notification Center, and iCloud, which makes synchronizing your app-related data a straightforward process.
![]() Tip
Tip
When using an iPhone with 3D Touch capabilities, press and hold your finger on the app icon for the Reminders app while you’re viewing the Home screen. You see a pop-up menu that enables you to quickly view the last note you worked with, create a new note, create a new checklist, capture and add a photo to a note, or create and add a sketch to a note.
Reminders enables you to color-code lists. Tap the Edit button to the right of a list’s title, and then tap the Color option. Seven different colors are displayed. Tap your selection. The list title is displayed in the selected color.
Because your iPhone or iPad has Location Services (GPS) capabilities, it always knows exactly where it is. Thus, you can create items in your to-do lists and associate one or more of them with an alarm that alerts you when you arrive at or depart from a particular geographic location, such as your home, office, or a particular store.
In addition, you can set an alarm to warn you of an upcoming deadline. This can be displayed on your device’s screen in Notification Center or as separate alerts or banners, depending on how you have the Reminders app configured to work with the notifications options offered by your iPhone or iPad (which is adjustable from within Settings).
As you’re setting up an alarm, if you want it to repeat every day, every week, every two weeks, every month, or every year, tap the Repeat option and make your selection. By default, the Never option is selected, meaning the alarm does not repeat.
![]() Tip
Tip
Just as you do for other apps, to set up Reminders to work with Notification Center and display onscreen alerts or banners, launch Settings, tap the Notifications option, and then tap the listing for the Reminders app. You can then customize the settings in the Reminders submenu screen.
Staying Up to Date with Reminders
When you launch Reminders on the iPad, the control center for this app appears on the left side of the screen. On the right side of the screen is a simulated sheet of lined paper.
If you’ve already been using the Reminders app on another iOS mobile device or Mac that’s linked to the same iCloud account, all your lists synchronize with the iPhone or iPad you’re currently using. Tap the Add List option in the bottom-left corner of the screen to create a new list from scratch.
When you create a new list from scratch, it is displayed on the right side of the screen using the temporary heading New List. Enter a title for the new list and then associate a color with it. Tap Done when you’re ready to begin populating the list with items (as shown in Figure 14.9 on an iPad).
On the iPhone, to create a new list from scratch as you’re looking at a list, place your finger near the center of the screen and swipe down. Next, tap the + icon to the right of the Search field. From the Create New screen, tap the Reminder or List option (see Figure 14.10).

FIGURE 14.9
Using Reminders, you can create and manage one or more lists. Each list can have as many separate items as you want.
Select the List option, and then type the name of the list and associate a color with it. Tap Done. You can then begin populating the list with items or repeat this process to create another list.
When viewing a list, tap an empty line of the simulated sheet of paper to add an item or tap the + icon at the bottom of the list. The virtual keyboard appears. Enter the item to be added to your to-do list (see Figure 14.11). Next, tap the Return key on the keyboard to enter another item.
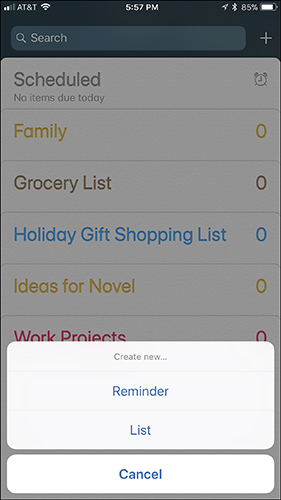
FIGURE 14.10
Designate whether you’re creating a reminder or a list.

FIGURE 14.11
Use the keyboard to add items to the list.
After creating a list item, tap its Info icon (the i icon to the right of Chips and Dip in Figure 14.11) to add an alarm, priority, or freeform notes to it.
![]() Tip
Tip
You have the option to set a priority with each list item. Your priority options include None, Low (!), Medium (!!), and High (!!!). (See Figure 14.12.) Although setting a priority for a list item displays that item with one, two, or three exclamation points to signify its importance, adjusting an item’s priority does not automatically change its position in the list. You must manually rearrange the order of items on a list.
To do this, while looking at a list, tap the Edit button. Then place your finger on the Move icon (three horizontal lines) associated with the list item you want to move, and drag it up or down to the desired location in the list. Tap the Done button to save your changes.
When you’re finished adding new list items, tap Done.
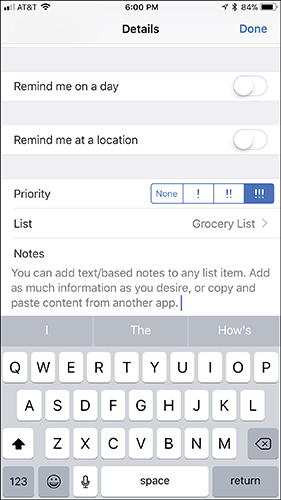
FIGURE 14.12
From the Details screen related to a list item, you can add an alarm, priority, or freeform notes.
To set a date-specific alarm, turn on the virtual switch associated with Remind Me on a Day option, and then tap the Alarm option to set the date and time.
To set a location-based alarm for that item, enter the Details screen by tapping the Info icon, and then turn on the virtual switch associated with the Remind Me at a Location option. Select a location, or enter an address, and then decide whether you want to be alerted when you arrive or when you leave that destination by tapping the When I Arrive or When I Leave tab.
Tap the Notes option to add freeform, text-based notes to it. Use the virtual keyboard to type notes or the Dictation feature to dictate notes. You can also copy and paste content from other apps into this field.
![]() Tip
Tip
One additional feature of the Reminders app is that you can display a separate list associated with each day on the calendar. When you use the Remind Me on a Day option, a date becomes associated with that item. Then, to review upcoming items related to a particular day tap the Scheduled option.
![]() Tip
Tip
At the bottom of every to-do list on the iPad is a Show Completed option. Tap this to display all items from the list you’re viewing that have been moved to the Completed list.
Just like the Notes app, Reminders has a Sharing/Collaboration feature. To use it, tap the Edit option for a list you’ve created, and then tap the Sharing option. From the Share With screen, tap the Add Person option. In the To field, fill in the name or email address of one or more people, and then tap the Add option.
The person or people you opt to share a list with receive a notification, which they need to accept in their version of Reminders.
At that point, any of the collaborators can view or modify the list. The list owner (that is, the person who created and first shared the list) can later revoke access to the list by people who were previously invited.
To delete an item from a to-do list, swipe your finger from right to left across the item. A More button and a Delete button are displayed. Tap Delete to confirm your selection, or tap the More button to reveal the Info menu options. Remember, as soon as you make changes to a list item, if you have iCloud functionality turned on for the Reminders app and have access to the Internet, your additions, edits, or deletions automatically sync with iCloud.
Deleting and Reordering Entire To-Do Lists
If you want to delete an entire list, enter the list and tap the Edit button, and then tap the Delete List option displayed at the bottom of the screen. A warning pops up asking you to confirm the deletion.
On the iPad, another method is to locate the list you want to delete from the column on the left and swipe your finger from right to left across it. When the Delete button appears, tap it. You also have the option of tapping the Edit button, and then tapping the – icon associated with the list you want to erase. In Edit mode, you can change the order of your lists by placing your finger on the Move icon (three horizontal lines) that’s associated with a list and dragging it up or down.
To exit Edit mode, tap Done.
Taking Notes or Gathering Information Using the Notes App
In addition to typed notes, the Notes app enables you to create, gather, and manage information, including photos, drawings, and handwritten content.
Use the Notes app to keep track of memos, brainstorm ideas, take notes in meetings or classes, gather content from other apps that you want to store in one place, or for anything else that you’d use a traditional notebook and writing instrument to document.
![]() Tip
Tip
Notes offers the optional ability to password-protect individual notes. Open a note and tap the Share icon. From the Share menu, tap Lock Note (see Figure 14.13). When prompted, create a password for the note, verify it by typing it again, and in the Hint field enter something that will help you remember the password.
Turn on the virtual switch associated with the Use Touch ID option so you’ll be able to unlock notes by scanning your fingerprint using the Touch ID sensor that’s built in to the Home button.
Keep in mind that if you forget the password you assign to a note, there is no way to recover or unlock it unless you’re using a newer iPhone/iPad with a Touch ID sensor, and you previously turned on the Use Touch ID option.
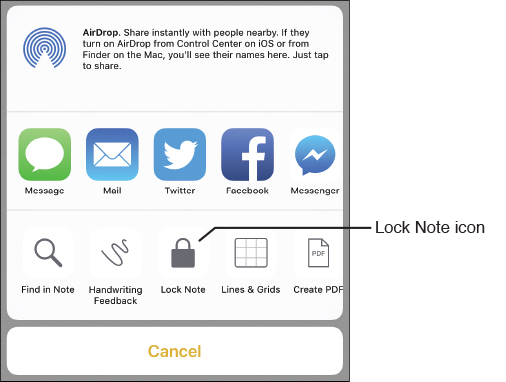
FIGURE 14.13
Protect a note from being accessed by unauthorized people by adding a password lock to it.
![]() Tip
Tip
When using an iPhone with 3D Touch capabilities, from the Home screen, place and hold your finger on the app icon for Notes to open a pop-up window that enables you to view your most recently created or edited note, create a new note, create a new checklist, take a photo and store it in a note, or create a sketch to be added to a note.
In the Notes app are several command icons, which are displayed directly above the virtual keyboard (shown in Figure 14.14 on the iPhone).
On the iPad only, in the top-left corner of the keyboard tap the Undo/Redo icon to reveal additional command icons that enable you to use the Undo, Redo, or Copy/Paste commands.
On either the iPhone or iPad, tap the check mark icon to begin creating and formatting an interactive checklist in your note.
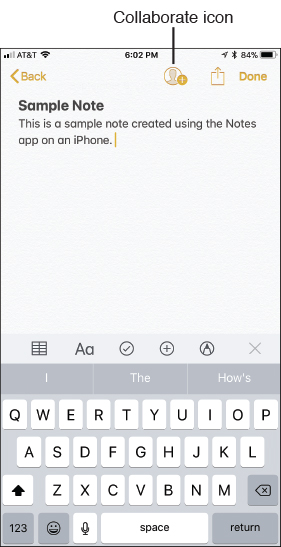
FIGURE 14.14
The Notes app displays special command icons directly above the virtual keyboard.
Tap the Aa formatting option to quickly format text that you’re typing into the Notes app. You have the following formatting options:
![]() Switch between a Title, Heading, Body, or Monospaced formatted text
Switch between a Title, Heading, Body, or Monospaced formatted text
![]() Switch among any combination of bold, italic, underline, or strikethrough text
Switch among any combination of bold, italic, underline, or strikethrough text
![]() Create a bulleted, numbered, or – formatted list
Create a bulleted, numbered, or – formatted list
![]() Indent text left or right
Indent text left or right
Tap the + icon to access a menu with the following options:
![]() Scan Documents—Use your iPhone or iPad’s rear-facing camera to take a photo of printed content. The Notes app scans the document and saves it within a Note. Figure 14.15 shows a document being scanned into the Notes app using this new feature. After the document is scanned, you can crop and straighten the page’s edges as needed.
Scan Documents—Use your iPhone or iPad’s rear-facing camera to take a photo of printed content. The Notes app scans the document and saves it within a Note. Figure 14.15 shows a document being scanned into the Notes app using this new feature. After the document is scanned, you can crop and straighten the page’s edges as needed.
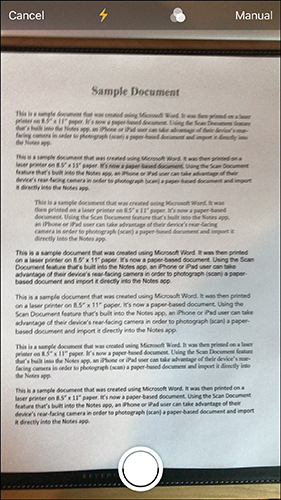
FIGURE 14.15
Using the Scan Documents tool, use your iPhone or iPad’s rear-facing camera to scan paper-based documents directly into the Notes app.
![]() Take a Photo or Video—Use one of the cameras built into your iPhone or iPad to take a photo or shoot a video, and insert that content directly into a note.
Take a Photo or Video—Use one of the cameras built into your iPhone or iPad to take a photo or shoot a video, and insert that content directly into a note.
![]() Photo Library—Access the Photo Library (within the Photos app) to import an image from your iPhone, iPad, or iCloud account into a note.
Photo Library—Access the Photo Library (within the Photos app) to import an image from your iPhone, iPad, or iCloud account into a note.
![]() Add Sketch—Handwrite or draw directly on your device’s screen, and save that content within a note. This feature works really well on an iPad Pro when used with an Apple Pencil, although you can use your finger as a virtual drawing and writing tool on any iPhone or iPad. See the “Using the Drawing Tools in the Notes App” section later in this chapter for more information about drawing and writing in Notes.
Add Sketch—Handwrite or draw directly on your device’s screen, and save that content within a note. This feature works really well on an iPad Pro when used with an Apple Pencil, although you can use your finger as a virtual drawing and writing tool on any iPhone or iPad. See the “Using the Drawing Tools in the Notes App” section later in this chapter for more information about drawing and writing in Notes.
Using the Collaboration Feature
After creating a note in the Notes app, you have the ability to invite other people to view and modify that note and collaborate in real time. While composing or viewing a note, tap the Collaboration icon (refer to Figure 14.14), and then add people who you want to collaborate with.
You can invite collaborators via Message, Mail, Twitter, Facebook, or other compatible third-party apps. After choosing how you want to invite one or more collaborators, fill in the To field with the name, email address, or iPhone phone number. The Note is already embedded in the message. If you want, type an additional message, and then tap Send. After the collaboration tool becomes active, a Collaboration icon appears to the left of the note’s title.
The recipient receives your message and can click the provided Notes link. The note opens in their iOS 11 (or macOS Sierra or later) version of the Notes app (running on their iPhone, iPad, or Mac). Any time a collaborator makes a change to the shared note, the updated version is immediately shared with the other collaborators, assuming each person’s iPhone, iPad, or Mac has Internet access. Changes are highlighted in yellow for a few moments, and then they automatically blend with the rest of the note. All collaborators will see, almost instantly, any changes made to the note.
Notes that are shared using the Collaboration feature are stored in the original composer’s iCloud account. The collaborators have access to only the shared note (not all of the composer’s other notes that are stored in the Notes app).
The person who set up the collaboration feature for a note can revoke anyone’s collaboration privileges by tapping the Add Collaborator icon. From under the People heading, tap the person you want to remove from the list of people with collaboration privileges. Next, tap the Remove Access option related to that person.
To quickly remove everyone’s access to the Note and turn off the collaboration feature for just that note, tap the Stop Sharing option below the People heading.
Creating and Managing Notes App Folders
Think of the Notes app as a digital notebook. Each note stored in the app is a separate page that can have its own title and content. Individual notes are stored in folders, which are basically virtual notebooks. Each folder can also be custom named.
Begin by creating one or more virtual notebooks (folders) in the Notes app. Do this from the Folders screen (see Figure 14.16) by tapping the New Folder option, choosing where the content should be stored (in iCloud or only on your mobile device), and then typing a title for that folder.

FIGURE 14.16
From the Folders screen, create one or more folders (virtual notebooks) within which you store your individual note pages.
To edit folders already created in the Notes app, access the Folders screen and then tap the Edit option. You can then select and delete entire folders created using the Notes app.
![]() Note
Note
Notes created using other apps that were synced with or imported into the Notes app can’t be deleted or managed from the Folders screen.
Creating Individual Notes
From the Folders screen in the Notes app, tap the folder (notebook) within which you want to create a new note. When the screen for that folder opens, a listing of individual notes stored in it is displayed. If the folder is empty, only command icons are displayed on the screen.
To open and view, edit, or work with an existing note in a folder, access the Folder screen and tap that note’s title/listing.
To create a new note from scratch, tap the Compose icon. The first line of text in a note becomes its title. Each time a new note is created, the time and date are automatically recorded and displayed. After typing the title for the note, tap the Return key and start typing your note’s content. You can type as much content as you want in each virtual note page. The note page extends infinitely downward.
![]() Tip
Tip
If you’re using an iPad Pro, use the Multitasking feature to open the Notes app on one side of the screen and another app on the opposite side of the screen. You can then select content from that other app and drag and drop it (or cut and paste it) directly into the note you’re composing or editing within the Notes app (see Figure 14.17).
Using any iPhone or iPad, take advantage of iOS 11’s Select, Copy, and Paste commands, to select content from other apps, copy it into the iPhone or iPad’s virtual clipboard, and then paste that content into a note within the Notes app.

FIGURE 14.17
When using an iPad Pro, you can drag and drop content between a compatible app and the Notes app, when both are simultaneously open on the tablet’s screen.
As you’re typing content, use the command icons at the top of the virtual keyboard to help you format the text or add checklists, for example. Tap the Emoji key on the virtual keyboard to add Emoji characters, or tap the Dictation key to use iOS 11’s Dictation feature to speak into the app and have what you say translated into text and then imported into the note.
Some apps (such as Safari) offer integration with the Notes app and include an Add to Notes option in the Share menu. Access this feature from a compatible app to export content from the app directly into a note within the Notes app.
![]() Tip
Tip
You can use Settings to adjust a handful of Notes-specific options. Launch Settings and tap on the Notes option. Figure 14.18 shows the Notes submenu within Settings.
For example, to determine whether photo and video content you capture in the Notes app also gets stored in the Photos app, turn on the virtual switch associated with the Save to Photos option.
Because the Notes app is designed to work with iCloud, if you want to be able to store notes locally within your iPhone or iPad (not just in the cloud), turn on the virtual switch associated with the On My iPad Account or On My iPhone Account.

FIGURE 14.18
Customize a handful of Notes app-specific options by accessing the Notes submenu within Settings (shown here on an iPad Pro).
To delete the note you’re currently working with, tap the Trash icon. The note is deleted from the iPhone or iPad you’re using, as well as from your iCloud account.
To retrieve an accidentally deleted note, visit the Folders menu screen and tap the Recently Deleted option. From there you can select one or more accidentally deleted notes and move them into a different folder using the Move command. Tap the Move or Move All option, and then choose which folder the notes should be transferred to.
Moving Notes Between Folders
After notes are created and stored in particular folders, you can manually move them between folders. To do this, access the Folders screen and tap the folder that contains the notes you want to move. Next, tap Edit. Tap the listing for each note you want to move to select it.
After you’ve selected one or more note listings, tap the Move To option and select which folder you want to move the notes to. At this point, the notes are removed from their current folder and moved into the newly selected folder. Instead of tapping the Move To option, delete the selected notes by tapping the Delete option.
On an iPad, you’re also able to press and hold a listing for a note, and then drag it to another location, or copy it into another app by dragging it there.
Creating Interactive Checklists in Notes
Using the checklist tool built in to the Notes app, it’s easy to add and format interactive checklists into a note. To do this, place the cursor where you want to insert the list and tap the Checklist icon. The first empty circle is displayed. To the right of this icon, type your first list item, and then tap the Return key. Add second, third, and fourth items, and keep going until your list is complete.
Later, when you tap one of the circles, a check mark is added to it, indicating that the item has been completed. In a note, add as many separate checklists as you want, and each list can have any number of items. The various lists can be surrounded by other types of content.
Remember, with the new Collaboration feature, multiple people can contribute to a list, so those other people can add or delete items from a checklist or mark items as completed.
As you’re typing text into a note, tap the Table icon to use the Table menu to create or edit a table. This feature allows you to create content that is nicely formatted on the screen. A table can have any number of columns and rows. Once created and populated with content, you can move columns, rows, or individual fields by dragging them with your finger.
You also can Copy and Paste table-related content within the same note, move it into a different note, or export just a table’s contents to another app altogether.
Using the Drawing Tools in the Notes App
Tap the Sketch icon to access the Notes app’s drawing tools, which can also be used for handwriting on your phone’s or tablet’s screen using your finger or the Apple Pencil (on an iPad Pro). At the bottom of this screen are several virtual writing/drawing tools, which are are very similar to the Markup/Annotation tools offered by the Files app. You can choose between several virtual drawing instruments.
![]() Note
Note
On the iPhone, to view all of the Sketch tools and the virtual ink icons, rotate the phone to Landscape mode.
After choosing a virtual writing instrument, tap an ink color. Swipe your finger across the ink colors to view all the available colors, and then tap the desired color. If you’re using an Apple Pencil, tap an ink color icon.
Use your finger, an optional stylus, or an Apple Pencil (when working with an iPad Pro) to draw or handwrite on the screen. You can switch ink colors or writing instruments as often as you choose.
![]() Tip
Tip
If you’re using an Apple Pencil, the harder you press on the screen, the thicker and darker the virtual ink will be as you’re writing or drawing.
![]() What’s New
What’s New
When you handwrite text into the Notes app using an iPad Pro and Apple Pencil, and you later use the app’s Search feature or iOS 11’s Spotlight Search feature, iOS 11 is typically able to understand your handwriting and find notes that are applicable to the search.
To move something you’ve written or drawn around on the screen, tap the selection tool (which looks like a dotted line) and then draw a circle around the content you want to move (see Figure 14.19). When the dots in the circle become animated, use the Apple Pencil or your finger to drag the selected content to its new location.
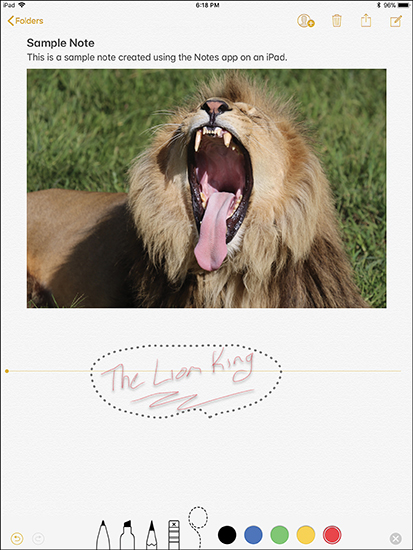
FIGURE 14.19
Select and move handwritten or drawn content around within a note by drawing a circle around it.
The content you’ve handwritten or drawn is automatically incorporated onto the note page you were previously working on, which can also include typed text or photos, for example.
To erase content that you’ve drawn on the screen, tap the Eraser tool, and then move your finger (or Apple Pencil) on the screen over the areas you want to erase. If you want to delete everything on the screen, however, tap the Erase All option.
To undo your last action, tap the Undo icon. To redo something that you just undid, tap the Redo icon.
![]() Note
Note
A single note can contain multiple sketches that were created separately.
Sharing Notes
As you’re viewing a note, tap the Share icon to access the Share menu. From here, you can share the contents of the note via a variety of apps.
The Share menu also enables you to do the following things (refer to Figure 14.13):
![]() Lock a note (by adding password protection)
Lock a note (by adding password protection)
![]() Save the note to a cloud-based account using the Files app
Save the note to a cloud-based account using the Files app
![]() Print the note
Print the note
![]() Find content within a saved note (using the Search tool)
Find content within a saved note (using the Search tool)
![]() Adjust the virtual paper style within a note (choose between blank and several different lined or grid formats)
Adjust the virtual paper style within a note (choose between blank and several different lined or grid formats)
![]() Create a PDF from the note
Create a PDF from the note
![]() Note
Note
The option for sharing a note from the app’s Share menu is different from the Collaboration option that allows multiple people to compose, edit, and view the same note, in almost real time.
The Share options simply give the person you share the note with a copy of the note in its current form. The person doesn’t see any edits you make, and you don’t see any changes they make unless the note is shared again.
The Collaboration tool differs in that it enables all collaborators to always be working with the most up-to-date version of the note, as anyone makes any changes to it.
With each update the Notes app becomes more powerful and versatile, but a handful of other note-taking and virtual notepad apps for the iPhone and iPad offer a broader selection of tools or take a vastly different approach to composing, collecting, and organizing information.
For example, there’s Evernote (www.evernote.com) or Microsoft OneNote (www.onenote.com), which work across all computer and mobile device platforms, and allow notes to be synced and shared easily.
Meanwhile, there are dozens of other powerful, third-party, note-taking apps. To find them, launch the App Store and in the Search field type note taking.
If you’re an iPad Pro user with an Apple Pencil, search for Apple Pencil Apps, to see a selection of note-taking, writing, painting, and drawing apps, such as GoodNotes 4, Notepad+, PDF Reader Pro Edition, Post-It Plus, Moleskine Journal, and PDF Expert.