10. Make and Receive Calls with an iPhone or iPad
In this Chapter
![]() How to use the calling features you’ll find useful on your iPhone
How to use the calling features you’ll find useful on your iPhone
![]() How to manage Favorites, Recents, Contacts, and Voicemail
How to manage Favorites, Recents, Contacts, and Voicemail
![]() Take advantage of the Handoff features to answer incoming calls to your iPhone from your iPad or Mac
Take advantage of the Handoff features to answer incoming calls to your iPhone from your iPad or Mac
Although your iPhone is capable of handling a wide range of tasks, one of its core purposes is to serve as a feature-packed cell phone. Your iPhone makes and receives voice calls using a cellular network that’s operated by the service provider you selected when the phone was activated. The Phone app that comes preinstalled on your iPhone offers a vast selection of calling features that make it easy to stay in touch with people.
After you set up and activate your new iPhone with a cellular service provider and choose a calling plan, the iPhone is capable of receiving incoming calls, plus it enables you to make outgoing calls using the Phone app.
Many cellular service providers offer plans that enable you to pay for the iPhone over time and then upgrade to the newest model iPhone each year when it’s released.
Apple offers the iPhone Upgrade Program, which is available from Apple Stores and Apple.com. It involves paying up to 24 monthly installments to purchase an unlocked iPhone outright, or enables you to keep paying monthly installments but receive a brand-new iPhone (every 12 months) when a new model is released.
When you receive a new phone, if it’s before the 24 installments have been paid, the installment plan restarts, or you can pay off the balance for the phone you already have and keep it, but then begin paying installments on the newest iPhone model.
The monthly installment varies, based on which model iPhone you acquire and how much internal storage space it contains. Keep in mind that the monthly installment you pay for the Apple Upgrade Program or your cellular service provider (for the phone) doesn’t include cellular service. The service is a separate fee, which is based on the plan you select from a compatible cellular service provider.
One benefit to the Apple Upgrade Program is that AppleCare+ is included. To learn more about this program, visit www.apple.com/shop/iphone/iphone-upgrade-program.
Choose a wireless service provider that offers the best coverage in your area, the most competitively priced calling plan based on your needs, and the extra features you want or need. When looking at coverage area maps for various service providers, focus on 4G LTE coverage, as opposed to 3G or plain 4G service. Some wireless service providers, for example, offer better international roaming coverage than others, whereas some are more generous when it comes to monthly wireless data allocation.
![]() Note
Note
Cellular service providers continue to offer incentives to customers to switch to a specific carrier. For example, starting in September 2017, T-Mobile began offering a free Netflix subscription with its unlimited One family plans. Other providers offer deep discounts for signing up multiple family members under a single account.
Keep in mind that the iPhone hardware is sometimes slightly different based on which wireless service provider you choose, so you typically can’t switch providers after you’ve acquired the iPhone (unless it’s an unlocked iPhone or you exchange the iPhone for a model that’s compatible with the new provider).
Using Your iPhone as a Phone
For your iPhone to make or receive calls, it must be turned on and not in Airplane mode. Unless you’re using the Call Over Wi-Fi function (which not all cellular service providers support), a decent cellular service signal, which is displayed in the upper-left corner of the screen in the form of dots, is also a necessity. The more dots you see (up to five), the stronger the cellular signal (which is based on your proximity to the closest cell towers).
![]() Tip
Tip
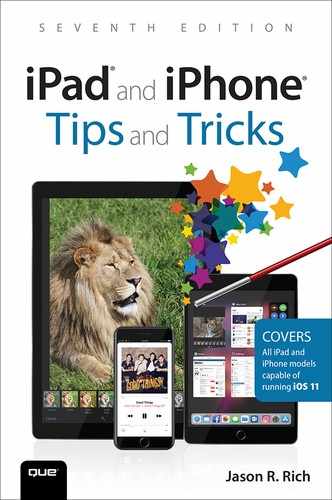
From the Home screen of a compatible iPhone that offers 3D Touch capabilities, press and hold the Phone app icon to reveal a menu that gives you quick access to a handful of useful call-related features, including icons representing your most recently called contacts from the Phone app’s Favorites list (shown in Figure 10.1).
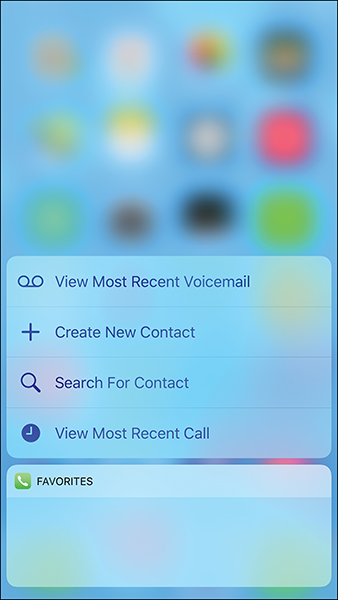
FIGURE 10.1
Use the iPhone’s 3D Touch capabilities from the Home screen (on compatible iPhones) to gain quick access to useful call-related features.
Managing Incoming Calls
Regardless of what you’re doing on your iPhone, when you receive an incoming call, everything else is put on hold and the Phone app launches automatically, unless the iPhone is turned off, in Airplane mode, or the Do Not Disturb feature is turned on, in which case incoming calls automatically go to voicemail.
To control the volume of the ringer, press the Volume Up or Volume Down buttons on the side of your iPhone; or to turn off the ringer (which causes the phone to vibrate when an incoming call is received), turn on the Mute button on the side of the iPhone.
Avoid Answering and Silence the Ringer
While your iPhone is still ringing, you can silence the ringer and send the incoming call to voicemail after a 5- to 10-second delay, press the Power button or the Volume Up or Volume Down button one time.
To send the incoming call immediately to voicemail, double press the Power button. Alternatively, tap the Decline option displayed on the screen when the phone is not locked at the time the incoming call is received.
To temporarily silence the iPhone’s ringer (when you go into a meeting or you’re watching a movie, for example), switch on the Mute button, which is a small, physical switch located on the side of most iPhone models. When the Mute button is on, your phone vibrates instead of ringing when an incoming call is received.
![]() Note
Note
If you’re an Apple Watch user, cover the watchface with your hand to decline an incoming call.
![]() Tip
Tip
To customize the Vibrate feature, launch Settings, tap the Sounds & Haptics option, turn on the virtual switch associated with Vibrate On Ring or Vibrate On Silent, and then tap the Ringtone option under the Sounds and Vibration Patterns heading to select a custom vibration pattern when incoming calls are received.
Yet another way to be left alone is to put your phone in Do Not Disturb mode. This can be done automatically at certain predetermined times, or manually whenever you want to be left alone. To do this, access Control Center and tap the Do Not Disturb icon. Read more about the Do Not Disturb feature later in this chapter.
Answer Incoming Calls
There are several ways to answer an incoming call. If you’re doing something else on your iPhone and it starts to ring, the caller ID for the incoming caller appears, along with a green-and-white Accept button and a red-and-white Decline button (as shown in Figure 10.2). Tap the Accept button to answer the call. If you tap Decline or wait too long to answer, the call automatically goes to voicemail.
If you’re using your iPhone with EarPods, AirPods, ear buds, or a headset with a built-in microphone, answer an incoming call by pressing the Accept button on the headset.

FIGURE 10.2
Your iPhone notifies you when an incoming call is received. You can then answer or decline the call. This screen appears as long as the phone is not locked when the incoming call is received.
When you receive an incoming call, displayed above the Decline and Accept buttons (or the Slide to Answer slider on the Lock screen) are two other options labeled Remind Me and Message (refer to Figure 10.2).
When you tap Message, a menu containing four prewritten text messages, along with a Custom button, is displayed. Tap one of the Message buttons to send that message to the caller via text/instant message. Or tap the Custom button to type a custom message to send to that caller. The incoming call is automatically transferred to voicemail.
To customize the prewritten messages available from the Message option, launch Settings, tap the Phone option, and then tap the Respond with Text option. Displayed on the Respond with Text menu screen are three customizable fields under the heading “Respond With:” Tap one of these fields to replace one of the default messages with your own.
The other option for managing incoming calls is the Remind Me option. When you tap this button, the incoming call is sent to voicemail, but you can quickly set a reminder (and alarm) for yourself to call that person back in one hour, when you leave your current location, or when you get home. For these last two options to function, Locations Services related to the Phone app must be turned on from within Settings.
If the iPhone is in Sleep mode (or on the Lock screen and locked) when an incoming call is received, unlock the phone by swiping your finger from left to right on the Slide to Answer slider, which automatically takes the phone out of Sleep mode, unlocks it, and answers the incoming call (shown in Figure 10.3).
Of course, if your iPhone has a Touch ID sensor built in to the Home button, you’re able to unlock the phone and answer a call simply by placing your finger on the Touch ID sensor. An iPhone X user can simply look at the screen to unlock the phone to answer an incoming call.
Notice that the iPhone’s Lock screen displays the Remind Me and Message icons but does not display an Accept or Decline button.
If you’re too busy to answer an incoming call on your iPhone, you can simply let the call go to voicemail by doing nothing.
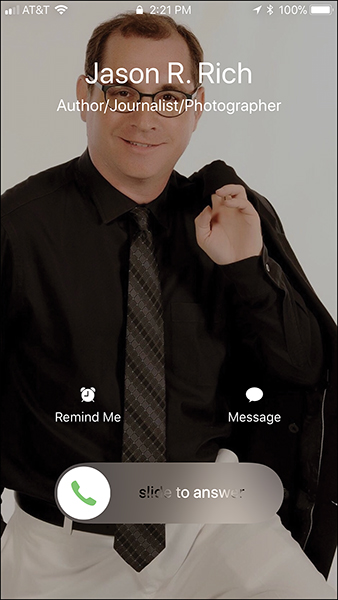
FIGURE 10.3
When an incoming call is received while the phone is in Sleep mode (locked), you need to unlock the phone to automatically answer it.
![]() Note
Note
Answering the phone using an optional Bluetooth headset, such as Apple AirPods, automatically unlocks the phone if it’s in Sleep mode.
After you answer an incoming call, you have a few additional options. You can hold the iPhone up to your ear and start talking, or you can tap the Speaker icon to use your iPhone as a speakerphone. It’s also possible to use the phone with a wired or Bluetooth (wireless) headset or CarPlay, which offers hands-free operation. The headset option is ideal when you’re driving, plus it offers privacy (versus using the iPhone’s speakerphone option).
If you’re driving, choose a headset that covers only one ear, use the Speaker option for hands-free operation, or use CarPlay. Refrain from holding the phone up to your ear or covering both ears with a headset. Make sure you’re familiar with state and local laws in your area related to the use of cell phones while driving.
When using a Bluetooth headset, you don’t need to hold the phone up to your ear to carry on a conversation. If you’re using a headset, answer the call by pressing the headset’s answer button when you receive an incoming call. There’s no need to do anything on your iPhone.
Set Up Call Forwarding
Call forwarding allows you to automatically reroute all incoming calls to another phone number, such as your home or office number. To set up call forwarding and turn this function on or off, launch Settings and then tap the Phone option.
Tap the Call Forwarding option, turn on the virtual switch for Call Forwarding, and then manually enter the phone number to which you want to divert all incoming calls.
Customizing Other Phone Options
From the Phone submenu in Settings, your iPhone’s phone number is displayed at the top of the screen (see Figure 10.4). From this menu, you can customize a handful of Phone app and call-related features.
![]() Note
Note
The options available to you depend on which model iPhone you’re using and which cellular service provider the phone is linked with.
For example, tap the Announce Calls option. This allows Siri to tell you who is calling when a call comes in. From the Announce Calls submenu, choose when you want this feature to be active. Options include Always, Headphones & Car, Headphones Only, or Never.
With the Call Blocking & Identification option you can manage calls you’ve manually added to your Blocked Calls list. Using the Call Blocking feature is a way to reduce telemarketing calls (or calls from an “ex”).
FIGURE 10.4
Customize options related to the Phone app from the Phone submenu within Settings.
![]() Tip
Tip
To manually add a phone number to your iPhone’s Blocked Call list, after you’ve received at least one call from a number you want to block, tap the Recents button in the Phone app. Look for the incoming call’s listing. Tap the Info (i) icon for the call and then scroll down and tap the Block This Caller option.
In the future, calls from this number will be blocked, until you manually remove the phone number from your iPhone’s Blocked list. To do this, launch Settings, tap Phone, tap Call Blocking & Identification, tap Edit (located in the top-right corner of the screen), and then tap the – icon associated with the phone number listing.
Also from Settings, you have the option of enabling the Dial Assist feature, which figures out the dialing prefixes and phone number format that’s necessary to make a call overseas. That makes initiating international phone calls much less confusing.
Tap Show My Caller ID to set whether you want your iPhone’s phone number and/or your name to be displayed when you make calls from your iPhone to other people.
Using the Handoff Feature with Calls
When Handoff is activated, as long as your iPhone is within wireless proximity to your iPad or Mac (typically within 33 feet), it’s possible to use your iPad (see Figure 10.5) or Mac to answer a call coming in to your iPhone.
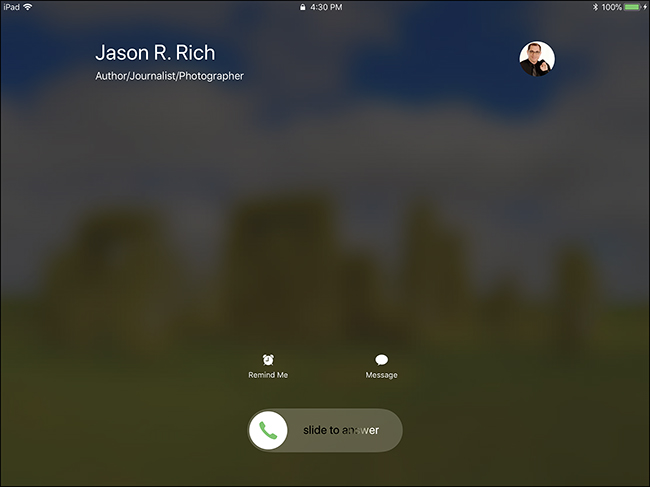
FIGURE 10.5
When an iPhone and iPad are linked to the same iCloud account and have the Handoff option turned on, it’s possible to answer an incoming call on the iPad (shown here).
![]() Note
Note
All Macs and iOS mobile devices that are set up to work with the Handoff feature must be linked to the same iCloud account and have Bluetooth and Wi-Fi turned on. Keep in mind that some older iPhones and iPads do not support this feature. Likewise, only Macs purchased in 2012 or later (and running OS X Yosemite, El Capitan, macOS Sierra, or macOS High Sierra) support this feature.
When the Handoff feature is turned on and the iPhone is wirelessly linked with an iPad or Mac, you can initiate calls from that tablet or computer by tapping or clicking a displayed phone number that appears in the Contacts app, Safari, or another compatible app. These calls are initiated using your iPad or Mac, but they’re actually handled by your nearby iPhone’s cellular service connectivity.
To set up this feature, start with your iPhone and launch Settings, tap the General option, and then tap the Handoff option. From the Handoff submenu, turn on the virtual switch that’s associated with the Handoff option. Next, repeat this process on your iPad. (This only needs to be done once per device.)
When the Handoff feature is turned on, your iPhone automatically maintains a wireless link to your iPad and/or Mac. When an incoming call is received, all connected devices ring, Caller ID information is displayed, and you can accept or decline the call from any connected device.
On the iPad or Mac, the tablet or computer acts like a speakerphone by taking advantage of the built-in microphone and speaker(s). You can also pair a Bluetooth wireless headset to your iPad or Mac, or you can connect a corded headset (with built-in microphone) to the tablet or Mac via the headphone jack.
![]() Note
Note
To learn how to manage the Handoff feature on your Mac, visit https://support.apple.com/en-us/HT204681.
Managing the Do Not Disturb Feature
To activate and customize the Do Not Disturb feature, launch Settings and tap the Do Not Disturb option. To later enable or disable this feature, access the Control Center, and tap the crescent moon–shaped icon (shown in Figure 10.6).
When turned on, a moon icon is displayed on the iPhone’s or iPad’s status bar (at the very top of the screen), and all calls and alerts are silenced.
You can turn on or off this feature at any time or schedule specific times you want Do Not Disturb to be automatically activated, such as between 11:00 p.m. and 7:00 a.m. on weekdays. From the Do Not Disturb menu in Settings, determine whether certain important callers are allowed to reach you, even when the phone is in Do Not Disturb mode.

FIGURE 10.6
You can easily access the Do Not Disturb feature from Control Center.
Keep in mind that when your iPhone is turned off, all incoming calls are forwarded directly to voicemail, and it is not possible to initiate an outgoing call. Likewise, incoming text messages, FaceTime calls, and other communications from the outside world are not accepted when an iPhone is turned off, in Do Not Disturb mode, or in Airplane mode. Instead, notifications for these missed messages are displayed in Notification Center (depending on how you set up Notification Center), in their respective apps, and potentially on the Lock screen when you turn on the device or turn off Airplane mode.
Managing Calls in Progress
As soon as you answer an incoming call, the Phone app’s display changes to the Call in Progress screen (see Figure 10.7). This screen contains several command icons, including Mute, Keypad, Speaker/Audio, Add Call, FaceTime, Contacts, and End. The caller’s information and a call timer are displayed at the top of the screen.
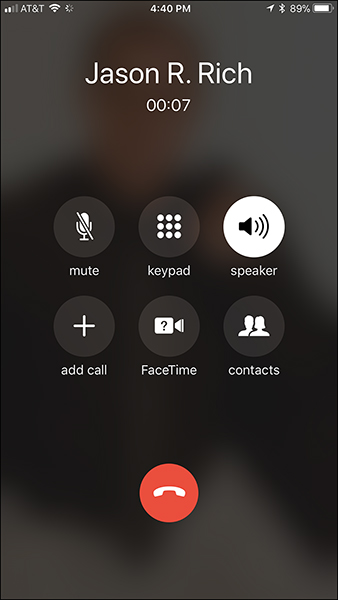
FIGURE 10.7
The Call in Progress screen with the speaker feature active.
![]() Note
Note
When you receive an incoming call, if the caller ID for that caller matches up with a contact entry stored in the Contacts app, that person’s name, which number the call is from (Home, Work, Mobile, and so on), and the caller’s photo (if you have a photo of that person linked to the contact) are displayed.
If there’s no match in your Contacts database, the regular Caller ID data is displayed, which can include the person’s name, phone number, and the city and state from which the call is originating. You might also receive calls labeled Private or Unknown.
Here’s a summary of the command icons available to you from the Call in Progress screen during a phone conversation:
![]() Mute—Tap this icon to turn off your iPhone’s microphone. You can still hear what’s being said to you, but the person you’re speaking with cannot hear you. When you’re ready to be heard again, turn off the Mute feature by tapping this icon again.
Mute—Tap this icon to turn off your iPhone’s microphone. You can still hear what’s being said to you, but the person you’re speaking with cannot hear you. When you’re ready to be heard again, turn off the Mute feature by tapping this icon again.
![]() Keypad—Replace the current Call in Progress screen with the numeric telephone keypad. This is necessary for navigating your way through voicemail trees (for example, when you’re told to press 1 for English, press 2 to speak with an operator, press 3 to track an order, and so on).
Keypad—Replace the current Call in Progress screen with the numeric telephone keypad. This is necessary for navigating your way through voicemail trees (for example, when you’re told to press 1 for English, press 2 to speak with an operator, press 3 to track an order, and so on).
![]() Speaker (or Audio)—Tap the Speaker icon to switch from Handset mode (in which you hold the iPhone up to your ear to have a phone conversation) to Speaker mode, which turns your iPhone into a speakerphone. If you’re using your iPhone with an optional Bluetooth headset (such as AirPods) or CarPlay, a third Headset/AirPods or CarPlay option is displayed.
Speaker (or Audio)—Tap the Speaker icon to switch from Handset mode (in which you hold the iPhone up to your ear to have a phone conversation) to Speaker mode, which turns your iPhone into a speakerphone. If you’re using your iPhone with an optional Bluetooth headset (such as AirPods) or CarPlay, a third Headset/AirPods or CarPlay option is displayed.
![]() Add Call (+)—During a conversation with someone, you can initiate a conference call and bring a third party into the conversation by tapping Add Call, as described later in this chapter.
Add Call (+)—During a conversation with someone, you can initiate a conference call and bring a third party into the conversation by tapping Add Call, as described later in this chapter.
![]() FaceTime—If the person to whom you’re talking is also using an iPhone, iPad, or Mac, and both devices have Internet access, tap the FaceTime icon to switch from a traditional voice call to a real-time video call using the FaceTime app. This is a free service.
FaceTime—If the person to whom you’re talking is also using an iPhone, iPad, or Mac, and both devices have Internet access, tap the FaceTime icon to switch from a traditional voice call to a real-time video call using the FaceTime app. This is a free service.
![]() Tip
Tip
In addition to being able to launch FaceTime from the Phone app and switch from a normal call to a video call, you can use the separate FaceTime app to initiate a video or audio-only call from your iPhone (or iPad) that uses an Internet connection.
Many cellular service providers allow FaceTime calls to be made using a 4G LTE connection, although a Wi-Fi connection typically works better.
![]() Contacts—While you’re conversing on the phone, you can access your Contacts database and look up someone’s information by tapping this option.
Contacts—While you’re conversing on the phone, you can access your Contacts database and look up someone’s information by tapping this option.
![]() End—Tap the large red-and-white End button or press the end call button on your headset, if applicable, to terminate the call.
End—Tap the large red-and-white End button or press the end call button on your headset, if applicable, to terminate the call.
Your phone conversation can continue while you’re using other apps. To launch another app, press the Home button, and tap the app icon from the Home screen. To access the app switcher, double press the Home button and then tap any app icon that appears. To access the Control Center, place your finger near the bottom of the screen and swipe up.
When you view the Home screen or use another app while still on the phone, a green-and-white banner at the top of the screen says, “Touch to return to call,” along with a call timer. Tap this green bar to return to the Phone app.
Responding to a Call Waiting Signal While on the Phone
As you’re chatting it up on the phone, if someone else tries to call you will hear a call waiting tone. The caller ID information of the new caller is displayed on the screen, along with several command icons and buttons (see Figure 10.8). These commands are End & Accept, Send to Voicemail, or Hold & Accept.
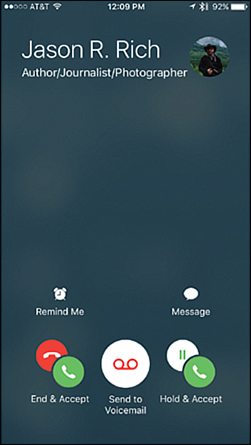
FIGURE 10.8
The Call Waiting feature allows you to answer a second call while you’re already engaged in a phone conversation.
If you place the first call on hold and answer the new incoming call (by tapping the Hold & Accept icon), you then have the opportunity to merge the two calls and create a conference call or switch between the two calls and speak with each person individually (while the other is on hold).
While engaged in a conference call on your iPhone, the names of the other parties on the call are displayed along the top of the screen, along with an Info icon. Tap the circular “i” icon to the right of this information to reveal a new screen that enables you to manage any of the parties involved with the conference call.
While you’re engaged in a three-way call (with two other parties), you can tap the Add Call option again to add more parties to the conference call. How many parties you can add to a conference call is determined by your cellular service provider.
On the secondary Conference Call Info screen, associated with each name/Caller ID number is an End button and a Private button. Tap End to disconnect that party, or tap Private to speak with that party privately and place the other party (or parties) on hold. You can then reestablish the conference call by tapping the Back button to return to the previous Conference Call screen, and then tap the Merge Calls icon again.
![]() Tip
Tip
To turn off the Call Waiting feature, so you’re never disturbed by another incoming caller during a phone conversation, launch Settings, tap Phone, and then tap Call Waiting. Turn off the virtual switch associated with Call Waiting.
Making Calls from Your iPhone
There are several ways to initiate a phone call from your iPhone; however, you typically must first launch the Phone app. Then, do the following:
![]() Dial a number manually using the keypad.
Dial a number manually using the keypad.
![]() Access a listing from your Contacts database (from within the Phone app), choose a number, and tap on it to dial that phone number.
Access a listing from your Contacts database (from within the Phone app), choose a number, and tap on it to dial that phone number.
![]() Use Siri (which is explained in Chapter 4, “Say It and Make It So Using Siri”). This can be done anytime, regardless of what app is running on your iPhone.
Use Siri (which is explained in Chapter 4, “Say It and Make It So Using Siri”). This can be done anytime, regardless of what app is running on your iPhone.
If you’re using one of the newer iPhone models and the “Hey Siri” feature is active, simply say “Hey Siri, call [name]” or “Hey Siri, call [name] at [location (such as home or work)]” to initiate a call.
![]() Redial a number from the Phone app’s Recents call log.
Redial a number from the Phone app’s Recents call log.
![]() Select and dial a phone number from the Phone app’s Favorites list.
Select and dial a phone number from the Phone app’s Favorites list.
![]() Dial a number displayed in another compatible app or iOS 11 feature, such as Maps, Messages, Mail, Safari, Contacts, or the Notification Center window. When you tap a displayed phone number, it dials that number and initiates a call using the Phone app.
Dial a number displayed in another compatible app or iOS 11 feature, such as Maps, Messages, Mail, Safari, Contacts, or the Notification Center window. When you tap a displayed phone number, it dials that number and initiates a call using the Phone app.
Manual Dialing
To initiate a call by manually dialing a phone number, launch the Phone app and tap the Keypad option. Enter the desired phone number, one digit at a time, and press the green-and-white Call button to initiate the call.
![]() Tip
Tip
As you’re manually entering a phone number, if you want to create a Contacts entry for it, tap the Add Number option, which is directly below the number you’ve entered, and then tap Create New Contact or Add to Existing Contact.
![]() Note
Note
You can also use the Cut, Copy, and Paste features of iOS 11 to copy a phone number displayed in another app, and then paste it into the phone number field on the Keypad screen. Or, if you tap a phone number displayed in the Contacts app, listed in an email message, or displayed in a web page while you’re using Safari, the Phone app automatically launches and a call to that number is initiated.
Dialing from a Contacts Entry
In the Phone app, you can look up any phone number stored in the Contacts app. Tap the Contacts icon at the bottom of the Phone app screen. When you tap a phone number in a Contacts entry (see Figure 10.9), a call is initiated.
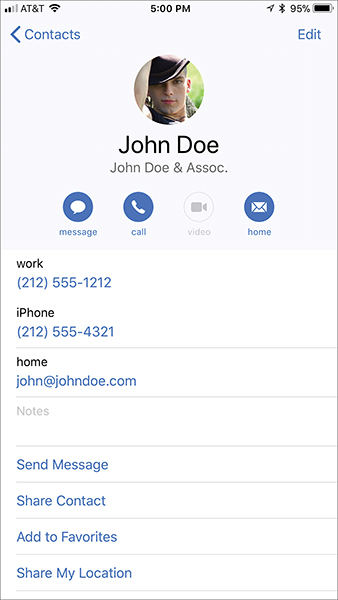
FIGURE 10.9
Initiate a call by tapping any telephone number listed in a Contacts app entry.
To look up the number for a business, restaurant, tourist attraction, or service, launch the Maps app and type the name of the business you’re looking for (along with its city and state) in the Search for a Place or Address field. Tap on the appropriate search result, and then scroll down to the phone number listing (see Figure 10.10). Tap the phone number or the Call button to launch the Phone app and initiate a call. (This also works with the optional Yelp! app, as well as other phone directory and business database apps.)
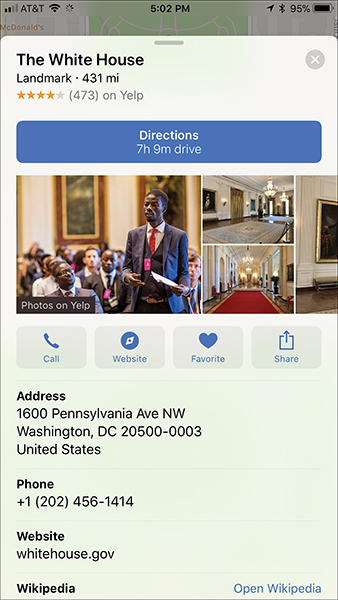
FIGURE 10.10
Use the Maps app to look up the phone number for a business, service, restaurant, or tourist attraction.
Using the Call Over Wi-Fi Calling Feature
Typically, when you initiate a call from your iPhone, it connects to the cellular network you’ve subscribed to, such as AT&T Wireless, Verizon Wireless, Sprint, or T-Mobile (if you’re in the United States). Thanks to the Call Over Wi-Fi feature, if you’re not in a good cellular network coverage area, but your compatible iPhone is within range of a Wi-Fi hotspot, you can still make a call to any landline or other cellphone via the Internet.
Once you initiate a Wi-Fi call, if you leave the Wi-Fi hotspot, your call is automatically transferred to the cellular network’s Voice Over LTE feature, if your cellular service supports this option. Likewise, if you’re using the Voice Over LTE feature and a Wi-Fi signal becomes available, the call is seamlessly transferred to the Wi-Fi network.
If a Wi-Fi network is available, manually initiate calls using the Call Over Wi-Fi feature (rather than over a cellular network) by launching Settings, tapping the Phone option, and then turning the virtual switch associated with the Wi-Fi Calling option.
![]() Tip
Tip
From either any iPhone or iPad, you can also make and receive Internet-based Voice-over-IP (VoIP) phone calls using Skype or a similar app. These calls can be made to or received from any landline or cell phone. You can participate in Skype-to-Skype calls for free. For other calls, Skype charges a very low per-minute rate (typically $0.02 or less per minute).
In addition to VoIP calls, Skype can be used for free video calls with Mac, PC, iOS mobile device, Android mobile device, or Windows mobile device users. Using FaceTime for video or audio-only calls, however, works only with other Mac or iOS mobile device users.
Skype is also ideal for saving money when you’re making international calls from the United States, or to avoid hefty international roaming charges when you’re calling home to the United States when traveling overseas.
Yet another Internet calling option is to use the audio calling feature offered by Facebook Messenger to initiate calls with your Facebook friends.
Managing Your Voicemail
Your unique iPhone phone number comes with voicemail, which enables people to leave you messages if you’re not able to speak with them when they call. Just as with any voicemail service, you can record your outgoing message, play back missed messages from your iPhone, or call your iPhone’s voicemail service and listen to your calls from another phone.
Using the Voicemail Transcription feature, you’re able to read text-based versions of your incoming voicemail messages that your iPhone creates for you. This feature works automatically.
Recording Your Outgoing Message
To record your outgoing voicemail message, which is what people hear when they call your iPhone and you don’t answer, follow these steps. Alternatively, you can have a computer-generated voice instruct callers to leave a message.
1. Launch the Phone app from the Home screen.
2. Tap the Voicemail icon, displayed in the lower-right corner of the screen.
3. In the upper-left corner of the Voicemail screen, tap the Greeting option.
4. From the Greeting screen, tap the Default option to skip recording a message and have a computer voice use a generic message. Alternatively, tap the Custom option to record your own outgoing voicemail message and continue to step 5.
5. Tap the Record option that’s also displayed on the Greeting screen. Hold the phone up to your mouth and begin recording your message.
6. When you’re finished recording, tap the Stop option. You can play back your message by tapping the Play option, or tap the Save option to save your message and activate it.
Playing and Deleting Voicemail Messages
It’s possible to listen to audio voicemail messages either from your iPhone or by calling your iPhone’s voicemail from another phone.
Listening to Voicemail From Your iPhone
From your iPhone, follow these steps to listen to and then save or delete an incoming voicemail message:
1. Launch the Phone app from the Home screen, or by swiping a voicemail notification appearing on the Notification Center screen.
2. Tap the Voicemail icon displayed in the bottom-right corner of the screen.
3. Under the Voicemail heading at the top of the screen is a listing of missed voicemail messages. Tap a message to highlight it.
![]() Note
Note
When you see a blue dot to the left of a voicemail message listing, this indicates it’s a new, unheard message. After you listen to the message, the blue dot disappears. When you tap the message to listen to it, the blue dot changes to a Pause/Play icon.
4. After a message is highlighted, tap the small Play/Pause icon. The message begins playing. It might, however, take a few seconds for the message to load. Expect a brief pause before the message begins.
5. Displayed immediately below the message’s Caller ID information is a transcription of the message. It appears a minute or two after the message is recorded by the caller.
6. Near the bottom of the voicemail listing is a slider that depicts the length of the message, along with Speaker/Audio, Call Back, and Delete options. As your message plays, the timer slider moves to the right. You can listen to parts of the message again by moving this slider around with your finger.
![]() Tip
Tip
Associated with each incoming voicemail message is a Share icon and an Info icon. Tap the Share icon to access a variety of options for sharing or exporting the voicemail message. Tap the Info icon to reveal information about the caller and, among other things, view options that enable you to call back that person or create a new contact for him/her in the Contacts app. It’s also possible to keep the caller from reaching you in the future by tapping the Block This Caller option.
7. When you’re finished listening to the message, either leave the listing alone (which keeps the message saved on your phone) or tap the Delete option to erase it. You also have the option of calling back the person who left the message by tapping the Call Back option.
8. To exit the voicemail options, tap any of the other command icons displayed at the bottom of the Phone app’s screen, or press the Home button on your iPhone.
![]() Tip
Tip
You might find it easier to listen to your voicemail messages via speaker phone, by first tapping the Speaker/Audio option that’s displayed below the timer slider.
![]() Tip
Tip
If you accidentally delete an important voicemail, don’t panic. From the voicemail screen, scroll to the very bottom of your voicemail message list and tap the Deleted Messages icon. Tap a message to highlight it, and then tap the Undelete icon.
Using the Message Transcription Feature
Thanks to automatic voicemail message transcription, when a caller leaves a voicemail message, the iPhone automatically transcribes that message (typically within a minute or two) and offers both text and audio versions of the message.
To access this feature, launch the Phone app and tap the Voicemail icon. Tap a listing for a new voicemail message. In addition to the familiar Play/Pause icon, as well as a slider for fast forwarding and rewinding through the audio message, you see a text transcription of the voicemail message.
Tap the Share icon to forward the message to yourself or other people using any of the options offered by the Share menu, such as text message or email. You also can export the voicemail message transcript into a compatible app, such as Notes.
Like the Dictation feature, the voicemail transcription feature often has trouble accurately interpreting words if the person speaking is in a noisy area or doesn’t speak clearly. Consequently, this feature does not always provide 100-percent accurate voicemail transcript, especially for longer messages, but it does offer a readable version of the message that you can quickly review.
Creating and Using a Favorites List
The Phone app allows you to maintain a Favorites list, which is a customized list of your most frequently dialed contacts. To access this list, launch the Phone app, and then tap the Favorites icon.
To add a contact to the Favorites list, tap the + icon in the upper-right corner of the screen. Select any listing from your Contacts database, and tap it. When the complete listing for that entry appears, tap the specific phone number you want listed in your Favorites list. The newly created Favorites listing appears at the end of your Favorites list.
![]() Tip
Tip
Each Favorites entry can have one name and one phone number associated with it, so if a Contact entry has multiple phone numbers listed, choose one. If you want quick access to someone’s home, work, and mobile numbers from your Favorites list, create three separate entries for that person.
When you create the entry in Favorites, the type of phone number (Home, Work, Mobile, iPhone, and so on) is displayed to the right of the person’s name. A Favorites listing can also relate to someone’s FaceTime identifier (their iPhone number, Apple ID, or the email address they used to set up their FaceTime account).
To edit the contacts already listed in your Favorites list, tap the Edit option in the upper-left corner of the screen.
As you’re viewing your Favorites list, tap the Info (“i”) icon, shown to the right of each listing. This enables you to view that person’s entire entry from within your Contacts database.
To dial a phone number listed in your Favorites list, simply tap its listing. The Phone app automatically dials the number and initiates a call.
Accessing Your Recents Call Log
The Phone app automatically keeps track of all incoming and outgoing calls. To access this detailed call log, launch the Phone app, and then tap the Recents icon at the bottom of the screen.
At the top of the Recents screen are two command tabs, labeled All and Missed, along with an Edit option. Tap the All tab to view a detailed listing of all incoming and outgoing calls, displayed in reverse-chronological order. Missed incoming calls are displayed in red. Tap the Missed tab to see a listing of calls you didn’t answer. Tap the Edit option to delete specific calls from this listing, or tap the Info (“i”) icon to view more details about that caller, including their recent call history with you.
![]() Tip
Tip
Missed calls are also displayed in the Notification Center window on your iPhone or as an icon badge or alert on your Home screen, depending on how you set up Notifications for the Phone app in the Settings app. To customize the Notifications options for the Phone app, launch Settings and tap the Notifications option. Then tap the Phone option. You can adjust how your iPhone alerts you to missed calls by personalizing the options on this Phone screen.
Each listing in the Recents call log displays the name of the person you spoke with (based on data from your Contacts database or the Caller ID feature) or their phone number. If it’s someone from your Contacts database, information about which phone number (home, work, mobile, or such) the caller used appears below the name.
If the same person called you, or you called that person, multiple times in a row, a number in parentheses indicates how many calls were made to or from that person. This is displayed to the right of the name or phone number.
On the right side of the screen, with each Recents listing, is the time/date the call was made or received. To view the Contacts entry related to that person, tap the Info icon associated with the listing. At the top of a contact’s entry screen are details about the call itself, including its time and date, whether it was an incoming or outgoing call, and its duration.
To call someone back who is listed in the Recents list, tap anywhere on that listing except for on the Info icon.
Customizing Ringtones
Thanks to the iTunes Store, you’re able to purchase and download optional ringtones for your iPhone. Use one ringtone as your generic ringtone for all incoming calls, or you can assign specific ringtones to individual people.
![]() Tip
Tip
iOS 11 comes with more than two dozen preinstalled ringtones. To shop for ringtones, launch Settings, tap Sounds & Haptics, and then tap the Ringtone option. Tap the Tone Store option and then tap Tones to access the Ringtones section of the iTunes Store. (An Internet connection is required.)
When you purchase and download a new ringtone, it becomes available on your iPhone’s internal ringtones list. Ringtones from the iTunes Store cost either $0.99 or $1.29 each. Before you purchase a ringtone, you can preview it by tapping the ringtone’s listing and then tapping its name.
Using a specialized app, such as Ringtones - Unlimited Ringtones Maker, Ringtone Maker, or Ringtones for Me, it’s also possible to create your own ringtones using music or audio from your iTunes library.
To choose a default ringtone for all your incoming calls, launch Settings and select the Sounds & Haptics option. Scroll down to the Ringtone option and tap it. A complete listing of ringtones stored on your iPhone is displayed. Select the one you want to hear when you receive calls.
Picking Custom Ringtones for Specific Contacts
To assign a custom ringtone to a specific contact so that you hear it when that person calls your iPhone, follow these steps:
1. Launch the Contacts app.
2. Using the Search field or by scrolling through your listing of entries, find the specific contact with whom you want to link a custom ringtone.
3. When the contact is selected and you’re looking at that Contacts entry, tap the Edit option in the upper-right corner of the screen.
4. From the Info screen that displays that contact entry’s data, scroll down to the Ringtone field and tap it.
5. When the Ringtone screen appears, select a specific ringtone from the list that you want to assign to the contact and tap it. You can choose a specific song (purchased from iTunes) or ringer sound that reminds you of that person.
6. Tap the Done icon to save your selection and return to the contact’s Info screen.
7. When that contact calls you, you will hear the ringtone you just linked to that contact (as opposed to the default ringtone).
![]() Tip
Tip
Also from a Contact’s entry screen in the Contacts app, it’s possible to choose a special vibration pattern for the phone when that person calls. To do this, tap the Vibration option and choose a vibration pattern from the Vibration menu, or scroll to the bottom of this screen and tap the Create New Vibration option to create a custom vibration pattern for that contact.
![]() More Info
More Info
Many states have outlawed using a cell phone while driving unless you have a wireless headset or hands-free (CarPlay) feature on your phone. Although the speakerphone feature of your iPhone counts as a hands-free feature, to ensure the best possible call quality while you’re driving, invest in a wireless Bluetooth headset.
Using a headset enables you to keep your hands free while you’re talking so you can easily access other apps or iPhone features during a phone conversation.
Bluetooth wireless headsets are priced as low as $20 but can cost as much as $200. If you want to ensure the highest-quality phone conversations possible so that people can hear you and you can hear them even if there’s background noise present, invest in a good-quality Bluetooth wireless headset that includes a noise-canceling microphone and a good-quality speaker. Plus, choose a headset that’s comfortable to wear and that has a long battery life.
Apple’s popular wireless AirPods work as stereo headphones when you place one AirPod in each ear. However, using just one AirPod (in one ear), it can be used as a wireless headset with the Phone app. To learn more about this optional $159.00 accessory, visit www.apple.com/airpods, or visit any Apple Store or authorized Apple dealer.
Built into iOS 11 is a new Emergency SOS feature. After you turn on the feature, when you rapidly press the Sleep/Wake button on your iPhone five times, your iPhone automatically calls one or more Emergency Contacts that you’ve established.
To set up this feature, launch Settings and tap the Emergency SOS option. Turn on the virtual switch associated with the Auto Call option. Tap Edit Emergency Contacts in Health to select whom the iPhone should call in an emergency.