1. Tips and Tricks for Customizing Settings
In this chapter
![]() Personalize your iPhone or iPad by adjusting the options available from within Settings
Personalize your iPhone or iPad by adjusting the options available from within Settings
![]() Customize the Lock screen and Home screen
Customize the Lock screen and Home screen
![]() Learn to use Control Center
Learn to use Control Center
![]() Discover what’s possible from the Lock screen
Discover what’s possible from the Lock screen
Thanks to iOS 9, the functionality of your iPhone or iPad is more customizable than ever. You can adjust many device and app-related options from within Settings, plus use Notification Center to help you manage alerts, alarms, notifications, and other informative content in one centralized location. Meanwhile, iOS 9’s Control Center gives you quick access to a handful of commonly used features and functions.
This chapter focuses on personalizing and customizing your iOS mobile device and gets you acquainted with Settings, Control Center, Notification Center, and Spotlight Search.
In Settings, it’s possible to personalize and customize many different options that give you more control than ever over how your iPhone or iPad responds to you, while managing your apps, files, content, and data.
After iOS 9 is installed onto your iPhone or iPad, you’ll definitely want to manually adjust some of the options in Settings, as opposed to relying entirely on their default settings.
![]() Tip
Tip
As you install additional apps onto your iPhone or iPad, if those apps enable you to customize specific features within the app, those customization options are often available to you from within Settings.
To customize iCloud-related functions, including Family Sharing and iCloud Drive, launch Settings and tap on the iCloud menu option. More about using iCloud with your iOS mobile device is covered in Chapter 5, “Use iCloud and the iCloud Drive App from Your iPhone or iPad.”
Using the Settings App
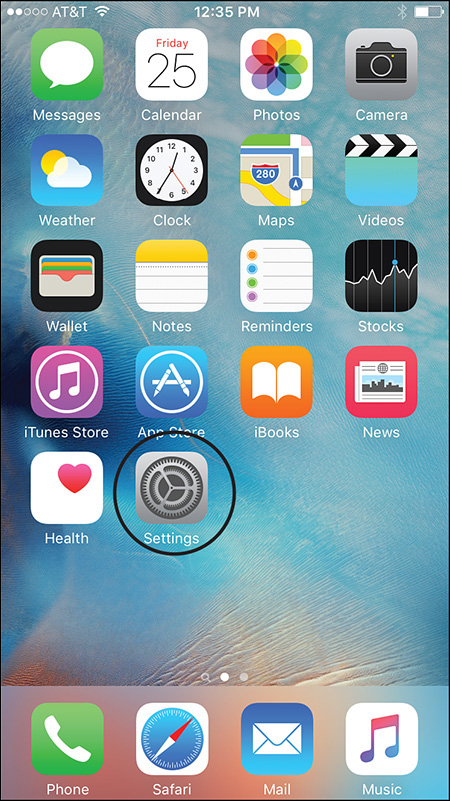
After you launch Settings, the menus and submenus are displayed in a hierarchical structure. Under the main Settings heading are a handful of menu options relating to various apps and functions offered by your iPhone or iPad (shown in Figure 1.2). When you tap on many of these options, a submenu displays with additional related options.
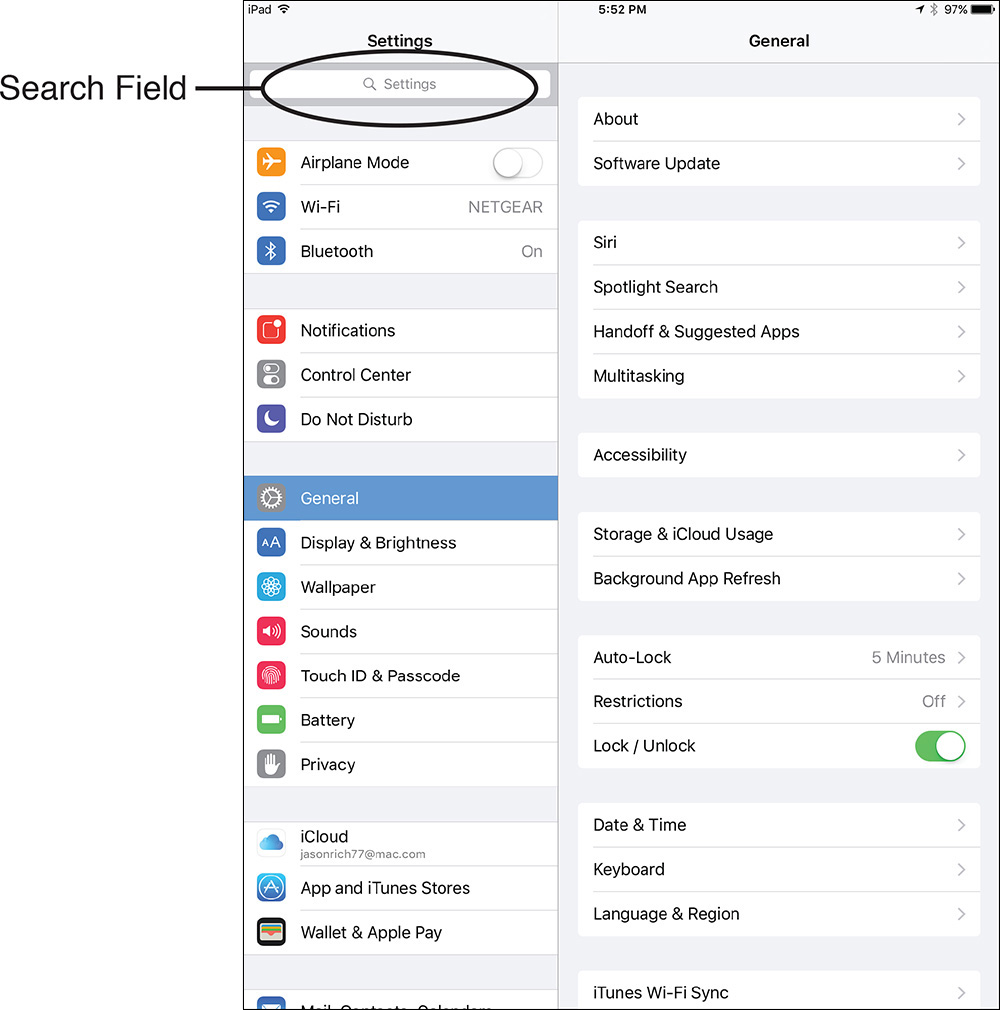
Figure 1.2 On the iPad, the left side of the screen shows the main Settings menu. To the right are available submenu options.
![]() Note
Note
Added to the iOS 9 edition of Settings is a new Search field. Use it to quickly find which feature/function you want to adjust, simply by typing a keyword associated with that feature/function.
When you access Settings (shown in Figure 1.3), you’ll immediately discover some new menu options that were not available in iOS 8. Keep in mind that when an option’s virtual switch is positioned to the right and you see green, that option is turned on. When the switch is positioned to the left, it’s turned off.
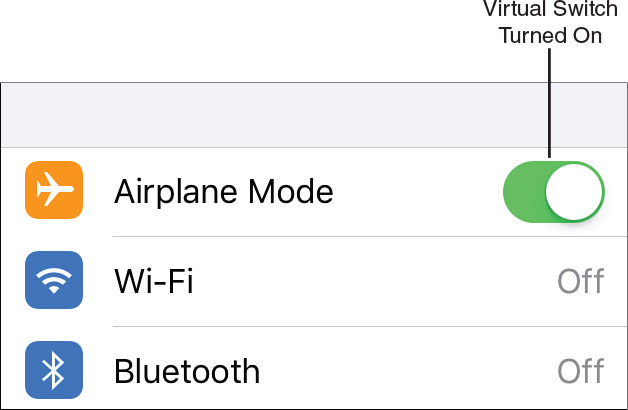
Figure 1.3 To turn on a feature, the switch should be positioned to the right and green should be showing.
For example, if you tap on the Wallpaper option, the submenus associated with customizing your device’s Lock and Home screens appear. By tapping on the wallpaper thumbnails displayed under the Wallpaper heading, additional submenu options are displayed.
As you work your way deeper into each submenu, a left-pointing arrow icon appears near the upper-left corner of each submenu screen. It enables you to exit out of each Settings submenu and move a step back toward the main Settings menu. At any time, tap on this left-pointing arrow icon to exit out of the submenu you’re in (before or after you’ve made adjustments to the various option settings). If you opt to make adjustments, those changes are automatically saved when you exit out of the menu or submenu within Settings. If you exit out of a menu or submenu without making any changes, nothing is altered.
Main Options Available from the Settings App
The following is a list of the most commonly used main options available from the Settings app. These vary slightly, based on whether you’re using an iPhone, an iPad, or another iOS device and how that device is configured.
Airplane Mode (iPhone/iPad Cellular + Wi-Fi Models)
The Airplane mode option has no submenu; it simply offers one virtual on/off switch. When Airplane mode is turned on, a small airplane icon appears in the upper-left corner of the iPhone or iPad’s screen, as shown in Figure 1.4.
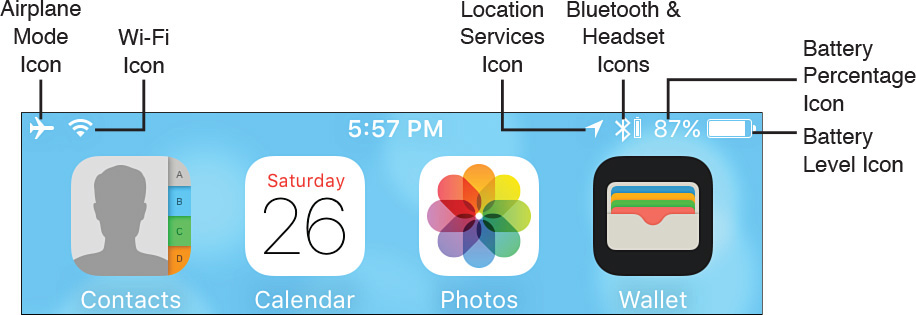
Figure 1.4 In Airplane mode, a small airplane icon appears in the upper-left corner of your iPhone or iPad’s screen.
Even while your device is in Airplane mode, you can still turn on Wi-Fi and/or Bluetooth, enabling the iOS device to access the Web via a Wi-Fi hotspot (to utilize the wireless web access available on some commercial aircrafts, for example), and also communicate with a Bluetooth-enabled wireless keyboard, external speaker(s), and/or headset.
![]() Tip
Tip
When you turn on Airplane mode, the Wi-Fi and Bluetooth features of your iPhone or iPad get turned off automatically. You can, however, turn them back on manually while still in Airplane mode. This can be done from within Settings or the Control Center.
In Figure 1.4, the iPhone is in Airplane mode (the airplane icon is displayed in the upper-left corner of the screen). However, the smartphone is also connected to a Wi-Fi network. You can see the Wi-Fi signal strength icon displayed in the upper-left corner of the screen, near the Airplane Mode icon. In addition, this iPhone has Bluetooth turned on and a Bluetooth headset is linked to the phone. You can tell this from the Bluetooth icons displayed in the upper-right corner of the screen, next to the battery indicator icon and percentage meter.
The tiny arrow icon displayed to the left of the Bluetooth icon is the Location Services icon. When it’s visible, this means the main Location Services feature of your iPhone or iPad is turned on, and one or more apps are utilizing the feature to automatically determine the current location of your mobile device.
Turn on Airplane mode on your iPhone or iPad when plugging it in to speed up the charging process. Keep in mind, however, that this prohibits the device from receiving calls (they go straight to voice mail), and the iPhone or iPad does not receive incoming text messages, emails, or FaceTime calls until Airplane mode is turned off.
Wi-Fi (iPhone/iPad)
Located directly below the Airplane Mode option is the Wi-Fi option. When you tap this option, a submenu containing a virtual on/off switch is displayed. When it’s turned on, a listing of available Wi-Fi networks (hotspots) is displayed directly below the Choose a Network heading.
![]() Tip
Tip
When you’re reviewing a list of available Wi-Fi networks, look to the right side of each listing for a lock icon. This indicates that the Wi-Fi hotspot is password protected. Tap on a hotspot that does not display a lock icon unless you possess the password for that network.
Also on the right side of each listing is the signal strength of each Wi-Fi hotspot in your immediate area.
To choose any Wi-Fi hotspot listed, simply tap on it. In a few seconds, a check mark appears to the left of your selected Wi-Fi hotspot, and a Wi-Fi signal indicator appears in the upper-left corner of your device’s screen, indicating that a Wi-Fi connection has been established.
If you select a Wi-Fi network that is password protected, when you tap on it, an Enter Password window appears on your screen. Using the device’s virtual keyboard, enter the correct password to connect to the Wi-Fi network you selected. You will often have to do this when connecting to a Wi-Fi hotspot offered in a hotel, for example.
![]() Note
Note
If you attempt to access a public Wi-Fi hotspot—in an airport, library, or school, for example—you might be required to accept terms of a user agreement before Internet access is granted. In this case, your iOS device will say it’s connected to a Wi-Fi hotspot, but until you launch Safari and accept the user agreement terms, your apps will not be able to access the Internet.
Benefits of Connecting to a Wi-Fi Hotspot to Access the Web
There are several benefits to connecting to the Internet using a Wi-Fi connection, as opposed to a cellular-based 3G/4G (LTE) connection (if you’re using an iPhone or iPad Cellular + Wi-Fi model), including the following:
![]() A Wi-Fi connection is typically faster than a 3G/4G (LTE) connection. (Although if you’re within a 4G LTE coverage area, you might experience faster connectivity using it as opposed to Wi-Fi.)
A Wi-Fi connection is typically faster than a 3G/4G (LTE) connection. (Although if you’re within a 4G LTE coverage area, you might experience faster connectivity using it as opposed to Wi-Fi.)
![]() When connected to the Internet via Wi-Fi, you can send and receive as much data as you’d like without worrying about using up the monthly wireless data allocation for your cellular data plan. This is the best option when streaming content from the Internet, such as music or video programming.
When connected to the Internet via Wi-Fi, you can send and receive as much data as you’d like without worrying about using up the monthly wireless data allocation for your cellular data plan. This is the best option when streaming content from the Internet, such as music or video programming.
![]() Using a Wi-Fi connection, you can download large files, such as movies and TV show episodes, from the iTunes Store directly onto your device. Use the iCloud Backup feature to create wireless backups of your iPhone or iPad that get stored within iCloud.
Using a Wi-Fi connection, you can download large files, such as movies and TV show episodes, from the iTunes Store directly onto your device. Use the iCloud Backup feature to create wireless backups of your iPhone or iPad that get stored within iCloud.
![]() Note
Note
The main drawback to using a Wi-Fi connection is that a Wi-Fi hotspot must be present, and you must stay within the radius of that hotspot to remain connected to the Internet. The signal of most Wi-Fi hotspots extends for only several hundred feet from the wireless access point (the Internet router). When you go beyond this signal radius, your Internet connection will be lost.
If you leave the Wi-Fi option turned on, your iPhone or iPad can automatically find and connect to an available Wi-Fi hotspot based on whether you have the Ask to Join Networks option turned on or off. When the Ask To Join Networks feature is turned off, your iPhone or iPad reconnects automatically to wireless networks and Wi-Fi hotspots that you have connected to previously, such as each time you return to your home or office.
![]() Tip
Tip
By turning off the Ask To Join Networks option found in the Wi-Fi submenu of Settings, your iOS mobile device automatically joins known Wi-Fi networks without first asking you for permission.
Bluetooth (iPhone/iPad)
Turn on Bluetooth functionality to use compatible Bluetooth devices, such as a wireless headset, external keyboard, or wireless speakers, with your iOS mobile device. Bluetooth is also needed to use AirDrop and certain iOS 9 Continuity features (including Handoff) that enable your iPhone or iPad to communicate with other iOS mobile devices and/or Macs.
In Settings, tap Bluetooth and then turn on the virtual switch in the submenu. The first time you use a particular Bluetooth device with your iOS mobile device, you will probably need to pair it. Follow the directions that came with the device or accessory for performing this initial setup task. Some Bluetooth 4.0 devices automatically pair with your iOS device. The pairing process should take only about a minute or two. Multiple Bluetooth devices can be used simultaneously with your iPhone or iPad.
Keep in mind that after an optional device has been paired once, as long as it’s turned on and in close proximity to your iOS device, and the iOS device has the Bluetooth feature turned on, the two devices will automatically establish a wireless connection and work together.
![]() Tip
Tip
If you’re using your iPhone or iPad without having a Bluetooth device connected, and you do not want to use the Handoff feature built in to iOS 9, turn off the Bluetooth feature altogether. This helps extend the battery life of your iOS device.
![]() Note
Note
Handoff allows your iPhone to forward calls to your iPad, so you can answer them on your tablet. You can also initiate outgoing calls on your iPad that are ultimately routed through your iPhone when the Handoff feature is active on both your iPhone and iPad.
Cellular (iPhone) or Cellular Data (iPad with Cellular + Wi-Fi)
When the Cellular Data option is turned on, your iOS mobile device can access the wireless data network from the wireless service provider to which you’re subscribed. When this option is turned off, your device can access the Internet only via a Wi-Fi connection, assuming that a Wi-Fi hotspot is present.
The Data Roaming option appears on the Cellular submenu. When turned on, Data Roaming enables your iPhone or iPad to connect to a cellular network outside the one you subscribe to through your wireless service provider. The capability to tap into another wireless data network might be useful if you must connect to the Internet, there’s no Wi-Fi hotspot present, and you’re outside your own service provider’s coverage area (such as when traveling abroad).
![]() Caution
Caution
When your iPhone or iPad is permitted to roam (the Data Roaming option is turned on), you will incur hefty roaming charges, often as high as $20 per megabyte (MB). Refrain from using this feature unless you’ve prepurchased a cellular data roaming plan through your service provider, or be prepared to pay a fortune to access the Web.
From the Cellular menu within Settings, you can determine which apps and iPhone or iPad features can use your phone or tablet’s cellular data network in order to connect to the Internet. Scroll down and set the virtual switch that’s associated with each app or device feature to turn it on or off. When turned on, Internet access via a cellular data network and/or Wi-Fi is granted. When turned off, only Wi-Fi Internet access is granted.
Depending on your service provider, you might be able to transform your iOS device into a personal hotspot so other devices can connect wirelessly to the Internet via Wi-Fi using your iPhone or iPad’s cellular data connection. If your provider allows, this option is available from the main Settings menu or within the Cellular submenu.
![]() Note
Note
To use iOS 9’s Continuity and Handoff functions, your iPhone can establish a private wireless hotspot that can be utilized by your own iPad and Mac that are located within Bluetooth range. This enables you to answer incoming calls to your iPhone from your iPad or Mac, for example. This feature is covered in Chapter 4, “Sync, Share, and Print Files Using AirDrop, AirPlay, AirPrint, and Handoff.”
The Cellular menu also enables you to track call time (on the iPhone) and cellular data usage.
Notifications (iPhone/iPad)
This Settings option (shown in Figure 1.5) enables you to determine which apps and app widgets function with Notification Center, plus it enables you to determine the other ways in which apps that generate alerts, alarms, or notifications notify you.
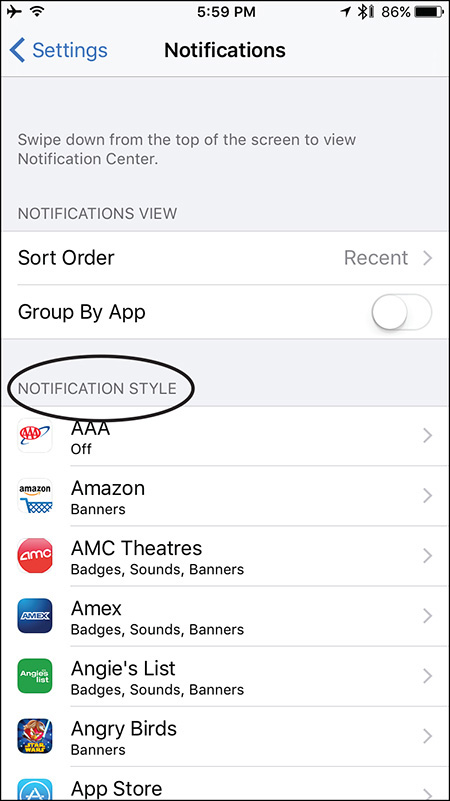
Figure 1.5 All apps that are capable of exchanging data with Notification Center are listed under the heading Notification Style.
![]() Tip
Tip
It’s possible to customize additional content that’s displayed in the Notification Center window, beyond just how alerts, alarms, and notifications are presented. For example, you can toggle between and personalize the appearance of the Today and Notifications screens, which are part of the Notification Center feature.
On the iPhone, displayed near the top of the Notification Center window are two tabs. The Today tab displays a summary of the day’s weather forecast, along with an overview of your appointments and tasks for the day that are stored in the Calendar and Reminders apps. Below this information are options related to the app-specific widgets you’ve turned on. The Notifications tab reveals a list of alerts and notifications generated by all the apps that Notification Center is monitoring. This includes notification of missed calls and text messages, for example.
On the iPad (in landscape mode), the left side of the Notification Center screen displays the date, weather, and details about your upcoming schedule. Tap on the Edit tab to access the app-specific widgets you can set up. On the right side of the screen are your Notifications, which include missed alerts, alarms, and notifications generated by your tablet and the apps running on it.
When the iPad is in portrait mode, displayed near the top-center of the screen are the Today and Notifications tabs.
![]() Note
Note
Widgets are associated with certain specific apps that get displayed within Notification Center. When you use an app’s widget, you can quickly manage or handle tasks associated with that app without manually launching the app. Tap on the Edit button at the bottom of the Notification Center to set up and configure available widgets. Not all apps have widgets associated with them.
When you tap on the Notifications option within Settings and scroll down, a section of the submenu under the Notification Style heading lists all apps currently installed on your iPhone or iPad that are compatible with Notification Center, and that you can set up to automatically share data with Notification Center. Tap on an app listing to customize how that app interacts with Notification Center.
![]() Tip
Tip
When you tap on an app in the Notification Style list, the first option is labeled Allow Notifications. When turned on, this app shares information with Notification Center. When turned off, no alerts, alarms, or notifications will be generated by that app.
When the Show in Notification option is turned on for an app, it displays banners or alerts within Notification Center, and when the Show on Lock Screen option is turned on, those same banners and alerts are displayed on the device’s Lock screen. The device is woken up from Sleep mode to display the app-related alert, alarm, or notification on the Lock screen, even when the device continues to be locked.
When applicable, tap on the Sounds option to customize the audible alert associated with the app.
As you review each app listed under the Notification Style heading, tap on it to reveal a secondary submenu pertaining specifically to that app.
Notifications can be viewed as a banner or alert on the Lock screen and within Notification Center, and/or as a badge on the app icon (displayed on the Home screen).
Some apps have additional options. For example, the Calendar submenu under Notifications (shown in Figure 1.6), displays another submenu that allows you to separately customize alerts, alarms, and notifications related to Upcoming Events, Invitations, Invitee Responses, Shared Calendar Changes, and Events Found in Mail. The submenu that appears (shown in Figure 1.7) for each of these enables you to determine where related notifications are displayed, plus which Alert Style should be used.
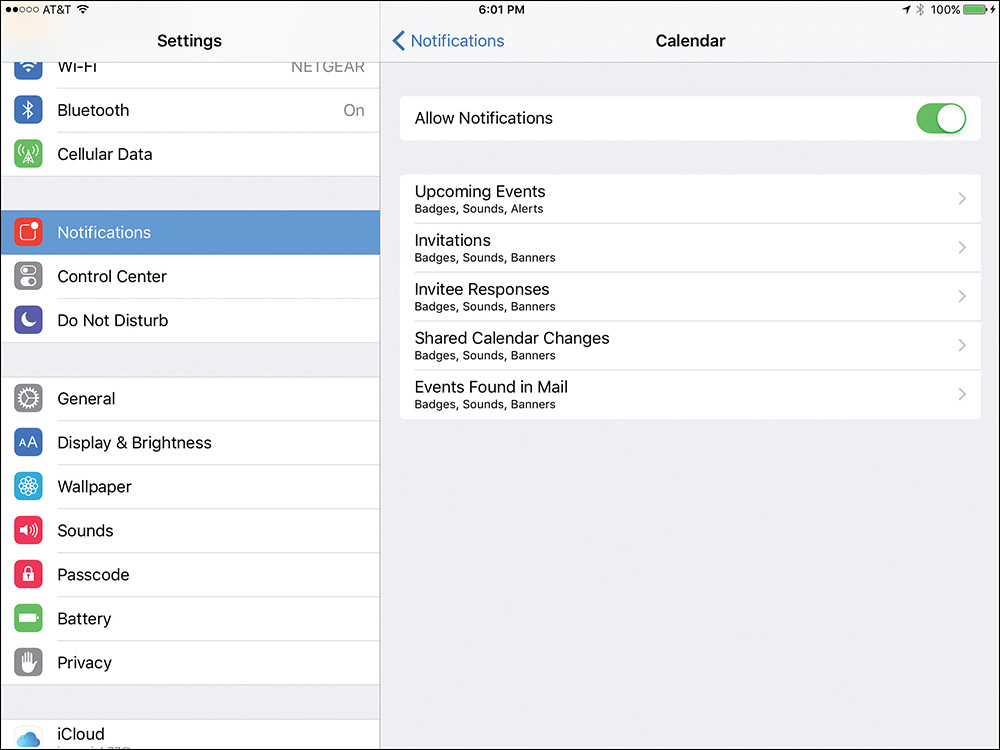
Figure 1.6 Depending on the app, there can be several levels of submenus that enable you to customize how each app exchanges information with Notification Center.
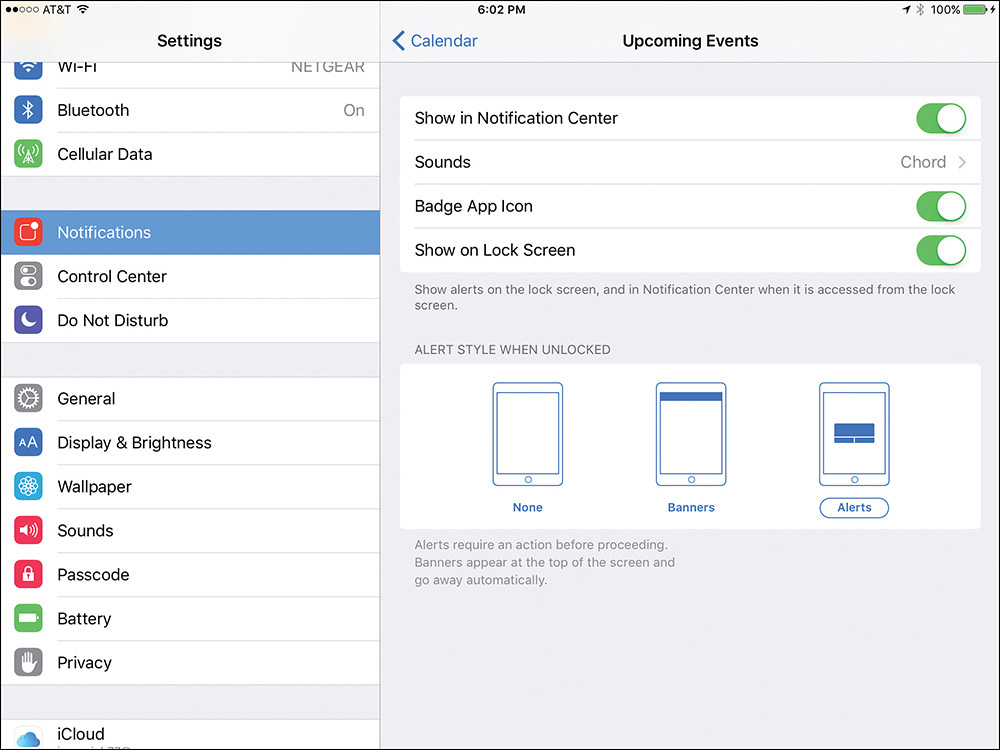
Figure 1.7 New iOS 9 options give you greater control over what information is displayed by Notification Center, plus you can choose how, when, and where that information is displayed.
By selecting an Alert Style, you choose whether a banner or alert is displayed on the screen, even when you are using another app.
If you choose Banners, a pop-up window appears at the top of the screen with the alert-related information. It appears for a few seconds, and then automatically disappears.
If you choose the Alerts option, a pop-up window displays on the iPhone or iPad’s screen until you tap on it to dismiss or address the alarm. The Calendar app generates alerts by default if you set an alarm for an upcoming event.
If you select the None option, no app-specific banner or alert is displayed while you’re using the iPhone or iPad. You can, however, have a custom sound played to get your attention by tapping on the Sounds option.
By turning on the virtual switch associated with the Badge App Icon option (when applicable), the app you’re customizing can display a badge on the Home screen along with its app icon. Some, but not all, apps can utilize Home screen badges.
![]() Note
Note
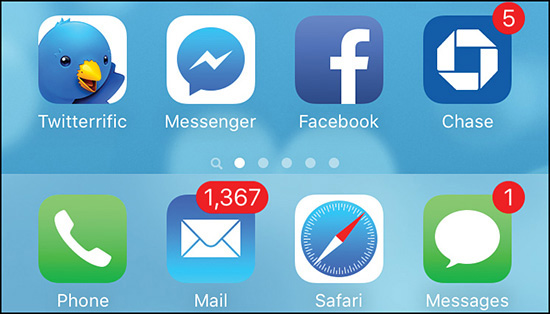
A badge (as shown in Figure 1.8) is a small red-and-white circular graphic that can appear in the upper-right corner of an app icon on your device’s Home screen. The badge contains a number used to graphically show you that something relating to a specific app has changed. For example, a badge appears on your Mail app icon when you’ve received new incoming email messages, indicating how many unread messages you have waiting in your inbox.
Also from the submenu associated with customizing app-specific Notification Center options, you can adjust the sounds generated if that app is capable of playing sounds with alerts, alarms, or notifications.
From the Calendar submenu in the Notification Center settings, tap on the Upcoming Events option, for example, and then tap on the Sounds option to access another submenu that enables you to choose a sound to be associated with event alarms. The default sound for this specific option is called Chord.
Turn on the virtual switch associated with Show In Notification Center if you want alerts related to that app to be displayed in the Notification Center window.
Finally, you can determine whether notifications generated by a particular app should be displayed on the Lock screen when your device is otherwise in Sleep mode. When enabled, the phone or tablet is woken up automatically to display new notifications on the Lock screen for anyone to see, without the device first needing to be unlocked.
Notification Center Quick Tips
![]() Avoid getting bombarded by excessive notifications from apps that aren’t too important to you by manually setting Notification Center to work only with apps that you deem important.
Avoid getting bombarded by excessive notifications from apps that aren’t too important to you by manually setting Notification Center to work only with apps that you deem important.
![]() At the very bottom of the Notification Center settings on the iPhone are two features: AMBER alerts and Emergency Alerts. When turned on, if the government issues an AMBER alert in your area or a message is broadcast over the Emergency Broadcast System, an alert appears on your device.
At the very bottom of the Notification Center settings on the iPhone are two features: AMBER alerts and Emergency Alerts. When turned on, if the government issues an AMBER alert in your area or a message is broadcast over the Emergency Broadcast System, an alert appears on your device.
![]() To protect your privacy, consider setting up Notification Center to refrain from having alerts displayed on your Lock screen. To do this, tap on each app under the Notifications Style heading, and turn off the Show on Lock Screen option.
To protect your privacy, consider setting up Notification Center to refrain from having alerts displayed on your Lock screen. To do this, tap on each app under the Notifications Style heading, and turn off the Show on Lock Screen option.
![]() As you customize how Notification Center displays notifications, the options available to you vary by app. For example, for the Messages app, you can assign Notification Center to repeat alerts between zero and ten times, at two-minute intervals, to get your attention. You also can opt to preview an incoming message in alerts and banners, and in the Notification Center window.
As you customize how Notification Center displays notifications, the options available to you vary by app. For example, for the Messages app, you can assign Notification Center to repeat alerts between zero and ten times, at two-minute intervals, to get your attention. You also can opt to preview an incoming message in alerts and banners, and in the Notification Center window.
Control Center (iPhone/iPad)
Control Center (shown in Figure 1.9) grants you quick access to a handful of smartphone- or tablet-related functions and apps. In the Settings app, tap the Control Center option to choose whether to make Control Center accessible from the Lock screen or while using other apps.
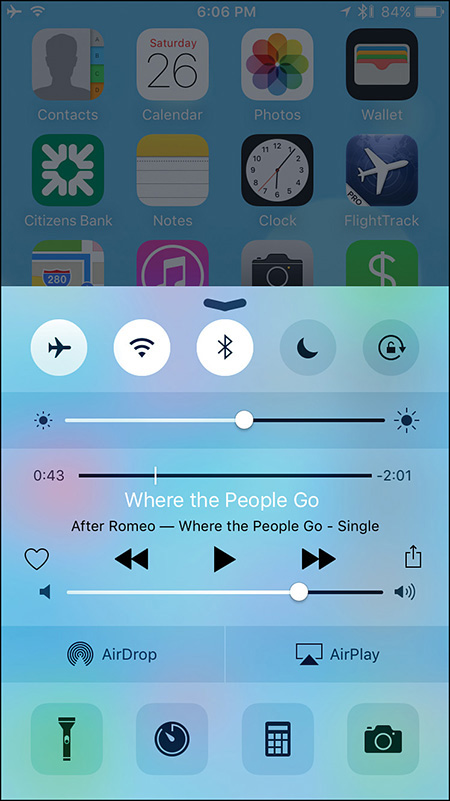
Figure 1.9 Control Center (shown here on the iPhone) gives you quick access to a bunch of commonly used features and functions.
When the Access on Lock Screen option is turned on, you can swipe your finger from the bottom of the screen up to display Control Center from the Lock screen. When the option is turned off, Control Center is accessible only after the device is unlocked. If Access Within Apps is turned off, you can access Control Center from the Home screen, but not while you’re using an app.
If you play a lot of games that require a lot of onscreen tapping or swiping near the bottom of the screen, you might want to disable Control Center to keep it from opening accidently and disrupting your game. To do this, launch Settings, tap on the Control Center option, and then turn off the virtual switch that’s associated with the Access within Apps option.
Do Not Disturb (iPhone/iPad)
This feature enables you to temporarily turn off your iPhone or iPad’s capability to notify you about incoming calls or text messages, as well as app-specific alerts, alarms, or notifications. From the Do Not Disturb menu option within Settings, it’s possible to fully customize this feature.
At any time, you can manually turn on the Do Not Disturb feature by turning on the virtual switch that’s labeled Manual (shown in Figure 1.10). This feature can also be manually turned on from the Control Center. Turn on the Scheduled switch to preset times when you want this mode to automatically activate.

Figure 1.10 It’s possible to manually turn on the Do Not Disturb feature anytime from the Do Not Disturb submenu within Settings by turning on the Manual virtual switch.
General (iPhone/iPad)
When you tap the General option in the Settings app, various other options become available. Unless otherwise noted, each option is available using an iPhone or iPad. Because many of these options remain consistent from iOS 8, only the most important or new options are discussed here. Thus, some of the General options include the following:
![]() About—At the top of this screen is the Name field. Here, you can create a unique name for your mobile device, such as “Jason’s iPad mini 4” or “Jason’s iPhone 6s.” Naming your device is useful if you have multiple devices linked to the same iCloud/Apple ID account. The rest of this About screen includes details about your device, including what version of the iOS is installed, information pertaining to the cellular network it’s connected to (if applicable), and how its internal storage is utilized.
About—At the top of this screen is the Name field. Here, you can create a unique name for your mobile device, such as “Jason’s iPad mini 4” or “Jason’s iPhone 6s.” Naming your device is useful if you have multiple devices linked to the same iCloud/Apple ID account. The rest of this About screen includes details about your device, including what version of the iOS is installed, information pertaining to the cellular network it’s connected to (if applicable), and how its internal storage is utilized.
![]() Software Update—Use this option to update the iOS operating system wirelessly, without having to connect your iPhone or iPad to your primary computer and use the iTunes sync procedure.
Software Update—Use this option to update the iOS operating system wirelessly, without having to connect your iPhone or iPad to your primary computer and use the iTunes sync procedure.
![]() Siri—Enable or disable Siri functionality on compatible devices, and adjust specific settings related to this feature. See Chapter 2, “Using Siri, Dictation, and CarPlay to Interact with Your Mobile Device,” for more information about using Siri.
Siri—Enable or disable Siri functionality on compatible devices, and adjust specific settings related to this feature. See Chapter 2, “Using Siri, Dictation, and CarPlay to Interact with Your Mobile Device,” for more information about using Siri.
![]() Tip
Tip
Many of the newer iPhone and iPad models offer an always turned on “Hey Siri” feature that can be activated from within Settings. When activated, instead of pressing and holding the Home button for two seconds to activate Siri (which can be done from any iOS mobile device), you simply need to say the words, “Hey Siri,” followed by your verbal command or question.
![]() Tip
Tip
From the Siri menu in Settings, you can give Siri a male or female voice, as well as an American, British, or Australian accent. To do this, tap on the Siri option, followed by the Siri Voice option.
![]() Spotlight Search—Tap this option to determine which portions of your iPhone or iPad are searched when you use the Spotlight Search feature. When using one of the newer iOS mobile devices, turn on the Siri Suggestions option so that your iPhone or iPad can recommend apps, people, locations, and other content (based on recent usage) before you type anything into the Spotlight Search field.
Spotlight Search—Tap this option to determine which portions of your iPhone or iPad are searched when you use the Spotlight Search feature. When using one of the newer iOS mobile devices, turn on the Siri Suggestions option so that your iPhone or iPad can recommend apps, people, locations, and other content (based on recent usage) before you type anything into the Spotlight Search field.
To access Spotlight Search from the Home screen, perform a swipe downward that originates from the center of the screen to make the Spotlight Search screen appear.
If you swipe from the top of the screen, you open the Notification Center, so be sure your swipe originates from the center. Separate Search fields also appear in some other apps.
You can access a more robust Spotlight Search screen from the first page of the Home screen by swiping horizontally from left to right.
![]() Note
Note
Turn on Location Services for Spotlight Search to show nearby businesses or points of interest as part of your search results. For example, if you enter “Chinese Food” in the Spotlight Search field, listings for local Chinese food restaurants are displayed. Tap on one of these listings to launch the Maps app and learn more about it.
To turn on Location Services related to Spotlight Search, launch Settings, tap on the Privacy option, and tap on the Location Services option. At the bottom of the Location Services screen, tap on System Services and then make sure the switch for Safari & Spotlight Suggestions is on.
![]() Handoff & Suggested Apps—Handoff enables you to start performing a task on one iOS mobile device (or Mac) and continue it on another Mac or iOS mobile device linked to the same iCloud account. From this submenu, you can also set the Suggested Apps feature, which enables the App Store to recommend specific apps based on your location or what you’re working on. These recommendations appear in the app switcher and the Lock screen.
Handoff & Suggested Apps—Handoff enables you to start performing a task on one iOS mobile device (or Mac) and continue it on another Mac or iOS mobile device linked to the same iCloud account. From this submenu, you can also set the Suggested Apps feature, which enables the App Store to recommend specific apps based on your location or what you’re working on. These recommendations appear in the app switcher and the Lock screen.
![]() Multitasking (iPad)—The options available from the Multitasking submenu within Settings allow you to customize finger gestures used to navigate between apps when using the tablet.
Multitasking (iPad)—The options available from the Multitasking submenu within Settings allow you to customize finger gestures used to navigate between apps when using the tablet.
![]() Storage & iCloud Usage—Tap on this option to see how the storage capacity of your device and your iCloud account are being utilized. Tap on the Manage Storage option under the Storage heading to view storage space utilized by individual apps installed on your iPhone or iPad and manage that content. Tap on the Manage Storage option under the iCloud heading to see how your online (“cloud-based”) storage space is being utilized and manage content. At the bottom of the iCloud Manage Storage screen, tap on the Change Storage Plan option to purchase additional online storage space for your iCloud account.
Storage & iCloud Usage—Tap on this option to see how the storage capacity of your device and your iCloud account are being utilized. Tap on the Manage Storage option under the Storage heading to view storage space utilized by individual apps installed on your iPhone or iPad and manage that content. Tap on the Manage Storage option under the iCloud heading to see how your online (“cloud-based”) storage space is being utilized and manage content. At the bottom of the iCloud Manage Storage screen, tap on the Change Storage Plan option to purchase additional online storage space for your iCloud account.
![]() Background App Refresh—This enhanced feature enables you to control the capability of apps to automatically access the Internet to refresh app-specific content and/or Location Services data when the device has Internet access. Turning off this feature helps extend battery life and cuts down on your cellular data usage. You will, however, need to manually update apps each time you launch them. This feature can also be turned on/off on an app-by-app basis from within Settings.
Background App Refresh—This enhanced feature enables you to control the capability of apps to automatically access the Internet to refresh app-specific content and/or Location Services data when the device has Internet access. Turning off this feature helps extend battery life and cuts down on your cellular data usage. You will, however, need to manually update apps each time you launch them. This feature can also be turned on/off on an app-by-app basis from within Settings.
![]() Auto-Lock—Anytime your iPhone or iPad is turned on, if you don’t do anything for a predetermined amount of time, it can be set to automatically switch into Sleep mode to conserve battery life and secure the device.
Auto-Lock—Anytime your iPhone or iPad is turned on, if you don’t do anything for a predetermined amount of time, it can be set to automatically switch into Sleep mode to conserve battery life and secure the device.
![]() Restrictions—This feature provides a way to “childproof” your iPhone or iPad by enabling an authorized guest user (such as your child) to gain access exclusively to apps or content that you choose. To activate it, tap the Restrictions option, and then tap Enable Restrictions from the submenu. Set a passcode for the restrictions. You can then customize which apps are allowed, block the installation or deletion of apps, prevent in-app purchases, or set ratings limits for content.
Restrictions—This feature provides a way to “childproof” your iPhone or iPad by enabling an authorized guest user (such as your child) to gain access exclusively to apps or content that you choose. To activate it, tap the Restrictions option, and then tap Enable Restrictions from the submenu. Set a passcode for the restrictions. You can then customize which apps are allowed, block the installation or deletion of apps, prevent in-app purchases, or set ratings limits for content.
![]() Caution
Caution
If you choose to utilize the Restrictions feature, make sure you remember the passcode you associate with it. If you forget the passcode, it might be necessary to erase your entire iOS device and reload everything from scratch. Do not give this passcode to your child or the person you’re allowing to use your mobile device.
![]() Keyboard—You can make certain customizations from the Settings screen that impact how your virtual keyboard responds as you’re typing. It’s possible to make supplemental keyboard layouts accessible, customize the Text Replacement feature, plus adjust settings, such as whether Auto-Capitalization, Auto-Correction, Check Spelling, and Dictation are turned on. You can add the popular emoji keyboard from the Keyboards option in the Keyboards submenu of Settings.
Keyboard—You can make certain customizations from the Settings screen that impact how your virtual keyboard responds as you’re typing. It’s possible to make supplemental keyboard layouts accessible, customize the Text Replacement feature, plus adjust settings, such as whether Auto-Capitalization, Auto-Correction, Check Spelling, and Dictation are turned on. You can add the popular emoji keyboard from the Keyboards option in the Keyboards submenu of Settings.
![]() Reset (iPhone/iPad)—Every so often, you might run in to a problem with your iPhone or iPad resulting in a system crash or the need to reset specific settings. For example, to restore your iPhone or iPad to its factory default settings and erase everything stored on it, tap on the Reset option, and then tap on the Erase All Content and Settings option. In general, you should refrain from using any of these settings unless you’re instructed to do so by an Apple Genius or a technical support person. If you upgrade to a new iOS mobile device and want to return your old device to factory settings and erase all of your data and content, so you can safely give away or sell the device, use the Erase All Content and Settings option found in the Reset submenu of Settings.
Reset (iPhone/iPad)—Every so often, you might run in to a problem with your iPhone or iPad resulting in a system crash or the need to reset specific settings. For example, to restore your iPhone or iPad to its factory default settings and erase everything stored on it, tap on the Reset option, and then tap on the Erase All Content and Settings option. In general, you should refrain from using any of these settings unless you’re instructed to do so by an Apple Genius or a technical support person. If you upgrade to a new iOS mobile device and want to return your old device to factory settings and erase all of your data and content, so you can safely give away or sell the device, use the Erase All Content and Settings option found in the Reset submenu of Settings.
![]() Caution
Caution
Before using any of the options found under the Settings Reset option, which could potentially erase important data from your iPhone or iPad, be sure to perform a manual iCloud Backup or iTunes sync and create a reliable backup of your device’s contents. See Chapter 5 for step-by-step directions for how to do this.
You’ll probably never need to tinker with or adjust several options found under the General heading. Leave them at their default settings. Others you’ll need to utilize often as you use your iPhone or iPad for different tasks.
Display & Brightness (iPhone/iPad)
The Display & Brightness options enable you to control the brightness of your iPhone or iPad’s screen, plus customize the default text size and typestyle. In general, you should leave the virtual switch for the Auto-Brightness feature turned on, and then only use the Brightness slider when you manually need to adjust the screen to accommodate a specific lighting situation.
Drag the white dot on the Auto-Brightness slider to the right to make the screen brighter, or to the left to make the screen darker.
When the Auto-Brightness virtual switch is turned on, your device takes into account the surrounding lighting where you’re using your Phone or iPad, and then adjusts the screen’s brightness accordingly. This can also be set from the Control Center. In addition, some apps, such as iBooks, have their own Brightness sliders built in to the app.
Wallpaper (iPhone/iPad)
The capability to choose a custom graphic to be used as the wallpaper behind your device’s Lock and Home screen has its own option within Settings. From the main Settings menu, tap on the Wallpaper option to adjust this.
![]() Note
Note
Your iPhone or iPad has more than two dozen preinstalled wallpaper designs built in, plus you can use any digital images stored in the Photos app as your Lock screen or Home screen wallpaper. In Figure 1.11, you see a thumbnail graphic of an iPhone or iPad’s Lock screen (left) and its Home screen (right).
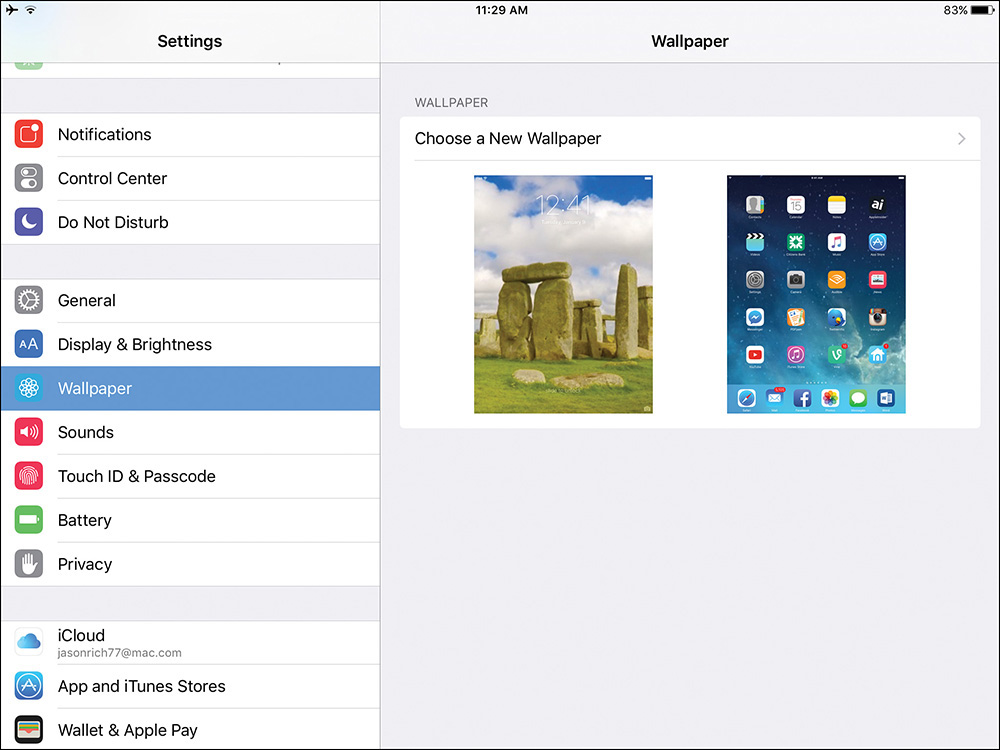
Figure 1.11 Tap on the Choose a New Wallpaper option to select a new graphic or photo to be used behind your Lock and/or Home screen as a Wallpaper.
To change the Wallpaper, tap on the Choose a New Wallpaper option. Tap on the Dynamic, Stills, or Live thumbnail to reveal iOS 9’s built-in Wallpaper options, or select a photo from an Album that’s listed under the Photos heading.
![]() What’s New
What’s New
The new Live wallpapers (available for the iPhone 6s and iPhone 6s Plus) animate when you place your finger on them as they’re being displayed within the Lock or Home screen. They work better on the Lock screen where they’re not covered with app icons.
Next, the graphic or image you select is displayed in full-screen mode. Three command options, labeled Set Lock Screen, Set Home Screen, and Set Both, are displayed (shown in Figure 1.12).
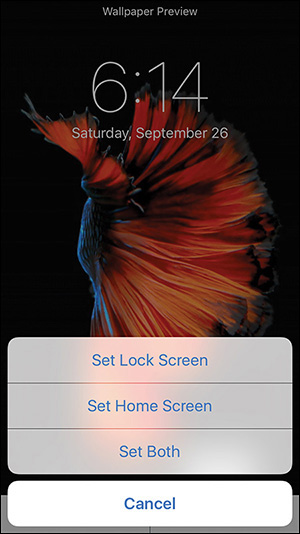
Figure 1.12 Decide whether the selected wallpaper will be used on the Lock screen, Home screen, or both.
After making your selection, when you return to the iPhone or iPad’s Lock screen or Home screen, you see your newly selected wallpaper graphic displayed.
Instead of choosing one of the preinstalled wallpaper graphics, you also have the option of using photos you’ve transferred to your iOS device and have stored in the Photos app, or photos you’ve shot using the Camera app.
To select one of your own photos to use as your Lock screen or Home screen wallpaper, tap on the Wallpaper option in Settings, followed by the Choose a New Wallpaper option. Next, tap on an Album thumbnail that’s listed under the Photos heading.
When the thumbnails related to the contents of the image Album you selected are displayed, tap on the thumbnail that represents the image you want to use as your Wallpaper. As soon as a preview screen is displayed, if necessary, use your finger to move the image around on the screen. You can also zoom in or out, in some cases. When this is possible, the Perspective Zoom On/Off option will be displayed in the lower-right corner of the preview screen.
Now, tap on the Set Lock Screen, Set Home Screen, or Set Both option to save your selection. Figure 1.13 shows a custom Lock screen on an iPhone, while Figure 1.14 shows a custom Home screen on an iPad.
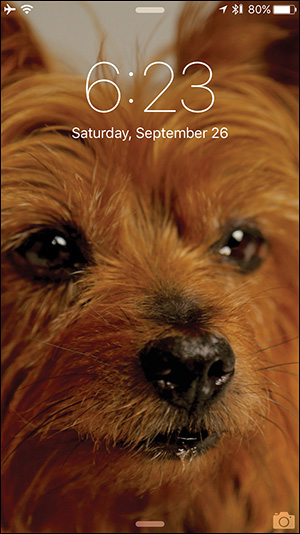
Figure 1.13 A newly selected Lock screen graphic, chosen from a photo stored on the iPhone 6s in the Photos app.
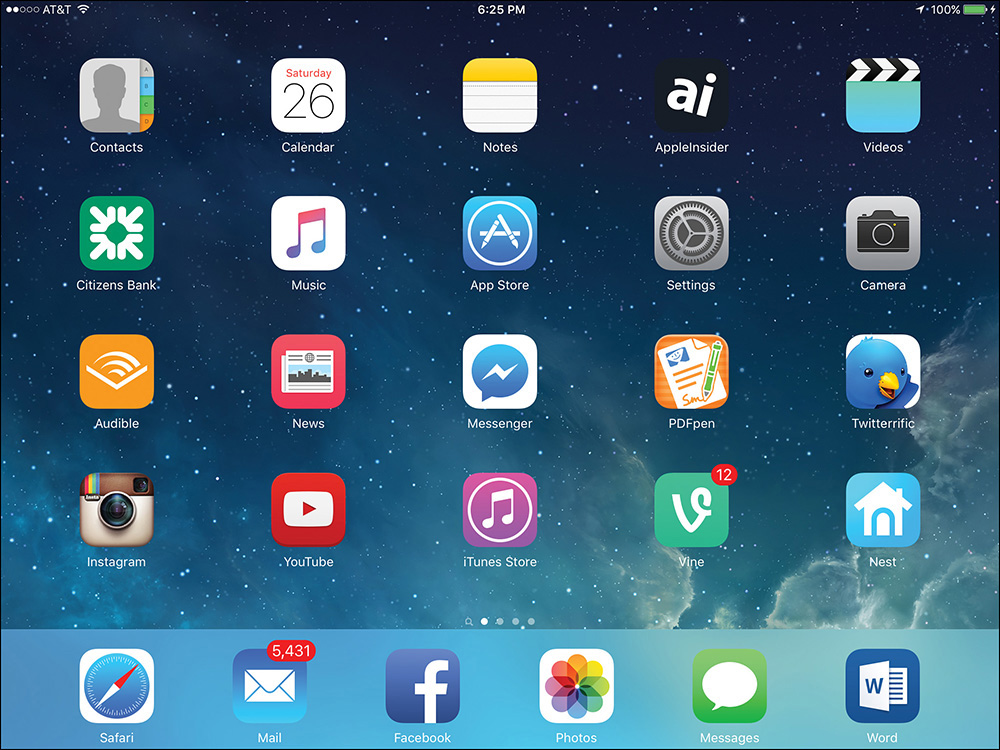
Figure 1.14 A still wallpaper selected from within Settings is now displayed as the Home screen wallpaper, behind the app icons (shown here on the iPad Air 2).
![]() Caution
Caution
If the image you opt to use is not sized appropriately for both the portrait and landscape aspect ratio on the iOS mobile device’s screen, the image can appear distorted or not fill the entire screen when you rotate your device.
Sounds (iPhone/iPad)
Tap on this option to adjust the overall volume of the iPhone or iPad’s built-in speaker (or the volume of the audio you hear through headsets), as well as to turn on or off various audible tones and alarms your phone or tablet generates.
From this menu, it’s possible to assign specific audio tones, sounds, or ringtones to specific types of app-specific alerts and alarms, plus turn on or off the click noise associated with pressing keys on the iPhone or iPad’s virtual keyboard.
It’s also possible to turn on the Vibrate mode so that the iPhone handset shakes, instead of or in addition to playing a ringtone. You can control the ringer volume using an onscreen slider and adjust the custom ringtones and audio alerts associated with various features and functions of your iPhone. Your device has a built-in library of different audio alarms and alerts, as well as ringtones built in, plus you can download additional ringtones from the iTunes Store.
In addition to customizing ringtones and the wallpaper, it’s possible to customize the vibration patterns used by your device, such as when an incoming call is received. To do this, launch Settings, tap on the Sounds option, and from under the Sounds and Vibration Patterns heading, tap on any of the listed options, such as Ringtone or New Mail.
Next, tap on the Vibration option that’s displayed at the top of the submenu for the option you selected. Choose one of the patterns from the Vibration submenu, or tap on Create New Vibration to create your own pattern for the selected option.
![]() Tip
Tip
Manually adjust the ringer and speaker volume using the Volume Up and Volume Down buttons located on the left side of your handset.
You also can choose different vibration patterns to alert you to different things from the Sounds option within Settings. Volume controls are also accessible from the Control Center.
Touch ID & Passcode (iPhones and iPad)
Determine whether your device’s Touch ID (Home button sensor) can be used to identify your fingerprint and unlock the device and/or approve online purchases. Turn on the Apple Pay option to activate Apple Pay on your iPhone 6, iPhone 6 Plus, iPhone 6s, or iPhone 6s Plus. Tap on the Add a Fingerprint option displayed as part of this menu to securely scan and store your fingerprint(s). These fingerprint scans cannot be accessed by Apple or third parties.
![]() Note
Note
If your iPhone or iPad is equipped with a Touch ID sensor, options pertaining to setting up and using this fingerprint scanner feature are found under the Touch ID & Passcode option within Settings. Devices not equipped with Touch ID, however, simply have a Passcode option available to them within Settings.
![]() Tip
Tip
Consider storing the fingerprint for the thumb and index finger on both of your hands, so you can use Touch ID with any of those fingers based on how you’re holding the device.
Battery (iPhone/iPad)
This submenu enables you to display the Battery Life Percentage remaining on your device in the top-right corner of the screen in addition to the Battery Status Bar. From this menu, you can also see how the use of individual apps that are running on your iPhone or iPad are impacting the device’s overall battery life. Tap on the Last 24 Hours or Last 7 Days tab, and then view the apps listed below the Battery Usage heading if you’re wondering why your iPhone or iPad’s battery is draining too quickly. Shut down specific apps and keep them from running in the background when not in use to extend battery life.
From the Battery submenu screen, if you tap on the new clock icon, information about how much time each app has been used is displayed along with each app’s listing.
Privacy (iPhone/iPad)
This menu option in Settings gives you much greater privacy control in terms of how information is shared between apps and shared with other people.
From this Settings submenu screen, it’s possible to control specifically which apps have access to the iOS device’s Location Services feature, for example, plus which other apps can share data with certain pre-installed apps (including Contacts, Calendar, Reminders, and Photos).
Certain apps and services, such as Maps, HomeKit, or Find My iPhone (or Find My iPad), utilize the capability to pinpoint your exact location. It’s important to customize the Location Services options if you’re concerned that certain apps can potentially share this information.
When the master virtual switch for Location Services option is turned on, your iPhone or iPad can fully utilize its GPS capabilities, in addition to crowd-sourced Wi-Fi hotspots and cell towers, to determine your exact location. When it’s turned off, your device cannot determine (or broadcast) your location. However, some of your apps will not function properly.
![]() Tip
Tip
When the Location Services option is turned on and you snap a photo or shoot video using the Camera app, the exact location where that photo or video was shot is recorded and saved. This feature is deactivated if you turn off the Location Services option. You can also leave the master Location Services feature for your device turned on, but turn off this feature with specific apps, such as the Camera app.
From the Privacy menu within Settings, determine which apps can share information with each other and with the public when you use Facebook, Twitter, Instagram, or other online social networking apps.
iCloud (iPhone/iPad)
Learn all about using iCloud with your iPhone or iPad in Chapter 5.
App and iTunes Stores (iPhone/iPad)
Choose which Apple ID account you want to associate with the iPhone or iPad you’re using and manage that account by tapping on the Apple ID option displayed near the top of this menu.
From below the Automatic Downloads heading determine whether the device you’re using will automatically download content acquired from other computers or mobile devices that are linked to the same iCloud (Apple ID) account. This relates to Music, Apps, Books, and App Updates acquired from the iTunes Store, iBook Store, and App Store.
It’s also possible to turn on/off the Installed Apps option, which enables your device to recommend apps based on your location or what you’re currently doing. These recommendations appear on the Lock screen and app switcher screen.
Wallet & Apple Pay (iPhone)
If you’re using an iPhone 6, iPhone 6 Plus, iPhone 6s, iPhone 6s Plus (or a newer iPhone model), you have the ability to set up and use Apple Pay.
From the Wallet & Apple Pay option within Settings, add or delete debit and credit cards associated with the Wallet app and the Apple Pay feature.
![]() Tip
Tip
To speed up making payments using Apple Pay in stores, turn on the Double-Click Home Button option. Then from the Lock screen, quickly press the Home button twice to launch the Wallet app and select the stored debit or credit card with which you want to pay. When this option is turned off, you must manually launch the Wallet app from the Home screen.
From under the Transaction Defaults heading, you can choose a default debit or credit card to use with Apple Pay transactions plus store your default shipping address, email, and phone number. This speeds up the checkout process.
The verification process for linking a credit, debit, or store credit card varies based on the card issuer. Follow the onscreen prompts.
If you’re using an older model iPhone that does not have a Touch ID sensor, the Wallet app can still be used to manage store/company reward cards or membership cards that are set up to utilize Wallet functionality.
Mail, Contacts, Calendars (iPhone/iPad)
If you use your iPhone or iPad to help manage your life, you probably rely heavily on Mail, Contacts, and Calendars. From the Settings app, you can customize a handful of options pertaining to each of these apps. From here, you also must set up your existing email account(s) to work with your smartphone or tablet.
For information about how to use the Settings app to customize the Mail app-related settings, see Chapter 11, “Send and Receive Emails, Texts, and Instant Messages with the Mail and Messages Apps.” You can find details about customizing the settings of the Contacts and Calendar apps in Chapter 13, “Tips for Using Calendar, Contacts, Reminders, and Notes.”
![]() Tip
Tip
Under the Calendars heading of the Mail, Contacts, Calendars option, one useful setting is Default Alert Times. Tapping on this option reveals the Default Alert Times menu screen, from which it’s possible to automatically set advance alarms for birthdays, events, and all-day events stored in the Calendar app. Each of these options can be individually set to alert you at 9:00 a.m. on the day of the event, one or two days prior, or one week before the event, based on your preference.
If you fill in the Birthday field as you create contact entries in the Contacts app, these dates can automatically be displayed in the Calendar app to remind you of birthdays. The advance warning of a birthday gives you ample time to send a card or a gift.
![]() Tip
Tip
From the Default Alert Times submenu screen, turn on the Time To Leave option if you want your device to determine how long it will take you to travel from your current location to the next event in the Calendar app based on distance and current traffic conditions. In addition to turning on this feature from within Settings, the location of your event must be entered into the Location field for the event.
More App-Specific Options within Settings
As you scroll down on the main Settings menu on your iPhone or iPad, you’ll see specific apps listed, including some of the core preinstalled apps (such as Notes, Reminders, Messages, FaceTime, Maps, Safari, News, Music, Videos, Photos & Camera, iBooks, Podcasts, and Game Center).
As you continue scrolling down, listings for Twitter, Facebook, Flickr, and Vimeo lead to submenus that offer the capability to fully customize integration with these online social networking services with many of the apps you’ll soon be using.
User-Installed Apps
By scrolling toward the bottom of the Settings menu, you’ll discover a listing of other individual apps that you have installed on your iPhone or iPad, and that have user-adjustable options or settings available. Tap on one app listing at a time to modify these settings. Remember, as you install new apps in the future, additional app listings will be added to this section of the Settings menu and can be modified accordingly.
Control Center Gives You Quick Access to Popular Features and Functions
At any time, regardless of what you’re doing on your iPhone or iPad, it’s possible to access the Control Center. To do this, simply place your finger near the bottom of the screen and swipe upward. This causes the Control Center window to appear.
On the iPhone, several circular icons appear near the top of the Control Center window, each of which enables you to control a frequently used iPhone feature (refer to Figure 1.9). From left to right, the icons include the following:
![]() Airplane Mode—Quickly place your iPhone or iPad into Airplane mode.
Airplane Mode—Quickly place your iPhone or iPad into Airplane mode.
![]() Wi-Fi—Turn Wi-Fi on or off with a single tap, without having to access Settings.
Wi-Fi—Turn Wi-Fi on or off with a single tap, without having to access Settings.
![]() Bluetooth—Turn Bluetooth on or off so that your iPhone or iPad can link to Bluetooth devices it has already been paired with.
Bluetooth—Turn Bluetooth on or off so that your iPhone or iPad can link to Bluetooth devices it has already been paired with.
![]() Do Not Disturb—Manually turn on the Do Not Disturb feature after you’ve customized this option from within Settings.
Do Not Disturb—Manually turn on the Do Not Disturb feature after you’ve customized this option from within Settings.
![]() Rotation Lock—Normally, when you rotate your iPhone sideways, the screen automatically switches from portrait to landscape mode. To prevent this from happening when the phone is rotated, turn on the Rotation Lock feature by tapping on its icon.
Rotation Lock—Normally, when you rotate your iPhone sideways, the screen automatically switches from portrait to landscape mode. To prevent this from happening when the phone is rotated, turn on the Rotation Lock feature by tapping on its icon.
If you turn on the Rotation Lock, this could prevent you from accessing certain app-specific features or views, depending on which app you’re using. For example, turning on Rotation Lock prevents you from using the Week view in the Calendar app.
Displayed below these icons is the screen brightness slider, and below that are the Music app controls, which enable you to play currently selected music (or Playlists) without launching the Music app.
Moving down within Control Center, there are two additional command buttons, labeled AirDrop (left) and AirPlay (right). Tap on AirDrop to quickly activate this feature and determine which content or data you want to wirelessly share with nearby iPhone, iPad, or Mac users. Tap the AirPlay button to select where AirPlay-compatible apps will direct content.
If you have a Bluetooth device linked with your smartphone or tablet, the AirPlay button is replaced with a button that represents the Bluetooth device, such as a wireless headset.
![]() Tip
Tip
When AirDrop is turned on, your iPhone or iPad is discoverable by any iPhone, iPad, or Mac user that’s in your immediate vicinity that also has the AirDrop feature turned on (or just by people included in your Contacts database). You can then wirelessly transfer data from certain apps, such as Contacts and Photos. To protect your privacy when out in public, consider keeping this feature turned off unless you specifically want to use it.
Displayed along the bottom of the Control Center window on the iPhone are four app-related icons. Tap on the flashlight icon to turn on the iPhone’s flash so that it serves as a bright flashlight. Tap on the Timer icon to set and manage timers (that is, access the World Clock, Alarm Clock, Stopwatch, and Timer feature). Tap on the Calculator icon to launch the Calculator app quickly. Finally, tapping on the Camera icon offers yet another way to quickly launch the Camera app and begin snapping photos.
The Control Center on the iPad is similar to that of the iPhone; however, as you can see from Figure 1.15, the layout of the options is different. The Control Center on the tablet is displayed as a bar across the bottom of the screen.
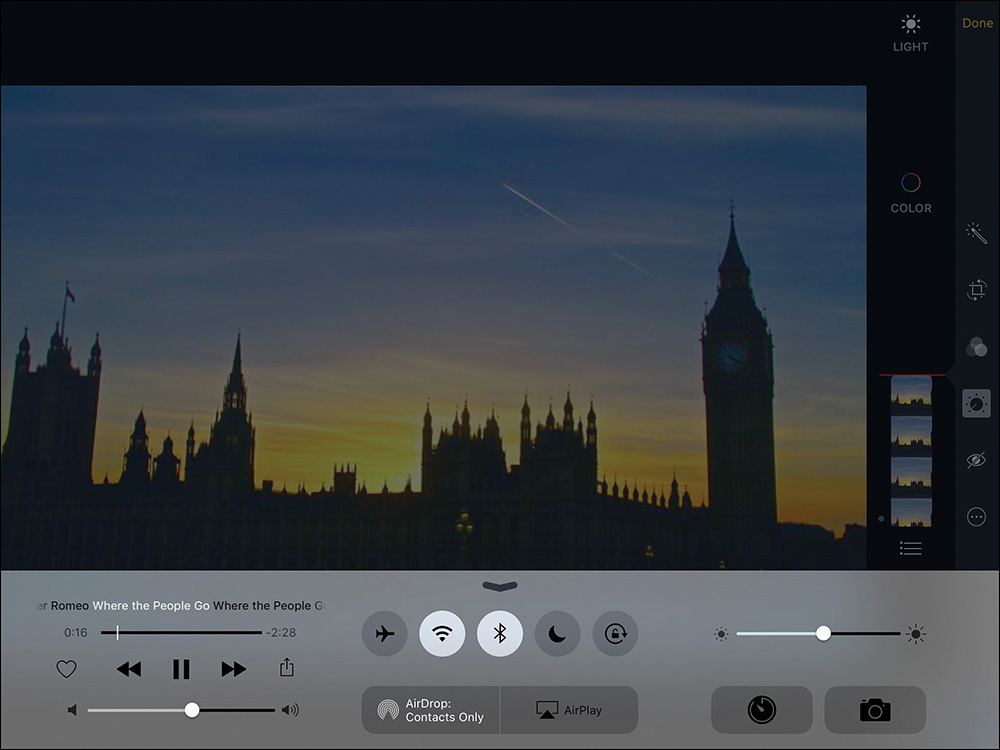
Figure 1.15 While the Photos app is running, the Control Center feature on the iPad is displayed along the bottom of the screen.
The Music controls and volume slider are displayed on the left, the five command icons (Airplane Mode, Wi-Fi, Bluetooth, Do Not Disturb, and Rotation Lock) are displayed near the center, and the Clock/Alarm and Camera app icons and screen brightness slider can be found on the right. The AirDrop and AirPlay/Bluetooth icons are displayed near the bottom center of the Control Center window.
To close the Control Center window, tap anywhere near the top of the iPhone or iPad’s screen, or tap on the down-pointing arrow icon displayed near the top of the window.
Organize Apps on Your Home Screen with Folders
If you’re like most iPhone and iPad users, you’ll probably be loading a handful of third-party apps onto your device. After all, there are well over 1.5 million third-party apps to choose from. To make finding and organizing your apps easier from the iPhone or iPad’s Home screen, and to reduce onscreen clutter, you can place app icons in folders.
Utilizing the Folders feature is easy. From the Home screen, tap and hold down any app icon until all the app icons begin shaking on the Home screen. Using your finger, drag one app icon on top of another, to automatically place both of those apps into a new folder.
You can organize your apps in folders based on categories, like Games (shown in Figure 1.16), Travel, or Productivity, or you can enter your own folder names, and then drag and drop the additional app icons into the folders you create. After your app icons are organized, simply press the Home button again on the iPhone or iPad to save your folders and display them on your Home screen.
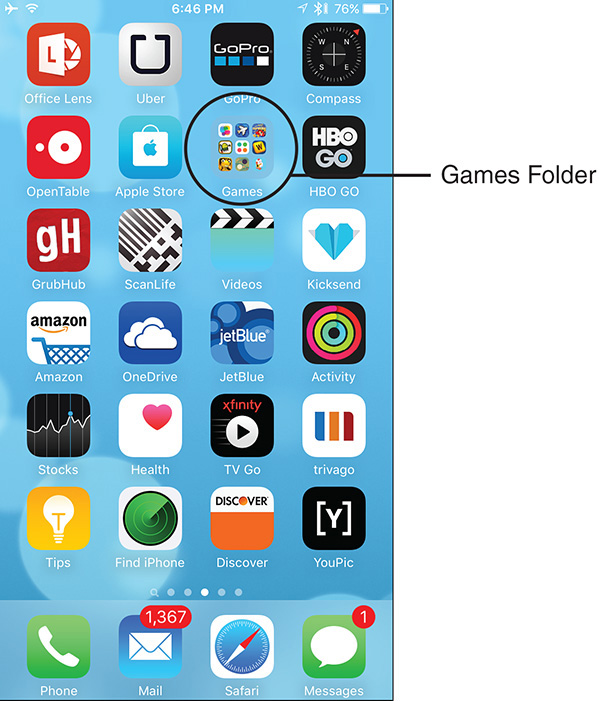
To open a folder, tap on its icon displayed on the Home screen. Tap on any of the contained app icons to launch one of the apps. Figure 1.17 shows a Games folder that contains several popular game apps.
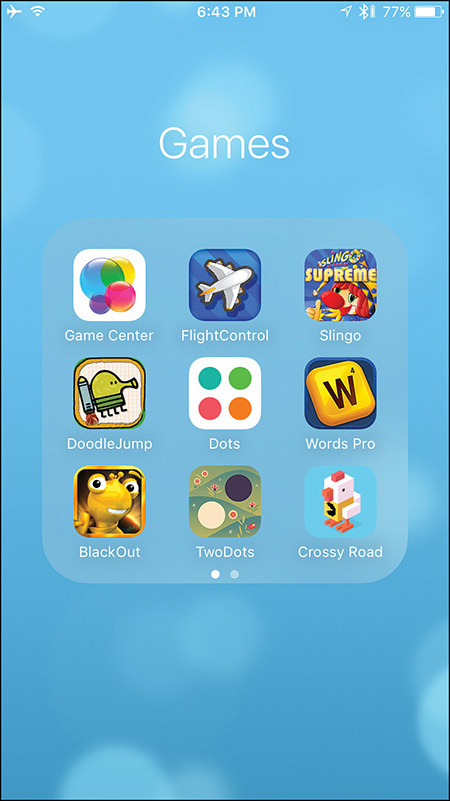
Figure 1.17 This Games folder was created to organize the game apps currently installed on this iPhone 6s. Using folders helps to eliminate clutter on your Home screen.
As you’re creating app folders, you are no longer limited in terms of how many apps you can place into each folder.
If you later want to remove an app icon from a folder so that it appears as a standalone app icon on your Home screen, simply press and hold any of the folder icons until all the onscreen icons start to shake. The folder’s contents are displayed.
When the app icons are shaking, simply drag the app icons, one at a time, back onto the Home screen. Each is then removed from the folder. Press the Home button to finalize this action.
Moving App Icons Around on the Home Screen
To move app icons around and reorganize them on the Home screen, press and hold down any app icon with your finger. When the app icons start to shake, you can use your finger to drag one app icon at a time around on the Home screen.
Your iPhone or iPad can extend the Home screen across multiple pages. (Switch pages by swiping your finger from left to right, or right to left when viewing the Home screen.)
To move an app icon to another Home screen page, while it’s shaking, hold it down with your finger and slowly drag it to the extreme right or left, off of the screen, so that it bounces onto another of the Home screen’s pages.
When you switch pages, the row of up to four app icons displayed at the very bottom of the iPhone’s screen (or up to six app icons on the iPad’s screen) remains constant. Place your most frequently used apps in these positions so that they’re always visible from the Home screen.
As the app icons are shaking on the Home screen, you can delete the icons that display a black-and-white “X” in the upper-left corner from your iPhone or iPad by pressing that “X” icon. The preinstalled (core) apps related to iOS 9, such as Contacts, Calendar, Reminders, Notes, News, iCloud Drive, Maps, App Store, and Settings, cannot be deleted. They can only be moved.
![]() Tip
Tip
Although it is not possible to delete any of the apps that come preinstalled on your iPhone or iPad, you can place the core apps that you seldom or never use in a separate folder to remove unwanted clutter from your Home screen.
Discover What’s Possible from the Lock Screen
The Lock screen enables you to do more than just unlock your device or prevent unauthorized people from using it.
From within Settings, you can opt to turn off most of this functionality to protect your privacy. Thus, if you turn on Passcode Lock, strangers cannot pick up and use your phone or tablet or access any content from it.
The Lock screen automatically displays the current time and date, the Slide To Unlock feature, as well as the Camera icon. You can also set it up so app-specific alerts or banners are displayed on the Lock screen when applicable, plus you can decide whether you want the ability to access the Control Center directly from the Lock screen. These features can be customized from within Settings.
![]() Tip
Tip
To unlock the Lock screen and access your Home screen, swipe anywhere on the screen from left to right. You don’t have to place your finger directly on the Slide To Unlock slider.
When you have the Continuity feature turned on, if there was an app you were using on your Mac or another mobile device that’s linked to the same iCloud account, a tiny icon for that app appears in the lower-left corner of the Lock screen. By tapping on this icon, you can launch the app and pick up exactly where you left off. This works really well with Safari when surfing the Web, for example.
![]() Tip
Tip
To launch the Camera app from the Lock screen, instead of tapping on the app, place your finger on the app icon and swipe upward.
Manage Your Customized Notification Center Screen
Accessing the Notification Center window/screen from the iPhone or iPad at any time continues to be possible simply by placing your finger near the top of the screen and swiping downward. The Notification Center displays all alerts, alarms, and notifications generated by your device in one place.
As you now know, the Notification Center screen displays additional content beyond just app-specific notifications. For example, along the top of the Notification Center are two command tabs: Today and Notifications. (In landscape mode, the iPad displays similar information, plus widget-related information, but in a slightly different format.) Tap on Today to see the current day and date, along with the weather forecast, plus a preview of upcoming appointments from the Calendar app. Scroll down on this screen to see a preview of tomorrow’s schedule. This content is automatically displayed on the left side of the iPad’s Notification Center screen.
Tap on the Notifications tab to see items recently generated by all compatible apps running on your phone or tablet. The name and app icon for each compatible app is displayed, followed by the preselected number of alerts, alarms, or notifications related to that app. (Keep in mind that which apps are displayed and the number of alerts, alarms, or notifications from each app can be customized from within Settings.)
To clear all notifications related to an app that’s displayed in Notification Center, tap on the small “X” icon that’s displayed to the right of the app’s name and icon.
Tap on the Widgets tab (iPad) to access installed and active, app-specific widgets that are accessible to you. This content is displayed on the Today screen on an iPhone.
To control the order in which content is displayed within the Notification Center window/screen, tap on the Edit button displayed near the bottom of the screen.
To further customize what information is displayed, launch Settings, select the Notifications option, and then under the Notifications View, tap on the Sort Order option and/or turn on or off the Group By App option.
To sort and view Notifications based on the date and time each alert, alarm, or notification was generated, tap on the Sort By Time option and then select the Recent option.
![]() Tip
Tip
When viewing an item from within Notification Center, swipe sideways to access a mini-menu of available options, or tap on the item to launch the related app to review the item.
When looking at incoming email message items from within Notification Center, for example, swipe from right to left across the listing to reveal an “X,” Mark As Read, and Trash button pertaining to that message. Menu options vary based on what app the item is related to.
If you’re using an iPhone 6s or iPhone 6s Plus, you can use the Peek and Pop options to preview an email by holding your finger on a message listing and then launching the Mail app to work with that message by pressing your finger a bit harder on the listing or preview.