5. Use iCloud and the iCloud Drive App from Your iPhone or iPad
In this chapter
![]() How to sync files, documents, photos, and data via iCloud
How to sync files, documents, photos, and data via iCloud
![]() Get acquainted with the iCloud Drive feature and the iCloud Drive mobile app
Get acquainted with the iCloud Drive feature and the iCloud Drive mobile app
![]() Take advantage of iCloud’s Family Sharing feature to share purchased content with up to five other family members
Take advantage of iCloud’s Family Sharing feature to share purchased content with up to five other family members
iCloud is Apple’s cloud-based service, which has been designed from the ground up to work seamlessly with all iOS mobile devices and Macs. Functionality for using iCloud’s various features and functions is built in to the iOS 9 operating system, as well as the Mac’s operating system.
Now, more than ever, if you’re an iPhone, iPad, and/or Mac user, setting up an iCloud account is essential in order to take full advantage of the latest features and functions built in to your smartphone, tablet, and/or computer.
![]() What’s New
What’s New
The new iCloud Drive app comes preinstalled with iOS 9. This app enables you to directly access the online-based iCloud Drive aspect of your iCloud account to directly view, manage, or share data, documents, photos, and/or files that you have stored online. Your iPhone or iPad requires Internet access to use the iCloud Drive app.
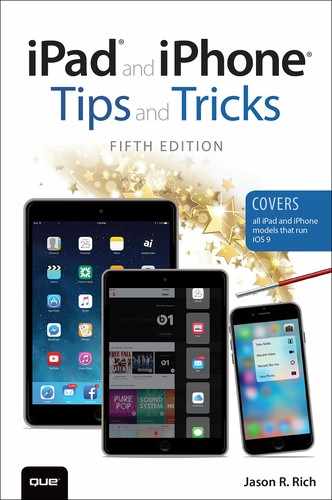
While setting up an iCloud account continues to be free, if you need to utilize more than the 5GB of online storage space that comes with each account, you must purchase additional online storage. The monthly fee structure for additional iCloud online storage space is shown in Table 5.1.
* This new fee structure went into effect September 16, 2015. Charges for the monthly fees are automatically billed to the debit or credit card linked to your Apple ID account as a recurring charge, once you acquire additional online storage space. For more information on pricing outside the U.S., visit https://support.apple.com/en-us/HT201238.
Table 5.1 iCloud Online Storage Space Fees*
![]() Caution
Caution
The included 5GB of online storage space, plus any additional space you pay for, can be utilized to store your app-specific data, backup files, photos, and your personal files.
In the past, online storage needed to store your photos as part of iCloud’s My Photo Stream and Shared Photo Streams was provided for free. This is no longer the case, however. Using iCloud Photo Library, which is managed from the Photos app on your iPhone, iPad, and/or Macs, photo storage now utilizes some of your 5GB online storage allocation and any additional storage space you purchase (based on the size of your personal photo library).
However, the additional online storage space that’s needed for your iTunes Store, App Store, iBook Store, and other content purchases continues to be free.
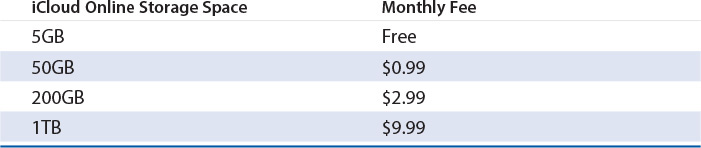
To see and manage how your iCloud online storage space is actually being utilized, launch Settings and tap on the iCloud option. Then tap on the Storage option.
From the Storage screen (shown in Figure 5.1), you see how much online storage space is currently available, as well as how much is being utilized by photos, backups, documents, data, mail, and your other stored content.
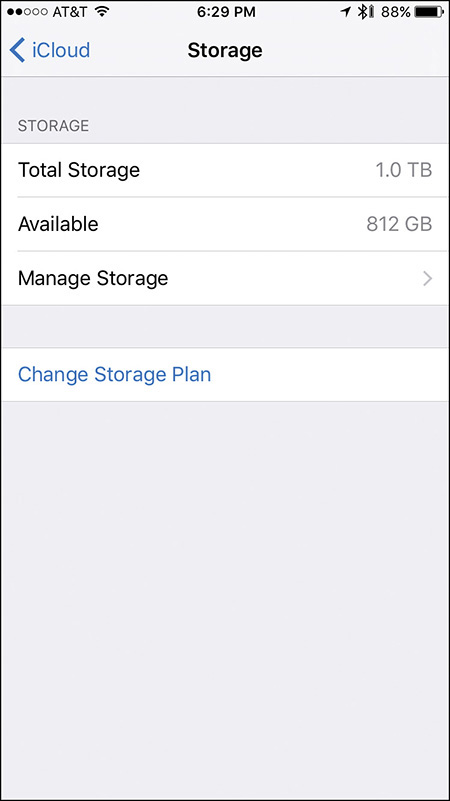
Figure 5.1 The Storage screen enables you to see how your iCloud account’s online storage is currently being utilized. (The iCloud account shown here has been upgraded to have 1TB of online storage space.)
![]() Tip
Tip
To conserve online storage space within your iCloud account, delete iCloud Backup files for old devices, or backups that are redundant and no longer needed.
To do this, launch Settings, tap on the iCloud option, tap on the Storage option, and then tap on the Manage Storage option.
Under the Backups heading (shown in Figure 5.2), tap on any of your device-specific listings. Then, to delete that old or unwanted backup, tap on the Delete Backup option.
Each iCloud account also includes a free @icloud.com email account, which you can use to send and receive email from any devices linked to your iCloud account. Once it’s set up, iCloud automatically keeps your email account synchronized via the Mail App.
![]() Note
Note
If you have an older Apple ID account that has an associated @mac.com or @me.com email address, its @icloud.com equivalent can automatically be used as the email address that’s associated with your iCloud account.
Content Saved to iCloud Is Available Anywhere
By default, as soon as you establish your free iCloud account, anytime you acquire and download content from the iTunes Store, App Store, or iBook Store, a copy of that content automatically gets saved in your iCloud account, and immediately becomes available on all of your compatible computers and iOS mobile devices (including Apple TV) that are linked to that iCloud account. This includes all past purchases and downloads.
So, if you hear an awesome new song on the radio (or on iTunes Radio), you can immediately purchase and download it from the iTunes Store using your iPhone. As always, that song becomes available on your iPhone within a minute. Then, thanks to iCloud, you can access that same song from your primary computer, iPad, iPod touch, and/or Apple TV device, without having to repurchase it. This feature also works with TV shows and movies purchased from the iTunes Store.
![]() Note
Note
Thanks to iCloud’s Family Sharing feature, it’s now possible for up to six family members to have their own independent Apple ID/iCloud accounts, but share some or all of their purchased content from the iTunes Store, App Store, and iBook Store. Family Sharing is covered later in this chapter.
Another benefit to using iCloud is that syncing can be done from anywhere via the Internet, without using iTunes Sync or requiring a physical cable connection between your iOS mobile device and your primary computer.
![]() Note
Note
The iTunes Sync process is still possible by installing the iTunes software onto your primary computer, and then connecting your iOS mobile device using the supplied USB cable, but this process for backing up and syncing data is less convenient than using iCloud. (The Wi-Fi iTunes Sync process can be done without a cable, as long as both devices are linked to the same wireless network.)
Because using the iTunes Sync process is now considered an antiquated way to sync and back up data, this book focuses on using iCloud. If you’re still interested in using iTunes Sync, however, visit Apple’s website (https://support.apple.com/en-us/HT203977) for more information on how to use this feature.
If you ever opt to delete a purchase from your iOS mobile device, for whatever reason, you always have the option of downloading and installing it again, free, from iCloud.
Depending on how you set up the iTunes Store, App Store, and iBook Store to work with iCloud, you can automatically have all of your computers and iOS mobile devices download all new music, app, and eBook content you purchase, or this can be done manually.
To adjust these Automatic Downloads settings, launch Settings, select the App and iTunes Stores option, and then set the virtual switches associated with Music, Apps, and Books that are listed under the Automatic Downloads heading.
It’s possible to also set up your iPhone or iPad to automatically update all of your apps as new versions of previously installed apps get released. To do this, turn on the virtual switch associated with the Updates option that’s listed below the Music, Apps, and Books options.
Due to their large file sizes, automatic downloads are not possible for TV show episodes or movies acquired from the iTunes Store. However, you can download these purchases manually onto all your computers and/or iOS mobile devices linked to the same iCloud account.
![]() Note
Note
Although your iTunes Store music purchases might represent a portion of your overall personal digital music library, chances are that library also includes CDs (which you have ripped into digital format), as well as online music purchases and downloads from other sources (such as Amazon.com).
For an additional fee of $24.99 per year, you can upgrade your iCloud account by adding the iTunes Match services. This grants you full access to your entire personal digital music library (including non-iTunes Store purchases) from all of your computers and devices that are linked to the same iCloud account. To learn more about iTunes Match, visit www.apple.com/itunes/itunes-match.
Alternatively, for $9.99 per month, you can sign up for the Apple Music service and have access to almost every song in the iTunes Store’s digital music library (more than 43 million songs) via the Music app.
Access Your Purchased iTunes Store Content from Any Device
If you do not have the Automatic Downloads option enabled, you can still manually load iTunes Store purchases onto your device by following these steps:
1. Make sure that your iOS device is connected to the Web via a cellular data or Wi-Fi connection.
2. Launch the iTunes Store app on your device. If prompted, when the Apple ID Password window pops up on your screen, use the virtual keyboard to enter your Apple ID password. (You can also use your device’s Touch ID to scan your fingerprint.)
3. Tap on the Purchased icon near the lower-right corner of the iTunes Store app’s screen. Then, near the top center of the screen, tap on the Music, Movies, or TV Shows tab.
4. On an iPhone, to access already purchased content, launch the iTunes Store app, tap on the More (“...”) icon near the bottom-right corner of the screen, and then tap on the Purchased option. Select Music, Movies, or TV Shows; then choose the content you want to download onto the phone.
5. On the iPad, in a column on the left side of the screen is an alphabetical listing of artists, music groups, or TV shows, depending on which category of content you selected. Tap one to see what is available under that listing (shown in Figure 5.3). If you chose Movies in step 3, you can directly select a movie.

Figure 5.3 From the iTunes Store app, access and download your previous purchases by tapping on the Purchased icon. Here, the Music option has been selected.
6. On the iPhone, after selecting a content type, past purchases are listed in alphabetical order. Tap on a song listing, and then tap on its iCloud icon to download that song onto the device you’re currently using. On the iPad, this is possible from a single screen that displays both purchase listings and respective iCloud icons.
To see a listing of your most recently purchased content, tap on a category (Music, Movies, or TV shows, for example), and then tap on the Recent Purchases option.
7. Tap on the iCloud icons, one at a time, to select content you want to download onto the iPhone or iPad you’re currently using. Or to download all the listed content, tap on the Download All option at the top of the list.
![]() Tip
Tip
If you’ve acquired audiobooks, an additional tab is displayed alongside the Music, Movies, and TV Shows options for this content.
8. Within minutes, the content you selected to download is available to enjoy on the iOS mobile device you’re currently using.
9. Exit the iTunes Store app by pressing the Home button.
10. Launch the Music or Videos app on your iOS mobile device to experience the newly downloaded (or re-downloaded) content.
Use iCloud to Sync Your App-Specific Data, Documents, and Files
Most cloud-based file-sharing services serve mainly as a place in cyberspace to remotely store files. However, you must manually transfer those files to and from the “cloud.” This functionality is possible using the iCloud Drive feature.
However, thanks to iCloud’s integration with iOS 9, many of the core apps that come with the latest version of this mobile operating system, as well as a growing number of third-party apps, automatically keep data and files created or managed using those apps synchronized with other devices and computers linked to the same iCloud account.
From within Settings on your iPhone or iPad, turn on or off iCloud support for all compatible apps on your device. In terms of iOS 9’s preinstalled apps, those compatible with iCloud data syncing include Contacts, Calendars, Reminders, Safari, Notes, Photos, News, Wallet, and Mail (relating only to your free iCloud-related email account).
iCloud Keychain can automatically store the usernames, passwords, and credit card information (for online purchases) related to all the websites you visit. Thus, you no longer need to manually sign in to websites when you revisit them, nor do you need to remember each username and password you associated with a website-related account.
When this feature is turned on once on each of your iOS mobile devices and Macs, your iCloud Keychain database syncs automatically with iCloud and all computers and iOS mobile devices linked to your iCloud account.
![]() Note
Note
Bank- and personal finance-related websites purposely do not support the iCloud Keychain feature. When visiting sites that require added security, iCloud Keychain might be able to remember your username, but it cannot automatically remember your password.
![]() More Info
More Info
iCloud is fully compatible with Apple’s optional iWork apps, which include Pages (word processing), Numbers (spreadsheet management), and Keynote (for digital slide presentations).
The Microsoft Office apps (Word, Excel, PowerPoint, OneNote, and Outlook) now support iCloud, as well as Dropbox, and Microsoft’s own OneDrive service (https://onedrive.live.com/about).
When you turn on the iCloud functionality related to the Contacts app, for example, your iOS mobile device automatically syncs your Contacts app database with iCloud. Thus, if you add or update an entry on your iPhone, it automatically synchronizes with the Contacts app running on your other iOS devices, as well as the compatible contact management software that’s running on your computers (such as the Contacts app or Microsoft Outlook on your Mac). This is also true if you delete a Contacts entry from one device. It is almost instantly deleted from all of your other computers and iOS mobile devices linked to the same iCloud account. (Keep in mind, there is no “undo” option related to this feature.)
As you surf the Web using Safari, when you turn on iCloud syncing functionality related to this app, all your Bookmarks and Bookmark Bar data, along with your Reading List information and open browser window/tabs data, are synced via iCloud.
To share your photos between iOS devices, your primary computer, and/or an Apple TV device, from the iCloud submenu within Settings, tap on the Photos option to turn on the iCloud Photo Library feature.
Customizing iCloud to Work with Your Apps
It’s important to understand that the app-related synchronization feature offered by iCloud is different from iCloud Backup, which creates a complete backup of your iOS mobile device that gets stored online as part of your iCloud account.
When you set up iCloud to work with a specific compatible app, that app automatically accesses the Web, connects to iCloud, and then uploads or downloads app-related files, documents, or data as needed. iCloud then shares (syncs) that app-specific data with your other computers and devices that are linked to the same iCloud account.
To customize which of your compatible apps utilize iCloud functionality, follow these steps:
1. Launch Settings from your iPhone’s or iPad’s Home screen.
2. Tap on the iCloud option.
3. When the iCloud screen appears (shown in Figure 5.4), at the top of the screen, make sure the Apple ID–linked email address that’s associated with your iCloud account is displayed next to the Account option. If it’s not, use your existing Apple ID to create or access an iCloud account by tapping on the Account option.
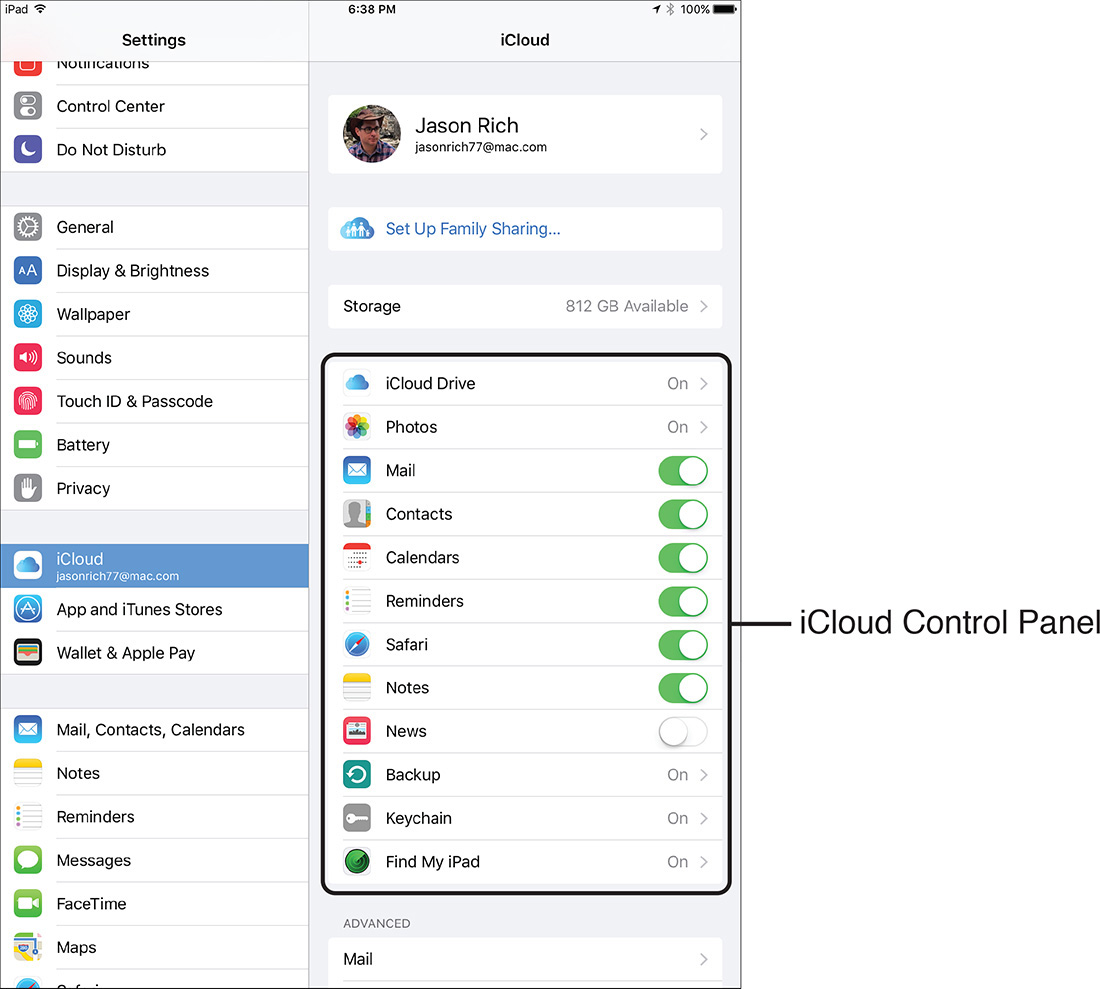
Figure 5.4 Turn iCloud functionality on or off for specific preinstalled Apple apps from the iCloud menu within Settings.
4. Below the Account option is a list of all preinstalled iCloud-compatible apps on your iOS device. To the right of each listing is a virtual on/off switch. To turn on the iCloud functionality associated with a specific app, set its related virtual switch to the on position.
5. When you have turned on the iCloud functionality for all the apps that you want to synchronize via iCloud, press the Home button to exit Settings and save your changes.
6. Repeat this process on each of your iOS mobile devices. If you have an iPhone and an iPad, you must turn on the iCloud functionality for Contacts, for example, on both devices to keep Contacts data synchronized via iCloud on both devices.
From the iCloud Drive Settings menu, there is a list of apps you have installed on your iPhone or iPad that allow you to store content, data, or files within iCloud Drive. Turn on or off the virtual switch for each app to activate this feature.
To access the iCloud Drive menu, launch Settings, tap on the iCloud option, and then tap on the iCloud Drive option.
![]() Note
Note
After you’ve turned on the iCloud functionality for specific apps, to stay synchronized, each computer or device must have access to the Internet. For this use of iCloud on your iPhone or iPad, a cellular or a Wi-Fi Internet connection works fine. For certain other iCloud features, such as managing iCloud Photo Library functions or iCloud Backup, your iPhone or iPad requires a Wi-Fi Internet connection.
Access Your App-Specific Data Online from iCloud.com
Another benefit of using iCloud to sync your app-specific data is that using any computer or Internet-enabled device, you can visit www.iCloud.com to run online versions of iOS 9 preinstalled apps populated with all your app-specific data.
To do this, log in to iCloud.com using your iCloud username and password (which is typically your Apple ID username and password). Online versions of the Mail, Contacts, Calendar, Photos, iCloud Drive, Notes, Reminders, Pages, Numbers, Keynote, News Publisher, Find My..., and Settings apps are available. This is shown on a Mac using the Safari web browser in Figure 5.5.
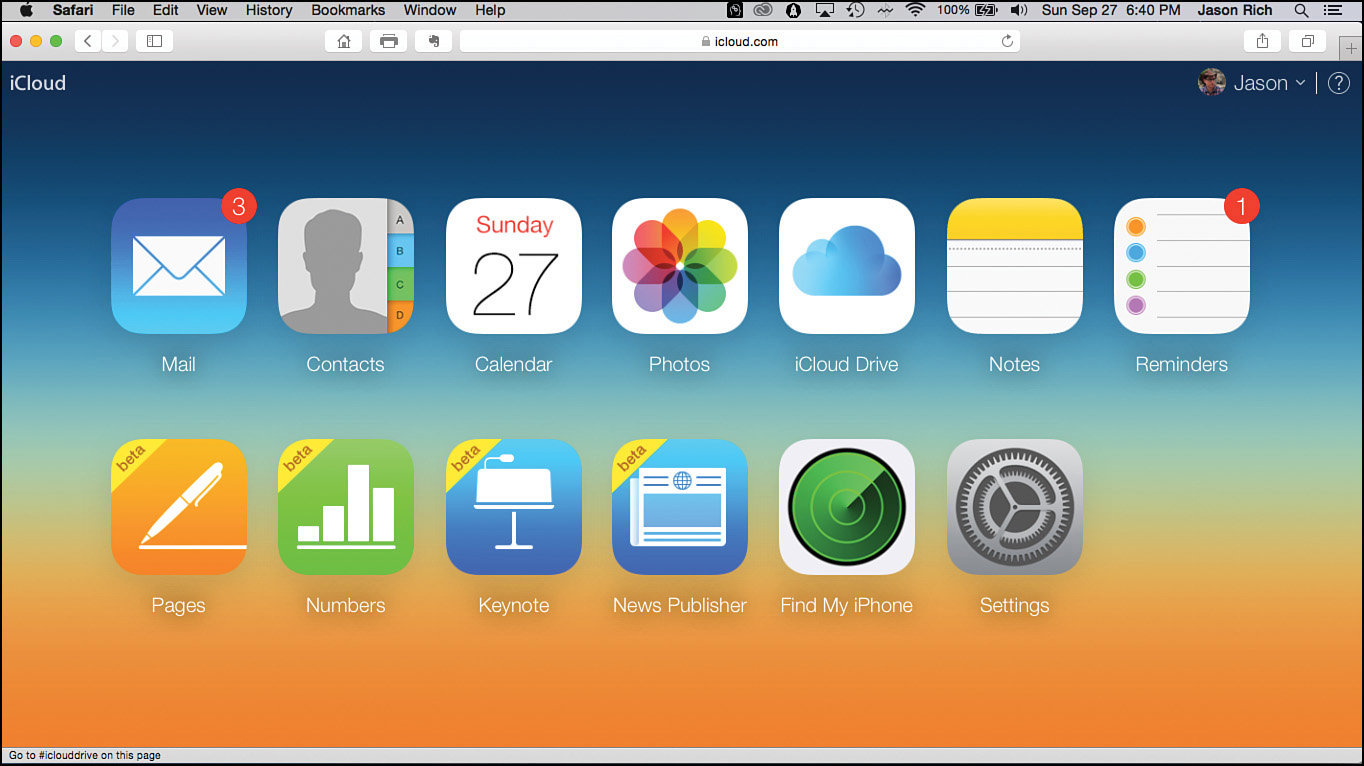
Figure 5.5 Log in to www.iCloud.com to access your app-specific content using online versions of popular iPhone and iPad apps.
If you forget your iPhone at home, for example, you can still securely access your complete Contacts database, your schedule, your to-do lists, and your notes from any Internet-enabled computer, whether or not that computer is typically linked to your iCloud account.
After you log in to iCloud.com, click on the onscreen app icon for the app you want to use.
From iCloud.com, it’s possible to access and manage files you manually store in the iCloud Drive portion of your iCloud account. This includes nonapp-specific files. To do this, log in to iCloud.com and click on the iCloud Drive icon. You can then access or manage your files from the iCloud Drive screen (shown in Figure 5.6).
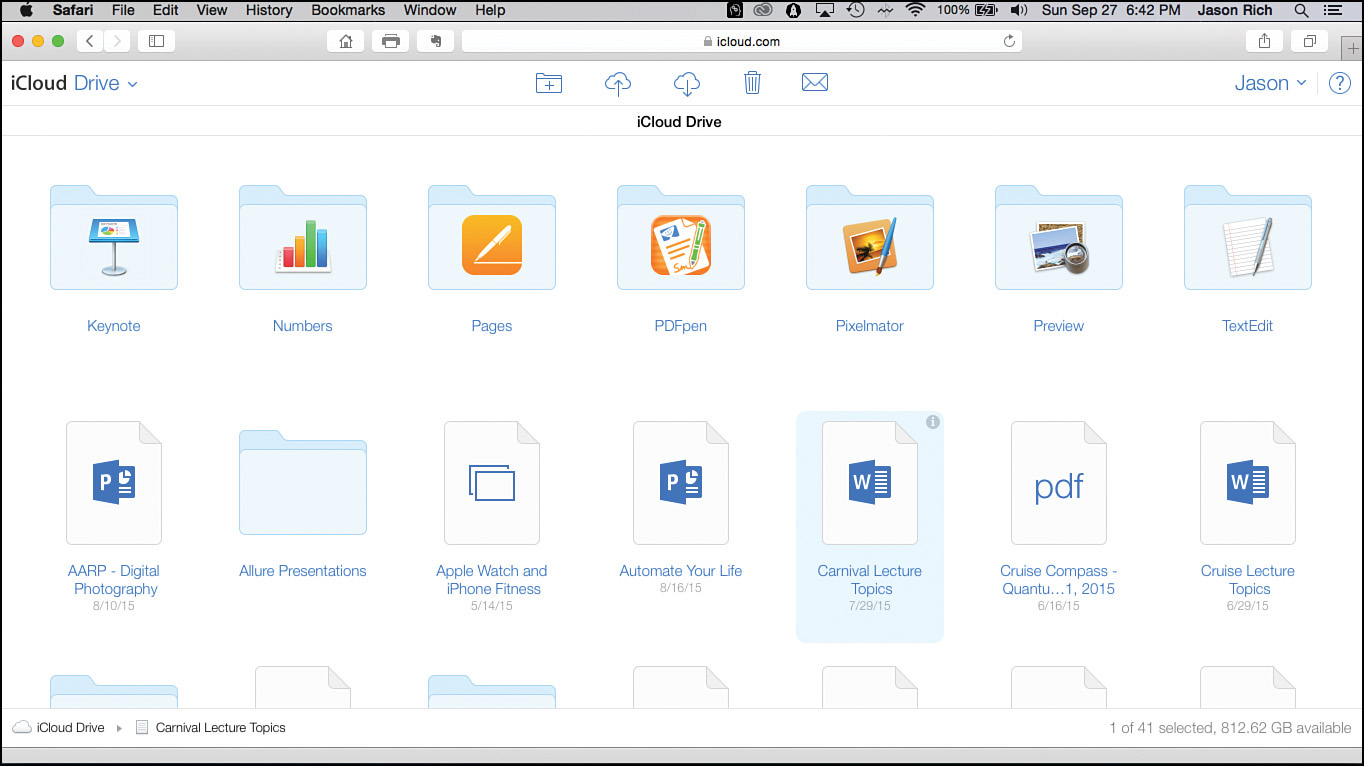
Figure 5.6 From the iCloud Drive screen accessible from iCloud.com, it’s possible to access and manage files you’ve manually stored in this area of your iCloud account.
Displayed near the top center of the iCloud Drive screen, from left to right, are command icons for creating a new file folder, as well as uploading, downloading, deleting, and/or sharing (via email) selected files.
As you’ll see later in this chapter, the new iCloud Drive app that comes preinstalled with iOS 9 works almost exactly like this online iCloud Drive app, but from your mobile device.
![]() Caution
Caution
If you’re using someone else’s computer to access iCloud.com, be sure to log off from the iCloud service when you’re finished. To do this, click on your username in the top-right corner of the screen, and click on the Sign Out option.
Automatically Transfer Documents Using iCloud
In addition to the iCloud compatibility built in to many of the core (preinstalled) apps that are included with iOS 9, a growing number of other apps also offer iCloud compatibility and enable you to easily and automatically transfer or synchronize app-related documents and files.
If you turn on iCloud functionality within compatible third-party apps, when you create or revise a document or file, that revision is stored on your iOS device and on iCloud. It then syncs with that same app running on other iOS mobile devices, Macs, or PCs linked with your iCloud account.
The synchronization process happens automatically and behind the scenes, assuming that your iOS devices and primary computer are connected to the Internet.
![]() Tip
Tip
Many iCloud features are now accessible from Windows-based PCs. However, you must download and install the free iCloud for Windows software onto your PC, which is available from this page of Apple’s website: www.apple.com/icloud/setup/pc.html.
As with all apps running on your iPhone or iPad, iCloud functionality must be turned on in compatible third-party apps. How to do this varies by app, but it’s typically done from the app’s Settings, Setup, or Preferences menu. You can also adjust this setting from the iCloud Drive submenu within Settings. To access it, launch Settings, tap on the iCloud option, and then tap on the iCloud Drive option.
Create a Photo Library Using iCloud
Apple has recently redesigned and streamlined iCloud’s photo sharing, backup, syncing, and sharing capabilities. Everything is now done through the iCloud Photo Library portion of your iCloud account and can be managed from the Photos app that comes bundled with iOS 9, as well as the OS X Yosemite or El Capitan version of the operating system and Photos app for the Mac.
iCloud Photo Library automatically syncs your complete personal photo library with all the computers and mobile devices linked to the same iCloud account (including Windows PCs). Plus, it’s possible to share specific albums (or a group of selected photos from within an album) with specific people, yet keep the rest of your photo library private.
To customize options related to iCloud Photo Library, launch Settings, tap on the iCloud option, and then tap on the Photos option. From the Photos submenu (shown in Figure 5.7), turn on the virtual switch associated with iCloud Photo Library, and if you want to be able to share certain albums with others, turn on the iCloud Photo Sharing option. This must be done on all of your iOS mobile devices and from the iCloud Preference Pane on your Mac or Control Panel on PC computers.

Figure 5.7 From the Photos menu within Settings on your iPhone or iPad (shown here), it’s possible to customize the iCloud Photo Library feature.
![]() Note
Note
One goal of iCloud Photo Library is to give you full online access to your entire digital images library, anytime, from any of your computers or iOS mobile devices. As a result of this content being readily available via the Internet, the need to store digital images on your mobile device will be reduced, so you will ultimately be able to free up internal storage space within your iPhone or iPad.
Depending on the size of your entire digital photo library, it might become necessary, however, to purchase additional iCloud online storage space in order to store all of your digital images.
Using a Unique Apple ID for iCloud
When you first create an iCloud account, you’re encouraged to use your existing Apple ID and username. This is to entice Apple computer and mobile device users to use the same Apple ID to make all of their iTunes Store, App Store, and iBook Store, purchases, plus use that same Apple ID to access Apple’s online-based iMessage instant messaging service, use the FaceTime video calling service, and use all of iCloud’s other functionality.
To create and manage your Apple ID account(s), visit https://appleid.apple.com from any computer or Internet-enabled device. When you set up iCloud, or try to use iMessage or FaceTime, or try to access the iTunes Store or iBook Store for the first time, you also have the option to create an Apple ID account.
![]() Tip
Tip
From your iPhone or iPad, to view and manage your Apple ID account, launch Settings, tap on the App and iTunes Stores option, and then tap on the Apple ID option displayed at the top of the submenu screen. Tap on the View Apple ID option to access and manage your account, or tap on the iForgot option to recover a forgotten Apple ID username or password.
Backing Up with iCloud
Another useful feature of iOS 9 is the capability to create a backup of your iOS device wirelessly and have the related backup files stored online (“in the cloud”). To use this iCloud Backup feature, your iOS mobile device must be connected to the Internet via Wi-Fi. Your primary computer is not needed. Thus, the backup can be created from anywhere, and you can later restore your device from wherever a Wi-Fi Internet connection is present.
When activated, your iOS mobile device automatically creates a backup to iCloud once per day. For this to happen, your iPhone or iPad also must be connected to an external power source. However, at any time, you can manually create a backup of your device to iCloud from within Settings. This can be done when your device is running on battery.
Follow these steps to activate and use the iCloud Backup feature on an iPhone or iPad:
1. Connect your device to the Internet via a Wi-Fi connection.
2. From the Home screen, launch Settings.
3. Tap on the iCloud option.
4. Scroll down and tap on the Backup option.
5. Turn on the virtual switch that’s associated with the iCloud Backup option.
6. The Back Up Now option appears near the bottom of the Backup screen (as shown in Figure 5.8). Tap on it to manually begin creating a backup of your iOS mobile device at any time.
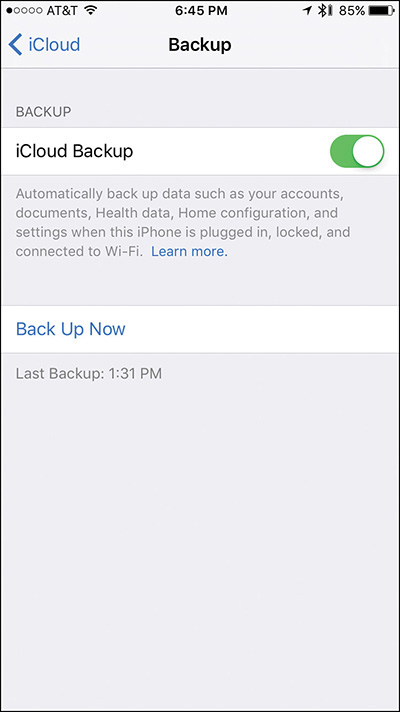
Figure 5.8 Manage and launch the iCloud Backup feature from the Backup screen, accessible from within the Settings app.
![]() Tip
Tip
The first time you use the iCloud Backup feature to create a wireless backup of your iOS device, the process could take up to an hour (or longer), depending on how much data you have stored on your device. After the backup process begins, a progress meter is displayed at the bottom of the Backup screen within Settings.
In the future, the iCloud Backup process takes place once per day, automatically, when your iOS device is not otherwise in use. These backups save all newly created or revised files and data only, so subsequent iCloud Backup procedures are much quicker.
At the bottom of the Backup screen within Settings, the time (and date, if it’s not the current day) of the last backup is displayed.
The purpose of creating and maintaining a backup of your device is so that you have a copy of all your apps, data, files, content, and personalized settings stored if something goes wrong with your device. If and when you need to access the backup to restore your device using iCloud, when prompted, choose the Restore from iCloud option.
Likewise, if your iPhone or iPad gets lost or stolen and is ultimately replaced, you can restore the content from your old device onto the new one.
![]() Tip
Tip
To be able to restore your iOS mobile device completely from an iCloud Backup, you also need to turn on and be syncing app compatible apps. Turn on these app-specific features from the iCloud Control Panel screen, which is accessible by launching Settings and tapping on the iCloud option.
Family Sharing Allows for the Sharing of Purchased Content
Thanks to iCloud’s Family Sharing feature, up to six people can share some or all of their content purchases, while each person retains his or her own private iCloud account. At the same time, a separate Family folder is set up within the Photos app that enables participating family members to share selected photos by placing them in this Family album. All the other photos, however, remain private.
![]() Note
Note
When you set up Family Sharing, a separate Family calendar is automatically created in each participant’s Calendar app. This calendar is shared with other family members, while all other Calendar-related data remains private.
To set up a Family Sharing account, one adult in the family needs to turn on this feature and then invite up to five other family members. To do this, launch Settings, tap on the iCloud option, and then tap on the Set Up Family Sharing option (refer to Figure 5.4).
One drawback to this feature is that the person setting up Family Sharing must choose one iCloud account associated with a credit card from which all purchases by all family members will be paid from this point forward. (This doesn’t apply to gift cards, which are deducted from only the specific user’s account.)
One useful feature of Family Sharing is the ability for family members to share their whereabouts with each other via the free Find My Friends app (which comes preinstalled with iOS 9). As you’re setting up Family Sharing, you can activate this feature by tapping on the Share Your Location option.
Then, from the Family submenu screen, tap on the Add Family Member option and enter the name or email address for each family member who will participate.
Remember, you need to select a single Shared Payment Method that can be used to purchase content via this account in the future. By using Family Sharing, parents can now preapprove their kids’ spending for online content and in-app purchases, plus set spending limits.
As soon as this feature is set up and the family members respond to the email invitation to participate, each person’s music, TV shows, movies, eBooks, and compatible apps become available to everyone else. However, it’s possible for each family member to keep selected content purchases and/or photos private.
![]() Note
Note
It’s a good idea for parents to set up the Family Sharing feature for their younger kids and create a separate Apple ID account for each child who the parent maintains control over. To do this, launch Settings, tap on the iCloud option, tap on the Family option, and then tap on the Create an Apple ID for a Child option.
![]() Tip
Tip
Before a family member accepts a Family Sharing invitation, his iOS mobile device (or Mac) must already be signed into his personal iCloud account.
When everyone is active with Family Sharing, to access each other’s previously purchased content, launch the iTunes Store app, iBooks app (to access iBook Store), or the App Store app (to access apps), and tap on the Purchased option. Select a family member from the displayed menu. The purchased content already acquired by that family member (using the person’s own Apple ID account) is displayed and becomes downloadable by others. All new purchases are considered acquired by the primary account used to manage the Family Sharing option.
![]() Tip
Tip
If you’re a parent, turn on the Ask To Buy option when setting up the Family Sharing feature. Then, anytime a child (under age 18) who is linked to the account wants to make a content purchase, the parent receives a text message asking them to approve the purchase. This approval is also required when a child wants to acquire free content.
In addition to the other Family Sharing features, events can be created and shared within an automatically created Family calendar using the Calendar app. Any participating family member can create an event with the Calendar app, like they normally would, and choose the Family calendar in the Calendar option in the New Event screen.
To view the Family calendar from the Calendar app, tap on the Calendars option, and then tap on the Family option to select the Family calendar for viewing.
Any participating member can add or delete events from the Family calendar; however, any other calendars being managed by each person’s Calendar app remain separate and private.
![]() Note
Note
Just like the Family calendar accessible by all participating family members, a Family list is also created automatically in the Reminders app. This allows for centralized lists to be accessed and viewed by all participating family members, while at the same time, by default, all other lists stored in each person’s Reminders app are kept private (unless you opt to share your other lists as well.)
![]() Note
Note
Using the Find My Friends app, it’s possible to deactivate the Share My Location feature and block family members from viewing your current location. This cannot be done from a child’s Apple ID/iCloud account if the account was set up as a “Child Account.”
Like all of iCloud’s features and functions, what’s possible with Family Sharing will evolve over time.
Using the New iCloud Drive App on Your Mobile Device
The new iCloud Drive app enables you to access the individual folders that contain data, documents, files, photos, and other content that you manually stored online on your iCloud Drive.
When you access a file, you can either preview it from within the iCloud Drive app or open and work with it using a compatible app. For example, if it’s a Word document, you can open that document using the Word or Pages app. If it’s a PDF file, you can open and view it using any PDF reader app.
Like any app that comes preinstalled with iOS 9, iCloud Drive has an app icon that appears on your device’s Home screen. Tap on the app to launch it. Your mobile device must have Internet access for this app to work.
If the app icon for iCloud Drive does not appear on your Home screen, launch Settings, tap on the iCloud option, tap on the iCloud Drive option, and then turn on the virtual switch that’s associated with Show on Home Screen.
As soon as you launch the iCloud Drive app, default folders for specific apps are displayed, as are folders you created from your primary computer (shown in Figure 5.9).
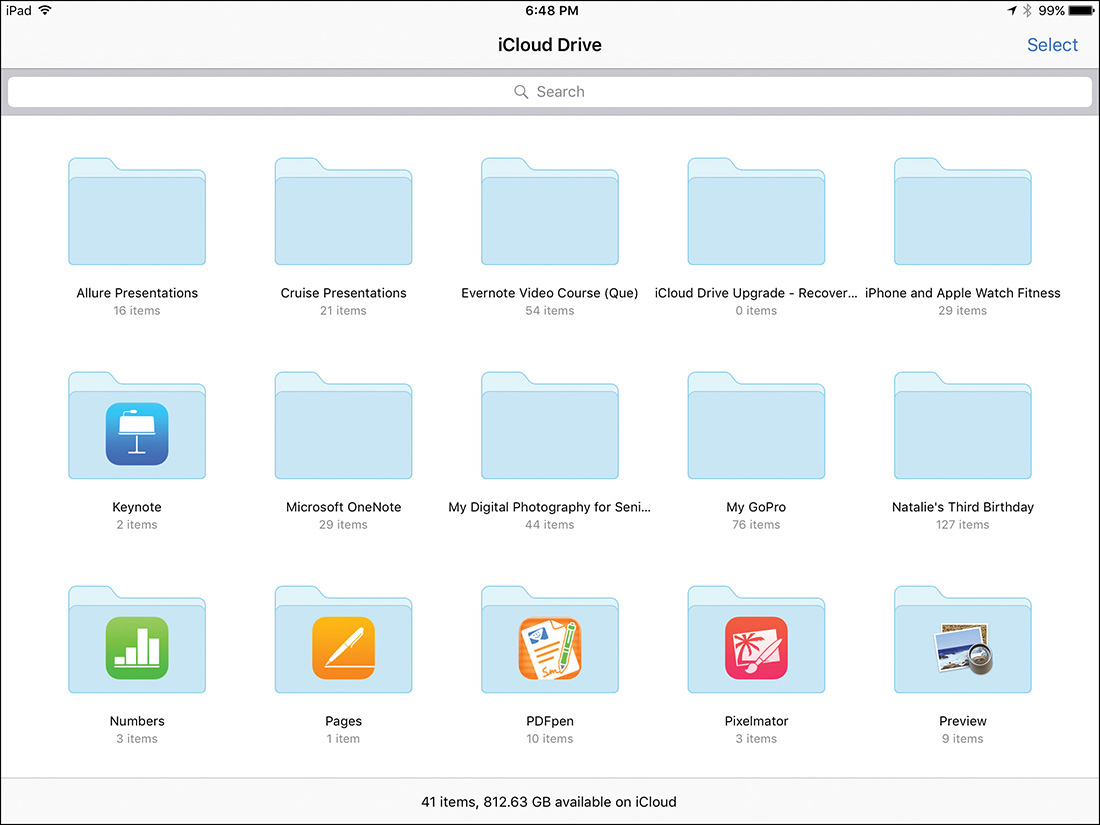
Tap on any folder to open it and view its contents, or tap on any file icon or listing to preview it using the iCloud Drive app (shown in Figure 5.10).
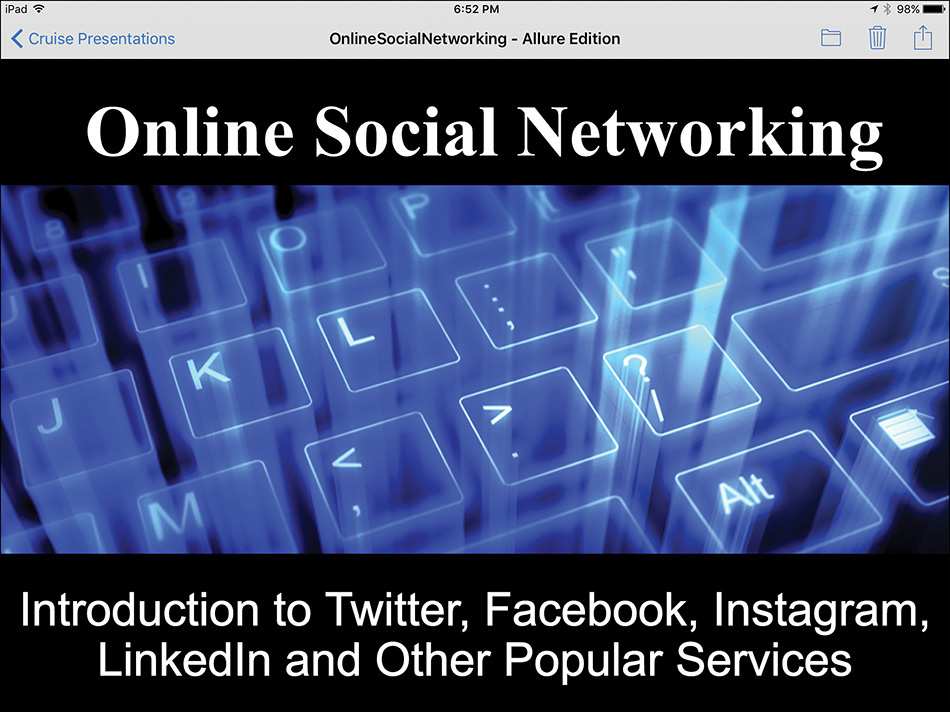
Figure 5.10 You can preview most types of files and content stored in iCloud Drive from directly within the iCloud Drive app by tapping on its icon or listing. Shown here is a PowerPoint presentation.
When you’re previewing content, tap on the Share icon to access a menu that enables you to share that content via text message or email, or open that content within a specific (compatible) app already installed on your mobile device. In some cases, you will first need to tap on the Download to View option that’s displayed to view that content on your mobile device’s screen.
To transfer the PowerPoint file (previewed in Figure 5.10) that’s stored on your iCloud Drive to the PowerPoint app on the iPad being used, tap on the Copy to PowerPoint icon displayed after tapping on the Share icon (shown in Figure 5.11).
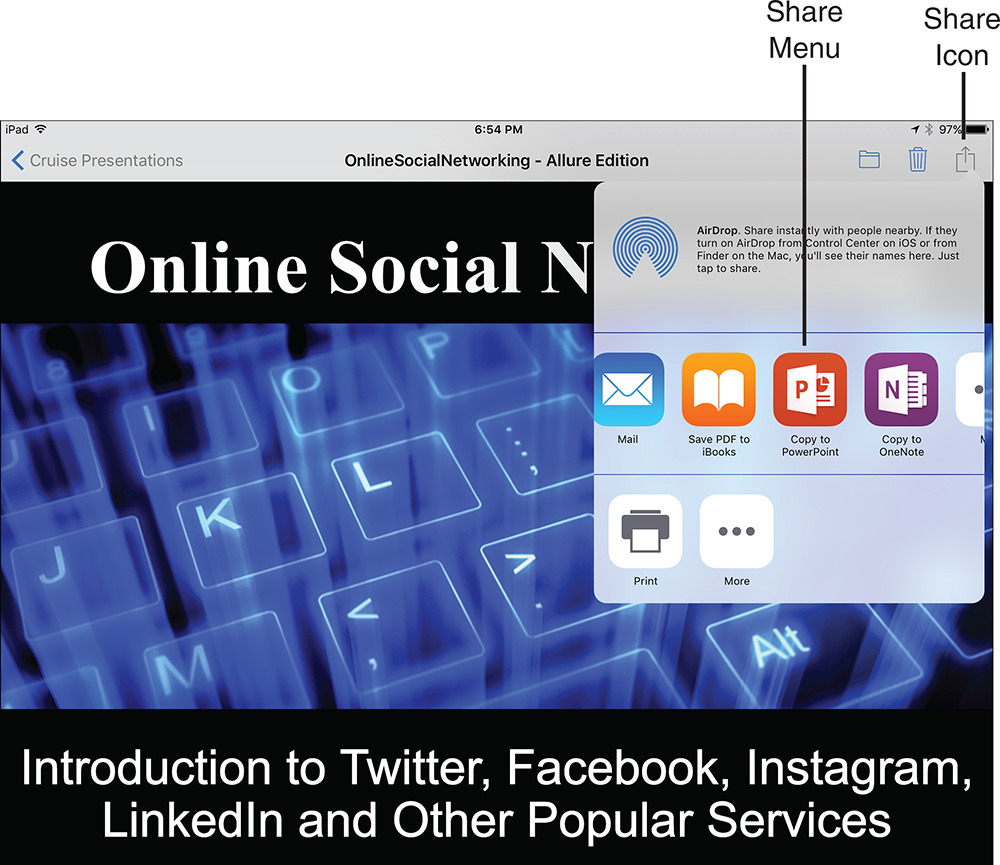
Figure 5.11 When previewing a file, it’s possible to open it in another compatible app and work with it or share it via email with someone else. To do this, tap on the Share icon.
As needed, the file or content is automatically downloaded from iCloud Drive, stored in your mobile device, and loaded into a compatible app.
![]() Tip
Tip
As you’re previewing content or files, tap on the Trash icon to delete the file, or tap on the Folder icon to move that file to a different folder within iCloud Drive. When you tap on the Folder icon, a listing of folders in your iCloud Drive is displayed. Tap on the listing for the folder where you want to move the file or content.
Located at the top of the screen when you launch the iCloud Drive app is a Search field (refer to Figure 5.9). Type a keyword or search phrase to quickly find a file stored online in the iCloud Drive portion of your iCloud account.
To custom sort how the iCloud Drive folders and files are displayed on the screen, tap on the Date, Name, or Tags tab displayed below the Search field. Tap on the View icon, located to the right of these tabs, to switch between an icon view and a listing view of your stored folders and files. If you don’t see these tabs, place your finger near the center of the screen and swipe downward, so you’re looking at the very top of the screen (just below the Search field).
![]() Tip
Tip
Tap on the Select option displayed in the top-right corner of the iCloud Drive app’s screen to select one or more files or folders by tapping on them. As soon as you tap on the Select option, the New Folder, Move, and Delete options are displayed at the bottom of the screen.
After selecting one or more files, tap on the New Folder, Move, or Delete option to handle that task. When you tap on New Folder, you can create a new folder within your iCloud Drive account. Tap on the Move option to move the selected file into a different online-based folder. Tap on the Delete option to delete the selected content.
When using the iCloud Drive app, displayed at the bottom of the main screen is a summary of how many individual files are stored online, as well as how much of your allocated online storage space is still available. Thanks to iCloud Drive, it’s possible to store content online and not keep it stored on your mobile device (or computer). This frees up internal storage space. Yet, as long as your mobile device or computer has Internet access, the files stored in iCloud Drive are always accessible when they’re needed.
The same content that you can access from the iCloud Drive app on your mobile device can also be accessed from iCloud.com by clicking on the iCloud Drive app icon when using the web browser of any Internet-connected computer.
![]() Caution
Caution
Anything you do in the iCloud Drive app in terms of creating new folders, moving files, or deleting content happens instantly. There is no “undo” option, and this impacts what can be accessed via iCloud Drive from all your other computers and mobile devices linked to the same iCloud account.
iCloud: Many Uses, One Storage Space
Keep in mind that you are not required to use all of iCloud’s various features. You can turn on only those features you believe are beneficial to you, based on how you typically use your iPhone and/or iPad and what content, data, and information you want to synchronize or back up to your iCloud account.