
13. Tips for Using Calendar, Contacts, Reminders, and Notes
In This Chapter
![]() Get acquainted with the Calendar, Contacts, and Reminders apps
Get acquainted with the Calendar, Contacts, and Reminders apps
![]() Rediscover the newly enhanced Notes app
Rediscover the newly enhanced Notes app
![]() Stay organized, on time, and productive with your iOS mobile device
Stay organized, on time, and productive with your iOS mobile device
![]() Sync your app data across all your devices and iCloud
Sync your app data across all your devices and iCloud
Veteran iPhone or iPad users will quickly discover that the Contacts, Calendar, and Reminders apps that come bundled with iOS 9 have the same core functionality as before. However, the Notes app is packed with new features and tools that are useful for note taking, gathering information from a variety of sources, and then organizing and sharing your digital notes.
The Calendar, Contacts, Reminders, and Notes apps continue to be fully compatible with iCloud, which makes synchronizing your app-related data a straightforward process. Plus, from any computer or mobile device that’s connected to the Internet, it’s possible to access the online versions of these apps, which are automatically populated with all of your most current app-specific data.
Plus, in Notification Center, the Calendar and Reminders apps can easily be set up so alerts, alarms, and notifications related to your schedule and lists are consistently displayed as part of the Today screen.
![]() Note
Note
The features and functions offered by the Calendar, Contacts, Reminders, and Notes apps are virtually identical on all iOS mobile devices, as well as on the Mac. However, due to varying screen sizes, the location of specific command icons, options, and menus often varies. After you get to know how each app works in general, you can easily switch between the iPhone, iPad, Mac, and/or the iCloud.com online-based versions of these apps without confusion.
Sync App-Specific Data with Online-Based Apps
To sync your Calendar, Contacts, Reminders, and/or Notes data with Yahoo!, Google, or Microsoft Exchange–compatible software, launch Settings and tap on the Mail, Contacts, Calendars option. Under the Accounts heading, tap on Add Account. Choose which type of account you want to sync data with, such as iCloud, Microsoft Exchange, Google, Yahoo!, AOL, or Outlook.com. Tap on the Other option if you use alternate contact management and/or scheduling software that supports the industry-standard LDAP or CardDAV protocols.
When prompted, enter your name, email address, password, and an account description (as well as any other requested information). After your account is verified, a menu screen in Settings related to that account lists app-specific options, such as Mail, Contacts, Calendars, Reminders, and/or Notes. Turn on the virtual switch associated with any or all of these options. Your iPhone or iPad can automatically and continuously sync your app-specific data on your iOS device with your online-based account. So, if you turn on the virtual switch associated with Calendars, for example, your schedule data is continuously synchronized.
To sync scheduling and/or contact-related data with Facebook, launch Settings and tap on the Facebook option. When prompted, enter your Facebook username and password. Then, near the bottom of the Facebook menu screen in Settings, turn on the virtual switch that’s associated with Calendars and/or Contacts.
Periodically tap on the Update All Contacts option as you add new online Facebook friends. Calendar and/or Contacts data is imported from Facebook and incorporated into your Calendar and/or Contacts apps. This includes profile pictures of your online friends who also have an entry in your Contacts database.
Sync App-Specific Data with iCloud
The Calendar, Contacts, Reminders, and Notes apps work seamlessly when syncing data between your iOS mobile devices, Mac(s), and PC(s) that are linked to the same iCloud account. To set up this feature, launch Settings, tap on the iCloud option, and then turn on the virtual switches associated with Contacts, Calendars, Reminders, and/or Notes. This needs to be done only once, but it must be done separately on each device or computer that’s linked to the same iCloud account.
![]() Note
Note
By setting up app-specific data syncing for Contacts, Calendar, Notes, and Reminders via iCloud, your data automatically gets imported into the online version of these apps that are available via iCloud.com (www.iCloud.com). So, when you sign in to iCloud.com using your Apple ID and password, and then launch the online version of Contacts, Calendar, Notes, or Reminders, all of your current app-specific data is available to you. This can be done from any computer or mobile device that’s connected to the Internet, even if that computer or device is not normally linked to your iCloud account.
Get Acquainted with the Calendar App
With its multiple viewing options for keeping track of the scheduling information stored in it, the Calendar app is a highly customizable scheduling tool. In the Calendar app, any appointment, meeting, activity, or entry that you create and store within the app is referred to as an event.
Because the Calendar app can manage and display multiple color-coded calendars at once, when you create a new event, be sure to choose which calendar it gets stored in. For example, you can maintain separate calendars for Work, Personal, Family, Travel, and/or for whatever organization you volunteer for and allocate time to.
From within Calendar, you can also share some or all of your schedule information with colleagues and maintain several separate, color-coded calendars to keep personal and work-related responsibilities, as well as individual projects, listed separately, while still being able to view them on the same screen.
![]() Tip
Tip
When you turn on iCloud’s Family Sharing feature, a separate color-coded calendar labeled Family is created in the Calendar app. This calendar can be accessed by up to five other family members. Thus, your teens can add details about their after-school activities, sports practices, or drama rehearsals, while weekend family events can be viewed for all to see. Plus, everyone can keep tabs on upcoming vacation dates.
While the Family calendar data is viewable by anyone with Family Sharing access, events stored within other calendars remain private, or viewable only by people you invite to see the information.
More information about setting up iCloud’s Family Sharing feature can be found in Chapter 5, “Use iCloud and the iCloud Drive App from Your iPhone or iPad.”
Controlling the Calendar View
Launch Calendar from your iOS device’s Home screen, and then choose in which viewing perspective you’d like to view your schedule data. Regardless of which view you’re using, tap on the Today option to immediately jump to the current date on the calendar. The current date is always highlighted with a red dot.
![]() What’s New
What’s New
From the Home screen of the iPhone 6s or iPhone 6s Plus, press and hold your finger on the Calendar app icon to make an Add Event option appear (shown in Figure 13.1). Tap on this to quickly launch the Calendar app and access the New Event screen.
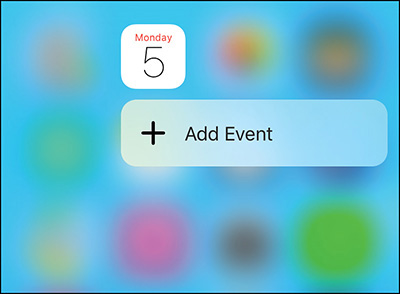
Figure 13.1 Quickly access the New Event screen within the Calendar app by pressing and holding down the Calendar app icon when viewing the Home screen of the iPhone 6s or iPhone 6s Plus.
![]() What’s New
What’s New
If event-related information is displayed in an incoming email, such as an upcoming airline flight reservation or restaurant reservation, the Mail app displays an Add Event banner near the top of the email. Tap on this banner (which includes a tiny Calendar app icon) to import the event details from the body of the incoming email directly into the Calendar app as a new event.
On the iPad, switching between Calendar views is as easy as tapping on the Day, Week, Month, or Year tab displayed at the top center of the Calendar app screen.
On the iPhone and iPad, the Calendar app opens on the last view option that you were using previously. However, on the iPhone, you also have access to a detailed Day, Week, Month, or Year view, as well as a Listing view, which works with the Month or Day view.
![]() Tip
Tip
When the Month calendar view is selected, tap on the Listing icon (which appears near the top-right corner of the screen) to display a list of events for the current day (or the day you select). This information is displayed below the month view of the calendar (shown in Figure 13.2).
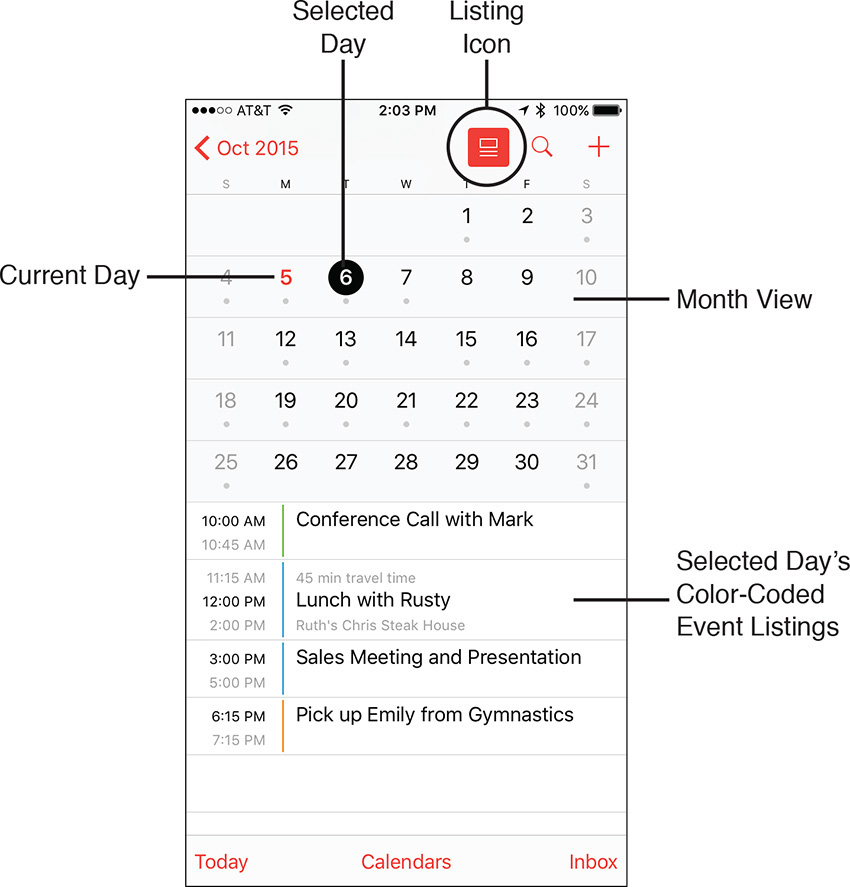
Figure 13.2 The Listing icon in the Calendar app provides an additional way to format and view your schedule on the iPhone’s screen.
When you select the Day view in the Calendar app, the Listing icon shows you all your appointments, hour-by-hour, in a scrollable format that enables you to quickly see your schedule for the previous or upcoming days in addition to the currently selected day.
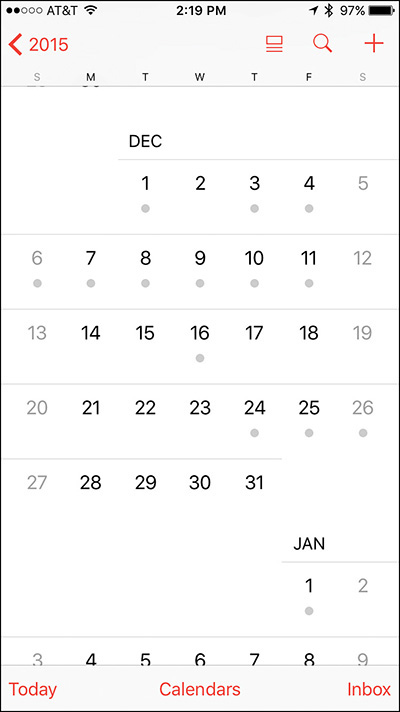
The Year view shows mini calendars for the entire year. To switch from the Year view to the Month view (shown in Figure 13.3), tap on any month in the Year view.
From the Month view, switch to the Week view by rotating your iPhone from portrait to landscape mode. In other words, hold your smartphone sideways.
Also from the Month view, to switch to the Day view, tap on a day displayed in the calendar. From the Month view, any day that displays a gray dot in it has event details associated with it.
![]() Tip
Tip
On the iPhone, from the Month or Day view, tap on the Listing icon to view a more detailed and scrollable listing for the selected day’s events.
The Year, Month, Week, and Day views in the iPhone version of the Calendar app are switchable in a hierarchical order. If you’re in the Day view, for example, you can switch back to the Month view by tapping on the Back icon (a left-pointing arrow), which is displayed in the top-left corner of the screen.
Whether you’re using the Calendar app on an iPhone or iPad, your Calendar view options include the following.
The Calendar App’s Day View
This view displays your events individually, based on the time each event is scheduled. When using the iPad version of the app, this information is displayed on a split screen. On the left is an hour-by-hour summary of your day, and on the right is a synopsis of the events for that day.
![]() Note
Note
On the iPhone, the Day view (shown in Figure 13.4) displays a week’s worth of calendar dates near the top of the screen. Below that, the selected date is displayed, followed by an hour-by-hour rundown of your events.
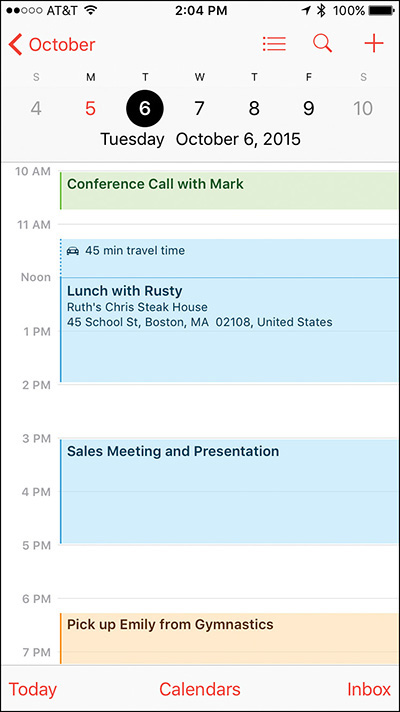
Figure 13.4 The Day view of the Calendar app lets you see your schedule broken down one day at a time in one-hour increments.
On the iPad, the Day display is split into two sections. The selected date, along with a week’s worth of calendar dates, is displayed at the top of the screen, followed by a summary listing of appointments and/or events displayed on the left side of the screen. Details about one selected appointment or event are displayed on the right side of the screen by tapping on it.
Use the Day view of the Calendar app to see a detailed outline of scheduled events for a single day. Swipe your finger to scroll up or down to see an hour-by-hour summary of that day’s schedule.
Swipe right or left along the week’s worth of calendar days to see upcoming or past dates, and to view another day’s schedule. Tap on a specific day to switch to that date’s Day view.
![]() Tip
Tip
To quickly find an event, tap on the Search icon, and then enter any relevant text to help you find the item you’re looking for that’s stored in the Calendar app. This can also be done using Spotlight Search, or a verbal request can be made using Siri. In the Search field, enter a date, time, name, business, meeting location, or other pertinent information. Tap on a search result to view that event listing in detail within the Calendar app.
The Calendar App’s Week View
The view uses a grid format to display the days of the week along the top of the screen and time intervals along the left side of the screen (shown in Figure 13.5 on an iPhone). With it, you’re given an overview of all events scheduled during a particular week (Sunday through Saturday).

Scroll along the dates displayed near the top of the screen to quickly view your schedule for past or future weeks.
![]() Tip
Tip
To fine-tune this or any other Calendar app view, tap on the Calendars option that’s displayed near the bottom center of the screen. A listing of the separate color-coded calendars that the Calendar app is managing is displayed. Tap on a listing to add or remove it from the Calendar view you’re looking at.
When you remove a calendar from the calendar view, this does not delete any data; it simply hides the events that are stored in that particular calendar from the display.
The Calendar App’s Month View
This view enables you to see a month’s worth of events at a time. On the iPhone, tap any single day to immediately switch to the Day view and review a detailed summary of events slated for that day. From the Month view, use your finger to scroll up or down to look at past or future months. On the iPad, use the Day, Week, Month, or Year tabs, located at the top of the screen, to switch Calendar views.
The Calendar App’s Year View
The Year view enables you to look at 12 mini calendars (with minimal detail displayed).
![]() Tip
Tip
Tap on the Inbox option, displayed near the bottom-right corner of the screen, to view invites for events from other people that you might want to import into one of your calendars.
How to Enter a New Event into the Calendar App
Regardless of which calendar view you’re using, follow these steps to enter a new event:
1. Tap the New Event icon (which looks like a plus sign) in the upper-right corner of the screen. This causes a New Event window to be displayed (shown in Figure 13.6).
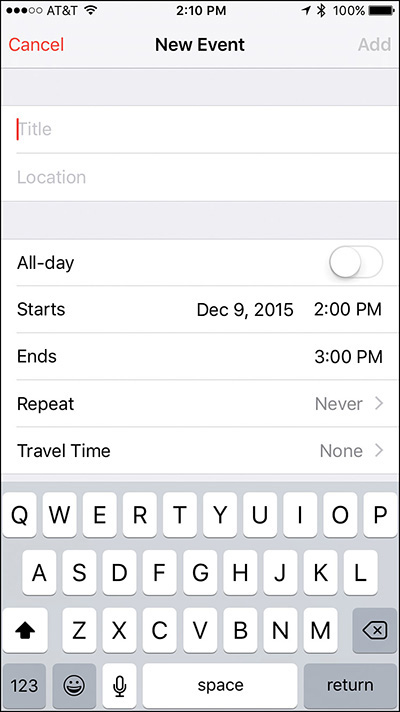
2. The first field in the New Event window is labeled Title. Using the virtual keyboard, enter a title for the event.
3. If a location is associated with the event, tap the Location field located below the Title field and enter an address or location. Entering information into the Location field is optional. You can be as detailed as you want when entering information into this field.
![]() Tip
Tip
By entering a location, your iOS mobile device can calculate travel time to this event from your current location and give you ample warning related to when you need to leave. The Maps app can also use the location information to provide directions to that event.
If you ask Siri a question related to an event’s location, such as “Where is my next meeting?” or “How do I get to my next appointment?,” the event’s location information is used.
![]() Note
Note
Many of the fields within the New Event screen are optional. In other words, only fill in the fields that are relevant to the new event you’re creating. However, the more information you include, the more useful Maps, Siri, and Spotlight Search will be later when you want to refer to event information.
4. If the event lasts for the entire day, turn on the All-Day virtual switch. Otherwise, to set the time and date the event begins and ends, first tap the Starts field. Use the scrolling Date, Hour, Minute, and AM/PM dials to select the start time for your event.
5. After entering the start time, scroll down and tap on the Ends option, and again use the scrolling Date, Hour, Minute, and AM/PM dials to select the end time for your event.
![]() Note
Note
If the new event you’re creating repeats every day, every week, every two weeks, every month, or every year, tap the Repeat option, and choose the appropriate time interval. The default for this option is Never, meaning that it is a nonrepeating, one-time-only event.
6. Turn on the virtual switch associated with the Travel Time option to add between 5 minutes and 2 hours of travel time to that event by tapping on one of the listed options. So, if this event turns out to be one hour away from your previous event scheduled on the same day, one hour’s worth of travel time can be added to your schedule. However, if you have a specific location entered in the Location field, your iPhone or iPad can calculate the travel time from wherever you happen to be prior to that event.
7. If you’re managing several calendars within the Calendar app, tap on the Calendar option to select in which calendar the new event will be placed. The default calendar is called Home, but you can change this from within Settings.
8. To invite other people to the event, tap on the Invitees option and, when prompted, fill in the To field with the invitees’ names or email addresses. Use their name if they already have a contact entry in the Contacts app; otherwise, enter an email address for each person separated by a comma. The people you add as invitees are sent an email allowing them to respond to the invite. The Calendar app keeps track of RSVPs from event attendees and displays this information in the app.
9. To set an audible alarm for the event, tap the Alert option. The Event Alert window temporarily replaces the Add Event screen. In the Event Alert window, tap on the option for how much advance notice you want before the scheduled event. Your options include None, At Time of Event, 5 minutes, 15 minutes, 30 minutes, 1 hour, 2 hours, 1 day, 2 days, or 1 week before the event. Once you tap a selection, you are returned to the Add Event screen.
![]() Tip
Tip
A Second Alert option is also available from the Add Event screen. If you want to add a secondary alarm to this event, tap the Second Alert option and then set it.
10. Tap on the Show As option to classify how you want an event to appear within your calendar. The default option is Busy. This is information others can see if you opt to share specific calendars with other people.
11. Tap on the URL field to add a website address associated with the event.
12. Tap on the Notes field to add text-based notes you want to associate with the new event. It’s also possible to paste content from other apps into the Notes field.
13. Tap the Add option to save the event. Tap the Cancel icon to exit without saving any new information.
![]() Note
Note
As soon as you create a new event, that information syncs with your iCloud account and all other computers and/or mobile devices that you have linked to that account. If you have the Calendar app set up to sync with another scheduling app or online service, your new data syncs with that app.
This near instant data synchronization also applies if you delete an event.
Use Siri to Enter New Events into the Calendar App
Instead of manually entering event information into your iPhone or iPad using the virtual keyboard, or importing/syncing scheduling data from another computer or device, you always have the option to use Siri. Refer to Chapter 2, “Using Siri, Dictation, and CarPlay to Interact with Your Mobile Device,” for more information.
Using Siri, say something like, “When is my next appointment with [name]?” You can also say, “Show me my schedule for Wednesday,” or ask, “What’s on my calendar for July 7?” to quickly find an event. If you enter information into the Location field as you’re creating events, you can later ask Siri, “Where is my next meeting?”
Viewing Individual Appointment Details
From any view in the Calendar app, tap an individual event to display the details related to it.
When you tap on a single event listing, a new screen opens (shown in Figure 13.7). Tap the Edit option in the upper-right corner to modify any aspect of the event listing, such as its title, location, start/end time, alert, invitees, or notes.
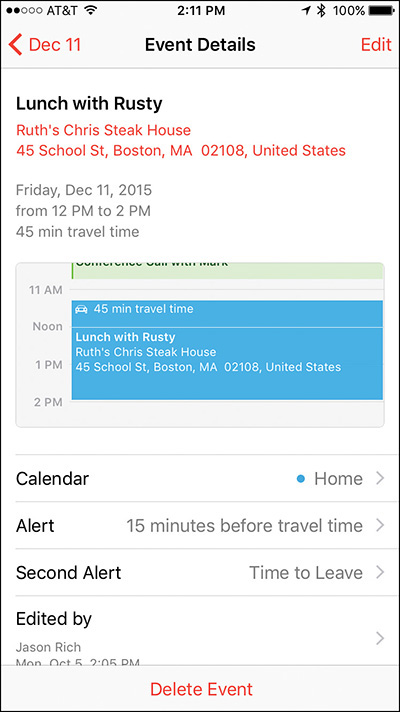
Figure 13.7 Detailed information about each event stored within the Calendar app can easily be viewed.
At the bottom of an event listing, a map showing the event’s location is provided if the Location field has been filled in.
How to Delete an Event from the Calendar App
To delete an event entry entirely, tap the red-and-white Delete Event option found at the bottom of the Edit window. Or when you’re finished making changes to an event entry, tap on the Done option in the upper-right corner of the window.
![]() Tip
Tip
The Calendar app works with several other apps, including Contacts and Notification Center. For example, in Contacts, you can enter someone’s birthday into an entry, and that information can automatically be displayed in the Calendar app.
To display birthday listings in Calendar, tap the Calendars button displayed near the bottom center of the screen in the Calendar app, and then tap on the Birthdays option to add a check mark to that selection. All recurring birthdays stored in Contacts appear in Calendar.
There are also two options related to the Facebook app that enable you to display all the birthdays for your online Facebook friends, and/or all Facebook Events related to your account in the Calendar app. This can be found under the Facebook heading of the Show Calendars screen/window.
Quickly Find Appointment or Event Details
In addition to viewing the various calendar views offered within the Calendar app, use the in-app Search or Spotlight Search options to find individual events.
Customizing the Calendar App
There are many ways to customize the Calendar app beyond choosing between the various calendar views. For example, you can set audible alerts and/or use onscreen alerts and banners to remind you of events. You can also display Calendar-related information in the Notification Center and/or on the Lock screen.
![]() Tip
Tip
To customize the audio alert generated by the Calendar app, launch Settings and then select the Sounds option. Tap on the Calendar Alerts option and choose a sound from the menu. Choose the None option from the Calendar Alerts menu to set up Calendar so it never plays audible alerts or alarms.
From the Mail, Contacts, Calendars submenu within Settings, under the Calendars heading, determine how far back in your schedule you want to sync appointment data between your primary computer and your iOS device(s). Your options include Events 2 Weeks Back, Events 1 Month Back, Events 3 Months Back, Events 6 Months Back, and All Events. All Events is the default option.
Tap on the Time Zone Override option and then turn on the virtual switch associated with this feature if you want the Calendar app to always show event dates and times in your home time zone, regardless of which alternate time zone you’ve traveled to. After you turn on the virtual switch associated with this feature, tap on the Time Zone option to select a home time zone.
Use the Contacts App to Keep Track of People You Know
Contact information related to the people in your life, as well as companies you do business with, can all be stored and easily managed using the Contacts app.
Your personal contacts database might include people you work with, customers, clients, family members, people from your community with whom you interact (doctors, hair stylist, barber, dry cleaners, and so on), your real-world friends, and your online friends from Facebook, for example.
![]() What’s New
What’s New
From the Home screen when using an iPhone 6s or iPhone 6 Plus, press and hold your finger on the Contacts app icon to view a pop-up menu that enables you to quickly create a new contact entry or view your own entry in the Contacts database, which is referred to as My Info (shown in Figure 13.8).
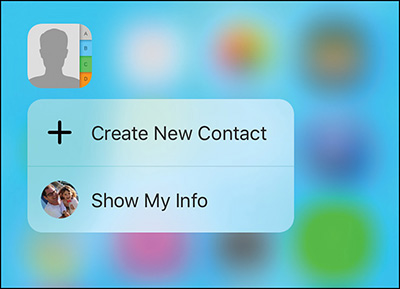
Figure 13.8 Use the new Peek function offered by iOS 9 when using the iPhone 6s or iPhone 6s Plus to access this Contacts-related menu directly from the Home screen.
Be sure to create an entry for yourself in your Contacts database and populate it with as much information as possible, because many other apps will access this information in the future for a variety of reasons.
As you receive incoming emails, if the sender includes their details within their email, and this information is not stored within your Contacts app already, you’ll have the ability to add it. This is also true if the sender updates their contact information, and it doesn’t match what’s stored within the Contacts app. Within the Mail app, as you’re reading the email, you’ll be given the opportunity to create a new contact or update the existing contact’s entry within the Contacts app.
For this feature to work, launch Settings, tap on the Mail, Contacts, Calendar option, and then turn on the virtual switch associated with the Contacts Found in Mail option.
Contacts is a powerful and customizable contact management database that works with several other apps that also came preinstalled on your iPhone or iPad, including Mail, Calendar, Safari, FaceTime, and Maps, as well as optional apps, like the official Facebook and Twitter apps. It’s also fully compatible with Siri and Spotlight Search.
You Determine What Information You Add to Each Contact Entry
Chances are, the same contacts database that you rely on at your office or on your personal computer at home can be synced with your iPhone or iPad and made available to you using the Contacts app.
Of course, Contacts can also be used as a standalone app, enabling you to enter new contact entries as you meet new people and need to keep track of details about them using your iOS mobile device(s).
The information you maintain in your Contacts database is highly customizable, which means you can keep track of only the information you want or need. For example, in each contact entry, it’s possible to store a vast amount of information about a person or company, including multiple phone numbers, addresses, and email addresses. Each field is labeled for easy reference. For example, a Contact entry can include someone’s home, work, and cell phone numbers.
![]() Note
Note
To include some fields that aren’t provided by default, tap on the Add Field option and select a field type from the submenu.
You can also customize your contacts database to include additional information, such as each contact’s photo, as well as detailed and freeform notes related to a contact.
When you’re using the Contacts app, your entire contacts database is instantly searchable using data from any field within the database, so even if you have a database containing thousands of entries, you can always find the person or company you’re looking for in a matter of seconds, using a wide range of search criteria. This can be done using the Search field in the Contacts app, using the Spotlight Search feature, or with Siri.
The Contacts App Works Seamlessly with Other Apps
After your contacts database has been populated with entries, Contacts works with many other apps on your iPhone and/or iPad. Here are just a few popular examples:
![]() When you compose a new email message in Mail, begin typing someone’s full name or email address in the To field. If that person’s contact information is already stored in Contacts, the relevant email address automatically displays in the email’s To field.
When you compose a new email message in Mail, begin typing someone’s full name or email address in the To field. If that person’s contact information is already stored in Contacts, the relevant email address automatically displays in the email’s To field.
![]() If you’re planning a trip to visit a contact, pull up someone’s address from your Contacts database and then quickly obtain driving directions to the person’s home or work location from the Maps app.
If you’re planning a trip to visit a contact, pull up someone’s address from your Contacts database and then quickly obtain driving directions to the person’s home or work location from the Maps app.
![]() Activate Siri and request directions to any person or company with an entry stored in your Contacts database. For example, activate Siri and say, “How do I get to John Doe’s house from here?”
Activate Siri and request directions to any person or company with an entry stored in your Contacts database. For example, activate Siri and say, “How do I get to John Doe’s house from here?”
![]() If you include each person’s birthday in your Contacts database, that information can automatically be displayed in the Calendar app and be set up to remind you (in advance) to send a card or gift.
If you include each person’s birthday in your Contacts database, that information can automatically be displayed in the Calendar app and be set up to remind you (in advance) to send a card or gift.
![]() As you’re creating each Contacts entry, include a photo of that person—by activating the Camera app from the Contacts app to snap a photo, by using a photo stored in the Photos app that you link to the entry, or by acquiring profile photos from social media accounts. For example, to automatically insert profile photos of Facebook friends into the Contacts app, see the section “Add a Photo to a Contacts Entry” later in this chapter.
As you’re creating each Contacts entry, include a photo of that person—by activating the Camera app from the Contacts app to snap a photo, by using a photo stored in the Photos app that you link to the entry, or by acquiring profile photos from social media accounts. For example, to automatically insert profile photos of Facebook friends into the Contacts app, see the section “Add a Photo to a Contacts Entry” later in this chapter.
![]() When using FaceTime, create a Favorites list of people you often engage in video calls with, compiled from entries in your Contacts database.
When using FaceTime, create a Favorites list of people you often engage in video calls with, compiled from entries in your Contacts database.
![]() From the Messages app, access your Contacts database when filling in the To field as you compose new text messages to be sent via iMessage, text message, or instant message.
From the Messages app, access your Contacts database when filling in the To field as you compose new text messages to be sent via iMessage, text message, or instant message.
![]() If you’re active on Facebook or Twitter, you have the option of adding each contact’s Facebook and/or Twitter username to their Contacts entry. When you turn on the Facebook feature, the Contacts app automatically downloads each entry’s Facebook profile picture and inserts it into your Contacts database.
If you’re active on Facebook or Twitter, you have the option of adding each contact’s Facebook and/or Twitter username to their Contacts entry. When you turn on the Facebook feature, the Contacts app automatically downloads each entry’s Facebook profile picture and inserts it into your Contacts database.
When you first launch the Contacts app, its related database is empty. However, you can create and build your database in two ways:
1. Sync the Contacts app with your primary contact management application on your computer, network, or online (cloud)-based service, such as iCloud or Microsoft Outlook.
2. Manually enter contact information directly into the Contacts app.
![]() Note
Note
The Contacts app that comes preinstalled with iOS 9 is 100 percent compatible with and extremely similar to the Contacts app that comes bundled with OS X Yosemite or OS X El Capitan on the Mac. Thus, be sure to set up each version of the app to sync with each other via iCloud, so you always have access to your entire Contacts database.
As you begin using this app and come to rely on it, it’s possible to enter new contact information or edit entries either on your iOS mobile device or using your primary contact management application and keep all the information synchronized, regardless of where the entry was created or modified.
How to View Your Contacts
On the iPhone, the All Contacts screen displays an alphabetical listing of all entries in your Contacts database. Along the right side of the screen are alphabetic tabs, and a Search field is located near the top of the screen.
![]() Note
Note
If you’ve used the Contacts app previously, and it has been running in the background, the last contact entry you viewed will be displayed when you relaunch the app.
On the iPad, in the middle of the screen are alphabetic tabs. The All Contacts heading is near the upper-left corner of the screen. Below it is a Search field. After you have added entries in your contacts database, they are listed alphabetically on the left side of the screen below the Search field.
Tap on the Search field to quickly find a particular entry by entering any keyword associated with an entry, such as a first or last name, city, state, job title, or company name. Any content in your Contacts database is searchable from this Search field.
You can also tap a letter tab on the screen to see all entries “filed” under that letter by a contact’s last name, first name, or company name, depending on how you set up the Contacts app using the Mail, Contacts, Calendars option in Settings.
On the iPhone, to see the complete listing for a particular entry, tap on its listing from the All Contacts screen. A new screen shows the specific contact’s information (shown in Figure 13.9).
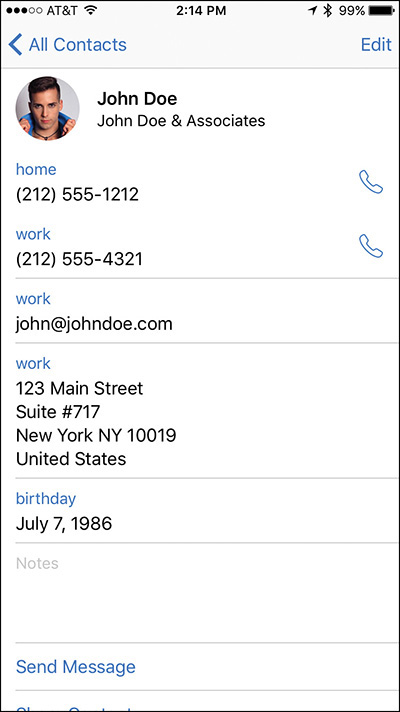
On the iPad, to see the complete listing for a particular entry, tap on it from the All Contacts display on the left side of the screen. That entry’s complete contents are then displayed on the right side of the screen.
To quickly find and display any contact in your Contacts database, activate Siri and say, “Find [name] within Contacts.” The contact’s information will be displayed as a Siri results screen, but the Contacts app will not automatically launch.
How to Create a New Contacts Entry
To create a new Contacts entry, tap the New Contact icon (which looks like a plus sign). On the iPhone, it’s displayed in the upper-right corner of the All Contacts screen. On the iPad, the New Contact icon can be found near the top center of the Contacts app’s screen.
After tapping on the New Contact icon, the New Contact screen appears.
![]() Note
Note
As you’re creating each Contacts entry, fill in whichever fields you want. You can always edit a contact entry later to include additional information. The more information you enter, however, the more data the Contacts app will later be able to share with Siri and other apps running on your mobile device.
In the New Contact screen are several empty fields related to the entry, starting with the First Name field (shown in Figure 13.10).

Figure 13.10 From this New Contact screen, create a new contact and include as much information pertaining to that person or company as you want.
Some fields, including Phone, Email, and Mailing Address, enable you to input multiple listings, one at a time. So you can include someone’s home phone, work phone, and mobile phone (iPhone) numbers in the entry, for example. Likewise, you can include multiple email addresses, and/or a home address and work address for an individual.
![]() Tip
Tip
One of the available fields when creating a new Contact entry is labeled Add Related Name. Use this field to add the names of your contact’s mother, father, parent, brother, sister, child, friend, spouse, partner, assistant, manager, or other. You can also add your own titles for the Related People field.
![]() Tip
Tip
It’s possible to change the label associated with certain fields (which are displayed in blue) by tapping the field label itself. This reveals a Label menu, offering selectable options for that field. For example, the Label options for the Add Phone field include Home, Work, iPhone, Mobile, Main, Home Fax, Work Fax, Pager, and Other. At the bottom of this Label window, tap the Add Custom Label option to create your own label if none of the listed options applies.
Tap the label title of your choice. A check mark appears next to it, and you are returned to the New Contact screen.
At the bottom of the New Contact screen is the Add Field option. Tap it to reveal a menu containing a handful of additional fields you can add to individual Contacts entries as applicable, such as a middle name, job title, and/or nickname.
![]() Note
Note
If there’s a field displayed that you don’t want to utilize or display, simply leave it blank as you’re creating or editing a Contacts entry.
Each time you add a new mailing address to a contact’s entry from within the New Contact screen, the Address field expands to include a Street, City, State, ZIP, and Country field.
After you have filled in all the fields for a particular entry, tap the Done option, which is displayed in the upper-right corner of the New Contact screen. Your new entry gets saved and added to your contacts database and is then synced with your other computers and/or mobile devices.
How to Add a Photo to a Contacts Entry
To the immediate left of the First Name field is a circle that says Add Photo. When you tap this field, a submenu with two options—Take Photo and Choose Photo—is displayed. If the entry already has a photo associated with it, the Edit Photo and Delete Photo options are also displayed.
Tap Take Photo to launch the Camera app from within the Contacts app and snap a photo to be linked to the Contacts entry you’re creating. Alternatively, tap on the Choose Photo option. In this case, the Photos app launches so that you can choose any digital image that’s currently stored on your iOS mobile device. When you tap the photo of your choice, a Choose a Photo window displays on the Contacts screen, enabling you to move and scale the image.
![]() Tip
Tip
As you’re previewing the image (shown in Figure 13.11), use a pinch or reverse-pinch finger motion to zoom in or out, and then hold your finger down on the image and reposition it within the frame.

Figure 13.11 Linking a photo with someone’s Contacts entry enables you to visually identify the person as you’re reviewing your contacts.
After cropping or adjusting the selected photo, tap the Use icon displayed in the upper-right corner of the Choose Photo window to link the photo with that contact’s entry.
The photo you link with an entry is displayed by other apps, like Mail, Messages, and FaceTime, that utilize the Contacts app data.
![]() Tip
Tip
If you use an iPhone, or FaceTime on your iPhone or iPad, from the Ringtone option in the New Contact screen, select the specific ringtone you will hear each time that particular contact calls you. Your iPhone or iPad has many preinstalled ringtones. From the iTunes Store, you can purchase and download thousands of additional ringtones, many of which are clips from popular songs, movies, or TV shows.
Editing or Deleting a Contact
To edit a contact, tap on its listing from the All Contacts screen to display the contact details, and then tap on the Edit option displayed in the upper-right corner of the screen. Tap any field to modify it. Delete a field by tapping on the red-and-white minus sign icon associated with it, and then tap the Delete button that appears to the right of the entry.
You can also add new fields in an entry by tapping any of the green-and-white plus sign icons and then choosing the type of field you want to add.
When you’re finished editing a Contacts entry, again tap the Done option.
![]() Tip
Tip
To delete an entire entry from your Contacts database, as you’re editing a contact entry and looking at the Contact screen for that entry, scroll down to the bottom of it, and tap the Delete Contact option that’s displayed in red.
Keep in mind that if you have your Contacts database syncing with iCloud or another contacts database, the contact you delete is removed from all your computers and devices that are connected to the Internet within seconds. There is no “undo” option.
Sharing Contact Entries
From the main All Contacts screen, tap on the contact listing you want to share. When the contact’s entry is displayed, scroll down toward the bottom of the entry until you see the Share Contact option. Tap it. Then choose to share the contact’s details with someone else via AirDrop, text/instant message (via the Message app), or email (via the Mail app).
The entire Contacts entry you selected (stored in .vcf format) will already be embedded in the outgoing email or text/instant message. When you’ve filled in all the necessary fields, tap the blue-and-white Send icon. Upon doing this, you are returned to the Contacts app.
When the recipient receives your email or message and clicks on the attachment (the contact entry you sent), it automatically is imported into their contact management application as a new entry, such as in the Contacts app running on a Mac, iPhone, or iPad.
Contacts App Quick Tips
![]() If someone shares a Contacts entry with you via email, when you’re viewing the incoming email on your iPhone or iPad, tap the email’s attachment. The Contacts entry that was emailed is displayed in a window. At the bottom of this window, as the recipient of the contact’s information, tap the Create New Contact or Add to Existing Contact option to incorporate this information into your Contacts database.
If someone shares a Contacts entry with you via email, when you’re viewing the incoming email on your iPhone or iPad, tap the email’s attachment. The Contacts entry that was emailed is displayed in a window. At the bottom of this window, as the recipient of the contact’s information, tap the Create New Contact or Add to Existing Contact option to incorporate this information into your Contacts database.
![]() As you’re creating or editing a contact entry, in the Notes field, enter as much information pertaining to that contact as you want using freeform text. It’s also possible to paste content from another app into this field using the iOS’s Select, Copy, and Paste commands, and using the app switcher to quickly switch between apps.
As you’re creating or editing a contact entry, in the Notes field, enter as much information pertaining to that contact as you want using freeform text. It’s also possible to paste content from another app into this field using the iOS’s Select, Copy, and Paste commands, and using the app switcher to quickly switch between apps.
![]() When creating or editing contacts, it’s important to associate the correct labels with phone numbers, email addresses, and address data. For each phone number you add to a contact’s entry, for example, it can include a Home, Work, Mobile, iPhone, or Other label (among others). For many iOS 9 functions that utilize data from your Contacts database to work correctly (including Siri), it’s important that you properly label content you add to each Contacts entry.
When creating or editing contacts, it’s important to associate the correct labels with phone numbers, email addresses, and address data. For each phone number you add to a contact’s entry, for example, it can include a Home, Work, Mobile, iPhone, or Other label (among others). For many iOS 9 functions that utilize data from your Contacts database to work correctly (including Siri), it’s important that you properly label content you add to each Contacts entry.
Create and Manage Lists with the Reminders App
Use the Reminders app to easily manage multiple lists simultaneously, and if necessary, add alarms and deadlines to individual list items. Plus, it’s possible to be reminded of responsibilities, tasks, or objectives exactly when you need this information, based on your geographic location or a predetermined time and date.
The Reminders app works nicely with Siri, Notification Center, and iCloud, which makes synchronizing your app-related data a straightforward process.
![]() What’s New
What’s New
When using the iPhone 6s or iPhone 6s Plus, use iOS 9’s Peek feature by pressing and holding your finger on the app icon for the Reminders app when viewing the Home screen. This reveals a pop-up menu that allows you to quickly add items to a specific list you’ve already created within the app or add items to the app’s default list.
On its surface, Reminders is a straightforward list manager. However, it offers a plethora of interesting and useful features.
Using Reminders, create as many separate lists as you need to properly manage your personal and professional life, or various projects for which you’re responsible.
![]() Tip
Tip
Reminders enables you to color-code lists. Tap on the Edit button displayed to the right of a list’s title, and then tap on the Color option. Seven different colors are displayed. Tap on your selection. The list title is displayed in the selected color.
Because your iPhone has Location Services (GPS) capabilities, it always knows exactly where it is. Thus, it’s possible to create items within your to-do lists and associate one or more of them with an alarm that alerts you when you arrive at or depart from a particular geographic location, such as your home, office, or a particular store.
For example, have your morning to-do list or call list automatically display on your iPhone’s screen when you arrive at work, if you associate just one item on that list with a location-based alarm. Likewise, if you use Reminders to maintain a list of office supplies you need to purchase at Staples or OfficeMax, you can have it pop up on the screen when you arrive at your local office supply superstore.
In addition, you can have a reminder alarm set to warn you of an upcoming deadline. This can be displayed on your device’s screen in the Notification Center or as separate alerts or banners, depending on how you have the Reminders app set up to work with the Notifications options offered by your iPhone or iPad (which is adjustable from within Settings).
As you’re setting up an alarm, if you want it to repeat every day, every week, every two weeks, every month, or every year, tap on the Repeat option and make your selection. By default, the Never option is selected, meaning the alarm does not repeat.
Just as you do for other apps, to set up Reminders to work with Notification Center and/or display onscreen alerts or banners, launch Settings, tap on the Notifications option, and then tap on the listing for the Reminders app. You can then customize the settings on the Reminders menu screen within Settings.
Stay Up to Date with Reminders
When you launch Reminders for the first time on the iPad, the control center for this app appears on the left side of the screen. On the right side of the screen is a simulated sheet of lined paper.
Tap on the Add List option in the bottom-left corner of the screen to create a new list from scratch. However, if you’ve already been using the Reminder app on another iOS mobile device or Mac that’s linked to the same iCloud account, all of your lists synchronize with the iPhone or iPad you’re currently using.
When you create a new list from scratch, it is displayed on the right side of the screen using the temporary heading New List. Enter a title for the new list and then associate a color with it. Tap on the Done option when you’re ready to begin populating the list with items (as shown in Figure 13.12 on an iPad), or repeat this process to create another list.
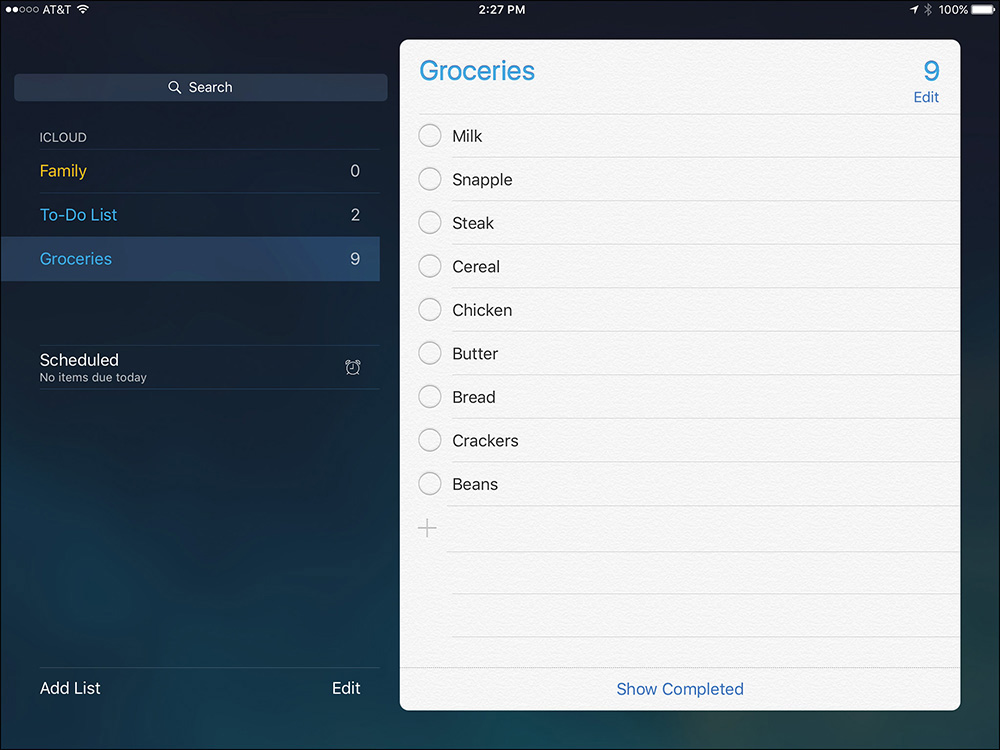
Figure 13.12 Using Reminders, it’s possible to create and manage one or more lists. Each list can have as many separate items as you want.
On the iPhone, to create a new list from scratch as you’re looking at a list, tap the list name to bring up a master list screen. The New List (+) icon is displayed at the top of this screen (shown in Figure 13.13). Tap on this icon, select the List option, and then type the name of the list and associate a color with it. Tap on the Done option. You can then begin populating the list with items or repeat this process to create another list.
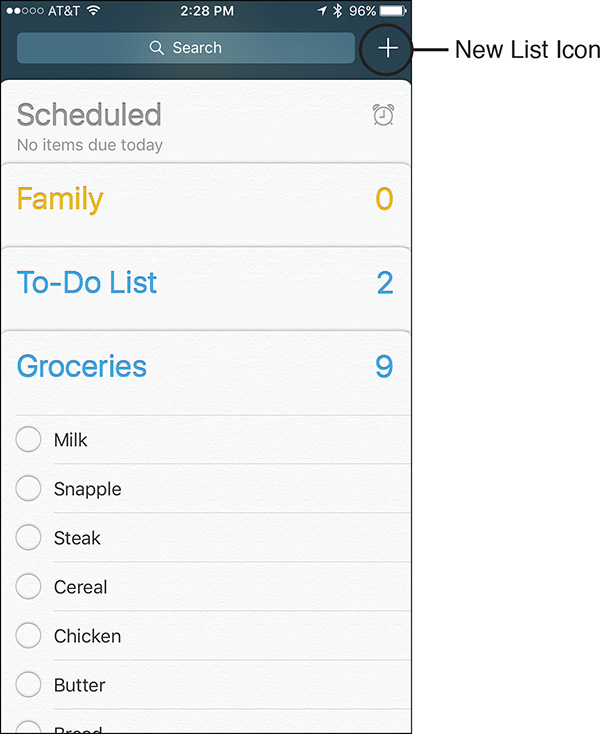
Figure 13.13 To create a new list, tap on the New List (+) option displayed near the top of the Reminders screen on the iPhone. Then name your list and start adding items, one at a time.
When viewing a list, tap on an empty line of the simulated sheet of paper to add an item. The virtual keyboard appears. Enter the item to be added to your to-do list. Next, tap on the Return key on the keyboard to enter another item, or tap on the Info icon (the blue i with a circle around it) to the right of the newly added item to associate an alarm, priority, and/or notes with it.
When you’re finished adding new list items, tap on the Done option.
To set a date-specific alarm, turn the virtual switch associated with Remind Me On a Day to the on position and then tap on the date and time line that appears below it to set the date and time for the alert.
To set a location-based alarm for that item, enter the Info screen and then turn on the virtual switch associated with the Remind Me At A Location option. Select a location or enter an address and then decide whether you want to be alerted when you arrive or when you leave that destination by tapping on the When I Arrive... or When I Leave... tab.
![]() Tip
Tip
You have the option to set a priority with each list item. Your priority options include None, Low (!), Medium (!!), and High (!!!).
Although setting a priority for a list item displays that item with one, two, or three exclamation points to signify its importance, adjusting an item’s priority does not automatically change its position within the list. You must manually rearrange the order of items on a list.
To do this, while looking at a list, tap on the Edit button. Then place your finger on the Move icon (three horizontal lines) that’s associated with the list item you want to move, and drag it up or down to the desired location within the list. Tap the Done button to save your changes.
Different alarms can be associated with each item in each of your lists. You also have the option to create a list item but not associate any type of alert or alarm with it.
When an alarm is generated for a list item, a notification can automatically appear within Notification Center, assuming that you have this feature turned on.
![]() Tip
Tip
One additional feature of the Reminders app is that you can display a separate list associated with each day on the calendar. When you use the Remind Me On A Day option, a date becomes associated with that item. Then, to review upcoming items related to a particular day using an iPhone, access the Search field from the main menu of lists stored within the app. Displayed to the right is an Alarm Clock icon. Tap on this to display scheduled items for the current day.
On the iPad, tap on the Scheduled option on the left side of the screen.
![]() Tip
Tip
At the bottom of every to-do list on the iPad is a new Show Completed option. Tap this to display all items originally added to the list you’re viewing that have since been moved to the Completed list.
To delete an item from a to-do list, swipe your finger from right to left across the item. A More button and a Delete button are displayed. Tap on Delete to confirm your selection, or tap on the More button to reveal the Info menu options related to that item.
Remember, as soon as you make changes to a list item, if you have iCloud functionality turned on for the Reminders app and have access to the Internet, your additions, edits, or deletions automatically sync with iCloud.
How to Delete an Entire To-Do List
If you want to delete an entire list, enter the list and click on the Edit button, and then click on the Delete List option displayed at the bottom of the screen. A warning pops up asking you to confirm the deletion.
On the iPad, you can also locate the list you want to delete from the column on the left, and swipe your finger from right to left across it. When the Delete button appears, tap on it. You also have the option of tapping the Edit button, and then tapping on the negative sign icon that’s associated with the list you want to erase. In Edit mode, it’s possible to change the order of your lists by placing your finger on the Move icon (three horizontal lines) that’s associated with a list and dragging it up or down.
To exit Edit mode, tap on the Done option.
Take Notes or Gather Information Using the Newly Redesigned Notes App
With the release of iOS 9, Apple has redesigned the Notes app, almost from scratch. It’s now much more powerful. In addition to typed notes, it enables you to create, gather, and manage information, including photos, drawings, and handwritten content.
Use the Notes app to keep track of reminders to yourself, brainstorm ideas, take notes in meetings or classes, gather content from other apps that you want to store in one place, or for anything else that you’d use a traditional notebook and writing instrument to document.
![]() What’s New
What’s New
When using an iPhone 6s or iPhone 6s Plus, from the Home screen, place and hold your finger on the app icon for Notes to make a pop-up window appear that allows you to create a new note, take a photo and store it in a note, or handwrite/sketch content to be added to a note (shown in Figure 13.14).
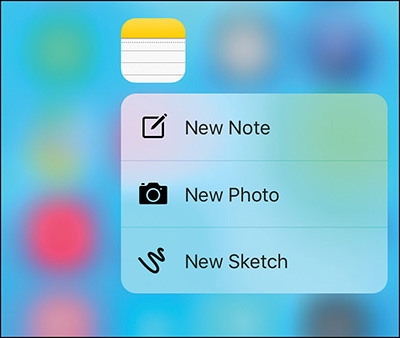
Figure 13.14 Use iOS 9’s Peek feature to access this menu and quickly start creating specific types of content within Notes, without having to manually launch the Notes app.
When using the Notes app, displayed directly above the virtual keyboard (used for typing note content) are several new command icons (shown in Figure 13.15). In the top-left corner of the keyboard tap on the Undo/Redo icon to reveal additional command icons that allow you to use the Undo, Redo, or Copy/Paste commands.
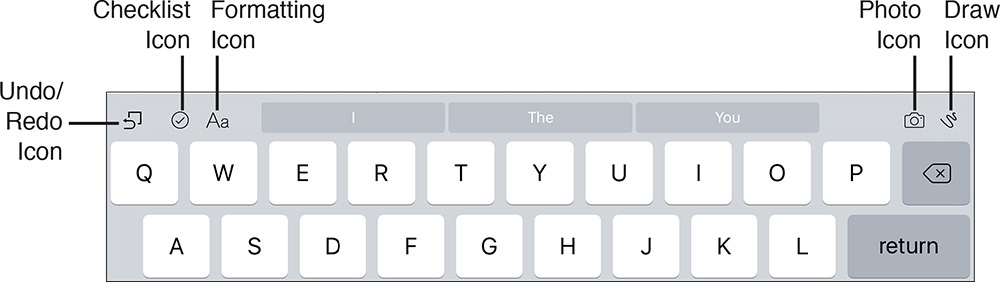
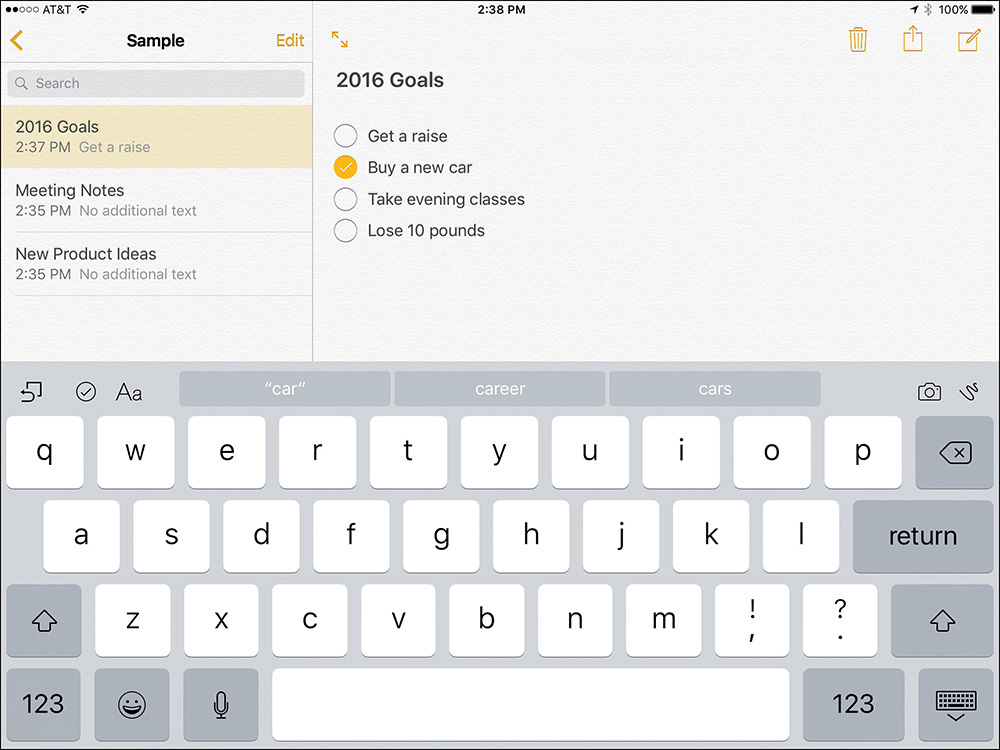
Tap on the check mark icon to begin creating and formatting an interactive checklist within your note (shown in Figure 13.16).
Tap on the Formatting option to quickly format text that you’re typing into the Notes app.
In the top-right corner of the virtual keyboard are the Camera and Draw command icons. Tap on the Camera icon to import an image stored on your mobile device (from the Photo Library), or tap on the Take Photo or Video option to use the device’s built-in camera to snap a photo or shoot a video to be imported into the note you’re working with.
Tap on the Draw icon to access the Notes app’s new drawing/sketch tools, which can also be used for handwriting on your phone or tablet’s screen using your finger or a stylus. (If you’re using the iPad Pro, this feature works nicely with the optional Apple Pencil stylus.)
Create and Manage Notes App Folders
Think of the Notes app as a digital notebook. Each note stored in the app is a separate page that can have its own title and content. Individual notes get stored in folders, which are basically virtual notebooks. Each folder can also be custom named.
Begin by creating one or more virtual notebooks (folders) within the Notes app. This is done from the Folders screen (shown in Figure 13.17) by tapping on the New Folder option, choosing where the content should be stored (in iCloud or only on your mobile device), and then typing a title for that folder.
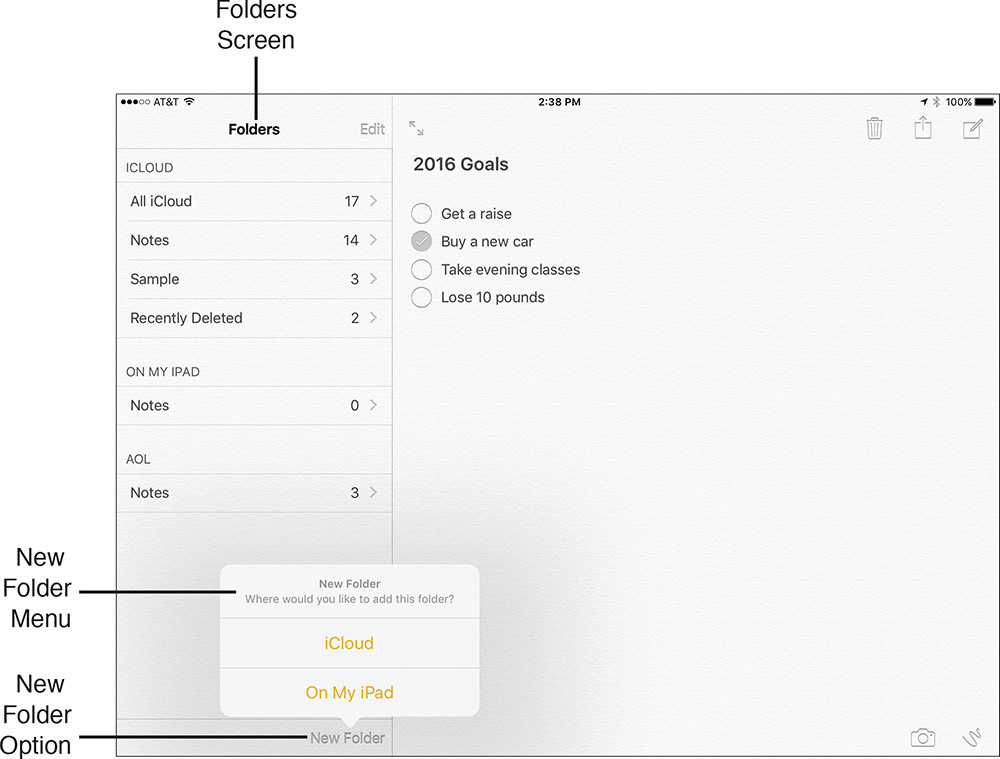
Figure 13.17 From the Folders screen, create one or more folders (virtual notebooks) within which you store your individual note pages.
To edit folders already created in the Notes app, access the Folders screen and then tap on the Edit option. You can then select and Delete entire folders created using the Notes app.
![]() Note
Note
Notes created using other apps that were synced with or imported into the Notes app can’t be deleted or managed from the Folders screen.
How to Create Individual Notes
From the Folders screen in the Notes app, tap on the folder (notebook) within which you want to create a new note. When the screen for that folder opens, a listing of individual notes stored in it is displayed (shown in Figure 13.18). If the folder is empty, only command icons are displayed on the screen.
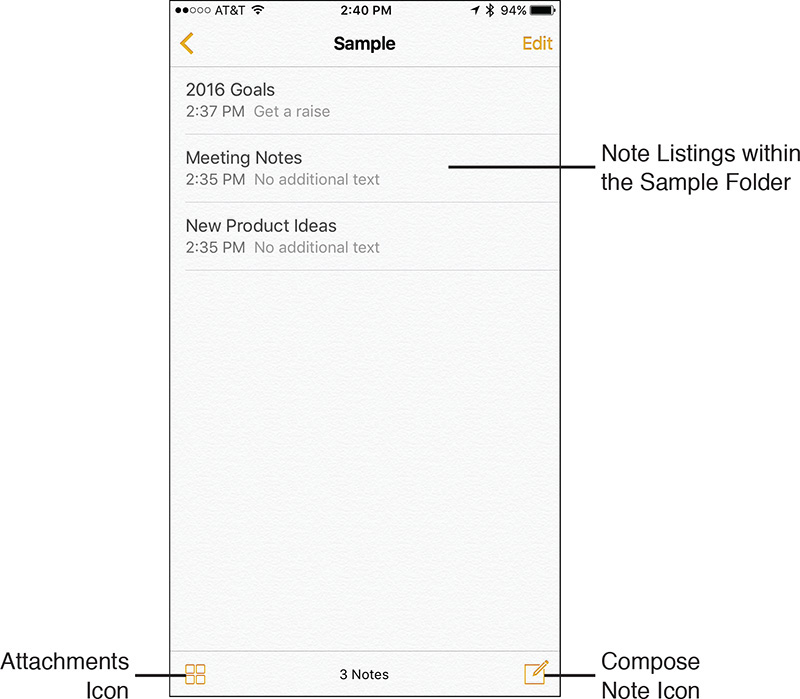
Figure 13.18 From a specific Folder’s screen, you can access any notes stored in that folder or create a new note from scratch.
To open and view, edit, or work with an existing note within a folder, access the Folder screen and tap on that note’s title/listing.
![]() Tip
Tip
To view attachments in notes stored in the folder you’re viewing, tap on the Attachments icon. The Attachments icon is located in the bottom-left corner of the screen.
To create a new note from scratch, tap on the Compose Note icon. On the iPhone, this icon is located in the bottom-right corner of the screen. On the iPad, it’s located in the top-right corner of the screen.
The first line of text in a note becomes its title. Each time a new note is created, the time and date are automatically recorded and displayed.
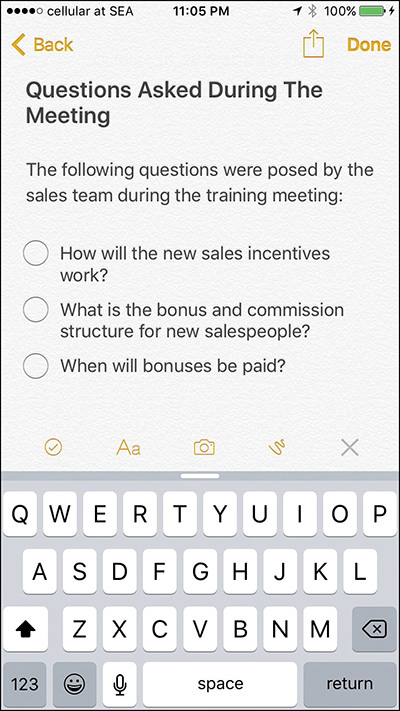
After typing the Title for the note, tap on the Return key and start typing your note’s content. You can type as much content as you want within each virtual note page (shown in Figure 13.19). The note page extends infinitely downward.
As you’re typing content, use the command icons displayed at the top of the virtual keyboard to help you format the text or add checklists, for example.
Tap on the Emoji key on the virtual keyboard to add Emoji characters, or tap on the Dictation key to use iOS 9’s Dictation feature to speak into the app and have what you say translated into text and then imported into the note.
If you opt to import a photo into a note, tap on the Camera icon, choose the Photo Library option, for example, and select the photo you want to add. The photo gets imported and embedded into the note.
![]() Tip
Tip
To delete the note you’re currently working with, tap on the Trash icon. Keep in mind, the note will be deleted from the iPhone or iPad you’re using, as well as from your iCloud account.
To retrieve an accidentally deleted note, visit the Folders menu screen and tap on the Recently Deleted option. It’s then possible to select one or more accidentally deleted notes and move them into a different folder using the Move command that’s displayed. Tap on the Move or Move All option, and then choose which folder the notes should be transferred to.
Keep in mind that using iOS 9’s Select, Copy, and Paste commands, you can select content from other apps, copy it into the iPhone or iPad’s virtual clipboard, and then paste that content into a note in the Notes app. This is easier if you’re using an iPad and take advantage of the Split View feature to operate two apps at once on the tablet’s screen.
Moving Notes Between Folders
After notes are created and stored within particular folders, you can manually move them between folders. To do this, access the Folders screen and tap on the folder that contains the notes you want to move. Next, tap on the Edit option. Tap on the listing for each note you want to move to select it (shown in Figure 13.20).
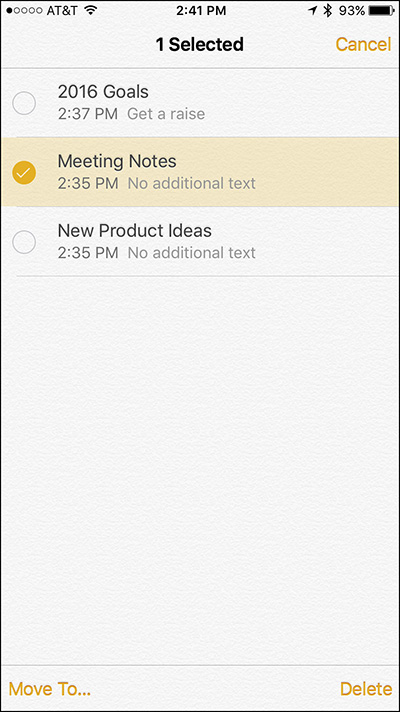
Figure 13.20 From the Folders screen, select the notes you want to move, and then tap on the Move To option.
Once one or more note listings have been selected, tap on the Move To option and select which folder you want to move the notes to.
At this point, the notes are removed from their current folder and moved into the newly selected folder. Instead of tapping on the Move To option, to delete the selected notes, tap on the Delete option.
Create Interactive Checklists within Notes
Using the checklist tool built in to the Notes app, it’s easy to add and format interactive checklists into a note. To do this, place the cursor where you want to insert the list and tap on the Checklist icon. The first empty check mark circle is displayed.
To the right of this icon, type your first list item and then tap the Return key. Now, add a second, third, and fourth item, and keep going until your list is complete (refer to Figure 13.16).
Later, when you tap on one of the check mark circles, a check mark is added to it, indicating that the item has been completed. In a note, add as many separate checklists as you want, and each list can have any number of items. The various lists can be surrounded by other types of content.
Using the Drawing Tools in the Notes App
One of the newly added sets of features built in to the iOS 9 edition of the Notes app is the capability to handwrite, draw, or sketch on your iPhone or iPad’s screen and store that content in the Notes app.
To do this, tap on the Draw icon displayed in the top-right corner of the virtual keyboard. The Drawing screen is displayed. At the bottom of this screen are three virtual writing/drawing tools, including a pen, highlighter, and pencil.
Tap on the Ruler icon to make a virtual ruler appear on the screen (shown in Figure 13.21), which you can then drag around, reposition, or rotate.
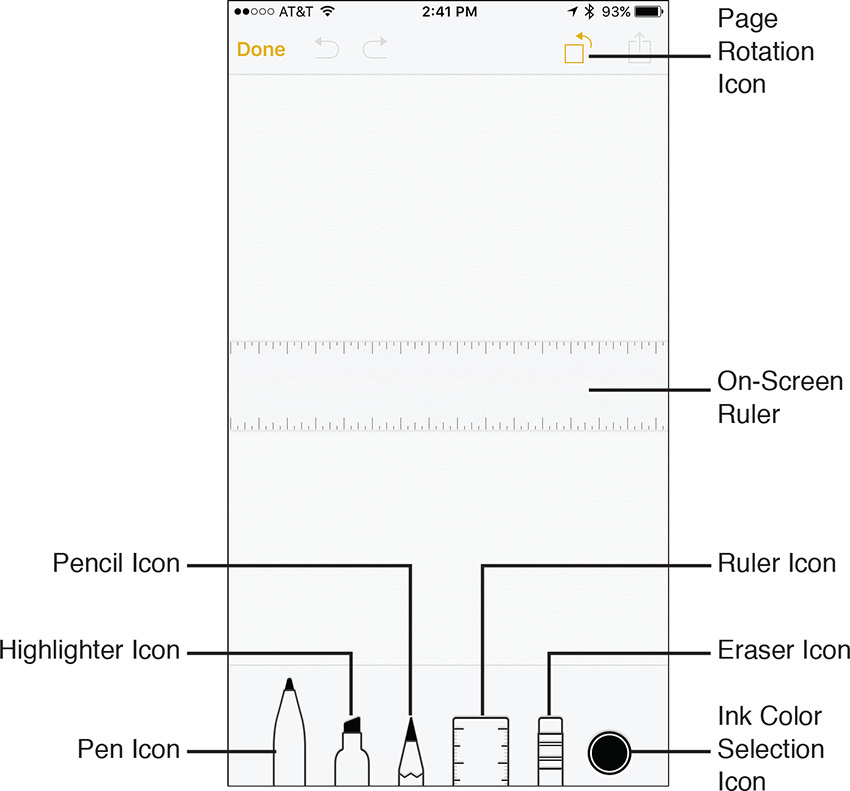
Figure 13.21 Use the Notes app’s Drawing tools to draw, sketch, or handwrite content within a note. Use the Ruler tool for added precision.
![]() Tip
Tip
To drag the ruler, place and hold one finger on the ruler and move it around on the screen. To rotate the ruler, place two fingers (separated) on the ruler and rotate your fingers clockwise or counterclockwise.
To erase content that you’ve drawn on the screen, tap on the Eraser tool and then move your finger on the screen over the areas you want to erase. If you want to delete everything on the screen, however, tap on the Erase All option.
After choosing a virtual writing instrument by tapping on it, tap on an ink color. Swipe your finger across the ink colors to view all the available colors, and then tap on the desired color.
When you’re ready, use your finger or an optional stylus to draw or handwrite on the iPhone or iPad’s screen. You can switch ink colors or writing instruments as often as you choose (shown in Figure 13.22).
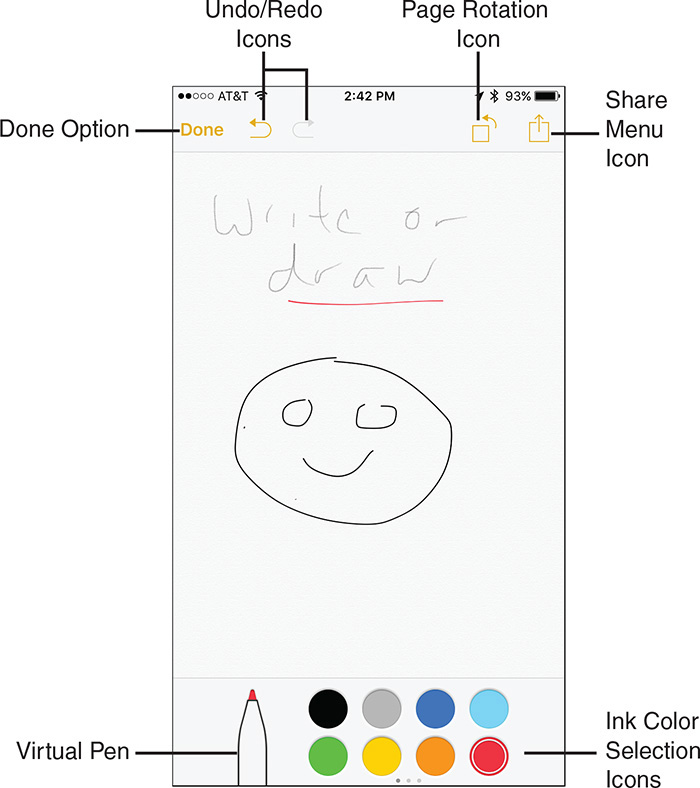
Figure 13.22 Draw, sketch, or handwrite on your phone or tablet’s screen and incorporate that content into notes that get stored in the Notes app.
![]() Tip
Tip
To undo your last action, tap on the Undo icon, or to Redo that option you just undid, tap on the Redo icon.
If you want to rotate the entire virtual page you’re drawing on, tap on the Rotation icon. To share just the drawn content, not the entire note, tap on the Share icon displayed on the Drawing screen.
To save your work, tap on the Done option. The content you’ve drawn is incorporated onto the note page you were previously working on, which can also include typed text and/or photos, for example.
![]() Note
Note
A single note can contain multiple drawn pages created separately. Tap on the Show Attachments icon to view each separate photo or drawing embedded within your various notes.
Sharing Notes
As you’re viewing a note, tap on the Share icon to access the Share menu (shown in Figure 13.23). From here, you can share the contents of the note via AirDrop, text message, email, Facebook, or Facebook Messenger, for example, or use any listed third-party app that’s compatible with the Notes app.
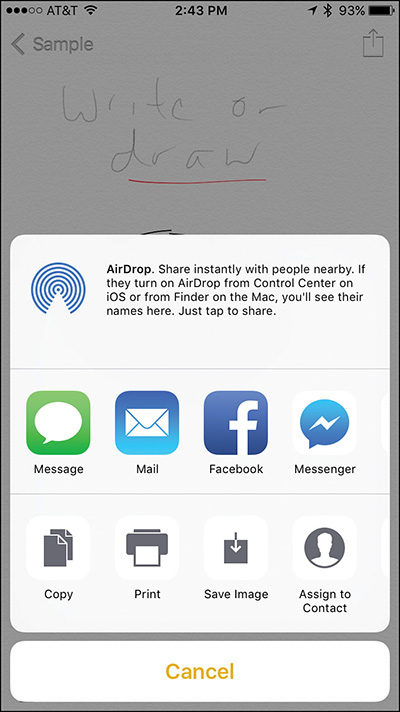
From the Share menu, it’s also possible to Copy content from a note to the device’s virtual clipboard and then Paste it into another app. Tap on the Print icon to print the contents of the note using an AirPrint-compatible printer that’s wirelessly connected to your iPhone or iPad.