
6. Navigating with the Maps App
In this chapter
![]() Use the Maps app to obtain turn-by-turn directions between two locations
Use the Maps app to obtain turn-by-turn directions between two locations
![]() Find and display any address, landmark, point-of-interest, or business on a map
Find and display any address, landmark, point-of-interest, or business on a map
![]() Get real-time public transportation information via the Maps app
Get real-time public transportation information via the Maps app
In addition to overall improvements in accuracy and integration with other apps, the preinstalled Maps app now includes real-time mass transit information for buses, trains, subways, and ferries related to many major cities around the world.
![]() More Info
More Info
To discover what cities around the world are supported by various Maps app features, like public transportation (Transit) or turn-by-turn navigation, visit this page of Apple’s website: www.apple.com/ios/feature-availability. Keep in mind that this list is updated often.
The Maps app now offers the Nearby feature that allows you to quickly find businesses or services that are nearby simply by tapping on a category icon, such as Food, Drinks, Shopping, Travel, Services, Fun, Health, or Transport (shown in Figure 6.1).
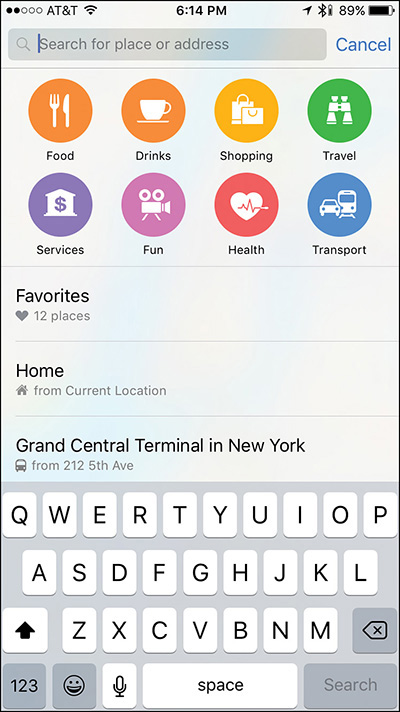
Figure 6.1 Tap on the Search field in the Maps app to access the new Nearby feature. Use it to quickly find a nearby business or service that you’re looking for by first tapping on a category icon.
To view these Nearby icons, tap on the Search field in the Maps app. They’re also displayed on the Spotlight Search screen when you access the Home screen and then swipe from left to right.
The Maps app requires continuous Internet access to function. Although the app works with a Wi-Fi connection, if you plan to use the app’s turn-by-turn directions feature, you must use a cellular data connection (which uses up some of your monthly wireless data allocation with each use) because you’ll be in motion and will quickly leave the wireless signal radius of any Wi-Fi hotspot.
That being said, a Wi-Fi connection can be used to preload driving or public transportation directions prior to your departure. If your route changes, however, your iOS mobile device will not be able to help if it cannot connect to the Internet.
Using the Maps app with Siri (which is very convenient) requires even more cellular data usage.
![]() Tip
Tip
To use the Maps app, the main Location Services feature in your iPhone or iPad (as well as Location Services for the Maps app) must be turned on. To do this, launch Settings, tap on the Privacy option, and then tap on Location Services. From the Location Services menu screen, turn on the virtual switch displayed near the top of the screen (associated with Location Services). Then, scroll down and tap on the Maps option. Be sure that the While Using The App option is selected.
![]() Caution
Caution
Just as when using any GPS device, do not rely 100 percent on the turn-by-turn directions you’re given. Pay attention as you’re driving and use common sense. If the Maps app tells you to drive down a one-way street or drive along a closed road, for example, ignore those directions and seek out an alternative route.
Get the Most from Using the Maps App’s Features
In addition to providing detailed maps, the Maps app is capable of displaying useful information with each map, including real-time, color-coded traffic conditions showing traffic jams and construction, which can be graphically overlaid onto maps. Plus, when you look up a business, restaurant, point of interest, or landmark, the Maps app seamlessly integrates with Yelp! to display detailed information about specific locations.
The Yelp! information screens are interactive, so if you’re using an iPhone and tap on a phone number, you can initiate a call to that business or restaurant. Likewise, if you tap on a website URL (on either an iPhone or iPad), Safari launches and the applicable website automatically loads and displays.
![]() Tip
Tip
To enhance the capabilities of the Yelp! integration, download and install the optional (and free) Yelp! app from the App Store. Without the Yelp! app, when appropriate, the Maps app transfers you to the Yelp! website.
Yelp! is a crowd-sourced online database that contains more than 83 million reviews related to local businesses, stores, restaurants, hotels, tourist attractions, and points of interest. Reviews are created by everyday people who share their experiences, thoughts, and photos. Beyond user-provided reviews, Yelp! offers details about many businesses and restaurants, often including menus.
Although Maps offers a lot of functionality packed into a standalone app, it’s also designed to work with many other apps. For example, as you’re viewing an entry in the Contacts app, when you tap on an address, the Maps app launches and displays that address on a map. You can then quickly obtain detailed directions to that location from your current location, or from any address you select. This also works with any address displayed in any other app, such as Calendar, Mail, Messages, Notes, or Safari.
![]() Tip
Tip
Anytime you receive a text message or view a Calendar event that has an address included with it, iOS 9 automatically determines you’re looking at an address and turns it into an active link. Tap on this link to launch the Maps app and view the address or obtain directions to or from that address.
Plus, you can utilize many features built in to the Maps app using voice commands and requests, thanks to Siri. For example, regardless of what you’re doing on the iPhone or iPad, it’s possible to activate Siri and say, “How do I get home from here?” or “Where is the closest gas station?” and then have the Maps app provide you with the directions and map you need.
![]() Tip
Tip
If you’re using one of the newer model iPhones that support the “Hey Siri” feature, this is extremely useful for controlling your iPhone while driving, for example, because you don’t need to look at or touch the display to obtain information.
For example, you can simply say, “Hey Siri, how do I get home from here?” or “Hey Siri, where is the closest Starbucks?”
![]() Tip
Tip
When you’re viewing a map using the Maps app, tap on the My Location icon (which looks like a northeast-pointing arrow) displayed near the bottom-left corner of the screen to pinpoint and display your current location on the map. Your location is displayed using a pulsating blue dot.
Overview of the Maps App’s Screen
The main screen of the iOS 9 edition of the Maps app sometimes displays a tiny compass in the upper-right corner of a map, as well as a map scale in the top-left corner of a map. The compass displays automatically when North isn’t toward the top of the screen. The map scale appears if you’re scrolling around a map using your finger or zooming in or out.
Displayed near the top-left corner of the screen is the Directions option. On the iPhone, this looks like a curved arrow that’s pointing to the right. On the iPad, the option actually says “Directions.”
Use the Search field located at the top center of the Maps screen to find and map out any address. You can enter a complete address (house/building number, street, city, state) or provide less specific information, such as just a city, state, or country. Enter United States to see a map of the entire country. Enter California to view a map of the state.
You also have the option of entering Los Angeles, California, to view a more detailed map of the city, or you can enter a specific street address located within Los Angeles to view it on a detailed map that shows specific streets (and street names).
![]() Tip
Tip
When viewing a map on the screen after typing a location or address in the Search field, for example, if the Maps app’s 3D Flyover featured is offered for that area, a message that says “3D Flyover Tour of [insert city]” is displayed below the Search field. To switch to the viewing mode, tap on the Start option displayed to the right of this message. More information about 3D Flyover is offered later in this chapter.
This Search field is also used to find businesses, restaurants, points of interest, landmarks, and tourist destinations. When the Maps app finds the location you’re looking for, you can zoom in or zoom out manually on that map to see more or less detail. Plus, you can change the Map view and switch between the Standard, Satellite, 3D, Transit, or 3D Flyover views. To do this, tap on the Info icon located in the bottom-right corner of the screen and tap on applicable menu options (shown in Figure 6.2).
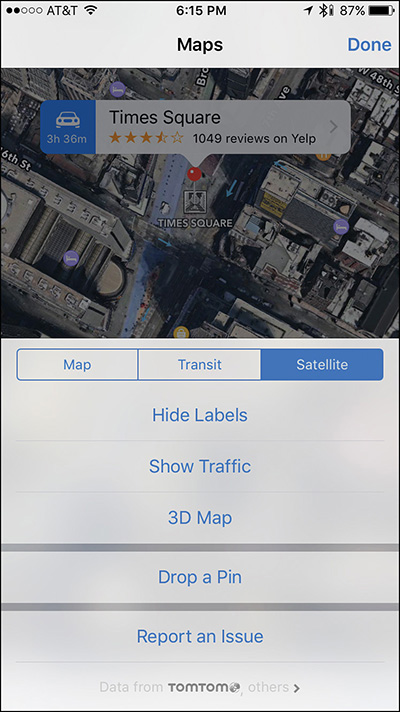
Figure 6.2 With a few onscreen taps, it’s possible to dramatically alter the appearance of a map and how information is presented to you. You can also overlay traffic details on the map, for example, by tapping on the Show Traffic option.
In the Search field, enter the name of any contact that has an entry stored in the Contacts app to find and display an address for that contact. The Maps app searches the contents of your iOS device (including the Contacts app), followed by a web-based search, if applicable.
Anytime a specific location is identified on the map, such as results of a search, those results are displayed using a virtual red push-pin. Tap on a push-pin to view more details about that location and to access a separate Location Information screen (iPhone) or window (iPad).
Continuously displayed near the bottom-left corner of the main Maps screen is the My Location icon (it looks like a northeast-pointing arrow). At anytime a map is displayed, tap on this icon to locate and display (or update) your current location on the map.
This feature is useful if you look up another destination and then want to quickly see where you’re located in comparison to that other location. However, when you’re using the Maps app for turn-by-turn directions, your iPhone/iPad keeps track of your location in real time, and displays this on the map as you’re in motion.
As you’re viewing a map, the main Maps app screen includes a Share icon (iPhone) or option (iPad) that’s displayed in the top-right corner of the screen. Tap on this Share icon/option to reveal a Share menu (shown in Figure 6.3), from which you can share location details with others, add the location to the Maps app’s Favorites list, or print the current map (using an AirPrint-compatible printer).
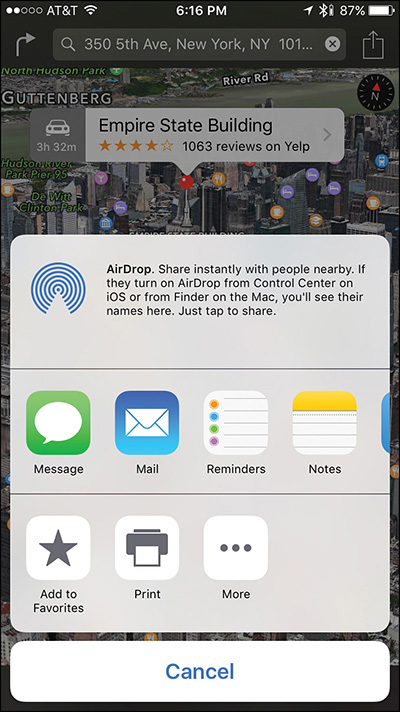
Figure 6.3 The Share menu built in to the Maps app enables you to share your location with others or save the location in the Maps Favorites listing.
![]() Tip
Tip
To add a location to the Maps Favorites listing, when viewing a location on a map, tap on the Share icon and then from the Share menu (see Figure 6.3) tap on the Add to Favorites icon.
To access your Favorites menu in the Maps app, tap on the Search field that’s located in the top center of the screen. Displayed below the Nearby icons is the Favorites option. Tap on this to reveal your list of manually saved Favorites locations. When this list is visible, tap any item to reopen the map of that location.
Anytime you tap on the Search field within Maps, below the Nearby icons and Favorites heading is a Home button. Tap on this to quickly get directions from your current location to your Home address. Below that is a listing of recent searches you’ve performed in the Maps app, which includes the places you’ve used the app to travel to.
Tap on any listing displayed on the Search Results screen to obtain detailed directions to or from that location.
View a Map from Multiple Perspectives
As you’re viewing a map on the screen, place one finger on the screen and drag it around to move the map around. To rotate the map, place two fingers (slightly separated) on the screen, and rotate your fingers clockwise or counterclockwise. To then return to the north-up orientation, tap on the compass icon that’s displayed on the screen.
Use a reverse-pinch finger gesture to zoom in or a pinch finger gesture to zoom out. If you’re using the Satellite, 3D, or 3D Flyover map view, it’s possible to zoom in very close and then drag your finger around the map to take a bird’s-eye tour of the area.
The Maps App’s Info Screen
The Info icon is displayed near the bottom-right corner of the main Maps screen. When you tap on this circular “i” icon, a menu is displayed that enables you to quickly switch between the various map views available, based on the mapped location. Simply tap on the labeled tabs that are displayed to customize your map view (refer to Figure 6.2).
From the Info window, it’s possible to drop a virtual pin on any location displayed on the currently viewed map, plus show or hide color-coded traffic details on the map, for example.
The Drop a Pin Option
When you tap on the Drop A Pin option, the full Maps screen returns with a new push-pin displayed. Using your finger, drag the push-pin to the desired location on the map. The new push-pin is displayed in purple instead of red. After you place a push-pin, it’s possible to view detailed information about that particular location, including its exact address. You can then tap on the displayed Info icon to view a location menu that offers a handful of menu options, including Directions, Create New Contact, Add To Existing Contact, Remove Pin, Add Bookmark, or Report An Issue.
The Show/Hide Traffic Option
Regardless of which map view you’re looking at, you can have color-coded real-time traffic information superimposed on the map. This feature can help you avoid traffic jams and construction, and enables you to seek an alternative route before you get stuck in the traffic.
![]() Note
Note
Mild traffic is showcased using orange, while heavy traffic is depicted in red. When construction is being done on a roadway, separate construction icons (in yellow or red) are displayed on the map.
![]() Tip
Tip
The Show Traffic feature works much better when you’re viewing a zoomed-in version of a map that shows a lot of street-level detail.
The Map View Tabs
Displayed in the Maps app’s Info window are the three map view command tabs: Standard, Transit, and Satellite. The Standard map view (shown in Figure 6.4) displays a traditional-looking, multicolored map on the screen. Street names and other important information are labeled and displayed on the map.

Figure 6.4 The Standard map view shows a traditional, multicolored map with street names and other points of interest listed on it.
The Satellite view uses high-resolution and extremely detailed satellite imagery to show maps from an overhead view (shown in Figure 6.5).
The Transit map shows information such as bus, subway, and train stations (and their routes) on the displayed map (shown in Figure 6.6).
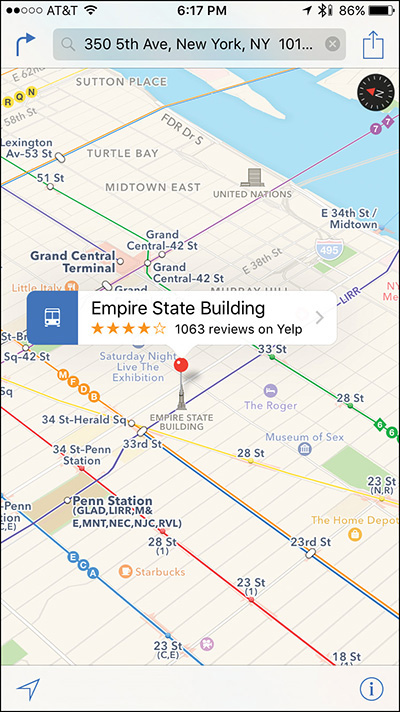
Figure 6.6 Get an overview of an area’s public transportation system when you tap on the Transit map view tab.
Anytime you’re viewing a map, it’s possible to switch between a 2D and 3D map view by tapping on the Show 2D/3D Map option displayed as part of the Info menu. Which you use is a matter of personal preference. When using 3D view, place two fingers on the screen simultaneously, and move them up or down to alter the tilt angle of the view.
![]() Tip
Tip
When you look up any business using the Maps app, if you then view the location of the business with the Satellite view, you can often determine the best place to park nearby. Consider dropping a pin on that location, and then using turn-by-turn directions to get you to that spot. There are also third-party apps, like Parker, that can help you find a parking spot or paid parking lot within a major city.
Obtain Turn-By-Turn Directions Between Two Locations
The turn-by-turn directions feature of the Maps app is not only easy to use, it’s also extremely useful. Begin using this feature from the main Maps app screen. Tap on the Directions icon located near the top-left corner of the screen.
The Start and End fields, as well as the reverse directions icon and recently displayed location results (if applicable), are displayed (shown in Figure 6.7).
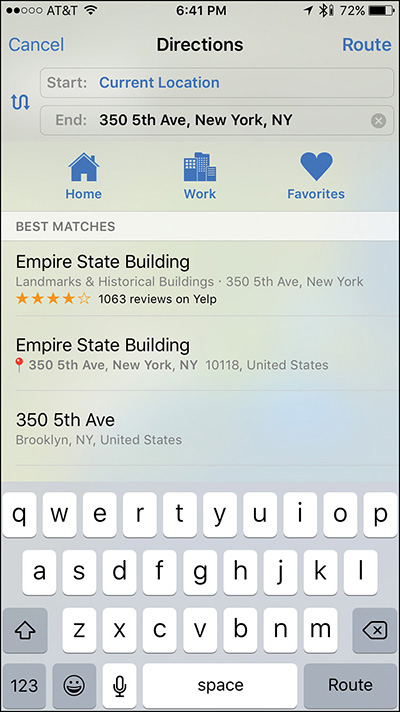
Figure 6.7 Fill in the Start and End fields to obtain detailed, turn-by-turn directions between any two locations that you choose.
In the Start field, the default option is your current location; however, to change this, tap on the field and enter any starting address. Then tap on the End field and enter any ending address.
![]() What’s New
What’s New
Below the Start and End fields are the Home, Work, and Favorites icons. Tap on the Home icon to quickly obtain directions from your current location to your home address. Tap on the Work icon to obtain directions from your current location to your work address, or tap on the Favorites icon to view your list of saved (bookmarked) locations. Then choose one of those listings to obtain directions from your current location to that location.
Also displayed below the Start and End field are recent locations you’ve utilized within the Maps app. Scroll up or down this list using your finger, or tap on any entry to use it as your Start or End location.
![]() Tip
Tip
In the Start and End field, you can enter a contact entry’s name, a full address, a city and state, just a state, or just a country. You can use two-letter state abbreviations, and you don’t have to worry about using upper- and lowercase letters. For example, you can type “New York, NY,” “new york, ny,” or “New York, New York,” and get the same result. This goes for contacts or business names as well.
When the Start and End fields have been filled in, tap on the Route option that’s displayed near the top-right corner of the window. There’s also a Route button on the virtual keyboard.
A route overview map (shown in Figure 6.8) is displayed. The green push-pin represents your starting location and the red-push pin represents your ending location.
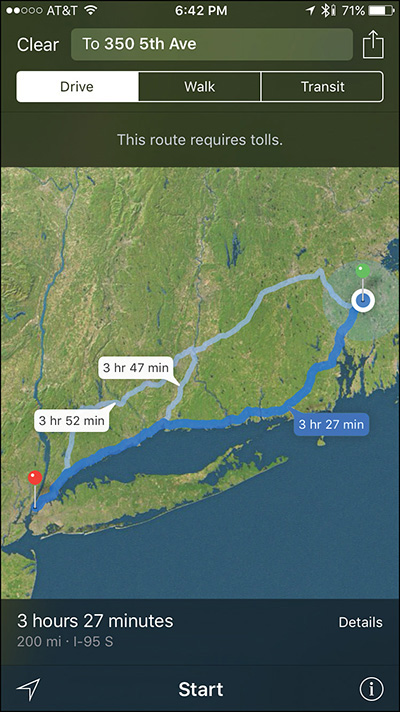
Figure 6.8 A route overview map shows your start and end location on one map, plus up to three possible driving routes to get there.
![]() What’s New
What’s New
Displayed at the top of the Route map are three tabs labeled Drive, Walk, and Transit. Tap the Drive tab to receive turn-by-turn driving directions. Tap on the Walk tab if you prefer to walk to your destination. Tap on the Transit tab if you plan to use public transportation to reach your destination (and you’re in a city supported by this new Transit feature).
Tap on the Drive tab displayed at the top of the Route screen if you plan to drive to your selected destination and want turn-by-turn directions. Between one and three possible routes between the start and end locations are displayed.
The primary route is outlined on the route overview map with a dark blue line. One or two alternative routes may be outlined with light blue lines. Associated with each route is an approximate travel time.
Turn on the Show Traffic option to display current traffic conditions along the three routes, and then choose the one with the least congestion or construction. Tap on any of the route lines to select your route. The route highlighted with the dark blue line is the default (recommended) route.
When you’re ready to begin your journey, tap on the Start option that’s displayed near the bottom center of the screen. You’re then given real-time, turn-by-turn directions. Just like when using a standalone GPS device, the Siri voice guides you through each turn, while also displaying related information on the main map screen (shown in Figure 6.9).
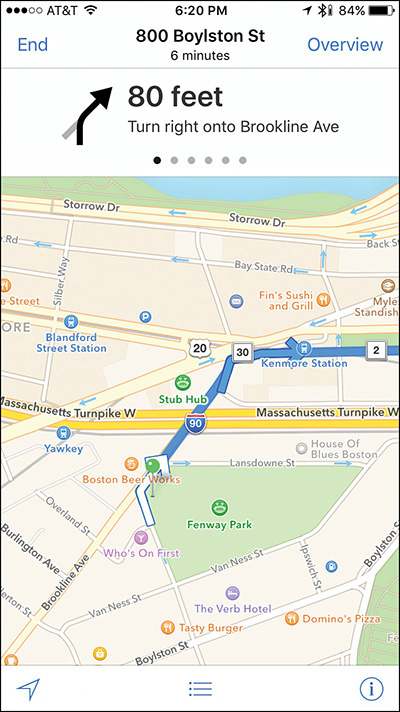
Figure 6.9 The Maps app shows detailed turn-by-turn directions on the map screen and speaks to you as you’re driving.
![]() What’s New
What’s New
If you’re wearing an Apple Watch that’s paired with your iPhone, navigation information is automatically and simultaneously displayed on your watch.
While the turn-by-turn directions are being displayed, a variation of the Standard map view is used. Your ETA, as well as how much time is left in your trip, and the distance from your destination are displayed on the screen. At any time, tap the Overview option to return to the route overview map, or tap the End option to exit out of the turn-by-turn directions feature and return to the main Maps screen. When available, you can switch to the 3D view option. Look for the 3D icon to be displayed in the bottom-right corner of the screen when applicable.
Follow the voice and onscreen prompts until you reach your destination. If you press the Home button, you can return to the Home screen (or access the app switcher by pressing the Home button twice quickly) and launch another app while the Maps feature is still running, and then return to the turn-by-turn directions by tapping on the blue bar that says Touch To Return To Navigation. It’s displayed near the top of the screen when using a different app (and the Map app, with the navigation feature active, is simultaneously running in the background).
![]() What’s New
What’s New
When using the Maps app’s turn-by-turn directions feature, you’re now warned about upcoming construction or traffic while you’re driving. This allows you to quickly find an alternative route, before you get delayed.
![]() Tip
Tip
To view text-based directions to your destination, enter Start and End locations using the Directions feature of the Maps app, but before tapping Start to obtain the directions, tap on the Details option, which can be found just above the Info icon when viewing the route overview screen. Also, the Overview option appears if you tap on the screen during the navigation process.
Look Up Contact Entries, Businesses, Restaurants, Landmarks, and Points of Interest
One of the other primary uses of the Maps app is to find and display addresses, contacts, businesses, points of interest, or landmarks on a map screen. To do this, from the main Maps screen, simply type what you’re looking for into the Search field. In Figure 6.10, “Space Needle” was entered into the search field.
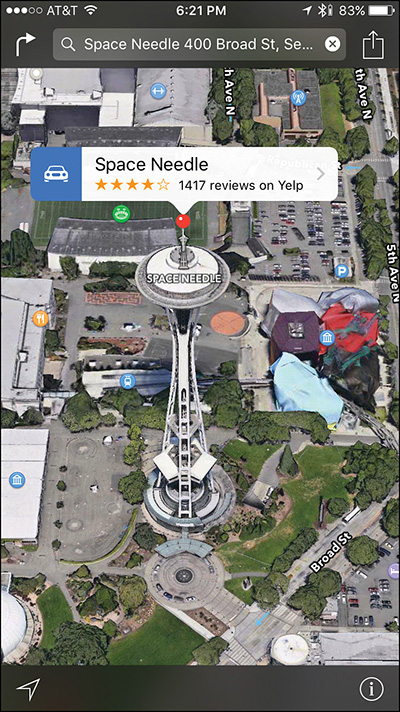
If you’re looking for businesses or services in your immediate area, tap on the My Location icon first, so the iPhone or iPad pinpoints your location, and then enter what you’re searching for, or tap on one of the Nearby icons. No city or state needs to be entered. However, if you don’t tap on the My Location icon first, you must enter into the Search field what you’re looking for, followed by the city, a comma, and the state, to find local search results. Otherwise, the Maps app defaults to the last search location.
If the business or service is considered a major point of interest, such as the Seattle Space Needle, The White House, The Empire State Building, Disney World, or O’Hare Airport, you do not need to include the city or state in the Search field.
Use the Interactive Location Screens to Find More Information
Once search results are displayed on the map in the form of virtual push-pins, tap on any push-pin to view an information banner for a location on a map. In Figure 6.11, a search for Apple Store locations in New York City was performed and displayed on the map.
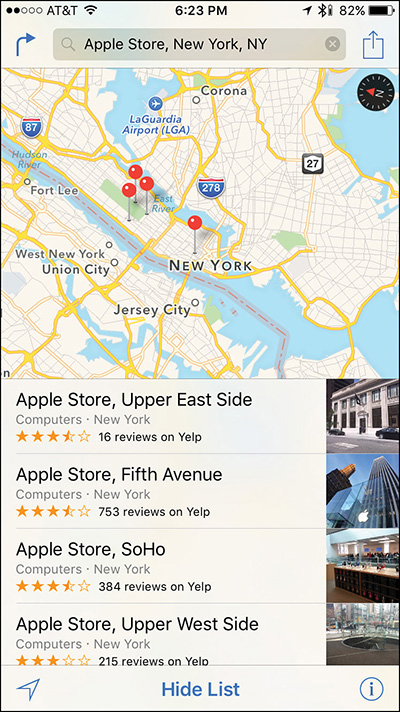
Figure 6.11 The results of a search for Apple Stores in the New York City area appear as red virtual push-pins on the map.
Tap on one push-pin, and then tap the left side of the information banner to obtain “quick” turn-by-turn directions from your current location. Or, tap on the “>” arrow displayed to the right of the banner listing to view an interactive Location Information screen.
A separate and informative Location Information screen (shown in Figure 6.12) displays details about that search result using details from the Maps app, the Internet, and from Yelp!. This information includes the phone number, address, website URL, hours of operation, and other information for that search result. The information displayed depends on whether it’s a business, restaurant, point of interest, or tourist attraction.
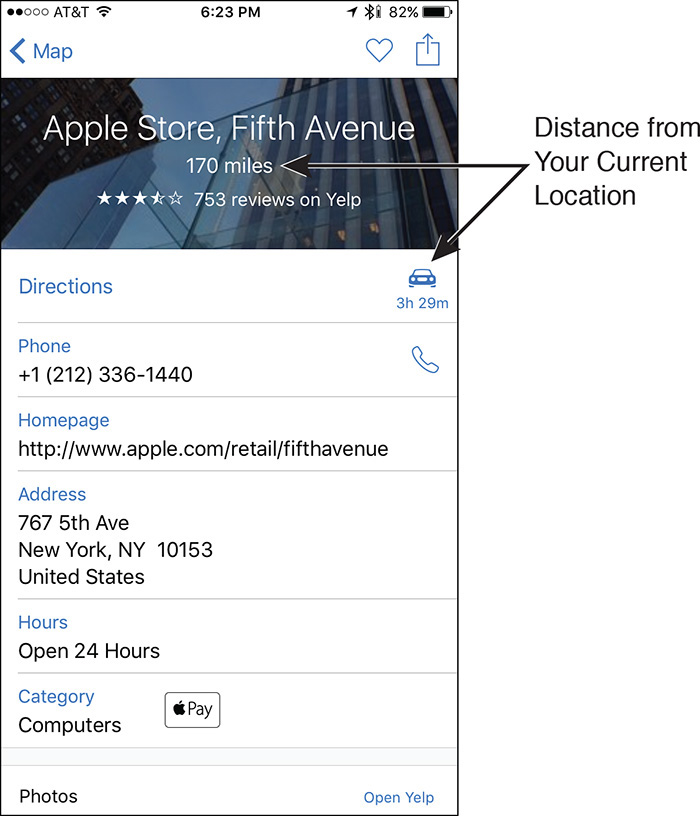
Figure 6.12 A detailed Location Information screen combines location information with details about that location obtained from Yelp!. Information about the Apple Store on Fifth Avenue in Manhattan is shown here.
On any Location Information screen, you’ll see a Directions option. Tap on it to obtain directions to or from your current location to the address listed on the screen.
Tap on the More Info On Yelp! option to launch the Yelp! app or visit the Yelp! website to view more detailed information about that location.
Create New Contact, Add To Existing Contact, and Report A Problem options are also available by scrolling down in the Location Information screen (iPhone) or window (iPad).
Displayed next to the Reviews option is an Open Yelp option. Tap on it to view all the individual reviews that others have published on Yelp! that are related to the selected location.
Another potentially useful feature offered within each Location Information window is the Popular Apps Nearby listing. This showcases a handful of optional third-party apps relevant to that specific area or location. From this listing, you might find apps from local stores, malls, tourist attractions, or media outlets, for example.
If you look up information about a restaurant, the Location Information screen features Yelp!-related information, including the type of food served, the menu price range (using dollar sign symbols), the hours of operation, and potentially a website link that enables you to view the restaurant’s menu. You can also determine whether the restaurant delivers or accepts reservations.
If reservations are accepted, use the optional Open Table app to make reservations online. Activate Siri and say, “Make a reservation for [insert number of people] for [insert day and time],” or initiate a call from an iPhone to the restaurant by tapping on the phone number field. When applicable, the Info or Yelp! screen for a business also tells you whether Apple Pay is accepted at that location.
The Maps App’s Flyover View
The Flyover map view is offered for many major cities, although it doesn’t really serve a navigation purpose. This feature, however, can be used to help you get acquainted with the layout of a city, and enables you to take a virtual tour of its skyline from your iPhone or iPad.
When available, the 3D option normally displayed as a map view option is replaced with the 3D Flyover icon. Tap on it to switch to a stunning Flyover map view. New to iOS 9, an animated virtual tour showcasing a city’s landmarks is offered. Shown in Figure 6.13 is a virtual tour of London, England.
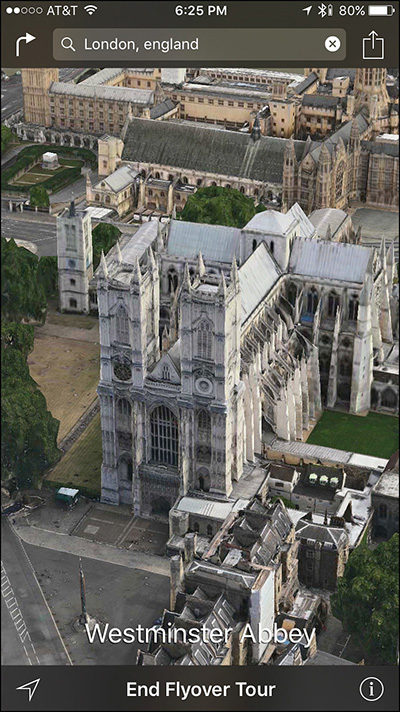
Figure 6.13 The Maps app offers a stunning 3D Flyover view of many popular cities around the world, including London (shown here).
Navigate a City’s Public Transportation System
Built in to the Maps app for a growing number of cities around the world is extensive public transportation information relating to buses, trains, subways, and ferries. This feature is customized for every city that it works with. Displayed on the map are applicable bus/train/subway stations and routes, and based on where you are and where you’re headed, current (real-time) schedules are offered.
What’s great about the Transit feature is that you can manually enter your Start and End locations and then choose the Transit option or ask Siri to guide you. Once you enter your Start and End locations and then tap on the Transit option, the Maps app offers walking directions to the closest bus, subway, or train station, and then tells you exactly what bus, subway, or train to take and provides the appropriate schedule, as well as how long each leg of the trip will take and when you need to make a transfer.
Tap on the Overview option at any time to see a list that details each leg of your trip and what mode of public transportation the Maps app recommends you use (shown in Figure 6.14).
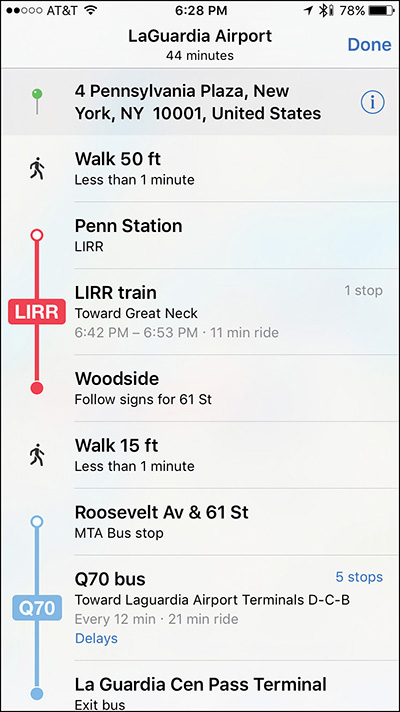
Figure 6.14 The Transit feature of the Maps app works just like the Turn-By-Turn Navigation feature (used when driving), but it explains how to utilize the local public transportation system. Tap on the Overview option to view this comprehensive step-by-step listing, as opposed to receiving real-time, step-by-step driving directions.
Maps Quick Tips
![]() After tapping the Directions option to obtain directions between two addresses, a Reverse icon is displayed to the immediate left of the Start and End. Tap it to switch the addresses you have in the Start and End fields to obtain reverse directions.
After tapping the Directions option to obtain directions between two addresses, a Reverse icon is displayed to the immediate left of the Start and End. Tap it to switch the addresses you have in the Start and End fields to obtain reverse directions.
![]() When using the Maps app, your iPhone or iPad accesses the Internet extensively. This drains the device’s battery faster. If you use this feature from your car often, consider investing in a car charger that plugs into your car’s 12-volt or USB jack. This way, your iPhone/iPad’s battery remains charged (and can recharge) while it’s being used.
When using the Maps app, your iPhone or iPad accesses the Internet extensively. This drains the device’s battery faster. If you use this feature from your car often, consider investing in a car charger that plugs into your car’s 12-volt or USB jack. This way, your iPhone/iPad’s battery remains charged (and can recharge) while it’s being used.
![]() Using the Maps app for turn-by-turn directions via a cellular data Internet connection requires a significant amount of wireless data usage. Using this feature will help to deplete your monthly cellular data allocation unless you’re subscribed to an unlimited wireless service plan (or a plan with a generous amount of cellular data). Also, if you’re using international roaming to access the Internet from abroad, using Maps with a cellular data connection can get very expensive.
Using the Maps app for turn-by-turn directions via a cellular data Internet connection requires a significant amount of wireless data usage. Using this feature will help to deplete your monthly cellular data allocation unless you’re subscribed to an unlimited wireless service plan (or a plan with a generous amount of cellular data). Also, if you’re using international roaming to access the Internet from abroad, using Maps with a cellular data connection can get very expensive.
![]() The Maps app works with iCloud and automatically syncs your Favorites list with all your other computers and mobile devices linked to the same iCloud account. You can also use the Handoff feature to switch from using your iPhone to your iPad or Mac (or vice versa) when using the Maps app, without having to reenter information.
The Maps app works with iCloud and automatically syncs your Favorites list with all your other computers and mobile devices linked to the same iCloud account. You can also use the Handoff feature to switch from using your iPhone to your iPad or Mac (or vice versa) when using the Maps app, without having to reenter information.