14. Get Acquainted with the Music, Videos, and iTunes Store Apps
In this chapter
![]() Play digital music using the redesigned Music app
Play digital music using the redesigned Music app
![]() Watch music videos, TV shows, and movies with the Videos app
Watch music videos, TV shows, and movies with the Videos app
![]() Acquire new content from the iTunes Store
Acquire new content from the iTunes Store
![]() Listen to streaming music using Apple Music and iTunes Radio
Listen to streaming music using Apple Music and iTunes Radio
What do eight-track tapes, vinyl records, cassettes, and CDs have in common? These are all outdated methods for storing music that have been replaced by digital music players. The music in your personal library can now be kept in a purely digital format, transferred via the Internet, shared with family members, and listened to on the digital music player included with your iPhone or iPad.
iOS 9 comes with the newly redesigned version of the Music app preinstalled. This app serves as a full-featured digital music player, enabling you to play music. However, before playing your music, you first must load digital music files into your iOS mobile device or choose to stream music from the Internet. There are several ways to do this, including the following:
![]() Purchase digital music directly from the iTunes Store (using the iTunes Store app) on your iPhone or iPad. An Internet connection is required.
Purchase digital music directly from the iTunes Store (using the iTunes Store app) on your iPhone or iPad. An Internet connection is required.
When you activate the iCloud Family Sharing feature, you’re able to share some or all of your iTunes Store digital content purchases with up to five other family members. You decide what content gets shared and have the option of keeping some of your content private, so it’s only available through your iCloud account on all of your own iOS mobile devices and Macs. Family Sharing only needs to be set up once. See Chapter 5, “Use iCloud and the iCloud Drive App from Your iPhone or iPad.”
![]() Purchase music using the iTunes software on your primary computer (used to connect to the iTunes Store) and then transfer content purchases and downloads to your iPhone or iPad using the iTunes Sync process or through iCloud.
Purchase music using the iTunes software on your primary computer (used to connect to the iTunes Store) and then transfer content purchases and downloads to your iPhone or iPad using the iTunes Sync process or through iCloud.
![]() “Rip” music from traditional CDs and convert it into a digital format using your primary computer and then transfer the digital music files to your iOS device. For this, the free iTunes software on your computer or other third-party software is required.
“Rip” music from traditional CDs and convert it into a digital format using your primary computer and then transfer the digital music files to your iOS device. For this, the free iTunes software on your computer or other third-party software is required.
![]() Upgrade your iCloud account by adding the optional iTunes Match service, for $24.99 per year, so you can access your entire digital music library via iCloud, whether that music was purchased from the iTunes Store, ripped from your own CDs, or purchased/downloaded from other sources. To learn more about iTunes Match, visit www.apple.com/itunes/itunes-match.
Upgrade your iCloud account by adding the optional iTunes Match service, for $24.99 per year, so you can access your entire digital music library via iCloud, whether that music was purchased from the iTunes Store, ripped from your own CDs, or purchased/downloaded from other sources. To learn more about iTunes Match, visit www.apple.com/itunes/itunes-match.
![]() Shop for and download music from another source besides the iTunes Store, load that music into your primary computer, convert it to the proper format, and then transfer it to your iPhone or iPad using the iTunes Sync process, or use a specialized app to experience that content.
Shop for and download music from another source besides the iTunes Store, load that music into your primary computer, convert it to the proper format, and then transfer it to your iPhone or iPad using the iTunes Sync process, or use a specialized app to experience that content.
![]() Note
Note
The Apple iTunes Store offers the world’s largest collection of digital music that’s available for purchase and download. This includes more than 30 million songs, such as the latest hits, new music from the biggest bands and recording artists, as well as music from up-and-coming and unsigned artists/bands. You can also find classic songs and oldies from all music genres.
Apple Music subscribers can stream most of the iTunes Store’s music collection and listen to it on an on-demand basis.
The Music app is used for playing and managing digital music. If you want to watch videos, TV show episodes, or movies that you’ve purchased and/or downloaded from the iTunes Store, use the Videos app.
Instead of storing music on your iOS mobile device, you also have the option to stream music via the Internet. One way to do this is using Apple Music or iTunes Radio (an online-based streaming music service that enables you to listen to music via the Music app when your mobile device has Internet access).
To experience the free podcasts available from the iTunes Store, use Apple’s own Podcasts app. To access a vast collection of educational and personal enrichment content available from the Apple Store, also for free, take advantage of the underhyped iTunes U service. To do this, use the free iTunes U app.
Meanwhile, if you want to stream and watch videos from YouTube, this can be done using Safari by visiting www.YouTube.com, but your experience watching this content will be much better if you use the official (free) YouTube app available from the App Store.
![]() Note
Note
When you stream content from the Internet, it gets transferred from the Internet directly to your iOS device. However, your iPhone or iPad does not save streamed content.
Streaming content from the Internet requires using a specialized app, which is provided by the source of the content. Later in this chapter, you discover which apps are for accessing specific on-demand television programming, movies, videos, radio stations, and other content that gets streamed (not downloaded) to your iPhone or iPad.
Get Started Using the Music App
In June 2015, Apple released a redesigned version of the Music app, which is chock full of new features and functions, including access to the new Apple Music service. This new version of the Music app now comes preinstalled with iOS 9.
The Music app continues to serve multiple purposes when it comes to experiencing music content. For example, it allows you to play songs or albums that are stored on your iPhone or iPad and that you own. You can also use the app to create, manage, and play back custom song playlists that you create or acquire.
Plus, when your iPhone or iPad has a continuous Internet connection, it’s possible to launch the free iTunes Radio feature to stream music from the Internet, listen to the Beats 1 global radio station, and take advantage of the Music app’s new Connect feature. Streaming capabilities are also needed to use Apple Music.
Discover the New Apple Music Service
In June 2015, Apple launched a new music service, called Apple Music. While a free, three-month trial subscription to the service is available, individual users ultimately need to pay $9.99 per month for an ongoing subscription. Apple Music is accessible from the Music app. A $14.99 Family Membership plan (giving up to six people access to the service) is also offered.
Apple Music enables users to stream (not download) any music available from the iTunes Store on an on-demand and unlimited basis. In addition, music from independent bands, artists, and musicians is available.
![]() Note
Note
Music content you experience via Apple Music is streamed from the Internet, not purchased. One benefit to this on-demand aspect of the listening experience is that songs from Apple Music can be incorporated into your personalized playlists and stored on your mobile device even if you don’t own them.
Apple Music also allows users to access precreated playlists compiled by others. In addition, the online-based service allows fans to interact with their favorite artists and music groups in new and innovative ways through a feature built in to the new Music app called Connect.
Another useful feature of Apple Music is that you can quickly select one or more artists, songs, albums, or music genres that you love, and the service recommends similar music based on your personal tastes. This is a great tool for discovering new, up-and-coming artists and bands, or for previewing new music from some of your favorite artists or bands.
Using the Music App: A Quick Tutorial
The Music app is designed to give you total control over your music listening experience when it comes to music stored on your iPhone, as well as when listening to iTunes Radio, Apple Music, and music from the iTunes Store that’s streamed from the Internet.
Everything having to do with the Music app, as well as finding and listening to music on your iPhone or iPad, can now be controlled using Siri.
For example, if you’re an Apple Music subscriber, at any time an Internet connection is available, activate Siri and say, “Play [insert song title].” Your iPhone or iPad finds and begins streaming that song, on-demand, within a few seconds.
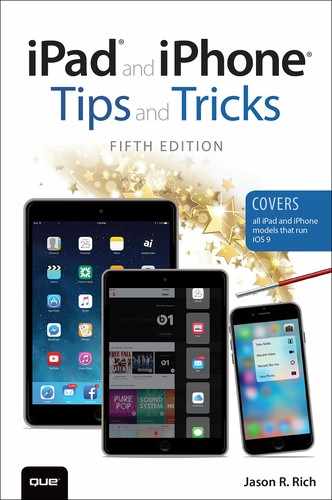
When you launch the Music app from the Home screen on your iPhone or iPad, along the bottom of the screen multiple command icons are displayed: For You, New, Radio, Connect, Playlists (iPad only), and My Music (shown in Figure 14.1). Tap on these icons to manage and experience music via the Music app, iTunes Radio, and Apple Music.
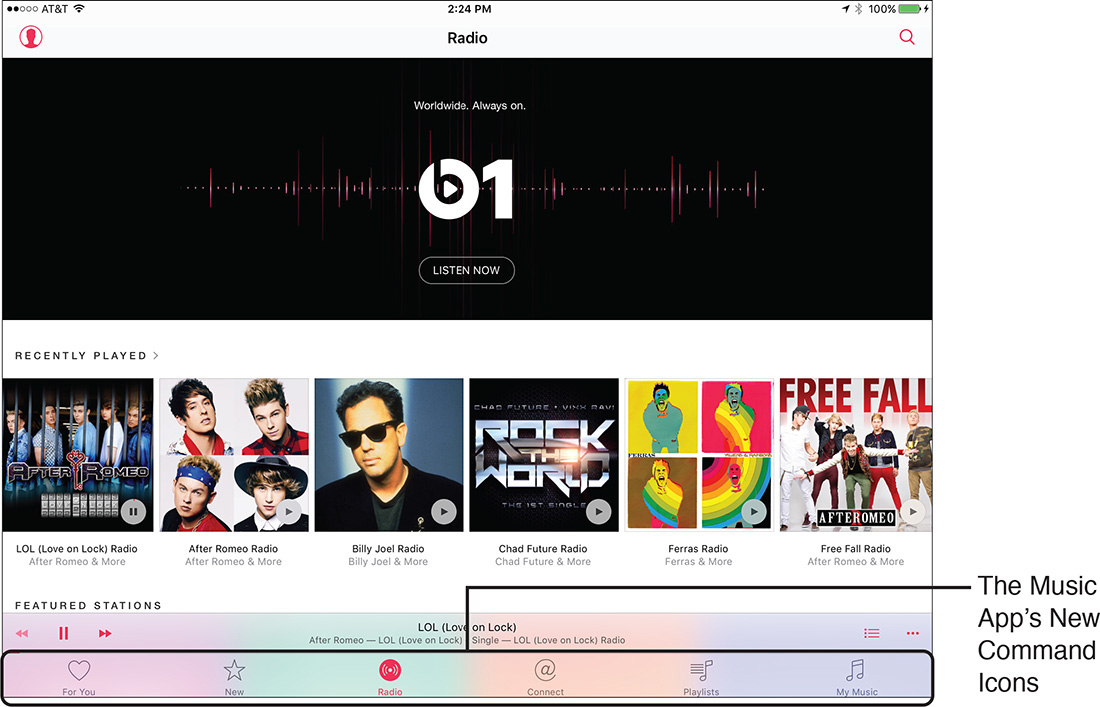
Figure 14.1 The Music app offers a new selection of icons displayed at the bottom of the screen. The Radio icon is selected here.
![]() Note
Note
With Apple Music disabled in the Music app, the options icons available include My Music, Playlists, Radio and Connect.
Here’s a rundown of what each icon is used for:
![]() For You—Based on past music purchases, your music listening habits using the Music app, and information about your musical tastes that you provide to the app, the Music app recommends music you might be interested in and provides collections of curated playlists. An Internet connection is required.
For You—Based on past music purchases, your music listening habits using the Music app, and information about your musical tastes that you provide to the app, the Music app recommends music you might be interested in and provides collections of curated playlists. An Internet connection is required.
![]() Tip
Tip
When viewing the For You section of the Music app, tap on any music selection or listing to begin streaming that music (if you subscribe to Apple Music). Tap on the song’s More icon to add the selected (and playing) song to the My Music section of the app, or make it available for offline playing. This feature requires that you turn on the iCloud Music Library feature from within Settings. To do this, launch Settings, tap on the Music option, and then turn on the virtual switch associated with the iCloud Music Library feature.
![]() New—Discover newly released music from well-known recording artists and bands, as well as music from independent or up-and-coming artists and bands. This includes new singles, new albums, spotlights on new artists, and curated music selections (see Figure 14.2).
New—Discover newly released music from well-known recording artists and bands, as well as music from independent or up-and-coming artists and bands. This includes new singles, new albums, spotlights on new artists, and curated music selections (see Figure 14.2).
![]() Radio—In addition to giving you access to the free iTunes Radio service, which allows you to create custom radio stations based on your music preferences or listen to precreated streaming stations, tap on the Listen Now button associated with Beats 1 to tune in to this 24/7 global broadcast. To utilize this feature, a continuous Internet connection is required.
Radio—In addition to giving you access to the free iTunes Radio service, which allows you to create custom radio stations based on your music preferences or listen to precreated streaming stations, tap on the Listen Now button associated with Beats 1 to tune in to this 24/7 global broadcast. To utilize this feature, a continuous Internet connection is required.
![]() Tip
Tip
Using iTunes Radio, to listen to a precreated radio station, launch the Music app, tap on the Radio icon, and then scroll down on the screen to the Featured Stations listing. Tap on a listing to play that station, or scroll down further for a more extensive listing of stations based on genre.
Anytime you’re listening to any music in the Music app, to quickly create a custom iTunes Radio station based on that music selection, tap on the More icon from the mini-player or Now Playing controls, and then tap on the Start Station menu option.
![]() Note
Note
Based on the song, album, artist, or music genre you choose, iTunes Radio creates a custom radio station for you. Unless you’re a paid Apple Music or iTunes Match subscriber, however, the programming will include commercials.
Keep in mind that iTunes Radio does not allow you to control the song selections or song order. You can, however, skip to the next song at any time, and for songs you like, tap on the heart-shaped “like” button, so iTunes Radio can better learn your music preferences.
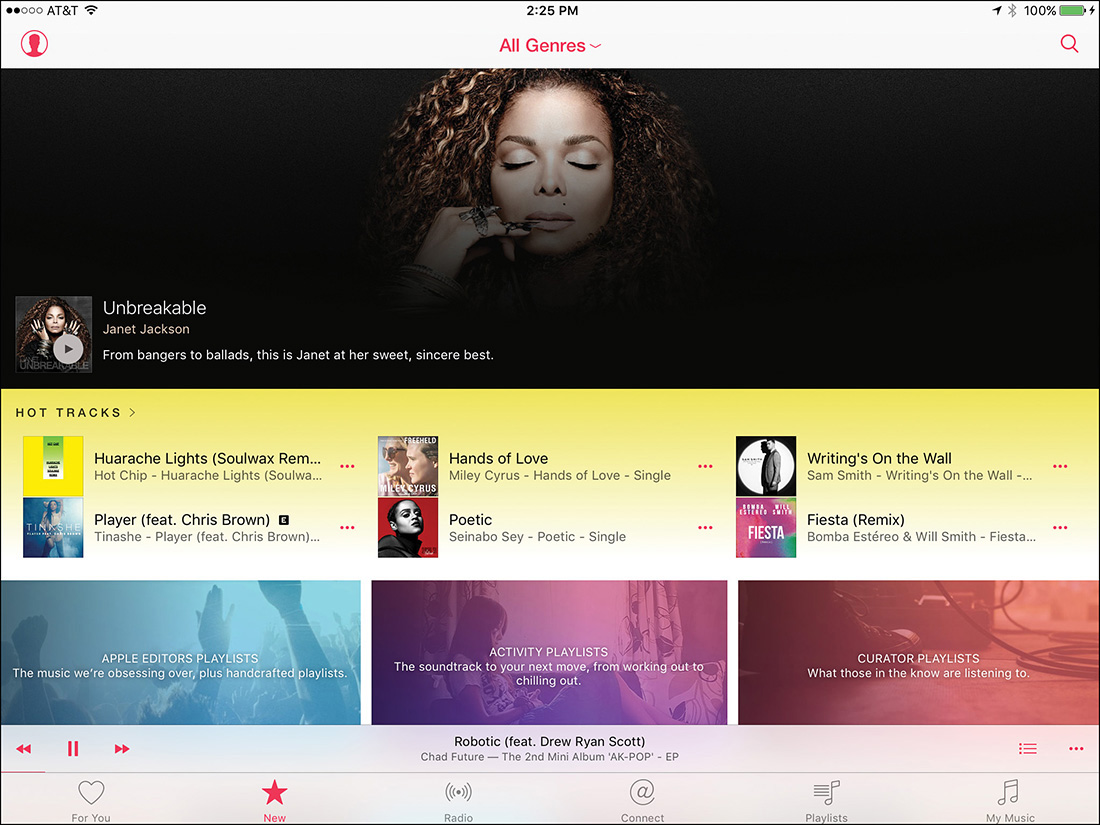
![]() Connect—The Music app offers an interactive online community where any artist or band can communicate directly with fans by publishing music, videos, photos, or other content (shown in Figure 14.3). A growing number of popular, as well as up-and-coming artists and bands, are using this interactive online forum in much the same way as they would use a Facebook page, Instagram feed, Snapchat account, Tumblr page, or Twitter feed, for example, to communicate with their fans. In addition to the content that the artist/band uploads, Connect offers direct access to the selected artist’s music.
Connect—The Music app offers an interactive online community where any artist or band can communicate directly with fans by publishing music, videos, photos, or other content (shown in Figure 14.3). A growing number of popular, as well as up-and-coming artists and bands, are using this interactive online forum in much the same way as they would use a Facebook page, Instagram feed, Snapchat account, Tumblr page, or Twitter feed, for example, to communicate with their fans. In addition to the content that the artist/band uploads, Connect offers direct access to the selected artist’s music.
Figure 14.3 Interact with popular and up-and-coming recording artists and bands who you opt to follow by tapping on the Connect icon in the Music app.
![]() Tip
Tip
If you want to see the content uploaded by your favorite artists using the Music app’s Connect feature, you first need to Follow that artist. When you begin using the Music app and provide your music preferences, the app automatically follows a handful of relevant artists on your behalf.
To find your own artists/bands to follow, tap on the Connect icon, tap on the Search icon, and then enter the name of the artist/band you’re interested in. Tap on a search result related to the artist you want to follow, and then tap on the corresponding Follow button.
To manage your list of followed artists, tap on the Connect icon and then tap on the See Who You’re Following option. When the listing of followed artists appears, tap on the Unfollow button for any artists you no longer want to follow, or tap on the Find More Artists and Curators to see additional recommendations for artists and bands you might want to follow. Tap on the Done option to save your changes.
![]() Playlists—On the iPad, tap on the Playlists icon to create, view, and manage your customized music playlists (shown in Figure 14.4). On the iPhone, to work with Playlists, tap on the My Music icon, and then at the top-center of the screen, tap on the Playlists tab. Figure 14.5 shows the Playlist creation and management screen on the iPhone. (Keep in mind, when using an iPhone, if Apple Music is disabled, a Playlists icon is displayed on the toolbar.)
Playlists—On the iPad, tap on the Playlists icon to create, view, and manage your customized music playlists (shown in Figure 14.4). On the iPhone, to work with Playlists, tap on the My Music icon, and then at the top-center of the screen, tap on the Playlists tab. Figure 14.5 shows the Playlist creation and management screen on the iPhone. (Keep in mind, when using an iPhone, if Apple Music is disabled, a Playlists icon is displayed on the toolbar.)
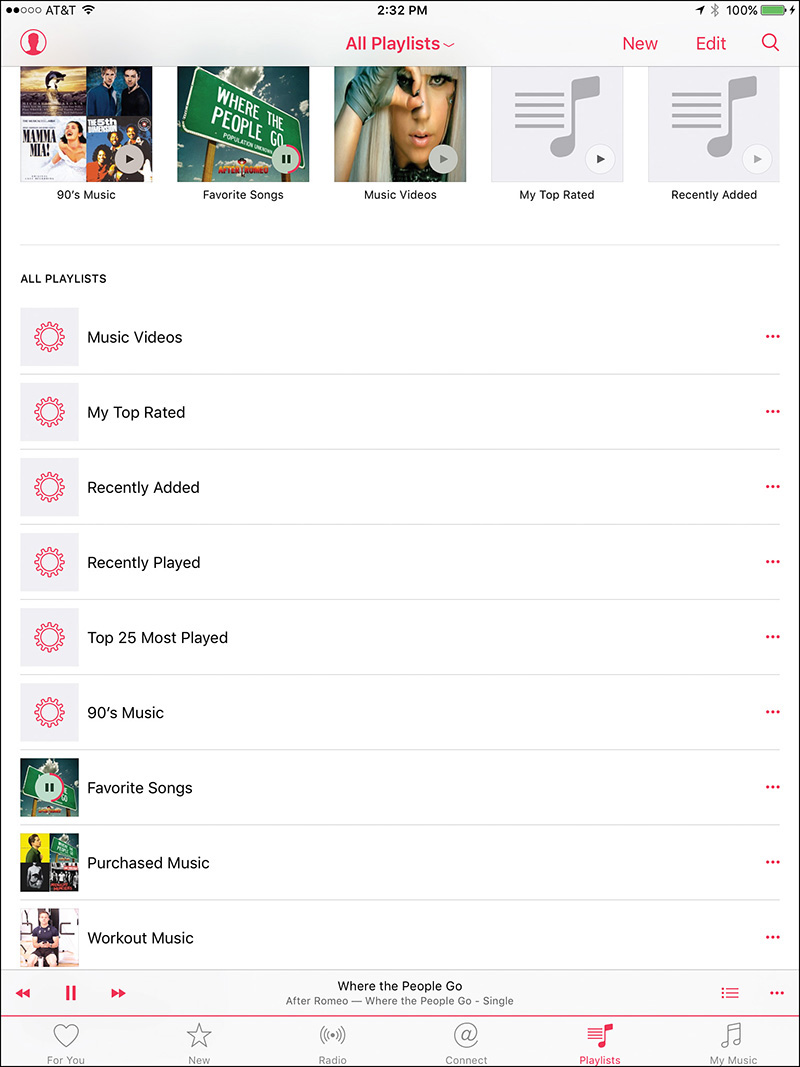
Figure 14.4 Create, listen to, and manage customized playlists using the Playlists feature of the Music app on an iPad.

![]() My Music—From here you can manage all the music currently stored on your iPhone or iPad. To use the functionality offered in the My Music portion of the app, no Internet connection is required to access music stored in your device. To access music stored in your iCloud account, Internet access is needed.
My Music—From here you can manage all the music currently stored on your iPhone or iPad. To use the functionality offered in the My Music portion of the app, no Internet connection is required to access music stored in your device. To access music stored in your iCloud account, Internet access is needed.
![]() Note
Note
On an iPhone, after tapping on the My Music option, tap on the Library tab located in the top center of the screen to find and play individual songs or albums, or tap on the Playlists tab to manage your playlists (shown in Figure 14.6). These tabs are not displayed if you have Apple Music disabled.
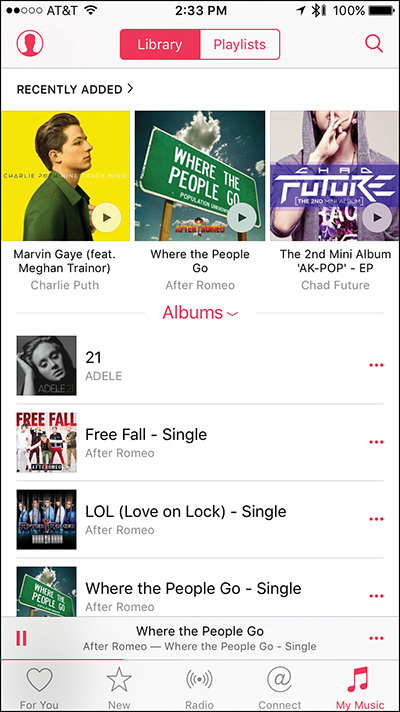
Figure 14.6 On the iPhone, manage music stored on your smartphone, plus manage playlists by first tapping on the My Music icon. The Library tab is selected here, and the music is sorted alphabetically by artist name.
![]() Note
Note
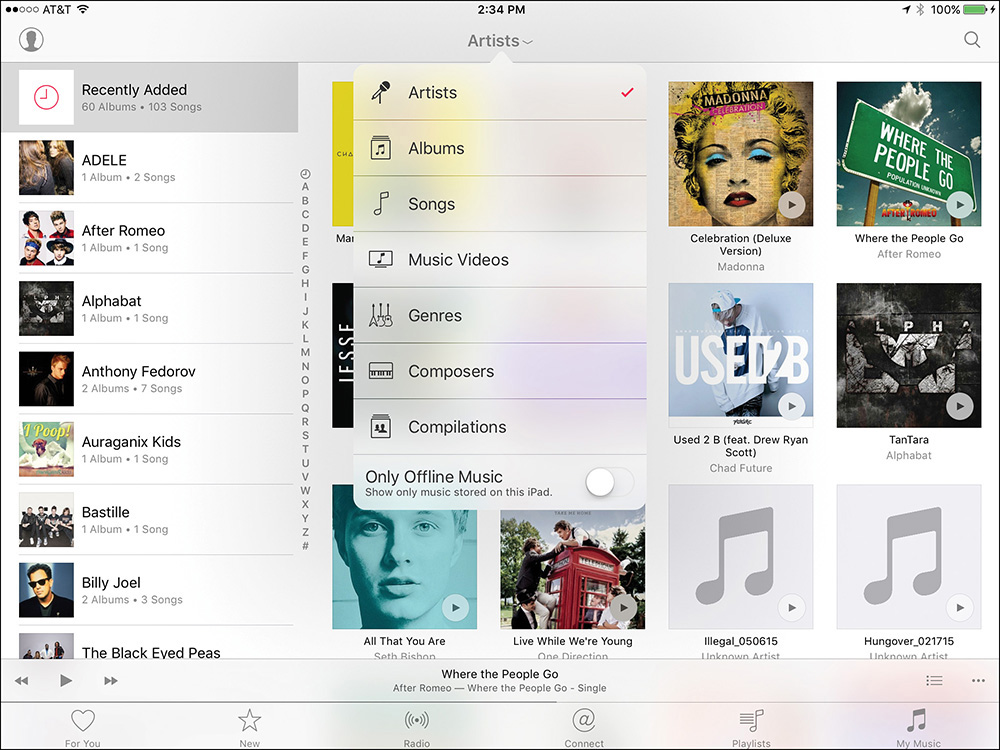
To change how the music is sorted and displayed, tap on the Artists pull-down menu to reveal a pull-down menu that contains options for sorting music by Artists, Albums, Songs, Music Videos, Genres, Composers, or Compilations. To display only music that’s stored on your device (as opposed to music stored on your device and available to you via iCloud), turn on the virtual switch associated with the Only Offline Music option displayed at the bottom of this menu.
Anytime music is selected or playing via the Music app, near the bottom of the screen, just above the command icons, a new mini-player is displayed that allows you play/pause the music or quickly access the app’s Now Playing screen, which gives you more options than ever before when it comes to controlling the music playing on your iPhone or iPad.
Managing Your Music Via the Music App
Music stored on your iOS device can be accessed, managed, and enjoyed either one song at a time or by creating and listening to custom playlists.
For example, on the iPhone, when you tap on the Library tab displayed near the top center of the screen (after tapping on the My Music option), or when you tap on the My Music option on the iPad, you see music that’s recently been acquired under the Recently Added heading, as well as a listing of all music currently stored on your iOS device. It’s possible to organize this music alphabetically by song title, artist, album, genre, or one of several other ways.
To do this, tap on the displayed pull-down menu (shown in Figure 14.7). On the iPad, this pull-down menu is displayed at the top center of the screen, while on the iPhone, it’s found below the Recently Added section.
On the iPhone, tap on the Playlists tab displayed near the top center of the screen to gain access to the in-app tools for creating, managing, accessing, and playing custom playlists. On the iPad, tap on the Playlists icon.
Controlling Your Music Using the Mini-Player Controls
Whenever music is playing via the Music app, and the app is currently open, the mini-player controls are displayed near the bottom of the screen, just above the five command icons (shown in Figure 14.8).

Figure 14.8 The mini-player controls display the name of the music, a time slider, a Play/Pause icon, as well as a More icon.
To use the mini-player controls, tap on the Play/Pause icon to start or stop the currently selected music or tap on the More icon to display a menu that offers more options.
![]() Tip
Tip
From the mini-player, to instantly switch to the Now Playing screen (which is explained in the next section), tap your finger on the mini-player controls.
To then close the Now Playing screen and return to the mini-player controls, and the Music app screen you were previously viewing, tap on the downward-pointing arrow icon displayed in the top-left corner of the Now Playing screen.
Controlling Your Music from the Now Playing Screen
Whenever music is playing via the Music app, when you access the Now Playing screen, the album/artist artwork is displayed on the screen (shown in Figure 14.9).
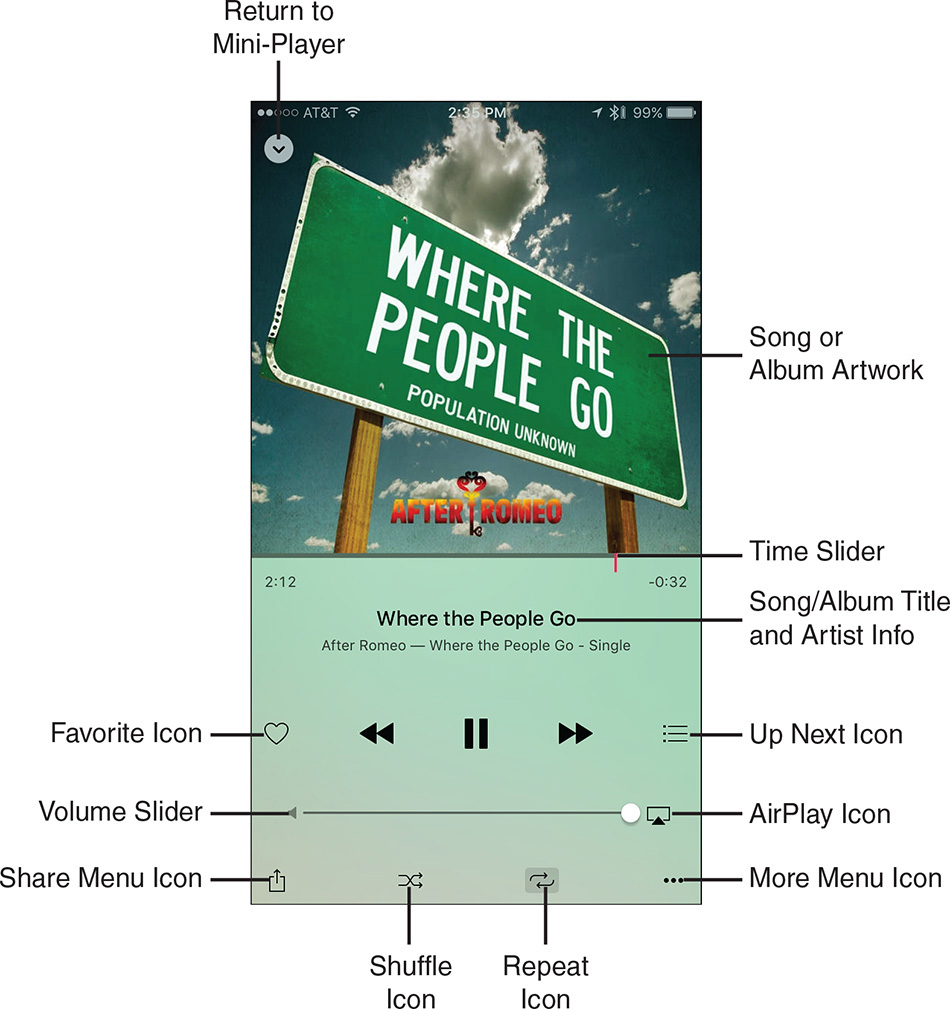
Immediately below the album/artist artwork is the time slider. Move your finger on this slider to fast forward or rewind within the song. To the left of the slider is a clock that displays how much of the song has played. To the right of the slider is a clock that displays how much of the song is remaining.
Below the time slider (on the iPhone) the song’s title is displayed, and below that are music control icons, which include
![]() Note
Note
On the iPad, the song’s title and album info are displayed at the top center of the Now Playing screen.
![]() Like—Tap on this icon to “like” the currently playing song. This helps the Music app better learn your music preferences, which then helps it make more accurate music recommendations and create more personalized programming when using iTunes Radio.
Like—Tap on this icon to “like” the currently playing song. This helps the Music app better learn your music preferences, which then helps it make more accurate music recommendations and create more personalized programming when using iTunes Radio.
![]() Rewind—Tap this button to switch to the previously played song. Press and hold this button to rewind within the song.
Rewind—Tap this button to switch to the previously played song. Press and hold this button to rewind within the song.
![]() Play/Pause—When the music is playing, press the Pause icon to pause the music. When the music is paused, press the Play icon to restart the music from where you last left off.
Play/Pause—When the music is playing, press the Pause icon to pause the music. When the music is paused, press the Play icon to restart the music from where you last left off.
![]() Fast Forward—Tap this icon to jump to the next song, or press and hold this icon to fast forward within the song.
Fast Forward—Tap this icon to jump to the next song, or press and hold this icon to fast forward within the song.
![]() Up Next—View a listing of songs stored on your iPhone or iPad, from the current playlist, or from the iTunes Radio programming lineup you’re listening to. To switch to a different song, tap on its listing.
Up Next—View a listing of songs stored on your iPhone or iPad, from the current playlist, or from the iTunes Radio programming lineup you’re listening to. To switch to a different song, tap on its listing.
![]() Note
Note
When playing an album, the Up Next option displays the song that will be played next, whether or not the Shuffle feature is turned on.
Located below the music control icons on the Now Playing screen is the volume slider. Use your finger to move this slider left or right to decrease or increase the volume. Keep in mind that the volume control buttons on the side of your iPhone or iPad and/or the volume control buttons associated with your earphones or headphones can also be used.
![]() Tip
Tip
Yet another volume control slider can be found in the Control Center. Place your finger at the bottom of your iOS device’s screen and swipe upward to access iOS 9’s Control Center.
Displayed along the bottom of the Now Playing screen are four additional icons. On the iPhone, from left to right, these include Share, Shuffle, Repeat, and More. On the iPad, from left to right, these include Shuffle, Repeat, Share, and More.
Here’s what each is used for:
![]() Share—Access the Share menu to share with other people details about the song or album you’re enjoying, or access the Remove from this Playlist option (if applicable).
Share—Access the Share menu to share with other people details about the song or album you’re enjoying, or access the Remove from this Playlist option (if applicable).
![]() Shuffle—Shuffle the order in which the currently selected playlist or music selections are heard.
Shuffle—Shuffle the order in which the currently selected playlist or music selections are heard.
![]() Repeat—Tap on this icon to continuously repeat the currently selected song.
Repeat—Tap on this icon to continuously repeat the currently selected song.
![]() More—Tap on this icon to reveal a menu that offers the following options: Show in iTunes Store, Share Song, Add to a Playlist, and Remove from My Music.
More—Tap on this icon to reveal a menu that offers the following options: Show in iTunes Store, Share Song, Add to a Playlist, and Remove from My Music.
![]() Note
Note
When your iPhone or iPad has Internet access, any songs stored in your iCloud account but not currently stored on your iPhone can be streamed from the Internet and listened to on your iPhone or iPad without first downloading that content. These songs (or albums) display an iCloud icon to the right of their listings.
How to Create Custom Playlists Using the Music App
Playlists are used to create a custom selection of songs. If you’re an Apple Music subscriber, a playlist can be created from any music that’s part of the iTunes Store music collection. However, if you’re not an Apple Music subscriber, the music that can be added to playlists is limited to music stored on the mobile device you’re using (or within your iCloud account that you own).
![]() Note
Note
Think of a playlist as being like a custom mix tape. You decide what songs are included, how many songs are included, and the order in which those songs will be played (or they can be played in a random order).
Using the Music app, it’s possible to create or access an unlimited number of playlists, so you can have separate playlists for different types of activities or moods, for example.
Thanks to iCloud, when you create a playlist, it almost instantly syncs between your iPhone, iPad, and all other computers linked to your iCloud account. Thus, all your playlists are always accessible when and where you want to experience them.
Furthermore, if you’re an Apple Music subscriber, an ever-changing and growing selection of curated playlists are accessible to you via the Music app.
![]() Tip
Tip
When playing a playlist comprised of music stored on your iPhone or iPad, no Internet connection is required. However, if the music is being streamed from your iCloud account or via the Apple Music service, a continuous Internet connection is required.
Create a Playlist Using the Music App on an iPhone
Follow these steps to create and save a custom playlist using the Music app on your iPhone:
1. Launch the Music app on your iPhone.
2. Tap on the My Music icon in the bottom-right corner of the screen.
3. Tap on the Playlists tab near the top center of the screen (shown in Figure 14.10). Playlists will appear as an icon on the toolbar if Apple Music is turned off.
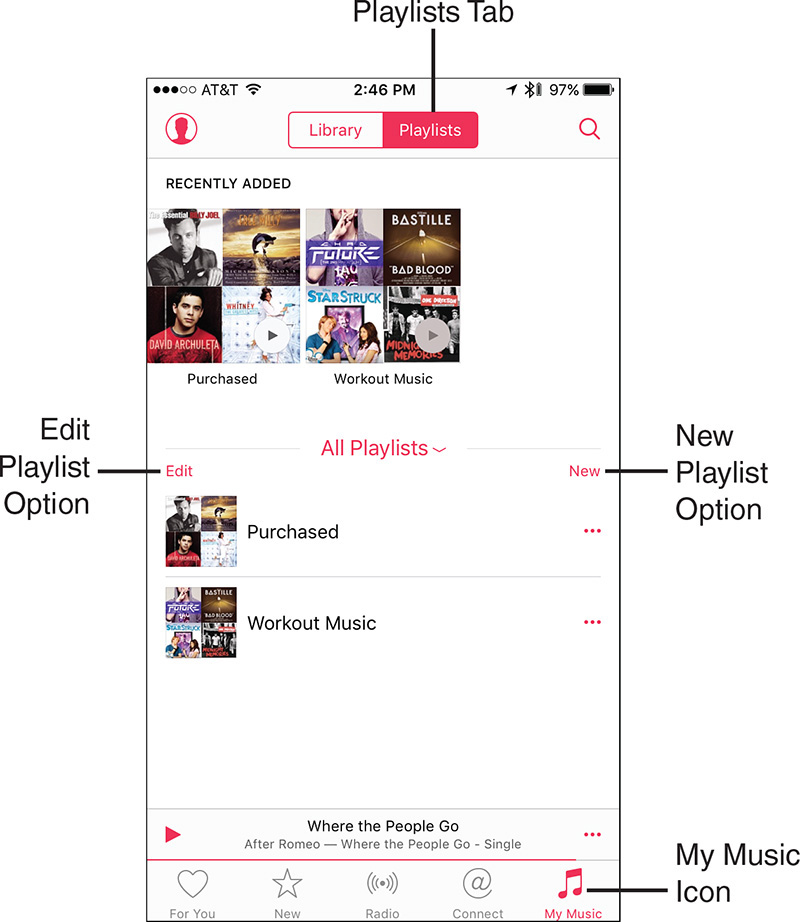
Figure 14.10 Tap on the Playlists tab at the top of the My Music screen to create, manage, or play a playlist stored in the Music app.
4. To the right of the All Playlists option, tap on the New option.
5. Enter a custom title for the playlist (shown in Figure 14.11).
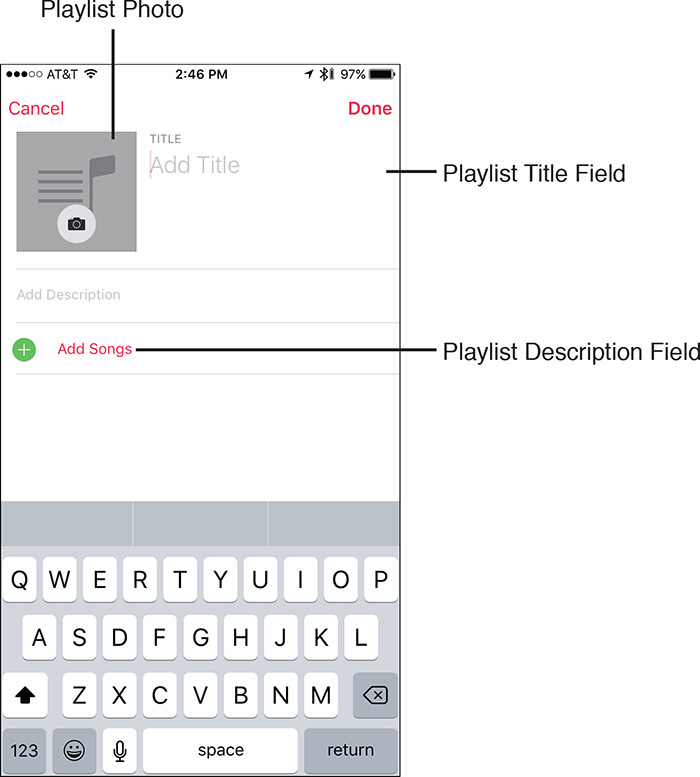
Figure 14.11 Fill in the Add Title and Add Description fields, and select an optional photo/graphic for your playlist.
6. In the Add Description field, type a short description of the playlist. For example, type “Music for Road Trips.”
7. Tap on the Photo icon to import any image that you want to associate with that playlist. You can either take a photo using the iPhone or iPad’s camera or select a photo already stored on the device.
8. Tap on the Add Songs option.
9. From the Add Music screen, choose an option based on how you want your music selections displayed. Options include Artists, Albums, Songs, and so on (shown in Figure 14.12).
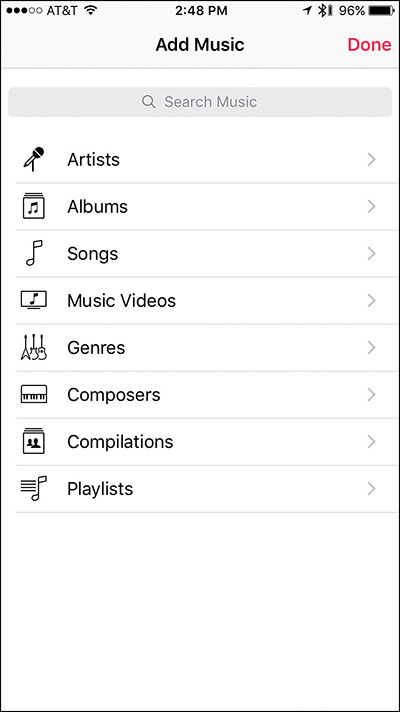
10. If you select Songs, for example, all the songs currently stored on your iPhone or accessible via your iCloud account are displayed in alphabetical order (shown in Figure 14.13). Each song has an Add icon to the right of its listing. Tap on this “+” icon to add the song to your playlist.
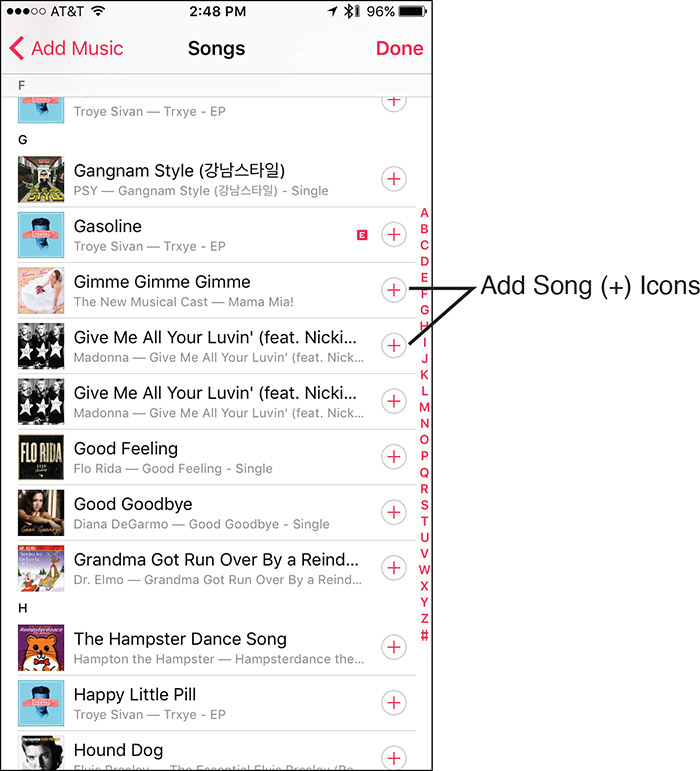
If you selected Artists or Albums, for example, after tapping on the Add Music option, a list of artists whose music you have stored on your iPhone or iPad, or a list of albums (or partial albums) you have stored on your iOS device is displayed. Tap on a listing to view individual song titles, and then tap on the Add icon associated with each song you want to add. If you select Artists, initially a list of that artist’s albums is displayed. Tap on an album to reveal individual songs.
11. Tap on the Done option when you’ve finished compiling the list of songs to be added to your playlist.
12. A summary screen for your playlist is displayed (shown in Figure 14.14). To the right of each song listing you see a Move icon. Place your finger on any of these icons and then drag it up or down to rearrange the order of the songs.
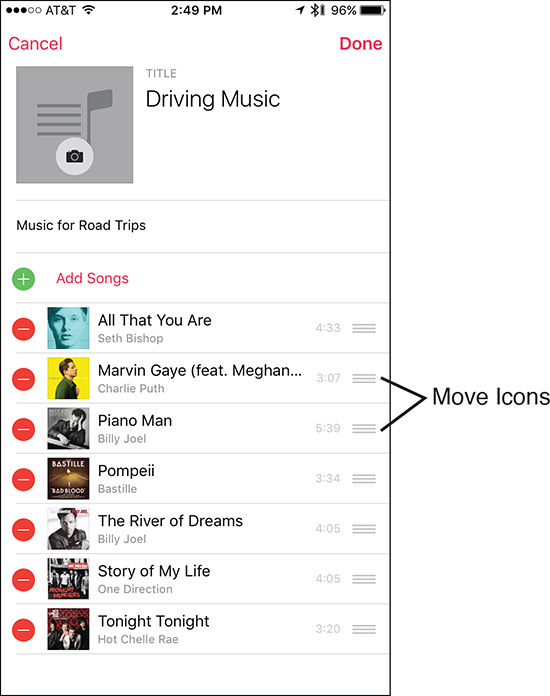
13. Tap on the Done option to save your newly created playlist.
14. The new playlist is displayed below the All Playlists heading when you tap on the My Music icon and then the Playlists tab (shown in Figure 14.15).

Figure 14.15 Access or manage a playlist by tapping on its listing displayed below the All Playlists heading.
15. Tap on the playlist listing under the All Playlists heading to access that playlist.
16. Tap on any song listing in the playlist to begin playing it.
To edit the contents of a playlist, from the playlist screen while a playlist is being played, tap on the Edit option. Alternatively, while a song from a playlist is playing, access the Now Playing screen, and then tap on the More icon to remove the currently playing song from the currently selected playlist.
To delete a playlist, tap on the My Music icon, followed by the Playlists tab, and then tap on the More icon associated with the playlist title listed below the All Playlists option. From the More menu, tap on the Delete option, and then when prompted, confirm your decision by tapping on the Delete Playlist button.
![]() Tip
Tip
Regardless of what you’re doing on your iPhone, it’s also possible to begin playing a playlist, or any song, by activating Siri and issuing a command like, “Play [insert playlist title] playlist.” You can also ask Siri to play a particular song, or music from a specific artist, for example.
Create a Playlist Using the Music App on an iPad
To create a Playlist using the iPad, begin by launching the Music app on your tablet and then tap on the Playlists icon at the bottom of the screen. Next, tap on the New option near the top-right corner of the screen. Starting at step 5, follow the steps outlined in the previous section.
Control the Music App from Control Center
Once music is playing via the Music app, it’s possible to control the playback of that music in several ways. For example, many headphones and earbuds have controller buttons associated with them that replicate the Rewind, Pause/Play, and Fast Forward buttons seen in the Music app.
However, regardless of what you’re doing on your iPhone or iPad, it’s possible to control music playing using the Music app controls that appear in the Control Center.
To access the Control Center, place your finger near the bottom of the iPhone or iPad’s screen and swipe upward. Then, in the Control Center (shown in Figure 14.16), the Music app controls include a time slider; details about the song that’s playing; the Rewind, Play/Pause, and Fast Forward icons; and a volume slider. (If you’re listening to iTunes Radio, the Rewind icon is replaced by the star-shaped icon for liking the currently playing music.)
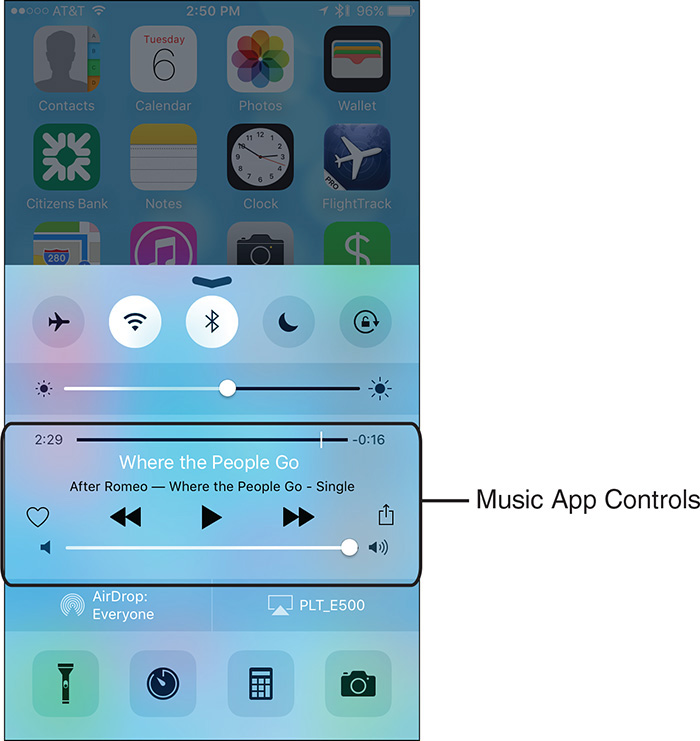
Figure 14.16 The Control Center can be accessed regardless of what app is running. From within Settings, you can also grant permission to access the Control Center directly from the Lock screen.
Customize the iTunes Store and Music Apps on Your iPhone
To customize some of the functions and features associated with the iTunes Store and Music apps, launch Settings and tap on the App & iTunes Stores and Music option one at a time.
After tapping on the App and iTunes Stores option, for example, from under the Automatic Downloads option, turn on the virtual switch associated with Music if you want songs you purchase on other computers or mobile devices that are linked to the same iCloud account to automatically be downloaded to the iPhone or iPad you’re currently using. If this feature is turned off, you always have the option of manually downloading that music.
![]() Tip
Tip
If you have a preset cellular data monthly usage allocation, turn off the virtual switch associated with Use Cellular Data. This prevents you from using iTunes Radio or automatically downloading content from the iTunes Store using a cellular (3G/4G/LTE) connection, which will quickly use up your monthly data allocation. These features work fine, however, anytime your iPhone or iPad is connected to the Internet via a Wi-Fi connection.
Upon tapping on the Music option within Settings, one at a time, turn on/off the virtual switches associated with each customizable option, or when applicable, tap on the option to select options from a submenu.
Streaming Music Via the Internet
iTunes Radio offers a free music streaming service operated by Apple. This service does not allow you to create custom playlists, but it does allow you to create custom iTunes Radio Stations that play music that the service believes you’ll enjoy.
By subscribing to the new Apple Music service, it’s possible to create and stream any music you want—either individual songs, entire albums, or custom playlists, pulling from almost any music offered by the iTunes Store.
There are also many other free and subscription-based streaming music services that you can enjoy from your iPhone or iPad. To utilize one of these services, such as Pandora, Last.fm, SoundCloud, Amazon Cloud Player, or Spotify, for example, you need to download and install the app for that service, set up an account, and if applicable, pay for a subscription.
In addition, virtually every radio network and local radio station in the world, as well as Sirius/XM Satellite Radio, now has proprietary apps that allow you to stream live programing from the Internet directly to your iOS device. An AM, FM, or satellite radio receiver is not required, but a continuous Internet connection is needed.
The free iHeartRadio app, for example, allows you to stream live radio (music) programming from many of the most popular radio stations in the United States. You can also create customized radio stations, based on your favorite music genre, artist, or favorite song(s) using this app.
Use the Videos App to Watch TV Shows, Movies, and More
After you purchase and download TV show episodes, movies, or music videos from the iTunes Store, that video-based content can be enjoyed using the Videos app. It can also be viewed on your primary computer using the iTunes software and shared between devices via iCloud. If you have Apple TV, it’s possible to stream videos from your iOS device to your home theater system.
After you download or transfer iTunes Store video content to your iPhone or iPad, it is accessible from the Videos app. When you launch the Videos app, you see multiple tabs on the screen, based on the types of video content stored on your device. Figure 14.17 shows the TV show episodes that have been downloaded and are ready to view.

Figure 14.17 Use the Videos app content tabs to view the video content that you have stored on your iPhone or iPad that’s downloaded and ready to watch.
From within Settings, tap on the Videos option and then turn on the virtual switch for the Show iTunes Purchases option to view all compatible content you’ve purchased or acquired from the iTunes Store, including content stored in your iCloud account but not downloaded to the iOS device you’re using (shown in Figure 14.18).

Figure 14.18 After turning on the Show iTunes Purchases option from within Settings, you can see all content you’ve previously acquired from the iTunes Store, based on which content tab you tap on in the top center of the screen. Shown here are acquired TV shows.
Thumbnails that display a cloud icon represent content stored in iCloud but not on the device you’re using.
These tabs are labeled TV Shows, Rentals, Movies, and Music Videos. On the iPhone, they’re displayed near the bottom of the screen, whereas on the iPad, they’re displayed near the top center.
If you have rented movies from the iTunes Store, as opposed to purchasing them, a Rentals tab is displayed in addition to or instead of a Movies tab. Movie rentals can be viewed only on the device on which they were rented and cannot be transferred from one iOS mobile device to another. It is possible, however, to use AirPlay to play rented movies from your iPhone or iPad on an HD TV equipped with Apple TV.
When you tap on the TV Shows, Movies, Rentals, or Music Videos tab, a thumbnail graphic representing each piece of viewable content is displayed. To begin playing a video, tap on its thumbnail graphic.
If an iCloud icon appears in the thumbnail graphic, it means you own that content, but it is not currently stored on your mobile device. Tap on the iCloud icon to download that content from your iCloud account to the device you’re using.
When looking at the graphic thumbnails for TV shows you own, the number displayed in a blue circle near the top-right corner indicates how many episodes of that particular TV series you own. Tap on the thumbnail to see a listing of specific episodes and then view them.
To delete video content from your iPhone, access the listing for that particular TV show episode, movie, or music video, and then swipe your finger from right to left across the listing. Tap the Delete button to confirm your decision.
On the iPad, to delete video content, tap on the Edit button near the top-right corner of the screen and then tap on the “X” icon that appears on the movie thumbnail listing(s) you want to delete.
After you delete iTunes Store–purchased content from your iPhone or iPad, it’s always possible to redownload it from your iCloud account for free.
To shop for additional video content from the iTunes Store while using the Videos app, tap on the Store.
To play a video, tap on a thumbnail representing the video that you want to watch. If you’ve downloaded a TV show, for example, a new screen appears listing all episodes from that TV series currently stored on your iOS device (as shown in Figure 14.19). Tap on the episode of your choice to begin playing it, or tap on the Play icon.
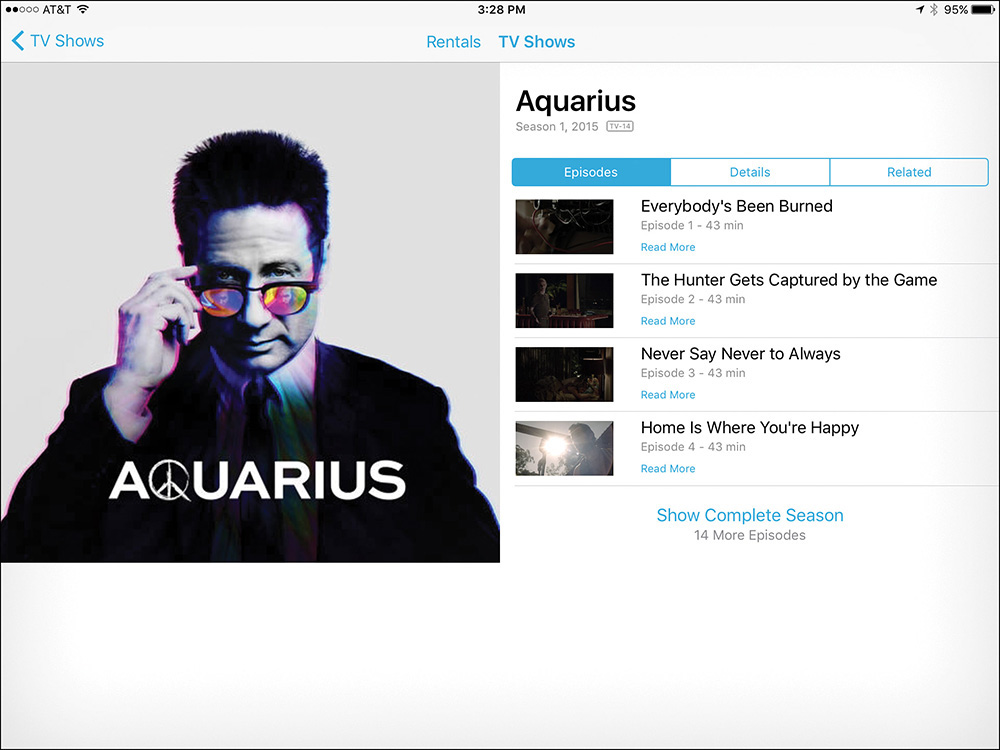
Figure 14.19 Multiple episodes of the same TV series are grouped together for easy access and viewing.
For music videos or movies, a similar information screen pertaining to that content is displayed. Tap on the Play icon to begin watching that video content.
![]() Tip
Tip
When playing video content, hold your iPhone or iPad in either portrait or landscape mode. However, the video window is significantly larger if you position your iOS mobile device sideways and use landscape mode.
If applicable, based on the video content you’re watching, on an iPad, you can instantly switch between full-screen mode and letterbox mode as your onscreen viewing option by tapping the icon displayed in the upper-right corner of the screen.
![]() What’s New
What’s New
If you’re using one of the newer iPad models to watch a video using the Videos app, you have the option to use the new Picture-in-Picture feature (shown in Figure 14.20). After you start playing a TV show or movie, for example, tap on the Picture-in-Picture icon in the bottom-right corner of the screen. The video window shrinks and displays Enlarge, Play/Pause, and Close icons. Tap the Play icon to continue playing your video in the smaller screen.
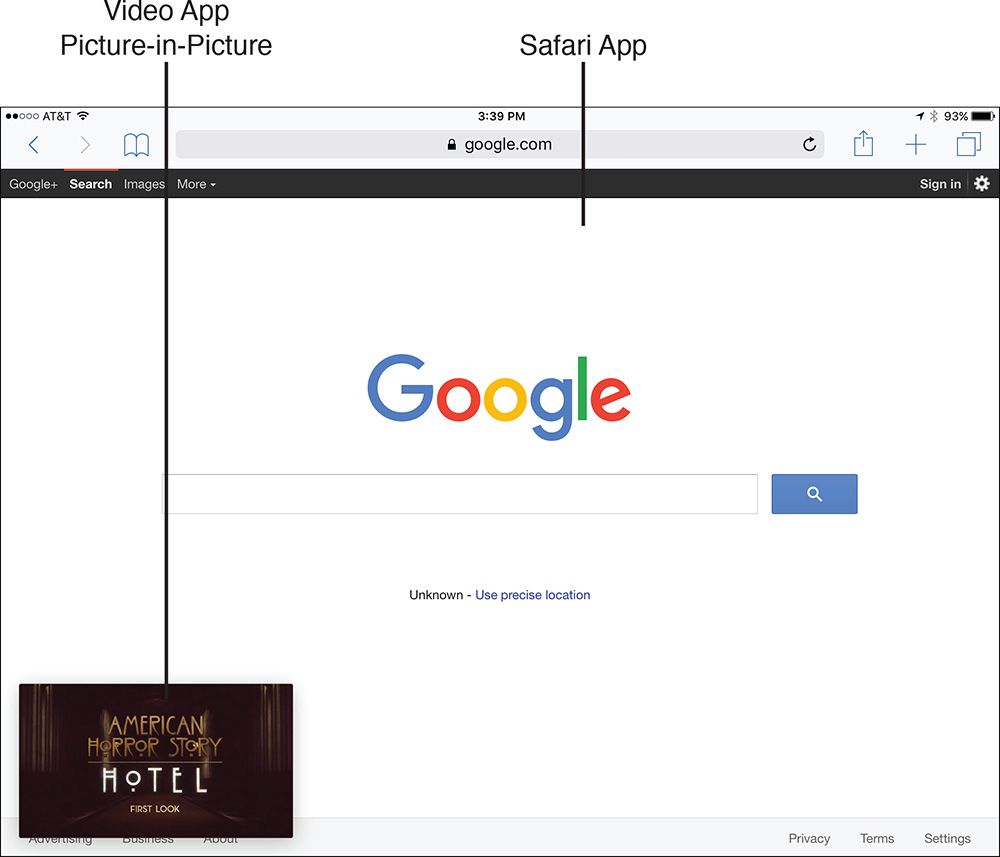
Figure 14.20 Shown here is Safari running on the iPad mini 4, with a video playing in the window located in the bottom-left corner of the screen.
As the video is playing, place and hold your finder on the video window to move it around within the iPad’s screen. It’s then possible to launch another app and use that app as the video continues playing in its smaller window.
When iOS 9 was first released, only video played using the Videos app supported this feature. However, other popular apps used for streaming video content, like YouTube, HBOGo, Netflix, Amazon Video, and HuluPlus, will no doubt add this feature in the near future (if they haven’t already done so).
Typically, while video content is playing, it displays in full-screen mode or letterbox mode. Tap anywhere on the screen to reveal the onscreen command icons used for controlling the video as you’re watching it (shown in Figure 14.21). When a video is playing, these controls disappear automatically after a few seconds. Tap anywhere on the screen to make them reappear.

![]() Note
Note
If you’re watching a purchased movie acquired from the iTunes Store, below the Play, Rewind, and Fast Forward controls you might discover additional tabs that enable you to access movie-related “extras” that would otherwise be made available as part of the DVD or Blu-ray version of the movie. Tap on any of these tabs to access the bonus content, which is movie-specific.
Along the top center of the screen is a time slider. On either end of this slider are timers. To the left is a timer that displays how much of the video you’ve already watched. On the right of the slider is a timer that displays how much time in the video remains. Tap on the Done button in the upper-left corner of the screen to exit the video you’re watching.
![]() Tip
Tip
To manually fast-forward or rewind while watching a video, place your finger on the dot icon that appears on the time slider and drag it left or right.
Near the bottom center of the screen as you’re watching video content are the Rewind and Fast Forward icons. Tap on the Rewind icon to move back by scene or chapter, or tap the Fast Forward icon to advance to the next scene or chapter in the video (just as you would while watching a DVD). Press and hold the Rewind or Fast Forward icon to rewind or fast forward while viewing the onscreen content. You can rewind or advance by a few seconds at a time.
Tap the Play icon to play the video. When the video is playing, the Play icon transforms into a Pause icon, used to pause the video.
![]() Note
Note
If you pause a video and then exit the Videos app, you pick up exactly where you left off watching the video when you relaunch the Videos app. This information is automatically saved.
Use the volume control slider to manually adjust the volume of the audio.
Located near the lower-right corner of the screen while a video is playing (when the controls are visible) are the Captions and AirPlay icons. (On newer iPad models, the Picture-in-Picture icon is also displayed in the lower-right corner of the screen.)
Tap on the Captions icon to adjust captions and/or switch between audio languages, if the video content you’re watching supports these features. If not available, the text-bubble icon is not visible.
Tap on the AirPlay option to stream the video from your mobile device to your television set or home theater system via an Apple TV. If you have Bluetooth- or AirPlay-compatible speakers, it’s possible to stream just the audio from a TV show or movie, for example, to external speakers or wireless headphones.
![]() Note
Note
You must use Wi-Fi to stream video from your iOS mobile device to your HD television via Apple TV. Both the iOS mobile device and Apple TV must be linked to the same wireless network.
![]() Tip
Tip
From the iTunes Store, it’s possible to purchase TV show episodes (or entire seasons from your favorite series), as well as full-length movies. In addition, you can rent certain movies.
When you rent a move from the iTunes Store, it remains on your device for 30 days before it automatically deletes itself, whether or not the content has been viewed. However, after you press Play in the Videos app and begin watching rented content, you have access to that video for only 24 hours before it deletes itself. During that 24-hour period, you can watch and rewatch the movie as often as you’d like.
The first time you tap Play to watch a rented movie, you’re prompted to confirm your choice. This starts the 24-hour clock and allows the rented movie to begin playing.
Unlike movies you purchase from the iTunes Store (that you can load into all of your computers and/or iOS mobile devices that are linked to the same Apple ID account), rented movies can be stored on only one computer, Apple TV, or iOS mobile device.
Use the iTunes Store App to Acquire New Music, TV Shows, Movies, and More
The iTunes Store app comes preinstalled with iOS 9 and is used to acquire music, movies, TV shows, and ringtones.
To utilize this app (shown in Figure 14.22), your iOS mobile device requires Internet access. For smaller-sized files, such as songs, albums, or ringtones, a cellular data connection can be used. However, for larger-sized files, such as TV show episodes and movies, you must use a Wi-Fi Internet connection to download the content.
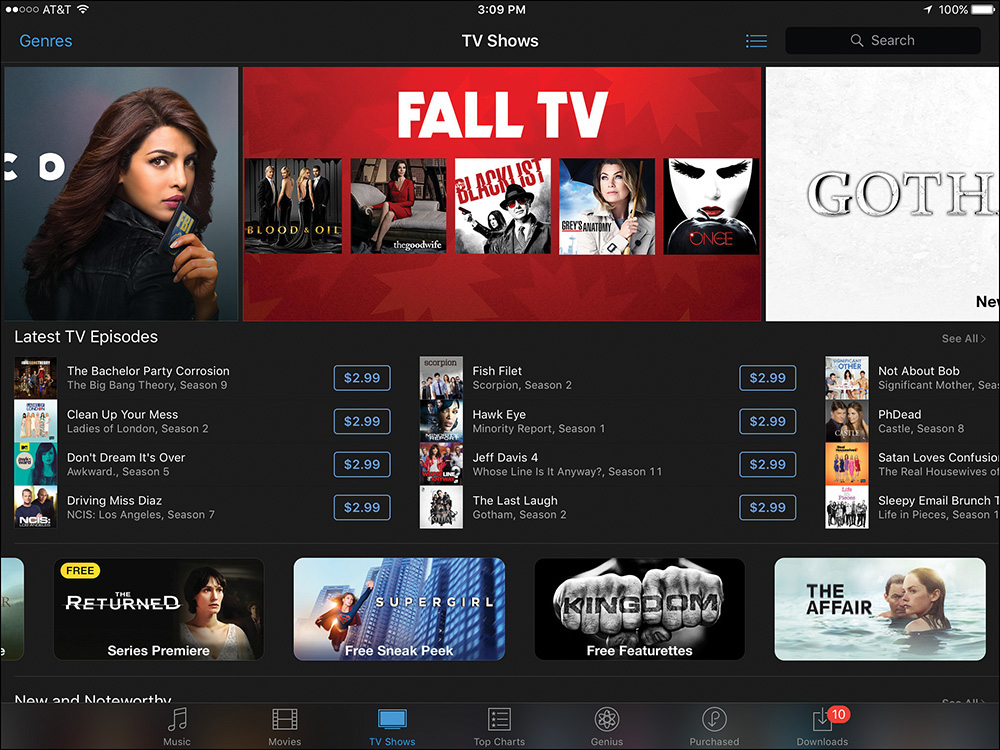
Figure 14.22 Use the iTunes Store app to purchase music, TV shows, and movie content and acquire free music and video-based content.
Like the App Store, from the iTunes Store you’re able to view detailed descriptions and reviews of content before purchasing (or renting) it.
It’s also possible to preview the content or watch a movie’s trailer(s). Tap on the Details tab to read a description and access previews (shown in Figure 14.23), or tap on the Reviews tab to see star-based ratings and read reviews.
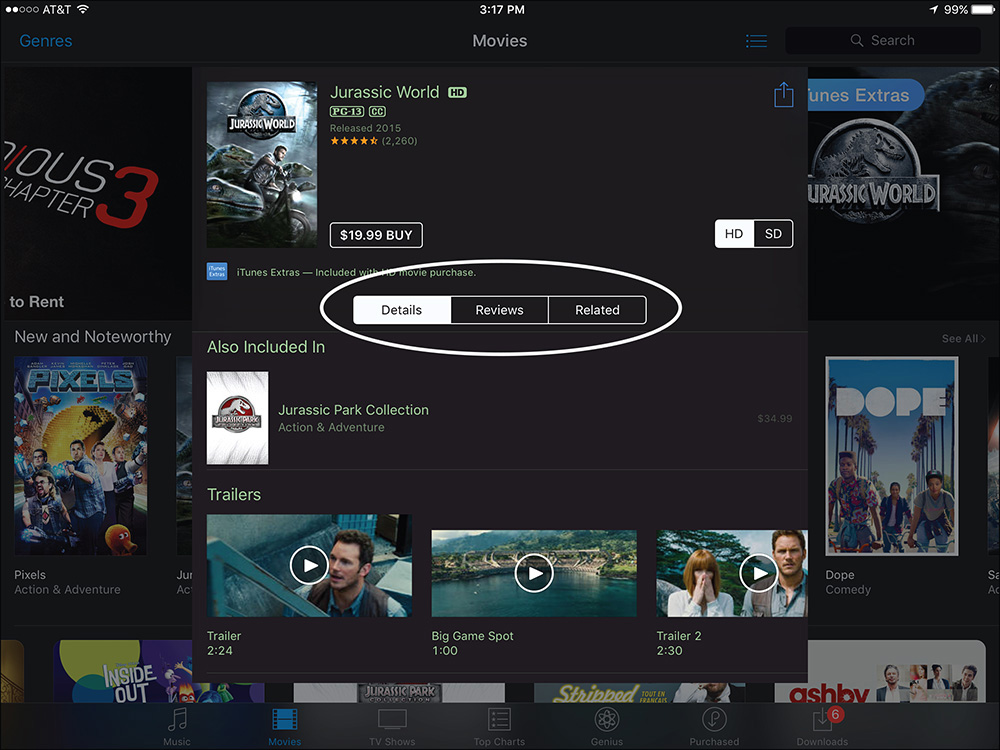
Figure 14.23 Tap on any content’s listing to view a detailed Description screen. From here, you can read a description, watch a preview/trailer(s), and access star-based ratings and reviews.
The process for purchasing content from the iTunes Store is virtually identical to using the App Store, so refer to Chapter 3, “Strategies for Finding, Buying, and Using Third-Party Apps,” for more information.
On the iPhone, displayed along the bottom of the iTunes Store screen are five command icons: Music, Movies, TV Shows, Search, and More. Tap on the More icon to access the Ringtones, Genius, Purchased, and Downloads options.
On the iPad, six command icons are displayed along the bottom of the screen, which from left to right are Music, Movies, TV Shows, Top Charts, Genius, and Purchased. The Search field is displayed in the top-right corner of the screen.
To shop for music (or acquire free music), tap on the Music icon. Likewise, to purchase or rent movies, tap on the Movies icon. For TV shows (either individual episodes or entire seasons of a series), tap on the TV Shows icon. Use the Search feature to quickly find audio or video content using keywords.
![]() Tip
Tip
After you tap on the More icon on the iPhone, tap Purchased to view all past purchases from the iTunes Store. As content is downloading, you can view the progress of that download by tapping on the Purchased icon.
Just like when using the App Store to acquire new apps for your mobile device, when you make a purchase from the iTunes Store, all charges are automatically billed to the credit or debit card you have linked with your Apple ID or offset against any credit your account might have from redeemed gift cards.
![]() Tip
Tip
You can redeem an iTunes Gift Card and add the credit to the Apple ID account used for making online purchases from the iTunes Store, App Store, or iBook Store. When you select the Redeem option, it’s possible to scan a physical gift card using the camera built in to your iOS mobile device so you don’t have to manually type the long redemption code.
When you make a purchase from your iPhone or iPad, it immediately gets downloaded to that device and, at the same time, gets stored in your iCloud account. The online storage space required for purchased iTunes Store content is provided free of charge, and does not count against the 5GB of free online storage space your iCloud account comes with.
The same content can then be downloaded and experienced on your other Macs and iOS mobile devices that are linked to the same iCloud account.
![]() Tip
Tip
The iTunes Store offers a Complete My Season feature for TV show seasons. If you purchase one or more single episodes of a TV series (from a specific season), you can later return to the iTunes Store and purchase the rest of the episodes from that season at a reduced price (based on how many episodes from that season you already own). This feature works just like the Complete My Album feature for your music but relates to TV shows.
If you’re interested in purchasing and listening to audiobooks on your iOS mobile device, thousands of titles are available from the iTunes Store. However to acquire and then listen to this content, you now need to use the iBooks app, which is covered in Chapter 15, “Customize Your Reading Experience with iBooks and the News App.”
All audiobooks you previously acquired and enjoyed listening to using the Music app have been automatically transferred to the iOS 9 edition of the iBooks app.
Another option is to use the Audible.com service. It too offers a vast and ever-growing audiobook library. Audiobook titles can be purchased online and enjoyed using the free Audible app available from the App Store.
Quickly Find TV Episodes You Want to Purchase on iTunes
When shopping for TV show episodes to purchase and watch using the iTunes Store app, tap on the TV shows button that’s displayed near the bottom of the screen. Shows are displayed by series name. The search results display the TV show by season number and by available episodes.
![]() Note
Note
Purchasing most single TV episodes from the iTunes Store costs $1.99 (standard definition) or $2.99 (high definition). A discount for acquiring a complete season of a TV series is offered.
The price to purchase movies varies, but the rental price is typically $3.99 (standard definition) or $4.99 (high definition).
Most individual songs available from the iTunes Store cost between $0.69 and $1.29, while album prices vary.
In addition to purchasing one episode at a time, the iTunes Store gives you the option of purchasing the entire season at a discounted rate, plus choosing between high definition (HD) or standard definition (SD) video quality. The HD versions of TV shows utilize much larger file sizes and take up much more internal storage space within your device, but they look much better when you watch them.
To save money, purchase an entire season of your favorite show’s current season. This is called a Season Pass. Then, when a new episode airs each week and becomes available from the iTunes Store (about 24 hours later), it can be downloaded to your iOS device and made available to you via iCloud using a Wi-Fi Internet connection. You’ll also receive a weekly email, plus Notification Center alerts from Apple telling you when each new episode in your Season Pass is available.
When you shop for TV episodes from the iTunes Store (via the iTunes app), they’re commercial free and available to watch whenever you want. They’re also permanently accessible via your iCloud account to be downloaded to any computer, iOS device, or Apple TV device that’s linked to the same iCloud account. Once an episode is download to your iPhone or iPad, an Internet connection is no longer needed to watch it.
![]() Tip
Tip
Each week, the iTunes Store offers free episodes of featured TV shows. To discover which episodes are being offered, launch the iTunes Store app, tap on the TV Shows icon, scroll down to the bottom of the screen, and under the TV Shows Quick Links heading, tap on Free TV Episodes. Then, from the Free TV Episodes screen, look under the Free Full-Length Episodes heading to see what’s currently available.
Stream Video Content Instead of Purchasing and Downloading It
To stream video content from the Internet, you must use a specialized app, based on where the content is originating from on the Internet.
Whenever you’re streaming video content, you can pause the video at any time. Depending on the app, you also can exit the app partway through a video and resume watching it from where you left off when you relaunch the app later.
Streamed TV programming and movies may or may not include commercials, based on the service you use to access it. For example, if you use the app from your cable TV service provider or from specific TV networks to stream on-demand programming using your iPhone or iPad, TV commercials are included if the original broadcast programming included commercials. However, if you subscribe to a fee-based service, like Netflix, Amazon Prime, or HuluPlus, streamed content is offered commercial-free.
![]() Caution
Caution
The capability to stream content from the Internet gives you on-demand access to a wide range of programming; however, streaming audio or video content requires a tremendous amount of data to be transferred to your iOS device. Therefore, if you use a cellular data connection, your monthly wireless data allocation will quickly get used up. So, when you’re streaming Internet content, it’s best to use a Wi-Fi connection.
Not only does a Wi-Fi connection often allow video data to be transferred at faster speeds and at a higher resolution, there’s also no limit as to how much data you can send or receive.
Keep in mind that many cable television service providers (such as Xfinity/Comcast and Time Warner), as well as satellite TV service providers, individual television and cable TV networks (ABC, NBC, CBS, FOX, USA Network, Lifetime, SyFy, and so on), and even specific TV shows, often have their own proprietary apps available for streaming content from the Internet directly to your mobile device.
There are also paid streaming services, such as Netflix, Amazon Prime, and HuluPlus, that offer vast libraries of TV shows and movies available for streaming. These services charge a flat monthly fee (starting around $8.00 per month) to stream as much programming as you want to your computer(s) and mobile device(s).
![]() What’s New
What’s New
If you’re not a paid subscriber of the HBO premium cable TV network, it’s now possible to subscribe to HBO via the HBO Now app and be able to stream all of HBO’s programming using your mobile device. This trend is being adopted by other premium cable TV networks as well. The HBOGo app is used if you’re a current HBO subscriber via your cable/satellite service provider.
When you stream TV episodes from the Internet using a specialized app, this programming does not get stored on your iOS device and is available only when your iPhone or iPad has a constant connection to the Internet while you’re watching that content. In many cases, a Wi-Fi connection is required.
![]() What’s New
What’s New
In addition to streaming TV and movie programming using the apps offered by cable TV and satellite providers, some of these apps now allow certain programming to be downloaded and watched offline. A growing number of these apps also now offer access to live programming.
The ability to download and store some TV show and movie content on your iPhone or iPad is also offered by the Amazon Prime streaming service.