
7. Make the Most of Online Social Networking Apps
In This Chapter
![]() Learn to use the Facebook and Twitter functionality that’s integrated into iOS 9
Learn to use the Facebook and Twitter functionality that’s integrated into iOS 9
![]() Discover how to use the official Facebook and Twitter app
Discover how to use the official Facebook and Twitter app
![]() Discover other online social networking apps for services like YouTube and Instagram
Discover other online social networking apps for services like YouTube and Instagram
One of the reasons why online social networking services have become so incredibly popular around the world is because access to these services is incredibly easy from any smartphone, tablet, or computer. In some cases, social media accounts for services like Twitter and Instagram can also be managed from an Apple Watch that’s paired with your iPhone.
Available for free from the App Store are official apps from all of the major social networks that enable you to fully manage your online account, stay in touch with your online friends, and share photos, videos, or other content while you’re on the go.
Meanwhile, iOS 9 has Facebook, Twitter, Flickr, and/or Vimeo integration built in to the Share menu of many apps. This means you can quickly create and publish app-specific content without actually launching a social networking app. Other third-party apps used for managing social media accounts also now show up in the Share menu.
Almost any iPhone or iPad app that has a Share button now enables you to share app-specific information by publishing it on Facebook and/or Twitter from within the app you’re using.
To begin using any of the popular online social networking services from your iPhone or iPad, you first must set up a free account with that service. This can be done either by visiting the service’s main website (such as www.facebook.com or www.twitter.com) on your primary computer, using Safari on your mobile device, or by clicking on the new account setup-related option offered in the official iOS mobile app for that service.
After you’ve set up an account, enter your username and password into the social networking app on your iPhone or iPad.
![]() Caution
Caution
Many of the online social networking apps automatically tap in to the Location Services function of your iPhone or iPad and display your exact location anytime you publish a new posting to that service (or upload a new photo or video). To prevent this and protect your privacy, do not grant permission for a specific online social networking app to access your mobile device’s Location Services as you’re first setting it up.
Anytime thereafter, it’s possible to customize privacy-related settings for many apps by launching Settings and tapping on the Privacy option. Next, tap on the Location Services option (at the top of the screen). Tap on the option for each app (including the social media apps) to adjust how that selected app will utilize the Location Services feature built in to your device. For example, if you tap on the Facebook option, under the Allow Location Access heading, you can choose between the Never, While Using the app, or Always options.
Most services, like Twitter or Instagram, also enable you to add your location to a posting, but only if you want to.
Many people opt to leave Location Services turned on, but as they’re using a social networking service from their mobile device, they pay attention to when this feature is going to be utilized and opt to include or leave out their location when creating a new post or uploading content.
![]() Tip
Tip
Facebook (www.Facebook.com), as well as the Facebook app, offers its own Privacy Settings menu that you should access and customize based on your level of comfort sharing information as you begin using this service. Tap on the More menu icon and select the Privacy Shortcuts option or the Settings option to do this.
Facebook, Twitter, Flickr, and Vimeo Integration Is Built In to iOS 9
If you already have a Facebook, Twitter, Flickr, or Vimeo account, you must set up the iOS 9 integration functionality for each of these services separately, plus download and install the official app for each of the services on which you’re active.
Setting up account integration with iOS 9 (and many of the apps that come preinstalled on your iOS mobile device) must be done once per account on each of your iOS mobile devices.
![]() Note
Note
This integration allows options for the compatible online social networking services to be displayed as part of the Share menu of many apps, including Photos.
If you don’t turn on integration with a service, these options will not be accessible from the Share menu of the apps you use.
To set up iOS 9 integration for each service, follow these steps:
1. Launch Settings from the Home screen.
2. Scroll down to the Twitter, Facebook, Flickr, or Vimeo option that’s displayed as part of the main Settings menu. Tap on the app you want to configure.
3. Tap on the Username and Password option and enter the appropriate information (shown in Figure 7.1).
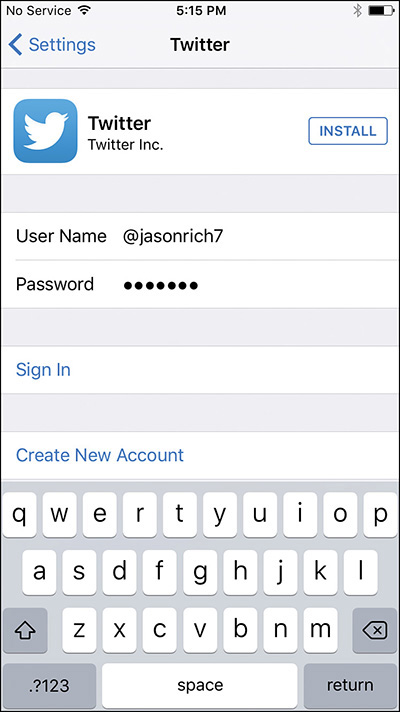
Figure 7.1 Add your existing Twitter account information to the Twitter submenu within Settings, and then tap Sign In to log in to your account. This enables iOS 9 and many apps to include a Share via Twitter option as part of the app’s Share menu.
4. Tap on the Sign In option.
5. If you haven’t already done so, tap on the Install button displayed next to the app logo to download and install the official app. Once the app is downloaded, you must sign in to the service from the app, and once again supply your account username and password (this time, while using the app).
6. When the app is installed, if applicable, tap on the Settings option below the app icon on the service-specific menu within Settings to customize specific features of the online social networking app.
7. Near the bottom of the service-specific menu within Settings, under the heading Allow These Apps To Use Your Account, turn on or off the virtual switches associated with specific apps. Your Calendar and Contacts apps can sync with your Facebook account if you allow it.
8. When applicable, tap on the Update Contacts button that’s also displayed on the service-specific menu within Settings. This enables your iPhone or iPad to access your online account and compare your online friends with the entries you already have in the Contacts app. When appropriate, the Contacts app pulls additional information from services such as Facebook and adds details to each applicable Contacts entry. For example, when you do this for the Facebook app, Contacts adds Profile pictures, birthdays, and other information listed on the Facebook profile to your Contacts entry.
![]() Tip
Tip
If you manage multiple Twitter accounts, repeat steps 1–4 for each account after selecting the Twitter option from the main Settings menu. Later, you can select from which account you publish new content as you use the Tweet command from within the Share menu of various apps.
From the Share menu of many apps (shown in Figure 7.2), you can now publish new content directly to your compatible online social networking account. However, if you want to fully manage your account and interact directly with your online friends, you must download and install the official app for each service on which you’re active. Find these apps by performing a search in the App Store or looking in the Social Networking category.

Figure 7.2 After you turn on Facebook, Twitter, Flickr, and/or Vimeo integration, options for publishing content to these services appear in the Share menu of many compatible apps, including Photos.
Manage Your Facebook Account Using the Official Facebook App
The official Facebook app offers much of the same functionality for managing your Facebook account as using the web browser on your primary computer to access www.facebook.com. However, the Facebook app is custom designed to fully utilize the iPhone or iPad’s touchscreen and format content for the screen size of the iOS mobile device you’re using.
![]() Tip
Tip
On the iPad, more content is displayed when you use the official Facebook app in landscape mode.
Every two weeks or so, Facebook updates its official app, as well as the Facebook Messenger app. Facebook Messenger is the instant messaging component of Facebook that enables you to communicate with your Facebook friends in real time via instant messages (text), Internet-based voice calls, or video calling through Facebook.
If you use Facebook to manage your own Page or Group, separate official Facebook apps (Facebook Page Manager and Facebook Groups) are available for free from the App Store to allow you to manage Pages or Groups directly from your mobile device.
Found along the bottom of the official Facebook app are News Feed, Requests, Messenger, and Notifications icons, as well as the More menu icon. Tapping on these icons gives you access to the majority of Facebook’s features and functions from your mobile device (shown in Figure 7.3).
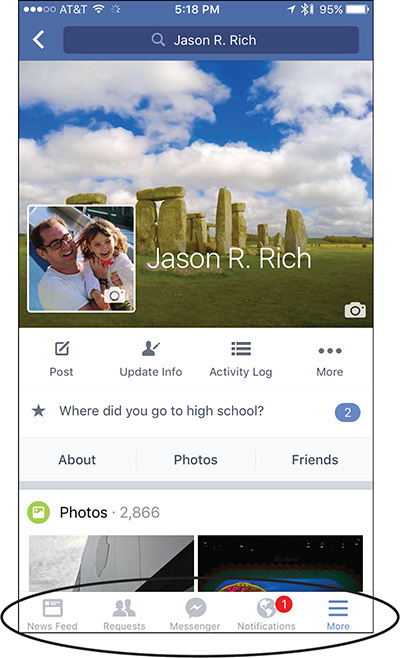
Figure 7.3 Access most of Facebook’s features and functions from the icons displayed along the bottom of the Facebook app’s screen.
Tap on the More icon to access the Facebook app’s main menu. At the top of this menu is your Facebook name. Tap on this to access your own online profile and Facebook page.
Available from this More menu (shown in Figure 7.4) are a handful of other options for managing all aspects of your Facebook account. For example, under the Settings option, tap on the Privacy Shortcuts option to customize your Facebook Privacy settings, which is highly recommended.

Figure 7.4 Spend a few minutes customizing the various settings offered from this More menu, especially the Privacy Shortcuts-related settings.
From along the bottom of the screen, tap on the News Feed icon to view your live newsfeed and see the posts and status updates of your Facebook friends.
Tap on the Requests icon to respond to incoming friend requests, plus view a listing of People You May Know. When you tap on the Messenger icon, your iPhone/iPad exits out of the Facebook app and launches the separate Facebook Messenger app, which is also available for free from the App Store. It is used to communicate with other Facebook users.
Displayed on the right side of the iPad screen when using the Facebook app (or when you tap on the icon in the top-right corner of the iPhone screen), you can see a listing of your Facebook friends and whether they’re currently online and using Facebook or logged in to Facebook using their mobile device.
![]() Tip
Tip
Tap on the Nearby Friends option to view a listing of your friends who have recently used the Check In feature and posted their current location online. You can then determine their proximity to you, based on your current location. For this feature to work, you must have the Location Services feature that’s associated with Facebook set to “Always.”
Tap on the Notifications option to view listings for new content that’s been created or updated by your online friends. The information shown here depends on how you set up the Facebook Activity Log, News Feed Preferences, and Privacy Shortcuts from the More Menu.
Use the Search field displayed at the top of the screen to enter a name, keyword, or search phrase, based on what you’re looking for. For example, if you’re looking for the Facebook page for your favorite TV show, movie, hobby, area of interest, company, public figure, or celebrity, type it into the Search field.
When viewing the News Feed, at the top of this screen are the Status, Photo, and Check In options. Use one of these options to update your own Facebook wall or status.
When you tap on the Status icon, you can publish content on your Facebook wall. This can include text, photos, your current location, tags for the people you’re currently with, and an icon-based activity or emotion update.
When you tap on the smiley face emoticon when updating your Status, you can tap on the Feeling option to choose an option (and icon) for how you’re currently feeling, or you can choose an activity icon, such as Watching..., Eating..., Playing..., or Traveling To... . Doing this, however, is an optional part of a status update.
As you’re composing your status update, tap on the To field to determine who will be able to see it. Tap on the Post option to publish your status update online.
By tapping on the Photo option, you can choose one or more photos that are stored in your iPhone or iPad and publish them on Facebook—as a new Album, within an Existing Album, or on your Facebook wall. Tap on the Camera icon to snap a photo from within the Facebook app to publish online.
The Check In option enables you to publish a status update that automatically includes your current location. Your online friends and people following you will be able to see where you are when they tap on the Nearby Friends option.
Participate In Chats Using the Facebook Messenger App
To participate in a real-time text, audio-, or video-based chat with one of your Facebook friends, you now must use the Facebook Messenger app, which you can launch from the Home screen or from within the Facebook app by tapping on the Messenger icon.
![]() Tip
Tip
You can also launch the Facebook Messenger app by tapping on someone’s name when you view the listing of friends who are currently online (displayed on the right side of the Facebook app on the iPad, or when you tap on the icon displayed in the top-right corner of the iPhone.)
When viewing your friends list in the official Facebook app, a green dot displayed with a friend’s name indicates that person is currently on Facebook. A cell phone icon to the right of his name indicates he’s accessing Facebook from his mobile phone or tablet.
If a message such as Active 4m Ago, Active 5H Ago, or Active 2D ago is displayed, this tells you the last time that person was active on Facebook. The “M” stands for minutes, the “H” stands for hours, and the “D” stands for days.
After tapping on a Facebook friend’s name to initiate or return to a chat, the Facebook Messenger app automatically launches and a chat window is displayed (shown in Figure 7.5). The app also enables you to set up and participate in group chats/conversations. To do this, select more than one person when initiating a new chat.

Figure 7.5 Participate in real-time text chats with your Facebook friends via the Facebook Messenger app.
When using the instant messaging feature of Facebook Messenger, text bubbles down the left side indicate what your friend types, while the text bubbles down the right side show what you’ve typed.
![]() Tip
Tip
In the top-right corner of the Facebook Messenger chat window is a phone and video camera icon. Tap on the phone icon to initiate a voice call with that person via the Internet (which is free), or tap on the video camera icon to initiate a video call with that person (also free). Either of these features is a great alternative to traditional long-distance or international phone calls, which typically cost a lot.
When using the instant messaging aspect of Facebook Messenger to send text, type what you want to send in the Type A Message field displayed at the bottom of the screen.
Tap on any of the icons displayed with this field to add a photo, audio clip, animated GIF graphic, or another type of compatible content.
If you want to include an emoji in your text-based message, tap on the smiley face icon that appears between the 123 and microphone (Dictation) keys near the bottom of your mobile device’s virtual keyboard, and select one or more emoticons by tapping on them.
![]() Tip
Tip
Instead of turning on the Do Not Disturb feature, if you want to keep someone from disturbing you via Facebook Messenger, it’s possible to “mute” and then “unmute” a specific conversation. To do this, tap on the person’s username (at the top of the screen). When viewing the Contact screen, tap on the Notifications option. You can then “mute” that person for 15 minutes, 1 hour, 8 hours, 24 hours, or until you manually unmute them by returning to this menu screen.
It’s also possible to block someone altogether. To do this, from the Contact screen, tap on the Block option.
Read Your News Feed Using the Facebook App
After launching the Facebook app, the News Feed is shown by default. However, if you were using the Facebook app previously and chose a different feature, when you reopen the app, the last feature used will be shown. To then view the News Feed, tap on the News Feed icon at the bottom of the screen to discover what your friends are up to. When the News Feed screen is displayed, along the top of the screen, tap the Status option to update your own status.
Scroll down to read your current News Feed. The postings are displayed in reverse chronological order, with the most recent or most recently commented-upon posts listed first. You can, however, change how information is presented by adjusting the app’s Sort Order and See First options.
Just below the poster’s name is the time the post was published or updated (as well as the person’s location, if this information was shared by the poster). Along the bottom of each posting are three icons.
Tap Like (the thumbs-up icon) to “Like” the post. If you want to add a comment related to the post, tap the Comment icon, and then type a public message. If you want to share the post with your friends on your own Facebook wall, tap the Share icon.
![]() Note
Note
At the time of this writing, Facebook announced plans to add a variety of emote buttons, in addition to Like.
![]() Caution
Caution
If you’re active on several online social networking services, be mindful of the permissions you grant to these apps.
Many of them, like Facebook, Instagram, and Twitter, are now designed to work together and share information. (In some cases, a third-party app that’s compatible with multiple services must be used.) For example, if you post a new photo on Instagram (using the official Instagram app), that same photo/posting can automatically appear on Facebook as a status update, and be published as a tweet via your Twitter account.
You can customize how these various services interact and determine what information they share by visiting their main websites (such as www.facebook.com or www.twitter.com) and logging in to your account.
Manage Your Twitter Account(s) Using the Official Twitter App
The official Twitter app enables you to manage one or more Twitter accounts from your iPhone or iPad. Using the app, it’s possible to compose and publish new tweets (outgoing messages), access your Twitter feed and see what the people you’re following are up to, manage your account’s followers, send private messages to other Twitter users, and discover interesting content using the Search feature with keyword (hashtag) searches and/or by tracking what’s currently trending on Twitter.
![]() What’s New
What’s New
From the Home screen, if you’re using an iPhone 6s or iPhone 6s Plus, place and hold your finger gently on the Twitter app icon to reveal a menu that allows you to quickly perform a search, compose and publish a new tweet, or compose a new (private) message (shown in Figure 7.6).
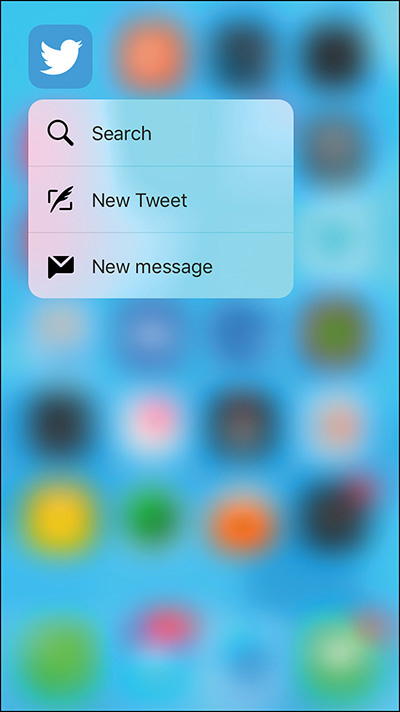
Figure 7.6 Use your iPhone 6s or iPhone 6s Plus’s 3D Touch screen to access this Twitter-related menu by gently resting your finger on the Twitter app icon.
When composing a tweet with the official Twitter app (shown in Figure 7.7), or by selecting the Twitter option from the Share menu of any compatible app, the Compose Tweet screen (iPhone) or window (iPad) is displayed.
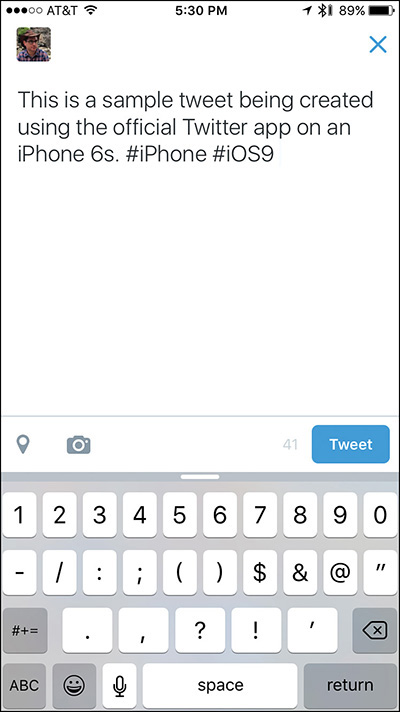
Figure 7.7 Manage all aspects of your Twitter account, which include composing and sending tweets using the official Twitter app.
Use the virtual keyboard or the Dictation feature to compose an outgoing tweet to publish to your Twitter feed. It’s also possible to use Siri to compose and publish content to either Facebook or Twitter using voice commands.
A tweet can be up to 140 characters in length. Aside from text, you can also attach a photo that’s taken using the iPhone or iPad’s built-in camera (or a photo that’s already stored on your mobile device), include a website URL, or add your exact location to the tweet.
![]() Tip
Tip
As you’re composing a tweet, a character counter is displayed in the Compose Tweet screen/window. Keep in mind that when you attach a photo, website URL, or your location to the tweet, this utilizes some of the 140 characters you have available.
To find and follow your real-life friends who are already active on Twitter, launch the Twitter app, tap on the Add Friends icon, and then use the Find People tools that are built in to the app.
One nice feature of the official Twitter app is that you can manage multiple accounts and quickly switch between them. As you’re composing a tweet, if you have multiple accounts, simply tap on your Twitter username in the Compose Tweet screen/window, and you can choose from which of your accounts you want to send the tweet.
You can create or update your personal profile at any time from within the Twitter app. To do this, launch the app, tap on the Me option, and then tap the Edit Profile option. Tap the Save button to save your changes.
![]() Note
Note
Visit the App Store to discover dozens of additional third-party apps that enable you to easily manage one or more Twitter accounts. Many of these third-party apps, such as Twitterific, TweetCaster, or Tweetbot, are paid apps that offer extra functionality that’s not found in the official Twitter app, while others are free (but offer in-app purchase options).
Discover the Official Apps for Other Popular Online Social Networking Services
Official (free) apps from virtually all the popular online social networking services are available from the App Store. You can also find some third-party (paid) apps that offer a different mix of features and functions for managing one or more online social networking accounts.
The YouTube App
As an online-based video sharing service, YouTube offers millions of hours worth of free videos you can watch on demand. The official YouTube app enables you to stream the service’s content from anywhere your iOS mobile device has an Internet connection.
If you want to access your YouTube account, watch YouTube videos, or upload your own YouTube videos from an iPhone or iPad, the easiest way to do this is using the official YouTube app. Alternatively, you can visit www.youtube.com from the Safari web browser.
When you sign in to the YouTube service from within the app, the YouTube app’s main menu adds a My Subscriptions heading. Below it are details about all of the YouTube Channels to which you subscribe. Tap on any of these listings to quickly find the latest videos from your favorite YouTubers.
Displayed under the Best of YouTube heading in the YouTube app’s main menu, tap on the category for videos you’re interested in viewing. Or from the main YouTube screen, tap on the Search icon and then in the Search field enter any keyword or phrase to quickly find videos you might be interested in related to any topic whatsoever.
When you tap on a video listing, what’s displayed on the screen (shown in Figure 7.8) is similar to what you see when accessing YouTube from your primary computer.

Figure 7.8 The official YouTube app enables you to watch unlimited videos for free or manage a YouTube channel and publish your own videos to share with others. Use the onscreen controls to manage a video as it’s playing.
This includes a video window in which the YouTube video plays. Tap on the video window to access onscreen controls to play or pause the video, view the time slider, and tap the Full Screen mode icon or the AirPlay icon. Turn the iPhone sideways to view the video in full-screen mode (as shown in Figure 7.9).

Figure 7.9 Turn your iPhone sideways to view a streaming YouTube video in full-screen mode. On an iPad, tap on the Full-Screen icon displayed in the bottom-right corner of the video window.
![]() Note
Note
Videos you watch using the YouTube app are streamed to your mobile device. These videos are not, however, saved on your device. To avoid quickly using up your monthly cellular wireless data allocation, if applicable, opt to use this app with a Wi-Fi Internet connection.
The Instagram App
Instagram is a social networking service that enables users to create and share an ongoing stream of individual photos. Each photo can include a caption, keywords, and your location.
What’s great about Instagram is that instead of using the Camera app to snap pictures, you can use the Instagram app to take photos and/or use the app’s powerful photo editing tools to quickly edit or enhance a photo before sharing it online. Unlike other photo sharing services, Instagram crops images into a square shape (shown in Figure 7.10).

Figure 7.10 Snap or select a photo, crop it, and then edit it using powerful, but easy-to-use tools, before publishing it on Instagram.
Instagram offers a fun and easy way to share moments of your life in the form of snapshots taken using the camera built in to your iOS mobile device (shown in Figure 7.11).

Figure 7.11 Instagram users can share individual photos and manage their online account using the official Instagram app.