
PROJECT 2
Spy Camera Basics
AT ONE TIME, a decent low-light video camera was the size of soda can and cost several hundred dollars. Now, you can purchase a decent micro spy camera that will fit into a marker cap for well under a hundred dollars. Tiny security cameras also offer a huge variety of lenses to allow for practically any angle of view and covert installation. These cameras are also very easy to connect because they have used the same basic video standard since the invention of the television. This introduction to security cameras will give you the required basic information needed to install and power up practically any type of security camera.
We use these small video cameras for security work, machine vision experiments, and robotic projects. They range in size from half an inch square to quite large depending on the features, imaging system, and type of lens installed. For most security installations, a small board camera with a fixed medium- to wide-angle lens will be perfect, but there are times when you need to see a much larger area or over great distances, so these cameras have several body types that allow the use of multiple lens styles. Extremely tiny spy cameras will not have this option, as they use a very tiny glass or plastic lens built right into the housing. There will be a bit of a tradeoff between image quality and size.

Figure 2-0 Micro spy cameras are inexpensive and easy to install in covert locations.
For most covert work, size will be the key factor in camera selection, so you probably won’t be dealing with multiple lenses or even have a choice. In Figure 2-1, you can see the huge difference in size between the long-range motorized lens telephoto camera on the left and the tiny spy camera at the front of the photo. The tiny spy camera has a simple fixed medium-angle lens and will run from a 6-volt (V) power source for many hours. The larger camera uses a computer to control the motorized zoom lens and requires multiple power sources and electronic control systems in order to operate. Of course, the zoom lens can see the color of your eyes from 500 feet away, but the tiny spy cam can be hidden just about anywhere. There will always be a camera available to suit your needs as long as you have the budget to afford it.
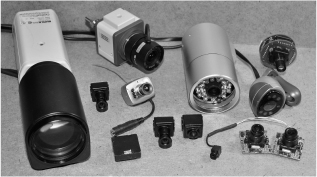
Figure 2-1 A few of the basic security cameras in an ever-growing collection.
Security cameras and micro spy cameras will have a connection point for DC (direct current) power and a video output, and some will have an audio output or several control lines for onboard features such as gain, color, text overlay, and lens control. The most basic cameras you will probably work with most often will have only power and video connectors, or simply include three wires coming out of the tiny enclosure. The tiny board cameras with three wires will usually follow a simply color scheme of black or green = ground, red = positive power, and white, yellow, or brown = composite video output. Of course, it is always a good idea to check the manual for polarity and voltage before making any guesses.
The camera in the left of Figure 2-2 is quite advanced, having a built-in on-screen display system, many internal function parameters, lens control, and audio. This camera is somewhat large, so it has many buttons on the back side, audio and video jacks, DC power jack, and a special connector to control a motorized lens. The basic low-lux micro camera on the right of Figure 2-2 only has a tiny connector with a three-wire cable to allow power, ground, and video output connections. We will discuss lux later in this section. The large camera is great for daytime long-range imaging where color quality is important, and the tiny camera is perfect for extremely low light or infrared night vision imaging in a stealthy location.
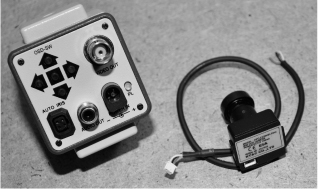
Figure 2-2 Camera connections for power, ground, and audio.
Larger security cameras designed to be used with higher-quality interchangeable lenses like the one shown in Figure 2-3 will usually have a C- or CS-type mount. C-mount lenses provide a male thread, which mates with a female thread on the camera. The thread is nominally 1 inch (25 mm) in diameter, with 32 threads per inch. A CS lens has a flange focal distance of 12.526 millimeters (0.4931 in), and is otherwise identical to the C-mount. Some camera bodies have a smaller lens mount and will often come with an adapter to allow the attachment of C or CS lenses, although some focal range may be lost. The camera shown in Figure 2-3 has been fitted with a C-mount adapter.

Figure 2-3 Large cameras with removable lenses have C or CS mounts.
With the lens unscrewed form the camera body, you can see the charge-coupled device (CCD) mounted to the circuit board (Figure 2-4). This IC has a top glass window to allow the lens to focus the image on the extremely tiny, high-resolution array, which forms the image to be displayed. When removing a line, be careful not to touch the top surface of the CCD sensor or it will become smudged and require a proper cleaning. The CCD determines the type of image (color or monochrome), as well as the resolution in horizontal and vertical pixels. Most color cameras will also include a special set of filters to remove infrared light, which is why monochrome cameras are much better for night vision operations. CCD imagers are available in extremely high resolutions, but for composite video application, the video bandwidth limits the usable resolution to about 720 by 480 pixels.
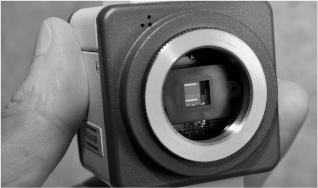
Figure 2-4 The CCD or CMOS imager shown with the lens removed.
When digging into the technical details of a security camera, one of the most important aspects will be the type of imaging device used, which will either be a CCD imager or complementary metal-oxide semiconductor (CMOS) imager. Both types of imagers convert light into voltage and process it into electronic signals. In a CCD sensor, every pixel is transferred through a very limited number of output nodes (often just one) to be converted to voltage, buffered, and sent off-chip as an analog signal. All of the pixels can be devoted to light capture, and the image quality is high (Figure 2-5). In a CMOS sensor, each pixel has its own charge-to-voltage conversion, and the sensor often also includes amplifiers, noise-correction, and digitization circuits, so that the chip outputs digital bits. These other functions increase the design complexity and reduce the area available for light capture.
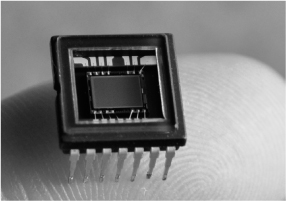
Figure 2-5 The CCD imaging chip taken from a high-quality camcorder.
These various qualities means that for low-resolution and low-light imaging, CCD cameras are currently the best choice. CMOS imagers are used in very high-resolution imaging systems, such as digital cameras and scanners, as proper lighting is usually not a problem in those situations. If you have the choice between a hundred-dollar CCD security camera with a 0.5 lux rating and a fifty-dollar CMOS camera with a 1.5 lux rating, the CCD camera will offer a far superior image and work well in a low-light or night vision application. Resolution is not much concern in a security camera, as most are already beyond the actual capabilities of the NTSC (National Television System Committee) or PAL (Phase Alternate Line) composite video standard anyhow. The lux rating will probably be the most important specification on a security camera next to the type of lens and field of view.
Lux is the measure of light or luminous power per area. It is used in photography as a measure of the intensity, as perceived by the human eye. The lower the lux rating on a camera, the better it will see in the dark. For instance, a monochrome camera with a lux rating of only 0.5 lux will see much better in the dark than you could with your naked eye, and with the help of an infrared illuminator will be able to see into the darkness and display it on a monitor as if it were midday. Color cameras require much more light to achieve a decent image, and since they usually include infrared filters, they are not the best choice for night vision applications.
Although security cameras with removable C-type lens mounts are much more expensive and bulky than fixed-lens micro cameras, the availability of different lens types is vast. If your security application requires control over field of view, zoom, or iris, then you will likely be looking for a camera body with a C- or CS-type mount to mate to the lens. A long-range zoom lens like the large ones shown in Figure 2-6 may cost upwards of a $1000, but the ability to pinpoint the tiniest detail at long distances may be the goal. Smaller focusable C-mount lenses range in price from $20 to $500 depending on the size and style of the optics, but they are always top quality, comparable to the optics in high-grade camcorders.
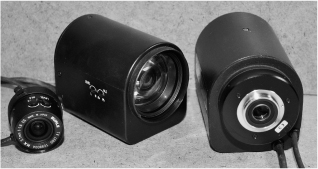
Figure 2-6 C-type lenses offer the highest quality and range of features.
The large motorized zoom lenses shown in Figure 2-6 are expensive and much larger than the camera body, but they allow for fine digital control over focus, zoom, and iris through a set of analog control lines. It would be next to impossible to hide this lens, but since it can see so far away, stealth installation is not really necessary. C-mount lenses are also available in special pinhole and snake configurations, but these are incredibly expensive and bulky compared to the lower-end micro camera lenses of this type.
Micro video cameras or board cameras like the ones shown in Figure 2-7 are very inexpensive, offer good quality, and normally only need a power and video connection to operate. These cameras are perfect for covert operations as they range in size from about an inch square to the size of a pencil eraser. These cameras will run for hours from a single 9-V battery and have many fixed-lens options ranging from the small glass medium-wide-angle type to the ultra-tiny pinhole type. The only downside to these smaller lens types is that they are not really adjustable—they are designed to have only a single field of view and focal range.
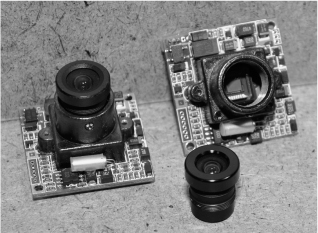
Figure 2-7 Fixed-lens micro cameras are very small and easy to conceal.
With the small lens unscrewed from the mounting hardware, the CCD can be seen installed on the camera circuit board. This 1/3-inch color CCD is no different from the ones found in lower-end color camcorders. The quality of the image far exceeds what is necessary for basic surveillance operations. Most micro camera lenses use the same thread type and are often interchangeable, although they are not easy to source by themselves.
The focus can be set on these micro video lenses by loosening the tiny set screw, as shown in Figure 2-8, in order to turn the lens clockwise or counterclockwise to gain the best focus for a certain installation. Most of these lenses will see perfectly from about 10 feet to infinity, but for closer focus, it will probably be necessary to make initial adjustments. Although the optics on these tiny lenses range from good to poor, the image quality is always decent because of the low resolution of the composite video signal along with the high quality of the CCD imaging device used. We found that a $30 color board camera will exceed the quality of a $1500 camcorder that was made five years earlier. Technology is always improving and becoming less expensive, so high-quality surveillance equipment is becoming more and more affordable for the “average” person.
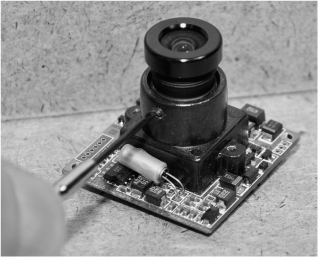
Figure 2-8 Setting the initial focus on a simple micro-camera fixed lens.
With the price of security gear at an all-time low, you can often purchase a complete night vision camera like the one shown in Figure 2-9 for well under $50. Inside the weatherproof aluminum shell, you will find a high-quality board camera, power supply, and another board with an array of infrared light- emitting diodes (LEDs). By itself, this inexpensive security camera is a high-performing night vision camera with a range of about 50 feet, and has a very good color image for daylight operations. As for parts, the camera module is the same one as shown in Figure 2-8, and the cost of all of the components separately would be a lot more. Sadly, we have seen many online spy stores sell the bare camera for three or four times the price of this entire unit, so shop around and be wary of any site claiming that they sell mainly to law enforcement agencies.

Figure 2-9 An outdoor security camera with built-in night vision LEDs.
There are a few different types of connectors used on security cameras, but the most common type is the RCA jack shown in Figure 2-10. This connector is the same one used on the back of a television set to connect older video players and camcorders. On the back of a TV or monitor, this jack will often be labeled “Video Input,” “Line Input,” or “External Input,” and will use the same connector for audio and video. Most security cameras will output composite video in either NTSC or PAL format to be connected to any TV or monitor that can accept this input. Some of the smaller spy cameras may not have any connector, just bare wires, so it makes sense to adapt them to the RCA jack if you plan to use them with standard TVs or monitors.
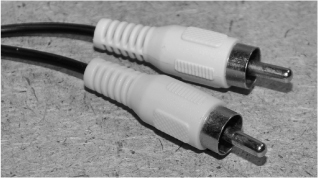
Figure 2-10 This is the most common type of composite video connector.
On the back of the monitor, video recorder, or television, the RCA connectors will look like the ones shown in Figure 2-11, often having two inputs for stereo audio along with the video input. Although there is no real standard, the color coding for the inputs will usually be yellow for video and red or white for audio.
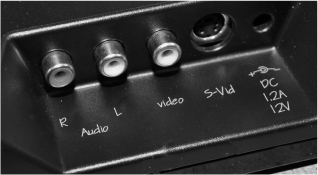
Figure 2-11 The back of a composite video monitor showing the RCA inputs.
On the larger, more expensive types of security cameras, the type of connector may be the BNC style as shown in Figure 2-12. Except for the way the connector locks together, there is no difference between the RCA connector and BNC connector for the transmission of the composite video signal. It is best to simply add an adapter to the BNC connector in order to convert it back to the much more commonly available RCA connector.
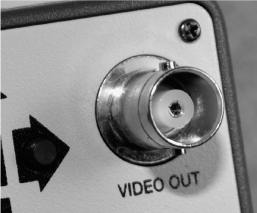
Figure 2-12 Some security cameras use a BNC-style video connector.
The inexpensive adapters shown in Figure 2-13 can be used to adapt the BNC-style connectors back to the more commonly used RCA-style connectors. Although the BNC-type connector is better for high-frequency signal transmission, this means nothing on a composite video camera, which will send a low-bandwidth signal. BNC connectors are not found on TVs or video recorders, so it is pointless to mess around with this type of connection unless you already have a complete system, including cables.
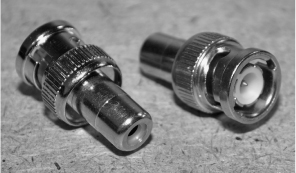
Figure 2-13 Adapting the BNc connector to the RCA-style connector.
The BNC-to-RCA adapter is shown hooked to the back of the high-quality machine vision camera in Figure 2-14. Oddly, the audio output was already using an RCA connector, so it seemed like a strange move to sell the camera with a BNC-style connector. The camera can now feed its video output into any video recording system or TV with an RCA-style composite input connector.

Figure 2-14 The camera is now adapted for use on any composite monitor.
On the smaller micro spy cams and board cameras, the connector will often be like the one shown in Figure 2-15, just a small plastic plug with as many connection points as needed. The majority of small cameras in our collection have a three-pin connector with pins for ground, power, and video output. The cameras that include audio also have an audio output pin. Since these connectors are often custom-made or hard to source, it is important to ensure that your camera includes the cable and connector when purchased. The other end of the cable will often break out into a set of female RCA connectors for audio and video, as well as a coaxial plug for the DC power source. Also make sure that you have the correct power supply voltage and polarity for your camera.

Figure 2-15 The board camera– and micro camera–style connector.
Because the audio and video signals are prone to interference over longer distances, shielded coaxial cable is necessary in order to make the connection between the camera and the monitor or recording device. If your camera has RCA connectors at both ends, then you can use any standard patch cable to make the connection to your TV or monitor, but often you will need longer cables or have to install your own connectors. The standard coaxial cable type used for security cameras is the RG-59 type. This cable has a single insulated signal wire surrounded by a conductive shield. The “Siamese RG-59” version also includes a second shielded pair to allow camera power supplies to be located indoors at the location of the video recorder or monitor. For short connections of only a few feet, just about any coaxial wire will work just fine.
Figure 2-16 shows the various stages of stripping down a coax cable to reveal the grounded outer shielding, as well as the protected inner signal wire. When connecting coaxial cable to an audio or video source, the inner wire carried the signal and the outer shield is connected to a common ground. When using coaxial cable to carry power, the positive supply is connected to the inner wire and the common ground becomes the outer shield. In almost all instances, the ground is common to all signals, including the power supply.
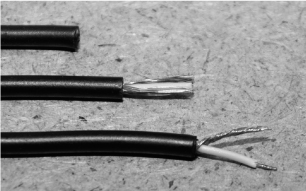
Figure 2-16 Coaxial cable is needed to carry the audio and video signals.
A lot of electronics prototyping will be done using a solderless breadboard, so it will make your job a lot easier if you create a set of breadboard-pluggable cables for your camera. This way you can test various power supplies, audio preamplifiers, and video systems without having to cut and strip the wires every time. We have several sets of breadboard cables for the various camera models in our collection, as well as some standard DC connectors and the RCA-style coaxial connectors. Figure 2-17 shows how to make a solderless breadboard-compatible cable by soldering the ends of the cables to a set of header pins. You could also just solder the ends of the wires to a set of solid copper wires that will push into the breadboard sockets.
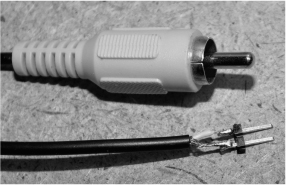
Figure 2-17 Making a set of breadboardc-ompatible connector cables.
We often work with machine vision, robotics, and video generation, so it is useful to have the ability to drop an NTSC camera right onto our solderless breadboard. For this task, we have made the necessary power connector for a 9-V battery, as well as the necessary three-pin camera connector and another RCA cable to feed back to the video monitor. With these breadboard-compatible cables, it takes only seconds to add a video signal to a machine vision project or connect a monitor to our video generator (Figure 2-18).

Figure 2-18 A complete set of breadboard-compatible cables for a micro camera.
If you are planning to do a lot of work with video cameras, then a small liquid crystal display (LCD) monitor with a composite input is a must-have tool for your kit (Figure 2-19). You can often find these small video monitors at any gaming supply outlet or even in the auto department of a hardware store. These small monitors are used as portable gaming screens or as video displays in recreation vehicles and passenger vehicles for rearview cameras. Many small televisions also include RCA jacks on the back to input composite video sources, and these are normally fully compatible with most security cameras, too.
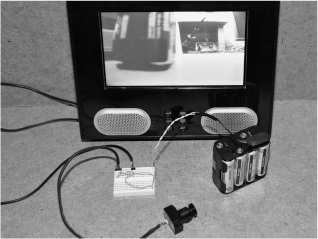
Figure 2-19 A micro video camera image displayed on a small LCD monitor.
Now that you have the basic understanding of how to get the video signal out of your security camera, you can begin to design your covert spy system, machine vision robot, or practically any project that requires a video source or video screen.