CHAPTER 1
Introduction to ROS: ROS tools and nodes
CONTENTS
1.2.2 Writing a minimal ROS publisher
1.2.5 Examining running minimal publisher node
1.2.7 Writing a minimal ROS subscriber
1.2.8 Compiling and running minimal subscriber
1.2.9 Minimal subscriber and publisher node summary
1.3 More ROS tools: catkin_simple, roslaunch, rqt_console, and rosbag
1.3.1 Simplifying CMakeLists.txt with catkin_simple
1.3.2 Automating starting multiple nodes
1.3.3 Viewing output in a ROS console
1.3.4 Recording and playing back data with rosbag
1.4 Minimal simulator and controller example
INTRODUCTION
This introductory chapter will focus on the concept of nodes in ROS, starting with minimal examples. A few ROS tools will be introduced as well to help illuminate the behavior of ROS nodes. The simplest means of ROS communications—publish and subscribe—will be used here. Alternative communications means (services and action servers) will be deferred until Chapter 2.
1.1 Some ROS concepts
Communications among nodes are at the heart of ROS. A node
is a ROS program that uses ROS’s middleware for communications. A node can be launched independently of other nodes and in any order among launches of other nodes. Many nodes can run on the same computer, or nodes may be distributed across a network of computers. A node is useful only if it can communicate with other nodes and ultimately with sensors and actuators.
Communication among nodes uses the concepts of messages, topics, roscore, publishers and subscribers. (Services are also useful, and these are closely related to publishers and subscribers). All communications among nodes is serialized network communications. A publisher publishes a message, which is a packet of data that is interpretable using an associated key. Since each message is received as a stream of bits, it is necessary to consult the key (the message type description) to know how to parse the bits and reconstruct the corresponding data structure. A simple example of a message is
Float64, which is defined in the package std_msgs, which comes with ROS. The message type helps the publisher pack a floating-point number into the defined stream of 64 bits, and it also helps the subscriber interpret how to unpack the bitstream as a representation of a floating-point number.
A more complex example of a message is a twist, which consists of multiple fields describing three-dimensional translational and rotational velocities. Some messages also accommodate optional extras, such as time stamps and message identifier codes.
When data is published by a publisher node, it is made available to any interested subscriber nodes. Subscriber nodes must be able to make connections to the published data. Often, the published data originates from different nodes. This can happen because these publishers have changed due to software evolution or because some publisher nodes are relevant in some contexts and other nodes in other contexts. For example, a publisher node responsible for commanding joint velocities may be a stiff position controller, but in other scenarios a compliant-motion controller may be needed. This hand-off can occur by changing the node publishing the velocity commands. This presents the problem that the subscriber does not know who is publishing its input. In fact, the need to know what node is publishing complicates construction of large systems. This problem is addressed by the concept of a topic.
A topic may be introduced and various publishers may take turns publishing to that topic. Thus a subscriber only needs to know the name of a topic and does not need to know what node or nodes publish to that topic. For example, the topic for commanding velocities may be vel_cmd, and the robot’s low-level controller should subscribe to this named topic to receive velocity commands. Different publishers may be responsible for publishing velocity-command messages on this topic, whether these are nodes under experimentation or trusted nodes that are swapped in to address specific task needs.
Although creating the abstraction of a topic helps some, a publisher and a subscriber both need to know how to communicate via a topic. This is accomplished through communications middleware in ROS via the provided executable node roscore. The roscore node is responsible for coordinating communications, like an operator. Although there can be many ROS nodes distributed across multiple networked computers, there can be only one instance of roscore running, and the machine on which roscore runs establishes the master computer of the system.
A publisher node initiates a topic by informing roscore of the topic (and the corresponding message type). This is called advertising the topic. To accomplish this, the publisher instantiates an object of the class ros::Publisher. This class definition is part of the ROS distribution, and using publisher objects allows the designer to avoid having to write communications code. After instantiating a publisher object, the user code invokes the member function advertise and specifies the message type and declares the desired topic name. At this point, the user code can start sending messages to the named topic using the publisher member function publish, which takes as an argument the message to be published.
Since a publisher node communicates with roscore, roscore must be running before any ROS node is launched. To run roscore, open a terminal in Linux and enter roscore. The response to this command will be a confirmation “started core services.” It will also print the ROS_MASTER_URI, which is useful for informing nodes running on non-master computers how to reach roscore. The terminal running roscore will be dedicated to roscore, and it will be unavailable for other tasks. The roscore node should continue running as long as the robot is actively controlled (or as long as desired to access the robot’s sensors).
After roscore has been launched, a publisher node may be launched. The publisher node will advertise its topic and may start sending messages (at any rate convenient to the node, though at a frequency limited by system capacity). Publishing messages at 1 kHz rate is normal for low-level controls and sensor data.
Introducing a sensor to a ROS system requires specialized code (and possibly specialized hardware) that can communicate with the sensor. For example, a LIDAR sensor may require RS488 communications, accept commands in a specific format, and start streaming data in a predefined format. A dedicated microcontroller (or a node within the main computer) must communicate with the LIDAR, receive the data, then publish the data with a ROS message type on a ROS topic. Such specialized nodes convert the specifics of individual sensors into the generic communications format of ROS.
When a publisher begins publishing, it is not necessary that any nodes are listening to the messages. Alternatively, there may be many subscribers to the same topic. The publisher does not need to be aware of whether it has any subscribers nor how many subscribers there may be. This is handled by the ROS middleware. A subscriber may be receiving messages from a publisher, and the publisher node may be halted and possibly replaced with an alternative publisher of the same topic, and the subscriber will resume receiving messages with no need to restart the subscriber.
A ROS subscriber also communicates with roscore. To do so, it uses an object of class ros::Subscriber. This class has a member function called subscribe that requires an argument of the named topic. The programmer must be aware that a topic of interest exists and know the name of the topic. Additionally, the subscriber function requires the name of a callback function. This provides the necessary hook to the ROS middleware, such that the callback function will start receiving messages. The callback function suspends until a new message has been published, and the designer may include code to operate on the newly received message.
Subscriber functions can be launched before the corresponding publisher functions. ROS will allow the subscriber to register its desire to receive messages from a named topic, even though that topic does not exist. At some point, if or when a publisher informs roscore that it will publish to that named topic, the subscriber’s request will be honored, and the subscriber will start receiving the published messages.
A node can be both a subscriber and a publisher. For example, a control node would need to receive sensor signals as a subscriber and send out control commands as a publisher. This only requires instantiating both a subscriber object and a publisher object within the node. It is also useful to pipeline messages for sequential processing. For example, a low-level image processing routine (e.g. for edge finding) could subscribe to raw camera data and publish low-level processed images. A higher-level node might subscribe to the edge-processed images, look for specific shapes within those images, and publish its results (e.g. identified shapes) for further use by still higher-level processes. A sequence of nodes performing successive levels of processing can be modified incrementally by replacing one node at a time. To replace one such link in a chain, the new node needs only to continue to use the same input and output topic names and message types. Although the implementation of algorithms within the modified node may be dramatically different, the other nodes within the chain will be unaffected.
The flexibility to launch publisher and subscriber nodes in any order eases system design. Additionally, individual nodes may be halted at any time and additional nodes may be hot-swapped into the running system. This can be exploited, for example, to launch some specialized code when it is needed and then halt the (potentially expensive) computations when no longer needed. Additionally, diagnostic nodes (e.g. interpreting and reporting on published messages) may be run and terminated ad hoc. This can be useful to examine the output of selected sensors to confirm proper functioning.
It should be appreciated that the flexibility of launching and halting publishers and subscribers at any time within a running system can also be a liability. For time-critical code—particularly control code that depends on sensor values to generate commands to actuators—an interruption of the control code or of the critical sensor publishers could result in physical damage to the robot or its surroundings. It is up to the programmer to make sure that time-critical nodes remain viable. Disruptions of critical nodes should be tested and responded to appropriately (e.g. with halting all actuators).
From the system architecture point of view, ROS helps implement a desired software architecture and supports teamwork in building large systems. Starting from a predetermined software architecture, one can construct a skeleton of a large system constructed as a collection of nodes. Initially, each of the nodes might be dummy nodes, capable of sending and receiving messages via predefined topics (the software interfaces). Each module in the architecture could then be upgraded incrementally by swapping out an older (or dummy) node for a newer replacement and no changes would be required elsewhere throughout the system. This supports distributed software development and incremental testing, which are essential for building large, complex systems.
1.2 Writing ROS nodes
In this section, design of a minimal publisher node and a minimal subscriber node will be detailed.
The concept of a ROS package is introduced, along with instructions on how to compile and link the code via the associated files package.xml and CMakeLists.
Several ROS tools and commands are introduced, including rosrun, rostopic, rosnode, and rqt_graph|. Specific C++ code examples for a publisher and a subscriber are detailed, and results of running the compiled nodes are shown.
The code examples used in this section are contained in the accompanying code repository, within the directory package minimalnodes under learning_ros/Part_1/minimal_nodes. This introduction begins with instructions on how the example code was created. In following these instructions it is important to avoid ambiguity from naming conflicts. In this section, the names used will be altered (as necessary) from the provided code examples for the purpose of illustrating to how the example code was created. In subsequent sections, the example code may be used verbatim.
Before creating new ROS code, one must establish a directory (a ROS workspace)
where ROS code will reside. One creates this directory somewhere convenient in the system (for example, directly under home). A subdirectory called src must exist, and this is where source code (packages) will reside. The operating system must be informed of the location of your ROS workspace (typically done automatically through edits to the start-up script .bashrc). Setting up a ROS workspace (and automating defining ROS paths) needs to be done only once. The process is described at: http://www.w3.org/1999/xlink.
It is important that the necessary environment variables be set in Linux, or the OS will not know where to find your code for compilation and execution. Formerly (ROS Fuerte and older), ROS used its own build system called rosbuild that was replaced by the catkin build system, which is faster, but can be more complex. A useful simplification is catkin_simple, which reduces the detail required of the programmer to specify how to build a project.
For the following, it is assumed that you already have ROS Indigo installed, that you have a ROS workspace defined (called ros_ws in the examples to follow), that it has a src subdirectory, and that the OS has been informed of the path to this workspace (via environment variables). These requirements will satisfied if your setup uses the learningrossetupscripts recommended in the preface. We proceed with creating new code within this workspace.
1.2.1 Creating ROS packages
The first thing to do when starting to design new ROS code is to create a package.
A package is a ROS concept of bundling multiple, necessary components together to ease building ROS code and coupling it with other ROS code. Packages should be logical groups of code, e.g. separate packages for low-level joint control, for high-level planning, for navigation, for mapping, for vision, etc. Although these packages normally would be developed separately, nodes from separate packages would ultimately be run together simultaneously on a robot (or on a network of computers collectively controlling the robot).
One creates a new package using the catkin_create_pkg command (or the alternative cs_create_pkg, which will be the preferred approach in this presentation).
The catkincreatepkg command is part of the ROS installation. For a given package, package-creation needs to be done only once. One can go back to this package and add more code incrementally (without needing to create the package again). However, the code added to a package should logically belong to that package (e.g. avoid putting low-level joint-control code in the same package as mapping code).
New packages should reside under the src directory of your catkin workspace (e.g. ros_ws/src). As a specific example, consider creation of a new package called my_minimal_nodes, which will contain source code in C++ and depend on the basic, pre-defined message types contained in std_msgs. To do so, open a terminal and navigate (cd) to the ros_ws directory. A shortcut for this is roscd, which will bring you to /ros_ws. From here, move to the subdirectory /src and enter the following command:

The effect of this command is to create and populate a new directory: /ros_ws/src/my_minimal_nodes.
Every package name in ROS must be unique. By convention, package names should follow common C variable naming conventions: lower case, start with a letter, use underscore separators, e.g. grasp_planner. (See http://www.w3.org/1999/xlink.) Every package used within your system must be uniquely named. As noted at http://www.w3.org/1999/xlink, you can check whether a name is already taken via http://www.w3.org/1999/xlink. For the present illustration, the name myminimalnodes was chosen so as not to conflict with the package minimalnodes, which resides in the example code repository (under /ros_ws/src/learning_ros/Part_1/minimal_nodes).
Moving to the newly created package directory, /ros_ws/src/my_minimal_nodes, we see that it is already populated with package.xml, CMakeLists and the subdirectories src and include. The catkincreatepkg command just created a new package by the name of my_minimal_nodes, which will reside in a directory of this name.
As we create new code, we will depend on some ROS tools and definitions. Two dependencies were listed during the catkin_create_pkg command: roscpp and stdmsgs. The roscpp dependency establishes that we will be using a C++ compiler to create our ROS code, and we will need C++ compatible interfaces (such as the classes ros::Publisher and ros::Subscriber, referred to earlier). The stdmsgs dependency says that we will need to rely on some datatype definitions (standard messages) that have been predefined in ROS. (an example is stdmsgs::Float64).
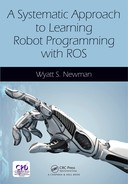
The package.xml file: A ROS package is recognized by the build system by virtue of the fact that it has a package.xml file. A compatible package.xml file has a specific structure that names the package and lists its dependencies. For the new package myminimalnodes, a package.xml file was auto-generated, and its contents are shown in Listing 1.1.
Listing 1.1 Contents of package.xml for minimal nodes package
The package.xml file is merely ASCII text using XML formatting, and thus you can open it with any editor (gedit will do). In Listing 1.1, most of the lines are merely comments, such as , where each comment is delimited by an opening of and closing of . The comments instruct you how to edit this file appropriately. It is recommended that you edit the values to enter your name and e-mail address as author of the code, particularly if you intend to share your contribution publicly.
The line corresponds to the name of the new package. It is important that this name correspond to the name of your package. You cannot merely create a new directory (with a new name) and copy over the contents of another package. Because of the mismatch between your directory name and the package name in the package.xml file, ROS will be confused.
Within the package.xml file, the lines:

explicitly declare dependency on the package roscpp and on the package std_msgs, both of which were explicitly listed as dependencies upon creation of this package. Eventually, we will want to bring in large bodies of third-party code (other packages). In order to integrate with these packages (e.g. utilize objects and datatypes defined in these packages), we will want to add them to the package.xml file. This can be done by editing our package’s package.xml file and adding builddepend and rundepend lines naming the new packages to be utilized, emulating the existing lines that declare dependence on roscpp and std_msgs.
The src directory is where we will put our user-written C++ code. We will write illustrative nodes minimal_publisher.cpp and minimal_subscriber.cpp as examples. It will be necessary to edit the CMakeLists.txt file to inform the compiler that we have new nodes to be compiled, which will be described further later.
1.2.2 Writing a minimal ROS publisher
In a terminal window, move to the src directory within the
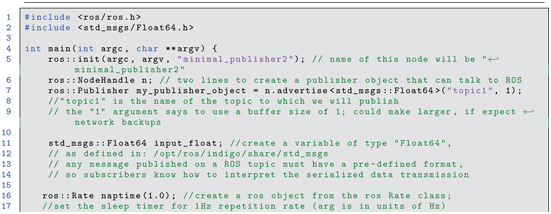
my_minimal_nodes package that has been created. Open an editor, create a file called minimal_publisher.cpp and enter the following code. (Note: if you attempt to copy/paste from an electronic version of this text, you likely will get copying errors, including undesired newline symbols, which will confuse the C++ compiler. Rather, refer to the corresponding example code on the associated github repository at http://www.w3.org/1999/xlink, under package /ros_ws/src/learning_ros/Part_1/minimal_nodes.)


Listing 1.2 Minimal Publisher

The above code is dissected here. On line 1,
is needed to bring in the header files for the core ROS libraries. This should be the first line of any ROS source code written in C++.
Line 2,

brings in a header file that describes objects of type: stdmsgs::Float64, which is a message type we will use in this example code.
As you incorporate use of more ROS message types or ROS libraries, you will need to include their associated header files in your code, just as we have done with std_msgs.
Line 4,

declares a main function. For all ROS nodes in C++, there must be one and only one main() function per node. Our minimalpublisher.cpp file has main() declared in the standard “C” fashion with generic argc, argv arguments. This gives the node the opportunity to use command-line options, which are used by ROS functions (and thus these arguments should always be included in main()).
The code lines 5 through 7 all refer to functions or objects defined in the core ROS library.
Line 5:

is needed in every ROS node. The argument minimalpublisher will be the name that the new node will use to register itself with the ROS system upon start-up. (This name can be overridden, or remapped, upon launch, but this detail is deferred for now.) The node name is required, and every node in the system must have a unique name. ROS tools take advantage of the node names, e.g. to monitor which nodes are active and which nodes are publishing or subscribing to which topics.
Line 6 instantiates a ROS NodeHandle object with the declaration:

A NodeHandle is required for establishing network communications among nodes. The NodeHandle name n is arbitrary. It will be used infrequently (typically, for initializing communications objects). This line can simply be included in every node’s source code (and no harm is done in the rare instances in which it is not needed).
Line 7:

instantiates an object to be called my_publisher_object (the name is the programmer’s choice). In instantiating this object, the ROS system is informed that the current node (here called minimal_publisher) intends to publish messages of type std_msgs::Float64 on a topic named topic1. In practice, one should choose topic names that are helpful and descriptive of the type of information carried via that topic.
On line 11:

the program creates an object of type std_msgs:Float64 and calls it input_float. One must consult the message definition in std_msgs to understand how to use this object. The object is defined as having a member called data. Details of this message type can be found by looking in the corresponding directory with: roscd std_msgs. The subdirectory msg contains various files defining the structures of numerous standard messages, including Float64.msg. Alternatively, one can examine the details of any message type with the command rosmsg show ..., e.g. from a terminal, entering the command:

will display the fields of this message, which results in the response:

In this case, there is only a single field, named data, which holds a value of type float64 (a ROS primitive).
On line 16,

the program initializes the data member of input_float to the value 0.0. An infinite loop is then entered, that will self terminate upon detecting that the ROS system has terminated, which is accomplished using the function ros::ok() in line 19:

This approach can be convenient for shutting down a collection of nodes by merely halting the ROS system (i.e., by killing roscore).
Inside the while loop, the value of input_float.data is incremented by 0.001 per iteration. This value is then published (line 24) using:

It was previously established (upon instantiation of the object my_publisher_object from the class ros::Publisher) that the object my_publisher_object would publish messages of type std_msg::Float64 to the topic called topic1. The publisher object, my_publisher_object has a member function publish to invoke publications. The publisher expects an argument of compatible type. Since the object inputfloat is of type stdmsgs::Float64, and since the publisher object was instantiated to expect arguments of this type, the publish call is consistent.
The example ROS node has only 14 active lines of code. Much of this code is ROS-specific and may seem cryptic. However, most of the lines are common boilerplate, and becoming familiar with these common lines will make other ROS code easier to read.
1.2.3 Compiling ROS nodes
ROS nodes are compiled by running catkinmake.
This command must be executed from a specific directory. In a terminal, navigate to your ROS workspace ( /ros_ws). Then enter catkinmake.
This will compile all packages in your workspace. Compiling large collections of code can be time consuming, but compilation will be faster on subsequent edit, compile and test iterations. Although compilation is sometimes slow, the compiled code can be very efficient. Particularly for CPU-intensive operations (e.g. for point-cloud processing, image processing or intensive planning computations), compiled C++ code typically runs faster than Python code.
After building a catkin package, the executables will reside in a folder in ros_ws/devel/lib named according to the source package.
Before we can compile, however, we have to inform catkinmake of the existence of our new source code, minimal_publisher.cpp. To do so, edit the file CMakeLists.txt, which was created for us in the package my_minimal_nodes when we ran catkin_create_pkg. This file is quite long (187 lines for our example), but it consists almost entirely of comments.
The comments describe how to modify CmakeLists.txt for numerous variations. For the present, we only need to make sure we have our package dependencies declared, inform the compiler to compile our new source code, and link our compiled code with any necessary libraries.
catkinpackagecreate already fills in the fields:

Listing 1.3 Snippet from CMakeLists.txt
However, we need to make two modifications, as follows:

Listing 1.4 Adding the new node and linking it with libraries
These modifications inform the compiler of our new source code, as well as which libraries with which to link.
In the above, the first argument to addexecutable is a chosen name for the executable to be created, here chosen to be myminimalpublisher, which happens to be the same root name as the source code.
The second argument is where to find the source code relative to the package directory. The source code is in the src subdirectory and it is called minimalpublisher.cpp. (It is typical for the source code to reside in the src sub-directory of a package.)
There are a few idiosyncrasies regarding the node name.
In general, one cannot run two nodes with the same name. The ROS system will complain, kill the currently running node, and start the new (identically named) node. ROS does allow for different packages to re-use node names, although only one of these at a time may be run. Although (executable) node names are allowed to be duplicated across packages, the catkinmake build system gets confused by such duplication (though the build can be forced by compiling packages one at a time). For simplicity, it is best to avoid replicating node names.
Having edited the CMakeLists file, we can compile our new code. To do so, from a terminal, navigate to the ros_ws directory and enter:

This will invoke the C++ compiler to build all packages, including our new myminimalnodes package. If the compiler output complains, find and fix your bugs.
Assuming compilation success, if you look in the directory ros_ws/devel/lib/my_minimal_nodes, you will see a new, executable file there named myminimalpublisher. This is the name that was chosen for the output file (executable node) with the addition of addexecutable(myminimalpublisher src/minimalpublisher.cpp) in CMakeLists.
1.2.4 Running ROS nodes
As noted in Section 1.1, there must be one and only one instance of roscore running before any nodes can be started. In a terminal, enter:

This should respond with a page of text concluding with “started core services.” You can then shrink this window and leave it alone. ROS nodes can be started and stopped at random without needing to start a new roscore. (If you kill roscore or the window running roscore, however, all nodes will stop running.)
Next, start the new publisher node by entering (from a new terminal):

The arguments to the command rosrun are the package name (myminimalnodes) and the executable name (myminimalpublisher).
The rosrun command can seem confusing at times due to re-use of names. For example, if we wanted to make a LIDAR publisher node, we might have a package called lidarpublisher, a source file called lidarpublisher.cpp, an executable called lidarpublisher, and a node name (declared within the source code) of lidarpublisher. To run this node, we would type:

This may seem redundant, but it still follows the format:

Once the command has been entered, the ROS system will recognize a new node by the name of lidarpublisher. This name re-use may seem to lead to confusion, but in many instances, there is no need to invent new names for the package, the source code, the executable name and the node name. In fact, this can help simplify recognizing named entities–as long as the context is clear (package, source code, executable, node name).
1.2.5 Examining running minimal publisher node
After entering: rosrun myminimalnodes myminimalpublisher, the result may seem disappointing. The window that launched this node seems to hang and provides no feedback to the user. Still, minimalpublisher is running. To see this, we can invoke some ROS tools.
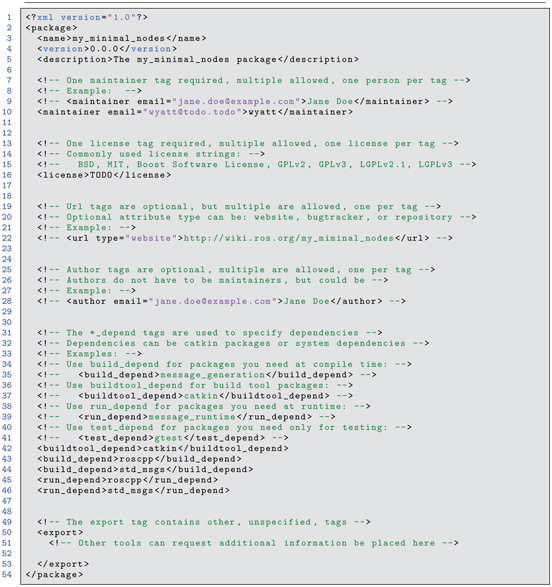
Open a new terminal and enter: rostopic. You will get the following response:
This shows that the command rostopic has eight options. If we type:

the result is:

We see that there are three active topics—two that ROS created on its own and the topic created by our publisher, topics.
Entering:

results in the following output:

This output shows that our minimal publisher (on this particular computer) is publishing its data at roughly 38 kHz (with some jitter). Viewing the system monitor would show that one CPU core is fully saturated just running the minimal publisher. This is because the while loop within our ROS node has no pauses. It is publishing as fast as it can.
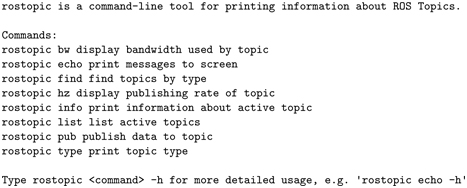
Entering:

yields the following output:
This display shows how much of our available communications bandwidth is consumed by our minimal publisher (nominally 1 MB/s). This rostopic option can be useful for identifying nodes that are over-consuming communications resources.
Entering:

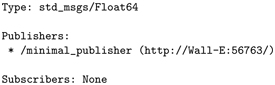
yields:
This tells us that topic1 involves messages of type std_msgs/Float64. At present, there is a single publisher to this topic (which is the norm), and that publisher has a node name of minimalpublisher. As noted above, this is the name we assigned to the node within the source code on line 5:


causes rostopic to try to print out everything published on topic1. A sample of the output is:

In this case, the display has no hope of keeping up with the publishing rate, and most of the messages are dropped between lines of display. If the echo could keep up, we would expect to see values that increase by increments of 0.001, which is the increment used in the while loop of our source code.
The rostopic command tells us much about the status of our running system, even though there are no nodes receiving the messages sent by our minimal publisher. Additional handy ROS commands are summarized in the “ROS cheat sheet” (see http://www.ros.org/news/2015/05/ros-cheatsheet-updated-for-indigo-igloo.html).
For example, entering:

results in the following output:

We see that there are two nodes running: rosout (a generic process used for nodes to display text to a terminal, launched by default by roscore) and minimalpublisher (our node).
Although minimalpublisher does not take advantage of the capability of displaying output to its terminal, the link is nonetheless available through the topic rosout,
which would get processed by the display node rosout. Using rosout can be helpful, since one’s code does not get slowed down by output (e.g. cout) operations. Rather, messages get sent rapidly by publishing the output to the rosout topic, and a separate node (rosout) is responsible for user display. This can be important, e.g. in time-critical code where some monitoring is desired, but not at the expense of slowing the time-critical node.
1.2.6 Scheduling node timing
We have seen that our example publisher is abusive of both CPU capacity and communications bandwidth. In fact, it would be unusual for a node within a robotic system to require updates at 30 kHz. A more reasonable update rate for even time-critical, low-level nodes is 1 kHz. In the present example, we will slow our publisher to 1 Hz using a ROS timer.
A modified version of source code for minimalpublisher.cpp, called sleepy_minimal_publisher.cpp, is shown below:
Listing 1.5 Minimal Publisher with Timing: sleepy_minimal_publisher.cpp
There are only two new lines in the above program: line 16

and line 31:

The ROS class Rate is invoked to create a Rate object that was named “naptime”. In doing so, naptime is initialized with the value “1”, which is a specification of the desired frequency (1 Hz). After creating this object, it is used within the while loop, invoking the member function sleep(). This causes the node to suspend (thus ceasing to consume CPU time) until the balance of the desired period (1 second) has expired.
After re-compiling the modified code (with catkinmake), we can run it (with rosrun) and examine its behavior by entering (from a new terminal):

which produces the display below:

This output indicates that topic1 is being updated at 1 Hz with excellent precision and very low jitter. Further, an inspection of the system monitor shows negligible CPU time consumed by our modified publisher node.
If we enter

from a terminal, example output looks like the following:


Each message sent by the publisher is displayed by rostopic echo, as evidenced by the increments of 0.001 between messages. This display is updated once per second, since that is the rate at which new data is now published.
1.2.7 Writing a minimal ROS subscriber
The complement to the publisher is a subscriber (a listener node). We will create this node in the same package, myminimalnodes. The source code will go in the subdirectory src.
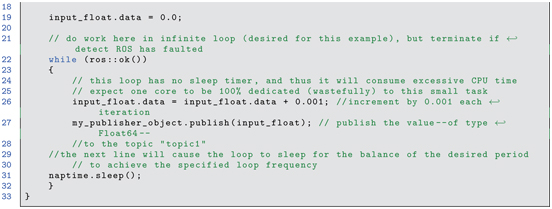
Open an editor and create the file minimalsubscriber.cpp in the directory /ros_ws/src/my_minimal_nodes/src. Enter the following code (which may be found in /ros_ws/src/learning_ros/Part_1/minimal_nodes/src/minimal_subscriber.cpp):
Listing 1.6 Minimal Subscriber
Most of the code within the minimal subscriber is identical to that of the minimal publisher (though the node name in line 19 has been changed to “minimalsubscriber”). There are four important new lines to examine.
Most notably, the subscriber is more complex than the publisher, since it requires a callback, which is declared in line 3,

This function has an argument of a reference pointer (indicated by the & sign) to an object of type stdmsgs::Float64. This is the message type associated with topic1, as published by our minimal publisher.
The importance of the callback function is that it is awakened when new data is available on its associated topic (which is set to topic1 in this example). When new data is published to the associated topic, the callback function runs, and the published data appears in the argument messageholder. (This message holder must be of a type compatible with the message type published on the topic of interest, in this case stdmsgs::Float64).
Within the callback function, the only action taken is to display the received data, implemented on line 13.

Display is performed using ROSINFO() instead of cout or printf. ROSINFO()
uses message publishing, which avoids slowing time-critical code for display driving. Also, using ROSINFO() makes the data available for logging or monitoring. However, as viewed from the terminal from which this node is run, the output is displayed equivalently to using cout or printf. The argument to ROSINFO() is the same as printf in C.
An alternative to using ROSINFO() is ROSINFOSTREAM(). Line 13 could be replaced with:

which produces the same output, but uses syntax of cout.
Once the callback function executes, it goes back to sleep, ready to be re-awakened by arrival of a new message on topic1.
In the main program, a key new concept is on line 26:

The use of ros::Subscriber is similar to the use of ros::Publisher earlier. An object of type Subscriber is substantiated; Subscriber is a class that exists within the ROS distribution. There are three arguments used in instantiating the subscriber object. The first argument is the topic name; topic1 is chosen as the topic to which our minimal publisher publishes.
(For this example, we want our subscriber node to listen to the output of our example publisher node.)
The second argument is the queue size. If the callback function has trouble keeping up with published data, the data may be queued. In the present case, the queue size is set to one. If the callback function cannot keep up with publications, messages will be lost by being overwritten by newer messages. (Recall that in the first example, rostopic echo topic1 could not keep up with the 30 kHz rate of the original minimal publisher. Values displayed skipped many intermediate messages.) For control purposes, typically only the most recent sensor value published is of interest. If a sensor publishes faster than the callback function can respond, there is no harm done in dropping messages, as only the most recent message would be needed. In this (and many cases) a queue size of one message is all that is needed.
The third argument for instantiating the Subscriber object is the name of the callback function that is to receive data from topic1. This argument has been set to myCallback, which is the name of our callback function, described earlier. Through this line of code, we associate our callback function with messages published on topic1.
Finally, line 28:

introduces a key ROS concept that is non-obvious but essential. The callback function should awaken whenever a new message appears on topic1. However, the main program must yield some time for the callback function to respond. This is accomplished with a spin() command.
In the present case, a spin causes the main program to suspend, but keeps the callback function alive. If the main program were to run to conclusion, the callback function would no longer be poised to react to new messages. The spin() command keeps main() alive without consuming significant CPU time. As a result, the minimal subscriber is quite efficient.
1.2.8 Compiling and running minimal subscriber
For our new node to get compiled, we must include reference to it in CMakeLists. This requires adding two lines, very similar to what we did to enable compiling the minimal publisher. The first new line is simply:

The arguments are the desired executable name (chosen to be myminimalsubscriber), and the relative path to the source code (src/minimal_subscriber.cpp).
The second line added is:

which informs the compiler to link our new executable with the declared libraries.
After updating CMakeLists, the code is newly compiled with the command catkinmake (which must be run from the rosws directory).
The code example should compile without error, after which a new executable, myminimalsubscriber, will appear in the directory: /ros_ws/devel/lib/my_minimal_nodes. Note: it is not necessary to recall this lengthy path to the executable file. The executable will be found when running rosrun with the package name and node name as arguments.
After recompiling, we now have two nodes to run. In one terminal, enter:

and in a second terminal enter:

It does not matter which is run first. An example of the display in the terminal of the myminimalsubscriber node is shown below:

This display was updated once per second, since the publisher published to topic1 at 1 Hz. The messages received differ by increments of 0.001, as programmed in the publisher code.
In another terminal, entering:

results in the output below.
This shows that we now have three nodes running: the default rosout, our minimal publisher (which we named node minimalpublisher2 for the timed version) and our minimal subscriber, minimalsubscriber.
In an available terminal, entering:
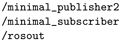
produces a graphical display of the running system, which is shown in Fig 1.1.

Figure 1.1 Node topology as illustrated by rqt_graph
The graphical display shows our two nodes. Our minimal publisher node is shown publishing to topic1 and our minimal subscriber is shown subscribing to this topic.
1.2.9 Minimal subscriber and publisher node summary
We have seen the basics for how to create our own publisher and subscriber nodes. A single node can subscribe to multiple topics by replicating the corresponding lines of code to create additional subscriber objects and callback functions. Similarly, a node can publish to multiple topics by instantiating multiple publisher objects. A node can also be both a subscriber and a publisher.
In a ROS-controlled robot system, custom device-driver nodes must be designed that can read and publish sensor information and one or more nodes that subscribe to actuator (or controller setpoint) commands and impose these on actuators. Fortunately, there is already a large body of existing ROS drivers for common sensors, including LIDARs, cameras, the Kinect sensor, inertial measurement units, encoders, etc. These may be imported as packages and used as-is in your system (though perhaps requiring some tweaking to reference specifics of your system). There are also packages for driving some servos (e.g. hobby-servo style RCs and Dynamixel motors). There are also some ROS-Industrial interfaces to industrial robots, which only require publishing and subscribing to and from robot topics. In some cases, the user may need to design device driver nodes to interface to custom actuators. Further, hard real-time, high-speed servo loops may require a non-ROS dedicated controller (although this might be as simple as an Arduino microcontroller). The user then assumes the responsibility for designing the hard-real-time controller and writing a ROS-compatible subscriber interface to run on the control computer.
1.3 More ROS tools: catkin_simple, roslaunch, rqt_console, and rosbag
Having introduced minimal ROS talkers (publishers) and listeners (subscribers), one can already begin to appreciate the value of some additional ROS tools. The tools and facilities introduced here are catkinsimple, roslaunch, rqtconsole and rosbag.
1.3.1 Simplifying CMakeLists.txt with catkin_simple
As seen in Section 1.2.3, the CMakeLists.txt file generated with a new package creation is quite long. While the required edits to this file were relatively simple, introducing additional features can require tedious, non-obvious changes. A package called catkinsimple helps to simplify the CMakeLists.txt file. This package can be found at http://www.w3.org/1999/xlink. A copy has been cloned into our external-packages repository at http://www.w3.org/1999/xlink, which should already be cloned into your /ros_ws/src directory.
Additionally, the external-packages repository has a Python script that assists with creating new packages that use catkinsimple. To run this script, it is convenient to define an alias to point to this script as a command. Within a terminal, enter:

Subsequently, from this same terminal, you can create a package that uses catkinsimple with the command cscreatepkg. For example, navigate to /ros_ws/src and create a new package called myminimalnodes2 by entering:

Note that this command will be recognized only in the terminal from which the alias cscreatepkg was defined. More conveniently, the alias definition should be including in your .bashrc file. To do so, navigate to your home directory and edit the (hidden) file .bashrc. Append the line

to this file and save it. Subsequently, this alias will be recognized by all new terminals that are opened. If you have used the recommended setup scripts, this .bashrc file edit will already be performed for you.
After having invoked our cscreatepkg command, the new package myminimalnodes2 contains the expected structure, including subdirectories src and include, the package.xml file, a CMakeLists.txt file and a new file, README.md. The README file should be edited to describe the purpose of the new package and how to run examples within the package. The README file uses markdown formatting (see http://www.w3.org/1999/xlink for a description of markdown). Such formatting allows your README file to be displayed with attractive formatting when viewed from your repository via a browser.
The package.xml file is similar to that created by catkincreatepkg, except it includes the additional dependency:

The CMakeLists.txt file is considerably simplified. A copy of the default generated file is:

Listing 1.7 CMakeLists.txt with catkin simple
The line catkinsimple() invokes actions to automatically perform much of the tedious editing of CMakeLists.txt. The commented lines are reminders of how to exploit CMake variations, including linking with popular libraries, such as Eigen, PCL and OpenCV. To modify CMakeLists.txt to compile our desired code, uncomment and edit the line:

By copying minimalpublisher.cpp to the new package, myminimalnodes2, we can specify that this node should be compiled by modifying the above line in CMakeLists.txt to:

This indicates that we wish to compile minimalpublisher.cpp and call the executable minimalpublisher3 (a name that will not conflict with other instances of minimal publisher nodes). We can add commands to compile additional nodes by inserting more csaddexecutable lines of the same form. It is not necessary to specify linking with libraries. This may not seem to be much of a simplification at this point, but catkinsimple will become much more valuable when we start to link with more libraries, create libraries, and create custom messages.
1.3.2 Automating starting multiple nodes
In our minimal example, we ran two nodes: one publisher and one subscriber. To do so, we opened two separate terminals and typed in two rosrun commands. Since a complex system may have hundreds of nodes running, we need a more convenient way to bring up a system. This can be done using launch files and the command roslaunch.
(See http://www.w3.org/1999/xlink for more details and additional capabilities, such as setting parameters.)
A launch file has the suffix .launch. It is conventionally named the same as the package name (though this is not required). It is also conventionally located in a subdirectory of the package by the name of launch (also not required). A launch file can also invoke other launch files to bring up multiple nodes from multiple packages. However, we will start with a minimal launch file. In our package my_minimal_nodes, we may create a subdirectory launch and within this directory create a my_minimal_nodes.launch file containing the following lines:

In the above, using XML syntax, we use the keyword “node” to tell ROS that we want to launch a ROS node (an executable program compiled by catkinmake). We must specify three key/value pairs to launch a node: the package name of the node (value of “pkg”), the binary executable name of the node (value of “type”), and the name by which the node will be recognized by ROS when launched (value of “name”). In fact, we already specified node names within the source code (e.g. ros::init(argc,argv, "minimalpublisher2") within sleepy_minimal_publisher.cpp). The launch file gives you the opportunity to rename the node when it is launched. For example, by setting: name="publisher" in the launch file, we would still start running an instance of the executable called sleepy_minimal_publisher within the package myminimalnodes, but it will be known to roscore by the name publisher. Similarly, by assigning name="subscriber" to the executable myminimalsubscriber, this node will be known to roscore as subscriber.
We can execute the launch file by typing:

Recall that for using rosrun to start nodes, it was necessary that roscore be running first. When using roslaunch, it is not necessary to start roscore running. If roscore is already running, the roslaunch will launch the specified nodes. If roscore is not already running, roslaunch will detect this and will start roscore before launching the specified nodes.
The terminal in which we executed roslaunch displays the following:

From another terminal, entering:

produces the output:

which shows that nodes known as “publisher” and “subscriber” are running (using the new names assigned to these nodes by the launch file).
Most often, we will not want to change the name of the node from its original specification, but ROS launch files nonetheless require that this option be used. To decline changing the node name, the default name (embedded in the source code) may be used as the desired node name.
After launching our nodes, rostopic list shows that topic1 is alive, and the command rostopic info topic1 shows that the node publisher is publishing to this topic and the node subscriber has subscribed to this topic. Clearly, this will be useful when we have many nodes to launch.
One side effect, though, is that we no longer see the output from our subscriber, which formerly appeared in the terminal from which the subscriber was launched. However, since we used ROSINFO() instead of printf or cout, we can still observe this output using the rqtconsole tool.
1.3.3 Viewing output in a ROS console
A convenient tool to monitor ROS messages is rqtconsole, which can be invoked from a terminal by entering: rqtconsole.
With our two nodes running, an example of using this tool is shown in Fig 1.2.

Figure 1.2 Output of rqt_console with minimal nodes launched.
In this instance, rqtconsole shows values output by the minimal subscriber from the time rqtconsole was started and until rqtconsole was paused (using the rqtconsole “pause” button). The lines displayed show that the messages are merely informational and not warnings or errors. The console also shows that the node responsible for posting the information is our minimal subscriber (known by the node name “subscriber”). rqtconsole also notes the time stamp at which the message was sent.
Multiple nodes using ROSINFO() may be run simultaneously, and their messages may be viewed with rqtconsole, which will also note new events, such as starting and stopping new nodes. Another advantage of using ROSINFO() instead of printf() or cout is that the messages can be logged and run in playback. A facility for doing this is rosbag.
1.3.4 Recording and playing back data with rosbag
The rosbag command is extremely useful for debugging complex systems. One can specify a list of topics to record while the system is running, and rosbag will subscribe to these topics and record the messages published, along with time stamps, in a “bag” file. rosbag can also be used to play back bag files, thus recreating the circumstances of the recorded system. (This playback occurs at the same clock rate at which the original data was published, thus emulating the real-time system.)
When running rosbag, the resulting log (bag) files will be saved in the same directory from which rosbag was launched. For our example, move to the my_minimal_nodes directory and create a new subdirectory bagfiles. With our nodes still running (which is optional; nodes can be started later), navigate to the bagfile directory (wherever you chose to store your bags) and enter:

With this command, we have asked to record all messages published on topic1. Running rqtconsole will display data from topic1, as reported by our subscriber node using ROSINFO(). In the screenshot of rqtconsole shown in Fig 1.3, the rosbag recording startup is noted at line number 34; at this instant, the value output from our subscriber node is 0.236 (i.e., 236 seconds after the nodes were launched).
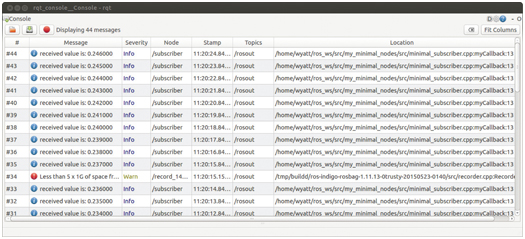
Figure 1.3 Output of rqt_console with minimal nodes running and rosbag running
The rosbag node was subsequently halted with a control-C in the terminal from which it was launched. Looking in the bagfiles directory (from which we launched rosbag), we see there is a new file, named according to the date and time of the recording, and with the suffix .bag.
We can play back the recording using rosbag as well. To do so, first kill the running nodes, then type:

where “fname” is the file name of the recording. The rosbag terminal shows a playback time incrementing, but there is otherwise no noticeable effect. The screen output is:
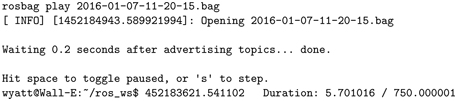
The rqtconsole display indicates that the bagfile has been opened, but no other information is displayed. What is happening at this point is that rosbag is publishing the recorded data (recorded from topic1) to topic1 at the same rate as the data was recorded.
To see that this is taking place, halt all nodes (including rosbag). Run rqtconsole. In a terminal window, start the subscriber, but not the publisher, using:

At this point, this terminal is suspended, because topic1 is not yet active.
From another terminal, navigate to the bagfiles directory and enter:

where “fname” is (again) the name of the recording that was bagged previously. rosbag now assumes the role formerly taken by sleepy_minimal_publisher, recreating the messages that were formerly published. The myminimalsubscriber window reports the recorded data, updating once per second. rqtconsole also shows the data posted by the minimal subscriber. As can be seen from the screenshot in Fig 1.4, the playback corresponds to the original recording, with the first output (console line 2) displaying a value of 0.238 from the subscriber node.

Figure 1.4 Output of rqt_console with minimal_subscriber and rosbag play of recorded (bagged) data
Dynamically, these values are posted at the original 1 Hz rate sleepy_minimal_publisher published them. The rosbag player terminates when it gets to the end of the recorded data.
Note that our subscriber is oblivious to what entity is publishing to topic1. Consequently, playback of previously recorded data is indistinguishable from receiving live data. This is very useful for development. For example, a robot may be teleoperated through an environment of interest while it publishes sensor data from cameras, LIDAR, etc. Using rosbag, this data may be recorded verbatim. Subsequently, sensor processing may be performed on the recorded data to test machine vision algorithms, for example. Once a sensory-interpretation node is shown to be effective on the recorded data, the same node may be tried verbatim on the robot system. Note that no changes to the developed node are needed. In live experiments, this node would merely receive messages published by the real-time system instead of by rosbag playback.
1.4 Minimal simulator and controller example
Concluding this introduction, we consider a pair of nodes that both publish and subscribe. One of these nodes is a minimal simulator, and the other is a minimal controller. The minimal simulator simulates by integrating acceleration to update velocities. The input force is published to the topic forcecmd by some entity (eventually the controller). The resulting system state (velocity) is published to the topic velocity by the minimal simulator.
The simulator code is shown in Listing 1.8, and the source code is in the accompanying repository, in http://www.w3.org/1999/xlink.
The main() function initializes both a publisher and a subscriber. Formerly, we saw nodes as dedicated publishers or dedicated subscribers, but a node can (and often does) perform both actions. Equivalently, the simulator node behaves like a link in a chain, processing incoming data and providing timely output publications.
Another difference from our previous publisher and subscriber nodes is that both the callback function and the main() routine perform useful actions. The minimal simulator has a callback routine that checks for new data on the topic forcecmd. When the callback receives new data, it copies it to a global variable, gforce, so that the main() program has access to it. The main() function iterates at a fixed rate (set to 100 Hz). In order for the callback function to respond to incoming data, the main() function must provide spin opportunities. Formerly, our minimal subscriber used the spin() function, but this resulted in the main() function ceasing to contribute new computations.
An important new feature in the minimal simulator example is the use of the ROS function: ros::spinOnce().
This function, executed within the 100 Hz loop of the simulator, allows the callback function to process incoming data at 10 ms intervals. If a new input (a force stimulus) is received, it is stored in gforce by the callback function. In the complementary minimal controller node, values of force stimulus are published at only 10 Hz. Consequently, 9 out of 10 times there will be no new messages on the forcecommand topic. The callback function will not block, but neither will it update the value of gforce when there is no new transmission available. The main loop will still repeat its iterations at 100 Hz, albeit re-using stale data in gforce. This behavior is realistic, since a simulator should emulate realistic physics. For an actuated joint that is digitally controlled, controller effort (force or torque) commands typically behave with a sample-and-hold output between controller updates (sample periods).
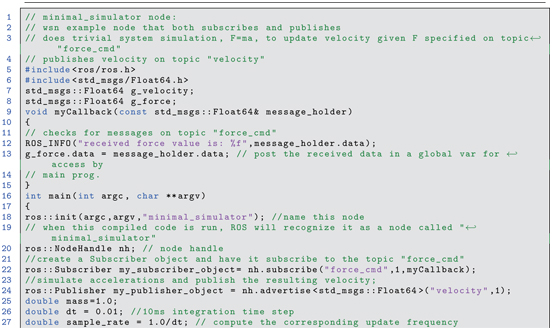

Listing 1.8 Minimal Simulator
The minimal simulator may be compiled and run. Running rqtconsole shows that the velocity has a persistent value of 0.
The result can be visualized graphically with the ROS tool rqtplot. To do so, use command-line arguments for the values to be plotted, e.g.:

will plot the velocity command against time. This output will be boring, at present, since the velocity is always zero.
One can manually publish values to a topic from a command line. For example, enter the following command in a terminal:

This will cause the value 0.1 to be published repeatedly on the topic forcecmd at a rate of 10 Hz using the consistent message type std_msgs/Float64. This can be confirmed (from another terminal) with:

which will show that the forcecmd topic is receiving the prescribed value.
Additionally, invoking:

will show that the velocity is increasing linearly, and rqtconsole will print out the corresponding values (for both force and velocity).
Instead of publishing force-command values manually, these can be computed and published by a controller. Listing 1.9 displays a compatible minimal controller node. (This code is also contained in the accompanying examples repository under http://www.w3.org/1999/xlink.)
The minimal controller subscribes to two topics, (velocity and velcmd), and publishes to the topic forcecmd. At each control cycle (set to 10 Hz), the controller checks for the latest system state (velocity), checks for any updates to the commanded velocity, and computes a proportional error feedback to derive (and publish) a force command. This simple controller attempts to drive the simulated system to the user-commanded velocity setpoint.
Again, the ros::spinOnce() function is used to prevent blocking in the timed main loop. Callback functions put received message data in the global variables gvelocity and gvelcmd.
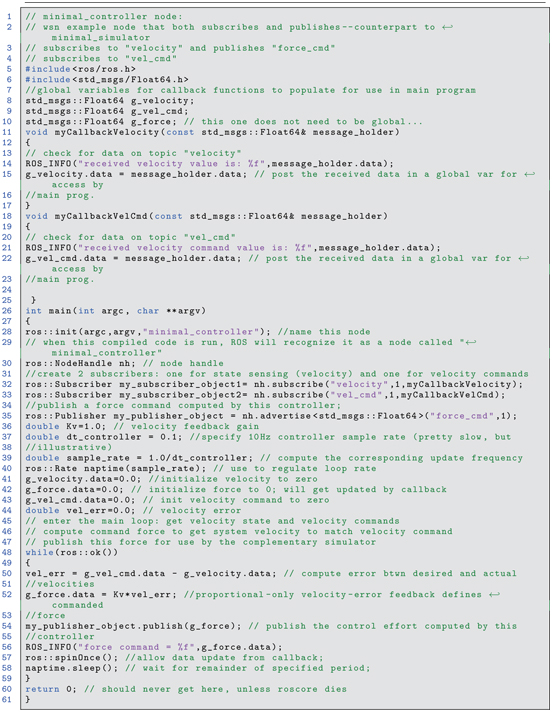
Listing 1.9 Minimal Controller
Once the two nodes are compiled with catkinmake (which requires editing CMakeLists.txt to add these executables to the package), they can be run (with rosrun) from separate terminal windows (assuming roscore is running). Running rqtconsole reveals that the force command is updated once for every 10 updates of velocity (as expected for the simulator at 100 Hz and the controller at 10 Hz).
The velocity command may be input from another terminal using a command line, e.g.:

publishes the value 1.0 to the topic velcmd repeatedly at a rate of 10 Hz. Watching the output on rqtconsole shows the velocity converge exponentially on the desired value of velcmd.
The result can be visualized graphically with the ROS tool rqtplot. To do so, use command line arguments for the values to be plotted, for example:

will plot the velocity command, the actual velocity and the force commands on the same plot versus time. For the minimal simulator and minimal controller, the velocity command was initially set to 0.0 via rostopic pub. Subsequently, the command was set to 2.0. A screenshot of the resulting rqtplot is shown in Fig 1.5. The control effort (in red) reacts to accelerate the velocity closer to the goal of 2.0, then the control effort decreases. Ultimately, the system velocity converges on the goal value and the required control effort decreases to zero.
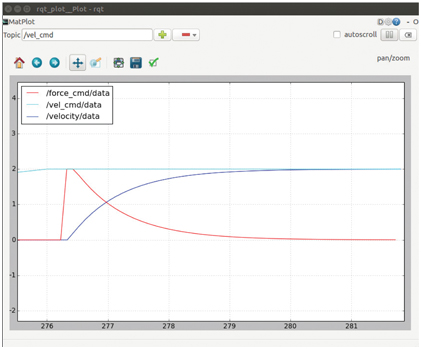
Figure 1.5 Output of rqt_plot with minimal_simulator, minimal_controller and step velocity-command input via console
1.5 Wrap-up
This chapter has introduced the reader to some basics of ROS. It has been shown that multiple asynchronous nodes can communicate with each other through the mechanisms of publish and subscribe of messages on topics, as coordinated by roscore. Some ROS tools were introduced for the purpose of compiling nodes (catkincreatepkg, cscreatepkg and catkinmake), for logging and replaying published information (rosbag) and for visualizing ROS output (rqtconsole and rqtplot).
In the next chapter, additional communications topics are introduced, including defining custom message types, using client–server interactions, the common design paradigm of action servers, and the ROS parameter server.