Understanding fonts
Managing fonts
Creating type outlines and special effects
Understanding how to manage and utilize fonts for CS applications is essential for creating an efficient workflow environment. This can be a daunting task, however, because it typically requires keeping track of hundreds or even thousands of fonts, which come in a variety of formats such as Type 1 or OpenType. In addition, fonts may have varying degrees of functionality depending on the kind of computer and software you use.
Typesetting on desktop computers has been around for more than 25 years. During this evolutionary era of digital page layout and design, there have been phenomenal changes in the tools and methods we use to produce our work. As rapid advances have been made in software development, so also has font technology evolved. And just as software packages are available that aren't suitable for current operating systems and design needs, there are also different font formats that aren't suitable for layout and imaging.
Fonts have been developed over the years using different technologies and categorized as different formats. Some font formats are obsolete today and won't work properly in some of the CS applications and with newer printing devices. Knowing what fonts are acceptable for use with the CS programs will help you prevent problems associated with printing and font embedding.
With literally thousands upon thousands of fonts to choose from, it's important to know the different formats and which ones are best suited for your individual working environment. Ideally, you should have a thorough knowledge of all the fonts currently installed on your system.
The various font types are covered in the following sections.
Type 1: The most popular PostScript font today. These fonts are single-byte fonts handled well by all PostScript printers. Type 1 fonts use a specialized subset of the PostScript language that has been optimized for performance. Type 1 fonts are reliable, and present the fewest problems when embedding and printing to PostScript devices.
Type 1 fonts were designed to be used with the Compact Font Format (CFF). CFF was designed for font embedding and substitution with Acrobat PDFs. As is the case with all PostScript fonts, you must install two files to view and print fonts properly. Screen fonts display a font on your monitor; printer fonts carry the PostScript code necessary to download to your printer. Each font in your layout needs an accompanying printer font. For example, if you use Adobe Garamond Bold, you need an Adobe Garamond Bold printer font. If you attempt to bold a font by using the "B" in a type formatting palette, the font may display properly on the monitor and may even print properly on your laser printer. But if you don't have the matching printer font, it typically does not print properly when printing to commercial devices.
Note
When preparing files for output for commercial printing, Acrobat PDFs offer you an advantage, because the fonts used in a design piece can be embedded in the PDF file. (Be sure the font licensing agreement doesn't prohibit embedding.) This way, the fonts do not need to be supplied separately to your commercial printer.
Type 3: Type 3 fonts are PostScript fonts that have often been used with type design and stylizing applications. These fonts can have special design attributes applied to them such as shading, patterns, exploding 3-D displays, and so on. Type 3 fonts can't be used with Adobe Type Manager (ATM), and they often present problems when printing to PostScript devices.
Type 4: Type 4 was designed to create font characters from printer font cartridges for permanent storage on a printer's hard drive (usually attached by a SCSI port to the printer). PostScript Level 2 provided the same capability for Type 1 fonts and eventually made these font types obsolete.
Type 5: This font type is similar to the Type 4 fonts but used the printer's ROM instead of the hard drive. PostScript Level 2 made this format obsolete.
Type 32: Type 32 fonts are used for downloading bitmap fonts to a PostScript interpreter's font cache. By downloading directly to the printer cache, space is saved in the printer's memory.
Type 42: Type 42 fonts are generated from the printer driver for TrueType fonts. A PostScript wrapper is created for the font, making the rasterization and interpretation more efficient and accurate. Type 42 fonts work well when printing to PostScript printers.
OpenType: OpenType is a new standard for digital type fonts, developed jointly by Adobe and Microsoft. OpenType supersedes Microsoft's TrueType Open extensions to the TrueType format. OpenType fonts can contain either PostScript or TrueType outlines in a common wrapper. An OpenType font is a single file, which can be used on both Mac and Windows platforms without conversion. OpenType fonts have many advantages over previous font formats because they contain more glyphs, support more languages (OpenType uses the Unicode standard for character encoding), and support rich typographic features such as small caps, old style figures, and ligatures—all in a single font.
Beginning with Adobe InDesign and Adobe Photoshop 6.0, applications started supporting OpenType layout features. OpenType layout allows you to access features such as old style figures or true small caps by simply applying formatting to text. In most applications that don't actively support such features, OpenType fonts work just like other fonts, although the OpenType layout features are not accessible.
Compact Font Format: Compact Font Format (CFF) is similar to the Type 1 format but offers much more compact encoding and optimization. It was designed to support Type 2 fonts but can be used with other types. CFF can be embedded in PDFs for all levels of PDF compatibility. Fonts supporting this format are converted by Acrobat Distiller during distillation to CFF/Type 2 fonts and embedded in the PDF. When viewed on-screen or printed, they're converted back to Type 1.
CID-keyed fonts: This format was developed to take advantage of large character sets, particularly the Asian CJK (Chinese, Japanese, and Korean) fonts. The format is an extension of the Type 1 format and supports PostScript printing. Kerning and spacing for these character sets are better handled in the OpenType format.
TrueType: TrueType is a standard for digital type fonts that was developed by Apple Computer and subsequently licensed to Microsoft Corporation. Each company has made independent extensions to TrueType, which is used in both Windows and Mac operating systems. Like Type 1, the TrueType format is available for development of new fonts.
You can copy an OpenType font from Mac to Windows and vice versa. The OpenType format is supported for font embedding in Adobe PDFs. Fonts produced with this technology are as reliable as you find with Type 1 and Type 42 fonts. In addition, OpenType offers a means for flagging the fonts for embedding permissions.
The OpenType format is an extension of the TrueType SFNT format that also can support Adobe PostScript font data and new typographic features. OpenType fonts containing PostScript data, such as those in the Adobe Type Library, have a filename extension of .otf, while TrueType-based OpenType fonts have a .ttf extension.
OpenType fonts can include an expanded character set and layout features, providing broader linguistic support and more precise typographic control. Feature-rich Adobe OpenType fonts can be identified by the word "Pro" in their name. OpenType fonts can be installed and used alongside PostScript Type 1 and TrueType fonts.
Note
See Chapter 17 for more information on working with expanded character sets.
Creative Suite 1 came with 83 OpenType fonts that are installed as part of the Illustrator CS application. If you upgraded the Creative Suite you have these fonts available. In addition, the Creative Suite 2 included more than 180 bundled fonts—most of which are OpenType fonts. The CS3 applications came with more than 30 OpenType fonts. In CS5 the fonts are installed in your application folders. OpenType fonts offer you an extended set of characters where you find more ligatures (character combinations) and special characters and symbols. Whereas PostScript fonts offer you a maximum of 256 glyphs (individual characters), OpenType fonts can contain more than 65,000 glyphs. Look for the OpenType "Pro" fonts and you'll find extended character sets.
As a standard of practice, you would be wise to replace your TrueType and PostScript fonts with OpenType fonts. This is likely to be an expensive proposition, but if you gradually begin to convert your font library and acquire new fonts in OpenType format, you'll benefit by having access to more characters, enhanced typographic features, and increased printing reliability.
Fonts generally carry licensing restrictions, and you need to be sure to honor them. This can be a confusing issue, however, because different font manufacturers impose different restrictions, and many licensing agreements are difficult to interpret. In order to provide font files to your service center or printer, developers often require you to get permission to distribute the font. Many developers prohibit such distribution altogether. In addition, some developers prohibit font embedding as you might do in programs like Acrobat. It's important to be aware of these limitations.
One possible way around font licensing issues is by converting any type not within your service provider's library to outlines in your documents before submitting them. In this way, the type becomes a graphic, and you don't need to copy your font files. This eliminates the transfer of the font's computer code, which is protected by copyright law. As a matter of practice, you should avoid converting large bodies of type to outlines, but in an emergency situation, it may mean the difference between getting the job out on time or not at all.
Font management has become more complicated for Mac OS X users. Prior to OS X, you could manage fonts easily using one of several different utilities, as well as by installing fonts in a single, logical location on your hard drive. With the introduction of Mac OS X, fonts are stored in several areas on your hard drive and, if not installed in the right folders, become inaccessible to your programs. In order to avoid complicated font installation procedures and ensure that fonts are accessible by CS applications, we highly recommend using a professional font-management utility. You'll find that this is a better solution than installing fonts in folders and letting your operating system handle the font management.
Mac OS X allows you to create accounts for multiple users, and you can choose to install fonts at the system level so all users of the computer have access to the same fonts, or you can store the fonts in individual users' Home folders to make them accessible only to a specific user.
Fonts for the Mac are installed in these locations:
Fonts accessible to all users of the computer: Store them on the hard drive in
Library/Fonts. To install fonts in the system Library folder, open your hard drive and open theLibraryfolder at the root level. Inside theLibraryfolder, you'll find aFontsfolder. You can copy TrueType, PostScript, and OpenType fonts to this location.User-specific fonts: Store them in
~/Library/Fonts. (The tilde represents a user'sHomefolder.) Fonts stored here are available only to the owner of the activeHomefolder, which means different users may have access to different fonts. In case of font conflicts, fonts in this location take precedence over those in other folders.System fonts: The Mac OS X System folder also contains a
Libraryfolder. Once again, aFontfolder resides inside theLibraryfolder. As a default, Apple fonts required by the operating system are placed in this location. It's possible to add fonts here, but as a general rule, don't.Mac OS 9: For Classic applications, fonts are installed in the
System Folder/Fontslocation. Notice that the folder is titledSystem Folder, notSystem. Because all the CS applications run in native mode on OS X, you don't need to bother loading fonts here.
By default, system fonts are installed in one of the above four font locations. In addition, some fonts required by applications are also installed in these locations. Many CS applications contain font folders inside the application's folders where fonts are installed. However, for creative professionals who use fonts for design purposes where operating systems do not require the fonts, you should build a separate folder on your hard drive and copy all your fonts to the folder. Use a font management utility such as FontAgent Pro to load and unload fonts as needed for any given project.
For Windows, like the Mac, you're best served by using a font utility.
STEPS: Installing Fonts
Open the Settings menu from the Start menu.
From the Settings menu, select Control Panel and double-click on Fonts in the submenu. The Fonts folder opens.
From the File menu, select Install New Font, as shown in Figure 14.1. A navigation dialog box opens where you can search your hard drive and locate a font to install.

Figure 14.1. Open the Fonts dialog box and choose File
Fonts are also located in the Windows/Fonts folder. On your boot drive (usually drive C:), open the folder and copy PostScript and OpenType fonts to this folder.
Fonts play a crucial role in any designer's work. Thus, it's important to take some time to learn how to best organize your fonts to ensure maximum productivity. The amount of time you invest up front in organizing your fonts will more than pay off down the road, especially if you face an eleventh-hour deadline and can't afford for anything to go wrong at the last minute.
Check your computer's fonts on a regular basis to be sure they are organized properly. Whenever you add, move or delete fonts, there is a chance that something can go awry. Or, if you install a new operating system or font-management utility, you may need to reorganize your fonts, throw out obsolete formats, or replace existing formats to become more compatible with your current operating system and programs. If you continue to use old fonts that aren't optimized for current technology, you'll eventually experience problems.
On the other hand, if you use high-quality fonts designed to work with current software and output devices, you avoid annoying imaging problems. One of the more common font errors is the inability of the printing device to recognize the font information in the file. The printing device then automatically substitutes a default font for the one you specified, with the end result looking nothing like what you intended. Thus, choosing fonts that have a high degree of printing reliability may mean the difference between getting the job out on time and missing a critical deadline.
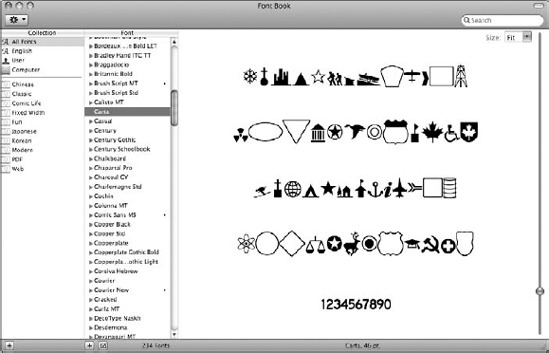
Font-management tools greatly facilitate font accessibility and usage. They also help prevent the installation of duplicate fonts, especially on the Mac. Mac OS X users have a utility that ships with the operating system called Font Book. Font Book 2.2.1 is installed with OS X Snow Leopard. This is a good, basic utility that allows you to enable and disable fonts. It doesn't offer the convenience of auto-activation, however. You can also use third-party tools such as Suitcase or FontAgent Pro.
Like the other font management utilities, Font Book offers you an option for detecting corrupt fonts. If you use Font Book and you suspect a font may be corrupted, use the validation features in Font Book to be certain your font is usable.
Open Font Book (installed in your Applications folder), select a font appearing in the Font list, and select Validate Font from the pull-down menu in the top left corner of the Font Book dialog box. The Font Validation dialog box opens as shown in Figure 14.2. The dialog box displays the selected font with icons representing the validation results. A checkmark icon informs you the font passed validation.

Figure 14.2. Select Validate Font from the Font Book pull-down menu and the validation results are reported for the selected font.
Another nice feature in Font Book is the ability to easily size fonts for previews. Suitcase and FontAgent Pro offer you the option to preview different sizes, but Font Book provides you a slider to size up and down the font preview. Rather than select fixed sizes or type a point size in a text box like you do in Suitcase, just drag the slider up or down to size the font and see the results dynamically in the preview area, as shown in Figure 14.3.
Perhaps the most aggravating nightmare for creative professionals on Macintosh OS X is related to reliable font activation. You may have copied fonts to all of the system font locations (see the section "Installing Fonts on the Macintosh") and find one of the CS programs informing you a font is missing. You then uninstall the font from system font folders, attempt to load the font in another font management utility, and an alert dialog box opens informing you the font is already loaded by the system. Your aggravation continues as you poke around your hard drive trying to find a way to load the offending font and make it available to the CS programs.
If you're a designer who has experienced problems with alert dialog boxes informing you that a font is not available, we have a solution for you. FontAgent Pro from Insider Software (www.insidersoftware.com) solves annoying font-management problems. This $99 (as of this writing) utility is our personal choice for reliable font management on the Macintosh.
When you install FontAgent Pro (FAP), the first thing you encounter in the install wizard is a dialog box prompting you to import your fonts into a user-defined font folder FAP manages. During the import process, FAP isolates corrupt and duplicate fonts and stores them in folders apart from your font library where the reliable fonts are stored. Fonts are organized in folders and subfolders for each font family. With this feature in FAP, you don't need to use Font Book's validation options.
One very nice feature is that FAP automatically splits font suitcases into one font style per set. This means you can activate only those fonts used in a design without loading the entire font family. When it comes time to send your files off to a service bureau or print shop, only the used fonts are packaged with the application document and file links.
Note
For information on packaging documents for service providers, see Chapter 36.
Auto-loading fonts
FontAgent Pro isn't stingy in supporting application programs with auto-loading features. Unlike other utilities that support only Illustrator CS and InDesign CS and that auto-load a font when the program launches an application document, FAP automatically loads a font from any application document you open. This could be your mail client, MS Office programs, text editors, or any document having a font not activated at the time of launch.
FontAgent Pro features
FontAgent Pro offers you an intuitive workspace where you can view and activate fonts, create new libraries and sets, share fonts in workgroups, and change the font display in the FAP window from lists to WYSIWYG (What You See Is What You Get) views. The FontAgent Pro screen is shown in Figure 14.4.
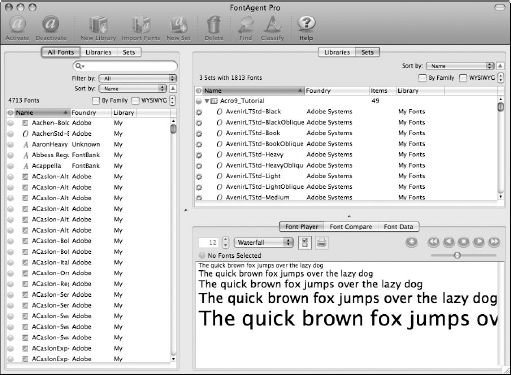
In addition to reliable font management, FAP also offers you some very nice options for viewing fonts in WYSIWYG style. From tools in the Font Player pane, you can view a selected font character set and a sample sentence in the view window. Click the Display Paragraph tool and the display changes to paragraphs of text set in Greek type. Moving to the right side of the Font Player pane, you have buttons that offer you a slide show. Select a root folder containing sub folders of font families and click the "Auto play fonts forward" (or backward) button and the window shows you a slide show of the fonts displayed in WYSIWYG views in the Font Player display window. This option lets you quickly view all font families within a given face. Another nice feature with Font Agent Pro is that you have options for identifying and finding fonts as well as purchasing fonts online.
Try before you buy
Obviously, there are many more features available than in this short description of FontAgent Pro. To test the product, visit the Insider Software Web site (www.insidersoftware.com) and download the free trial version. Insider Software offers you a 30-day free trial option where you can freely try all features and access the free user guide available as a PDF document. If font activation is a problem for you on Mac OS X, we guarantee this product is likely to solve all your font-management nightmares.
Creating outlines from type has long been a common practice by graphic artists and imaging technicians. If a stubborn font problem is encountered, a workaround solution is to convert the text to outlines so the type is transformed into an object. This way, the font information doesn't need to be downloaded to the output device in order for the document to be imaged properly. When word got out that converting text to outlines eliminated font-imaging problems, many designers decided to convert text to outlines as a matter of practice.
One disadvantage in converting text to outlines is that the resulting file size can become quite large and thus take an inordinate amount of time to print. In some cases, the document is rendered unprintable. So, before you convert text to outlines, be certain that you use this option as a last resort.
Another disadvantage in converting text to outlines is that, unless you save a back-up copy of your document, you lose the ability to edit your file utilizing the original font information. Say, for example, you create a half a dozen logotype variations for a client using different fonts. You then convert the type to outlines in order to apply special effects, and resave the document. You won't be able to go back into the Character palette to see which fonts you used, nor will you be able to edit any text if there are copy changes. The caveat here is always to save a separate copy of the document that contains the original font information when you choose to convert text to outlines.
So, you may need to convert text to outlines either as a workaround for stubborn font printing issues, or when you want to apply certain type effects. The Create Outlines command is available in Illustrator, Photoshop, and InDesign.
To convert type to outlines in Illustrator, select the type with either of the selection tools in the Tools palette. (Note that you cannot use the Type tool here as you can in InDesign.) Next, Choose Type

Figure 14.5. Type shown before and after converting to outlines. Each character becomes a compound path, which you can edit with the selection tools.
The options are almost limitless when it comes to creating eye-catching type effects with Illustrator. You can apply custom gradients, transparency, meshes, shadows, lighting and shading, distortion, stylization, 3D effects, and more. Figure 14.6 shows an example of the 3D type effects you can achieve quickly in Illustrator. For a more in-depth look at the ways you can use Illustrator to enhance your type, see the Illustrator CS5 Bible by Ted Alspach (published by Wiley).

Other interesting effects can be achieved by using type as a mask. Note that when creating type masks in Illustrator, you can create a mask without converting the type to outlines.
Position the type in front of the artwork that will be masked. Select both the type and the item to be masked by drawing a marquee around the objects or by Shift-clicking if necessary (two objects must be selected for this command to work). Then choose Object

You may have a need to re-create logos for clients where original artwork for the company logo is not available in digital form. If your client faxes you a copy of the company logo and you need to size it up for use in a large tradeshow display, a scan of the logo is likely to lose image quality. If you convert a logo to a vector object, you can then freely size the object without being concerned about losing image quality.
With Illustrator CS, you can easily convert raster data to vector objects using Live Trace. The results of the Live Trace object will be as good as the scan you use, so be certain to obtain good-quality originals and scan at high resolutions. To see how easy it is to convert a scanned logo from a Photoshop image to a vector object in Illustrator using Live Trace, follow the steps below.
STEPS: Converting Raster Data to Vector Objects
Scan the logo. Scan a logo at a high resolution and save the file as a TIFF file from Adobe Photoshop.
Create a new document in Adobe Illustrator. Choose File

Open Adobe Bridge. Choose File
Note
For more information about using Adobe Bridge to manage files, see Chapter 6.
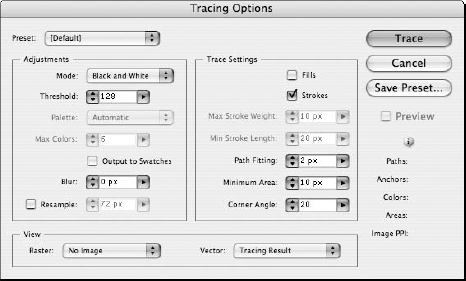
Adjust the trace settings. Choose Object
Warning
If you trace logos with gradients, be certain to set the maximum number of 256 for the Threshold. If scanning color logos with gradients, set the Max Colors setting to 256. If you don't set these values high, Live Trace may clip or posterize the image.
Note
For more information on using Live Trace, see Part III.
Trace the object. Choose Object
Apply effects. You may need to expand the object. Select Object


If it's a matter of printing a font, Photoshop files can always be rasterized in order to convert the type object to pixels. When type is rasterized in Photoshop it loses all the type attributes and prints like any Photoshop image.
In Photoshop CS5, you can also convert type to outlines. If you want to mask type originally created in Photoshop in Illustrator, you can convert the type to outlines in Photoshop and then import the Photoshop file into Illustrator, where you can apply the mask. Of course, if your mask object is in Photoshop, you can also mask type in Photoshop. With the new Photoshop CS features, you have a choice for where you want to apply type masks.
Photoshop type converted to outlines is recognized only in Illustrator. If you import a Photoshop file with outline type in InDesign, the text is not recognized as a vector object. To experiment a little with type converted as outlines in Photoshop, follow these steps.
STEPS: Converting Type to Outlines in Photoshop
Add type to a document in Photoshop. Create a new file in Photoshop. Select the Horizontal Type tool and add some type to the document. Type is added on a new layer.
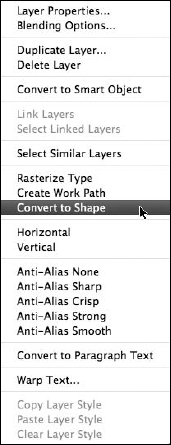
Convert the type to outlines. Open a context menu on the layer containing type and select Convert to Shape as shown in Figure 14.12. The Photoshop type is converted to outline type and remains a vector graphic.
Copy the type in Photoshop. Select the Path Selection tool in the Toolbox and drag a marquee around the type to select it. Choose Edit
Paste the type in Illustrator. Create a new document in Illustrator. Choose Edit
Apply effects to the type. You can size the type and apply effects from the Effect menu or from palettes such as the Graphic Styles palette. In Figure 14.14, the type was sized and a neon effect was added using a Neon Effects Graphic Style.


You can create many effects for type masks in Photoshop as well as stylize type with shadows, embossing, filters, and brightness enhancements after rasterizing type. Photoshop's array of editing tools allows you to apply effects to type in the same way you apply them to images. When you create type in Photoshop, type is added to a separate layer and remains as a vector object until you either flatten the layers or rasterize a layer by choosing Layer
If you import Photoshop files in InDesign, text is rasterized. If you save a Photoshop file with a text layer as PDF, you can keep your type in vector form by saving the Photoshop document with layers. Formats that can preserve layers include the native PSD, Photoshop PDF, and TIFF. Saving with layers keeps type as text and it remains editable. If you flatten the layers, the text is rasterized and you lose the ability to edit your text.
If you open a Photoshop PDF file in Acrobat with layers and vector data preserved, the text is searchable and editable. If you open the same file in Illustrator, Illustrator automatically converts the type to outlines. The same file saved as a native Photoshop (PSD) file opened in Illustrator preserves all type editing.
The type effects you can create in Photoshop are mind-boggling. For comprehensive coverage, see the Photoshop CS5 Bible by Lisa DaNae Dayley and Brad Dayley (Wiley).
Note
For more information on creating type effects in Photoshop, see Part III.
InDesign offers you the option for converting type to outlines as inline objects. With this feature, you can create many type effects directly in InDesign without having to create them in Illustrator and import them. After outlines have been created in InDesign, you have similar options as Illustrator for shaping text objects with the selection tools, as well as creating type masks.
To convert type to outlines in InDesign, select the characters you want to convert to outlines by highlighting them with the Type tool or by selecting the text frame with a selection tool. With the Type tool, you can select one character or a range of characters. If you want to convert your entire page to outlines as a workaround for font downloading problems or licensing issues, select all by choosing either of the selection tools in the Tools palette and then pressing
Tip
There's an even more powerful and flexible technique in both Adobe Illustrator and Adobe InDesign to convert type to paths when you encounter output problems or undesired flattening effects. Create a Transparency Flattener Preset that includes Convert text to outlines, then use some transparency on the InDesign spreads or in the Illustrator file. When the file is output, printed to PostScript, or exported/printed to a PDF/X 1.3 file, all text is automatically converted to outlines in the print stream. This way your original file remains editable text for future work, but you don't have any font problems in your output stream.
Many type effects can be achieved in InDesign without converting the type to outlines. As demonstrated in Figure 14.15, you can create sophisticated type treatments with strokes, fills, gradients, and drop shadows and still be able to edit the text. This is a difficult or impossible feat in some other page-layout programs.
Type masks are created a little differently than they are in Illustrator. Instead of placing type over artwork to be masked, the type is essentially turned into a graphics frame. You can then paste or import an image into the frame.
After you've converted your type to outlines, simply select it and choose File

Figure 14.15. InDesign allows you to create sophisticated type effects without converting the type to outlines. The text remains fully editable.

Figure 14.16. After converting type to outlines, select the type with either the Selection tool or the Direct Selection tool.
When the Place dialog box appears, be certain to select the check box for Replace Selected Item, as shown in Figure 14.17. If you don't check the box, the cursor is loaded with the graphic and InDesign expects you to place the file somewhere on the document page. Alternately you can use the Place command and when the cursor is loaded with the object to place; just click on the object on the page to replace it. When you select Replace Selected Item, the file is placed within the outlined type, resulting in a mask. If you want to place an item in a multi-page document, be certain to select the Show Import Options check box as shown in Figure 14.17. You might use this option if you have a selected item on a master page and want to scroll pages in your document to choose what page to replace the graphic.

Figure 14.17. Be certain to select the check boxes for Replace Selected Item and Show Import Options in the Place dialog box.
When selecting Show Import Options, another dialog box appears. The type of dialog box and the options available are dependent on the file type you place. In Figure 14.18, the Place PDF dialog box opens because the file type being placed is a PDF. In the Preview window, you can navigate pages and see page thumbnails before committing to place the document.
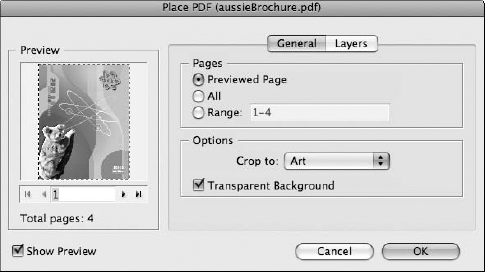
Figure 14.18. Be certain to Show Import Options when placing multiple-page PDF documents and layered files.
InDesign provides options for selecting layers when you place Photoshop and PDF files. Click the Layers tab in the Place PDF dialog box and the Layers pane opens with choices for selecting layers on a given page to place. You toggle layers on and off like you do in any of the CS programs. Click the right-pointing arrow to open the nested layers and click the eye icon to toggle layers on and off. The Layers pane in the dialog box displays a preview of the selected layers, as you can see in Figure 14.19.

Figure 14.19. When you place layered Photoshop, Illustrator, InDesign, and layered PDF files, you can click the Layers tab and toggle layer views.
Note
For more information on working with layers in the CS applications, see Chapter 23.
Click OK in the Place PDF dialog box and the layer view you see in the preview is placed inside the type, as shown in Figure 14.20. If you need to move the image within the mask, select the Direct Selection tool. When the cursor approaches the text, the cursor changes to a Hand tool, thus informing you that the image can be moved within the mask.
Tip
When you drag with the Hand tool, click and pause a moment. When you drag the cursor after pausing, you can see the entire image previewed as you move around the document window.

The three main font formats in use today are PostScript Type 1, TrueType, and OpenType.
OpenType fonts have two advantages: they work in cross-platform environments (Mac and Windows), and they support expanded character sets.
Font-management utilities such as FontAgent Pro help streamline your font-management tasks.
Converting all type to outlines in your documents is a way to circumvent font downloading problems, but this approach should be used as a last option.
Special type effects are easy to achieve in Illustrator, Photoshop, or InDesign. Illustrator offers a sophisticated array of transformation tools, including extrusion (3-D) and lighting effects for type objects. Photoshop CS enables you to create type outlines. InDesign allows certain type effects to be applied without first converting the type to outlines.
Photoshop provides virtually unlimited options for creating type effects. If you want your text to remain editable, however, be sure to keep the type in vector form by preserving layers when saving your file.