Getting familiar with Digital Rights Management
Adding security to documents
Securing documents with file attachments
Digital Rights Management (DRM) is a term used to describe protecting intellectual property against unauthorized viewing, editing, reproduction, and/or distribution. When using a creative-design workflow, you may want to restrict document viewing to selected individuals; or you may want to share design concepts with clients so they can view your designs, although you don't want the documents printed or edited.
Most of the CS programs offer you a vehicle for protecting documents via export to PDF. Document security is applied to PDF files and not directly in the CS application documents. Therefore, you first need to know how to generate a PDF from the other CS applications and then apply security either at the time of PDF creation or from within Acrobat. In this chapter, you learn how to export CS application documents to PDF and secure the files against unauthorized viewing, editing, and printing.
Securing documents created with CS applications means you ultimately get a document to PDF and apply Acrobat security either at the time of exporting a file to PDF or later, after you open a PDF in Acrobat. In either case, Acrobat security is used.
Methods of security available in Acrobat include two primary types of encryption. You can secure a file against opening and editing by applying Acrobat security at different levels of encryption, or you can secure files using certificates acquired from users when they create digital IDs. The first method should be thought of as security you might apply globally to PDFs either from within the CS programs at the time of exporting to PDF or later in Acrobat. Security added at the time of export to PDF is generally when you want the public to have a password to open your PDFs or you want to restrict editing features. These are referred to as unknown users.
The second method of security is restrictions you want to apply for a selected group of people in your workgroup (coworkers, colleagues, or individuals with whom you have direct communication) or among your client base. These are referred to as known users. This method requires the use of digital IDs and Trusted Certificates.
Permissions relate to the access you grant end users. You may restrict printing a document and, as such, you grant permission for users to view and possibly edit a file but prevent users from printing. When using the second method of security for known users, you can grant different permissions for different users all in the same document. This form of security uses digital ID identities and is discussed later.
Depending on the version of Acrobat compatibility you use (for example, Acrobat 4-, 5-, or 6-compatible files), the level of encryption changes according to each compatible file format. Acrobat 4 compatibility uses 40-bit encryption, Acrobat 5 and 6 use 128-bit RC4 encryption, Acrobat 7 and 8 use 128-bit AES (Advanced Encryption Standard) encryption, and Acrobat 9 uses 256-bit AES encryption. The level of encryption is not as important for you to understand as just realizing that, with each level of encryption, Acrobat offers you additional permissions. For example, with Acrobat 4 compatibility, you can grant permissions to print a document or prevent a user from printing a document. With Acrobat 5, 6, 7, 8, and 9 compatibility, where you use 128-bit or greater encryption, you can add to the printing permissions a restriction to print files only as low-resolution prints. This feature and others are added to encryption methods above 40-bit encryption.
Warning
Be aware that anyone using an earlier version of Acrobat cannot open a document with advanced encryption. For example, users of Acrobat 6 cannot open files secured with Acrobat 9-compatibility encryption.
When you use digital IDs to encrypt files for restricting permissions, Acrobat offers you a choice for using Acrobat Certificate Authority or a signature handler you acquire from a third-party supplier. Acrobat warns you that files secured with Acrobat Certificate Authority carry no guarantee that the security cannot be compromised. For more critical Digital Rights Management, warning dialog boxes point you in the direction of third-party vendors offering signature handlers.
In normal production workflows, you're not concerned with sophisticated signature handlers from third-party vendors. When sending clients drafts of your artwork, the turnaround time is relatively short, and the likelihood of a client exerting the energy and taking the time to break password security is incredibly far-fetched. Some algorithms running on powerful computers can take years to break a password.
As a matter of practice, use a minimum of 10 to 12 characters when supplying passwords to protect a file. The more characters you use, the more difficulty a software routine has in trying to break the code.
If you work with sensitive material that requires sophisticated security measures offered by third-party vendors, you can find a list of vendors offering various solutions on Adobe's Web site (www.adobe.com/security).
If you create an illustration or a layout, or you have some photos that you need to secure, you can save or export your files as PDF documents and add security at the time you create the PDF. You also can add security in Acrobat for all PDFs created without setting permissions at the time of PDF creation. Regardless of where you add permissions, the options available to you for securing PDFs are the same in all the CS5 programs.
Note
Because all the print-oriented CS5 applications including Photoshop, Illustrator, InDesign, and Fireworks use the same Adobe PDF settings used by Acrobat and Acrobat Distiller, security is equally available to all these programs. However, PDF Export in from Dreamweaver is locked to the operating system dialog and the Acrobat settings dialog box is not available.
For documents converted to PDF to which you want to add security later, you add permissions in Acrobat. The options you choose are contained in the Password Security–Settings dialog box. To open the dialog box with a document currently open in the Document pane, choose Advanced
Note
The same options for adding security exist in the PDFMaker for Microsoft Office files and in the Acrobat Distiller for PostScript files. For more information on using Distiller and applying security during distillation, refer to the Adobe Acrobat 9 PDF Bible (published by Wiley).
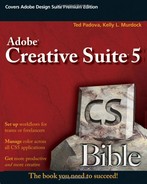
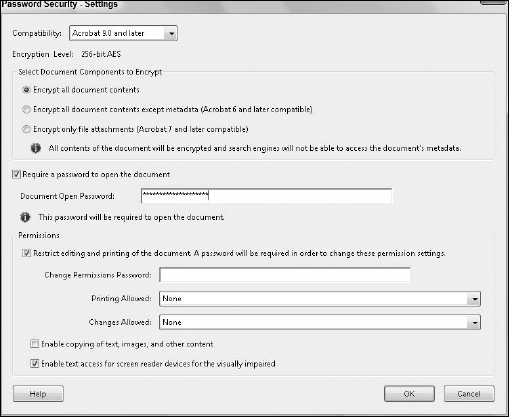
The security you add in this dialog box restricts a user from opening or changing a file's content. Users must know the password you assigned in this dialog box to open a file and/or make changes. Realize that you can restrict a file from opening unless a password is supplied or you can omit a password for opening a file but limit permissions for printing and editing. You can add two passwords—one for opening a file and another for restricting editing or printing features. You have these options in the Password Security–Settings dialog box:
Compatibility: The options from this pull-down menu include Acrobat 3, Acrobat 5, Acrobat 6, Acrobat 7 and later, and Acrobat 9 compatibility. If you select Acrobat 9 c ompatibility and save the PDF document, users need an Acrobat viewer of version 9 or greater to open the file. The same holds true when saving with Acrobat 5 compatibility for users who have Acrobat viewers lower than version 5.
Encryption Level: Below the Compatibility pull-down menu Acrobat informs you what level of encryption is applied to the document based on the compatibility choice made in the pull-down menu. If you select Acrobat 3 from the Compatibility pull-down menu, the encryption level is 40-bit encryption. Acrobat 5 and Acrobat 6 compatibility are encrypted at 128-bit RCA encryption. Acrobat 7 and 8 are 128-bit AES, and Acrobat 9 is 256-bit AES. All the higher encryption levels offer you more options for restricting printing and editing.
Encrypt all document contents: This option applies encryption to all document contents including text, images, and media content.
Encrypt all document contents except metadata (Acrobat 6 and later compatible): Use this option to apply encryption to all document contents except document metadata. As the item name implies, this level of security is compatible with Acrobat 6 and above. This is a good selection if you want to have the metadata in your secure documents available for a search engine.
Encrypt only file attachments (Acrobat 7 and higher compatible): Use this option to encrypt file attachments but not the PDF document. This option is compatible only with Acrobat 7 and above.
Note
For information regarding using file attachments and securing PDFs, see the section "Securing Files with Attachments," later in this chapter.
Require a password to open the document: Enable this option if you want a user to supply a password to open the PDF document. Once enabled, the field box for Document Open Password becomes active and you can add a password. Before you exit the dialog box, Acrobat prompts you in another dialog box to confirm the password.
Use a password to restrict printing and editing of the document and its security settings: You can add a password for opening the PDF document and also restrict permissions from the items active in the Permissions area of the dialog box. You also can eliminate the option for using a password to open the PDF document and make permissions choices for printing and editing. Either way, you check this box to make choices in the Permissions options.
Permissions Password: Fill in the field box with a password. If you apply permissions options for opening the PDF and restricting permissions, the passwords must be different. Acrobat opens a dialog box and informs you to make different password choices if you attempt to use the same password for opening the file and setting permissions.
Printing Allowed: If you use Acrobat 3 compatibility, the options are available to either enable printing or disallow printing. The choices are None and High Resolution. Although the choice reads High Resolution, the result simply enables users to print your file. With Acrobat 5 and 6 compatibility, you have a third choice for enabling printing at a lower resolution (150 dpi). If you select Low Resolution (150 dpi) from the menu options, users are restricted to printing the file at the lower resolution. This choice is typically something you might use for files intended for digital prepress and high-end printing or to protect your content from being printed and then re-scanned.
Changes Allowed: From this pull-down menu, you make choices for the kinds of changes you allow users to perform on the document. Acrobat 3 compatibility offers you four choices; Acrobat 5, 6, and 7 compatibility offer six choices, including these:
None: This option prevents a user from performing any kind of editing and content extraction.
Inserting, Deleting, and Rotating Pages: This option is not available when using Acrobat 3 compatibility. Users are permitted to insert, delete, and rotate pages. If you create PDFs for eBooks, allowing users to rotate pages can be helpful when they view PDFs on tablets and portable devices.
Page layout, filling in forms, and signing existing signature fields (Acrobat 3 only): Select this option to enable users to extract pages, insert pages, and also perform actions on form fields.
Filling in form fields and signing existing signature fields: If you create Acrobat Forms and want users to digitally sign documents, enable this check box. Forms are useless to users without the ability to fill in the form fields.
Commenting, filling in form fields, and signing existing signature fields: You might use this option in a review process where you want to have users comment on a design but you don't want them to make changes in your file. You can secure the document against editing, but allow commenting and form field filling in and signing. When you enable form filling in with this option or the Filling in form fields and signing existing signature fields option, users are restricted against changing your form design and cannot make edits other than filling in the fields. A good example of using this option is when you want customers to fill out a form that includes comments that describe their selections.
Any Except Extracting Pages: All the permissions are available to users except extracting pages from the document and creating separate PDFs from selected pages.
Enable copying of text, images, and other content and access for the visually impaired: If you restrict permissions for any of the previous pull-down menu options, users aren't allowed to copy data. You can add permission for content copying by enabling this check box. This option is available to users of all Acrobat viewers version 3 and greater.
Enable text access for screen reader devices for the visually impaired: This option is available for all versions except Acrobat 3 compatibility. As a matter of practice, selecting this check box is always a good idea because you can restrict all editing features while permitting users with screen-reading devices the ability to read your files. If the check box is not selected, screen readers cannot read the PDF document and all the options for using the View

After making decisions for the permissions you want to restrict, you need to save the file. Choose File
Setting permissions in the Password Security–Settings dialog box works fine for a single PDF document you want to secure, but it's a bit tedious when you want to secure a number of files. For automating the task where a common password is used in all files that need to be secured, you can use the Acrobat Batch Processing command. For a firsthand view of creating a batch sequence and applying steps in the sequence to a collection of PDF documents, follow these steps.
STEPS: Creating and Running Batch Sequences
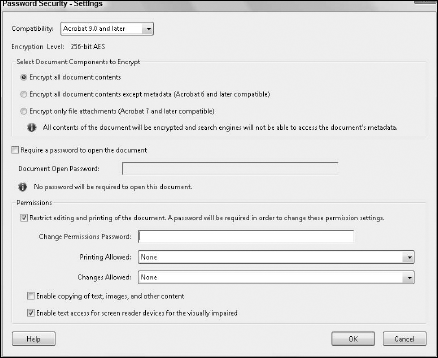
Open Batch Sequences. Choose Advanced
Note
You can create and run batch sequences only in Acrobat Professional.
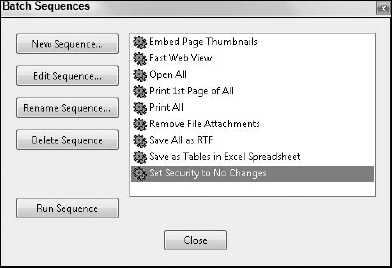
Create a new sequence. Click New Sequence in the Batch Sequences dialog box. The Name Sequence dialog box opens. Type a name for your sequence, and click OK to open the Batch Edit Sequence–[name of your sequence] dialog box shown in Figure 25.3. Note that the name for the dialog box in the figure is Batch Edit Sequence–Add Security. We created a new sequence and named it Add Security; thus, the name is reflected in the dialog box name. For purposes of clarity, this dialog box is henceforth referred to as the Batch Edit Sequence dialog box.
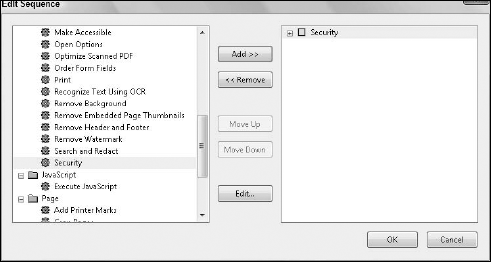
Add Security to the sequence. Click Select Commands in the Batch Edit Sequence dialog box. The Edit Sequence dialog box opens, shown in Figure 25.4. In the left pane, scroll down the window until you see Security appear at the end of the Document options. Select Security in the left pane, and click Add to move Security to the right pane.
Edit the security permissions. To set the security permissions, open the Password Security–Settings dialog box. Click on Security in the right pane, and click Edit or double-click on Security in the right pane to open the Document Security dialog box. From the pull-down menu, select Password Security and click the Change Settings button to open the Password Security–Settings dialog box, shown in Figure 25.5.
Edit the security items you want to use, and be certain to use passwords of ten or more characters. Click OK, and the Confirm Permissions Password dialog box opens, and a warning dialog box opens. Click OK again. Retype your password using the same letter case, and click OK. You're returned to the Document Security dialog box. Click Close, and you're returned to the Edit Sequence dialog box. Click OK, and you arrive at the Batch Edit Sequence dialog box. Click OK again, and you see your new sequence added to the Batch Sequences dialog box.
Note that the number of dialog boxes is extraordinary. Just keep in mind that after editing the security options, you return to the Batch Sequences by clicking OK through all the dialog boxes. When the sequence is added to the Batch Sequences dialog box, you're ready to run the sequence. You can run a sequence immediately after creating it or at a later time in another Acrobat editing session. After the new sequence is added to the batch Sequences dialog box, the sequence remains there until you physically remove it. If you want to dismiss the dialog box without running a sequence, click Close.
Sequences are designed for you to apply the same settings to a collection of PDF documents. When you set the attributes for the command you want to use and the sequence has been created, you run the sequence by selecting a file, a number of files, or a folder. To run a sequence for applying security to a collection of files, follow these steps.
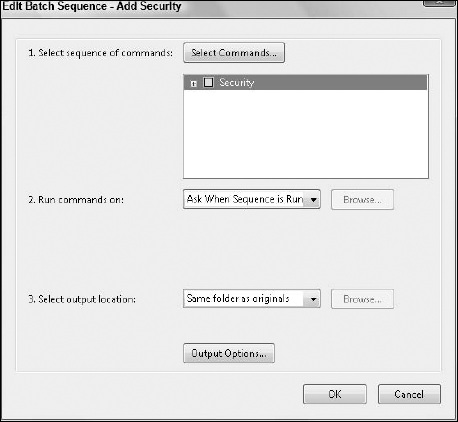
Edit a sequence. Select the new sequence you created in the Batch Sequence dialog box, and click Edit Sequence. The attributes for the security permissions have been defined, but now you need to inform Acrobat where the edited files are to be saved and the file-naming convention you want to use. Note that these options can be assigned at the time you create a sequence, but it's a good idea to visit the Batch Edit Sequence dialog box whenever you run a sequence to be certain you know where your files are saved and the names given to the new files.
Running a command. In the Batch Edit Sequence dialog box, shown in Figure 25.6, open the pull-down menu for item 2. You have several options from which to choose for when a command is run. The default is Ask When Sequence is Run. When selected, this option instructs Acrobat to prompt you for which files to run a sequence. Other choices enable you to identify a specific folder location, specific files, or currently opened files. The default is set to run a sequence by asking in a navigation dialog box that opens and permits you to search through your hard drive to find files you want to add to the sequence. Unless you want to run the sequence on a specific folder, leave the setting at the default.
Select an output location. From the pull-down menu for item 3, you determine where the edited files are saved. The default is set to save files in the same folder as the original files. You also have choices for saving to a specific folder (prompting you for a folder location) or not saving changes. If you save files to the same folder, be careful about overwriting existing files. If you leave the default at Same Folder as Originals, edit the filenames in the Output Options so new files are saved with new names as opposed to overwriting files. If you make mistakes when assigning attributes in your batch sequence, you can always return to the original files.
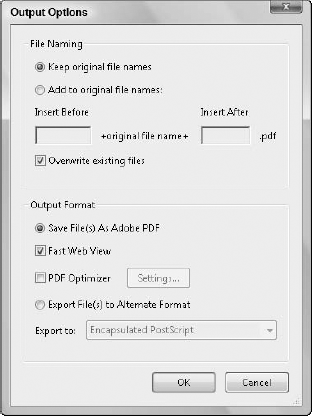
Set output options. Click Output Options and the Output Options dialog box, shown in Figure 25.7, opens. In this dialog box, you assign filenames. You can choose to use the default name for saving files with the same name that ultimately overwrites your existing files, or you can add to an existing name either a prefix or a suffix. If you click Add to Original Base Name(s), the field boxes for Insert Before and Insert After become active. Enter a prefix or suffix extension by typing characters in the field boxes. If you leave the default at Same As Original(s) and uncheck the box for Overwrite Existing Files, Acrobat automatically adds to the filenames to prevent the new files from overwriting the old files. Make your choices in this dialog box, and click OK to return to the Batch Edit Sequence dialog box. Click OK, and you return to the original Batch Sequences dialog box.
Run a sequence. In the Batch Sequence dialog box, click on your new sequence and click Run Sequence. If you elected to be prompted for files to select, the Select Files to Process dialog box opens. Navigate your hard drive, and open the folder where the files you want to process are located. To select files individually,

Click the Select button, and Acrobat adds security to all the files you selected for processing. After completing the task, be certain to verify files and note the password used to protect the files.
The common denominator for securing all CS applications documents is Adobe PDF. You have two choices for securing documents. You can export the file and essentially turn it into a PDF document whereby security is applied, or you can attach a native file to a PDF whereby Acrobat security is also applied. Either way, you eventually work with a PDF document.
Warning
Be aware that PDF support is much stronger for the print-oriented apps like Photoshop, Illustrator, and InDesign. PDF support is not included for Dreamweaver and Flash, but it is available for Fireworks.
Note
For information on securing PDFs with file attachments, see the section "Securing Files with Attachments," at the end of this chapter.
When using Photoshop and Illustrator, you create a PDF file by choosing File
Note
In all applications, you address the Adobe PDF Settings that include applying security. All the options are the same for all CS programs, regardless of whether you use Save As or Export.
To understand how security settings are applied to any CS application document, look over the following steps.
STEPS: Adding Security to CS5 Application Documents
Launch the Bridge, and double-click an image to open it in Photoshop. You can use any CS5 program and follow the same steps. In this example, Photoshop is used to secure image files.
Open the Save As dialog box. Choose File
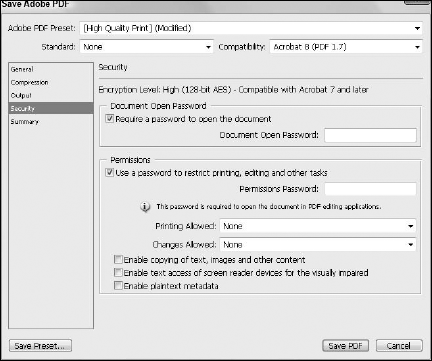
Apply security settings. Select an Adobe PDF Preset from the pull-down menu at the top of the dialog box. Select a compatibility option from the Compatibility pull-down menu. Click Security in the left pane. Select the options you want to use for your security settings such as using an open password and/or adding editing privileges. Add a password, and click Save PDF. In Figure 25.8, a password is used for opening the document.
Confirm your password. A second dialog box appears, prompting you to confirm the password. Type the same password used in the first dialog box, and click OK. The file is saved with the settings applied for security. Note that passwords are case sensitive. Be certain to record passwords used for your files, including case sensitivity.
Note
There are more options available to you for securing documents using the Adobe Policy Server and CDS partners. The scope of document security in Acrobat is enormous and is beyond the scope of this book. For an exhaustive authoritative description on Acrobat security, see the Adobe Acrobat 9 PDF Bible (Wiley Publishing).
If your workflow requires you to exchange original documents that need to be secured, obviously converting to PDF isn't a solution. The CS programs don't offer you options for securing files unless you convert to PDF. However, you can use PDF to protect native documents against unauthorized opening and viewing, and you can attach any file to a PDF. If the need arises for protecting word-processing files, spreadsheets, financial documents, layouts, images, and so on, you can use PDF as the container for native files and password-protect the contents.
Note
You can attach all files to PDF documents with the exception of ZIP and EXE files on Windows. These file types are prohibited to prevent the spread of viruses.
By using file attachments in Acrobat, you use the PDF as a wrapper and secure the PDF document with open permissions. If a user doesn't have a password to open the PDF document, the attached file is inaccessible. If your clients use the Adobe Reader software, you can secure PDFs with file attachments and exchange the PDFs with Adobe Reader users who can extract and open the attachments.
There are restrictions when using file attachments compared to using PDF security. For example, if you want to secure an InDesign file against unauthorized viewing, you can embed the InDesign document in a PDF and use an open password to protect the file. However, you can't restrict editing and printing the InDesign file. When using file attachments, you prevent users from viewing the documents or grant all permissions: There are no other options for securing native documents.
Acrobat is a handy tool for exchanging files that need to be protected against unauthorized viewing, and you can easily secure any kind of document by attaching the file to a PDF. For users to extract a file from a secured PDF, they need to have the open password and the original application that created the file attachment. For example, embedding a Microsoft Word file in a PDF document requires you to have MS Word installed on your computer in order to extract the file.
Acrobat provides you with a feature designed for creating secure PDF eEnvelopes know as Security Envelope. eEnvelopes are PDF document templates used for attaching any file and securing the PDF document. Before you can use Security Envelope, you need to create a security policy.
Security policies are like style sheets used to apply security to PDF documents. With all the attributes from which to choose for applying security to a PDF document, you need to spend some time opening the Password Security–Settings dialog box, selecting options for securing a file, and applying a security password. To simplify the process, you can capture all the settings used for securing a file and save the settings as a new policy. When you want to use the same policy to secure additional files, you select the policy without having to revisit the Password Security– Settings dialog box and adjust all the options choices.
You can use security policies with digital IDs and when you apply Acrobat Security. Creating and using digital IDs is a complex and lengthy subject. If you want to learn how to create and use digital IDs, see the Acrobat Help file or the lengthy description covering the subject in the Adobe Acrobat 9 PDF Bible (Wiley Publishing). To create a security policy using Acrobat Security, follow these steps.
STEPS: Creating a Security Policy
Launch Acrobat 9 Pro. Double-click the Acrobat program icon or an alias of the program on your desktop to launch Adobe Acrobat.
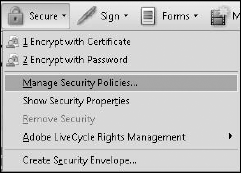
Open the Managing Security Policies window. Click the Secure task button, and from the pull-down menu shown in Figure 25.9, click Manage Security Policies. The Managing Security Policies window opens.
Open the New Security Policy wizard. Click New in the top-left corner of the Managing Security Policies window. The New Security Policy wizard opens. Creating security policies is handled in a wizard that walks you through each step in the process.
Select the type of security to use in the new policy. You have three options in the first pane in the New Security Policy wizard. Leave the default selection for Use Passwords selected, and click Next. The other options offer you choices when creating digital IDs and using the Adobe Policy Server. (See the Acrobat Help document to learn more about the other options.)
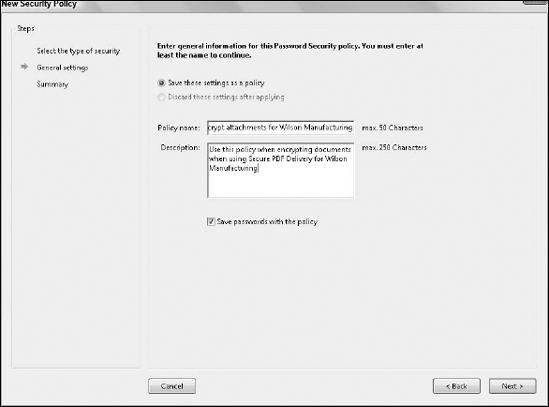
Add a policy name and description. The next pane in the New Security Policy wizard provides options for adding a name and description. You can choose to discard the settings after using the policy, but if you want to reuse the same security settings when you create additional eEnvelopes, be certain the Save these settings as a policy radio button is selected. In the Policy name text box, type a name for your new policy. Below the policy name, type a description for the policy. Be certain to add descriptive information that adequately identifies your policy similar to what you see in Figure 25.10. Select the Save passwords with the policy check box. Saving the password enables you to use the same password each time the policy is used. If you leave the check box deselected, you can change the password each time the policy is applied. Click Next after setting the attributes in the General settings pane.
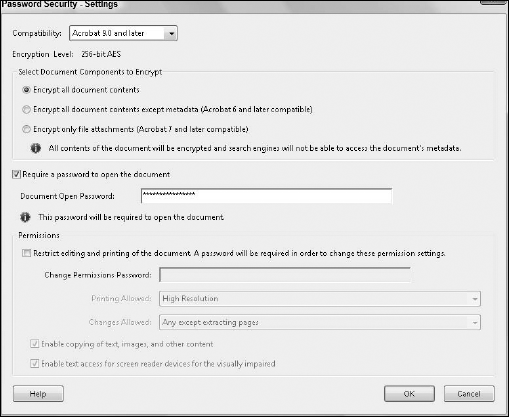
Make security settings choices for the policy. The Document restrictions pane offers you security settings options identical to the options described in the section "Securing Documents," earlier in this chapter. Make choices for the compatibility level, the document components you want to encrypt, passwords to open and/or change the document, and the permissions you want to grant. Note that using restrictions in the Permissions section of the pane shown in Figure 25.11 applies only to PDF documents. If you want to use the policy strictly to grant permissions for accessing a file attachment, don't select both options choices in the Permissions section. Click Ok when you finish adding the options choices.
Confirm the password. After clicking Ok, a dialog box appears, prompting you to confirm the password(s) used in the Document restrictions pane. Type the password(s) exactly the same as applied in the Document restrictions pane including case sensitivity. Be certain to record the passwords used for the policy.
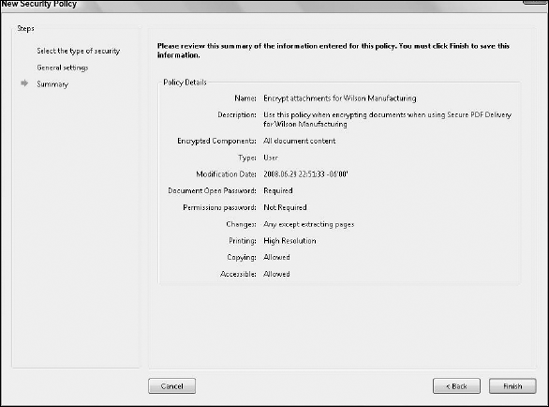
Review the Summary. The next pane provides you a summary view for the settings you made for your policy (see Figure 25.12). Be certain to review the information, and be certain that what you see is an accurate description for the policy you want to create. If all information is correct, click Finish to complete creating the new policy. If you need to revisit a pane, click Back to make adjustments in the previous panes.
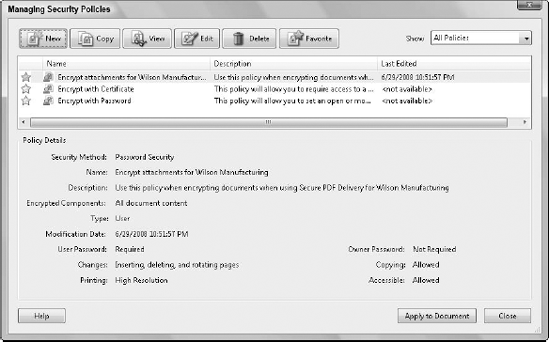
Close the Managing Security Policies window. After you finish creating a new policy, you are returned to the Managing Security Policies window where your new policy appears listed and available for use. This window is like a character or paragraph styles palette where you select a style to apply to a selection. When applying a security policy in Acrobat, you use one of the policies listed in the Managing Security Policies window. As you can see in Figure 25.13, several policies can be added to the list, and the name and description for your policy appears when you select it in the list window.
After you create a policy, you use your policy when using Security Envelope to secure eEnvelopes with file attachments. Security policies also can be used with other forms of encryption such as securing individual documents, using digital IDs, and creating certified documents.
Security Envelope is an easy method for securing PDF documents containing file attachments. When you need to send native files to your clients or others in your workflow, you can create an eEnvelope and attach any kind of document to the envelope. You need to have at least one security policy in order to proceed, so be certain to follow the steps outlined in the section "Creating security policies."
Follow these steps to create a secure PDF eEnvelope using Security Envelope.
STEPS: Using Security Envelope
Launch Acrobat. If Acrobat is not open, double-click the program icon or an alias of the program on your desktop. When Acrobat opens, you don't need to open a file in the Document pane. Create Security Envelope can be used without open files in Acrobat.
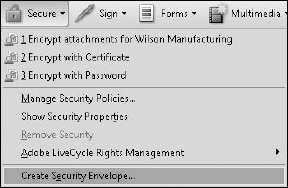
Open the Create Secure Envelope wizard. Click the Secure task button, and select Create Security Envelope, as shown in Figure 25.14. The Create Secure eEnvelope wizard opens when you create an eEnvelope.
Select a file to attach to the eEnvelope. The first pane in the Create Secure Envelope wizard provides an option for selecting the file you want to attach to your envelope. Any file on your hard drive can be used except a ZIP or EXE file on Windows. Click the Add file to send button below the list window. The Choose the files to enclose dialog box opens. Navigate your hard drive, and select the file(s) you want to attach to the envelope. Note that you can Shift+click (
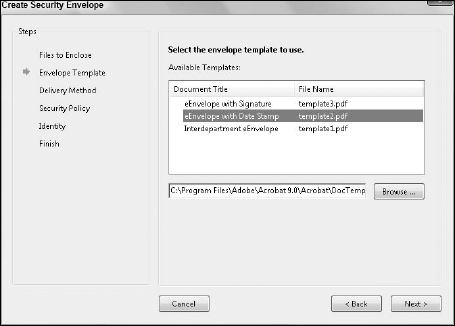
Choose the envelope template. The second pane offers some predesigned templates from which you can choose or an option for using your own design. If you choose a custom template, the file needs to be a PDF document. Select a template from the list shown in Figure 25.15, or click Browse to locate your own custom design. In this example, template2.pdf is used. This template adds a date stamp from your system clock. After selecting a template, click Next to advance to the next pane.
Choose a delivery method. The Delivery method pane offers two options. Select the Complete the eEnvelope manually option or the Email the completed eEnvelope option. If you choose the first option, you create the envelope and can save it to your hard drive for sending at a later time. If you select the second option, you save the envelope to your hard drive and the saved file is added to a new message window as an e-mail attachment in your default e-mail program. Make a choice from the options, and click Next. In this example, the envelope is completed manually for e-mailing at a later time.
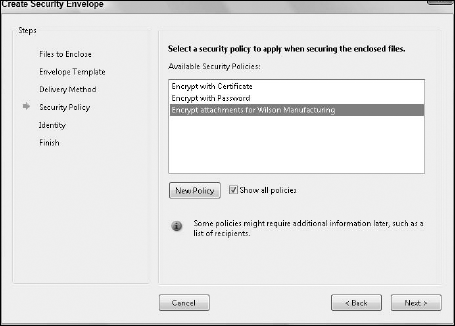
Choose a Security Policy. Select the check box for Show all policies, and the list window displays the policies available to you, as shown in Figure 25.16. You can select one of the policies you previously created or click the New Policy button, and the Managing Security Policies window opens where you create a new policy as was described in the "Creating security policies" section, earlier in this chapter. Select a policy or create a new one, and click Next to advance to the next pane.
Review the summary. The last pane provides a summary of the options selected for your eEnvelope. Review the summary, and click Finish to create the eEnvelope.
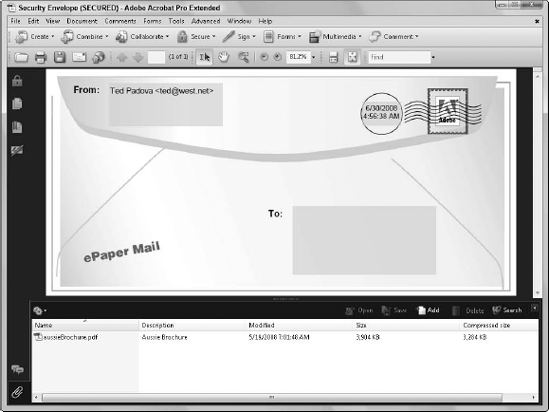
Secure the file. The eEnvelope opens in Acrobat with the Attachments pane open showing you the file attachments added to the envelope. Note in Figure 25.17 the document is time and date stamped. The file is not secure until you save it. Choose File
Different levels of security can prevent users of Acrobat viewers earlier than version 6 from opening files. It's important to know your user audience and which version of Acrobat viewers they use before securing files.
You can apply security to PDF documents that restrict open permissions and different levels of editing.
You can secure files from any CS5 application when you convert them to PDF. The print-oriented CS5 applications use the same Adobe PDF settings to convert document files to PDF.
PDF documents can contain file attachments from any document type except ZIP and EXE files on Windows. You can secure the PDF against unauthorized opening to prevent anyone from viewing the file attachments.
Security policies are like style sheets. You can create a policy setting all the permissions attributes and reuse the policy each time you want to encrypt a file with the same permissions.
You use Security Envelope to create eEnvelopes where you can create PDFs from templates, attach documents to the template, and secure the file with security policy permissions.