
8. Working with Layers
This lesson will take approximately 45 minutes to complete. If needed, remove the previous lesson folder from your hard disk and copy the Lesson08 folder onto it.
![]()
Layers let you organize your work into distinct levels that can be edited and viewed individually or together. Every Adobe® Illustrator® document has at least one layer. Creating multiple layers in your artwork lets you easily control how artwork is printed, displayed, and edited.
Getting started
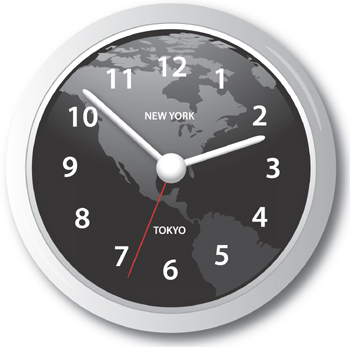
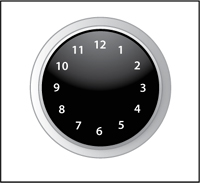
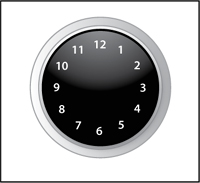
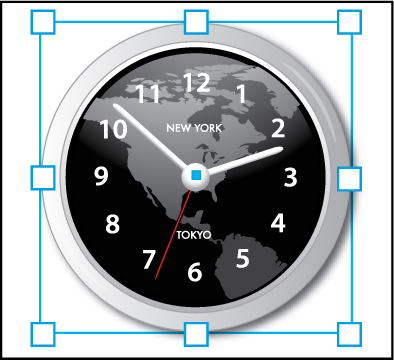
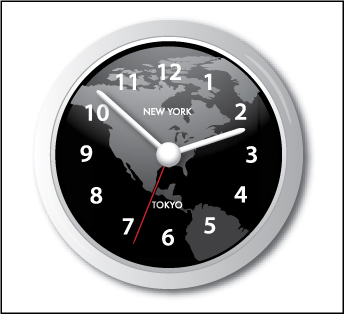
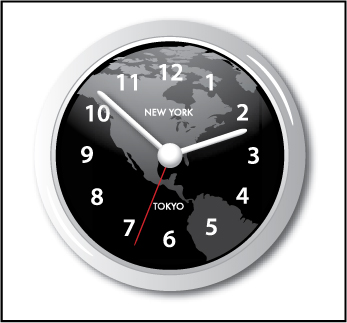
In this lesson, you’ll finish the artwork of a wall clock as you explore the various ways to use the Layers panel.
1. To ensure that the tools and panels function as described in this lesson, delete or deactivate (by renaming) the Adobe Illustrator CS5 preferences file. See “Restoring default preferences” on page 3.
2. Start Adobe Illustrator CS5.
Note
If you have not already done so, copy resource files for this lesson onto your hard disk from the Lesson08 folder on the Adobe Illustrator CS5 Classroom in a Book CD. See “Copying the Classroom in a Book files” on page 2.
3. Choose File > Open, and open the L8end_1.ai file in the Lesson08 folder, located in the Lessons folder on your hard disk.
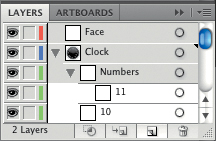
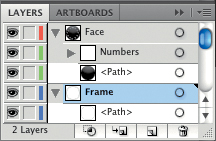
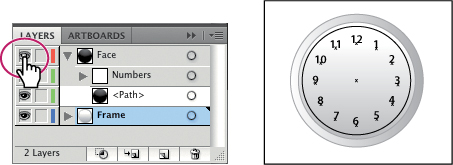
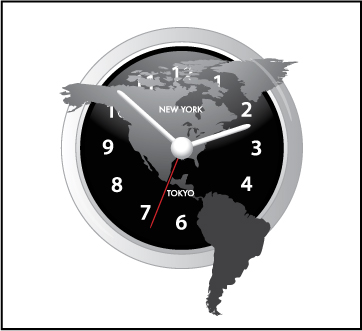
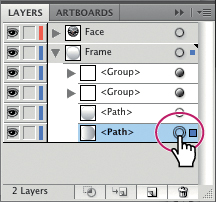
Separate layers are used for the objects that make up the clock’s frame, face, hands, and numbers, as indicated by the layer names listed in the Layers panel. Below you can see the Layers panel (Window > Layers) and descriptions of the icons.
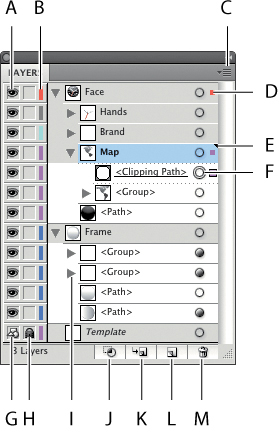
A. Visibility column
B. Layer color
C. Layers panel menu
D. Selection column
E. Current layer indicator
F. Target column
G. Template layer icon
H. Edit column (lock/unlock)
I. Expand/collapse triangle
J. Make/Release Clipping Mask
K. Create New Sublayer
L. Create New Layer
M. Delete Selection
Note
If the Layers panel in your workspace does not look exactly like the figure below, that’s okay. At this point, you just need to familiarize yourself with the panel.
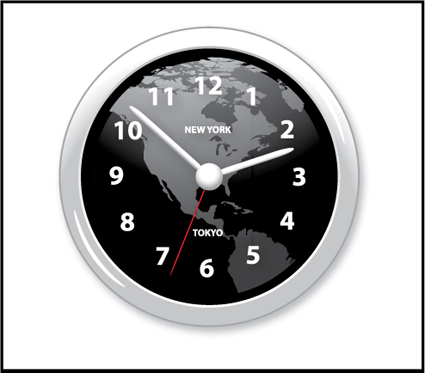
4. Choose View > Fit Artboard In Window. If you like, you can leave the file open as a visual reference. Otherwise, choose File > Close.
To begin working, you’ll open an existing art file that is incomplete.
5. Choose File > Open, and open the L8start_1.ai file in the Lesson08 folder, located in the Lessons folder on your hard disk.
6. Choose File > Save As, name the file clock.ai, and select the Lesson08 folder. Leave the Save As Type option set to Adobe Illustrator (*.AI) (Windows) or the Format option set to Adobe Illustrator (ai) (Mac OS), and click Save. In the Illustrator Options dialog box, leave the Illustrator options at their default settings, and then click OK.
About layers
When creating complex artwork, it’s a challenge to keep track of all the items in your document window. Small items get hidden under larger items, and selecting artwork becomes difficult. Layers provide a way to manage all the items that make up your artwork. Think of layers as clear folders that contain artwork. If you reshuffle the folders, you change the stacking order of the items in your artwork. You can move items between folders and create subfolders within folders.
The structure of layers in your document can be as simple or complex as you want it to be. By default, all items are organized in a single, parent layer. However, you can create new layers and move items into them, or move elements from one layer to another at any time. The Layers panel provides an easy way to select, hide, lock, and change the appearance attributes of artwork. You can even create template layers, which you can use to trace artwork, and exchange layers with Photoshop.

Example of composite art and how layers break out individually.
—From Illustrator Help
Creating layers
By default, every document begins with one layer. As you create artwork, you can rename and add layers at any time. Placing objects on separate layers lets you easily select and edit them. For example, by placing type on a separate layer, you can change the type all at once without affecting the rest of the artwork.
Next, you’ll change the default layer name, and then create a layer and a sublayer, and learn the difference between the two.
1. If the Layers panel isn’t visible, click the Layers panel icon (![]() ) on the right side of the workspace, or choose Window > Layers.
) on the right side of the workspace, or choose Window > Layers.
Layer 1 (the default name for the first layer) is highlighted, indicating that it is active. The layer also has a triangle (![]() ) in the upper-right corner, indicating that objects on the layer can be edited.
) in the upper-right corner, indicating that objects on the layer can be edited.
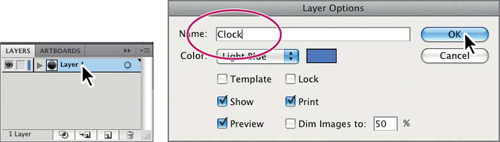
2. In the Layers panel, double-click the layer name to open the Layer Options dialog box. Type Clock in the Name text field, and then click OK.
Now, you’ll create a layer for the clock face elements and a sublayer for the clock numbers. Sublayers help you organize content within a layer.
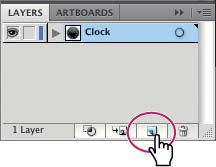
3. Click the Create New Layer button (![]() ) at the bottom of the Layers panel, or choose New Layer from the Layers panel menu (
) at the bottom of the Layers panel, or choose New Layer from the Layers panel menu (![]() ).
).
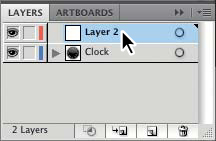
4. Double-click Layer 2. In the Layer Options dialog box, change the name to Face, make sure Red is chosen in the Color menu, and then click OK.
The new Face layer is added above the Clock layer and becomes active.
5. Click the layer named Clock once and then Alt-click (Windows) or Option-click (Mac OS) the Create New Sublayer button (![]() ) at the bottom of the Layers panel to create a new sublayer. The Layer Options dialog box appears. Creating a new sublayer opens the layer to show existing sublayers.
) at the bottom of the Layers panel to create a new sublayer. The Layer Options dialog box appears. Creating a new sublayer opens the layer to show existing sublayers.

Note
To create a new sublayer without setting options or naming the sublayer, click the Create New Sublayer button without pressing the Alt (Windows) or Option (Mac OS) key. Layers and sublayers that aren’t named are numbered in sequence, for example, the second layer is labeled Layer 2.
A sublayer is a layer within another layer. Sublayers are used to organize content within a layer without grouping or ungrouping content.
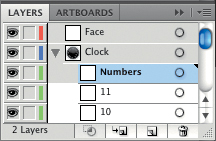
6. In the Layer Options dialog box, change the name to Numbers, and then click OK. The new sublayer appears directly beneath its main layer, Clock, and is selected.

Layers and color
By default, Illustrator assigns a unique color (up to nine colors) to each layer in the Layers panel. The color displays next to the layer name in the panel. The same color displays in the illustration window in the bounding box, path, anchor points, and center point of a selected object.
Each layer and sublayer can have a unique color.
You can use this color to quickly locate an object’s corresponding layer in the Layers panel, and you can change the layer color to suit your needs.
—From Illustrator Help
Moving objects and layers
By rearranging the layers in the Layers panel, you can reorder layered objects in your artwork. You can also move selected objects from one layer or sublayer to another. On an artboard, objects on layers higher in the Layers panel list are in front of objects on layers lower in the list.
First, you’ll move the clock numbers into their own sublayer.
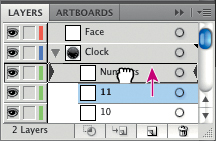
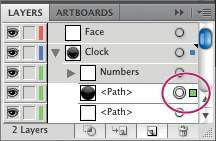
1. In the Layers panel, click the row for the 11 object and drag it onto the Numbers sublayer. Release the mouse button when you see the large black triangles at either end of the Numbers sublayer. The large triangles indicate that you are adding something to that layer. Notice the arrow that appears to the left of the Numbers sublayer when you release the mouse button. This indicates that the sublayer has content.
2. Click the triangle to the left of the Numbers sublayer thumbnail to open the sublayer and see its contents.
Tip
Keeping layers and sublayers closed can make it easier to navigate content in the Layers panel.
3. Repeat step 1 for each of the remaining number sublayers in the Layers panel. This better organizes the panel and makes it easier to find content later.
Tip
You can use the Shift key to select multiple sublayers and drag them all in at once.
4. Click the triangle to the left of the Numbers sublayer to hide its contents. Hiding layer and/or sublayer contents makes the Layers panel easier to work with.
5. Choose File > Save.
Now, you’ll move the clock face artwork to the Face layer, to which you’ll later add the map, hands, and brand name of the clock. You’ll also rename the Clock layer to reflect the new organization of the artwork.
6. In the artwork, using the Selection tool (![]() ), click behind the numbers to select the clock face. In the Layers panel, an object named <Path> becomes active, as indicated by the selected-art indicator (
), click behind the numbers to select the clock face. In the Layers panel, an object named <Path> becomes active, as indicated by the selected-art indicator (![]() ) to the right of the upper <Path> layer.
) to the right of the upper <Path> layer.
Tip
To select objects behind other objects, you can also press the Ctrl (Windows) or Cmd (Mac OS) key and click multiple times where the objects overlap to select behind. To learn more about selecting behind, see Lesson 2, “Selecting and Aligning.”
7. Drag the selected-art indicator (![]() ) on the <Path> sublayer in the Layers panel up to the right of the target icon (
) on the <Path> sublayer in the Layers panel up to the right of the target icon (![]() ) on the Face layer.
) on the Face layer.
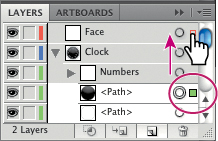
This action moves the <Path> object to the Face layer. The color of the selection lines in the artwork changes to the color of the Face layer, which is red in this case.
Because the Face layer is on top of the Clock layer and the Numbers sublayer, the clock numbers are covered. Next, you’ll move the Numbers sublayer into a different layer and rename the Clock layer.
8. Choose Select > Deselect.
9. In the Layers panel, drag the Numbers sublayer into the Face layer. Release the mouse button when you see the indicator bar with large black triangles at either end of the Face layer in the Layers panel.
Now, you can see the numbers again because they are on the top (Face) layer.
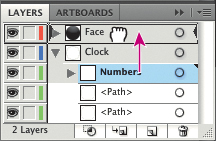
10. Double-click the Clock layer to display the Layer Options dialog box. Change the layer name to Frame, and then click OK.
11. Choose File > Save.
Locking layers
As you edit objects on a layer, use the Layers panel to lock other layers and prevent selecting or changing the rest of the artwork.
Now, you’ll lock all of the layers except the Numbers sublayer so that you can easily edit the clock numbers without affecting objects on other layers. Locked layers cannot be selected or edited in any way.
1. Click the triangle to the left of the Frame layer to collapse the layer view.
2. Select the edit column to the right of the eye icon on the Frame layer, to lock the layer. The lock icon (![]() ) indicates that a layer and all its content are locked.
) indicates that a layer and all its content are locked.

3. Repeat the previous step for the <Path> sublayer below the Numbers sublayer.
You can unlock individual layers by deselecting the lock icon (![]() ). Clicking again in the edit column relocks the layer. Pressing the Alt (Windows) or Option (Mac OS) key as you click in the edit column alternately locks and unlocks all other layers.
). Clicking again in the edit column relocks the layer. Pressing the Alt (Windows) or Option (Mac OS) key as you click in the edit column alternately locks and unlocks all other layers.
Now, you’ll change the type size and font of the numbers.
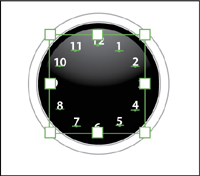
4. Click the Selection column to the right of the Numbers sublayer in the Layers panel to select all the content on that layer.
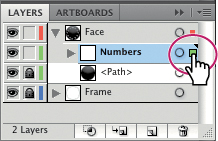
The Numbers sublayer now has a larger green square, indicating that everything on that sublayer is selected. On the artboard, you can see that the numbers are selected as well.
Next, you will change the font, font style, and font size for the selected numbers.
5. In the Control panel, choose Myriad Pro from the Font menu, Semibold from Font Style menu, and type 28. in the Font Size field.
Note
Myriad Pro is an OpenType font that is included with Illustrator CS5.
6. Use the Color panel (![]() ) if you want to change the color of the selected numbers.
) if you want to change the color of the selected numbers.
7. In the Layers panel, deselect the lock icons (![]() ) next to the <Path> and Frame layers to unlock them.
) next to the <Path> and Frame layers to unlock them.
8. Choose Select > Deselect.
9. Choose File > Save.
Viewing layers
The Layers panel lets you hide layers, sublayers, or individual objects from view. When a layer is hidden, the content on the layer is also locked and cannot be selected or printed. You can also use the Layers panel to display layers or objects individually, in either preview or outline mode.
Now, you’ll edit the frame on the clock, using a painting technique to create a three-dimensional effect on the frame.
Tip
Alt (Windows) or Option (Mac OS) click the layer eye icon to hide or show a layer. Hiding layers prevents them from being changed.
1. In the Layers panel, click the Frame layer to select it, and then Alt-click (Windows) or Option-click (Mac OS) the eye icon (![]() ) to the left of the Frame layer name to hide the other layers.
) to the left of the Frame layer name to hide the other layers.
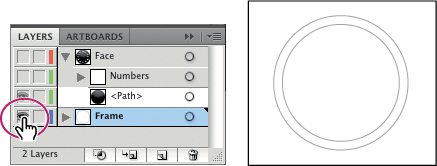
Alt-click or Option-click the eye icon to hide all other layers.
2. Using the Selection tool (![]() ), on the artboard, click the inner circle of the frame to select it. Then Shift-click the outer circle to add it to the selection.
), on the artboard, click the inner circle of the frame to select it. Then Shift-click the outer circle to add it to the selection.

3. With the two circles selected, click Fill color in the Control panel, and then select the clock.frame swatch in the Swatches panel that appears, to paint the circles with a custom gradient.

4. Shift-click the outer circle to deselect it. The inner circle remains selected.
5. Select the Gradient tool (![]() ) in the Tools panel. Position the pointer over the inner circle, just below the top of the circle, so a horizontal bar appears. Click the pointer, then drag in a vertical line straight down, to change the direction of the gradient. Release the mouse button.
) in the Tools panel. Position the pointer over the inner circle, just below the top of the circle, so a horizontal bar appears. Click the pointer, then drag in a vertical line straight down, to change the direction of the gradient. Release the mouse button.
Note
When you first select the Gradient tool, a horizontal line appears in the selected circle. This is the default direction of the gradient fill.
The Gradient tool works only on selected objects that are filled with gradients. To learn more about the Gradient tool, see Lesson 10, “Blending Colors and Shapes.”
6. Choose Select > Deselect, and then File > Save. Try selecting the outer circle and changing the direction of the gradient with the Gradient tool.
7. In the Layers panel, choose Show All Layers from the panel menu (![]() ).
).
As you edit objects in layered artwork, you can display individual layers in outline mode, keeping the other layers in preview mode.
8. Ctrl-click (Windows) or Command-click (Mac OS) the eye icon (![]() ) next to the Face layer to switch to outline mode for that layer.
) next to the Face layer to switch to outline mode for that layer.
This action lets you see the gradient-filled circle behind the clock face. Displaying a layer in outline mode is also useful for viewing the anchor points or center points on objects without selecting them.
Ctrl-click (Windows) or Command-click (Mac OS) the eye icon to enter outline mode.
9. Control-click (Windows) or Command-click (Mac OS) the eye icon (![]() ) next to the Face layer to return to preview mode for that layer. Choose Select > Deselect.
) next to the Face layer to return to preview mode for that layer. Choose Select > Deselect.
Pasting layers
To complete the clock, you’ll copy and paste the remaining pieces of artwork from another file. You can paste a layered file into another file and keep the layers intact.
1. Choose File > Open, and open the Details.ai file, located in the Lesson08 folder in the Lessons folder on your hard disk.

2. To see how the objects in each layer are organized, Alt-click (Windows) or Option-click (Mac OS) the eye icons for each layer in the Layers panel to show one layer and hide the others. You can also click the triangles (![]() ) to the left of the layer names to expand and collapse the layers for further inspection. When you’re finished, make sure that all the layers are showing and that they are collapsed.
) to the left of the layer names to expand and collapse the layers for further inspection. When you’re finished, make sure that all the layers are showing and that they are collapsed.
3. Choose Select > All, and then Edit > Copy to select and copy the clock details to the clipboard.
4. Choose File > Close to close the Details.ai file without saving any changes. If a warning dialog box appears, click No (Windows) or Don’t Save (Mac OS).
5. In the clock.ai file, choose Paste Remembers Layers from the Layers panel menu (![]() ). A check mark next to the option indicates that it’s selected.
). A check mark next to the option indicates that it’s selected.
Selecting the Paste Remembers Layers option indicates that when multiple layers from another file are pasted into the artwork, they’re added as individual layers in the Layers panel. If the option is not selected, all objects are pasted into the active layer.
6. Choose Edit > Paste In Front to paste the details into the clock. Choose Select > Deselect.
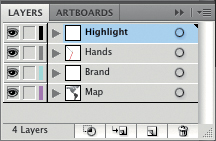
The Paste In Front command pastes the objects from the clipboard to a position relative to the original position in the Details.ai file. The Paste Remembers Layers option causes the Details.ai layers to be pasted as four separate layers at the top of the Layers panel (Highlight, Hands, Brand, Map).
Now, you will reposition some of the layers.
7. Close any open layers by toggling the arrow to the left of the layer names. Move the Frame layer above the Highlight layer, and then the Face layer above the Frame layer. If necessary, drag the bottom of the Layers panel down to reveal all the layers.
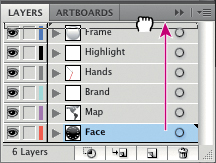
Release the mouse button when the indicator bar with black triangles extends the full column width above the Frame and Highlight layers so that you want to create a separate layer, not a sublayer. If any content is still selected on the artboard, choose Select > Deselect.
Tip
As you drag layers in the Layers panel, the panel scrolls up or down for you. You can also drag the bottom or lower-right corner of the Layers panel to make it taller.
Now, you’ll move the Hands and Brand layers into the Face layer, and the Highlight layer in front of the Frame layer.
8. In the Layers panel, select the Highlight layer, and drag it up between the Face and Frame layers.
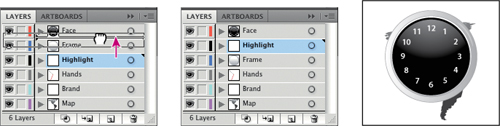
9. Click the arrow to the left of the Face layer to show the sublayers.
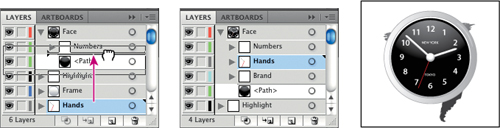
10. Click the Hands layer, then Shift-click the Brand layer to select both.
11. Drag the selected layers up between the Numbers and <Path> sublayers. When the insertion bar appears between those sublayers, release the mouse button to make the Hands and Brand layers into sublayers of the Face layer.
Note
You may want to resize the Layers panel by dragging the bottom of the Layers panel down so it is easier to see the layers.
12. Choose File > Save.
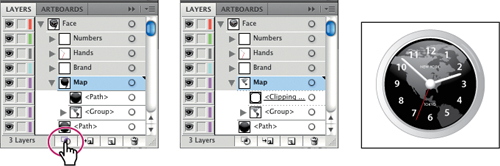
Creating clipping masks
The Layers panel lets you create clipping masks to control whether artwork on a layer (or in a group) is hidden or revealed. A clipping mask is an object or group of objects whose shape masks artwork below it so that only artwork within the shape is visible.
Now, you’ll create a clipping mask with the circle shape in the Face layer. You’ll group it with the Map sublayer so that only the map shows through the circle shape.
1. Drag the bottom of the Layers panel down to reveal all the layers.
2. In the Layers panel, drag the Map layer up until the double lines of the insertion bar are highlighted above the <Path> sublayer within the Face layer. Release the mouse button.
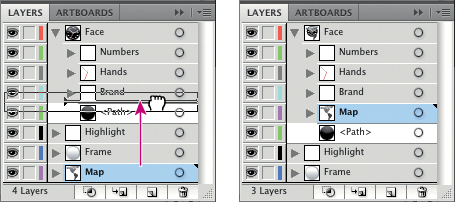
In the Layers panel, a masking object must be above the objects it masks. Because you want to mask only the map, you’ll copy the circular <Path> object to the top of the Map sublayer before you create the clipping mask.
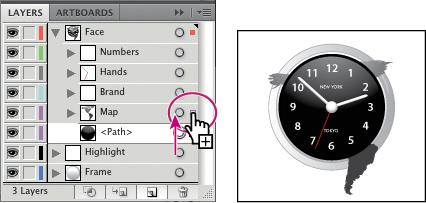
3. Click the selection column in the Layers panel to the right of the <Path> sublayer. Notice that the path is selected on the artboard.
4. Press the Alt (Windows) or Option (Mac OS) key, and click and drag the selected-art indicator (![]() ) on the <Path> sublayer straight up to the right of the target icon (
) on the <Path> sublayer straight up to the right of the target icon (![]() ) on the Map sublayer.
) on the Map sublayer.
5. Choose Select > Deselect.
6. Click the triangle (![]() ) to the left of the Map sublayer in the Layers panel to expand the layer view.
) to the left of the Map sublayer in the Layers panel to expand the layer view.
7. Make sure that the <Path> sublayer is at the top of the Map sublayer (above the <Group> sublayer), moving it if necessary. (Clipping masks must be the first object in a layer or group.)
Note
Deselecting the artwork on the artboard is not necessary to complete the next steps, but it can be helpful for viewing the artwork.
8. Select the Map sublayer to highlight it in the Layers panel.
9. Click the Make/Release Clipping Mask button (![]() ) at the bottom of the Layers panel. Notice that all the sublayer dividing lines are now dotted and the first path name has changed to <Clipping Path>. The name is also underlined to indicate that it is the masking shape. On the artboard, the <Path> sublayer has clipped the parts of the map that extended outside of the clock face.
) at the bottom of the Layers panel. Notice that all the sublayer dividing lines are now dotted and the first path name has changed to <Clipping Path>. The name is also underlined to indicate that it is the masking shape. On the artboard, the <Path> sublayer has clipped the parts of the map that extended outside of the clock face.
Note
You may not be able to see the entire name, <Clipping Path>, in the Layers panel.
10. In the Layers panel, click the triangle next to the Map sublayer name to collapse it.
11. Choose File > Save.
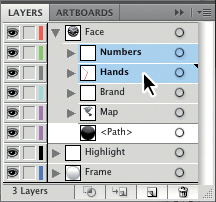
Merging layers
To streamline your artwork, you can merge layers. Merging layers combines the contents of all selected layers into one layer.
1. Click the Numbers sublayer in the Layers panel to highlight it, and then Shift-click to highlight the Hands sublayer.
Note
Layers can only merge with other layers that are on the same hierarchical level in the Layers panel. Likewise, sublayers can only merge with other sublayers that are in the same layer and at the same hierarchical level. Objects can’t be merged with other objects.
Notice that the current layer indicator (![]() ) shows the last highlighted layer as the active layer. The last layer you select determines the name and color of the merged layer.
) shows the last highlighted layer as the active layer. The last layer you select determines the name and color of the merged layer.
2. Choose Merge Selected from the Layers panel menu (![]() ) to merge the Numbers sublayer into the Hands sublayer.
) to merge the Numbers sublayer into the Hands sublayer.
The objects on the merged layers retain their original stacking order, and are added above the objects in the destination layer.
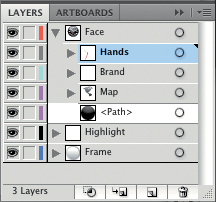
3. Click the Highlight layer to select it, and then Shift-click the Frame layer.
4. Choose Merge Selected from the Layers panel menu (![]() ) to merge the objects from the Highlight layer into the Frame layer.
) to merge the objects from the Highlight layer into the Frame layer.
5. Choose File > Save.
Applying appearance attributes to layers
You can apply appearance attributes such as styles, effects, and transparency to layers, groups, and objects using the Layers panel. When an appearance attribute is applied to a layer, any object on that layer takes on that attribute. If an appearance attribute is applied only to a specific object on a layer, it affects only that object, not the entire layer. To learn more about working with appearance attributes, see Lesson 13, “Applying Appearance Attributes and Graphic Styles.”
You will apply an effect to an object on one layer. Then you’ll copy that effect to another layer to change all objects on that layer.
1. In the Layers panel, collapse the Face layer and expand the Frame layer to reveal all its content.
2. Click to select the bottom <Path> sublayer in the Frame layer.
3. Click the target icon (![]() ) to the right of the lower <Path> sublayer name. Clicking the target icon indicates that you want to apply an effect, style, or transparency change.
) to the right of the lower <Path> sublayer name. Clicking the target icon indicates that you want to apply an effect, style, or transparency change.
Note
Clicking the target icon also selects the object(s) on the artboard.
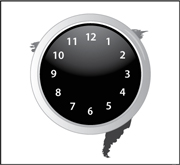
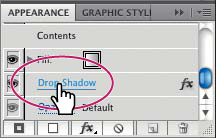
4. Choose Effect > Stylize > Drop Shadow from the Illustrator Effects. In the Drop Shadow dialog box, leave the settings at their default values, and then click OK. A drop shadow appears on the outer edge of the clock.
Note
There are two Stylize commands in the Effect menu. Choose the top Stylize menu command, which is in the Illustrator Effects.
Notice that the target icon (![]() ) is now shaded on the lower <Path> sublayer, indicating that the object has appearance attributes applied to it.
) is now shaded on the lower <Path> sublayer, indicating that the object has appearance attributes applied to it.
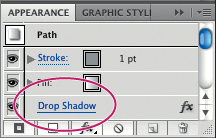
5. Click the Appearance panel icon (![]() ) on the right side of the workspace to reveal the Appearance panel. If the Appearance panel isn’t visible, choose Window > Appearance. Notice that Drop Shadow has been added to the list of appearance attributes for the selected object.
) on the right side of the workspace to reveal the Appearance panel. If the Appearance panel isn’t visible, choose Window > Appearance. Notice that Drop Shadow has been added to the list of appearance attributes for the selected object.
6. Change Stroke Weight to 0. pt in the Control panel.
7. Choose Select > Deselect.
You will now use the Layers panel to copy an appearance attribute into a layer and then edit it.
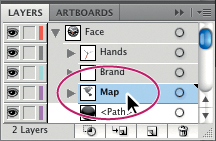
8. Click the Layers panel icon on the right side of the workspace to open the Layers panel. Click the arrow to the left of the Face layer to reveal its contents. If necessary, drag the bottom of the Layers panel down to display the entire list. Make sure that the triangles to the left of the Hands, Brand, and Map sublayers are toggled closed.
9. With the Selection tool (![]() ), click the clock hands in the artwork to select them.
), click the clock hands in the artwork to select them.
10. Choose Locate Object from the Layers panel menu (![]() ). This selects and scrolls to the group (<Group> appears in the Layers panel) that contains the clock hands in the Layers panel. You may need to scroll in the Layers panel for the next step.
). This selects and scrolls to the group (<Group> appears in the Layers panel) that contains the clock hands in the Layers panel. You may need to scroll in the Layers panel for the next step.
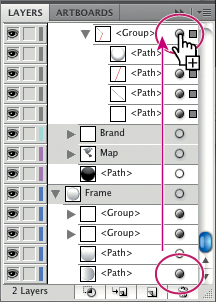
11. Press the Alt (Windows) or Option (Mac OS) key and drag the shaded target icon of the bottom <Path> sublayer in the Frame layer to the target icon of the clock hands <Group> sublayer, without releasing the mouse button. The hand pointer with a plus sign indicates that the appearance is being copied.
Note
You can drag and copy the shaded target icon to any layer or sublayer, to apply the properties found in the Appearance panel.
12. When the target icon of the <Group> sublayer turns light gray, release the mouse button and then the Alt or Option key. The drop shadow is now applied to the entire <Group> sublayer, as indicated by the shaded target icon.
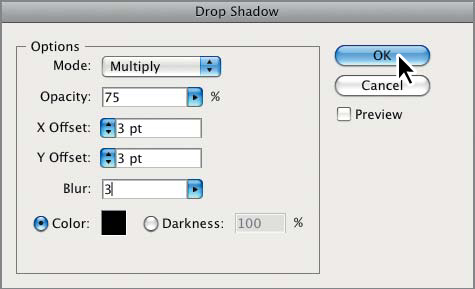
Now, you’ll edit the drop shadow attribute for the type and clock hands to tone down the effect.
13. Click the triangle to the left of the <Group> sublayer under the Hands layer to toggle it closed.
14. In the Layers panel, click the target icon (![]() ) for the <Group> sublayer that contains the clock hands. This automatically selects the objects on the <Group> sublayer and deselects the object on the Frame layer.
) for the <Group> sublayer that contains the clock hands. This automatically selects the objects on the <Group> sublayer and deselects the object on the Frame layer.
15. Click the Appearance panel icon (![]() ) on the right side of the workspace to reveal the Appearance panel. In the Appearance panel, click the words Drop Shadow, scrolling down if necessary.
) on the right side of the workspace to reveal the Appearance panel. In the Appearance panel, click the words Drop Shadow, scrolling down if necessary.
16. In the Drop Shadow dialog box, change X Offset, Y Offset and Blur to 3. pt. Click OK.
17. Choose Select > Deselect.
18. Choose File > Save.
For information on opening layered Photoshop files in Illustrator and working with layered Illustrator files in Photoshop, see Lesson 15, “Combining Illustrator CS5 Graphics with Other Adobe Applications.”
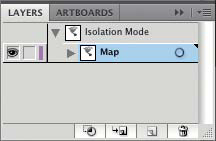
Isolating layers
When a layer is in isolation mode, objects on that layer are isolated so that you can easily edit them without affecting other layers. Next, you will enter isolation mode for a layer and make some simple edits.
1. Open the Layers panel by clicking the Layers panel icon.
2. Click the triangles to the left of the sublayers in the Layers panel to close them all. Make sure that the sublayers of the Face layer are showing.
3. Click to select the Map sublayer in the Layers panel.
4. Choose Enter Isolation Mode from the Layers panel menu (![]() ).
).
In isolation mode the contents of the Map sublayer appear on top of all the objects on the artboard. The rest of the content on the artboard is dimmed and locked.
The Layers panel now shows a layer called Isolation Mode and a sublayer that contains the map content.
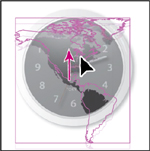
5. Select the Selection tool (![]() ), and click the map on the artboard to select it.
), and click the map on the artboard to select it.
6. Choose View > Smart Guides to deselect them temporarily.
7. Drag the map up to position it toward the top of the dark inner circle.
8. Press Escape to exit isolation mode. Notice that the content is no longer locked and the Layers panel reveals all the layers and sublayers again.
9. Chose Select > Deselect.
Now that the artwork is complete, you may want to combine all the layers into a single layer and delete the empty layers. This is called flattening artwork. Delivering finished artwork in a single layer file can prevent accidents, such as hiding layers and omitting parts of the artwork during printing.
Tip
To flatten specific layers without deleting hidden layers, select the layers you want to flatten, and then choose Merge Selected from the Layers panel menu.
For a complete list of shortcuts that you can use with the Layers panel, see “Keyboard shortcuts” in Illustrator Help.
10. Choose File > Save.
11. Choose File > Close.
Exploring on your own
When you print a layered file, only the visible layers print, in the same order in which they appear in the Layers panel, with the exception of template layers, which do not print even if they’re visible. Template layers are locked, dimmed, and non-printing layers. Objects on template layers neither print nor export.
Now that you know how to work with layers, try creating layered artwork by tracing an image on a template layer. is For practice, you can use the bitmap photo image of a goldfish, or your own artwork or photo images.
1. Choose File > New to create a new file for your artwork.
2. Choose File > Place. In the dialog box, select the goldfish.ai file, located in the Lesson08 folder, in the Lessons folder on your hard disk; alternatively, locate your file containing the artwork or image you want to use as a template. Click Place to add the placed file to Layer 1.
3. Create the template layer by choosing Template from the Layers panel menu or choosing Options for Layer 1 and selecting Template in the Layer Options dialog box.
4. Click the Create New Layer button to create a new layer on which to draw.
5. With Layer 2 active, use any drawing tool to trace over the template, creating new artwork.
6. Create additional layers to separate and edit various components of the new artwork.
7. If you want, delete the template layer after you finish to reduce the size of the file.
Tip
For information on custom views, search for “Use multiple windows and views” in Illustrator Help.
Review questions
1 Name two benefits of using layers when creating artwork.
2 How do you hide layers? How do you show individual layers?
3 Describe how to reorder layers in a file.
4 How can you lock layers?
5 What is the purpose of changing the selection color for a layer?
6 What happens if you paste a layered file into another file? Why is the Paste Remembers Layers option useful?
7 How do you move objects from one layer to another?
8 How do you create a layer clipping mask?
9 How do you apply an effect to a layer? How can you edit that effect?
10 What is the purpose of entering isolation mode?
Review answers
1. The benefits of using layers when creating artwork include: protecting artwork that you don’t want to change, hiding artwork that you aren’t working with so that it’s not distracting, and controlling what prints.
2. To hide a layer, click to deselect the eye icon to the left of the layer name. Select the blank, leftmost column (the Visibility column) to show a layer.
3. You reorder layers by selecting a layer name in the Layers panel and dragging the layer to its new location. The order of layers in the Layers panel controls the document’s layer order—topmost in the panel is frontmost in the artwork.
4. You can lock layers in several different ways:
• You can click in the edit column to the left of the layer name. A lock icon appears, indicating that the layer is locked.
• You can choose Lock Others from the Layers panel menu to lock all layers but the active layer.
• You can hide a layer to protect it.
5. The selection color controls how selected anchor points and direction lines are displayed on a layer, and helps you identify the different layers in your document.
6. The paste commands paste layered files or objects copied from different layers into the active layer, by default. The Paste Remembers Layers option keeps the original layers intact when the objects are pasted.
7. Select the objects you want to move, and drag the selected-art indicator (to the right of the target icon) to another layer in the Layers panel.
8. Create a clipping mask on a layer by selecting the layer and clicking the Make/Release Clipping Mask button. The topmost object in the layer becomes the clipping mask.
9. Click the target icon for the layer to which you want to apply an effect. Then choose an effect from the Effect menu. To edit the effect, make sure that the layer is selected, and then click the name of the effect in the Appearance panel. The effect’s dialog box opens, and you can change the values.
10. Isolation mode isolates objects so that you can easily select and edit content on a single layer or sublayer.