
10. Blending Colors and Shapes
This lesson will take approximately an hour to complete. If needed, remove the previous lesson folder from your hard disk and copy the Lesson10 folder onto it.
![]()

Gradient fills are graduated blends of two or more colors. Using the Gradient tool and Gradient panel, you can create or modify a gradient fill. With the Blend tool, you can blend the shapes and colors of objects together into a new blended object, or a series of intermediate shapes.
Getting started
You’ll explore various ways to create your own color gradients, and blend colors and shapes together using the Gradient panel and the Blend tool.
Before you begin, you’ll restore the default preferences for Adobe® Illustrator® CS5. Then you’ll open the finished art file for this lesson to see what you’ll create.
1. To ensure that the tools and panels function as described in this lesson, delete or rename the Adobe Illustrator CS5 preferences file. See “Restoring default preferences” on page 3.
2. Start Adobe Illustrator CS5.
Note
If you have not already done so, copy the resource files for this lesson onto your hard disk from the Lesson10 folder on the Adobe Illustrator CS5 Classroom in a Book CD. See “Copying the Classroom in a Book files” on page 2.
3. Choose File > Open, and open the L10end_1.ai file in the Lesson10 folder, located in the Lessons folder on your hard disk.
The text, background, steam, and coffee liquid are all filled with gradients. The objects that make up the colored beans on the coffee cup, and the coffee beans to the left of the cup, have been blended to create new objects.

4. Choose View > Zoom Out to make the finished artwork smaller, if you want to leave it on your screen as you work. (Use the Hand tool (![]() ) to move the artwork where you want it in the window.) If you don’t want to leave the image open, choose File > Close.
) to move the artwork where you want it in the window.) If you don’t want to leave the image open, choose File > Close.
To begin working, you’ll open an existing art file.
5. Choose File > Open, and open the L10start_1.ai file in the Lesson10 folder, located in the Lessons folder on your hard disk.
6. Choose File > Save As, name the file coffee.ai, and select the Lesson10 folder in the Save In menu. Leave the Save As Type option set to Adobe Illustrator (*.AI) (Windows) or the Format option set to Adobe Illustrator (ai) (Mac OS), and then click Save. In the Illustrator Options dialog box, leave the Illustrator options at their default settings, and then click OK.
Working with gradients
A gradient fill is a graduated blend between two or more colors. You can create your own gradients, or you can use the gradients provided with Adobe Illustrator, and then edit them and save them as swatches for later use.
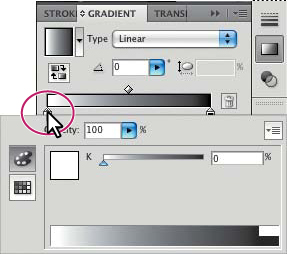
You can use the Gradient panel (Window > Gradient) or the Gradient tool (![]() ) to apply, create, and modify gradients. In the Gradient panel, the Gradient Fill box displays the current gradient colors and gradient type. When you click the Gradient Fill box, the selected object is filled with the gradient. The Gradient menu (
) to apply, create, and modify gradients. In the Gradient panel, the Gradient Fill box displays the current gradient colors and gradient type. When you click the Gradient Fill box, the selected object is filled with the gradient. The Gradient menu (![]() ) lists the default and saved gradients.
) lists the default and saved gradients.
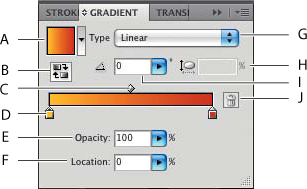
A. Gradient Fill box
B. Reverse Gradient
C. Gradient slider
D. Color stop
E. Opacity
F. Location
G. Gradient type
H. Aspect ratio
I. Angle
J. Delete Stop
By default, the panel includes a start and end color stop. You can add more color stops by clicking below the gradient slider. Double-clicking a color stop opens a panel where you can choose a color from swatches, color sliders, or the eyedropper.
In the Gradient panel, the left gradient stop under the gradient slider marks the starting color; the right gradient stop marks the ending color. A gradient stop is the point at which a gradient changes from one color to the next.
Creating and applying a linear gradient
To begin the lesson, you’ll create a gradient fill for the background.
1. Choose Essentials from the workspace switcher in the Application bar.
2. Choose View > Fit Artboard In Window.
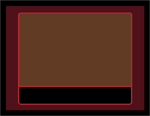
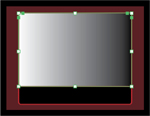
3. Using the Selection tool (![]() ), click to select the larger, top rectangle with rounded corners in the background of the artboard.
), click to select the larger, top rectangle with rounded corners in the background of the artboard.
The background is painted with a brown color fill and a red stroke, as shown in the Fill and Stroke boxes toward the bottom of the Tools panel. The Gradient box below the Fill and Stroke boxes shows the last used gradient. The default gradient fill is a black-and-white gradient. If you select a gradient-filled object or a gradient swatch in the Swatches panel, the gradient fill in the Tools panel changes to the fill of the selected object or swatch.
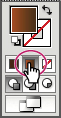
4. Click the Gradient box (![]() ) near the bottom of the Tools panel.
) near the bottom of the Tools panel.
The default black-and-white gradient appears in the Fill box, and is applied to the fill of the selected background shape.
5. Choose Window > Gradient if the Gradient panel is not visible on the right side of the workspace.
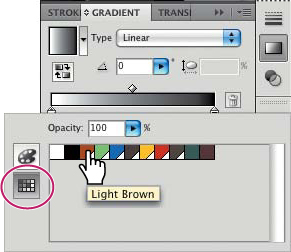
6. In the Gradient panel, double-click the white, leftmost gradient stop to select the starting color of the gradient. The tip of the gradient stop appears darker to indicate that it’s selected.
A new panel appears when you double-click a color stop. In this panel, you can change the color of the stop, using swatches or the Color panel.
7. In the panel that appears below the Gradient panel, click the Swatches button (![]() ). Click to select the swatch named Light Brown. Notice the gradient change on the artboard. Press Escape or click in a blank area of the Gradient panel to return to the Gradient panel.
). Click to select the swatch named Light Brown. Notice the gradient change on the artboard. Press Escape or click in a blank area of the Gradient panel to return to the Gradient panel.
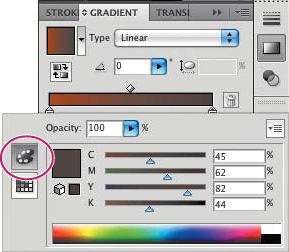
8. Double-click the black color stop in the Gradient panel to edit the color.
9. In the panel that appears below the Gradient panel, click the Color button (![]() ) to open the Color panel. Choose CMYK from the Color panel menu (
) to open the Color panel. Choose CMYK from the Color panel menu (![]() ) if it is not already showing. Change the values to C=45., M=62., Y=82., and K=44.. Press Escape or click in a blank area of the Gradient panel to return to the Gradient panel.
) if it is not already showing. Change the values to C=45., M=62., Y=82., and K=44.. Press Escape or click in a blank area of the Gradient panel to return to the Gradient panel.
Tip
To move between text fields, press Tab. Press Enter or Return to apply the last value typed.
Next, you’ll save the gradient in the Swatches panel.
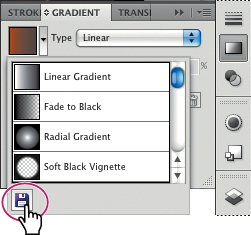
10. To save the gradient, click the Gradient menu button (![]() ), and then click the Add To Swatches button (
), and then click the Add To Swatches button (![]() ) at the bottom of the panel that appears.
) at the bottom of the panel that appears.
The Gradient menu lists all the default and pre-saved gradients that you can choose.
Next, you will rename the gradient swatch in the Swatches panel.
Tip
You can save a gradient by selecting an object with a gradient fill, clicking the Fill box in the Tools panel, and then clicking the New Swatch button (![]() ) at the bottom of the Swatches panel.
) at the bottom of the Swatches panel.
11. Click the Swatches panel icon on the right side of the workspace to open the Swatches panel. In the Swatches panel, double-click New Gradient Swatch 1 to open the Swatch Options dialog box. Type Background in the Swatch Name field, and then click OK.
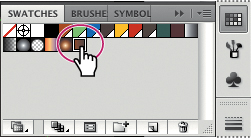
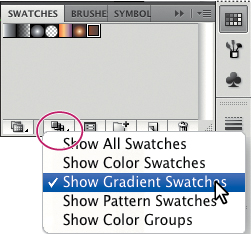
12. To display only gradient swatches in the Swatches panel, click the Show Swatch Kinds Menu button (![]() ) at the bottom of the Swatches panel, and choose Show Gradient Swatches from the menu.
) at the bottom of the Swatches panel, and choose Show Gradient Swatches from the menu.
13. With the rectangle still selected in the artboard, try some of the different gradients by clicking them in the Swatches panel. Click the Background gradient you just saved to make sure it is applied before continuing to the next step.
Notice that some of the gradients have several colors. You’ll learn how to make a gradient with multiple colors later in this lesson.
14. Click the Show Swatch Kinds Menu button (![]() ) at the bottom of the Swatches panel and choose Show All Swatches from the menu.
) at the bottom of the Swatches panel and choose Show All Swatches from the menu.
15. Choose Select > Deselect.
16. Choose File > Save.
Adjusting the direction and angle of a gradient blend
Once you have painted an object with a gradient fill, you can adjust the direction, origin, and the beginning and end points of the gradient using the Gradient tool.
Now, you’ll adjust the gradient fill in the background shape.
1. Use the Selection tool (![]() ) to select the same rectangle in the background.
) to select the same rectangle in the background.
2. Select the Gradient tool (![]() ) in the Tools panel.
) in the Tools panel.
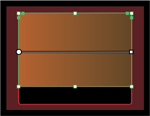
The Gradient tool works only on selected objects that are filled with a gradient. Notice the horizontal gradient annotator (bar) that appears in the middle of the rectangle. The bar indicates the direction of the gradient. The larger circle shows the starting point of the gradient, and the smaller square is the ending point.
3. Position the pointer over the gradient annotator. It turns into the gradient slider, much like the one in the Gradient panel. You can use the gradient slider to edit gradient colors and more, without opening the Gradient panel.

Note
If you move the pointer to different areas of the gradient slider, the appearance of the pointer may change. This indicates that different functionality has been activated.
4. With the Gradient tool, Shift-click the top of the rectangle and drag down to change the position and direction of the starting and ending colors of the gradient.
Holding down the Shift key constrains the gradient to 45 degree angles.
Practice changing the gradient in the rectangle. For example, drag inside the rectangle to create a short gradient with distinct color blends; drag a longer distance outside the rectangle to create a longer gradient with more subtle color blends. You can also drag up to transpose the colors and reverse the direction of the blend.
Next, you will rotate and reposition the gradient.
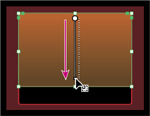
5. With the Gradient tool, position the pointer just off the small white square at the bottom of the gradient annotator. A rotation icon (![]() ) appears. Drag to the right to rotate the gradient in the rectangle.
) appears. Drag to the right to rotate the gradient in the rectangle.
The gradient annotator and the gradient rotate, but the gradient bar stays in the center of the rectangle when you release the mouse button.
Next, you will change the rotation in the Gradient panel.
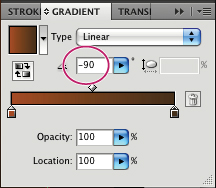
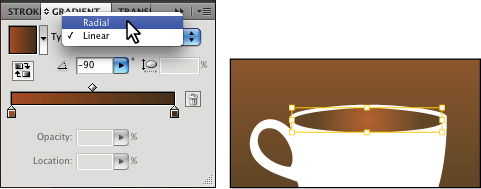
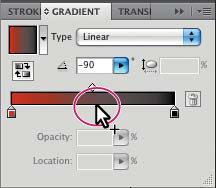
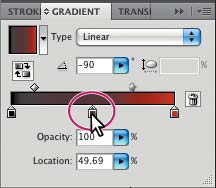
6. Click the Gradient icon (![]() ) on the right side of the workspace to show the Gradient panel, if it isn’t already showing. Change the rotation angle in the Angle field to −90, to return the gradient to vertical. Press Enter or Return to set the value.
) on the right side of the workspace to show the Gradient panel, if it isn’t already showing. Change the rotation angle in the Angle field to −90, to return the gradient to vertical. Press Enter or Return to set the value.
7. With the background rectangle still selected, choose Object > Lock > Selection.
8. Choose File > Save.
Note
Entering the gradient rotation in the Gradient panel, rather than adjusting it directly on the artboard, is useful when you want to achieve consistency and precision.
Creating a radial gradient
You can create linear or radial gradients. Both types of gradient have a starting and ending color. With a radial gradient, the starting color (leftmost color stop) of the gradient defines the center point of the fill, which radiates outward to the ending color (rightmost color stop). Next, you will create and edit a radial gradient.
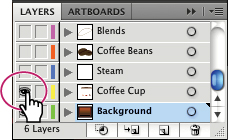
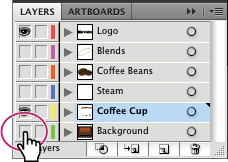
1. Open the Layers panel by clicking the Layers panel icon (![]() ) on the right side of the workspace. Click to select the Visibility column to the left of the Coffee Cup layer (you may need to scroll in the Layers panel).
) on the right side of the workspace. Click to select the Visibility column to the left of the Coffee Cup layer (you may need to scroll in the Layers panel).
2. Use the Selection tool (![]() ) to select the brown-filled ellipse at the top of the coffee cup. This is the coffee in the cup.
) to select the brown-filled ellipse at the top of the coffee cup. This is the coffee in the cup.

3. Select the Zoom tool (![]() ) in the Tools panel and click the coffee cup several times to zoom in.
) in the Tools panel and click the coffee cup several times to zoom in.
4. With the ellipse selected, click the Gradient box (![]() ) at the bottom of the Tools panel to apply the last selected gradient (the Background gradient). The Gradient panel appears on the right side of the workspace.
) at the bottom of the Tools panel to apply the last selected gradient (the Background gradient). The Gradient panel appears on the right side of the workspace.
The linear gradient that you created and saved earlier fills the ellipse. Next, you will change the linear gradient to a radial gradient, and then edit it.
5. In the Gradient panel, choose Radial from the Type menu to convert the gradient to a radial gradient. Keep the ellipse selected.
Changing colors and adjusting the gradient
Once you have filled an object with a gradient, you can use the Gradient tool to add or edit the gradients, including changing the direction, color, and origin. You can also move the start and end points of a gradient.
Next, you will use the Gradient tool to adjust the color of each color stop.
1. With the Zoom tool (![]() ) selected, click once to zoom into the ellipse at the top of the coffee cup.
) selected, click once to zoom into the ellipse at the top of the coffee cup.
2. With the Gradient tool (![]() ), position the pointer over the gradient bar to reveal the gradient slider, which has a dashed circle around it, indicating that it is a radial gradient. Double-click the rightmost color stop to edit the color. In the panel that appears, click the Color button (
), position the pointer over the gradient bar to reveal the gradient slider, which has a dashed circle around it, indicating that it is a radial gradient. Double-click the rightmost color stop to edit the color. In the panel that appears, click the Color button (![]() ), if it’s not already selected.
), if it’s not already selected.
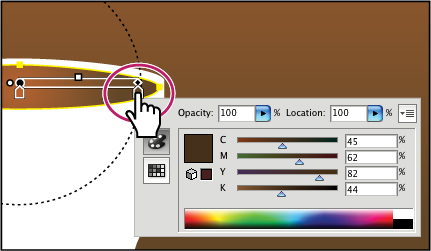
3. Shift-click the Cyan slider and drag a bit to the right to darken the color overall. Press Escape to close the panel.
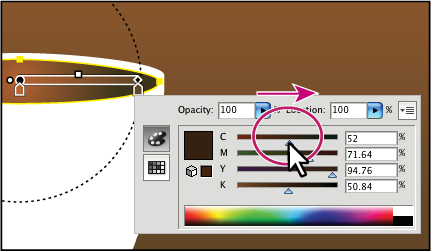
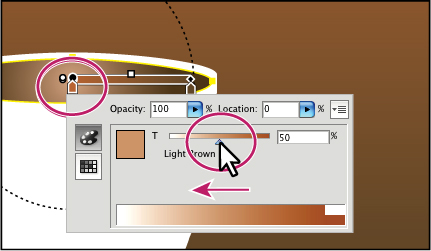
4. In the gradient slider, double-click the leftmost color stop. In the panel that appears, click the Color button (![]() ) and change the tint to 50% by dragging the tint slider to the left (or by typing 50. into the Tint field). Press Escape to close the panel.
) and change the tint to 50% by dragging the tint slider to the left (or by typing 50. into the Tint field). Press Escape to close the panel.
Next, you will change the aspect ratio, origin, and radius for the gradient.
5. In the Gradient panel, change Aspect Ratio to 20., and press Enter or Return to set the ratio.
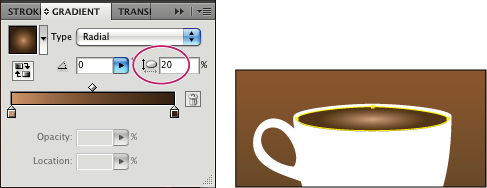
The aspect ratio changes a radial gradient into an elliptical gradient. This makes the coffee appear more realistic.
Note
The aspect ratio is a value between 0.5 and 32767%. As the aspect ratio gets smaller, the ellipse flattens and widens.
Next, you will edit the aspect ratio using the Gradient tool.
6. With the Gradient tool, click the top black circle on the dotted path and drag up to change the aspect ratio.
When you release the mouse button, notice the gradient in the ellipse on the artboard. If the Gradient panel isn’t showing, click the Gradient panel icon. The Aspect Ratio is now larger than the 20 set previously.
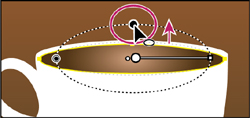
7. Drag the top black circle on the dotted path back down so that the Aspect Ratio is roughly 14% in the Gradient panel.
Next, you will drag the gradient slider to reposition the gradient in the ellipse.
8. With the Gradient tool, click the gradient slider and drag down a little bit to move the gradient in the ellipse.
9. Choose Edit > Undo Gradient to move it back.
10. Choose File > Save.
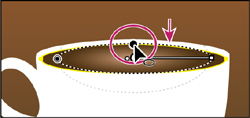
You will now change the radius and origin of the gradient.
11. With the Gradient tool, position the pointer over the ellipse to reveal the gradient slider. Click the black circle on the left of the dotted path and drag to the right to make the radius smaller. This shortens the transition between the leftmost and rightmost color stops.
Tip
To change the radius, you can also drag the second color stop to the right or left.
Try dragging the black circle on the left of the dotted path to the left and to the right to see the effect on the gradient. Make sure to drag it to match the figure above once you are done experimenting.
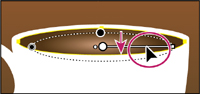
Next, you’ll change the origin of the gradient.
12. With the Gradient tool, click the small white dot to the left of the leftmost color stop and drag to the left. This dot repositions the center of the gradient (the leftmost color stop) without moving the entire gradient bar, and changes the radius of the gradient.
Every gradient has at least two color stops. By editing the color mix of each stop and by adding color stops either in the Gradient panel or using the Gradient tool, you can create custom gradients.
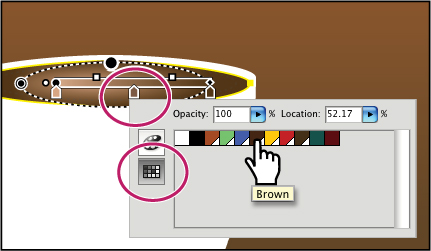
Now, you’ll add a third color to the coffee ellipse, and then you’ll edit it.
13. With the Gradient tool, position the pointer slightly below the bottom edge of the gradient slider. The pointer changes to a white arrow with a plus sign (![]() ). Click just below the middle of the gradient slider to add another color stop.
). Click just below the middle of the gradient slider to add another color stop.
14. Double-click the new color stop to edit the color. In the panel that appears, click the Swatches button (![]() ), and select the Brown swatch. Press Escape to close the panel.
), and select the Brown swatch. Press Escape to close the panel.
Now that you have three color stops, you will adjust the colors by reordering them.
15. With the Gradient tool, click the leftmost color stop and drag to the right, stopping before the middle color stop.
16. Drag the middle color stop all the way to the left end of the gradient slider to swap the two colors.
Drag the leftmost color stop to the right, and the middle color stop to the left.
17. Choose Select > Deselect, and then File > Save.
Applying gradients to multiple objects
You can apply a gradient to multiple objects by first selecting all the objects, then applying a gradient color, and then dragging across the objects with the Gradient tool.
Now, you’ll paint type that has been converted to path outlines with a linear gradient fill, and then edit the colors in it.
1. Choose View > Fit Artboard In Window.
2. Click the Layers panel icon (![]() ) to open the Layers panel. Click to select the Visibility column to the left of the Logo layer (you may need to scroll up in the Layers panel). Click the eye icon (
) to open the Layers panel. Click to select the Visibility column to the left of the Logo layer (you may need to scroll up in the Layers panel). Click the eye icon (![]() ) to the left of the Background layer to deselect visibility for that layer.
) to the left of the Background layer to deselect visibility for that layer.
Note
The text, coffee beans, and ellipse are still showing.
3. Use the Selection tool (![]() ) and click to select the text, “Mike’s Coffee.”
) and click to select the text, “Mike’s Coffee.”
The Mike’s Coffee type has already been converted to path outlines so that you can fill it with a gradient.

The Mike’s Coffee shapes are grouped together. By grouping the letters, you can fill each letter at once with the same gradient. Grouping them also lets you edit the gradient fill globally.
Note
To convert type to path outlines, select it with the Selection tool, and choose Type > Create Outlines. See Lesson 7, “Working with Type,” for more information.
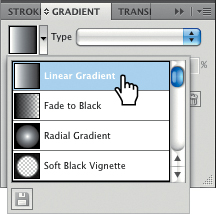
4. Click the Gradient panel icon (![]() ) on the right side of the workspace to open the Gradient panel. Click the Gradient menu button (
) on the right side of the workspace to open the Gradient panel. Click the Gradient menu button (![]() ), and then select Linear Gradient from the Gradient menu. This applies a white-to-black gradient.
), and then select Linear Gradient from the Gradient menu. This applies a white-to-black gradient.
Note
Notice that each letter is filled with the gradient independently. You can adjust this with the Gradient tool.
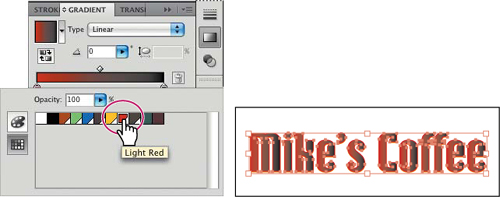
5. In the Gradient panel, double-click the leftmost color stop to select it, so that you can adjust the starting color of the gradient. Click the Swatches button (![]() ), and select the Light Red swatch. Press Escape to close the panel.
), and select the Light Red swatch. Press Escape to close the panel.
Now, you’ll adjust the gradient on the letters so that it blends across all the letters, and then add intermediate colors to the gradient to create a fill with multiple blends between colors.
6. Select the Gradient tool (![]() ) in the Tools panel. Shift-click the letters and drag across them from top to bottom, as shown in the figure below, to apply the gradient to all the letters.
) in the Tools panel. Shift-click the letters and drag across them from top to bottom, as shown in the figure below, to apply the gradient to all the letters.

Next, you will add a color to the gradient by adding a color stop. When you add a color stop, a new diamond appears above the gradient slider to mark the color’s new midpoint.
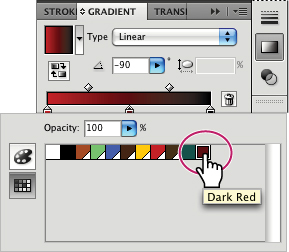
7. In the Gradient panel, click the color bar below the gradient slider to add a stop between the other gradient stops.
8. Double-click the new color stop to edit the color. In the panel that appears, click the Swatches button and select the Dark Red swatch. Press Escape to close the panel.
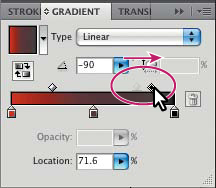
9. To adjust the midpoint between colors, drag the diamond icon between the dark red and black color stops to the right. This gives the gradient more red and less black.
Note
You can delete a color in a gradient by dragging its gradient stop downward and out of the Gradient panel.
Next, you will reverse the gradient colors.
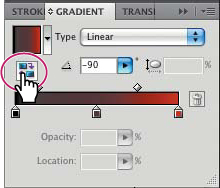
10. With the text still selected, click the Reverse Gradient button (![]() ) in the Gradient panel. The leftmost and rightmost color stops switch positions. You can also reverse the colors in a gradient by drawing in the opposite direction with the Gradient tool.
) in the Gradient panel. The leftmost and rightmost color stops switch positions. You can also reverse the colors in a gradient by drawing in the opposite direction with the Gradient tool.
Another way to apply a color to a gradient is to sample the color from the artwork, using the Eyedropper tool, or drag a color swatch onto a color stop.
11. Click the center gradient stop in the Gradient panel.
12. Select the Eyedropper tool (![]() ) in the Tools panel. In the artwork, Shift-click the coffee bean on the far right of where the coffee cup was.
) in the Tools panel. In the artwork, Shift-click the coffee bean on the far right of where the coffee cup was.
Shift-clicking with the Eyedropper tool applies the color sample to the selected gradient box in the gradient, rather than replacing the entire gradient with the color in the selected artwork. Try sampling other areas of the artwork, finishing with the purple-brown color in the rightmost coffee bean.

Next, you’ll save the new gradient.
13. Click the Gradient menu button (![]() ), and then click the Add To Swatches button (
), and then click the Add To Swatches button (![]() ) at the bottom of the panel that appears.
) at the bottom of the panel that appears.
14. Open the Layers panel by clicking the Layers panel icon on the right side of the workspace. Click to select the Visibility column to the left of the Background layer.
15. Choose Select > Deselect, and then File > Save.
Adding transparency to gradients
You can define the opacity of colors used in gradients. By specifying different opacity values for the different color stops in your gradient, you can create gradients that fade in or out and show or hide underlying images. Next, you will create a mirror reflection of the coffee cup and apply a gradient that fades to transparent.
1. Using the Selection tool (![]() ), click to select the coffee cup.
), click to select the coffee cup.
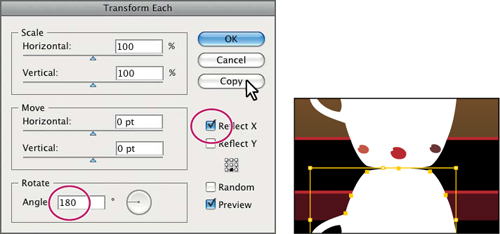
2. Choose Object > Transform > Transform Each. In the Transform Each dialog box, click the bottom, middle point of the reference point locator (![]() ). Select Reflect X and change Rotate Angle to 180.. Select Preview to see the changes. Click Copy to reflect, rotate, and copy the coffee cup.
). Select Reflect X and change Rotate Angle to 180.. Select Preview to see the changes. Click Copy to reflect, rotate, and copy the coffee cup.
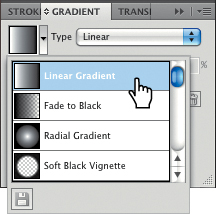
3. With the copy of the coffee cup still selected, open the Gradient panel by clicking the Gradient panel icon. Click the Gradient menu button (![]() ), and then select Linear Gradient. This fills the coffee cup with a white-to-black gradient.
), and then select Linear Gradient. This fills the coffee cup with a white-to-black gradient.
Tip
There are two gradients with transparency, Fade To Black and Soft Black Vignette in this document. These are great starting points for fading to transparency.
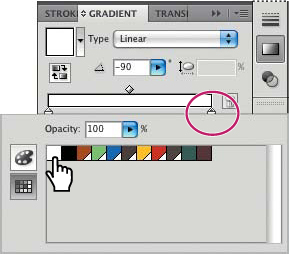
4. In the Angle field, change the value to −90. Double-click the rightmost color stop (the black color). In the panel that appears, click the Swatches button (![]() ) and select the white color swatch.
) and select the white color swatch.
5. Press Escape or click in a blank area of the Gradient panel to return to the Gradient panel.
Note
You’ll see the purpose of the white to white gradient in the next step, when you will change the transparency of the rightmost color stop to 0%, so that the coffee cup appears to fade away.
6. Click the rightmost color stop. Type 0. in the Opacity field or click the arrow to the right of the field and drag the slider all the way to the left. Press Enter or Return.
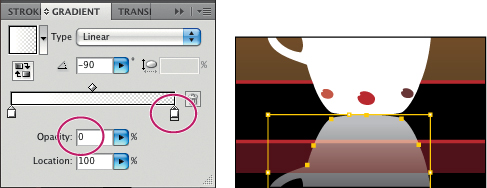
7. Click the leftmost color stop in the Gradient panel and change Opacity to 70..
8. Select the Gradient tool (![]() ) in the Tools panel. Holding down the Shift key, drag from the top of the selected coffee cup reflection to just above the outer edge of the dark red rectangle in the background.
) in the Tools panel. Holding down the Shift key, drag from the top of the selected coffee cup reflection to just above the outer edge of the dark red rectangle in the background.
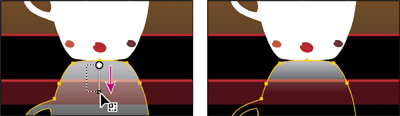
You can have a lot of creative fun working with gradients and transparency. Try changing the opacity for the color stops in the coffee cup and changing the direction and distance with the Gradient tool.
9. Choose Select > Deselect.
10. Click the Gradient panel icon (![]() ) on the right side of the workspace to collapse the Gradient panel.
) on the right side of the workspace to collapse the Gradient panel.
11. Choose File > Save.
Working with blended objects
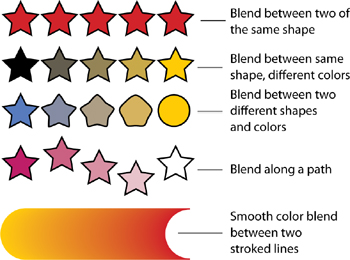
You can blend two distinct objects to create and distribute shapes evenly between two objects. The two shapes you blend can be the same or different. You can also blend between two open paths to create a smooth transition of color between objects, or you can combine blends of colors and objects to create color transitions in the shape of a particular object.
When you create a blend, the blended objects are treated as one object, called a blend object. If you move one of the original objects, or edit the anchor points of the original object, the blend changes accordingly. You can also expand the blend to divide it into distinct objects.
Creating a blend with specified steps
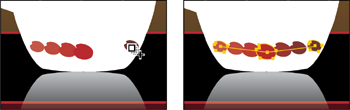
Now, you’ll use the Blend tool to create a series of blended shapes. You’ll use three different-colored shapes that make up the design on the coffee cup by specifying the number of steps in the blend.
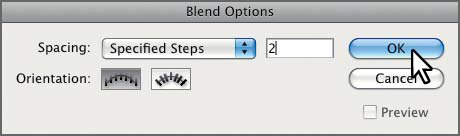
1. Double-click the Blend tool (![]() ) in the Tools panel to open the Blend Options dialog box.
) in the Tools panel to open the Blend Options dialog box.
2. Choose Specified Steps from the Spacing menu, and change the number of steps to 2.. Click OK.
Tip
You can also make a blend by selecting objects and choosing Object > Blend > Make.
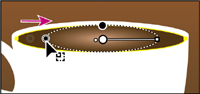
3. Using the Blend tool, position the pointer over the coffee bean on the far left. Click when the pointer displays an X (![]() ). Then, hover over the red coffee bean in the middle until the pointer displays a plus sign (
). Then, hover over the red coffee bean in the middle until the pointer displays a plus sign (![]() ), indicating that you can add an object to the blend. Click the red coffee bean to add it. There is now a blend between these two objects.
), indicating that you can add an object to the blend. Click the red coffee bean to add it. There is now a blend between these two objects.

4. Click the rightmost coffee bean with the Blend tool pointer (displaying the plus sign) to add it to the blend and complete the blended path.
Note
To end the current path and continue blending other objects on a separate path, first click the Blend tool in the Tools panel, and then click the other objects.
Modifying the blend
Now, you’ll modify the blend object using the Blend Options dialog box. You’ll also use the Convert Anchor Point tool to edit the shape of the path, called the spine, that the coffee beans blend along.
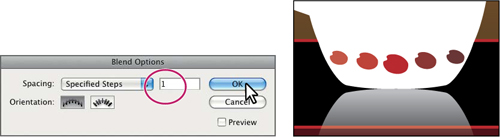
1. With the blended beans still selected, choose Object > Blend > Blend Options. In the Blend Options dialog box, change the Specified Steps to 1., and then click OK.
Tip
To edit the blend options for an object, you can also select the blend, and then double-click the Blend tool.
2. Choose Select > Deselect.
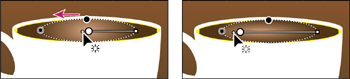
3. Select the Direct Selection tool (![]() ) in the Tools panel. Click the center of the red, center coffee bean to select that anchor point. In the Control panel, click the Convert Selected Anchor Points To Smooth button (
) in the Tools panel. Click the center of the red, center coffee bean to select that anchor point. In the Control panel, click the Convert Selected Anchor Points To Smooth button (![]() ) to smooth the curve. With the Direct Selection tool, drag the anchor point down.
) to smooth the curve. With the Direct Selection tool, drag the anchor point down.
Note
You are editing the spine. However you edit the spine, the blend objects will follow.
To edit the spine of a blend, select the anchor point, convert it to a smooth point, and drag.
4. Choose Select > Deselect.
Tip
A quick way to reshape the spine of a blend is to wrap it around another path or object. Select the blend, select the other object or path, and then choose Object > Blend > Replace Spine.
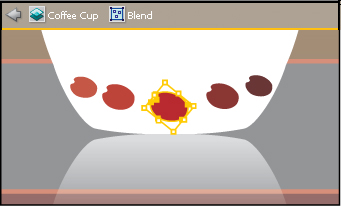
You can modify the blend instantly by changing the shape, color, or position of the original objects. Next, you will edit the color and position of the middle, red coffee bean and see the effect on the blend.
Tip
When you converted the bottom anchor point to a smooth point, the spacing changed between the coffee beans. To even out the spacing, convert the leftmost and rightmost anchor points on the spine to smooth points and then adjust the direction lines with the Direct Selection tool.
5. Select the Zoom tool (![]() ) in the Tools panel and drag a marquee across the beans to zoom in on them.
) in the Tools panel and drag a marquee across the beans to zoom in on them.
6. With the Selection tool (![]() ), click the blended objects to select them.
), click the blended objects to select them.
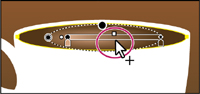
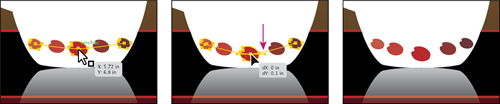
7. Double-click the red coffee bean in the center of the blend to enter isolation mode. This temporarily ungroups the blended objects and lets you edit each original bean (not the beans created by blending), as well as the spine. Click to select the red coffee bean.
8. Choose View > Outline to see the pieces of the blend. Choose View > Preview to see the filled objects again.
9. Change the fill color of the selected bean to the swatch called Light Green in the Control panel. Notice that the rest of the blend changes.
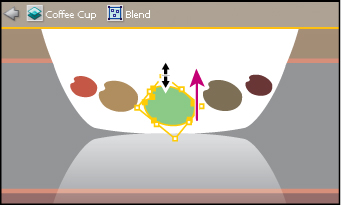
10. With the Selection tool, press Shift+Alt (Windows) or Shift+Option (Mac OS), and drag a corner bounding point of the selected coffee bean to make the bean bigger.
Try changing the shape of the coffee bean by rotating it and using the Direct Selection tool (![]() ).
).
11. Press Escape to exit isolation mode.
12. With the Selection tool, click to select the blended objects again. Choose Object > Blend > Reverse Spine. This reverses the order of the beans. Keep the blended objects selected.
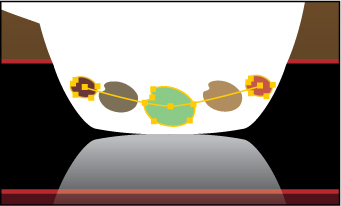
The blended objects are considered a single blend object. If you need to edit all the coffee beans (including the beans that the blend created), you can expand the blend. Expanding the blend converts the blend to individual objects. You can no longer edit the blend as a single object because it has become a group of beans.
Next, you will expand the beans.
13. Choose Object > Blend > Expand. With the beans still selected, notice the word Group on the left side of the Control panel.
The blend is now a group of individual shapes that you can edit independently.
14. Choose Select > Deselect.
15. Choose File > Save.
Creating smooth color blends
You can choose several options for blending the shapes and colors of objects to create a new object. When you choose the Smooth Color blend option, Illustrator combines the shapes and colors of the objects into many intermediate steps, creating a smooth graduated blend between the original objects.
Now, you’ll combine two shapes for a coffee bean into a smooth color blend.
1. Chose View > Fit Artboard In Window.
2. Expand the Layers panel, and click to select the Visibility column to the left of the Blends layer and the Coffee Beans layer.
You are going to blend colors to make the coffee bean look more realistic.
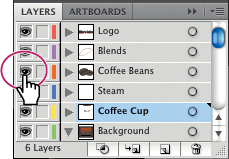
3. Click the eye icon (![]() ) to deselect visibility for the Coffee Beans layer, so that it’s easier to see the two objects you will blend next. Leave the Layers panel expanded, unless it gets in the way.
) to deselect visibility for the Coffee Beans layer, so that it’s easier to see the two objects you will blend next. Leave the Layers panel expanded, unless it gets in the way.
4. Select the Zoom tool (![]() ) in the Tools panel and drag a marquee around the curved lines that appear to the left of the coffee cup.
) in the Tools panel and drag a marquee around the curved lines that appear to the left of the coffee cup.
5. Double-click the Blend tool (![]() ) in the Tools panel to open the Blend Options dialog box.
) in the Tools panel to open the Blend Options dialog box.
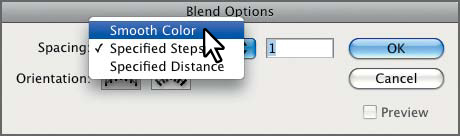
6. Choose Smooth Color from the Spacing menu to set up the blend options, which remain set until you change them. Click OK.
Tip
To release, or remove, a blend from the original objects, select the blend and choose Object > Blend > Release.
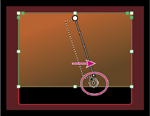
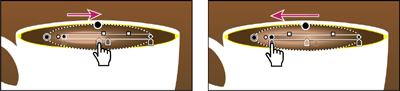
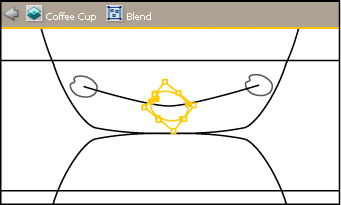
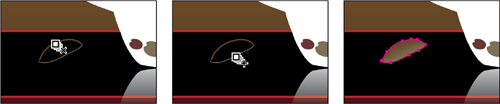
Next, you’ll create a smooth color blend from the two lines to the left of the coffee cup. Both objects have a stroke and no fill. Objects that have strokes blend differently than those that have no stroke.
7. Position the Blend tool pointer over the top line until it displays an X (![]() ), then click. Click the bottom line with the Blend tool pointer that displays a plus sign (
), then click. Click the bottom line with the Blend tool pointer that displays a plus sign (![]() ) to add it to the blend. You’ve created a smooth blend between the lines.
) to add it to the blend. You’ve created a smooth blend between the lines.
8. Choose Select > Deselect.
When you make a smooth color blend between objects, Illustrator automatically calculates the number of intermediate steps necessary to create the transition between the objects. Once you’ve applied a smooth color blend to objects, you can edit it. Next, you will edit the paths that make up the blend.
9. Using the Selection tool (![]() ), double-click the color blend to enter isolation mode. Click to select one of the paths, and change the stroke color in the Control panel to any color you want. Notice how the colors are blended. Choose Edit > Undo Apply Swatch to return to the original stroke color.
), double-click the color blend to enter isolation mode. Click to select one of the paths, and change the stroke color in the Control panel to any color you want. Notice how the colors are blended. Choose Edit > Undo Apply Swatch to return to the original stroke color.
Tip
Creating smooth color blends between paths can be difficult in certain situations. For instance, if the lines intersect or the lines are too curved, unexpected results can occur.
10. Double-click away from the blend paths to exit isolation mode.
11. In the Layers panel, click to select visibility for the Coffee Beans layer and the Steam layer to make those objects visible on the artboard.
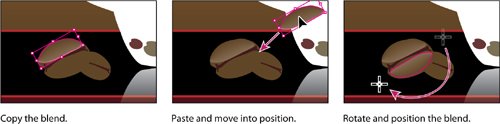
12. To complete the bean, select the blended paths with the Selection tool and choose Edit > Copy, and then Edit > Paste to paste a copy of the blend.
13. Move the blend to the bottom part of the same coffee bean, to the left of the coffee cup.
14. Select the Rotate tool (![]() ) in the Tools panel. Drag to rotate the blend so that it fits into the bottom part of the bean. You will need to switch to the Selection tool to move the blend into position.
) in the Tools panel. Drag to rotate the blend so that it fits into the bottom part of the bean. You will need to switch to the Selection tool to move the blend into position.
15. Choose View > Fit Artboard In Window.
16. Choose Select > Deselect, and then File > Save.
Exploring on your own
There are many ways to be creative with gradients and blends. To explore more, you will create a blend for coffee steam. Then you’ll create a new document for a more complex path that you will blend.
1. With the Steam layer visible, select the steam on the artboard with the Selection tool (![]() ).
).
2. Choose Essentials from the workspace switcher in the Application bar.
3. Expand the Gradient panel and select Fade To Black from the Gradient menu.
4. Select the Gradient tool (![]() ) in the Tools panel and position the pointer over the steam. Drag from the top of the steam to the bottom of the steam to change the direction of the gradient.
) in the Tools panel and position the pointer over the steam. Drag from the top of the steam to the bottom of the steam to change the direction of the gradient.
5. Add a color stop so that three appear in the gradient slider.

6. Change the color of each color stop to white by double-clicking each, using the Gradient tool. Change Opacity to 10. for the topmost color stop and 5. for the bottommost color stop.
Try changing the color and opacity of each color stop.
7. Choose File > Save, then File > Close.
Next, you’ll create a more complex blend.
1. Choose File > New to create a new document. Draw a straight line using the Line Segment tool.
2. Select the line, remove the fill, paint the stroke with a color, and increase the stroke weight to 20. pt.
3. If the Stroke panel is not showing, choose Window > Stroke. With the line selected, select the Dashed Line option. Type 25. in the first dash field, and press Enter or Return.
4. Choose Object > Path > Outline Stroke.
Notice that the stroke color and fill color values have switched, so now you can fill the object with a gradient.
5. Fill the object with a gradient of your choice.
6. Copy and paste the object, moving them apart with the Selection tool. Double-click the Blend tool (![]() ) in the Tools panel. Choose Smooth Color in the Blend Options dialog box and click OK. Click each of the two objects with the Blend tool to create the blend. Practice editing the individual objects in the blend.
) in the Tools panel. Choose Smooth Color in the Blend Options dialog box and click OK. Click each of the two objects with the Blend tool to create the blend. Practice editing the individual objects in the blend.
Review questions
1 What is a gradient fill?
2 Name two ways to fill a selected object with a gradient.
3 What is the difference between a gradient fill and a blend?
4 How do you adjust the blend between colors in a gradient?
5 Name two ways you can add colors to a gradient.
6 How do you adjust the direction of a gradient?
7 Describe two ways to blend the shapes and colors of objects.
8 What is the difference between selecting a smooth color blend and specifying the number of steps in a blend?
9 How do you adjust the shapes or colors in the blend? How do you adjust the path of the blend?
Review answers
1. A gradient fill is a graduated blend between two or more colors, or between tints of the same color.
2. Select an object and do one of the following:
• Click the Gradient box in the Tools panel to fill an object with the default white-to-black gradient or with the last selected gradient.
• Click a gradient swatch in the Swatches panel.
• Make a new gradient by clicking a gradient swatch in the Swatches panel and mixing your own in the Gradient panel.
• Use the Eyedropper tool to sample a gradient from an object in your artwork, and then apply it to the selected object.
3. The difference between a gradient fill and a blend is the way that colors combine together—colors blend together within a gradient fill and between objects in a blend.
4. You drag the diamond icons or color stops of the gradient in the Gradient panel.
5. In the Gradient panel, click beneath the gradient bar to add a gradient stop to the gradient. Then use the Color panel to mix a new color or, in the Swatches panel, Alt-click (Windows) or Option-click (Mac OS) a color swatch. You can select the Gradient tool in the Tools panel and position the pointer over the gradient-filled object. You can also click beneath the gradient slider that appears in the Gradient panel or in the artwork with the Gradient tool selected, to add a color stop.
6. Drag with the Gradient tool to adjust the direction of a gradient. Dragging a long distance changes colors gradually; dragging a short distance makes the color change more abrupt. You can also rotate the gradient using the Gradient tool, and change the radius, aspect ratio, and starting point.
7. You can blend the shapes and colors of objects by doing one of the following:
• Clicking each object with the Blend tool to create a blend of intermediate steps between the objects, according to preset blend options.
• Selecting the objects and choosing Object > Blend > Blend Options to set the number of intermediate steps, and then choosing Object > Blend > Make to create the blend.
Objects that have painted strokes blend differently than those with no strokes.
8. When you choose Smooth Color blend, Illustrator automatically calculates the number of intermediate steps necessary to create a seamlessly smooth blend between the selected objects. Specifying the number of steps lets you determine how many intermediate steps are visible in the blend. You can also specify the distance between intermediate steps in the blend.
9. You can use the Direct Selection tool to select and adjust the shape of an original object, thus changing the shape of the blend. You can change the colors of the original objects to adjust the intermediate colors in the blend. Use the Convert Anchor Point tool to change the shape of the path, or spine, of the blend by dragging anchor points or direction handles on the spine.