
15. Combining Illustrator CS5 Graphics with Other Adobe Applications
This lesson takes approximately an hour to complete. If needed, remove the previous lesson folder from your hard disk and copy the Lesson15 folder onto it.
![]()

You can easily add an image created in an image-editing program to an Adobe Illustrator file. This is an effective method for seeing how a photograph looks incorporated in a line drawing, or for trying out Illustrator special effects on bitmap images.
Getting started
Before you begin, you’ll need to restore the default preferences for Adobe Illustrator CS5. Then you’ll open the finished art file for this lesson to see what you’ll create.
1. To ensure that the tools and panels function as described in this lesson, delete or deactivate (by renaming) the Adobe Illustrator CS5 preferences file. See “Restoring default preferences” on page 3.
2. Start Adobe Illustrator CS5.
Note
If you have not already done so, copy the resource files for this lesson onto your hard disk from the Lesson15 folder on the Adobe Illustrator CS5 Classroom in a Book CD. See “Copying the Classroom in a Book files” on page 2.
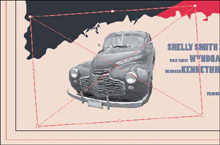
3. Choose File > Open. Locate the file named L15end_1.ai in the Lesson15 folder in the Lessons folder that you copied onto your hard disk. This is a postcard for a technology expo, and you will add and edit graphics in this lesson. Leave it open for reference, or choose File > Close.
Now, you’ll open the start file from Adobe Bridge CS5.

Working with Adobe Bridge
Bridge is an application that installs when you install either an Adobe® Creative Suite® 5 component, such as Illustrator, or the entire Adobe Creative Suite 5. It allows you to browse content visually, manage metadata, and more.
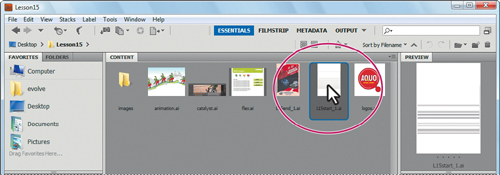
1. Choose File > Browse In Bridge to open Bridge.
2. In the Favorites pane on the left, click Desktop and navigate to the L15start_1.ai file in the Lesson15 folder. Click the file in the middle, Content pane.
Note
The first time Adobe Bridge launches, a dialog box may appear asking if you want the Bridge to start at login. Click Yes if you want it to launch at startup. Click No to manually launch Bridge when you need it.
3. At the bottom of the Content pane, drag the slider to the right to increase the size of the thumbnails in the Content pane.
4. At the top of Bridge, click Filmstrip. This changes the appearance of the workspace to a filmstrip view that provides a larger preview of the selected object. Click Essentials to return to the original workspace.
5. At the bottom of the Content pane, drag the slider to the left until you see all the thumbnails in the Content pane.
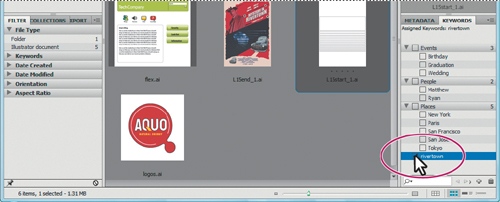
6. With the L15start_1.ai file still selected in the Content pane, click the Metadata panel tab on the right side of the workspace (if not already selected) to see the metadata associated with the selected file. This can be camera data, document swatches, and more. Click the Keywords panel tab to reveal the Keywords panel.
Keywords can be associated with objects such as images, which will allow them to be searched for by those keywords.
7. In the Keywords panel, click the plus at the bottom to create a keyword. Type rivertown into the keyword field and press Enter or Return. Click to select the box to the left of the keyword, if not already selected. This associates the keyword with the selected file.
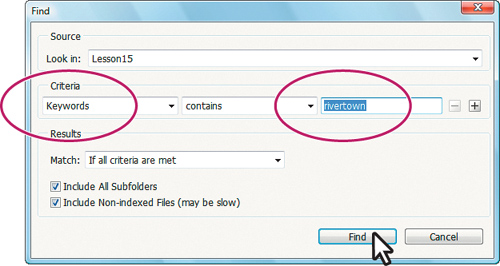
8. Choose Edit > Find. In the Find dialog box, choose Keywords from the first menu in the Criteria section. Type rivertown in the rightmost field of the Criteria options. Leave the middle field set to contains and click Find.
The Find results appear in the Content pane.
9. Click the x in the upper right corner of the Content pane, to the right of the New Search button, to close the find results and return to the folder.
Previewing files and working with metadata and keywords are just a few of the many features available in Bridge. To learn more about working with Bridge, choose Help > Illustrator Help and search for Adobe Bridge.
10. Double-click the file L15start_1.ai in the Content pane to open the file in Illustrator. Leave Bridge open.
11. Choose View > Fit Artboard In Window.
12. Choose Window > Workspace > Essentials to reset the Essentials workspace.
13. Choose File > Save As. In the Save As dialog box, navigate to the Lesson15 folder and open it. Name the file movieposter.ai. Leave the Save As Type option set to Adobe Illustrator (*.AI) (Windows) or the Format option set to Adobe Illustrator (ai) (Mac OS), and then click Save. In the Illustrator Options dialog box, leave the Illustrator options at their default settings, and then click OK.

Combining artwork
You can combine Illustrator artwork with images from other graphics applications in a variety of ways for a wide range of creative results. Sharing artwork between applications lets you combine continuous-tone paintings and photographs with line art. Even though Illustrator lets you create certain types of raster images, Adobe Photoshop excels at many image-editing tasks. The images can then be placed in Illustrator.
This lesson steps you through the process of creating a composite image, including combining bitmap images with vector art and working between applications. You will add photographic images created in Photoshop to a postcard created in Illustrator. Then you’ll adjust the color in the photo, mask the photo, and sample color from the photo to use in the Illustrator artwork. You’ll update a placed image, and then export your postcard to Photoshop.
Vector versus bitmap graphics
Illustrator creates vector graphics, also called draw graphics, which contain shapes based on mathematical expressions. Vector graphics consist of clear, smooth lines that retain their crispness when scaled. They are best for illustrations, type, and graphics that need to be scaled to different sizes, such as logos.
Logo is drawn as vector art, and retains its crispness when scaled to a larger size.
Bitmap graphics, also called raster images, are based on a grid of pixels and are created by image editing applications, such as Photoshop. When working with bitmap images, you edit groups of pixels rather than objects or shapes. Because bitmap graphics can represent subtle gradations of shade and color, they are appropriate for continuous-tone images, such as photographs or artwork created in painting programs. A disadvantage of bitmap graphics is that they lose definition and appear jagged when scaled up.
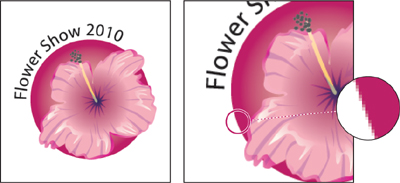
Logo is rasterized as bitmap art, and loses its definition when enlarged.
In deciding whether to use Illustrator or a bitmap image program such as Photoshop for creating and combining graphics, consider the elements of the image and how the image will be used.
In general, use Illustrator if you need to create art or type with clean lines that looks good at any magnification. In most cases, you’ll also want to use Illustrator for laying out a single-page design, because Illustrator offers more flexibility than Photoshop when working with type, and reselecting, moving, and altering images. You can create raster images in Illustrator, but its pixel-editing tools are limited. Use Photoshop for images that need pixel editing, color correcting, painting, and other special effects. Use InDesign for laying out anything from a postcard to a multiple chapter book, such as this Classroom in a Book.
Placing Adobe Photoshop files
You can bring artwork from Photoshop into Illustrator using the Open command, the Place command, the Paste command, and drag-and-drop.
Illustrator supports most Photoshop data, including layer comps, layers, editable text, and paths. This means that you can transfer files between Photoshop and Illustrator without losing the ability to edit the artwork. Adjustment layers for which visibility is deselected in Photoshop are imported into Illustrator, although they are inaccessible. When exported back to Photoshop, the layers are restored.
In this lesson, you’ll begin by placing a Photoshop file that contains a layer mask created in Photoshop. A layer mask is a way to mask, or hide, art in an image so that areas can be transparent. Placed files can be embedded or linked. When embedded files are added to the Illustrator file, the Illustrator file size increases to reflect the addition of the placed file. Linked files remain separate external files, and a link to the external file is placed in the Illustrator file. Linking to files can be a great way to ensure that image updates are reflected in the Illustrator file. The linked file must always accompany the Illustrator file or the link will break and the placed file will not appear in the Illustrator artwork.
Note
Illustrator includes support for Device N rasters. For instance, if you create a Duotone image in Photoshop and place it in Illustrator, it separates properly and prints the spot colors.
Placing a Photoshop file
1. In Illustrator CS5, choose Window > Layers to open the Layers panel.
2. In the Layers panel, select the Content layer, and then click the visibility column to show the contents of that layer.
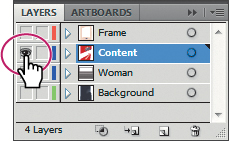
When you place an image, it is added to the selected layer. You’ll use the Content layer for the placed image. The layer already includes artwork.
3. Choose File > Place.
4. Navigate to the car.psd file in the images folder inside the Lesson15 folder, and select it. Do not double-click the file or click Place yet.
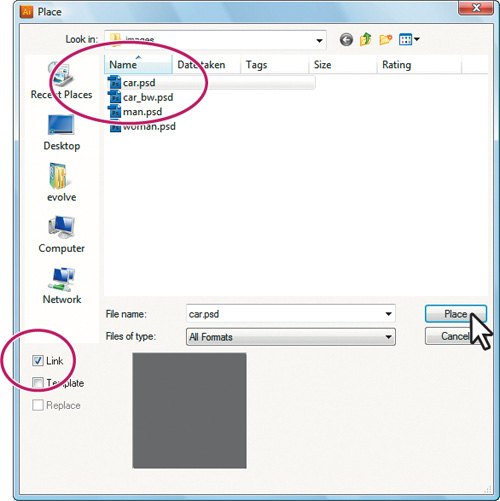
5. Make sure that Link is selected in the Place dialog box.
By default, placed Photoshop files are linked to their source file. So if the source file is edited, the placed image in Illustrator is updated. If you deselect the Link option, you embed the PSD file in the Illustrator file.
6. Click Place.
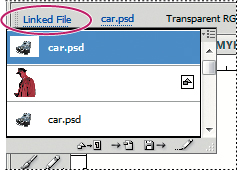
Notice that the image is placed in the center of the Document window. It is selected, has bounding points and an X in the center of the image. Also notice the Control panel. With the image selected, you see the words Linked File, indicating that the image is linked to its source file, and other information about the image. Clicking Linked File in the Control panel opens the Links panel which you’ll do later in the lesson.
Now, you’ll move and transform the placed image.
Duplicating and editing a placed image
You can duplicate placed images just as you do other objects in an Illustrator file. You can then modify the copy of the image independently of the original.
Next, you will edit the car.psd image and duplicate it in the Layers panel.
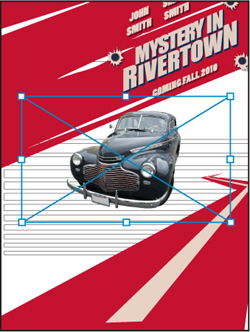
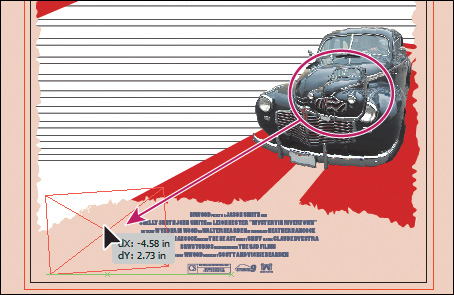
1. With the Selection tool (![]() ) selected and the image already selected, drag the image down and to the right so that it is positioned towards the top of the red “road.”
) selected and the image already selected, drag the image down and to the right so that it is positioned towards the top of the red “road.”
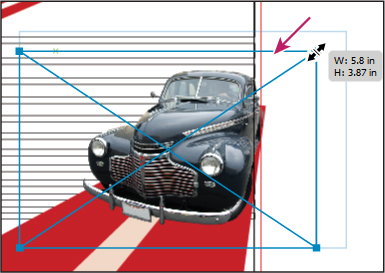
2. Holding down the Shift key, use the Selection tool to drag the upper-right bounding point toward the center of the image until the width is approximately 5.8 in.
Tip
To transform a placed image, you can also open the Transform panel (Window > Transform) and change settings there.
After resizing the image, notice that the PPI value in the Control panel is approximately 165. The PPI (Pixels Per Inch) refers to the resolution of the image. Working in Illustrator, if you make an image smaller, the resolution of the image increases. If you make an image larger, the resolution decreases.
Note
Transformations performed on a linked image in Illustrator, and any resulting resolution changes, do not change the original image. The changes apply only to the image within Illustrator.
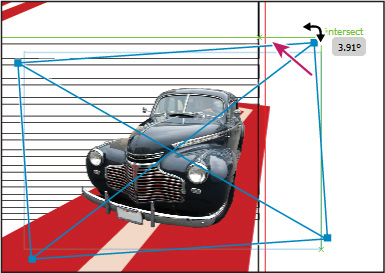
3. With the Selection tool, position the pointer off the upper-right bounding point. The rotate arrows should appear. Drag up and to the left to rotate the image about 4 degrees. With smart guides on, you’ll see a measurement label.
Note
To access the rotate arrows, the pointer needs to be positioned just off a corner point.
4. Choose File > Save, and leave the car.psd image selected.
Next, you will duplicate the car.psd image and make edits to the copy.
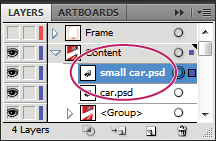
5. In the Layers panel, click the arrow (![]() ) to the left of the Content layer to expand it. Notice the car.psd sublayer.
) to the left of the Content layer to expand it. Notice the car.psd sublayer.
6. With the car selected on the artboard, choose Edit > Copy, then Edit > Paste In Place. This pastes a new car.psd image on top of the copied image and selects it on the artboard.
Tip
To make a copy of the car.psd, you can also drag the car.psd sublayer up or down in the layer list. While dragging, press Alt (Windows) or Option (Mac OS) to duplicate the sublayer. You must drag first, then hold down the modifier key.
7. In the Layers panel, double-click the new car.psd sublayer (the one on top in the Layers panel) and rename it small car.psd in the Options dialog box. Then click OK.
8. With the copied car image still selected on the artboard, double-click the Scale tool (![]() ) in the Tools panel. In the Scale dialog box, change the Uniform Scale value to 40. and click OK.
) in the Tools panel. In the Scale dialog box, change the Uniform Scale value to 40. and click OK.
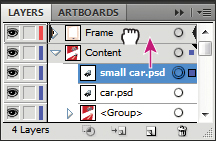
9. Select the Selection tool (![]() ) and, in the Layers panel, click the visibility column to the left of the Frame layer to show the artwork. Drag the small car.psd sublayer onto the Frame layer. Click the arrow (
) and, in the Layers panel, click the visibility column to the left of the Frame layer to show the artwork. Drag the small car.psd sublayer onto the Frame layer. Click the arrow (![]() ) to the left of the Content layer to collapse it.
) to the left of the Content layer to collapse it.
10. With the Selection tool, drag the small car on the artboard to the left of the text at the bottom of the poster. The smaller car image should be on top of the cream colored border. Exact positioning is not important. You may want to reposition the small car so that it is not on the text.
11. Choose Select > Deselect, and then File > Save.
Embed a Photoshop image with Layer comps
Designers often create multiple compositions, or comps, of a page layout to show their clients. Using layer comps in Photoshop, you can create, manage, and view multiple versions of a layout in a single Photoshop file.
A layer comp is a snapshot of a state of the Layers panel in Photoshop. Layer comps record the following information about a layer:
• Visibility—whether a layer is showing or hidden
• Position in the document
• Appearance—whether a layer style is applied to the layer and blending mode
You create a layer comp in Photoshop by making changes to the layers in your document and clicking the Create New Layer Comp button in the Layer Comps panel. You view comps by applying them in the document. You can export layer comps to separate files, to a single PDF file, to a web photo gallery, or choose one when placing the Photoshop file into Illustrator.
Next, you will place a Photoshop file with layer comps, and embed it in the Illustrator file.
1. Choose View > Fit Artboard In Window, in case you zoomed in on the artwork in previous steps.
Note
When placing an image, it is placed in the center of the Document window. That is why you fit the artboard in the window, so that it will place the image centered on the artboard.
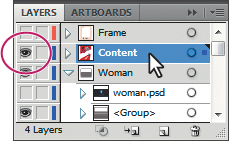
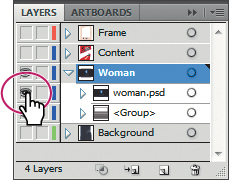
2. In the Layers panel, click the eye icon (![]() ) in the Content and Frame layers visibility column to hide both layer contents. Click to select the Woman layer.
) in the Content and Frame layers visibility column to hide both layer contents. Click to select the Woman layer.
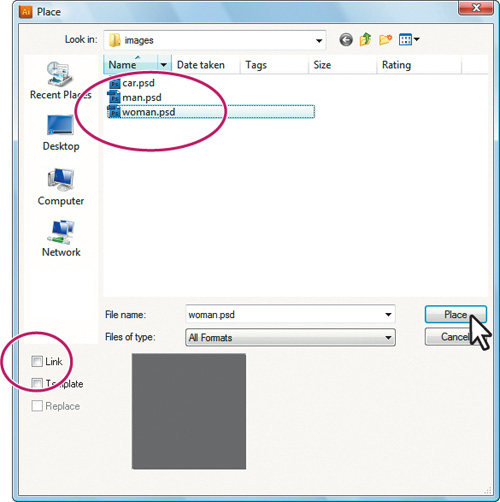
3. Choose File > Place.
4. Navigate to the woman.psd file in the images folder inside of the Lesson15 folder. Do not double-click the file or click Place yet.
5. Deselect Link in the Place dialog box, if it is selected.
Note
Deselecting the Link option embeds the PSD file in the Illustrator file. The Photoshop Import Options dialog box appears only when you deselect this option.
6. Click Place.
7. In the Photoshop Import Options dialog box, select Blue woman, black bg from the Layer Comp menu, and then select Show Preview to preview the artwork.
8. Select Convert Layers To Objects and select Import Hidden Layers to import all the document layers from Photoshop. Click OK.

Note
If a color warning dialog box appears, such as Paste Profile Mismatch, click OK.
Rather than flatten the file, you want to convert the Photoshop layers to objects, because the woman.psd file contains four layers and one layer mask. You will use them later in the lesson.
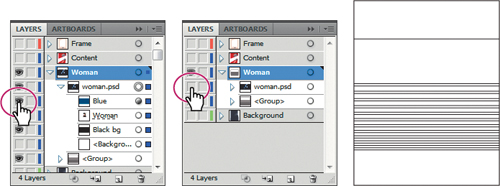
9. In the Layers panel, click the arrow (![]() ) to the left of the Woman layer to expand it. Drag the bottom of the panel down, if necessary, so that you can see more of the layers. Click the arrow to the left of the woman.psd sublayer to expand it.
) to the left of the Woman layer to expand it. Drag the bottom of the panel down, if necessary, so that you can see more of the layers. Click the arrow to the left of the woman.psd sublayer to expand it.
Notice all the sublayers of woman.psd. These sublayers were Photoshop layers in Photoshop and appear in the Layers panel in Illustrator because you chose not to flatten the image when you placed it. Also notice that, with the image still selected on the page, the Control panel shows the word Group on the left side and includes a link to Multiple Images. When you place a Photoshop file with layers and you choose to convert the layers to objects in the Photoshop Import Options dialog box, Illustrator treats the layers as separate images in a group.
10. Deselect the eye icon (![]() ) to the left of the Blue sublayer to hide the sublayer. Click the visibility column to the left of the Blue sublayer to show it again. Deselect the eye icon (
) to the left of the Blue sublayer to hide the sublayer. Click the visibility column to the left of the Blue sublayer to show it again. Deselect the eye icon (![]() ) to the left of the woman.psd sublayer to hide it.
) to the left of the woman.psd sublayer to hide it.
The rectangles should be the only visible objects on the artboard.
Applying color edits to a placed image
You can use color edits in a variety of ways to modify colors in placed images that are embedded. You can convert to a different color mode (such as RGB, CMYK, or grayscale) or adjust individual color values. You can also saturate (darken) or desaturate (lighten) colors, or invert colors (create a color negative).
Tip
For information on color modes and modifying colors with color edits, see “About colors in digital graphics” and “Apply an effect” in Illustrator Help.
Next, you’ll adjust colors in an image you will first place. Later in the lesson, you’ll apply a mask to this image.
1. In the Layers panel, click the visibility column in the Content layer to show the contents, and then select the Content layer.
2. Choose File > Place.
3. Navigate to the man.psd file in the images folder inside the Lesson15 folder and select it. Do not double-click the file or click Place yet.
4. Select Link in the Place dialog box, and then click Place.
Note
As long as the file is open, the Link option is sticky. That means the next time you place an image, the Link option will automatically apply.
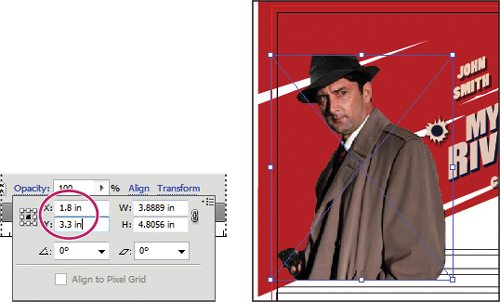
5. With the Selection tool (![]() ), click the word Transform in the Control panel. Make sure that the center point in the Reference Point indicator (
), click the word Transform in the Control panel. Make sure that the center point in the Reference Point indicator (![]() ) is selected. In the Transform panel that appears, change the X value to 1.8 in (make sure to type in the “in”) and the Y value to 3.3 in and press Enter or Return.
) is selected. In the Transform panel that appears, change the X value to 1.8 in (make sure to type in the “in”) and the Y value to 3.3 in and press Enter or Return.
This positions the man.psd image in the upper-left corner. Notice that the man appears to be cut out. That is a layer mask that was created in Photoshop and recognized by Illustrator.
Note
Depending on your screen resolution, the Transform options may appear in the Control panel, or you may need to choose Window > Transform to open the panel.
In order to edit colors in the image, the image needs to be embedded in the Illustrator file. If the file is linked, the edits you are about to do can be done in Photoshop and then updated in Illustrator. But sometimes you may want to embed the image so that you don’t have to worry about keeping track of a linked image.
6. With the man.psd still selected on the artboard, click the Embed button in the Control panel. This opens the Photoshop Import Options dialog box, where you can choose a layer comp or other options. Make sure Flatten Layers to a Single Image is selected, and then click OK.
In the Control panel you will now see the word Embedded.
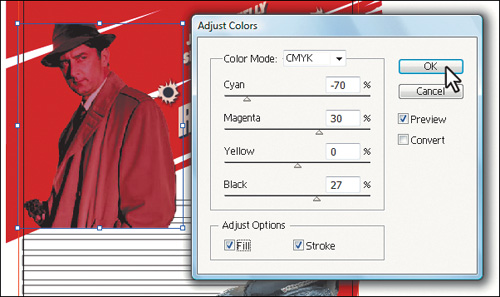
7. With the image still selected, choose Edit > Edit Colors > Adjust Color Balance.
8. In the Adjust Colors dialog box, drag the sliders or enter values for the CMYK percentages to change the colors in the image. You can press Tab to move between the text fields. We used the following values to create more of a red cast: C=−70, M=30., Y=0., and K=27.. Feel free to experiment a little. Select Preview so that you can see the color changes.
Note
To see the results, you may need to select and deselect Preview as you change options in the Adjust Colors dialog box.
9. When you are satisfied with the color of the image, click OK.
Note
If you later decide to adjust the colors of the same image by choosing Edit > Edit Colors > Adjust Color Balance, the color values will be set to 0 (zero).
10. Choose Select > Deselect, then File > Save.
Masking an image
Masks crop an image so that only a portion of the image appears through the shape of the mask. Only vector objects can be clipping masks; however, any artwork can be masked. You can also import masks created in Photoshop files as you’ve seen earlier. The clipping mask and the masked object are referred to as the clipping set.
Applying a clipping mask to an image
In this short section, you’ll create a clipping mask for the man.psd image.
1. With the Selection tool (![]() ), click the man.psd image to select it. Click the Mask button in the Control panel. This applies a clipping mask to the image in the shape and size of the image.
), click the man.psd image to select it. Click the Mask button in the Control panel. This applies a clipping mask to the image in the shape and size of the image.
Note
You can also apply a clipping mask by choosing Object > Clipping Mask > Make.
Tip
Another way to create a mask is to use the Draw Inside mode. This mode allows you to draw inside the selected object. The Draw Inside mode can eliminate the need to perform multiple tasks such as drawing and altering stacking order or drawing, selecting, and creating a clipping mask. To learn more about the drawing modes, see Lesson 3, “Creating and Editing Shapes.”
2. In the Layers panel, click the arrow (![]() ) to the left of the Content layer to reveal its contents, if not already done so. You may need to drag the bottom of the Layers panel down or scroll in the panel. Click the arrow to the left of the top <Group> Sublayer to reveal its contents as well.
) to the left of the Content layer to reveal its contents, if not already done so. You may need to drag the bottom of the Layers panel down or scroll in the panel. Click the arrow to the left of the top <Group> Sublayer to reveal its contents as well.
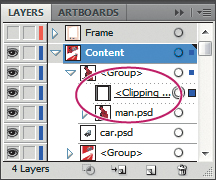
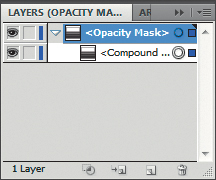
Notice the <Clipping Path> sublayer. This is the mask you created by clicking the Mask button in the Control panel. The <Group> sublayer is the clipping set that contains the mask and the object that is masked.
Next, you will edit this mask.
Editing a mask
1. With the image still selected, notice the Edit Clipping Path button (![]() ) and the Edit Contents button (
) and the Edit Contents button (![]() ) that appear on the left side of the Control panel.
) that appear on the left side of the Control panel.
2. Click the Edit Contents button (![]() ) and, in the Layers panel, notice that the man.psd is now selected. Click the Edit Clipping Path button (
) and, in the Layers panel, notice that the man.psd is now selected. Click the Edit Clipping Path button (![]() ) and notice that the <Clipping Path> is selected in the Layers panel.
) and notice that the <Clipping Path> is selected in the Layers panel.
When an object is masked, you can edit either the mask or the object that is masked. Use these two buttons to select which to edit.
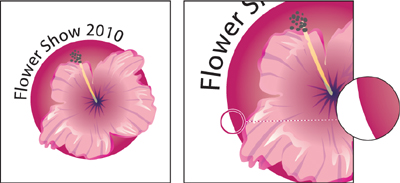
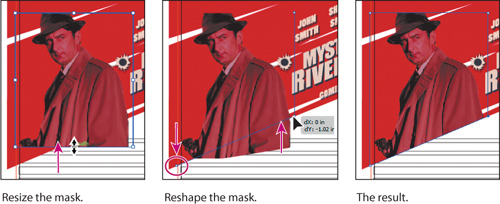
3. With the Edit Clipping Path button (![]() ) selected in the Control panel, use the Selection tool to drag the bottom, middle bounding point of the selected mask up a bit, as shown in the figure below. Notice that the bottom part of the image is hidden (masked).
) selected in the Control panel, use the Selection tool to drag the bottom, middle bounding point of the selected mask up a bit, as shown in the figure below. Notice that the bottom part of the image is hidden (masked).
4. Select the Direct Selection tool (![]() ) in the Tools panel. Click the bottom, left point first to select it, and then drag straight down until it snaps to the red object in the background. Drag the bottom, right bounding point straight up until it snaps to the same red object in the background.
) in the Tools panel. Click the bottom, left point first to select it, and then drag straight down until it snaps to the red object in the background. Drag the bottom, right bounding point straight up until it snaps to the same red object in the background.
5. Use the Selection tool to click the man.psd image to select it. In the Control panel, click the Edit Contents button (![]() ) to edit the man.psd image, not the mask. With the Selection tool, drag the man down a bit. Notice that you are moving the image and not the mask. Choose Edit > Undo Move.
) to edit the man.psd image, not the mask. With the Selection tool, drag the man down a bit. Notice that you are moving the image and not the mask. Choose Edit > Undo Move.
With the Edit Contents button (![]() ) selected, you can apply many transformations to the image, including scaling, moving, rotating, and more.
) selected, you can apply many transformations to the image, including scaling, moving, rotating, and more.
6. Choose Select > Deselect, then File > Save.
Masking an object with multiple shapes
In this section, you’ll create a mask for the woman.psd image from multiple rectangles. This will give the effect of the woman being hidden by window blinds. In order to create a clipping mask with multiple shapes, the shapes need to be converted to a compound path.
1. In the Layers panel, click the arrow (![]() ) to the left of the Content layer to collapse it, and then click the eye icon to hide its contents. Click the visibility column to the left of the woman.psd sublayer to see it on the artboard.
) to the left of the Content layer to collapse it, and then click the eye icon to hide its contents. Click the visibility column to the left of the woman.psd sublayer to see it on the artboard.
2. With the Selection tool, click to select the woman image on the artboard and choose Object > Arrange > Send To Back.
3. With the Selection tool, click one of the rectangles on the artboard. This selects the group of rectangles.
4. Choose Object > Compound Path > Make. Notice that the group of rectangles are placed onto one sublayer, called <Compound Path> in the Layers panel. Leave the new compound path selected.
Tip
To make the rectangles into a compound path, you can also right-click the group of rectangles or Control-click and choose Make Compound Path.
The Compound Path command creates a single compound object from two or more objects. Compound paths act as grouped objects. The Compound Path command lets you create complex objects more easily than if you used the drawing tools or the Pathfinder commands.
Note
In order to make a compound path from multiple objects, they don’t need to be grouped first.
Next, you’ll mask the woman.psd image with the compound path you just made.
5. With the compound path still selected, Shift-click the woman image on the artboard to select both. Right-click (Windows) or Ctrl-click (Mac OS) the compound path and choose Make Clipping Mask.

Tip
You can also make a clipping mask from text.
Notice the Edit Clipping Path button (![]() ) and the Edit Contents button (
) and the Edit Contents button (![]() ) in the Control panel.
) in the Control panel.
Tip
You can also choose Object > Clipping Mask > Make.
6. Choose File > Save and leave the masked image selected.
Release a mask
You may at some point no longer want a mask to hide parts of the masked object. You can always release a mask from the clipping set so that it no longer is a mask.
• With the image still selected, choose Object > Clipping Mask > Release. This releases the mask (compound path) and the image so that they are separate objects once again.
When a mask is released, it typically has no stroke and no fill.
Tip
You can also right-click (Windows) or Ctrl-click (Mac OS) the rectangle compound path and choose Release Clipping Mask.
Creating an opacity mask
An opacity mask is different from a clipping mask, because it allows you to not only mask an object, but also alter the transparency of artwork. An opacity mask is made and edited using the Transparency panel.
In this section, you’ll create an opacity mask from the compound path so that the woman.psd image appears through the mask.
1. Click the Transparency panel icon (![]() ) on the right side of the workspace to expand the Transparency panel.
) on the right side of the workspace to expand the Transparency panel.
2. Choose Select > Deselect.
3. Choose View > Outline. In Outline mode, click to select the edge of the compound path with the Selection tool (![]() ). Choose View > Preview to return to Preview mode.
). Choose View > Preview to return to Preview mode.
4. Press the letter D to set the default stroke and fill.
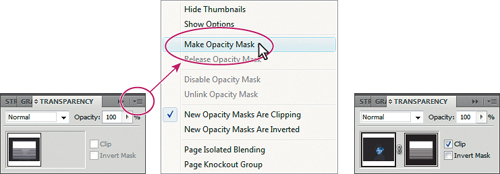
The color of the masking object matters. If there is no color fill, then nothing will appear when it is used as an opacity mask. Where the opacity mask is white, the artwork is fully visible. Where the opacity mask is black, the artwork is hidden. Shades of gray in the mask result in varying degrees of transparency in the artwork.
Note
The object that is to become the opacity mask (the masking object) needs to be the top selected object in the artboard. If it is a single object like a rectangle, it does not need to be a compound path. If the opacity mask is to be made from multiple objects, they need to be grouped.
5. Choose Select > All On Active Artboard to select the compound shape and the woman.psd image.
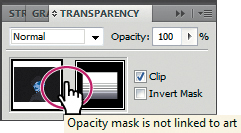
6. In the Transparency panel menu (![]() ), choose Make Opacity Mask. Make sure that the Clip option is selected in the Transparency panel.
), choose Make Opacity Mask. Make sure that the Clip option is selected in the Transparency panel.
The woman.psd image is now masked with the compound path, as indicated by the dashed underline beneath the layer name in the Layers panel, if you were to open it. Right now, the opacity mask doesn’t appear to be any different than a clipping mask. You will see that it has many more options.
Next, you’ll adjust the opacity mask that you just created.
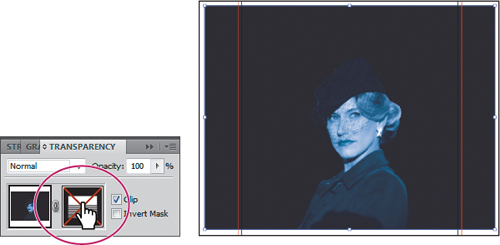
7. In the Transparency panel, Shift-click the mask thumbnail (as indicated by the white rectangles on the black background) to disable the mask. Notice that a red x appears on the mask in the Transparency panel and that the entire woman.psd image reappears in the Document window.
Tip
To disable and enable an opacity mask, you can also choose Disable Opacity Mask or Enable Opacity Mask from the Transparency panel menu.
Note
You need to open the Transparency panel on the right side of the workspace because the Transparency panel in the Control panel closes when you interact with the artwork.
8. In the Transparency panel, Shift-click the mask thumbnail to enable the opacity mask again.
9. Click to select the mask thumbnail on the right side of the Transparency panel.
Clicking the opacity mask in the Transparency panel, selects the mask (the compound path) on the artboard. If the mask isn’t selected, click to select it with the Selection tool. You cannot now edit other artwork. Also notice that the document tab shows (<Opacity Mask>/Opacity Mask), indicating that you are now editing the mask.
10. Click the Layers panel icon (![]() ) on the right side of the workspace to reveal the Layers panel. In the Layers panel, notice that layer <Opacity Mask> appears. Click the toggle arrow (
) on the right side of the workspace to reveal the Layers panel. In the Layers panel, notice that layer <Opacity Mask> appears. Click the toggle arrow (![]() ) to the left of the <Opacity Mask> layer to expand it.
) to the left of the <Opacity Mask> layer to expand it.
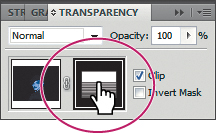
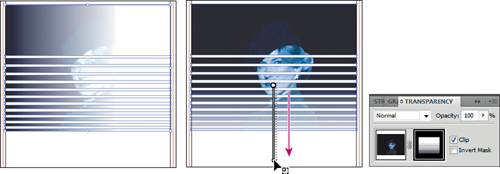
11. With the mask selected, in the Control panel, click the fill color and select a black to white linear gradient, called BW Gradient.
12. Select the Gradient tool (![]() ) in the Tools panel. Holding down the Shift key, click about half way down from the top of the compound shape and drag down past the bottom of the shapes, as shown in the figure below. Release the mouse button, and then release the Shift key.
) in the Tools panel. Holding down the Shift key, click about half way down from the top of the compound shape and drag down past the bottom of the shapes, as shown in the figure below. Release the mouse button, and then release the Shift key.
13. Click the Transparency panel icon (![]() ) and notice how the mask changes in the Transparency panel.
) and notice how the mask changes in the Transparency panel.
Next, you’ll move the image but not the opacity mask. With the image thumbnail selected in the Transparency panel, both the image and the mask are linked together, by default, so that if you move the image on the artboard, the mask moves as well.
14. In the Transparency panel, click the image thumbnail so that you are no longer editing the mask. Click the link icon (![]() ) between the image thumbnail and the mask thumbnail. This allows you to move just the image or the mask, but not both.
) between the image thumbnail and the mask thumbnail. This allows you to move just the image or the mask, but not both.
Note
You only have access to the link icon when the image thumbnail, not the mask thumbnail, is selected in the Transparency panel.
Note
You need to stop opacity mask editing before you can work with other artwork.
15. With the image selected on the artboard, choose Object > Transform > Reflect. In the Reflect dialog box, make sure that Vertical is selected, and then click OK.
16. With the Selection tool, drag the woman.psd image down and to the left, as shown in the figure.

Note
The position of the woman does not have to match the figure exactly.
17. In the Transparency panel, click the blank space between the image thumbnail and the mask thumbnail (where the link icon (![]() ) was). This links the image and the mask again so that they move together.
) was). This links the image and the mask again so that they move together.
18. Choose Select > Deselect, then choose File > Save.
Sampling colors in placed images
You can sample, or copy, the colors in placed images to apply the colors to other objects in the artwork. Sampling colors enables you to easily make colors consistent in a file that combines Photoshop images and Illustrator artwork.
In this section, you’ll use the Eyedropper tool to sample colors from a placed image, and apply the colors to another object.
1. In the Layers panel, make sure that all the layers are collapsed, and then click the visibility column to the left of the Frame, Content, and Background layers to show their contents on the artboard.

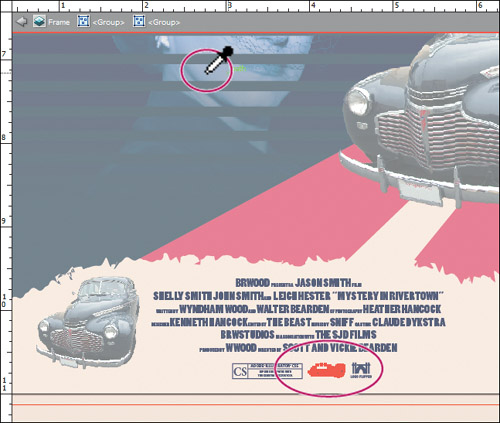
2. Select the Zoom tool (![]() ) in the Tools panel and drag a marquee around the text at the bottom of the poster to zoom in.
) in the Tools panel and drag a marquee around the text at the bottom of the poster to zoom in.
3. Select the Selection tool (![]() ), and double-click twice on the studio9 logo at the bottom of the artboard. This allows you to enter isolation mode and select just the logo from the group. Click to select the logo.
), and double-click twice on the studio9 logo at the bottom of the artboard. This allows you to enter isolation mode and select just the logo from the group. Click to select the logo.

4. Press Ctrl+− (Windows) or Cmd+− (Mac OS) several times to zoom out until you can see the bottom half of the woman’s face.
5. Select the Eyedropper tool (![]() ) in the Tools panel, and Shift-click the image of the woman to sample and apply the blue color from the top layer in the layered woman.psd file. You can try sampling the color of different images and content if you want.
) in the Tools panel, and Shift-click the image of the woman to sample and apply the blue color from the top layer in the layered woman.psd file. You can try sampling the color of different images and content if you want.
The color you sample is applied to the selected logo.
Note
Using the Shift key with the Eyedropper tool allows you to apply only the sampled color to the selected object. If you don’t use the Shift key, you apply all appearance attributes to the selected object.
Note
You may want to zoom in to the selected studio9 logo to see the color change.
6. Press Escape to exit isolation mode, and then choose View > Fit Artboard In Window.
7. Choose Select > Deselect, and then choose File > Save.
Replacing a placed, linked image
You can easily replace a placed image with another image to update a document. The replacement image is positioned exactly where the original image was, so no realignment is necessary. If you scaled the original image, you may have to resize the replacement image to match the original image.
Now, you’ll replace the smaller car.psd image with a grayscale version of the image.
1. Choose File > Save As. In the Save As dialog box, navigate to the Lesson15 folder and open it. Name the file movieposter2.ai. Leave the Save As Type option set to Adobe Illustrator (*.AI) (Windows) or the Format option set to Adobe Illustrator (ai) (Mac OS), and then click Save. In the Illustrator Options dialog box, leave the Illustrator options at their default settings, and then click OK.
2. With the Selection tool, click the smaller car.psd image in the lower-left corner of the artboard. In the Control panel, click the blue, underlined Linked File. This opens the Links panel.
In the Links panel, notice that some of the images listed have no names. That is typically because they are embedded. The embed icon (![]() ) also indicates that the images are embedded.
) also indicates that the images are embedded.
Tip
You can also open the Links panel separately by choosing Window > Links.
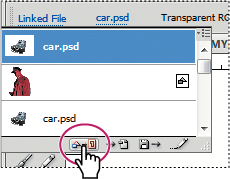
3. In the Links panel, car.psd is selected. Click the Go To Link button (![]() ) at the bottom of the Links panel to center the linked image on the artboard and select it if it wasn’t already selected. Make sure that car.psd is still selected in the Links panel, and then click the Relink button (
) at the bottom of the Links panel to center the linked image on the artboard and select it if it wasn’t already selected. Make sure that car.psd is still selected in the Links panel, and then click the Relink button (![]() ) at the bottom of the panel.
) at the bottom of the panel.
4. In the Place dialog box, navigate to the car_bw.psd image in the images folder in the Lesson15 folder and select it. Make sure that the Link option is selected. Click Place to replace the small car image with the new one.
The replacement image (car_bw.psd) appears on the artboard in place of the car.psd image. When you replace an image, the color adjustments that you made to the original image are not applied to the replacement. However, masks applied to the original image are preserved. Any layer modes and transparency adjustments that you’ve made to other layers also may affect the image’s appearance.
5. Choose Select > Deselect, then choose View > Fit Artboard In Window.
6. Choose File > Save.
If you want to learn how to open and manipulate a layered Illustrator file in Photoshop, continue to the next section. If not, skip to “Exploring on your own.”
Exporting a layered file to Photoshop
Not only can you open layered Photoshop files in Illustrator, but you can also save layered Illustrator files and then open them in Photoshop. Moving layered files between Illustrator and Photoshop is helpful when creating and editing web or print graphics. You can preserve the hierarchical relationship of the layers by selecting the Write Layers option when saving your file. You can also open and edit type objects.
1. Choose File > Export.
2. Navigate to the folder where you’ll save the file, and name the file poster.psd. Changing the file name preserves your original Illustrator file.
Tip
In the Export dialog box, the Use Artboards option allows you to export the artboards as separate Photoshop PSD files.
3. Choose Photoshop (PSD) from the Save As Type (Windows) or Format (Mac OS) menu, and click Save (Windows) or Export (Mac OS).
4. In the Photoshop Export Options dialog box, make sure that CMYK is the Color Model, select High (300 ppi) for the resolution, and make sure that Write Layers is selected. Leave the rest of the settings at their defaults. Preserve Text Editability is grayed out because all the text was already converted to outlines. Click OK.
Note
After clicking OK, you may see a warning dialog box. Click OK.
Note
After clicking OK, you may need to give it some time to save the file.
The Anti-alias option removes jagged edges in the artwork. The Write Layers option lets you export each Illustrator top-level layer as a separate Photoshop layer.
Tip
You can also copy and paste or drag and drop from Illustrator to Photoshop. When you copy and paste, a dialog box appears asking what type of object you’d like to place the content from Illustrator as: Smart Object, Pixels, Path, or Shape Layer. To learn more about bringing Illustrator content into Photoshop, search for “Duplicate selections using drag and drop” in Illustrator Help.
5. Start Adobe Photoshop CS5.
Note
You can open Illustrator files in previous versions of Photoshop, but for this lesson, it’s assumed that you are using Photoshop CS5.
6. Open the poster.psd file that you exported in step 4.
7. Click the Layers tab to view the Layers panel. Notice the layers. Choose File > Close, and don’t save the changes.
Note
Artwork that is too complex may be rasterized and flattened to one layer.
8. Close Photoshop CS5.
Illustrator and Adobe InDesign
You can place Illustrator (AI) files and PDF files in InDesign. You can also copy and paste content from Illustrator, and drag and drop from Illustrator into InDesign. To learn more about working with Illustrator and InDesign, see the PDF file, Adobeapps.pdf, on the Classroom in a Book CD.
Illustrator and Adobe Flash
Illustrator CS5 lets you use Illustrator content in Flash or export in the Flash file format (SWF). To learn more about working with Illustrator and Adobe Flash, see the PDF file, Adobeapps.pdf, on the Classroom in a Book CD.
Illustrator and Adobe Flash Catalyst
In Illustrator CS5, you can create and save an Illustrator file for use in Flash Catalyst. To learn more about working with Illustrator and Flash Catalyst, see the PDF file, Adobeapps.pdf, on the Classroom in a Book CD.
Illustrator and Adobe Flex
In Illustrator CS5, you can save an Illustrator file for use in Flex. To learn more about working with Illustrator and Flex, see the PDF file, Adobeapps.pdf, on the Classroom in a Book CD.
Exploring on your own
Now that you know how to place and mask an image in an Illustrator file, you can place other images and apply a variety of modifications to the images. You can also create masks for images from objects that you create in Illustrator. For more practice, try the following.
1. In addition to adjusting color in images, apply transformation effects (such as shearing or rotating), filters, or effects (such as one of the Artistic or Distort filters/effects) to create contrast between the two cars in the movieposter.ai file.
2. Use the basic shape tools or the drawing tools to draw objects to create a compound path to use as a mask. Then place the woman.psd image into the file with the compound path, and apply the compound path as a mask.
3. Create large type and use the type as a clipping mask to mask a placed object.
4. Choose File > Close without saving.
Review questions
1 Describe the difference between linking and embedding in Illustrator.
2 How do you create an opacity mask for a placed image?
3 What kinds of objects can be used as masks?
4 What color modifications can you apply to a selected object using effects?
5 Describe how to replace a placed image with another image in a document.
6 Name two ways that you can bring content from Illustrator into InDesign.
Review answers
1. A linked file is a separate, external file connected to the Illustrator file by an electronic link. A linked file does not add significantly to the size of the Illustrator file. The linked file must accompany the Illustrator file to preserve the link and ensure that the placed file appears when you open the Illustrator file. An embedded file is included in the Illustrator file. The Illustrator file size reflects the addition of the embedded file. Because the embedded file is part of the Illustrator file, no link can be broken. You can update linked and embedded files using the Replace Link button in the Links panel.
2. You create an opacity mask by placing the object to be used as a mask on top of the object to be masked. Then you select the mask and the objects to be masked, and choose Make Opacity Mask from the Transparency panel menu.
3. A mask can be a simple or compound path. You can use type as a mask. You can import opacity masks with placed Photoshop files. You can also create layer clipping masks with any shape that is the topmost object of a group or layer.
4. You can use effects to change the color mode (RGB, CMYK, or grayscale) or adjust individual colors in a selected object. You can also saturate or desaturate colors or invert colors in a selected object. You can apply color modifications to placed images, as well as to artwork created in Illustrator.
5. To replace a placed image, select the image in the Links panel. Then click the Replace Link button, and locate and select the replacement image. Click Place.
6. Choose File > Place in InDesign to place a graphic and create a link to the original, or choose Edit > Paste after copying content from Illustrator. Pasting content does not create a link.