
A Quick Tour of Adobe Illustrator CS5
This lesson takes approximately an hour to complete. You’ll need to first copy the Lesson00 folder onto your hard disk.
![]()

In this interactive demonstration of Adobe Illustrator CS5, you use new and exciting application features, like the Shape Builder tool and perspective drawing, as well as learn some key fundamentals for working in the application.
Getting started
You work with one file during this tour. All art files are on the Adobe Classroom in a Book CD that is included on the inside back cover of this book. Make sure that you copy the Lessons folder from the CD to your hard disk before starting this exercise. Before you begin, you need to restore the default preferences for Adobe Illustrator CS5. This lesson includes a finished art file so that you can see what you will be creating on your own.
1. To ensure that the tools and panels function as described in this lesson, delete or deactivate (by renaming) the Adobe Illustrator CS5 preferences file. See “Restoring default preferences” on page 3.
Note
If you have not already done so, copy the resource files for this lesson onto your hard disk from the Lesson00 folder on the Adobe Illustrator CS5 Classroom in a Book CD. See “Copying the Classroom in a Book files” on page 2.
2. Start Adobe Illustrator CS5.
3. Choose File > Open and open the L00end_1.ai file and the L00end_2.ai file in the Lesson00 folder in the Lessons folder on your hard disk. These are the final artwork files. You can leave them open for reference, or choose File > Close to close them. For this lesson, you will start with a blank document.

Working with multiple artboards
An Illustrator document can contain up to one hundred artboards (pages). Next, you will create a document with multiple artboards, and then edit them. Read more about creating and editing artboards in Lesson 4, “Transforming Objects.”
1. Choose File > New.
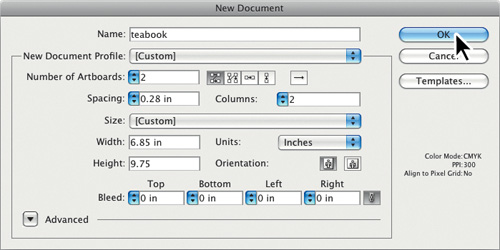
2. In the New Document dialog box, name the file teabook and leave the New Document Profile setting to Print. Change Number Of Artboards to 2., the Columns to 2., Units to Inches, Width to 6.85 in, and Height to 9.75 in. Click OK. A new blank document appears.
Note
New document profiles in Illustrator are tailored to different kinds of projects—mobile, print, web, and video, for example.
3. Choose File > Save As. In the Save As dialog box, leave the name as teabook.ai and navigate to the Lesson00 folder. Leave the Save As Type option set to Adobe Illustrator (*.AI) (Windows) or the Format option set to Adobe Illustrator (ai) (Mac OS), and click Save. In the Illustrator Options dialog box, leave the Illustrator options at their default settings, and then click OK.
4. Choose View > Rulers > Show Rulers to show rulers on the artboard.
5. Select the Artboard tool (![]() ) in the Tools panel. Click the artboard labeled 01 - Artboard 1 in the upper-left corner. In the Control panel, above the document, click the right, middle reference point (
) in the Tools panel. Click the artboard labeled 01 - Artboard 1 in the upper-left corner. In the Control panel, above the document, click the right, middle reference point (![]() ), and then change the Width to 3.5 in.
), and then change the Width to 3.5 in.
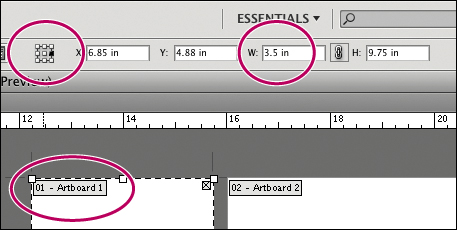
Notice that the options for editing the artboard dimensions, orientation, and more appear in the Control panel, below the menus.
Note
If you don’t see the Width and Height fields in the Control panel, click the Artboard Options button (![]() ) in the Control panel and enter the value in the dialog box that appears.
) in the Control panel and enter the value in the dialog box that appears.
6. Select the Selection tool (![]() ) to stop editing the artboards. Click the right artboard to make it the active artboard. Choose View > Fit Artboard In Window.
) to stop editing the artboards. Click the right artboard to make it the active artboard. Choose View > Fit Artboard In Window.
Creating shapes
Shapes are the cornerstone of Illustrator and you will create many of them throughout these lessons. Next, you will create and copy several shapes. Read more about creating and editing shapes in Lesson 3, “Creating and Editing Shapes.”
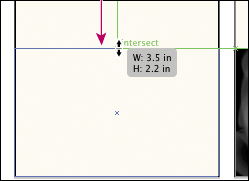
1. Select the Rectangle tool (![]() ) in the Tools panel and position the pointer over the upper-left corner of the artboard. Notice the word “intersect” next to the pointer, indicating that the rectangle you draw will snap to that corner of the artboard. Drag to the lower-right corner of the artboard.
) in the Tools panel and position the pointer over the upper-left corner of the artboard. Notice the word “intersect” next to the pointer, indicating that the rectangle you draw will snap to that corner of the artboard. Drag to the lower-right corner of the artboard.

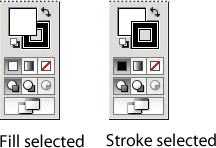
With the rectangle still selected, notice that there are controls for the fill and stroke at the bottom of the Tools panel. The stroke is essentially a border, and the fill is the interior of a shape. When the Fill box is in front, the selected color is assigned to the interior of the selected object.
2. Activate the fill by clicking the solid (white) Fill box, even if it’s already selected.
3. With the rectangle still selected, in the Color panel that appears on the right side of the workspace, change the values in the panel to C=0., M=2., Y=7., K=0.. After entering the last value, press Enter or Return to change the color. The rectangle now has a light yellow fill.

Note
If the color panel is not showing, click the Color panel icon (![]() ) on the right side of the workspace to expand the panel.
) on the right side of the workspace to expand the panel.
4. Select the Selection tool (![]() ) in the Tools panel and then choose Edit > Copy, Edit > Paste In Front.
) in the Tools panel and then choose Edit > Copy, Edit > Paste In Front.
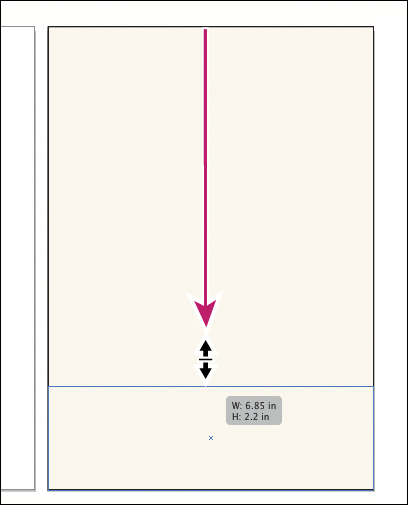
5. With the Selection tool, drag the top, middle bounding point of the selected shape down. In the gray measurement label that appears as you drag, you will see a width and height. When the height is approximately 2.2 in, release the mouse. The measurement label is a part of smart guides, which you will learn about later.
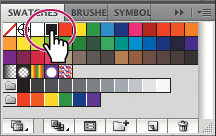
6. Click the Swatches panel icon (![]() ) on the right side of the workspace to expand the Swatches panel. Make sure that the Fill box is selected at the bottom of the Tools panel, and then click the Black swatch to fill the new shape with black.
) on the right side of the workspace to expand the Swatches panel. Make sure that the Fill box is selected at the bottom of the Tools panel, and then click the Black swatch to fill the new shape with black.
7. Choose Select > All On Active Artboard. Choose Object > Lock > Selection.
8. Choose File > Save. Leave the file open.
Working with the Shape Builder tool
The Shape Builder tool is an interactive tool for creating complex shapes by merging and erasing simpler shapes. Next, you will create a tea pot from simple shapes using the Shape Builder tool. Read more about working with the Shape Builder tool in Lesson 3, “Creating and Editing Shapes.”
1. Select the Zoom tool (![]() ) in the Tools panel and click twice on the black rectangle at the bottom of the artboard to zoom in.
) in the Tools panel and click twice on the black rectangle at the bottom of the artboard to zoom in.
2. Select the Rounded Rectangle tool (![]() ) by clicking and holding down the Rectangle tool (
) by clicking and holding down the Rectangle tool (![]() ) in the Tools panel. Click once in the center of the black rectangle.
) in the Tools panel. Click once in the center of the black rectangle.
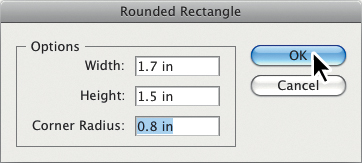
3. In the Rounded Rectangle dialog box, change the Width to 1.7 in, the Height to 1.5 in, and the Corner Radius to .8 in. Click OK.
Tip
If you don’t see in (inches) in the rounded rectangle dialog box, you can still enter “in” after the value to create the rectangle in inches.
4. Click the Fill color (![]() ) in the Control panel and click the white swatch.
) in the Control panel and click the white swatch.
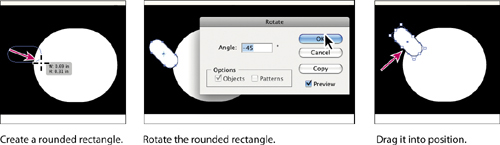
5. With the Rounded Rectangle tool still selected, drag to the left of the new shape to create a similar shape that is about .7 inches in width and .3 inches in height. Use the measurement label for sizing guidance.
6. Double-click the Rotate tool (![]() ) in the Tools panel. In the Rotate dialog box, change the Angle to −45, and then click OK.
) in the Tools panel. In the Rotate dialog box, change the Angle to −45, and then click OK.
Note
Your original rounded rectangle may not be in the same position as shown in the figure below. That is okay.
7. Select the Selection tool (![]() ) in the Tools panel and drag the shape to position it as in the figure, make a pouring spout.
) in the Tools panel and drag the shape to position it as in the figure, make a pouring spout.
8. Select the Rectangle tool (![]() ) from the Rounded Rectangle group in the Tools panel. Drag to create a rectangle that covers the bottom quarter of the large rounded rectangle. See figure for position.
) from the Rounded Rectangle group in the Tools panel. Drag to create a rectangle that covers the bottom quarter of the large rounded rectangle. See figure for position.

9. Select the Selection tool in the Tools panel. Holding down the Shift key, click the other two white shapes to select all three shapes.
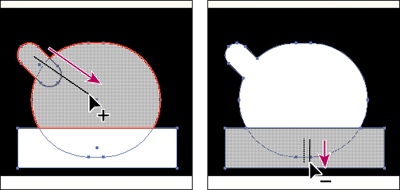
10. Select the Shape Builder tool (![]() ) in the Tools panel. Position the pointer over the smaller rounded-rectangle shape, and drag through to the larger white rounded rectangle. This combines the shapes into one.
) in the Tools panel. Position the pointer over the smaller rounded-rectangle shape, and drag through to the larger white rounded rectangle. This combines the shapes into one.
11. Holding down the Alt (Windows) or Options (Mac OS) key, drag through the bottom two shapes with the Shape Builder tool to remove them. Notice the minus sign in the pointer.
Working with drawing modes
Drawing modes allow you to draw inside shapes, draw behind existing shapes, or draw in normal mode, which typically layers shapes on top of each other. Next, you will draw a rectangle inside the tea pot shape. Read more about drawing modes in Lesson 3, “Creating and Editing Shapes.”
1. Select the Selection tool (![]() ) in the Tools panel. Click to select the tea pot shape.
) in the Tools panel. Click to select the tea pot shape.
2. Click the Draw Inside button (![]() ) at the bottom of the Tools panel. Notice that the teapot shape now has dotted lines around the corners, indicating that you can draw inside the shape.
) at the bottom of the Tools panel. Notice that the teapot shape now has dotted lines around the corners, indicating that you can draw inside the shape.
Note
If the Tools panel you see is displayed as a single column, you can click the Drawing Modes button (![]() ) at the bottom of the Tools panel and choose a drawing mode from the menu that appears.
) at the bottom of the Tools panel and choose a drawing mode from the menu that appears.
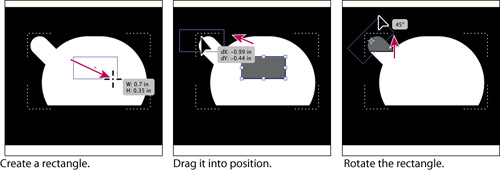
3. Select the Rectangle tool (![]() ) in the Tools panel. Position the pointer over the center of the white teapot shape. Drag to draw a rectangle that is about .7 inches in width and .35 inches in height. It does not have to be exact.
) in the Tools panel. Position the pointer over the center of the white teapot shape. Drag to draw a rectangle that is about .7 inches in width and .35 inches in height. It does not have to be exact.
4. Change the Fill color in the Control panel to a medium gray.
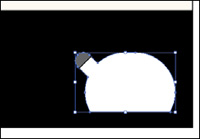
5. Select the Selection tool and drag the rectangle up into the pour spout.
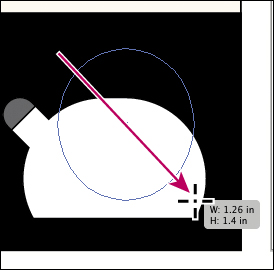
6. Select the Rotate tool (![]() ) in the Tools panel. Position the pointer over the upper-right corner of the rectangle. Holding down the Shift key, drag in a counter-clockwise motion until you see 45°. Release the mouse button, and then the Shift key.
) in the Tools panel. Position the pointer over the upper-right corner of the rectangle. Holding down the Shift key, drag in a counter-clockwise motion until you see 45°. Release the mouse button, and then the Shift key.
Tip
If you don’t like a shape you’ve drawn, you can always choose Edit > Undo to try again.
7. Click the Draw Normal button (![]() ) at the bottom of the Tools panel.
) at the bottom of the Tools panel.
8. Choose Select > Deselect, then File > Save.
Working with strokes
The Width tool allows you to create a variable width stroke and save the width as a profile that can be applied to other strokes. Next, you will create a handle for the teapot.
1. Select the Selection tool (![]() ) in the Tools panel. Choose Select > All On Active Artboard. Drag the teapot close to the lower-right corner of the black rectangle.
) in the Tools panel. Choose Select > All On Active Artboard. Drag the teapot close to the lower-right corner of the black rectangle.
2. Select the Ellipse tool (![]() ) from the Rectangle tool group in the Tools panel. Position the pointer above and to the right of the teapot spout. Drag to create an ellipse that is approximately 1.25 inches in width and 1.4 inches in height.
) from the Rectangle tool group in the Tools panel. Position the pointer above and to the right of the teapot spout. Drag to create an ellipse that is approximately 1.25 inches in width and 1.4 inches in height.
Tip
You can use the Selection tool (![]() ) in the Tools panel to reposition the ellipse after drawing it.
) in the Tools panel to reposition the ellipse after drawing it.
3. Click the Fill color in the Control panel and choose None (![]() ) for the fill. Click the Stroke color in the Control panel and choose a light gray (C=0, M=0, Y=0, K=50).
) for the fill. Click the Stroke color in the Control panel and choose a light gray (C=0, M=0, Y=0, K=50).
4. Choose 2 pt from the Stroke Weight to the right of the Stroke Color in the Control panel.
5. Choose Object > Arrange > Send Backward too send it behind the teapot.
6. Select the Zoom tool (![]() ) in the Tools panel and click twice on the new ellipse to zoom in to it.
) in the Tools panel and click twice on the new ellipse to zoom in to it.
7. With the ellipse still selected, select the Width tool (![]() ) in the Tools panel. Position the pointer over the top of the gray stroke, just to the left of center. Drag away from the line, as shown in the figure below.
) in the Tools panel. Position the pointer over the top of the gray stroke, just to the left of center. Drag away from the line, as shown in the figure below.
Tip
Read more about the Width tool in Lesson 3, “Creating and Editing Shapes.”
8. Position the pointer a little to the left of where you just dragged the stroke. Click and drag toward the center of the line. How far you drag doesn’t have to exaclty match the figure below.
9. Choose Select > Deselect, then choose File > Save.

Working with color groups and recoloring artwork
A color group is an organization tool that lets you group related color swatches together in the Swatches panel. In addition, a color group can be a container for color harmonies, which you create using the Edit Color/Recolor Artwork dialog box or the Color Guide panel. Next, you will create more colors for the book cover.
Tip
Read more about color groups and recoloring artwork in Lesson 6, “Color and Painting.”
1. Choose View > Fit Artboard In Window.
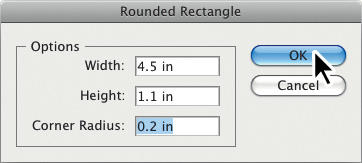
2. Select the Rounded Rectangle tool (![]() ) in the Tools panel. Click in the middle of the artboard. In the Rounded Rectangle dialog box, change the Width to 4.5 in, the Height to 1.1 in, and the Corner Radius to .2 in. Click OK.
) in the Tools panel. Click in the middle of the artboard. In the Rounded Rectangle dialog box, change the Width to 4.5 in, the Height to 1.1 in, and the Corner Radius to .2 in. Click OK.
3. Click the Fill box in the Tools panel if it isn’t already selected. Click the Swatches panel icon (![]() ) on the right side of the workspace to expand the Swatches panel.
) on the right side of the workspace to expand the Swatches panel.
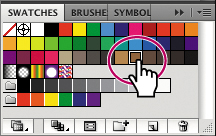
4. In the Swatches panel, position the pointer over the brown swatches. Click the brown swatch that shows a tooltip with C=40, M=65, Y=90, K=35, to fill the rectangle.
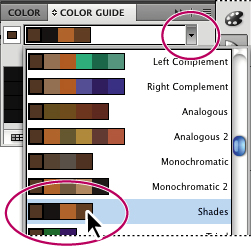
5. Select the Selection tool and click the Color Guide panel icon (![]() ) on the right side of the workspace. Click the Set Base Color To The Current Color icon (
) on the right side of the workspace. Click the Set Base Color To The Current Color icon (![]() ). Choose Shades from the Harmony Rules menu (circled in the figure).
). Choose Shades from the Harmony Rules menu (circled in the figure).
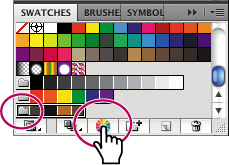
6. Click the Save Color Group To Swatch Panel button (![]() ). This saves the four colors at the top of the panel as a group in the Swatches panel.
). This saves the four colors at the top of the panel as a group in the Swatches panel.
7. With the Selection tool (![]() ), drag a marquee across the tea pot and handle at the bottom-right of the artboard to select both objects.
), drag a marquee across the tea pot and handle at the bottom-right of the artboard to select both objects.
8. Click the Swatches panel icon (![]() ) to expand the Swatches panel. Notice the new color group listed at the bottom of the panel (you may need to scroll down). Click the folder to the left of the four brown colors in the Swatches panel. Click the Edit Or Apply Colors button (
) to expand the Swatches panel. Notice the new color group listed at the bottom of the panel (you may need to scroll down). Click the folder to the left of the four brown colors in the Swatches panel. Click the Edit Or Apply Colors button (![]() ) at the bottom of the Color Guide panel.
) at the bottom of the Color Guide panel.
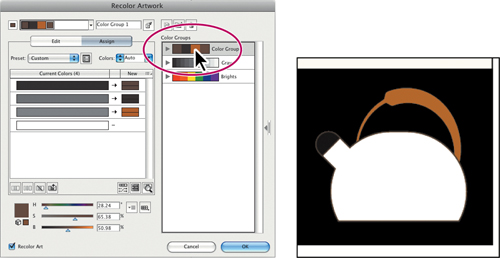
9. In the Recolor Artwork dialog box, click Color Group 1 in the Color Groups area. Click OK. Choose Select > Deselect.
The Recolor Artwork dialog box maps the colors in the artwork to the colors in the color group you select.
Placing Adobe Photoshop® images in Illustrator
In Illustrator, you can place Photoshop files and assign Layer Comps before you place images on the artboard. Next, you will place a hand drawn image. Read more about Layer Comps and placing Photoshop images in Lesson 15, “Combining Illustrator CS5 Graphics with Other Adobe Applications.”
1. Choose View > Fit Artboard In Window to ensure that the Document window is centered.
2. Choose File > Place. In the Place dialog box, navigate to the Lesson00 in the Lessons folder, and select the floral.psd file. Make sure that the Link option in the lower-left corner is selected, and click Place.
Illustrator recognizes when a file has been saved with Layer Comps, and opens the Photoshop Import Options dialog box. The file in this example has been saved with two different Layer Comps.
Note
By selecting Link in the Place dialog box, you are connecting the Photoshop image to the Illustrator file. If the image is later edited in Photoshop, it is updated in the Illustrator file.
3. In the Photoshop Import Options dialog box, select Show Preview. Make sure that No Background is chosen in the Layer Comp menu, and then click OK. The image of the floral pattern is placed on the artboard.

Note
Your rounded rectangle may be in a different position than shown in the figure. That’s okay.
4. Choose File > Save.
Using Live Trace
You can use Live Trace to convert photographs (raster images) into vector artwork. Next, you will trace the Photoshop file to create a piece of black and white line art. Read more about Live Trace in Lesson 3, “Creating and Editing Shapes.”
1. With the image still selected, click the Live Trace button in the Control panel. The image is converted to vector paths, but it is not yet editable.

Tip
At this point, if the image were linked, and if you were to edit the floral.psd image in Photoshop, the Live Trace image would update in Illustrator.
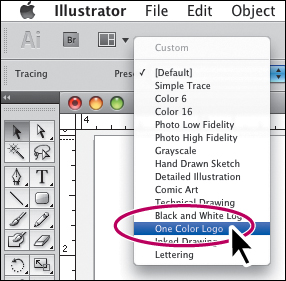
2. Choose One Color Logo from the Preset menu in the Control panel. This changes the trace settings and makes the white areas transparent.
3. Choose File > Save.
Using Live Paint
The Live Paint tool lets you color objects as you would on paper. Read more about Live Paint in Lesson 6, “Color and Painting.”
1. With the traced image still selected, click the Live Paint button in the Control panel.
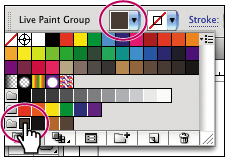
2. Select the Live Paint Bucket tool (![]() ) from the Shape Builder tool (
) from the Shape Builder tool (![]() ) group in the Tools panel. Click the Fill color in the Control panel and select the first brown swatch in the color group you created earlier.
) group in the Tools panel. Click the Fill color in the Control panel and select the first brown swatch in the color group you created earlier.
3. Press Ctrl++ (Windows) or Cmd++ (Mac OS) twice to zoom in.
4. With the Live Paint Bucket tool (![]() ) selected, position the pointer over one of the branches. Notice that much of the figure is highlighted in red, and colored squares appear above the pointer (
) selected, position the pointer over one of the branches. Notice that much of the figure is highlighted in red, and colored squares appear above the pointer (![]() ). Click to apply the brown fill color.
). Click to apply the brown fill color.
Note
If the area between the branches becomes painted, choose Edit > Undo Live Paint Bucket and try clicking again.
The color squares above the paint bucket represent the colors displayed before and after the selected color in the Swatches panel.
Note
Even though this shape is created from many paths, Live Paint recognizes the visual shapes and highlights them in red as you move the pointer over them.
5. Press the right arrow key once to choose the darker brown color (![]() ) from the three colored squares above the Live Paint Bucket tool. Using the Live Paint Bucket tool, click to apply the fill to one of the leaves.
) from the three colored squares above the Live Paint Bucket tool. Using the Live Paint Bucket tool, click to apply the fill to one of the leaves.
Try painting the remaining leaves and branches, pressing the arrow keys to switch colors as you paint.

6. Select the Selection tool (![]() ) in the Tools panel. With the traced artwork selected, click the Expand button in the Control panel to convert the traced artwork to editable vector shapes. Choose Object > Arrange > Send Backward.
) in the Tools panel. With the traced artwork selected, click the Expand button in the Control panel to convert the traced artwork to editable vector shapes. Choose Object > Arrange > Send Backward.
7. With the Selection tool click the rounded rectangle. In the Control panel, click the word Transform to open the Transform panel. Make sure that the center Reference Point (![]() ) is selected, then change the X value to 3.425 in and Y value to 4.1 in. Press Enter or Return to move the rounded rectangle.
) is selected, then change the X value to 3.425 in and Y value to 4.1 in. Press Enter or Return to move the rounded rectangle.
Note
Depending on the resolution of your screen, the Transform options may appear in the Control panel. If they do appear, you can set the options directly in the Control panel. You can also choose Window > Transform to open the Transform panel.
Note
You may need to type the “in” when entering the values in the Transform panel if it shows another type of unit.
8. Holding down the Shift key, with the Selection tool click the floral artwork. Release the Shift key, and then click the rounded rectangle once more to set it as the key object to align to.
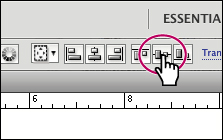
9. Click the Vertical Align Center button (![]() ) in the Control panel. Notice that the floral artwork moves to align with the rectangle.
) in the Control panel. Notice that the floral artwork moves to align with the rectangle.
Note
If you don’t see the Align options, click the word Align in the Control panel to open the Align panel.
10. Choose Select > Deselect.
11. With the Selection tool, click the floral shape to select it. Choose Align to Artboard (![]() ) from the Align To button (
) from the Align To button (![]() ) in the Control panel. This ensures that any selected objects are aligned to the artboard. Click the Horizontal Align left button (
) in the Control panel. This ensures that any selected objects are aligned to the artboard. Click the Horizontal Align left button (![]() ) to align the floral shape to the left edge of the artboard.
) to align the floral shape to the left edge of the artboard.

12. Choose Select > Deselect.
Working with the Blob Brush tool
The Blob Brush tool can be used to paint filled shapes that intersect and merge with other shapes of the same color. Next, you will use the Blob Brush tool to edit the floral artwork.
1. Choose View > Fit Artboard In Window. With the Selection tool (![]() ) selected, double-click the floral artwork. This enters isolation mode and allows you to edit the shapes in the floral artwork.
) selected, double-click the floral artwork. This enters isolation mode and allows you to edit the shapes in the floral artwork.
Note
Read more about working with the Blob Brush tool in Lesson 11, “Working with Brushes.”
2. Select the Zoom tool (![]() ) in the Tools panel. Drag a marquee across the top half of the floral artwork to zoom in.
) in the Tools panel. Drag a marquee across the top half of the floral artwork to zoom in.
3. With the Selection tool, click to select one of the main branches at the top (not a leaf). This selects most of the floral artwork.
4. Double-click the Blob Brush tool (![]() ) in the Tools panel. In the Blob Brush Tool Options dialog box, select Keep Selected, change the Smoothness to 80., and change the size to 5. pt. Click OK.
) in the Tools panel. In the Blob Brush Tool Options dialog box, select Keep Selected, change the Smoothness to 80., and change the size to 5. pt. Click OK.
5. Position the pointer over the end of one of the top branches (see the figure below for position). Drag from the top branch up and to the left to create another small branch. As you release the mouse button, see how the shape changes and notice that the part you drew is now part of the branch.
6. Drag to create a larger, rounded end on the branch you drew. You can treat the Blob brush like a crayon; precision is not necessary.

7. Choose Select > Deselect. Press the Escape key to exit isolation mode.
8. Choose View > Fit Artboard In Window, then choose File > Save.
Working with type
Next, you will add some text to the book cover artwork.
1. Choose Window > Workspace > Essentials to reset the panels.
Tip
Read more about working with type in Lesson 7, “Working with Type.”
2. Select the Type tool (![]() ), and click once on the artboard in an area where there are no objects. You will reposition the text later in the lesson.
), and click once on the artboard in an area where there are no objects. You will reposition the text later in the lesson.
3. Type FeliciTea. With the Type tool selected, choose Select > All, or press Ctrl+A (Windows) or Command+A (Mac OS) to select all the text that you typed. Choose Type > Change Case > UPPERCASE.
4. In the Control panel, drag to select the font name in the Font field in the Control panel (to the right of the word Character). Type “tra” with the font name selected to filter the font list to Trajan Pro. Type 45 pt in the Font Size field and press Enter or Return.

Tip
If you don’t see the Character options in the Control panel, then click the word Character to see the Character panel.
5. With the Type tool, select the “Tea” part of the text. Change the font size to 64. pt in the Control panel.
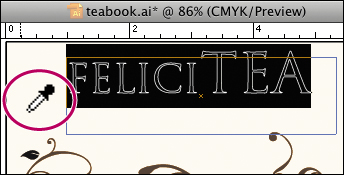
6. Choose Select > All. Select the Eyedropper tool (![]() ) in the Tools panel. Click the light yellow background shape to sample the color and apply it to the text.
) in the Tools panel. Click the light yellow background shape to sample the color and apply it to the text.
7. With the text still selected, change the Stroke color in the Control panel to None (![]() ).
).
8. With the Selection tool (![]() ), drag the text area down on top of the rounded rectangle toward the center of the artboard.
), drag the text area down on top of the rounded rectangle toward the center of the artboard.
9. Choose Object > Hide > Selection to temporarily hide the text.
10. Choose File > Save.

The result before hiding the text.
Using the Appearance panel and effects
The Appearance panel allows you to control an object’s attributes, such as stroke, fill, and effects.
1. With the Selection tool (![]() ), click to select the brown, rounded rectangle.
), click to select the brown, rounded rectangle.
Tip
Read more about working with the Appearance panel in Lesson 13, “Applying Appearance Attributes and Graphic Styles.”
2. Click the Appearance panel icon (![]() ) on the right side of the workspace. Note that in the Appearance panel, the current selection, listed at the top of the panel, as Path.
) on the right side of the workspace. Note that in the Appearance panel, the current selection, listed at the top of the panel, as Path.
3. Click the Stroke color in the Appearance panel and choose the light brown swatch (C=21, M=55, Y=83, K=5) from the color group you created. Change the Stroke Weight to the right of the color to 10. pt. Click the underlined word Stroke and in the Stroke panel that appears, click Align Stroke To Outside (![]() ).
).
4. Click the Add New Stroke button (![]() ) at the bottom of the Appearance panel to add a new stroke to the Appearance panel. Click the Stroke color, and select the first brown swatch (C=40, M=65, Y=90, K=35) in the swatch group you created. Click the Stroke color row in the Appearance panel to close the Swatches panel. Change the Stroke Weight to 4. pt.
) at the bottom of the Appearance panel to add a new stroke to the Appearance panel. Click the Stroke color, and select the first brown swatch (C=40, M=65, Y=90, K=35) in the swatch group you created. Click the Stroke color row in the Appearance panel to close the Swatches panel. Change the Stroke Weight to 4. pt.
5. Choose Effect > Path > Offset Path. In the Offset Path dialog box, change the offset to 11. pt, and then click OK.

6. Click the word Path at the top of the Appearance panel to apply the next effect to the entire path.
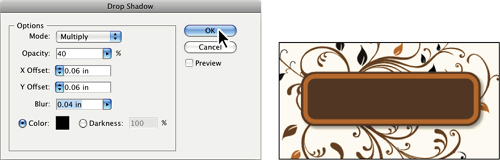
7. Click the Add New Effect button (![]() ) at the bottom of the Appearance panel, and choose Stylize > Drop Shadow. In the Drop Shadow dialog box, change the Opacity to 40., the X Offset and Y Offset to .06 in, and the Blur to .04 in. Click OK.
) at the bottom of the Appearance panel, and choose Stylize > Drop Shadow. In the Drop Shadow dialog box, change the Opacity to 40., the X Offset and Y Offset to .06 in, and the Blur to .04 in. Click OK.
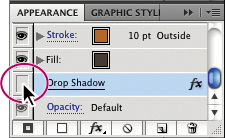
8. Scroll down in the Appearance panel. Click the eye icon (![]() ) to the left of the Drop Shadow effect to hide and disable it. Click the same box to reveal it again.
) to the left of the Drop Shadow effect to hide and disable it. Click the same box to reveal it again.
9. Choose Object > Show All to show the text.
10. Choose Select > Deselect and then choose File > Save.
Working with brushes
Brushes let you stylize the appearance of paths. You can apply brush strokes to existing paths, or you can use the Paintbrush tool to draw a path and apply a brush stroke simultaneously. Read more about working with brushes in Lesson 11, “Working with Brushes.”
1. Choose Object > Unlock All. With the Selection tool (![]() ), click to select the black rectangle at the bottom of the artboard. Hold down the spacebar, and drag the artboard up to reposition it.
), click to select the black rectangle at the bottom of the artboard. Hold down the spacebar, and drag the artboard up to reposition it.
2. Click the Draw Inside button (![]() ) at the bottom of the Tools panel. Choose Select > Deselect.
) at the bottom of the Tools panel. Choose Select > Deselect.
3. Click the Brushes panel icon (![]() ) on the right side of the workspace to expand the Brushes panel. Scroll down in the panel and click the Filbert brush. A tooltip appears when you position the pointer over a brush in the list.
) on the right side of the workspace to expand the Brushes panel. Scroll down in the panel and click the Filbert brush. A tooltip appears when you position the pointer over a brush in the list.
4. Change the Fill color in the Control panel to None (![]() ) and the Stroke color to White.
) and the Stroke color to White.
5. Select the Paintbrush tool (![]() ) in the Tools panel. Position the pointer of over the end of the teapot spout. Drag up and to the left, past the edge of the black rectangle, to create some steam. Draw a couple of lines to create the effect of steam.
) in the Tools panel. Position the pointer of over the end of the teapot spout. Drag up and to the left, past the edge of the black rectangle, to create some steam. Draw a couple of lines to create the effect of steam.
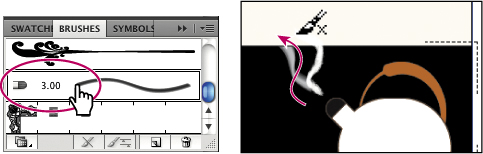
6. Double-click the Filbert brush in the Brushes panel to edit it. In the Bristle Brush Options dialog box, change the Shape to Flat Fan, the Size to 4., the Bristle Length to 280., the Paint Opacity to 15., and the Stiffness to 20.. Select Preview to see the change in your painting. You may need to move the dialog box to see it. Click OK.
7. In the Brush Change Alert dialog box, click Apply To Strokes to change the strokes you already painted on the artboard.
8. With the Paintbrush tool, try painting some steam on the left side of the black rectangle so that it looks like the steam is wrapping around the inside of the box.

9. Click the Draw Normal button (![]() ) at the bottom of the Tools panel, and then choose File > Save.
) at the bottom of the Tools panel, and then choose File > Save.
Creating and editing a gradient
Gradients are color blends that use two or more colors. Next, you will apply a gradient to a shape in the background.
1. With the Selection tool (![]() ), click to select the light yellow rectangle in the background. Choose Edit > Copy.
), click to select the light yellow rectangle in the background. Choose Edit > Copy.
Tip
Read more about working with gradients in Lesson 10, “Blending Colors and Shapes.”
2. Choose View > Fit All In Window. Click the first artboard on the left to make it the active artboard. Choose View > Fit Artboard In Window. Choose Edit > Paste In Place. Drag the right, middle bounding point to the left until it snaps to the right edge of the left artboard.
3. With the shape still selected, choose Edit > Copy, Edit > Paste In Front. Drag the top, middle point down to resize the copied rectangle. When the green alignment guide appears, indicating that it is aligned with the back rectangle on the artboard to the right, release the mouse button.
4. Click the Gradient panel icon (![]() ) on the right side of the workspace.
) on the right side of the workspace.
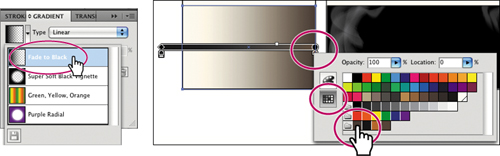
5. Click the Gradient menu button (![]() ) and choose Fade To Black from the menu. This applies a black-to-transparent gradient to the rectangle.
) and choose Fade To Black from the menu. This applies a black-to-transparent gradient to the rectangle.
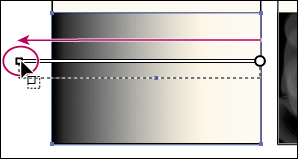
6. Select the Gradient tool (![]() ) in the Tools panel. Notice the gradient annotator (bar) that appears on the rectangle. Holding down the Shift key, drag across the rectangle from right to left above the gradient bar.
) in the Tools panel. Notice the gradient annotator (bar) that appears on the rectangle. Holding down the Shift key, drag across the rectangle from right to left above the gradient bar.
Dragging with the Gradient tool changes the direction of the gradient.
7. Position the pointer over the gradient annotator (the bar on the rectangle) so that it turns into a gradient slider. Notice the color stops beneath the gradient bar, which are similar to those in the Gradient panel. Double-click the black color stop (![]() ) on the right side of the gradient annotator. Click the Swatches button (
) on the right side of the gradient annotator. Click the Swatches button (![]() ) and click the first brown color in the color group you created, to change the color to brown. Press the Escape key to close the panel.
) and click the first brown color in the color group you created, to change the color to brown. Press the Escape key to close the panel.
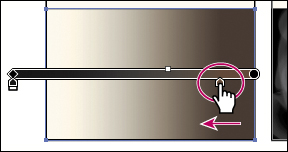
8. Position the pointer over the right end of the gradient annotator to reveal the brown color stop. Drag that stop a little to the left to change the appearance of the gradient.
9. Choose Select > Deselect, and then choose File > Save.
Working with symbols
A symbol is a reusable art object stored in the Symbols panel. You will now create a symbol from artwork. Read more about working with symbols in Lesson 14, “Working with Symbols.”
1. Click the Artboards panel icon (![]() ) on the right side of the workspace. Double-click Artboard 2 to fit the second artboard in the Document window.
) on the right side of the workspace. Double-click Artboard 2 to fit the second artboard in the Document window.
2. Choose File > Open and open the symbol.ai file in the Lesson00 folder in the Lessons folder on your hard disk. Choose Select > All On Active Artboard. Choose Edit > Copy, then File > Close. Back in the teabook.ai file, choose Edit > Paste.
3. Click the Symbols panel icon (![]() ) on the right side of the workspace.
) on the right side of the workspace.
4. With the circle still selected on the artboard, click the New Symbol button (![]() ) at the bottom of the Symbols panel. In the Symbol Options dialog box, name the symbol circle and select Graphic as the Type. Click OK.
) at the bottom of the Symbols panel. In the Symbol Options dialog box, name the symbol circle and select Graphic as the Type. Click OK.

The circle now appears in the Symbols panel. This symbol is saved in the Symbols panel for use in this document only.
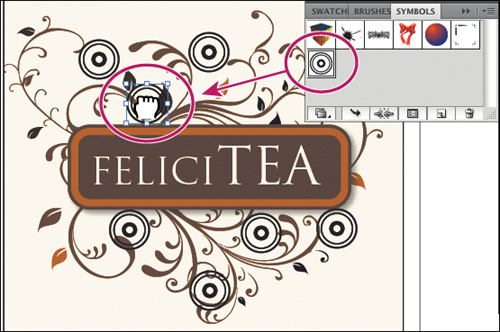
5. In the Symbols panel, drag the circle symbol onto the artboard. This creates an instance of the symbol. Drag out several more instances to create a loose pattern around the brown, rounded rectangle and text.
Note
Your symbol instances may be in different locations than in the figure. That’s okay. Use the figure as a guide.
6. Hold down the Shift+Alt (Windows) or Shift+Option (Mac OS) keys and, with the Selection tool (![]() ), drag a bounding point towards the center of one on the circles to make it smaller, while maintaining its proportions.
), drag a bounding point towards the center of one on the circles to make it smaller, while maintaining its proportions.
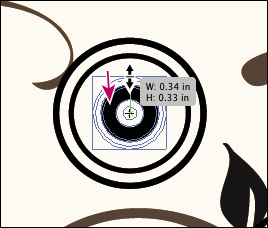
7. Try resizing each circle, making them smaller than the original in varying sizes.
8. Choose Select > Deselect, then File > Save.
Working with perspective
You will now render the book cover in perspective. The perspective feature in Illustrator allows you to easily draw or render artwork in perspective. Read more about this feature in Lesson 9, “Working with Perspective Drawing.”
1. Choose File > New. In the New Document dialog box, name the file teabook_persp and choose Print from the New Document Profile menu. Change the Units to Inches and the Width to 15. in. Click OK.
2. Choose File > Save As. In the Save As dialog box, leave the name as teabook_persp.ai and navigate to the Lesson00 folder. Leave the Save As Type option set to Adobe Illustrator (*.AI) (Windows) or the Format option set to Adobe Illustrator (ai) (Mac OS), and then click Save. In the Illustrator Options dialog box, leave the Illustrator options at their default settings, and then click OK.
3. Select the Perspective Grid tool (![]() ) in the Tools panel. Notice the perspective grid that appears.
) in the Tools panel. Notice the perspective grid that appears.
4. With the Perspective Grid tool selected, choose View > Perspective Grid > Lock Station Point. This allows you to edit the perspective grid planes together.
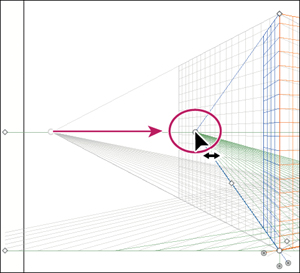
5. Drag the left vanishing point to the right to match the figure. This changes the perspective grid.
6. Click the teabook.ai tab at the top of the Document window.
7. Select the Selection tool (![]() ) in the Tools panel. Click the second (larger) artboard to make it active. Choose Select > All On Active Artboard.
) in the Tools panel. Click the second (larger) artboard to make it active. Choose Select > All On Active Artboard.
8. Choose Edit > Copy.
9. Click the teabook_persp.ai tab to return to the perspective document.
10. Choose Edit > Paste, and then choose Object > Group.
11. With teabook_persp.ai showing in the Document window, select the Perspective Selection tool (![]() ) in the same group as the Perspective Grid tool (
) in the same group as the Perspective Grid tool (![]() ) in the Tools panel.
) in the Tools panel.
12. Click the Right Grid Plane in the Plane Switching Widget in the upper-left corner of the artboard. This allows you to bring the group that is selected into perspective on the right grid plane.

13. With the Perspective Selection tool, drag the group so that the left edge of the group approximately aligns to where the left and right planes meet in the center.

Note
Dragging existing vector artwork with the Perspective Selection tool brings that content into perspective.
14. Click the teabook.ai tab at the top of the Document window.
15. Select the Selection tool (![]() ) in the Tools panel. Click the first (smaller) artboard to make it active. Choose Select > All On Active Artboard.
) in the Tools panel. Click the first (smaller) artboard to make it active. Choose Select > All On Active Artboard.
16. Choose Edit > Copy. Click the teabook_persp.ai tab to return to the perspective document. Choose Edit > Paste, and then choose Object > Group.
17. Select the Perspective Selection tool (![]() ) in the Tools panel.
) in the Tools panel.
18. Click the left grid plane in the Plane Switching Widget in the upper-left corner of the artboard. This allows you to bring the group that is selected into perspective on the left grid plane.

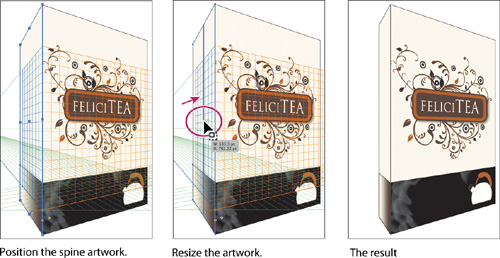
19. With the Perspective Selection tool, drag the group so that the right edge of the group approximately aligns with the left edge of the group that you positioned previously. You can reposition the group once it’s on the grid plane if it isn’t quite fitting, as shown in the figure.
20. With the Perspective Selection tool, drag the left, middle bounding point on the spine of the book to the right, to make it narrower.
21. Choose Select > Deselect, then choose View > Perspective Grid > Hide Grid.
22. Choose File > Save, and then File > Close for each of the open files.