
13. Applying Appearance Attributes and Graphic Styles
This lesson will take approximately an hour to complete. If needed, remove the previous lesson folder from your hard disk and copy the Lesson13 folder onto it.
![]()

Without changing the structure of an object, you can change its look using appearance attributes, including fills, strokes, effects, transparency and blending modes. You can save appearance attributes as graphic styles and apply them to another object. You can also edit an object that has a graphic style applied to it, and then edit the graphic style—an enormous time-saver!
Getting started
In this lesson, you’ll enhance the design for a web page by applying appearance attributes and graphic styles to the type, background, and buttons. Before you begin, you’ll restore the default preferences for Adobe® Illustrator® CS5. Then you will open the finished art file for this lesson to see what you’ll create.
1. To ensure that the tools and panels function as described in this lesson, delete or deactivate (by renaming) the Adobe Illustrator CS5 preferences file. See “Restoring default preferences” on page 3.
2. Start Adobe Illustrator CS5.
Note
If you have not already done so, copy the resource files for this lesson onto your hard disk from the Lesson13 folder on the Adobe Illustrator CS5 Classroom in a Book CD. See “Copying the Classroom in a Book files” on page 2.
3. Choose File > Open. Locate the L13end_1.ai file in the Lesson13 folder in the Lessons folder that you copied onto your hard disk to view the finished artwork. In this lesson, you will apply styling to the web buttons and other objects. Leave the file open for reference, or choose File > Close.

The design for the completed web page includes several graphic styles and effects, including gradients, semi-transparent type, drop shadows, and texturized and shaded graphics.
Note
If a color profile warning dialog box appears, click OK.
4. Open the L13start_1.ai file in the Lesson13 folder, located in the Lessons folder on your hard disk.

Note
If a color profile warning dialog box appears, click OK.
5. Choose File > Save As. In the Save As dialog box, navigate to the Lesson13 folder and open it. Name the file tech_design.ai. Leave the Save As Type option set to Adobe Illustrator (*.AI) (Windows) or the Format option set to Adobe Illustrator (ai) (Mac OS), and click Save. In the Illustrator Options dialog box, leave the Illustrator options at their default settings, and then click OK.
Using appearance attributes
You can apply appearance attributes to any object, group, or layer by using effects and the Appearance panel and Graphic Styles panel. An appearance attribute is an aesthetic property—such as a fill, stroke, transparency, or effect—that affects the look of an object, but does not affect its basic structure. An advantage of using appearance attributes is that they can be changed or removed at any time without changing the underlying object or any other attributes applied to the object.
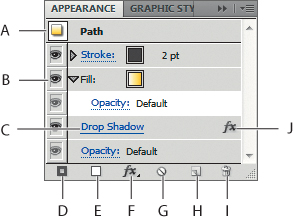
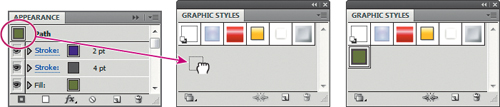
A. Path with stroke, fill, and drop shadow effect
B. Visibility column
C. Link to options
D. Add New Stroke
E. Add New Fill
F. Add New Effect
G. Clear Appearance
H. Duplicate Selected Item
I. Delete Selected Item
J. Indicates an effect applied
For example, if you apply the Drop Shadow effect to an object, you can change the drop shadow distance, blur, or color. You can also copy that effect and apply it to other shapes, groups, or layers. You can even save it as a graphic style and use it for other objects or files.
The Appearance panel contains the following types of editable attributes:
• Stroke (weight, color, and effects)
• Fill (type, color, transparency, and effects)
• Transparency, including opacity and blending mode
• Effect menu
Editing and adding appearance attributes
You’ll start by selecting an arrow shape and adding to its basic appearance using the Appearance panel.
1. Choose Window > Workspace > Essentials.
2. In the tech_design.ai file, using the Selection tool (![]() ), select the top green arrow shape in the Home button.
), select the top green arrow shape in the Home button.
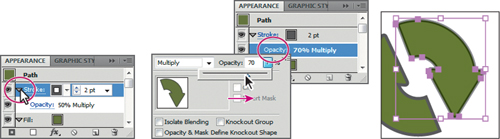
3. Click the Appearance panel icon (![]() ) on the right side of the workspace, and click the Stroke attribute row to select it. Do not click the blue underlined word Stroke. Click to the right or left of the word.
) on the right side of the workspace, and click the Stroke attribute row to select it. Do not click the blue underlined word Stroke. Click to the right or left of the word.
Selecting the Stroke attribute row lets you change just the stroke in the artwork.
4. Click the word Opacity in the Control panel to reveal the Transparency panel. In the Transparency panel, choose Multiply from the menu of blending modes. Change Opacity to 50.%. Press Enter or Return to close the Transparency panel.

5. With the Selection tool, press Ctrl+spacebar (Windows) or Command+spacebar (Mac OS) and click the arrow shape several times to zoom in to about 200%. Inspect the stroke around the arrow to see how it has changed. The effect of the Multiply blending mode is similar to drawing on a page with transparent marker pens.
Strokes are centered on a path outline—half of the stroke color overlaps the filled arrow shape, and half of the stroke color overlaps the white background.
Next, you will edit the stroke of the arrow using the Appearance panel.
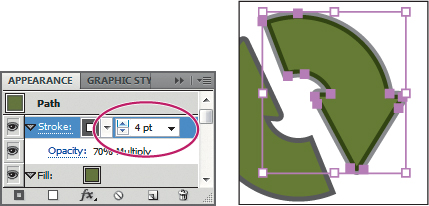
6. In the Appearance panel, expand the stroke attributes by clicking the triangle (![]() ) to the left of the word Stroke in the panel list.
) to the left of the word Stroke in the panel list.
7. Click the word Opacity to open the Transparency panel.
8. In the Transparency panel, change Opacity to 70.%. Click the Opacity attribute row in the Appearance panel to hide the Transparency panel.
9. Click 2 pt in the Appearance panel to edit the value. Change Stroke Weight to 4. pt. If you want, you can change the stroke color as well.
10. Choose File > Save.
Reordering appearance attributes
Now, you’ll change the appearance of the Multiply blending mode by rearranging the attributes in the Appearance panel.
1. Resize the Appearance panel so that you can view all its contents. Click the triangle (![]() ) to the left of the word Stroke to hide the stroke properties. If the Fill properties are showing as well, click the triangle (
) to the left of the word Stroke to hide the stroke properties. If the Fill properties are showing as well, click the triangle (![]() ) to the left of the word Fill to hide the fill properties.
) to the left of the word Fill to hide the fill properties.
2. Drag the Fill attribute above the Stroke attribute. (This technique is similar to dragging layers in the Layers panel to rearrange the stacking order.)
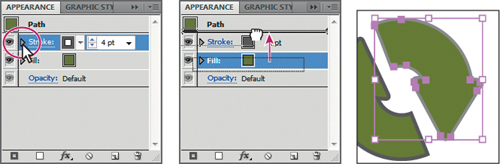
Moving the Fill attribute above the Stroke attribute changes the look of the Multiply blending mode on the stroke. Half the stroke is covered. Blending modes work only on objects that are beneath them in the stacking order.
Adding an additional stroke and fill
You’ll now add another stroke to the object, using the Appearance panel. Applying another stroke is a way to add interesting design elements to your artwork.
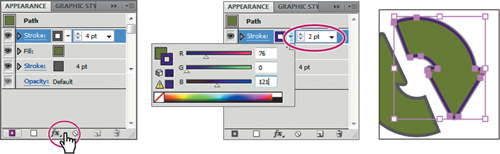
1. With the arrow shape selected, click the Add New Stroke button (![]() ) at the bottom of the Appearance panel. A stroke is added to the top of the list of appearance attributes. It has the same color and stroke weight as the first stroke.
) at the bottom of the Appearance panel. A stroke is added to the top of the list of appearance attributes. It has the same color and stroke weight as the first stroke.
2. For the new stroke, change Stroke Weight to 2. pt in the Appearance panel.
3. Shift-click the Stroke Color to open the Color panel instead of the Swatches panel. Choose RGB from the panel menu (![]() ). Change the RGB values to R=76., G=0., and B=121.. Press Enter or Return to close the Color panel and return to the Appearance panel.
). Change the RGB values to R=76., G=0., and B=121.. Press Enter or Return to close the Color panel and return to the Appearance panel.
You are using the RGB color mode because you are working with a web document.
Tip
Other ways to close panels, such as the Color panel, that appear in the Appearance panel include pressing Escape or clicking the Stroke attribute row.
Next, you will add an effect to change the offset of the stroke by bringing it toward the center of the arrow.
4. With the top Stroke attribute row still selected, click the Add New Effect button (![]() ) at the bottom of the Appearance panel. Choose Path > Offset Path from the menu that appears.
) at the bottom of the Appearance panel. Choose Path > Offset Path from the menu that appears.
5. Select Preview in the Offset Path dialog box to see the effect of offsetting as you change the values. Change Offset to −3 px, and then click OK.
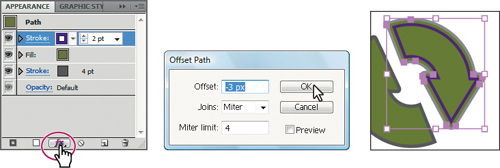
6. In the Appearance panel, click the arrow to the left of the top Stroke to reveal the Offset Path and Opacity effects. Deselect the eye icon (![]() ) to the left of Offset Path to hide that effect. Notice that the arrow on the artboard changes. Select the Visibility column to view the Offset Path again.
) to the left of Offset Path to hide that effect. Notice that the arrow on the artboard changes. Select the Visibility column to view the Offset Path again.
By clicking the eye icon in the Appearance panel, you disable an attribute without deleting it.
Tip
You can view all hidden attributes by choosing Show All Hidden Attributes from the Appearance panel menu.
Next, you’ll rearrange the order of the appearance attributes to prepare for adding live effects.
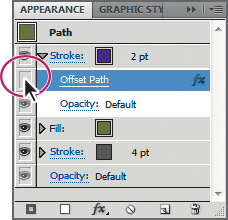
7. In the Appearance panel, click the triangle to the left of the 2 pt Stroke attribute to collapse the attribute, and then drag the 4 pt Stroke attribute between the Fill attribute and the 2 pt Stroke attribute.

8. Choose File > Save, and keep the arrow selected.
Using graphic styles
A graphic style is a saved set of appearance attributes that you can reuse. By applying graphic styles, you can quickly and globally change the appearance of objects and text.
The Graphic Styles panel (Window > Graphic Styles) lets you create, name, save, apply, and remove effects and attributes to objects, layers, and groups. You can also break the link between an object and an applied graphic style to edit that object’s attributes without affecting other objects that use that same graphic style.
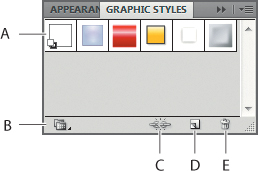
A. Graphic styles
B. Graphic Styles Libraries menu
C. Break Link To Graphic Style
D. New Graphic Style
E. Delete Graphic Style
For example, if you have a map that uses a shape to represent a city, you can create a graphic style that paints the shape green and adds a drop shadow. You can then use that graphic style to paint all the city shapes on the map. If you decide to use a different color, you can change the fill color of the graphic style to blue. All the objects that use that graphic style are then updated to blue.
Creating and saving a graphic style
Now, you’ll save and name a new graphic style using the appearance attributes you just specified for the arrow shape in the Home button. You will then apply the same appearance attributes to the other arrow shape.
1. Choose Essentials from the Workspace switcher in the Application bar, to reset the workspace.
Note
Even though Essentials is already selected, selecting it again will reset the workspace.
2. Click the Graphic Styles panel icon (![]() ) on the right side of the workspace to open the Graphic Styles panel.
) on the right side of the workspace to open the Graphic Styles panel.
3. Drag the Graphic Styles panel by the panel tab so that it is free-floating in the workspace. Resize the Graphic Styles panel so that all the default styles are visible and there is empty space at the bottom, if necessary.
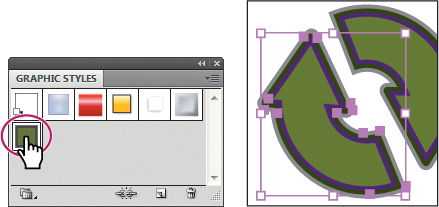
4. With the arrow shape on the artboard still selected, in the Appearance panel, drag the Path appearance thumbnail into the Graphic Styles panel.
5. When a small box appears on the inside of the panel, release the mouse button. The box indicates that you are adding a new style to the panel.
The path thumbnail in the Appearance panel changes to “Path: Graphic Style.”
6. In the Graphic Styles panel, double-click the new graphic style thumbnail. In the Graphic Style Options dialog box, name the new style Home button. Click OK.
Notice in the Appearance panel that “Path: Graphic Style” has changed to “Path: Home button.” This indicates that a graphic style called Home button is applied to the selected object.

7. Choose Select > Deselect, and then File > Save.
Applying a graphic style to an object
Graphic styles can be easily applied to other objects. Next, you will apply the graphic style of the right arrow shape to the left arrow in the Home button.
1. With the Selection tool (![]() ), click to select the other green arrow.
), click to select the other green arrow.
2. Click the Home button graphic style in the Graphic Styles panel to apply its attributes to the other arrow.
3. Choose Select > Deselect, and then File > Save.
Applying a graphic style to a layer
When a graphic style is applied to a layer, everything added to that layer has that same style applied to it. Now, you’ll create a new graphic style and apply it to a layer. Then you’ll create new shapes on that layer to see the effect of the style.
1. Choose Essentials from the workspace switcher in the Application bar.
2. Expand the Appearance panel (![]() ) on the right side of the workspace, and click the Clear Appearance button (
) on the right side of the workspace, and click the Clear Appearance button (![]() ) at the bottom of the panel. Select the No Selection appearance name or thumbnail at the top of the panel.
) at the bottom of the panel. Select the No Selection appearance name or thumbnail at the top of the panel.
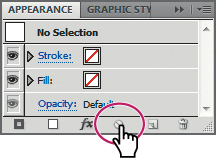
The Clear Appearance button removes all appearance attributes applied to an object, including any stroke or fill. By clicking the Clear Appearance button with nothing selected, you are setting the default appearance for new shapes.
3. In the Appearance panel, click the Add New Effect button (![]() ) and choose Stylize > Drop Shadow from the Illustrator Effects. Change Opacity to 50.%, X Offset to 3. pt, Y Offset to 3. pt, and Blur to 3. pt. Click OK.
) and choose Stylize > Drop Shadow from the Illustrator Effects. Change Opacity to 50.%, X Offset to 3. pt, Y Offset to 3. pt, and Blur to 3. pt. Click OK.
Note
When you type in 3 pt in a field, you may notice that it converts to 3 px when you click in another field. That is because the unit of measurement for the document was set to pixels.
4. In the Appearance panel, notice that Drop Shadow appears in the list. Drag the bottom of the Appearance panel down to expose more of the panel.
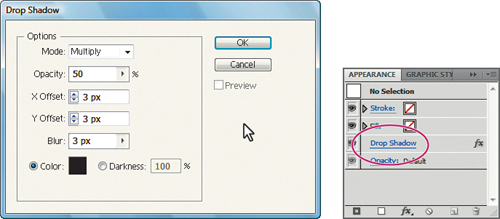
When creating a new style, the Graphic Style panel automatically uses the current appearance attributes displayed in the Appearance panel.
5. Click the Graphic Styles panel icon (![]() ) on the right side of the workspace to expand the panel. Alt-click (Windows) or Option-click (Mac OS) the New Graphic Style button (
) on the right side of the workspace to expand the panel. Alt-click (Windows) or Option-click (Mac OS) the New Graphic Style button (![]() ), and name the new style Drop Shadow. Click OK.
), and name the new style Drop Shadow. Click OK.
Now, you’ll target the Blog button layer to apply a drop shadow to all the shapes on that layer. Targeting selects the path(s) on that layer in the artwork.
6. Click the Layers panel icon (![]() ) on the right side of the workspace to open the Layers panel.
) on the right side of the workspace to open the Layers panel.
7. In the Layers panel, click the triangle (![]() ) to the left of the Blog button layer to expand the layer. Then click the target icon (
) to the left of the Blog button layer to expand the layer. Then click the target icon (![]() ) to the right of the Blog button layer name. If you can’t see the selected shapes on the artboard, you can hold down the spacebar and drag to the left.
) to the right of the Blog button layer name. If you can’t see the selected shapes on the artboard, you can hold down the spacebar and drag to the left.
Note
You may need to scroll down in the Layers panel.
8. In the Graphic Styles panel, click the Drop Shadow style to apply the style to the layer and all its contents. Keep the shapes selected on the artboard.

9. Double-click the Scale tool (![]() ) in the Tools panel. Change Uniform Scale to 70.%, and then click OK.
) in the Tools panel. Change Uniform Scale to 70.%, and then click OK.
10. Choose Select > Deselect, and then File > Save.
Now, you’ll test the layer effect by adding a shape to the Blog button layer.
11. Select the Zoom tool (![]() ) in the Tools panel, and click the blog shapes twice to zoom in.
) in the Tools panel, and click the blog shapes twice to zoom in.
12. Select the Ellipse tool (![]() ) from the same group as the Rectangle tool (
) from the same group as the Rectangle tool (![]() ) in the Tools panel.
) in the Tools panel.
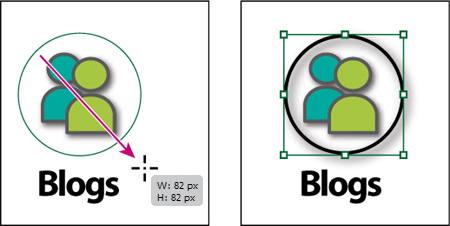
13. Make sure that Fill color in the Control panel is set to None (![]() ), Stroke Color is black, and Stroke Weight is 3. pt.
), Stroke Color is black, and Stroke Weight is 3. pt.
14. With the Blog button layer still selected, press the Shift key and draw a circle on top of the blog shapes that is about 82 px in height and width.
Note
To see the size as you draw in the measurement label, make sure that the smart guides are selected (View > Smart Guides).
15. Choose Object > Arrange > Send To Back to send the ellipse behind the blog shapes. With the Selection tool, position the circle so that it is approximately centered behind the blog shapes. Keep the ellipse selected.
Because the Drop Shadow style contains only an effect, and no stroke or fill, the objects added to the layer retain their original stroke and fill attributes.
Next, you will edit the drop shadow applied to the layer.
16. Click the Appearance panel icon (![]() ) on the right side of the workspace to open the Appearance panel.
) on the right side of the workspace to open the Appearance panel.
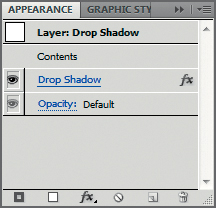
In the Appearance panel, notice the name “Layer: Drop Shadow” at the top of the panel. The Appearance panel shows that the ellipse is on a layer with a drop shadow applied to it.
17. Click the words Layer: Drop Shadow to access the Drop Shadow effect applied to the layer.
Tip
You can also select the Blog button layer target icon in the Layers panel, and then edit the effect in the Appearance panel.
18. Click the underlined words Drop Shadow in the Appearance panel and, in the Drop Shadow dialog box, change X Offset to 2. pt, and Y Offset to 2. pt. Select Preview to see the subtle change. Click OK.
19. Choose View > Fit Artboard In Window.
20. Choose Select > Deselect, then choose File > Save.
Target icons
The target icon on the Layers panel indicates whether an item in the layer hierarchy has any appearance attributes and whether it is targeted.
(![]() ) Indicates the item is targeted but has no appearance attributes beyond a single fill and a single stroke.
) Indicates the item is targeted but has no appearance attributes beyond a single fill and a single stroke.
(![]() ) Indicates the item is not targeted and has no appearance attributes beyond a single fill and a single stroke.
) Indicates the item is not targeted and has no appearance attributes beyond a single fill and a single stroke.
(![]() ) Indicates the item is not targeted but has appearance attributes.
) Indicates the item is not targeted but has appearance attributes.
(![]() ) Indicates the item is targeted and has appearance attributes.
) Indicates the item is targeted and has appearance attributes.
—From Illustrator Help
Tip
It is a good idea to use the Layers panel to select the objects or layers to which you want to apply styles. Effects and styles vary, depending on whether you’re targeting a layer or an object, or a group within a layer.
Applying existing graphic styles
You can apply graphic styles to your artwork from libraries that come with Illustrator CS5. Now, you’ll finish the button designs by adding an existing style to the Chat button layer.
1. Click the Layers panel icon (![]() ) on the right side of the workspace to open the Layers panel.
) on the right side of the workspace to open the Layers panel.
2. In the Layers panel, click the triangle (![]() ) to left of the Blog button layer to collapse it. Scroll down in the Layers panel, if necessary, and then click the triangle (
) to left of the Blog button layer to collapse it. Scroll down in the Layers panel, if necessary, and then click the triangle (![]() ) to left of the Chat button layer to expand the layer.
) to left of the Chat button layer to expand the layer.
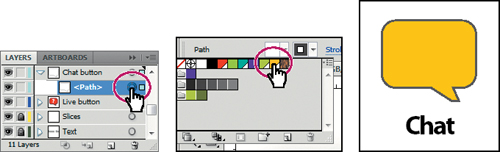
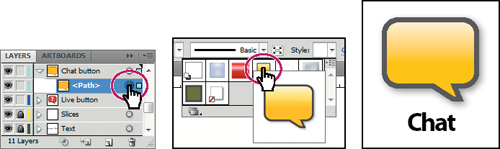
3. Select the <Path> sublayer. Then click the target icon (![]() ) to the right of the <Path> sublayer.
) to the right of the <Path> sublayer.
4. Select the yellow swatch (R=253, G=195, B=17) from the Fill color in the Control panel.
Note
If you target a layer or sublayer by mistake, Ctrl-click or Command-click the target icon to deselect it.
Now, you’ll apply a graphic style to the Chat button. The graphic style contains a color fill, which you’ll apply to the chat object in place of the existing yellow color.
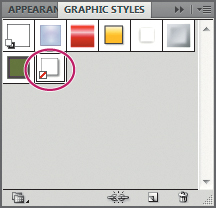
5. With the target icon (![]() ) for the <Path> sublayer still selected in the Layers panel, click the Style menu in the Control panel. Right-click (Windows) or Control-click (Mac OS) and hold down the mouse button on the Chat style in the Graphic Styles panel to preview the graphic style on the chat bubble.
) for the <Path> sublayer still selected in the Layers panel, click the Style menu in the Control panel. Right-click (Windows) or Control-click (Mac OS) and hold down the mouse button on the Chat style in the Graphic Styles panel to preview the graphic style on the chat bubble.
Previewing a graphic style is a great way to see what how the graphic style will affect the selected object, without actually applying it.
Note
If the Style menu doesn’t appear in the Control panel, open the Graphic Styles panel by clicking its icon on the right side of the workspace.
6. Click the Chat graphic style to apply it to the chat bubble.
7. Choose File > Save.
Next, you’ll apply an existing graphic style to some text.
8. Choose Select > Deselect.
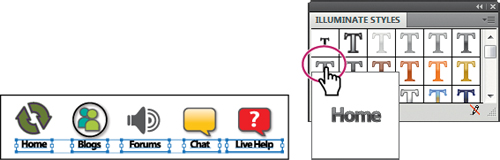
9. With the Selection tool (![]() ), drag a marquee across the button labels (the text below the buttons) to select them.
), drag a marquee across the button labels (the text below the buttons) to select them.
10. Choose Override Character Color from the Graphic Styles panel menu (![]() ), if it’s not already selected. Click the Graphic Styles Libraries Menu button (
), if it’s not already selected. Click the Graphic Styles Libraries Menu button (![]() ), and choose the Illuminate Styles library.
), and choose the Illuminate Styles library.
When you apply a graphic style to type, the text fill overrides the fill color of the graphic style. To prevent that, choose Override Character Color.
Tip
Use the arrows at the bottom of the Illuminate Styles library panel to load the previous or next graphic styles library in the panel.
11. Choose Use Text For Preview from the Illuminate Styles panel menu (![]() ).
).
12. In the Illuminate Styles library panel, right-click (Windows) or Control-click (Mac OS) and hold down the mouse button on the Charcoal Highlight graphic style to preview the graphic style on the text. Click the Charcoal Highlight graphic style to apply it.
Note that, if Override Character Color had been deselected, the fill would still be black.
Note
When you click a graphic style from a library, the graphic style is added to the Graphic Styles panel for that document.
13. Close the Illuminate Styles library panel.
14. Choose Select > Deselect, and then File > Save.
Adding to an existing graphic style
You can apply a graphic style to an object that already has a graphic style applied. This can be useful if you want to add properties to an object from another graphic style. The formatting becomes cumulative.
1. With the Selection tool (![]() ), click to select the red Live Help button shape (not the question mark).
), click to select the red Live Help button shape (not the question mark).
Next, you’ll make a change to the shape, and then create a new graphic style out of its appearance attributes.
2. Click the Appearance panel tab in the Graphic Styles panel group to show the panel. Select the red Fill attribute, and click the Duplicate Selected Item button (![]() ) at the bottom of the panel. This creates a copy of the fill above the original in the Appearance panel.
) at the bottom of the panel. This creates a copy of the fill above the original in the Appearance panel.
3. Click the Fill color of the new Fill attribute, which is automatically selected in the Appearance panel, to open the Swatches panel. Click the Swatch Libraries menu button (![]() ) at the bottom of the panel. Choose Patterns > Nature > Nature_Animal Skins. Select the pattern named Tiger to apply it to the fill.
) at the bottom of the panel. Choose Patterns > Nature > Nature_Animal Skins. Select the pattern named Tiger to apply it to the fill.
Tip
To see larger swatches, choose Large Thumbnail View from the Nature_Animal Skins panel menu.
4. Close the Nature_Animal Skins panel.
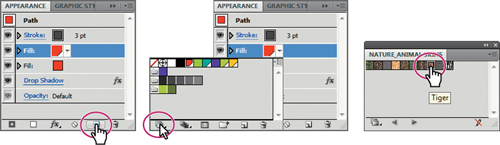
5. With the Tiger fill row selected in the Appearance panel, change Opacity to 30.% in the Control panel.

6. Click the Graphic Styles panel tab to show the graphic styles. Alt-click (Windows) or Option-click (Mac OS) the New Graphic Style button (![]() ). In the Graphic Style Option dialog box, name the style Help. Click OK.
). In the Graphic Style Option dialog box, name the style Help. Click OK.
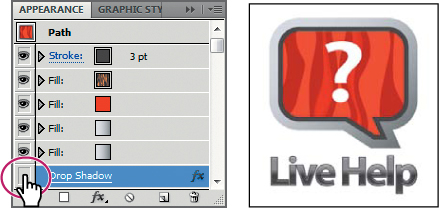
Next, you will apply the Bevel Soft graphic style to the live help button shape that is still selected.
7. In the Graphic Styles panel, click to apply the Bevel Soft graphic style to the button shape.
Notice that the fills and the stroke are no longer visible. Graphic styles replace the formatting on selected objects by default.
8. Choose Edit > Undo Graphic Styles.
9. Alt-click (Windows) or Option-click (Mac OS) the Bevel Soft graphic style.
Notice that the fills and stroke are preserved and that the bevel is applied as well. Alt-clicking (Windows) or Option-clicking (Mac OS) adds the graphic style formatting to the existing formatting.

10. Open the Appearance panel. Deselect the eye icon (![]() ) to the left of the Drop Shadow attribute to hide it.
) to the left of the Drop Shadow attribute to hide it.
11. Choose Select > Deselect, and then File > Save.
Applying an appearance to a layer
You can also apply simple appearance attributes to layers. For example, to make everything on a layer 50% opaque, target that layer, and change the opacity.
Next, you’ll target a layer and change its blending mode to soften the effect of the type.
1. In the Layers panel, click the downward triangle next to any open layers to collapse them.
2. Scroll to the Columns layer, and then click its target icon (![]() ).
).
3. Select the K=50 swatch from the Fill color in the Control panel, and change Opacity to 20.% in the Control panel as well.

4. Choose Select > Deselect.
5. Choose File > Save.
Copying, applying, and removing graphic styles
When you create several graphic styles and appearances, you may want to use them on other objects in your artwork. You can use the Graphic Styles panel, the Appearance panel, the Eyedropper tool (![]() ), or the Live Paint Bucket tool (
), or the Live Paint Bucket tool (![]() ) to apply and copy appearance attributes.
) to apply and copy appearance attributes.
Next, you’ll apply a style to one of the objects using the Appearance panel.
6. With the Selection tool (![]() ), click one of the arrow shapes for the Home button to select it.
), click one of the arrow shapes for the Home button to select it.
7. In the Appearance panel, drag the appearance thumbnail labeled Path: Home button onto the larger speaker shape of the Forums button to apply those attributes to it.
You can apply styles or attributes by dragging them from the Graphic Styles panel or the Appearance panel onto any object. The object doesn’t have to be selected.
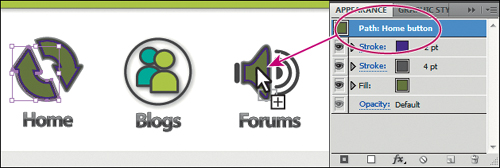
Note
Be sure to drag the thumbnail, not the text.
8. Choose Select > Deselect.
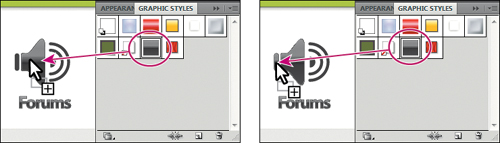
Next, you’ll apply a style by dragging it directly from the Graphic Styles panel onto an object.
9. With the Selection tool, drag the Charcoal Highlight graphic style thumbnail in the Graphic Styles panel onto the larger speaker shape in the Forums button artwork.
10. Release the mouse button to apply the style to the shape.
11. Drag the same graphic style to the smaller speaker shape to the left in the forums button to apply it. See the figure for placement.
Now, you’ll use the Layers panel to copy an attribute from one layer to another.
12. Expand the Layers panel to see all the layers. Click the Blog button layer to select it. Alt-drag (Windows) or Option-drag (Mac OS) the appearance indicator from the Blog button layer onto the appearance indicator of the Header type layer.
Using Alt or Option as you drag copies one layer effect onto another, which is indicated by the hand pointer with the plus sign. To move an appearance or style from one layer or object to another, drag the appearance indicator.
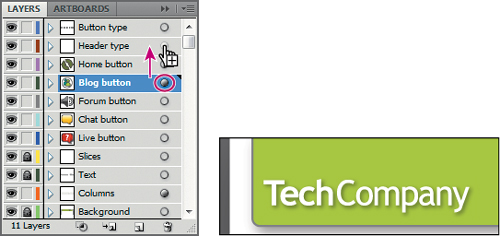
Alt-drag or Option-drag the appearance attributes from one layer to another.
Now, you’ll remove an appearance from a layer using the Layers panel.
13. In the Layers panel, click the target icon to the right of the Blog button layer.
14. Drag the target icon to the Trash button at the bottom of the Layers panel to remove the appearance attribute.
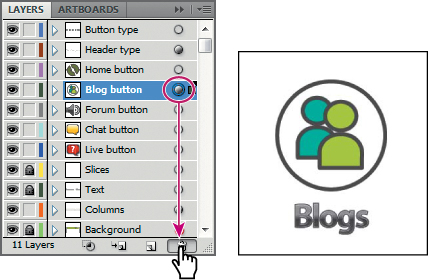
You can also remove attributes of a selected object or layer in the Appearance panel. To do this, select the object and then choose Reduce To Basic Appearance from the panel menu. This returns the object to its original state (including any stroke or fill), as it was before the appearance attribute or style was applied.
15. Choose File > Save, and then File > Close.
Exploring on your own
Now that you’ve learned the basic steps for creating and using appearances and graphic styles, you can experiment with different combinations of appearance attributes to fashion interesting special effects. Try combining different styles to produce new ones.
For example, here’s how to merge two existing styles to create a brand new style:
1. Choose File > New to create a new file. In the New Document dialog box, make sure that Print is chosen from the New Document Profile menu, and then click OK.
2. Choose Window > Graphic Styles to open the panel.
3. In the Graphic Styles panel, select the Round Corners 10 pt style.
Note
If the Round Corners 10 pt style does not appear in the Graphic Styles panel, then click the Graphic Styles Library Menu button and choose Image Effects > Yellow Glow.
4. Add another style to the selected style by Ctrl-clicking (Windows) or Command-clicking (Mac OS) the style named Illuminate Yellow.
Note
If the Illuminate Yellow style does not appear in the Graphic Styles panel, then click the Graphic Styles Library Menu button (![]() ) and choose Type Effects > Twine and repeat the previous two steps.
) and choose Type Effects > Twine and repeat the previous two steps.
5. Choose Merge Graphic Styles from the Graphic Styles panel menu.

6. Name the new style merged style in the Graphic Style Options dialog box, and then click OK.
7. On the artboard, draw a shape or create text, select the content with the Selection tool, and then apply the merged style.
8. Choose File > Close without saving the file.
Review questions
1 Name two types of appearance attributes.
2 How do you add a second stroke to an object?
3 What’s the difference between applying a graphic style to a layer versus applying it to an object?
4 How do you add to an existing graphic style?
5 How do you remove an appearance attribute using the Layers panel?
Review answers
1. The Appearance panel contains the following types of editable attributes:
• Fill attributes (fill type, color, transparency, and effects)
• Stroke attributes (stroke type, brush, color transparency, and effects)
• Transparency attributes (opacity and blending mode)
• Effects from the Effect menu
2. Click the Add New Stroke button in the Appearance panel, or choose Add New Stroke from the Appearance panel menu. A stroke is added to the top of the appearance list. It has the same color and stroke weight as the original stroke.
3. After a graphic style is applied to a layer, everything you add to that layer has that style applied to it. For example, if you create a circle on Layer 1 and then move that circle to Layer 2, which has a Drop Shadow effect applied, the circle adopts that effect.
When a style is applied to a single object, other objects on that layer are not affected. For example, if a triangle object has a Roughen effect applied to its path, and you move it to another layer, it retains the Roughen effect.
4. When a graphic style is applied to an object, Alt-click (Windows) or Option-click (Mac OS) a new graphic style in the Graphic Styles panel.
5. In the Layers panel, click the target icon of a layer. Drag the target icon to the Delete Selection button in the Layers panel to remove the appearance attribute. You can also remove the appearance attribute of a selected object or layer using the Appearance panel. Select the object and choose Reduce To Basic Appearance from the Appearance panel menu to return the object to its original state.