
11. Working with Brushes
This lesson takes approximately an hour to complete. If needed, remove the previous lesson folder from your hard disk and copy the Lesson11 folder onto it.
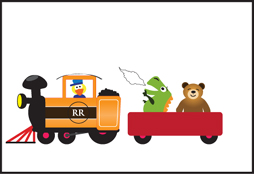
![]()

The variety of brush types in Adobe Illustrator CS5 lets you create a myriad of effects simply by painting or drawing using the Paintbrush tool or the drawing tools. You can work with the Blob Brush tool, as well as choose from the Art, Calligraphic, Pattern, Bristle, and Scatter brushes, or create new ones based on your artwork.
Getting started
In this lesson, you will learn how to work with the Blob Brush tool and the Eraser tool. You will also learn how to use the four brush types in the Brushes panel, and change brush options and create your own brushes. Before you begin, you’ll restore the default preferences for Adobe Illustrator CS5. Then you’ll open the finished art file for the first part of this lesson to see the finished artwork.
1. To ensure that the tools and panels function as described in this lesson, delete or deactivate (by renaming) the Adobe Illustrator CS5 preferences file. See “Restoring default preferences” on page 3.
2. Start Adobe Illustrator CS5.
Note
If you have not already done so, copy the resource files for this lesson onto your hard disk, from the Lesson11 folder on the Adobe Illustrator CS5 Classroom in a Book CD. See “Copying the Classroom in a Book files” on page 2.
3. Choose File > Open, and open the L11end_1.ai file in the Lesson11 folder, located in the Lessons folder on your hard disk.

4. If you like, choose View > Zoom Out to make the finished artwork smaller, and then adjust the window size and leave the artwork on your screen as you work. (Use the Hand tool (![]() ) to move the artwork where you want it in the Document window.) If you don’t want to leave the artwork open, choose File > Close.
) to move the artwork where you want it in the Document window.) If you don’t want to leave the artwork open, choose File > Close.
To begin working, you’ll open an existing art file.
5. Choose File > Open to open the L11start_1.ai file in the Lesson11 folder in the Lessons folder on your hard disk.
6. Choose File > Save As. In the Save As dialog box, name the file bookcover.ai, and choose the Lesson11 folder. Leave the Save As Type option set to Adobe Illustrator (*.AI) (Windows) or the Format option set to Adobe Illustrator (ai) (Mac OS), and then click Save. In the Illustrator Options dialog box, leave the Illustrator options at their default settings, and then click OK.
Working with brushes
Using brushes, you can decorate paths with patterns, figures, brush strokes, textures, or angled strokes. You can modify the brushes provided with Illustrator and create your own brushes.
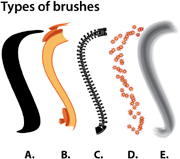
A. Calligraphic brush
B. Art brush
C. Pattern brush
D. Scatter brush
E. Bristle brush
You can apply brush strokes to existing paths, or you can use the Paintbrush tool to draw a path and apply a brush stroke simultaneously. You can change the color, size, and other features of a brush. You can also edit paths after brushes are applied.
There are five types of brushes that appear in the Brushes panel (Window > Brushes): Calligraphic, Art, Pattern, Scatter, and Bristle. In this lesson, you will discover how to work with all of these except for the Scatter type of brush.
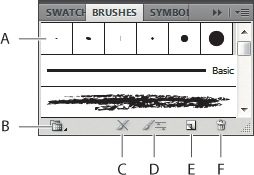
A. Brushes
B. Brush Libraries Menu
C. Remove Brush Stroke
D. Options Of Selected Object
E. New Brush
F. Delete Brush
Using Calligraphic brushes
Calligraphic brushes resemble strokes drawn with the angled point of a calligraphic pen. Calligraphic brushes are defined by an elliptical shape whose center follows the path. You can use these brushes to create the appearance of hand-drawn strokes made with a flat, angled pen tip.

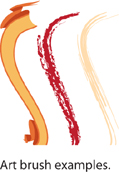
Calligraphic brush examples.
Next, you’ll use a Calligraphic pen to create the bunting on the train car.
1. Choose View > Fit Artboard In Window.
2. Click the Brushes panel icon (![]() ) on the right side of the workspace to expand the Brushes panel.
) on the right side of the workspace to expand the Brushes panel.
3. In the Brushes panel, choose List View from the panel menu (![]() ).
).
4. Open the Brushes panel menu (![]() ) and deselect Show Art Brushes, Show Bristle Brushes, and Show Pattern Brushes, leaving only the Calligraphic brushes visible in the Brushes panel.
) and deselect Show Art Brushes, Show Bristle Brushes, and Show Pattern Brushes, leaving only the Calligraphic brushes visible in the Brushes panel.
Note
A check mark next to the brush type in the Brushes panel menu indicates that the brush type is visible in the panel.
5. In the Control panel, click the Stroke color and choose the light orange swatch. Change the Stroke Weight to 2. pt, and make sure that the fill color is None. Calligraphic brushes use the current stroke color when you apply the brushes to artwork.
6. Double-click the Pencil tool (![]() ) in the Tools panel. In the Pencil Tool Options dialog box, change the Smoothness to 100.%. Click OK.
) in the Tools panel. In the Pencil Tool Options dialog box, change the Smoothness to 100.%. Click OK.
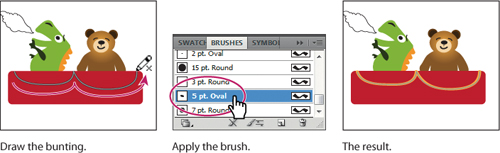
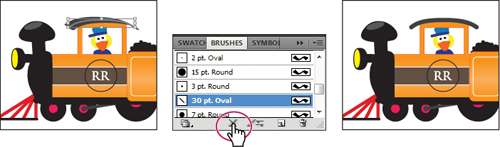
7. Position the pointer in the upper-left corner of the red train car shape and draw two “u”s on the train car, from left to right, in one continuous motion. This will be the bunting on the car.
8. With the shape you drew selected, click the 5 pt. Oval brush in the Brushes panel to apply it to the line. Notice that the stroke weight changes in the Control panel.
Editing a brush
To change the options for a brush, you can double-click the brush in the Brushes panel. Edits will apply to the current document only, and can change the artwork to which the brush has been applied, you can decide. Now you’ll change the appearance of the 5 pt. Oval brush.
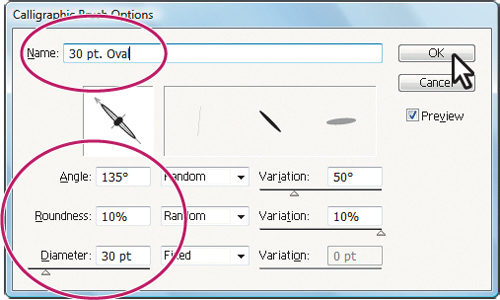
1. In the Brushes panel, double-click the 5 pt. Oval brush to display the Calligraphic Brush Options dialog box.
Note
The edits you make will change the brush for this document only.
You can change the following options: the angle of the brush, relative to a horizontal line; the roundness (from a flat line to a full circle); the diameter (from 0 to 1296 points), to change the shape that defines the brush’s tip; and the appearance of the stroke that the brush makes.
2. In the Name text field, type 30 pt. Oval. Enter 135. for the angle, 10.% for roundness, and 30. pt for the diameter. Select Preview and notice that the Calligraphic brush strokes in the artwork change. Click OK.
Tip
The preview window in the dialog box (below the Name field) shows the changes that you make to the brush.
3. In the warning dialog box, click Apply To Strokes to apply the change to the artwork that has the brush applied.
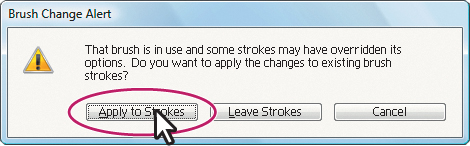
Since you are editing the brush in the Brushes panel, Apply To Strokes allows you to update the strokes on the artboard that have this brush applied.
4. Choose Select > Deselect, then choose File > Save.
Using a fill color with brushes
When you apply a brush to an object’s stroke, you can also apply a fill color to paint the interior of the object with a color. When you use a fill color with a brush, the brush objects appear on top of the fill color in places where the fill and the brush objects overlap. Now, you’ll fill the bunting shape you created with a fill color.
1. With the Selection tool (![]() ), select the bunting shape that you drew.
), select the bunting shape that you drew.
2. Click the Fill color in the Control panel, and select the CMYK Cyan swatch.
3. Click outside the artwork to deselect it.

Path with a fill color and a brush applied to the stroke.
Remove a brush stroke
You can easily remove a brush stroke applied to artwork where you don’t want it. Now, you’ll remove the brush stroke on the path above the duck, on the train engine. This path has the 5 pt. Oval path you edited applied to it.
1. With the Selection tool (![]() ), click the dark gray path above the duck.
), click the dark gray path above the duck.
2. Click the Remove Brush Stroke button (![]() ) at the bottom of the Brushes panel.
) at the bottom of the Brushes panel.
3. Change the Stroke Weight to 10. pt in the Control panel.
4. Choose File > Save.
Using Art brushes
Art brushes, which include arrow brushes, decorative brushes, artistic brushes, and others, stretch a brush shape (such as Rough Charcoal) or object shape evenly along the length of the path. Art brushes include strokes resembling various graphic media, such as the Charcoal-Feather brush.
Drawing with the Paintbrush tool
Now, you’ll use the Paintbrush tool to apply an art brush to the bear to make it look fuzzy. As mentioned earlier, the Paintbrush tool allows you to apply a brush as you draw.
1. Choose Essentials from the workspace switcher in the Application bar.
2. Select the Zoom tool (![]() ) in the Tools panel and drag a marquee around the teddy bear to zoom in on it.
) in the Tools panel and drag a marquee around the teddy bear to zoom in on it.
3. Select the Selection tool (![]() ) in the Tools panel and click to select the bear. This selects the layer that the bear is on, so that any artwork you paint will be on the same layer. Choose Select > Deselect.
) in the Tools panel and click to select the bear. This selects the layer that the bear is on, so that any artwork you paint will be on the same layer. Choose Select > Deselect.
4. Change the Stroke color to bear brown and the Fill color to None in the Control panel.
5. Click the Brushes panel icon (![]() ) on the right side of the workspace. Open the Brushes panel menu (
) on the right side of the workspace. Open the Brushes panel menu (![]() ) and deselect Show Calligraphic Brushes. Then select Show Art Brushes to make the brushes visible in the Brushes panel.
) and deselect Show Calligraphic Brushes. Then select Show Art Brushes to make the brushes visible in the Brushes panel.
Note
A check mark next to the brush type in the Brushes panel menu indicates that the brush type is visible in the panel.
6. Click the Brush Libraries Menu button (![]() ) at the bottom of the Brushes panel and choose Artistic > Artistic_ChalkCharcoalPencil.
) at the bottom of the Brushes panel and choose Artistic > Artistic_ChalkCharcoalPencil.
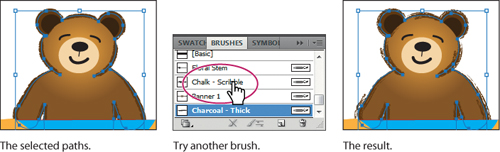
7. In the Artistic_ChalkCharcoalPencil panel, choose List View from the panel menu. Click Charcoal - Thick in the list to add the brush to the Brushes panel for this document. Close the Artistic_ChalkCharcoalPencil panel.
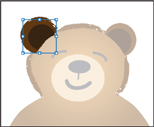
You are going to paint around the outside of the bear to give the edges a roughened (fuzzy) look.
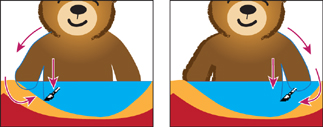
8. Select the Paintbrush tool (![]() ) in the Tools panel, and then click the Charcoal - Thick brush in the Brushes panel. Change the Stroke Weight to .5 pt in the Control panel. Draw a long, upward stroke to create the left side of the bear’s face, starting at the shoulder and stopping at the ear. Don’t worry if your stroke doesn’t follow the edges exactly. Drag across the top of the head from left ear to right ear. Finish by dragging a long downward stroke to create the right side of the bear’s face, starting at the bottom of the right ear and stopping at the right shoulder.
) in the Tools panel, and then click the Charcoal - Thick brush in the Brushes panel. Change the Stroke Weight to .5 pt in the Control panel. Draw a long, upward stroke to create the left side of the bear’s face, starting at the shoulder and stopping at the ear. Don’t worry if your stroke doesn’t follow the edges exactly. Drag across the top of the head from left ear to right ear. Finish by dragging a long downward stroke to create the right side of the bear’s face, starting at the bottom of the right ear and stopping at the right shoulder.
9. Select the Selection tool (![]() ) in the Tools panel. Double-click the left ear twice to enter isolation mode. Click to select the lighter brown part of the ear.
) in the Tools panel. Double-click the left ear twice to enter isolation mode. Click to select the lighter brown part of the ear.

10. Click the Charcoal - Thick brush in the Brushes panel to apply it. Change the Stroke Weight to .5 pt and the Fill color to bear brown in the Control panel.
11. Press Escape to exit isolation mode. Repeat the steps for the other ear.
12. Choose Select > Deselect, then choose File > Save.
Editing paths with the Paintbrush tool
Now, you’ll use the Paintbrush tool to edit a selected path.
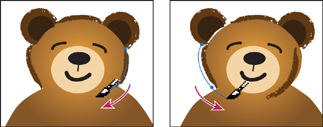
1. Click to select the last path you drew on the right side of the bear’s face with the Selection tool.
2. Select the Paintbrush tool (![]() ) in the Tools panel. Position the pointer near the bottom of the selected path and drag down and to the left to extend the path a bit under the bear’s chin. Make sure the pointer is over the selected path to begin with.
) in the Tools panel. Position the pointer near the bottom of the selected path and drag down and to the left to extend the path a bit under the bear’s chin. Make sure the pointer is over the selected path to begin with.
The selected path is edited from the point where you began drawing.
Tip
You can also edit paths drawn with the Paintbrush tool using the Smooth tool (![]() ) and the Path Eraser tool (
) and the Path Eraser tool (![]() ), located under the Pencil tool (
), located under the Pencil tool (![]() ) in the Tools panel.
) in the Tools panel.
3. Press and hold the Ctrl (Windows) or Command (Mac OS) key to toggle to the Selection tool, and select the first path you drew with the Paintbrush tool (on the left side of the bear’s face).
4. With the Paintbrush tool still selected, move the pointer near the bottom of the selected path and drag down and to the right to extend the path a bit under the bear’s chin. See the figure below for placement.
5. Choose Select > Deselect, and then choose File > Save.
Next, you will edit the Paintbrush tool options.
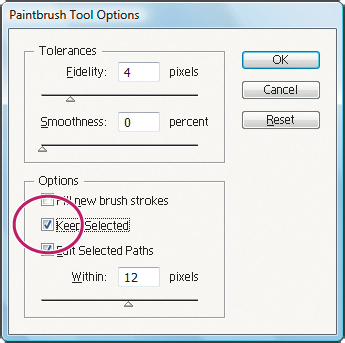
6. Double-click the Paintbrush tool (![]() ) to display the Paintbrush Tool Options dialog box. Select Keep Selected, and then click OK.
) to display the Paintbrush Tool Options dialog box. Select Keep Selected, and then click OK.
Tip
Increase the value of the Smoothness option in the Paintbrush Tool Options dialog box to smooth the path by using fewer points as you draw.
The Paintbrush Tool Options dialog box changes the way the Paintbrush tool functions. Because you selected Keep Selected, the paths now remain selected after you finish drawing them.
7. With the Paintbrush tool selected, position the pointer over the left shoulder and drag down and to the left, to trace around the arm on the left. Paint all the way around the arm and down the side of the bear.
Note
You can release the mouse button at certain points, and then continue painting the path. The path remains selected because of the Keep Selected option you set in the Paintbrush Tool Options dialog box.
8. With the Paintbrush tool selected, position the pointer over the right shoulder and drag down and to the right, to trace around the arm on the right. Paint all the way around the arm and down the side of the bear.
9. Double-click the Paintbrush tool in the Tools panel. In the Paintbrush Tool Options dialog box, deselect the Keep Selected option, and then click OK.
Now the paths will not remain selected after you finish drawing them, and you can draw overlapping paths without altering previously drawn paths.
10. Choose Select > Deselect. Choose Select > Object > Brush Strokes. This will select all of the objects with a brush stroke applied, on all artboards.
11. Select the Selection tool in the Tools panel. Shift-click the bunting to deselect it.
12. Click several other brushes in the Brushes panel to see the effects. When you have finished, click the Charcoal - Thick brush again to reapply that brush. Make sure the Stroke Weight is .5 pt in the Control panel.
Note
When the Keep Selected option is deselected, you can edit a path by selecting it with the Selection tool (![]() ) or by selecting a segment or point on the path with the Direct Selection tool (
) or by selecting a segment or point on the path with the Direct Selection tool (![]() ), and then redrawing over the path with the Paintbrush tool.
), and then redrawing over the path with the Paintbrush tool.
Tip
Don’t forget the large number of brushes that come with Illustrator. To access them, click the Brush Libraries Menu button (![]() ) in the lower-left corner of the Brushes panel.
) in the lower-left corner of the Brushes panel.
13. Click outside the artwork to deselect it.
14. Choose File > Save.
Create an Art brush
You can create new calligraphic, scatter, art, pattern, and bristle brushes based on your settings. For scatter, art, and pattern brushes, you must first create the artwork you want to use. In this section, you’ll use artwork provided with the lesson to create a new Art brush. The art brush will be used to create a logo for the train engine.
Note
To learn about guidelines for creating brushes, see “Create or modify brushes” in Illustrator Help.
1. Choose View > Fit Artboard In Window.
2. Choose 2 from the Artboard Navigation menu in the lower-left corner of the Document window. This will fit the second artboard in the Document window.
3. Using the Selection tool (![]() ), click to select the group of stars.
), click to select the group of stars.
Next, you will make an art brush from the selected artwork. You can make an art brush from vector artwork, but that artwork must not contain gradients, blends, other brush strokes, mesh objects, bitmap images, graphs, placed files, masks, or text that has not been converted to outlines.
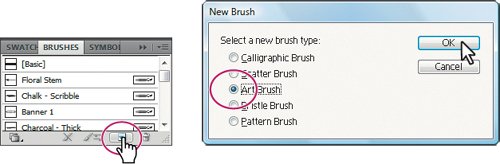
4. Click the New Brush button (![]() ) at the bottom of the Brushes panel. This creates a new brush from the selected artwork.
) at the bottom of the Brushes panel. This creates a new brush from the selected artwork.
5. In the New Brush dialog box, select Art Brush and then click OK.
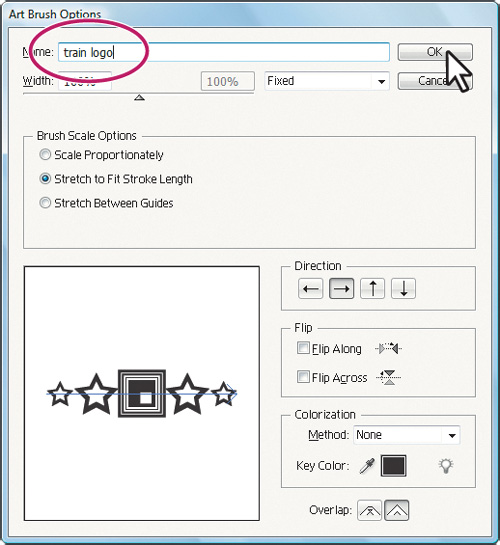
6. In the Art Brush Options dialog box, change the Name to train logo. Click OK.
7. Choose 1 from the Artboard Navigation menu in the lower-left corner of the Document window.
8. Select the Selection tool in the Tools panel, and click to select the circle around the “RR” on the engine.
9. Select the Zoom tool (![]() ) in the Tools panel, and drag a marquee across the circle and the RR in the center of the engine to zoom in to it.
) in the Tools panel, and drag a marquee across the circle and the RR in the center of the engine to zoom in to it.
10. Click the train logo brush in the Brushes panel to apply it.
Notice that the original artwork is stretched around the shape. This is the default behavior of an art brush.

Edit an Art brush
Next, you will edit the train logo art brush.
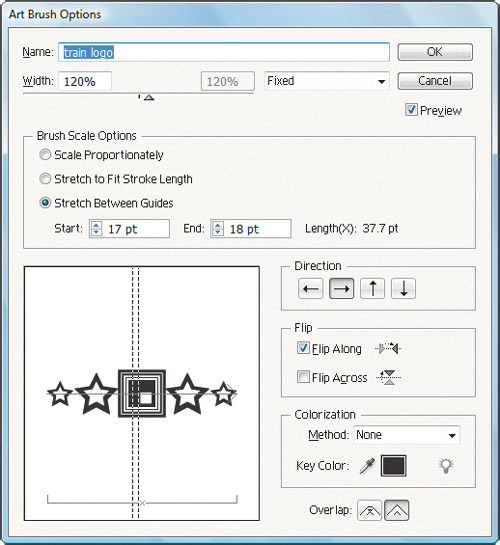
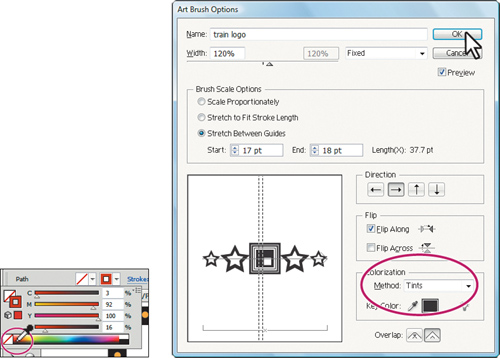
1. With the circle still selected, double-click the train logo brush in the Brushes panel to open the Art Brush Options dialog box. Select Preview to see the changes as you make them. Change the Width to 120.%. This will increase the size of the artwork relative to its original width. Select Stretch Between Guides, then change the Start to 17. pt and the End to 18. pt. Select Flip Along and then click OK.
Tip
To learn more about the Art Brush Options dialog box, see “Art brush options” in Illustrator Help.
2. In the warning dialog box, click Apply To Strokes to apply the change to the artwork that has the brush applied.
3. Choose View > Fit Artboard In Window.
4. Choose Select > Deselect, then choose File > Save.

Note
If the stars on your circle are not at the bottom of the circle, you can rotate the circle with the Rotate tool (![]() ) in the Tools panel, to match position shown in the figure.
) in the Tools panel, to match position shown in the figure.
Using Bristle brushes
Bristle brushes allow you to create strokes with the appearance of a natural brush with bristles. You’ll start by adjusting options for the brush to change how it appears in the artwork, and then paint with the Paintbrush tool to create a fire effect.
Changing bristle brush options
As you’ve seen earlier, you can change the appearance of a brush by adjusting its settings in the Brush Options dialog box, either before or after brushes have been applied to the artwork. When you paint with a bristle brush, it creates vector paths. It is usually best to adjust bristle brush settings prior to painting since it can take some time to update the brush strokes.
1. In the Brushes panel, choose Show Bristle Brushes from the panel menu (![]() ), and then deselect Show Art Brushes.
), and then deselect Show Art Brushes.
2. Double-click the Filbert brush to open the Brush Options dialog box for that brush. Leave the dialog box open for the next step.
Tip
Illustrator comes with a series of default Bristle brushes. Click the Brush Libraries Menu button (![]() ) at the bottom of the Brushes panel and choose Bristle Brush > Bristle Brush Library.
) at the bottom of the Brushes panel and choose Bristle Brush > Bristle Brush Library.
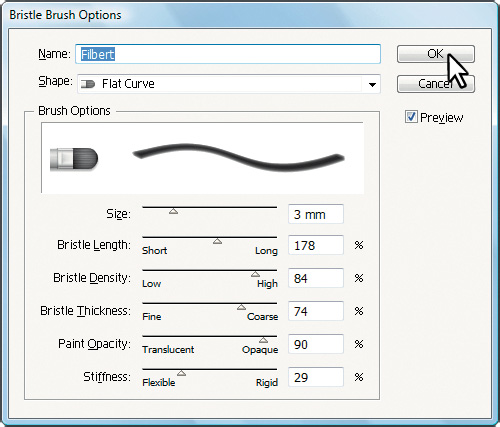
3. In the Bristle Brush Options dialog box, leave the Shape set at Flat Curve, and press the Tab key to move to the next field. Set the following values:
• Make sure that Size is 3. mm. The brush size is the diameter of the brush.
• Change the Bristle Length to 178.. The bristle length starts from the point where the bristles meet the handle of the bristle tip.
• Change the Bristle Density to 84.. The bristle density is the number of bristles in a specified area of the brush neck.
• For Bristle Thickness, set the value to 74.. The bristle thickness can vary from fine to coarse (between 1% and 100%).
• For Paint Opacity, change the value to 90.. This option lets you set the opacity of the paint being used.
• For Stiffness, change the value to 29.. Stiffness implies the rigidness of the bristles.
Note
To learn more about the Bristle Brush Options dialog box and its settings, see “Using the Bristle brush” in Illustrator Help.
4. Click OK.
Painting with a Bristle brush
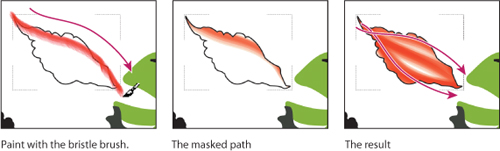
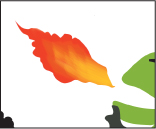
Now, you’ll use the Filbert brush to draw some fire. Painting with a Bristle brush can create a very organic stroke. In order to constrain the painting, you will paint inside a shape. This will mask the painting to be in the shape of the flame.
1. Select the Zoom tool (![]() ) in the Tools panel and drag a marquee around the flame shape next to the dinosaur, to zoom in on it.
) in the Tools panel and drag a marquee around the flame shape next to the dinosaur, to zoom in on it.
2. Select the Selection tool (![]() ) in the Tools panel and click to select the flame shape. This selects the layer that the shape is on, so that any artwork you paint will be on the same layer.
) in the Tools panel and click to select the flame shape. This selects the layer that the shape is on, so that any artwork you paint will be on the same layer.
3. Click the Draw Inside button (![]() ) at the bottom of the Tools panel.
) at the bottom of the Tools panel.
Note
To learn more about the drawing modes, see Lesson 3, “Creating and Editing Shapes.”
Note
If the Tools panel appears as one column, click and hold down the Drawing Modes button at the bottom of the Tools panel, then choose a drawing mode from the menu that appears.
4. Choose Select > Deselect to deselect the flame shape. You can still draw inside the shape, as indicated by the dotted lines on the corners of the shape.
5. Select the Paintbrush tool (![]() ) in the Tools panel. Choose the Filbert brush from the Brush Definition menu in the Control panel.
) in the Tools panel. Choose the Filbert brush from the Brush Definition menu in the Control panel.
6. Change the Fill color to None and Stroke color to flame red in the Control panel.
7. Position the pointer at the upper-left tip of the flame shape. Drag down and to the right to loosely follow the top edge of the flame shape. Release the mouse button when you pass the lower-right tip of the flame shape.
Tip
If you want to edit paths as you draw, you can select the Keep Selected option in the Paintbrush Tool Options for the Paintbrush tool, or select paths with the Selection tool. You don’t need to completely fill the shape.
When you release the mouse button, notice that the path you just painted is masked by the flame shape.
8. Use the Paintbrush tool (![]() ) to provide some texture by drawing more strokes inside the flame shape, using the Filbert brush.
) to provide some texture by drawing more strokes inside the flame shape, using the Filbert brush.
Tip
If you don’t like what you just painted, you can choose Edit > Undo Bristle Stroke.
Next, you will edit the brush, and paint with another color to build the flame by layering paths on each other.
9. Change the Stroke color to flame orange in the Control panel.
10. Double-click the Filbert brush in the Brushes panel. In the Bristle Brush Options dialog box, change the Paint Opacity to 30., and then click OK.
11. Click Leave Strokes in the dialog box that appears. This changes the brush settings without changing the red flame you already painted.
12. Draw some more paths on top of the red flames using the Paintbrush tool. Focus the orange paths you draw close the dinosaur’s mouth.
13. Change the Stroke color to flame yellow in the Control panel.
14. Double-click the Filbert brush in the Brushes panel. In the Bristle Brush Options dialog box, change the Bristle Density to 18. and the Stiffness to 60.. Click OK.
15. Click Leave Strokes in the dialog box that appears.
16. Draw some more paths on top of the orange flames, using the Paintbrush tool. Focus the yellow paths you draw close the dinosaur’s mouth.
17. Choose View > Outline.
18. Choose Select > Object > Bristle Brush Strokes to select all of the paths created with the Paintbrush tool using the Filbert bristle brush.
19. Choose Object > Group, then View > Preview.
20. Click the Draw Normal button at the bottom of the Tools panel.
21. Select the Selection tool in the Tools panel. Click the edge of the flame shape so it’s the only selected object.
22. Click the Edit Clipping Path button (![]() ) in the Control panel. Change the Stroke color to None in the Control panel.
) in the Control panel. Change the Stroke color to None in the Control panel.
23. Choose Select > Deselect, then choose File > Save.
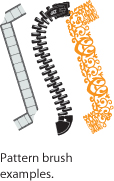
Using Pattern brushes
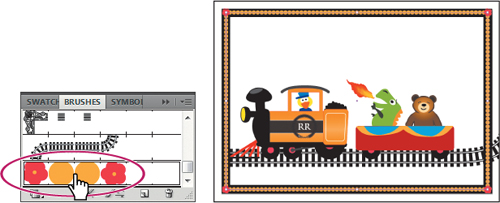
Pattern brushes paint a pattern made up of separate sections, or tiles. When you apply a Pattern brush to artwork, different tiles of the pattern are applied to different sections of the path, depending on where the section falls on the path—the end, middle, or corner. There are hundreds of interesting pattern brushes that you can choose from when creating your own projects, from dog tracks to cityscapes. Next, you’ll open an existing Pattern Brush library and choose a train track pattern to create tracks.
1. Choose View > Fit Artboard In Window.
2. In the Brushes panel, choose Show Pattern Brushes from the panel menu (![]() ) and deselect Show Bristle Brushes.
) and deselect Show Bristle Brushes.
3. Click the Brush Libraries Menu button (![]() ) and choose Borders > Borders_Novelty. A brush library panel with various borders appears.
) and choose Borders > Borders_Novelty. A brush library panel with various borders appears.
4. Scroll to the bottom of the Brushes panel and click the Train Tracks brush to add it to the panel. Close the Borders_Novelty brush library panel.

Next, you will apply the brush, and then edit its properties.
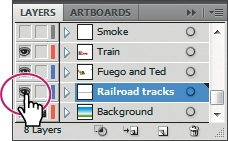
5. Click the Layers panel icon (![]() ) on the right side of the workspace to expand the Layers panel.
) on the right side of the workspace to expand the Layers panel.
6. Click the visibility column to the left of the Railroad tracks layer to show the path for the tracks on the artboard. Click the Layers panel icon to collapse the panel.
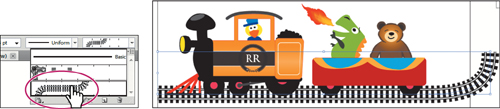
7. Select the Selection tool (![]() ) in the Tools panel. Click the path that appears below the train to select it.
) in the Tools panel. Click the path that appears below the train to select it.
8. Choose the Train Tracks pattern brush from the Brush Definition menu in the Control panel to apply the pattern brush.
9. Change the Stroke Weight to 4. pt in the Control panel.
Notice that the train tracks follow the curve precisely. A pattern brush has tiles, as described earlier, that correspond to parts of the path.
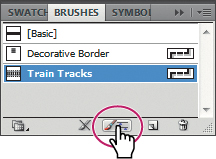
Next, you will edit the brush properties for the selected train tracks.
10. Click the Brushes panel icon (![]() ) on the right side of the workspace to expand the panel. Click the Options Of Selected Object button (
) on the right side of the workspace to expand the panel. Click the Options Of Selected Object button (![]() ) at the bottom of the Brushes panel to edit the brush options for only the selected train tracks on the artboard. This opens the Stroke Options (Pattern Brush) dialog box.
) at the bottom of the Brushes panel to edit the brush options for only the selected train tracks on the artboard. This opens the Stroke Options (Pattern Brush) dialog box.
11. Change the Scale to 120.% either by dragging the slider beneath the field to the right or by typing in the value. Click OK.
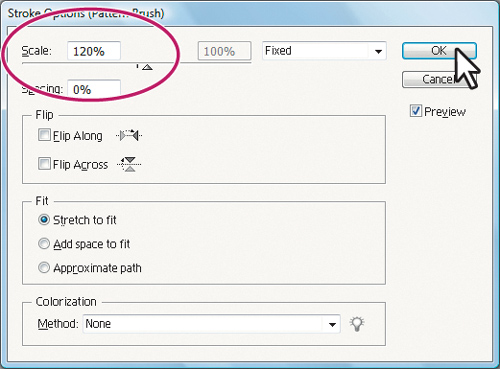
When you edit the brush options of the selected object, you only see some of the brush options. The Stroke Options (Pattern Brush) dialog box is used to edit the properties of the brushed path without updating the corresponding brush.
Tip
To change the size of the railroad tracks, you can also change the stroke of the line on the artboard, with the brush applied.
12. Choose Select > Deselect, and then File > Save.
Creating a Pattern brush
You can create a Pattern brush in several ways. For a simple pattern applied to a straight line, for instance, you can select the object that you’re using for the pattern and click the New Brush button (![]() ) at the bottom of the Brushes panel. To create a more complex pattern to apply to objects with curves and corners, you must first create swatches in the Swatches panel from the artwork that you are using for the Pattern brush tiles, and then create the new brush. For example, to create a pattern brush that will be used on a straight line with corners, you might need to create three swatches, one for the straight line, another for the inside corner and another for the outside corner. Next, you’ll create swatches to be used in a pattern brush.
) at the bottom of the Brushes panel. To create a more complex pattern to apply to objects with curves and corners, you must first create swatches in the Swatches panel from the artwork that you are using for the Pattern brush tiles, and then create the new brush. For example, to create a pattern brush that will be used on a straight line with corners, you might need to create three swatches, one for the straight line, another for the inside corner and another for the outside corner. Next, you’ll create swatches to be used in a pattern brush.
1. Click the Layers panel icon (![]() ) on the right side of the workspace to expand the Layers panel.
) on the right side of the workspace to expand the Layers panel.
2. Click the visibility column to the left of the Frame layer to show its contents.
3. Click the Swatches panel icon (![]() ) to expand the Swatches panel, or choose Window > Swatches.
) to expand the Swatches panel, or choose Window > Swatches.
Now, you’ll create a pattern swatch.
4. Choose 2 from the Artboard Navigation menu in the lower-left corner of the Document window.
5. With the Selection tool (![]() ), drag the flower into the Swatches panel. The new pattern swatch appears in the Swatches panel.
), drag the flower into the Swatches panel. The new pattern swatch appears in the Swatches panel.
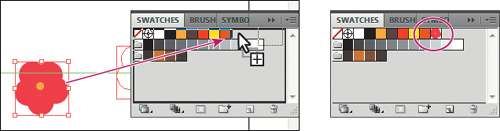
7. In the Swatches panel, double-click the pattern swatch that you just created. In the Swatch Options dialog box, name the swatch Corner, and then click OK.
8. Repeat steps 5 through 7 to create a pattern swatch of the orange circle located to the left of the flower on the artboard. Name the swatch Side.
To create a new Pattern brush, you apply swatches from the Swatches panel to tiles in the Brush Options dialog box. Now, you’ll apply the pattern swatches that you just made to tiles, to create a new Pattern brush.
Tip
For more information on creating pattern swatches, see “About patterns” in Illustrator Help.
9. Click the Brushes panel icon (![]() ) to expand the panel.
) to expand the panel.
10. Choose Select > Deselect if there is content selected.
This is an important step! Any content selected will be part of the brush.
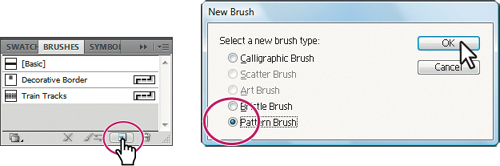
11. In the Brushes panel, click the New Brush button (![]() ).
).
12. In the New Brush dialog box, select Pattern Brush.
Notice that you can’t select the Art Brush or Scatter Brush. That is because artwork needs to be selected in the document first. Click OK.
Now, you’ll apply the swatches to the tiles for the new Pattern brush.
13. In the Pattern Brush Options dialog box, name the brush Border.
Tip
Position the pointer over the tile squares in the Pattern Brush Options dialog box to see a tooltip indicating which tile it is.
14. Make sure that, in the pattern swatches list, located below Spacing, the Side Tile box is selected. Below the tile boxes, select Side. The Side swatch appears in the Side tile box.
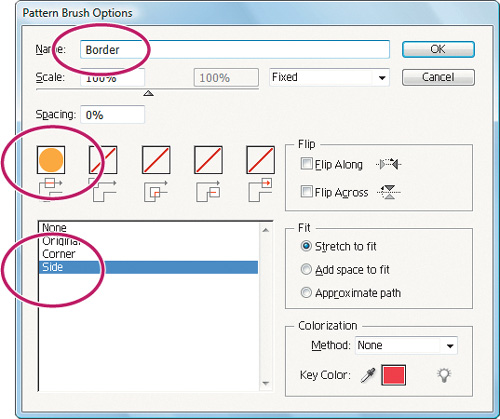
The Pattern Brush Options dialog box shows the tiles in the new brush you are making. The first tile on the left is the side tile, which is used to paint the middle sections of a path. The second tile is the outer corner tile. The third tile is the inner corner tile.
Pattern brushes can have up to five tiles—the side, start, and end tiles, plus an outer corner tile and an inner corner tile to paint sharp corners on a path. Some brushes have no corner tiles because the brush is designed for curved paths.
In the next part of this lesson, you’ll create your own Pattern brush that has corner tiles. Next, you’ll apply the Corner swatch to the outer corner and inner corner tiles for the new Pattern brush.
15. In the Pattern Brush Options dialog box, select the Outer Corner Tile box (the second tile box from the left). In the pattern swatches list, select Corner. The Corner swatch appears in the Outer Corner Tile box.
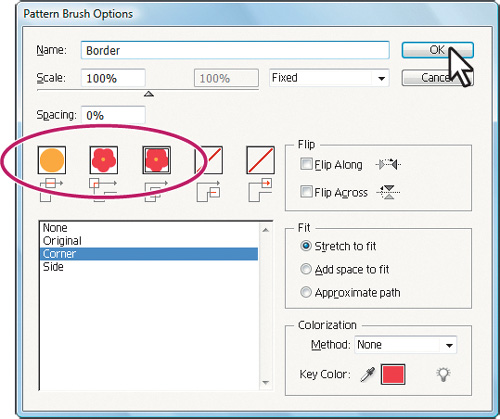
16. Select the Inner Corner Tile box (the middle tile box). In the pattern swatches list, select the Corner swatch. The Corner swatch appears in the Inner Corner Tile box. Click OK.
Note
When you create a new brush, the brush appears in the Brushes panel of the current document only.
You won’t create a start or end tile for the new brush, because you’ll apply the new brush to a path in the artwork next. When you want to create a Pattern brush that includes start and end tiles, you add those tiles the same way as you did the side and corner tiles.
The Border brush appears in the Brushes panel.
Tip
To save a brush and reuse it in another file, you can create a brush library with the brushes you want to use. For more information, see “Work with brush libraries” in Illustrator Help.
Applying a Pattern brush
In this section, you’ll apply the Border brush to a rectangular border around the artwork. When you use drawing tools to apply brushes to artwork, you first draw the path with the drawing tool, and then select the brush in the Brushes panel to apply the brush to the path.
1. Click the First artboard button (![]() ) in the lower-left corner of the Document window to return to the first artboard and fit it in the Document window.
) in the lower-left corner of the Document window to return to the first artboard and fit it in the Document window.
2. With the Selection tool (![]() ) selected, click the white stroke of the rectangle on the border.
) selected, click the white stroke of the rectangle on the border.
3. In the Tools panel, click the Fill box and make sure that None (![]() ) is selected. Then click the Stroke box and select None (
) is selected. Then click the Stroke box and select None (![]() ).
).
4. Choose Thumbnail View from the Brushes panel menu (![]() ).
).
Notice that pattern brushes in Thumbnail view are segmented in the Brushes panel. Each segment corresponds to a pattern tile. The side tile is repeated in the Brushes panel thumbnail preview.
5. With the rectangle selected, click the Border brush in the Brushes panel.
The rectangle is painted with the Border brush, with the side tile on the sides and the corner tile on the corners.
Now, you’ll edit the Border brush.
6. In the Brushes panel, double-click the Border pattern brush to open the Pattern Brush Options dialog box.
7. In the Pattern Brush Options dialog box, change the Scale to 70.%, the Spacing to 120.%, and select Add Space To Fit. Click OK.
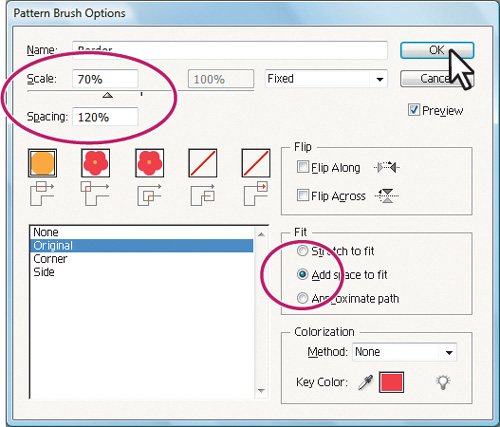
8. In the Brush Change Alert dialog box, click Apply To Strokes to update the border on the artboard.
9. With the Selection tool selected, click to select the arch right above the duck’s head. Click the Border brush in the Brushes panel to apply it.
Notice that the flowers are not applied to the path. The path is painted with the side swatch from the Border brush, to which the side tile is applied. Because the path does not include sharp corners, the outer corner and inner corner tiles are not applied to the path.
10. Choose Edit > Undo Apply Pattern Brush to remove the brush from the arch.
Note
Earlier in the lesson you learned how to remove a brush from an object by clicking the Remove Brush Stroke button (![]() ) in the Brushes panel. In this case, you chose Edit > Undo Apply Pattern Brush instead, because clicking the Remove Brush Stroke button would strip the previous formatting from the arch, leaving it with a default fill and stroke.
) in the Brushes panel. In this case, you chose Edit > Undo Apply Pattern Brush instead, because clicking the Remove Brush Stroke button would strip the previous formatting from the arch, leaving it with a default fill and stroke.
Changing the color attributes of brushes
The colors that a scatter, art, or pattern brush paints depend on the current stroke color and the colorization method of the brush. If you have not set a colorization method, the default color for that brush is used. For example, the train logo art brush was applied with its default color (not the current stroke of black), because its colorization method was set to None.
To colorize Art, Pattern, and Scatter brushes, there are three editing options you can use in the Brush Options dialog box: Tints, Tints and Shades, and Hue Shift. To learn more about each of these colorization methods, search for “Colorization options” in Illustrator Help.
Note
Brushes colorized with a stroke color of white may appear entirely white. Brushes colorized with a stroke color of black may appear entirely black. Results depend on which brush colors were originally chosen.
Changing a brush color using Tints colorization
Now, you’ll change the color of the train logo art brush using the Tints colorization method.
1. In the Brushes panel, choose Show Art Brushes from the panel menu (![]() ) and deselect Show Pattern Brushes.
) and deselect Show Pattern Brushes.
2. With the Selection tool (![]() ), click to select the train logo (the circle with the train logo art brush applied) below the duck.
), click to select the train logo (the circle with the train logo art brush applied) below the duck.
3. Pressing the Shift key, click the Stroke color in the Control panel to open the Color panel.
4. Click in the color spectrum bar to select a color. We chose an orangish-red color.
5. In the Brushes panel, double-click the train logo brush to view the Art Brush Options dialog box. Select Preview to see the changes you will make, then move the dialog box off to the side so that you can see your artwork as you work.
You must choose a colorization method before you can change the brush color. Brushes set to the Tints, Tints And Shades, or Hue Shift colorization method, automatically apply the current stroke color to the brush when you use it in the artwork.
6. In the Colorization section of the Art Brush Options dialog box, choose Tints from the Method menu.
The selected path with the train logo brush applied is colorized and displays the brush stroke in tints of the stroke color. Portions of the art that are black become the stroke color, portions that aren’t black become tints of the stroke color, and white remains white.
Note
The Tints And Shades colorization method displays the brush stroke in tints and shades of the stroke color. Tints and Shades maintains black and white, and everything between becomes a blend from black to white through the stroke color.
7. If desired, choose the Tints And Shades colorization method from the menu in the Art Brush Options dialog box to preview the change. Choose the Tints method and then click OK. In the warning dialog box, click Apply To Strokes to apply the colorization change to the strokes in the artwork.

You can also choose to change only subsequent brush strokes and leave existing strokes unchanged. When you select a colorization method for a brush, the new stroke color applies to selected brush strokes and to new paths painted with the brush.
8. Click the Color panel icon (![]() ) on the right side of the workspace to expand the panel. Click the Stroke Box to bring it forward, and then click the color spectrum bar in several different places to try applying other stroke colors to the selected artwork.
) on the right side of the workspace to expand the panel. Click the Stroke Box to bring it forward, and then click the color spectrum bar in several different places to try applying other stroke colors to the selected artwork.
9. When you are satisfied with the color of the train logo, click away from the artwork to deselect it.
10. Choose File > Save.
Changing the brush color using Hue Shift colorization
Now, you’ll apply a new color to the Banner 1 brush in the Brushes panel.
1. Click the Layers panel icon (![]() ) on the right side of the workspace to expand the Layers panel. Click the visibility column to the left of the Text layer to show its contents.
) on the right side of the workspace to expand the Layers panel. Click the visibility column to the left of the Text layer to show its contents.
2. Select the Zoom tool (![]() ) in the Tools panel, and drag a marquee around the Golden Book Award seal to zoom into it.
) in the Tools panel, and drag a marquee around the Golden Book Award seal to zoom into it.
3. With the Selection tool (![]() ), click to select the circle in the seal with the brush applied.
), click to select the circle in the seal with the brush applied.
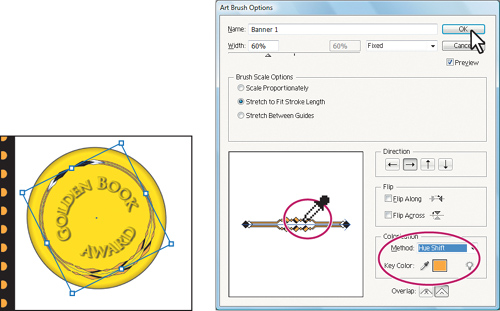
4. Click the Brushes panel icon (![]() ) to expand the panel. Double-click the Banner 1 brush in the Brushes panel to reveal the Art Brush Options dialog box. Note that the Banner 1 brush is set to a None Colorization method by default.
) to expand the panel. Double-click the Banner 1 brush in the Brushes panel to reveal the Art Brush Options dialog box. Note that the Banner 1 brush is set to a None Colorization method by default.
5. In the Art Brush Options dialog box, select Preview if not already selected. In the Colorization section choose Hue Shift from the Method menu.
You typically choose Hue Shift for brushes that use multiple colors. Everything in the artwork that is the key color changes to the new stroke color when the stroke color is changed.
Tip
To learn more about how the different colorization methods affect artwork, click the light bulb icon (![]() ) in the Art Brush Options dialog box.
) in the Art Brush Options dialog box.
6. In the Colorization section of the Art Brush Options dialog box, click the Key Color Eyedropper (![]() ) and position the pointer over an orange color in the preview area (to the left of the Colorization settings) and then click, as shown in the figure below.
) and position the pointer over an orange color in the preview area (to the left of the Colorization settings) and then click, as shown in the figure below.
The key color you just sampled (the orange) will be used the next time you apply a stroke color to the artwork after you’ve closed the dialog box.
The orange parts of the path with the brush applied are now colorized with the current stroke color. This color appears when you apply the Hue Shift colorization method.
7. Click OK. In the warning dialog box, click Apply To Strokes to apply the colorization change to the strokes in the artwork. You can also choose to change only subsequent brush strokes and leave existing strokes unchanged.
When you select a colorization method for a brush, the new stroke color applies to selected brush strokes and to new paths painted with the brush.
8. Change the Stroke color to flame red in the Control panel. Try other stroke colors for the selected brush strokes before finally choosing flame yellow, as shown in the figure at right.

9. Choose Select > Deselect, then choose File > Save.
Working with the Blob Brush tool
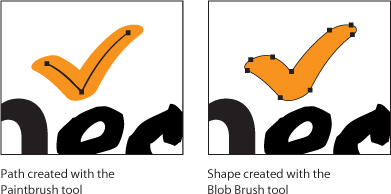
You can use the Blob Brush tool to paint filled shapes that intersect and merge with other shapes of the same color. With the Blob Brush tool, you can draw with Paintbrush tool artistry. Unlike the Paintbrush tool, which lets you create open paths, the Blob Brush tool lets you create a closed shape with a fill only (no stroke) that you can then edit with the Eraser or Blob Brush tool. Shapes that have a stroke cannot be edited with the Blob Brush tool.
Next, you will use the Blob Brush tool to create a part of the smoke coming from the train engine.
Drawing with the Blob Brush tool
The Blob Brush tool uses the same default brush options as calligraphic brushes.
1. Choose Essentials from the workspace switcher in the Application bar.
2. Choose View > Fit Artboard In Window.
3. Click the Layers panel icon (![]() ) on the right side of the workspace to expand the Layers panel. Click the eye icon to the left of the Text layer to hide its contents, then click the visibility column to the left of both the Background layer and the Smoke layer. Click the Smoke layer to select it.
) on the right side of the workspace to expand the Layers panel. Click the eye icon to the left of the Text layer to hide its contents, then click the visibility column to the left of both the Background layer and the Smoke layer. Click the Smoke layer to select it.
4. Change the fill color to white and the stroke color to None (![]() ) in the Control panel.
) in the Control panel.
Note
When drawing with the Blob Brush tool, if a fill and stroke are set before drawing, the stroke becomes the fill of the shape made by the Blob Brush tool. If only a fill is set before drawing, it becomes the fill of the shape created.
5. Double-click the Blob Brush tool (![]() ) in the Tools panel. In the Blob Brush Tool Options dialog box, select the Keep Selected option and change the Size to 30. pt in the Default Brush Options area. Click OK.
) in the Tools panel. In the Blob Brush Tool Options dialog box, select the Keep Selected option and change the Size to 30. pt in the Default Brush Options area. Click OK.
6. Position the pointer just above the black smoke stack to the left of the duck. Drag in a zigzag pattern up and to the right to create some smoke.
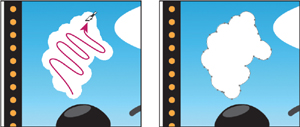
7. Choose Select > Deselect. Next, you will edit the smoke shape you created, to give it a more stylized look.
Note
When you draw with the Blob Brush tool, you create filled, closed shapes. Those shapes can contain any type of fill, including gradients, solid colors, patterns, and more.
Merging paths with the Blob Brush tool
Besides drawing new shapes with the Blob brush tool, you can use it to intersect and merge shapes of the same color. Next, you will merge the smoke you just created and the white ellipse to the right of it to create one big smoke shape.
1. Click the Appearance panel icon (![]() ) on the right side of the workspace to expand the panel. In the Appearance panel menu (
) on the right side of the workspace to expand the panel. In the Appearance panel menu (![]() ), deselect New Art Has Basic Appearance. When this option is deselected, the Blob Brush tool uses the attributes of the selected artwork.
), deselect New Art Has Basic Appearance. When this option is deselected, the Blob Brush tool uses the attributes of the selected artwork.
2. With the Selection tool (![]() ), click the smoke you just drew and Shift-click the white ellipse to the right of the smoke shape.
), click the smoke you just drew and Shift-click the white ellipse to the right of the smoke shape.
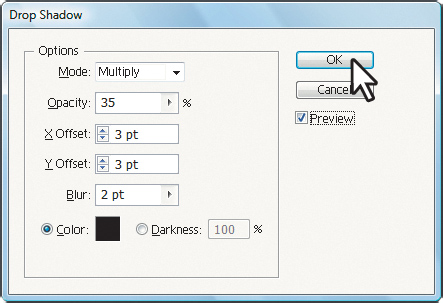
3. In the Appearance panel, click the word Path at the top of the panel, so that the drop shadow you apply next isn’t applied to the fill or stroke only.
4. Choose Effect > Stylize > Drop Shadow. In the Drop Shadow dialog box, change Opacity to 35.%, X Offset to 3. pt, Y Offset to 3. pt, and Blur to 2. pt. Click OK.
5. Choose Select > Deselect.
Note
Notice that the drop shadow is applied to the entire shape as you draw and edit.
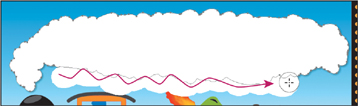
6. With the Blob Brush tool selected in the Tools panel, make sure that you see the same attributes as the smoke shapes (a white fill, no stroke, and a drop shadow) in the Appearance panel. Drag from inside the smoke shape you created to the inside of the ellipse to the right, connecting the two shapes.
Note
Objects merged with the Blob Brush tool need to have the same appearance attributes, have no stroke, be on the same layer or group, and be adjacent to each other in the stacking order.
7. Continue drawing with the Blob Brush tool to make the smoke look more like a cloud. When you release the mouse button, the drop shadow is applied.

8. With the Blob Brush tool, add more shape to the ellipse part of the smoke on the right side to make it more cloud-like.
Note
Objects merged with the Blob Brush tool need to have the same appearance attributes and no stroke, be on the same layer or group, and adjacent to each other in the stacking order.
9. Choose Select > Deselect, and then File > Save.
Editing with the Eraser tool
As you draw and merge shapes with the Blob Brush tool, you may draw too much and want to edit what you’ve done. Use the Eraser tool to mold the shape and correct any changes you don’t like.
Tip
As you draw with the Blob Brush and Eraser tools, it is recommended that you use shorter strokes and release the mouse button often. You can undo the edits that you make, but if you draw in one long stroke without releasing the mouse button, an undo removes the entire stroke.
1. With the Selection tool (![]() ), click to select the smoke shape.
), click to select the smoke shape.
Note
Selecting the shape before the selecting the Eraser tool limits the Eraser tool so that it erases only the selected shape.
2. Select the Eraser tool (![]() ) in the Tools panel. Proceed slowly with the next steps and remember that you can always stop and undo.
) in the Tools panel. Proceed slowly with the next steps and remember that you can always stop and undo.
3. With the Eraser tool, drag along the bottom of the smoke shape to remove some of the smoke.
The Blob Brush and Eraser tools have pointers that include a circle, indicating the diameter of the brush. Next, you will change the brush size to help edit the smoke shape.
4. Press the right bracket key (]) several times to increase the size of the brush.
5. Try switching between the Blob Brush tool and the Eraser tool to edit the smoke.
6. Click the Layers panel icon (![]() ) on the right side of the workspace to expand the Layers panel. Click the visibility column to the left of the Text layer.
) on the right side of the workspace to expand the Layers panel. Click the visibility column to the left of the Text layer.

Note
You may need to select the Selection tool and reposition the text, “Ted and Fuego Take a Train” to center the text on the smoke.
7. Choose File > Save. Leave the file open for the Exploring on your own section.
Exploring on your own
There are many ways to be creative with brushes. Try practicing with the Bristle brush next.
1. Select the smoke shape with the Selection tool (![]() ).
).
2. Click the Draw Inside button at the bottom of the Tools panel.
Note
If you cannot select Draw Inside, it may be because the cloud is now a group. Choose Object > Ungroup, then choose Select > Deselect. Click the cloud shape again to select it.
3. Choose Select > Deselect.
4. Click the Brushes panel icon (![]() ) to expand the panel. Click the Brush Libraries Menu button (
) to expand the panel. Click the Brush Libraries Menu button (![]() ) and choose Bristle Brush > Bristle Brush Library from the menu.
) and choose Bristle Brush > Bristle Brush Library from the menu.
5. Click a bristle brush in the Bristle Brush Library panel.
6. Select the Paintbrush tool (![]() ) in the Tools panel. Change the Stroke color to a light gray in the Control panel. Practice adding some texture to the inside of the smoke shape.
) in the Tools panel. Change the Stroke color to a light gray in the Control panel. Practice adding some texture to the inside of the smoke shape.
Experiment with the bristle brush settings.
7. Choose File > Save, and then File > Close.
Note
A warning dialog box may appear telling you that the document contains multiple Bristle Brush paths with transparency. For this lesson, click OK.
Practice applying brushes to paths that you create with drawing tools, just as you applied the Pattern brush to a rectangle earlier in the lesson.
1. Choose File > New, and create a document to use for practice.
2. Click the Brushes Libraries Menu button (![]() ) in the Brushes panel, and choose Decorative > Decorative_Scatter.
) in the Brushes panel, and choose Decorative > Decorative_Scatter.
3. Use the drawing tools (the Pen or Pencil tool, and any of the basic shape tools) to draw objects. Use the default fill and stroke colors when you draw.
4. With one of the objects selected, click a brush in the Decorative Scatter panel to apply the brush to the object’s path.
When you select a Scatter brush, it is automatically added to the Brushes panel.
5. Repeat step 4 for each object you drew.
6. In the Brushes panel, double-click one of the Scatter brushes that you used in Step 4 to display the Scatter Brush Options dialog box. Change the color, size, or other features of the brush. After you close the dialog box, click Apply To Strokes to apply your changes to the brush in the artwork.
Review questions
1 Describe each of the five brush types: Art, Calligraphic, Pattern, Bristle, and Scatter.
2 What is the difference between applying a brush to artwork using the Paintbrush tool and applying a brush to artwork using one of the drawing tools?
3 Describe how to edit paths with the Paintbrush tool as you draw. How does the Keep Selected option affect the Paintbrush tool?
4 How do you change the colorization method for an Art, Pattern, or Scatter brush? (Remember, you don’t use colorization methods with Calligraphic or Bristle brushes.)
5 For which brushes must you have artwork selected on the artboard before you can create a brush?
6 What does the Blob Brush tool allow you to create?
Review answers
1. The following are the five brush types:
• Art brushes stretch artwork evenly along a path. Art brushes include strokes that resemble graphic media, such as the Charcoal-Feather brush used to create the tree. Art brushes also include objects, such as the Arrow brush.
• Calligraphic brushes are defined by an elliptical shape whose center follows the path. They create strokes that resemble hand-drawn lines made with a flat, angled calligraphic pen tip.
• Pattern brushes paint a pattern made up of separate sections, or tiles, for the sides, ends, and corners of the path. When you apply a pattern brush to artwork, the brush applies different tiles from the pattern to different sections of the path, depending on where the section falls on the path.
• Bristle brushes allow you to create brush strokes with the appearance of a natural brush with bristles.
• Scatter brushes scatter an object, such as a leaf, along a path. You can adjust the size, spacing, scatter, and rotation options to change the appearance of the brush.
2. To apply brushes using the Paintbrush tool, you select the tool, choose a brush in the Brushes panel, and draw on the artboard. The brush is applied directly to the paths as you draw. To apply brushes using a drawing tool, you select the tool and draw in the artwork. Then you select the path in the artwork and choose a brush in the Brushes panel. The brush is applied to the selected path.
3. To edit a path with the Paintbrush tool, drag over a selected path to redraw it. The Keep Selected option keeps the last path selected as you draw with the Paintbrush tool. Leave the Keep Selected option selected (the default setting) when you want to easily edit the previous path as you draw. Deselect the Keep Selected option when you want to draw layered paths with the paintbrush without altering previous paths. When Keep Selected is deselected, you can use the Selection tool to select a path and then edit it.
4. To change the colorization method of a brush, double-click the brush in the Brushes panel to open the Brush Options dialog box. Use the Method menu in the Colorization section to select another method. If you choose Hue Shift, you can use the default color displayed in the dialog box preview, or you can change the key color by clicking the Key Color Eyedropper, and clicking a color in the preview. Click OK to accept the settings, and close the Brush Options dialog box. Click Apply To Strokes in the alert dialog box if you want to apply the changes to existing strokes in the artwork.
Existing brush strokes are colorized with the stroke color that was selected when the strokes were applied to the artwork. New brush strokes are colorized with the current stroke color. To change the color of existing strokes after applying a different colorization method, select the strokes and select a new stroke color.
5. For Art and Scatter brushes, you need to have artwork selected in order to create a brush using the New Brush button in the Brushes panel.
6. Use the Blob Brush tool to edit filled shapes that you can intersect and merge with other shapes of the same color, or to create artwork from scratch.