5. Transforming Artwork
Lesson overview
In this lesson, you’ll learn how to do the following:
Add, edit, rename, and reorder artboards in an existing document.
Navigate artboards.
Work with rulers and guides.
Position objects with precision.
Move, scale, rotate, and shear objects using a variety of methods.
Explore mirror repeat.
Work with the Puppet Warp tool.

This lesson will take about 60 minutes to complete. To get the lesson files used in this chapter, download them from the web page for this book at adobepress.com/IllustratorCIB2022. For more information, see “Accessing the lesson files and Web Edition” in the Getting Started section at the beginning of this book.

As you create artwork, you can modify it by quickly and precisely controlling objects’ size, shape, and orientation. In this lesson, you’ll explore creating and editing artboards, the various Transform commands, and specialized tools while creating several pieces of artwork.
Starting the lesson
In this lesson, you’ll transform artwork and use it to complete an ad. Before you begin, you’ll restore the default preferences for Adobe Illustrator and then open a file containing the finished artwork to see what you’ll create.
![]() Note
Note
If you have not already downloaded the project files for this lesson to your computer from your Account page, make sure to do so now. See the “Getting Started” section at the beginning of the book.
To ensure that the tools function and the defaults are set exactly as described in this lesson, delete or deactivate (by renaming) the Adobe Illustrator preferences file. See “Restoring default preferences” in the “Getting Started” section at the beginning of the book.
Start Adobe Illustrator.

Choose File > Open, and open the L5_end.ai file in the Lessons > Lesson05 folder on your hard disk.
This file contains the artboards that make up a few different versions of an ad. Any data presented is purely fictitious.

 Note
NoteFor more information on activating fonts, visit helpx.adobe.com/creative-cloud/help/add-fonts.html.
In the Missing Fonts dialog box, ensure that each missing font is selected, and click Activate Fonts. After some time, the font(s) should be activated, and you should see a success message in the Missing Fonts dialog box. Click Close.
If a dialog box appears discussing font auto-activation, you can click Skip.
Choose View > Fit All In Window, and leave the artwork onscreen as you work.

Choose File > Open. In the Open dialog box, navigate to the Lessons > Lesson05 folder, and select the L5_start.ai file on your hard disk. Click Open.
Choose File > Save As. If the Cloud Document dialog box opens, click Save On Your Computer.
In the Save As dialog box, name the file Vacation_ads.ai, and navigate to the Lesson05 folder. Leave Adobe Illustrator (ai) chosen from the Format menu (macOS) or Adobe Illustrator (*.AI) chosen from the Save As Type menu (Windows), and click Save.
In the Illustrator Options dialog box, leave the Illustrator options at their default settings, and then click OK.
NoteIf you don’t see Reset Essentials in the Workspace menu, choose Window > Workspace > Essentials before choosing Window > Workspace > Reset Essentials.
Choose Window > Workspace > Reset Essentials.
Working with artboards
Artboards represent the regions containing printable or exportable artwork, similar to pages in Adobe InDesign or artboards in Adobe Photoshop or Adobe XD. You can use artboards for creating a variety of project types, such as multipage PDF files, printed pages with different sizes or different elements, independent elements for websites or apps, or video storyboards, for instance.
Drawing a custom-sized artboard
You can add and remove artboards at any time while working on a document, and they can be different sizes, as needed. You can resize, position, reorder, and rename them in Artboard Editing mode. Next, you’ll add a few artboards to your document, which has only one artboard.
Choose View > Fit Artboard In Window.
Choose Select > Deselect, if available. If any fonts were replaced in the previous section, the text objects will be selected.
To zoom out, press Command and — (macOS) or Ctrl and — (Windows) twice.
Press the spacebar to temporarily access the Hand tool (
 ). Drag the artboard to the left to see the tree off the right side of the artboard.
Select the Selection tool (
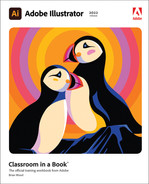
 ).
).To see document options like the Edit Artboards button in the Properties panel, you cannot have content selected in your document, and the Selection tool needs to be selected.
Click the Edit Artboards button in the Properties panel.
Clicking the Edit Artboards button enters Artboard Editing mode and selects the Artboard tool in the toolbar. You can see a dashed line around the only artboard in the document and, if it’s in view, a label “Artboard 1” in the upper-left corner of the artboard. Notice that artwork, like the palm tree, can extend beyond the edges of an artboard.
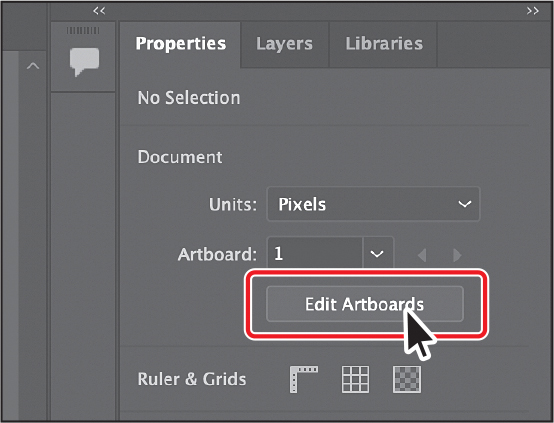
Move the pointer to the right of the artboard that has the “Unforgettable Beaches” text, and drag to draw an artboard around the tree. Don’t worry about the size; you’re going to change it soon.
The tree is now on that new artboard.

In the Properties panel on the right, in Artboard Editing mode, you’ll see lots of options for editing the selected artboard. For instance, when an artboard is selected, the Preset menu lets you change the artboard to a set size, like Letter. The sizes in the Preset menu include typical print, video, tablet, and web sizes.

In the Properties panel on the right, select the Width and type 336. Select the Height value, and type 280. Press Return or Enter to accept the height.
Notice that the unit shown is pixels.

Change the name to City vacation ad in the Artboards section of the Properties panel. Press Return or Enter to make the change.
Drag the artboard to the right a bit to make more room between the artboards.
By default, content on an artboard that isn’t locked moves with the artboard. Looking in the Properties panel, you’ll see the Move Artwork With Artboard option is selected. If you deselect that option before moving an artboard, the artwork won’t move with it. In this case, the tree would not have moved.
Creating a new artboard
Next, you’ll create another artboard that’s the same size as the City vacation ad artboard.
Click the New Artboard button (
 ) in the Properties panel to create a new artboard that’s the same size as the City vacation ad artboard and to its right.
Change the name of the new artboard to Mountain vacation ad in the Properties panel. Press Return or Enter to make the change.

When editing artboards in Artboard Editing mode, you can see the name of each artboard in the upper-left corner of the artboard.
Choose View > Fit All In Window to see all of your artboards.
Click the Exit button at the top of the Properties panel to exit Artboard Editing mode.
 Tip
TipTo exit Artboard Editing mode, you can also select another tool in the toolbar besides the Artboard tool (
 ) or press the Escape key.
Exiting Artboard Editing mode deselects all artboards and selects the tool that was active before you entered that mode. In this case, the Selection tool is selected.
Editing artboards
After creating artboards, you can edit or delete them by using the Artboard tool (![]() ), menu commands, Properties panel, or Artboards panel. Next, you’ll reposition and change the size of an artboard.
), menu commands, Properties panel, or Artboards panel. Next, you’ll reposition and change the size of an artboard.
Press Command and — (macOS) or Ctrl and — (Windows) twice to zoom out.
Select the Artboard tool (
 ) in the toolbar to enter Artboard Editing mode.
This is another way to enter Artboard Editing mode and can be useful when artwork is selected, since you can’t see the Edit Artboards button in the Properties panel with artwork selected.
TipI’m asking you to drag the artboard a little higher so when you align the artboards later, they will move.
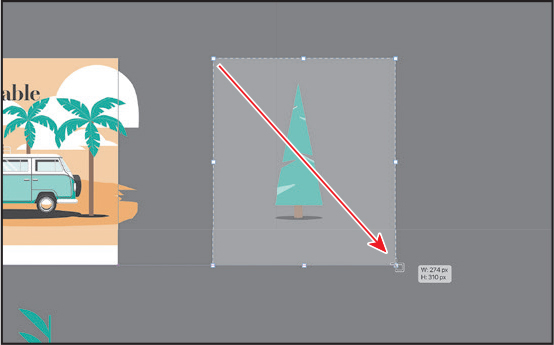
Drag the artboard named Mountain vacation ad to the left of the original artboard and a little higher. Don’t worry about its exact position yet, but make sure it doesn’t cover any artwork.
Click in the artboard in the center with the “Unforgettable Beaches” text to select that artboard. Choose View > Fit Artboard In Window to fit that artboard in the Document window.
Commands such as View > Fit Artboard In Window typically apply to the selected, or active, artboard.
Drag the bottom-middle point of the artboard up to resize it. When the point snaps to the bottom of the yellow-orange shape, release the mouse button.

You can resize artboards to fit content or the other way around—whatever you need. Next, you’ll delete the artboard named “City vacation ad” on the right since you will copy an artboard from another document to replace it.
Choose View > Fit All In Window to see all of your artboards.
TipWith an artboard selected with the Artboard tool (
 ) you can also click the Delete Artboard button (
 ) in the Properties panel to delete an artboard.
Click the City vacation ad artboard on the right and press Delete or Backspace to remove it.

When you delete an artboard, the artwork that was on that artboard remains. In your document, you can delete all but one artboard.
Select the Selection tool (
), which exits Artboard Editing mode, and drag the tree artwork below the artboard with the “Unforgettable Beaches” text on it.
Copying artboards between documents
You can copy or cut artboards from one document and paste them into another, and the artwork on those artboards comes with them. Copying artboards makes it easy to reuse content across documents. For this project, you’ll copy the start of another ad design into the project you’re working on to keep it all in one file.
Choose File > Open. Open the Bus.ai file in the Lessons > Lesson05 folder on your hard disk.
Choose View > Fit Artboard In Window to see the entire artboard.
Notice that the van is blue? A color swatch named “Van” is applied to it. That will be important soon.
 Note
NoteIf Move Artwork With Artboard is deselected in the Properties panel before you copy an artboard, the artwork on the artboard will not be copied with it.
Select the Artboard tool (
) in the toolbar, and the only artboard in the document is selected. If it isn’t, click the artboard to select it.Be careful about clicking the artboard if it’s already selected! You may make a copy on top.
Choose Edit > Copy to copy the artboard and the artwork on the artboard.
Artwork not on the artboard—like the palm tree off the right side of the artboard—isn’t copied. Depending on how the artboard fits, you may not see it.
Choose File > Close to close the file without saving.
Back in the Vacation_ads.ai document, choose Edit > Paste to paste the artboard and the artwork.
In the Swatch Conflict dialog that appears, make sure that Merge Swatches is selected and select Apply To All so any other swatches do the same. Click OK.

Swatches applied to any content on the artboard that you paste are imported. If those imported swatches have the same name but different color values as swatches already in the document, a swatch conflict occurs.
In the Swatch Conflict dialog box, by selecting the “Add Swatches” option, any swatches from the Van.ai document with the same name as found in the Vacation_ads.ai file are added by appending a number to the conflicting swatch names. If you select “Merge Swatches,” swatches with the same name are merged using the color values of the existing swatches. The blue van from the Bus.ai file is now green because the swatch named “Van” in the Vacation_ads.ai file is green.
Aligning and arranging artboards
To keep artboards tidy in your document, you can move and align artboards to suit your working style. One example is arranging artboards, so similar artboards are next to each other. Next, you’ll select all of the artboards and align them.
With the Artboard tool (
) still selected, Shift-click the other two artboards to select them as well. TipWith the Artboard tool (
 ) selected, you can also press the Shift key and drag across a series of artboards to select them.
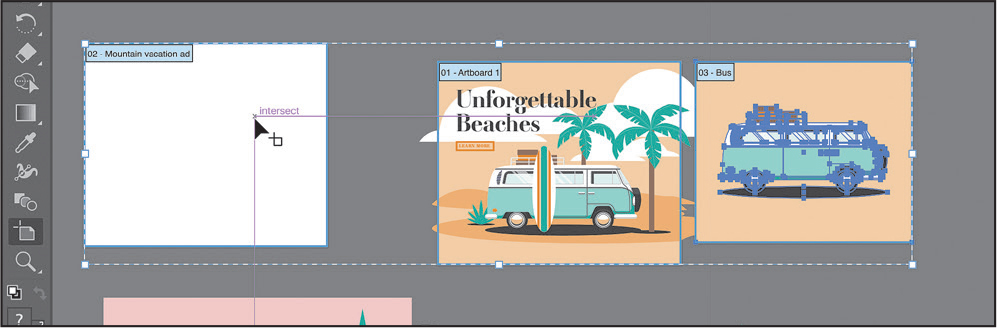
The Shift key allows you to add artboards to the selection, rather than draw an artboard, when the Artboard tool is selected.
Click the Vertical Align Top button (
 ) in the Properties panel on the right to align the artboards to each other.
You might have seen that the light orange background shape on the artboard with the “Unforgettable Beaches” text didn’t move with the artboard. An arrow is pointing to it in the previous figure. That rectangle is locked, and locked objects don’t move when you move an artboard.

Choose Edit > Undo Align to get the artboards back where they were.
To unlock the background object (and any other locked objects), choose Object > Unlock All.
Click the Vertical Align Top button (
) in the Properties panel on the right to align the artboards to each other.In Artboard Editing mode, you can also arrange your artboards however you like using the Rearrange All Artboards command. This option makes it possible to arrange artboards in columns and/or rows and define precise spacing between.

Click the Rearrange All button in the Properties panel to open the Rearrange All Artboards dialog box.
In the Rearrange All Artboards dialog box, you can arrange your artboards in columns or rows and set the spacing between each artboard to a set amount.
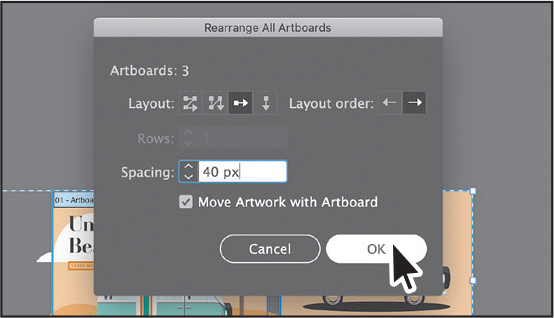
Click Arrange By Row (
 ) so the three artboards can remain next to each other horizontally. Set Spacing to 40 to set an exact spacing between them. Click OK.
The artboard that was in the middle is now first in the row of artboards and the other artboards are to the right of it. That’s because the Arrange By Row option ordered the artboards based on artboard number. You’ll see how to change that number shortly.

Setting options for artboards
By default, artboards are assigned a number and a name, as you’ve seen. When you navigate the artboards in a document, it can be helpful to name them. Next, you’ll learn how to rename artboards so that the names help identify artboards more quickly, and you’ll see other options you can set for each artboard.
While still in Artboard Editing mode, click to select the artboard named “Artboard 1.” It’s the artboard with the “Unforgettable Beaches” text on it.
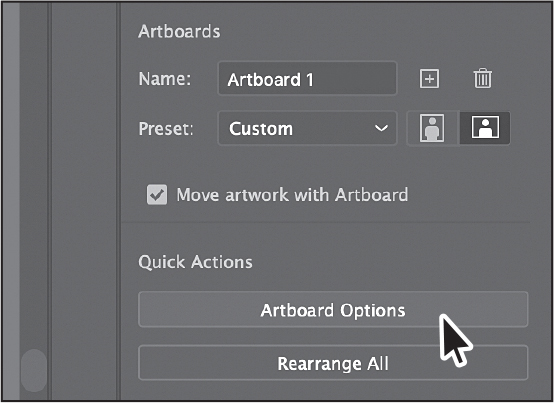
Click the Artboard Options button in the Properties panel.

In the Artboard Options dialog box, change the name to Beach vacation ad and click OK.
The Artboard Options dialog box has a lot of extra options for artboards, as well as a few you’ve already seen, like width and height.
Choose File > Save.
Reordering artboards
You can navigate between artboards in your document using the Next Artboard (![]() ) and Previous Artboard (
) and Previous Artboard (![]() ) buttons in the Properties panel with the Selection tool selected, with nothing selected, and while not in Artboard Editing mode. You can do this from below the Document window. By default, artboards appear according to the order created, but you can change that order. Next, you’ll reorder the artboards in the Artboards panel to navigate them in the artboard order you set.
) buttons in the Properties panel with the Selection tool selected, with nothing selected, and while not in Artboard Editing mode. You can do this from below the Document window. By default, artboards appear according to the order created, but you can change that order. Next, you’ll reorder the artboards in the Artboards panel to navigate them in the artboard order you set.
Choose Window > Artboards to open the Artboards panel.
The Artboards panel allows you to see a list of all of the artboards in the document. It also allows you to reorder, rename, add, and delete artboards and choose many other artboard options without being in Artboard Editing mode.

With the Artboards panel open, double-click the number 3 to the left of the name “Bus” in the Artboards panel.
Double-clicking the number to the left of an artboard name that isn’t selected in the Artboards panel makes that artboard the active artboard and fits it in the Document window.
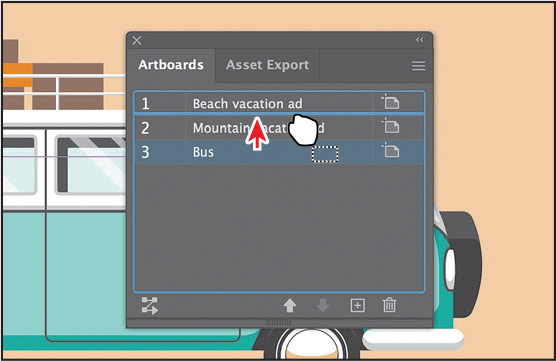
Drag the “Bus” artboard name up until a line appears above the artboard named “Mountain vacation ad.” Release the mouse button.
This makes the Bus artboard the second artboard in the list. When you choose artboards from the Properties panel—in this case, 1, 2, or 3—the numbering will follow what you see in the Artboards panel.
TipYou can also reorder the artboards by selecting an artboard in the Artboards panel and clicking the Move Up (
 ) or Move Down (
 ) button at the bottom of the panel.
Choose View > Fit All In Window.
TipThe Artboard Options button (
 ) appears to the right of the name of each artboard in the Artboards panel. It not only allows access to the artboard options for each artboard but also indicates the orientation (vertical or horizontal) of the artboard.
Notice that the if you change the ordering of the artboards in the panel, it doesn’t move the artboards around.

Drag the “Bus” artboard name back down below the artboard named “Mountain vacation ad.” Release the mouse button.
I find that keeping the artboard numbering in the order that the artboards appear in the document window is easiest when choosing artboards to show.
Click the Exit button at the top of the Properties panel to exit Artboard Editing mode.
Click the X at the top of the Artboards panel group to close it.
Choose View > Fit All In Window.
Choose File > Save.
Working with rulers and guides
With the artboards set up, you’ll learn about aligning and measuring content using rulers and guides. Rulers help you accurately place and measure objects and distances. They appear along the top and left sides of the Document window and can be shown and hidden. There are two types of rulers in Illustrator: artboard rulers and global rulers.
![]() Note
Note
You could switch between the artboard and global rulers by choosing View > Rulers > and selecting Change To Global Rulers or Change To Artboard Rulers, depending on which option is currently chosen, but don’t do that now.
The point on each ruler (horizontal and vertical) where the 0 (zero) shows is the ruler origin. Artboard rulers set the ruler origin to the upper-left corner of the active artboard. Global rulers set the ruler origin to the upper-left corner of the first artboard or the artboard at the top of the list in the Artboards panel, no matter which artboard is active. By default, rulers are set to artboard rulers.
Creating guides
Guides are nonprinting lines created from the rulers that help you align objects. Next, you’ll create a guide so you can accurately align content to an artboard.
![]() Tip
Tip
You can also choose View > Rulers > Show Rulers.
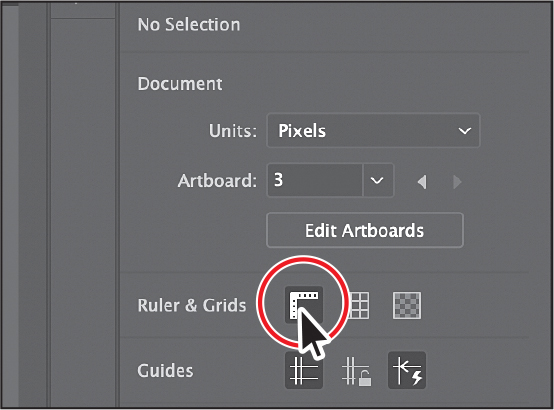
With nothing selected and the Selection tool (
) selected, click the Show Rulers button ( ) in the Properties panel to show the rulers.
Click in each of the artboards, and as you do, look at the horizontal and vertical rulers (along the top and left sides of the Document window).

The number 0 (zero) for each ruler is in the upper-left corner of the active (selected) artboard. As you can see, the 0 point on both rulers corresponds to the edges of the active artboard.

With the Selection tool, click the text “Unforgettable Beaches...” in the leftmost artboard.
Notice the very subtle black outline around the artboard, with “1” showing in the Artboard Navigation menu (below the Document window), which indicates that the Beach vacation ad artboard is the active artboard. There can be only one active artboard at a time. Commands such as View > Fit Artboard In Window apply to the active artboard.
Choose View > Fit Artboard In Window.
That fits the active artboard in the window, and the ruler origin (0,0) is in the upper-left corner of that same artboard. Next you’ll create a guide on the active artboard.
Choose Select > Deselect so you can see the document properties in the Properties panel on the right.
 Tip
TipTo change the units for a document (inches, points, etc.), you can also right-click either ruler and choose the new units.
TipDragging from a ruler while pressing the Shift key “snaps” a guide to the measurements on the ruler.
TipYou can double-click the horizontal or vertical ruler to add a new guide.
Click the Units menu in the Properties panel, and choose Inches to change the units for the entire document.
You can now see that the rulers show inches instead of pixels. For this example, you were told that text needs to be at least 0.25 inches from the edge of the ad.

Drag from the ruler on the left into the artboard to make a vertical guide. Continue dragging until you reach about 1/2 inch on the ruler above the document, and then release the mouse button. Don’t worry about the guide being at precisely 1/2 inch.
After creating a guide, it’s selected. When selected, the color of a guide matches the color of the layer it’s on (blue in this case) when you move the pointer away from it.
With the guide still selected, change the X value in the Properties panel to 0.25 (inch), and press Return or Enter to reposition the guide.

Choose Select > Deselect to deselect the guide. In a few sections, you’ll drag content to align it with the guide.
Choose File > Save.
Editing the ruler origin 
You can move the ruler origin to start the horizontal and vertical measurements at another location. To learn how to work with the ruler origin, check out the video Editing the ruler origin, which is part of the Web Edition. For more information, see the “Web Edition” section of “Getting Started” at the beginning of the book.
Transforming content
In Lesson 4, you learned how to take simple paths and shapes and create more complex artwork by editing and combining that content. That was one way to transform artwork. In this lesson, you’ll learn how to scale, rotate, and transform content in other ways, using various tools and methods.
Working with the bounding box
As you’ve seen in this lesson and previous lessons, a bounding box appears around selected content. You can resize and rotate content using the bounding box, but you can also turn it off. Turning off the bounding box makes it so you can’t resize or rotate content with the Selection tool by dragging anywhere on the bounding box.
With the Selection tool (
) selected, click to select the Unforgettable Beaches text to select the text and the button that are grouped together.
Move the pointer over the lower-left corner of the selected group. If you were to drag right now, you would resize the content.
Choose View > Hide Bounding Box.
This command hides the bounding box for the group and all other artwork. Now, you can’t resize the group by dragging with the Selection tool.
Move the pointer over the lower-left point on the LEARN MORE button, and drag the group to the left, onto the vertical guide you created. When the pointer arrow changes, the artwork is snapped to the guide, and you can release the mouse button.

If the group is not aligning to the guide, or in other words, it’s not snapping, and the pointer isn’t changing, you need to zoom in closer.
Choose View > Show Bounding Box to turn it back on for all artwork.
Positioning artwork using the Properties panel
At times, you may want to position objects more precisely—relative either to other objects or to the artboard. You could use the alignment options, as you saw in Lesson 2. You can also use Smart Guides (View > Smart Guides) and Transform options in the Properties panel to move objects to exact coordinates on the x and y axes and control the positioning of objects relative to the edge of the artboard. Next, you’ll add content to an artboard and position it precisely.
Choose View > Fit All In Window to see all three artboards.
Click in the blank artboard in the middle to make it the active artboard.

Click to select the group of artwork with the Untouched Beauty text, beneath the artboards. You may need to zoom out or pan to see it.
TipYou could have also aligned the content to the artboard using the alignment options. You’ll find there are at least a few ways to accomplish most tasks in Illustrator.
In the Transform section of the Properties panel, click the upper-left point of the reference point locator (
 ). Change the X value to 0 and the Y value to 0, and press Return or Enter.
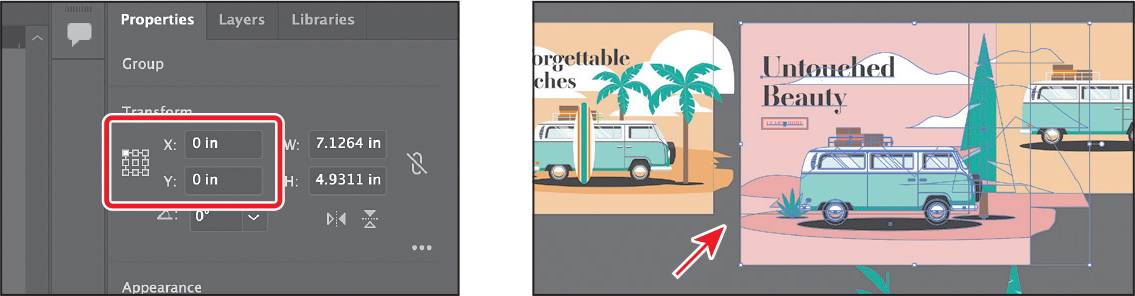
The group of content is moved into the upper-left corner of the active artboard. The points in the reference point locator map to the points of the bounding box for the selected content. For instance, the upper-left reference point refers to the upper-left point of the bounding box.

Shift-drag the lower-right corner to make the selected artwork smaller. Make sure the pink rectangle in the background just fits on the artboard. Other artwork will hang off and that’s okay.
Choose Select > Deselect, and then choose File > Save.
Scaling objects precisely
So far in this book, you’ve scaled most content with the selection tools. In this part of the lesson, you’ll scale artwork using the Properties panel and use an option called Scale Strokes & Effects.
If necessary, press Command and — (macOS) or Ctrl and — (Windows) (or choose View > Zoom Out) to see the half of a plant off the bottom edge of the artboards.

With the Selection tool (
) selected, drag across the plant group to select it.Press Command and + (macOS) or Ctrl and + (Windows) a few times to zoom in to it.
Choose View > Hide Edges so you hide the inside edges.
 Tip
TipWhen typing values to transform content, you can type different units, such as percent (%) or pixels (px), and they will be converted to the default unit, which is inches (in) in this case.
In the Properties panel, click the center reference point of the reference point locator (
 ), if it’s not selected, to resize from the center. Ensure that Maintain Width And Height Proportions is set (
 ), type 40% in the Width (W) field, and then press Enter or Return to make it less than half the size.
Notice that the artwork is smaller, but the stem of the plant is still the same width. That’s because it is a path with a stroke applied.
By default, strokes and effects, like drop shadows, are not scaled along with objects. For instance, if you enlarge a circle with a 1-pt stroke, the stroke remains 1 pt. By selecting Scale Strokes & Effects before you scale—and then scaling the object—that 1-pt stroke would scale (change) relative to the amount of scaling applied to the object.
Choose View > Show Edges to show the inside edges again.
Choose Edit > Undo Scale.
In the Properties panel, click More Options (
 ) in the Transform section. Select Scale Strokes & Effects. Type 40% in the Width (W) field and press Enter or Return to increase the size of the artwork.
Now any strokes applied to any paths are scaled proportionally.

Rotating objects with the Rotate tool
There are many ways to rotate artwork, including methods that range from precise to more free-form rotation. In previous lessons, you learned that you could rotate selected content with the Selection tool. By default, objects rotate around a designated reference point in the center of content. In this part of the lesson, you’ll learn about using the Rotate tool.
Choose View > Fit All In Window.
With the Selection tool (
) selected, click to select the palm tree to the right of the van on the far left artboard.Choose View > Fit Artboard In Window.
The palm tree would look better if it were rotated, giving it a more wind-blown look. You could rotate it with the Selection tool, and then drag it into place, but to save a step, you can rotate it with the Rotate tool.
Select the Rotate tool (
 ) in the toolbar. Move the pointer over the bottom of the tree trunk—click and release to set the point that the palm tree will rotate around. It looks like an aqua crosshairs and is called the reference point.
 Tip
TipIf you want to make the bottom of the palm tree look flatter, you can erase it with the Eraser tool (
 ) in the toolbar.
Move the pointer anywhere around the palm tree, and drag clockwise to give the tree a bit of a lean.

Scale using Transform Each
Making artwork bigger or smaller is relatively straightforward. Sometimes, however, you want to make multiple objects bigger or smaller together. Using the Transform Each command, objects you scale or rotate are done in place—they don’t move, and they are all transformed at once using the same settings.
Now you’ll scale three clouds at one time
With the Selection tool (
) selected, click to select one of the white clouds in the sky. Shift-click the other two clouds in the sky to select all three.Choose Object > Transform > Transform Each.
The Transform Each dialog box opens with multiple options like scale, moving, rotation, and more.
In the Transform Each dialog box, change the Horizontal Scale and Vertical Scale values to 70%. Click OK.

Each of the clouds is smaller and still in the same place. In other words, each cloud scaled individually from its center.
Choose File > Save.
Shearing objects
Shearing an object slants, or skews, the sides of the object along the axis you specify, keeping opposite sides parallel and making the object asymmetrical. Next, you’ll apply shear to a reflection in the window of the van.
Click to select the van and press Command and + (macOS) or Ctrl and + (Windows) a few times to zoom in.
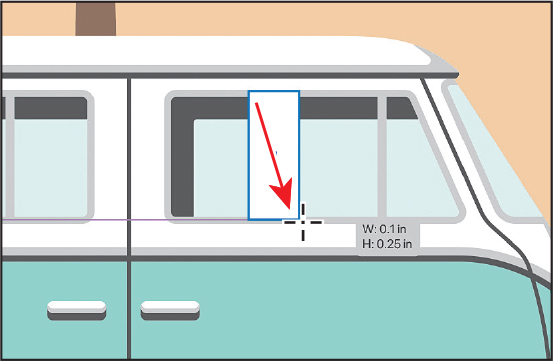
Select the Rectangle tool (
 ) in the toolbar. Drag to create a small rectangle in the middle of the front window of the van.
Change the fill color in the Properties panel to white or similar, and the Stroke Weight to 0, if necessary.
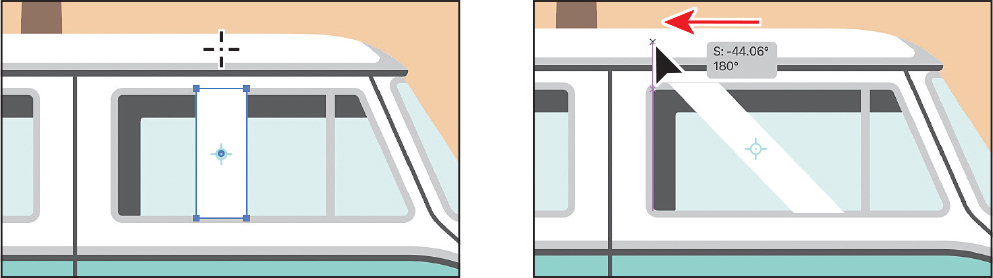
Now you’ll skew the shape to give it perspective.
With the shape selected, select the Shear tool (
 ), nested within the Rotate tool () in the toolbar.
Move the pointer above or off the right side of the shape, press the Shift key to constrain the artwork to its original height, and drag to the left. Release the mouse button and then the Shift key when you see a shear angle (S) of approximately 45.
Change the opacity of the rectangle in the Properties panel by clicking the arrow to the right of 100% in the Opacity field and dragging the slider to change it. I changed it to 60%.
Transform using menu commands
The transform tools you find in the toolbar—rotate, move, shear, skew, reflect—are also represented as menu items when you choose Object > Transform. In a lot of cases, you can use any of those menu commands in place of a tool.
Now you’ll make a copy of the window reflection using the Move command.
To make a copy of the rectangle, choose Object > Transform > Move.
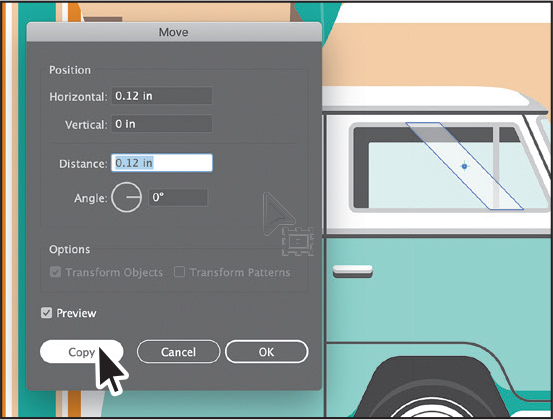
In the Move dialog box, change Horizontal Position to 0.12 in to move the rectangle that distance to the right, and make sure the Vertical Position is 0 to keep it in the same vertical position. Click Copy.
Now, you’ll make the rectangle narrower. It’s a bit more challenging than just dragging the bounding box since the shape is skewed. You’ll drag anchor points instead to maintain the skew angle while transforming the shape.
Select the Selection tool (
) and double-click the copied rectangle.This enters Isolation mode and makes it much easier to select part of the rectangle since everything else is dimmed and can’t be selected.
Select the Direct Selection tool (
 ). Click the top-right anchor and Shift-click the bottom-right anchor to select both.
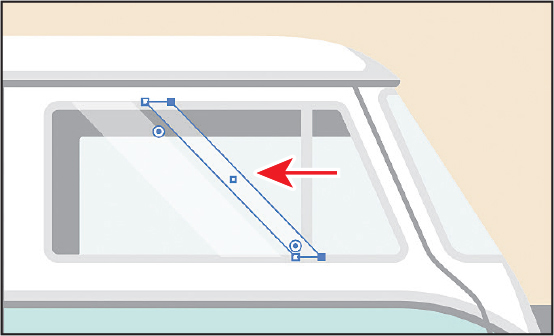
Press the left arrow key on your keyboard several times to move the selected anchor points to the left, making the shape narrower.
Press the Esc key to exit Isolation mode.
Choose View > Fit All In Window, and then choose File > Save.
Transforming with the Free Transform tool
To learn how to transform artwork freely with the Free Transform tool, check out the video Transforming with the Free Transform tool, which is part of the Web Edition. For more information, see the “Web Edition” section of “Getting Started” at the beginning of the book.
Using repeats
You can easily repeat objects by applying one of the available repeat types: Radial, Grid, or Mirror. When you apply one of the repeats to selected artwork, Illustrator auto-generates artwork using your chosen method. If you update one of the repeat instances, all instances are modified to reflect the change.

Applying a mirror repeat
To start with repeats, you’ll focus on applying a mirror repeat to artwork. Mirror repeat helps create symmetrical artwork. You create half of the artwork, and Illustrator automatically makes the other half for you. In this case, you’ll finish a plant that will become part of one of the ads.
Select the Zoom tool (
 ) and zoom into the plant below the artboards.
Select the Selection tool (
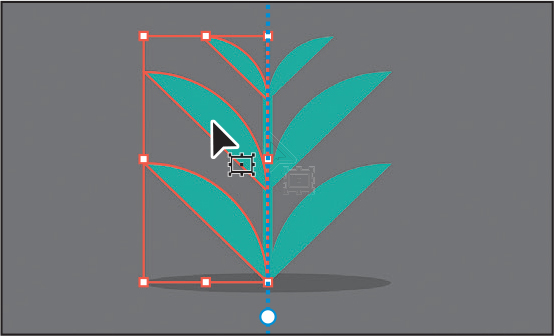
), and drag across the plant shapes below the artboards to select them. Make sure not to select the dark oval shadow.Choose Object > Repeat > Mirror.
In the Repeat menu, you’ll see the three options: Radial, Grid, and Mirror.

As soon as you choose Mirror, Illustrator enters an Isolation mode. The rest of the artwork is dimmed and cannot be selected, as is typical for Isolation mode. The vertical dashed line you see is called the symmetry axis. It shows the center of the symmetrical artwork, and you use it to change the distance between the halves and rotate the auto-generated half.

Find the circle control handle on the symmetry axis, just below the plant. Drag it left and right, to change the distance between the halves.
Make sure there is no gap between the plant halves.

Drag either circle control handle at the very top or bottom of the symmetry axis to rotate the mirrored content.
To reset the angle of the mirror repeat, choose 90 degrees from the Angle Of Mirror Axis in the Properties panel.

Not only can you use mirror to copy and flip artwork you’ve already created, but you can also add or remove artwork while editing the mirror repeat.
Choose Select > Deselect so no plant artwork is selected.
 Note
NoteThe Shift key constrains the movement, and the Option/Alt key copies the artwork.
To copy one of the leaves, Shift+Option-drag (macOS) or Shift+Alt-drag (Windows) the top leaf up. Make sure to drag it to the very top of the green plant stem (the vertical green path). Release the mouse button and then the keys.
Notice that the generated artwork on the right mirrors what you are doing in real time. Any changes you make to the artwork are visible in the mirrored half.

Shift-drag the upper-left corner to make the leaf smaller.
To stop editing the mirror repeat, exit Isolation mode by pressing the Esc key. The plant should be deselected.
Editing a mirror repeat
When you create a mirror repeat, or any type of repeat, the artwork becomes a repeat object. In this case, the plant is now a Mirror Repeat object—sort of like a special group. Now, you’ll learn how to edit the mirror repeat.
Click the plant to select it.
At the top of the Properties panel, you’ll see “Mirror Repeat,” which tells you that it’s a mirror repeat object group.
Double-click the plant to enter Isolation mode.
You can now see the symmetry axis and can edit the original artwork you created on the left.
Click away from the plant to deselect it, and then click one of the leaves and change the fill color in the Properties panel to another color. I chose a lighter green.
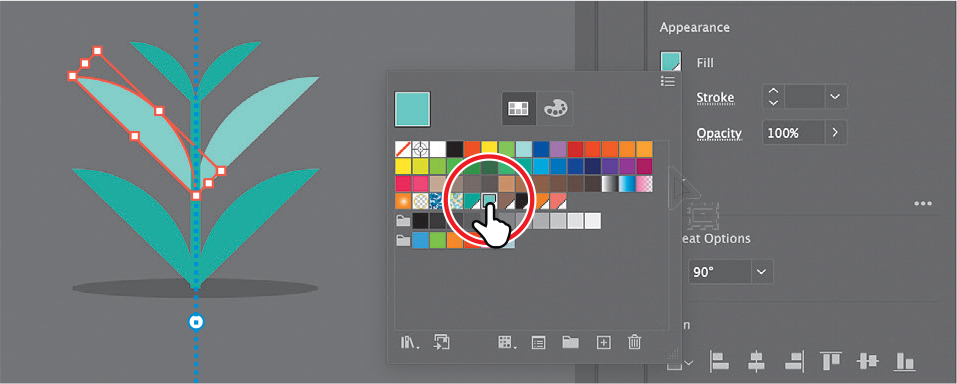
Press the Esc key to exit Isolation mode.
TipTo edit the auto-generated half of the mirrored artwork, you need to expand the Mirror Repeat object. Choose Object > Expand. Know that if you expand a Mirror Repeat object, you cannot edit the mirror repeat using the symmetry axis, and the artwork is simply a group of individual objects.
Choose View > Fit All In Window.
Drag across the plant art and oval shadow to select them. Choose Object > Group. Drag the group onto the artboard on the right with the van by itself.
If the plant is behind the artwork on the artboard, choose Bring To Front from the Arrange menu in the Properties panel.
Using grid and radial repeats
To learn how to work with the other repeat options, check out the video Using grid and radial repeats, which is part of the Web Edition. For more information, see the “Web Edition” section of “Getting Started” at the beginning of the book.
Adding the Puppet Warp tool to the toolbar
In Illustrator, you can easily twist and distort artwork into different positions using the Puppet Warp tool. In this section, you’ll warp one of the palm trees.
Click the palm tree you rotated on the Beach vacation ad artboard. Zoom in by pressing Command and + (macOS) or Ctrl and + (Windows) several times.

Click Edit Toolbar (
) at the bottom of the toolbar. Scroll in the menu that appears if necessary, and drag the Puppet Warp tool ( ) between two tools in the toolbar.
Press the Escape key to hide the extra tools menu.
Adding pins
With the tool now showing in the toolbar, you’ll use it to warp the palm tree so it looks a little more natural and less like it’s falling over.
Select the Puppet Warp tool (
) in the toolbar if it isn’t already selected.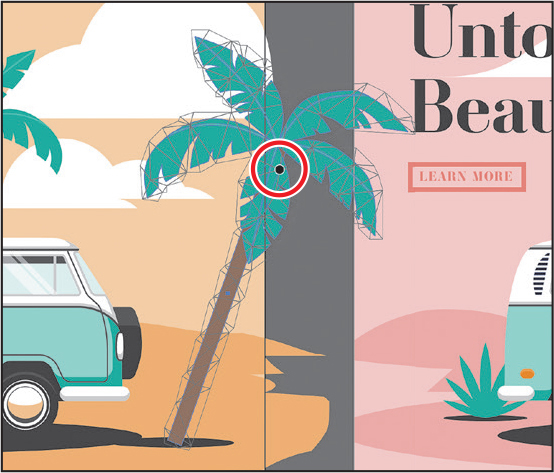 Note
NoteThe pins Illustrator adds to the artwork by default may not look like what you see in the figure. If that is the case, pay attention to the notes along the way.
By default, Illustrator identifies the best areas to transform your artwork and automatically adds pins to the artwork. The pin is circled in the figure.
Pins are used to hold part of the selected artwork to the artboard, and you can add or delete pins to transform your object. You can rotate the artwork around a pin, reposition pins to move artwork, and more.

In the Properties panel on the right, you should see Puppet Warp options. Deselect Show Mesh.
That will make it easier to see the pins and provide a clearer view of any transformations you make.
 Note
NoteIf your pin is in a different place, that’s okay.
TipYou can press the Shift key and click multiple pins to select them all, or click the Select All Pins button in the Properties panel to select all of the pins.
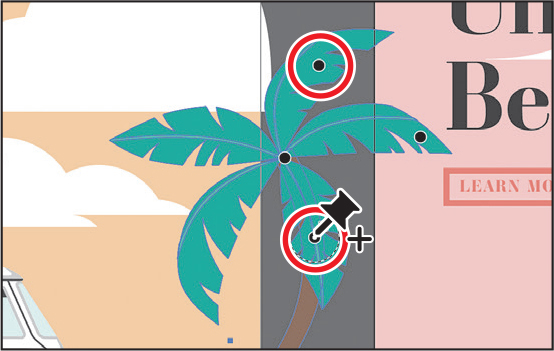
Click the one pin on the tree to select it. You can tell that a pin is selected because it has a white dot in the center. Drag the selected pin to the left to see how the artwork reacts.
Notice that the whole tree moves. That’s because there is only one pin. By default, pins on the artwork help to keep (pin) parts in place. Having at least three pins on your artwork usually achieves a better result.
Choose Edit > Undo Puppet Warp as many times as you need to return the tree to its original position.
Click the bottom of the brown tree trunk to add a pin. Click in the middle of the brown tree trunk to add another pin.

The pin at the bottom is meant to pin or hold the bottom of the tree trunk in place so that part won’t move as much. The pin in the middle of the tree trunk is the one you will drag to reshape the tree.

Drag the pin in the middle of the trunk to reshape the tree.
You’ll find that if you drag too far, odd things like path twisting may happen.
Now, you can’t move pins on the artwork without moving the artwork, so if they’re not in the right place for the warping you want, you need to remove pins and add them where they are needed.
Click the pin in the leaves to select it and press Delete or Backspace to remove it. It would better if it were in the middle of the leaves for rotation.
Notice that the leaves move once the pin is deleted.
Click in the middle of the leaves to add a new one.


Drag the new pin approximately back to where the original was. Leave the pin selected.
Rotating pins
Another helpful thing you can do to pins is rotate them. In this section, you’ll rotate all of the leaves and then warp one of the leaves without affecting the rest as much.
With the pin in the middle of the leaves still selected, you will see a dashed line around the pin. You drag that to rotate it. Move the pointer over the dashed circle, and drag to rotate the leaves around the pin until you think it looks good.

Now you’ll warp a single leaf. This will require adding some more pins.

Click in the end of one of the leaves on the right to add a pin.
You might see the other parts of the artwork change in reaction. If that happens, select the pin in the center of the leaves again and rotate it back.

Drag the new pin on the end of the leaf to stretch the leaf a bit and to see how the artwork reacts.
TipPressing the Option/Alt key limits the affected area directly around the pin you are dragging.
You might see the other leaves moving as well. In this case, you want to pin the parts that are moving to keep them still.
Choose Edit > Undo Puppet Warp as many times as you need to return the leaf to its original position.
Click to set pins on the leaves around to hold them in place.

Drag the pin at the end of the leaf to stretch the leaf a little and see how everything reacts now.
The last thing you’ll do is rotate and drag the pin at the bottom of the tree trunk.
Click the pin at the bottom of the tree trunk. Move it to see how the rest of the tree artwork reacts.

Move the pointer over the dashed circle around the pin, and drag to rotate the bottom until you think it looks good.
Choose Select > Deselect, and then choose View > Fit All In Window.

Choose File > Save, and then File > Close.
Review questions
1 Name three ways to change the size of an existing active artboard.
2 What is the ruler origin?
3 What is the difference between artboard rulers and global rulers?
4 Briefly describe what the Scale Strokes & Effects option in the Properties panel or Transform panel does.
5 Briefly describe what the Puppet Warp tool does.
Review answers
1 To change the size of an existing artboard, you can do any of the following:
Double-click the Artboard tool (
 ), and edit the dimensions of the active artboard in the Artboard Options dialog box.
With nothing selected and the Selection tool selected, click the Edit Artboards button to enter Artboard Editing mode. With the Artboard tool selected, position the pointer over an edge or corner of the artboard, and drag to resize.
With the Artboard tool selected, click an artboard in the Document window, and change the dimensions in the Properties panel.
2 The ruler origin is the point where 0 (zero) appears on each ruler. By default, the ruler origin is set to be 0 (zero) in the upper-left corner of the active artboard.
3 Artboard rulers, the default rulers, set the ruler origin at the upper-left corner of the active artboard. Global rulers set the ruler origin at the upper-left corner of the first artboard, no matter which artboard is active.
4 The Scale Strokes & Effects option, which can be accessed from the Properties panel or the Transform panel, scales any strokes and effects as the object is scaled. This option can be turned on and off, as needed.
5 In Illustrator, you can use the Puppet Warp tool to easily twist and distort artwork into different positions while adding pins to hold part of it stationary.