
6. Using the Basic Drawing Tools
Lesson overview
In this lesson, you’ll learn how to do the following:
Draw curves and straight lines with the Curvature tool.
Edit paths with the Curvature tool.
Create dashed lines.
Draw and edit with the Pencil tool.
Join paths with the Join tool.
Add arrowheads to paths.

This lesson will take about 30 minutes to complete. To get the lesson files used in this chapter, download them from the web page for this book at adobepress.com/IllustratorCIB2022. For more information, see “Accessing the lesson files and Web Edition” in the Getting Started section at the beginning of this book.

In previous lessons you created and edited shapes. Next you’ll learn how to create straight lines, curves, or more complex shapes using the Pencil and Curvature tools. You’ll also explore creating dashed lines, arrowheads, and more.
Starting the lesson
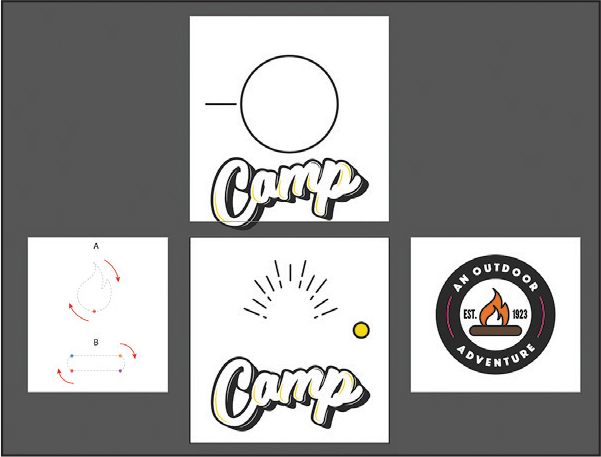
In the first part of this lesson, you’ll start by creating and editing free-form paths with the Curvature tool and exploring other drawing methods to create a series of logos.
![]() Note
Note
If you have not already downloaded the project files for this lesson to your computer from your Account page, make sure to do so now. See the “Getting Started” section at the beginning of the book.
To ensure that the tools function and the defaults are set exactly as described in this lesson, delete or deactivate (by renaming) the Adobe Illustrator preferences file. See “Restoring default preferences” in the “Getting Started” section at the beginning of the book.
Start Adobe Illustrator.
Choose File > Open. Locate the file named L6_end.ai, which is in the Lessons > Lesson06 folder that you copied onto your hard disk, and click Open.

This file contains the finished logos that you’ll create in this lesson.
Choose View > Fit All In Window; leave the file open for reference, or you can close it by choosing File > Close.
Choose File > Open, and open the L6_start.ai file in the Lessons > Lesson06 folder on your hard disk.
Choose File > Save As. If the Cloud Document dialog box opens, click Save On Your Computer.
In the Save As dialog box, navigate to the Lesson06 folder, and open it. Rename the file to Outdoor_logos.ai. Choose Adobe Illustrator (ai) from the Format menu (macOS), or choose Adobe Illustrator (*.AI) from the Save As Type menu (Windows). Click Save.
In the Illustrator Options dialog box, leave the default settings, and then click OK.
 Note
NoteIf you don’t see Reset Essentials in the menu, choose Window > Workspace > Essentials before choosing Window > Workspace > Reset Essentials.
Choose Window > Workspace > Reset Essentials.
Creating with the Curvature tool
With the Curvature tool (![]() ), you can create free-form paths with straight lines and smooth, refined curves, and it is one of the easier drawing tools to master. The Curvature tool creates paths made of anchor points that are editable with any drawing or selection tools. Let’s take a look.
), you can create free-form paths with straight lines and smooth, refined curves, and it is one of the easier drawing tools to master. The Curvature tool creates paths made of anchor points that are editable with any drawing or selection tools. Let’s take a look.
Drawing paths with the Curvature tool
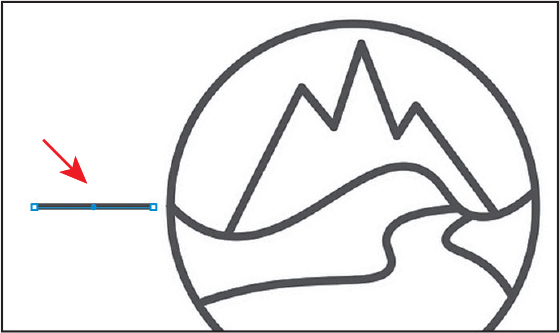
In this first part, you’ll draw a curved path with the Curvature tool that will become a horizon in a logo (the red path highlighted in the figure).
Choose 1 Logo 1 from the Artboard Navigation menu below the Document window to fit the first artboard in the window.
Select the Selection tool (
 ), and click the edge of the circle. To lock it, choose Object > Lock > Selection. That way, you can draw without accidentally editing the circle.
Select the Curvature tool (
 ) in the toolbar and move the pointer into the document—an asterisk (*) next to the pointer means you will draw a new path.
To set the stroke and fill before you draw, make sure that the Fill is set to None (
 ), that the stroke color is a dark gray swatch with the tool tip “C=0 M=0 Y=0 K=90,” and that the stroke weight is 4 pt.
The stroke and fill should be already set, since you just selected the circle and Illustrator remembers the last fill and stroke.
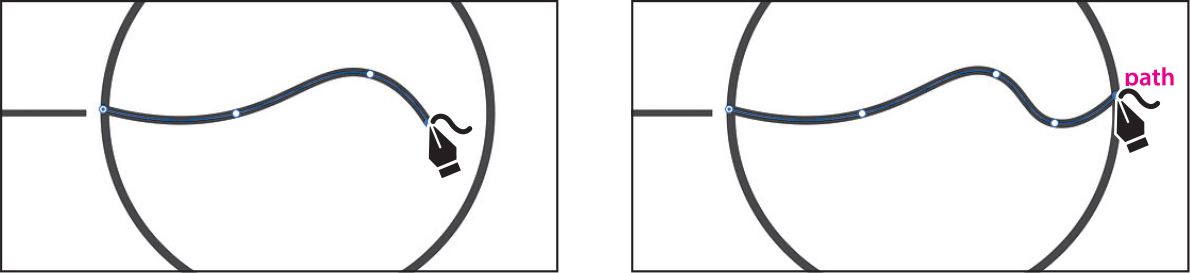
With the Curvature tool, you start a path by clicking and releasing to create an anchor point. You keep creating anchor points to change the path’s direction, how much it is curved, or both.
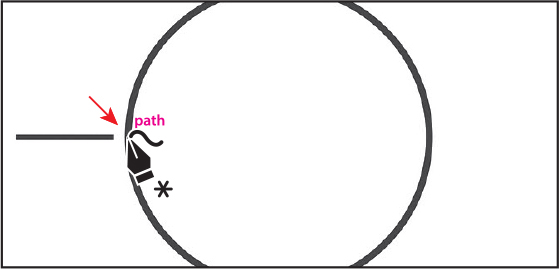
On the left edge of the circle, click and release to start the path that will become the horizon.
Move the pointer to the right, click and release to create a new point, and then move the pointer away.

Notice the rubber band preview of the curve before and after the new point. The Curvature tool works by creating anchor points where you click. The path will “flex” around the points dynamically.
Move the pointer to the right. Click and release to create a point. Move the pointer around to see how the path reacts.
If you add an anchor in the wrong spot at any point, you can always move the pointer over the anchor, drag it, and then continue drawing. You’ll learn all about editing paths with the Curvature tool in the next section.
Click and release to the right to create another anchor point.
Finally, to complete the horizon, move the pointer over the right edge of the circle; click and release to create the last anchor point.
To stop drawing and lock the path so you can’t accidentally edit it in the next section, choose Object > Lock > Selection.
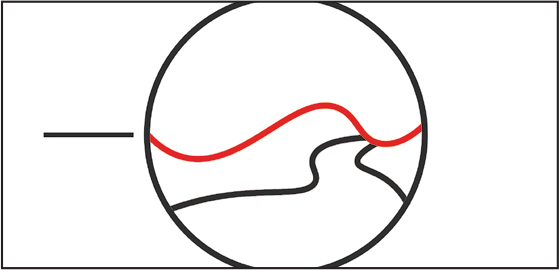
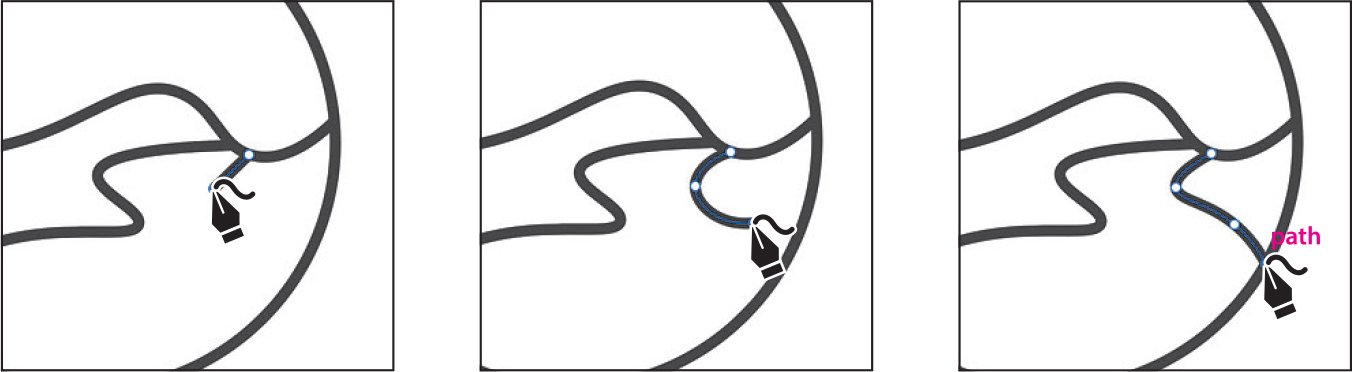
Drawing a river path
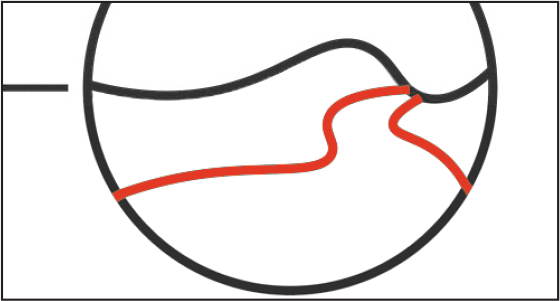
To continue with the Curvature tool, next you’ll draw a river that begins at the horizon path you just created. You’ll draw one side of the river, and then the other. The figure at the right shows an example of how the river might look. Yours may look different, and that’s okay.
You may want to zoom in to the artwork for this section.
Move the pointer over the horizon path as you see in the figure. Click and release to start a new path.
For the next steps, use the figures as a guide, but experiment a little!
Move the pointer down and to the left, and click. Continue moving the pointer down, clicking and changing direction three more times to create one side of the river. Make sure the last point you create is on the circle.
When learning the Curvature tool, it helps to click, release, and then move the pointer around to get a feel for how it affects the path.
Press the Escape key to stop drawing a path.
Next you’ll draw the other side of the river using a similar technique.
Choose Select > Deselect.

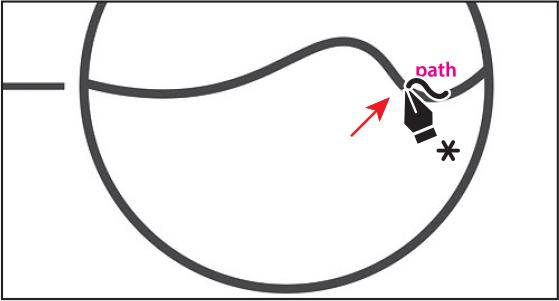
Move the pointer over the horizon path just to the right of the start of the path you just drew. Make sure you see the asterisk (*) next to the pointer. The asterisk means you will start a new path. Click and release to start a new path.
It’s important not to click too closely to the first river path you drew because you may edit that path instead of starting a new one. If you click and begin editing the other path, press the Escape key to stop editing the first river path.
Move the pointer down, and click to set another point. Do this two more times to add points to create the other side of the river. Make sure the last point you create is on the edge of the circle.
To stop drawing the river path, press the Escape key.
Editing a path with the Curvature tool
You can also edit paths with the Curvature tool by moving or deleting anchor points or adding new ones. You can use the Curvature tool to edit a path you’re drawing or any other path you’ve created regardless of the drawing tool used to create it. Next, you’ll edit the paths you’ve created so far.
With the Curvature tool selected, click the first river path you drew on the left to select it and show the anchor points.
To edit a path with the Curvature tool, it needs to be selected.
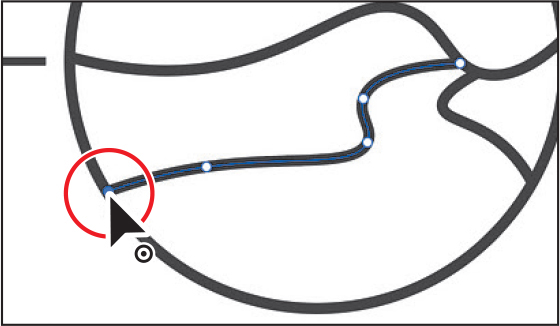
 Tip
TipTo close a path with the Curvature tool, hover the pointer over the first point you created in the path. When a circle appears next to the pointer (
 ), click to close the path.
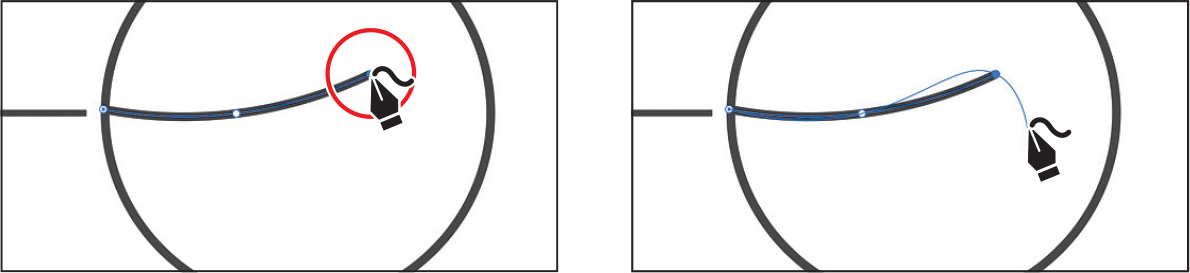
Move the pointer over the anchor point circled in the first part of the following figure. When the point changes appearance (
 ), click to select the point. Drag that point to reshape the curve a little.
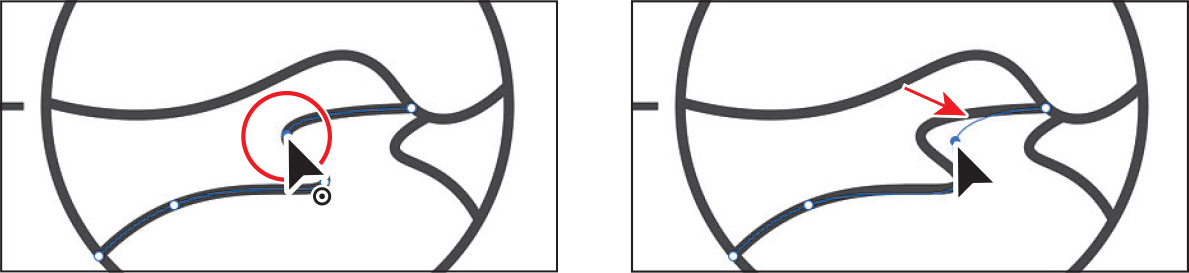
Try dragging other points in the path.
You’ll find that you don’t need to click and release to select a path, and then drag. You can simply drag the anchor point.
Next, you’ll unlock the horizon path and edit it.
Choose Object > Unlock All to be able to edit the horizon path you drew.
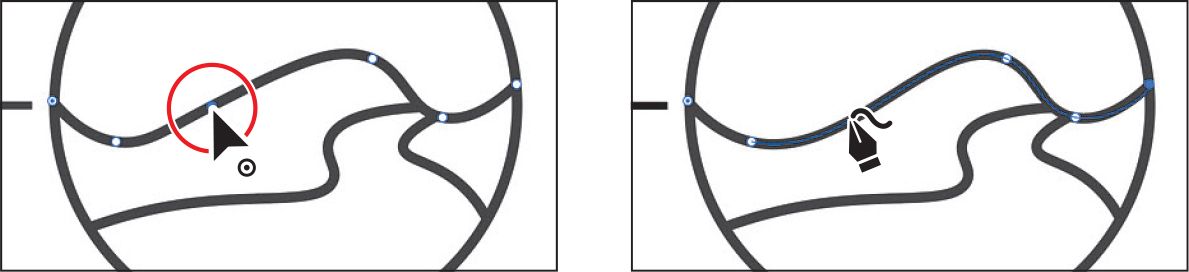
With the Curvature tool selected, click the horizon path to select just that path and see the anchor points on it.
Move the pointer over the path just to the right of the first anchor (on the left). When a plus sign (+) appears next to the pointer (
 ), click to add a new point.
Drag the new point down a bit to reshape the path.

You’ll remove the point just to the right of the new point you just added so the path can have more curve.
Click the point to the right, and to remove it press Delete or Backspace.
If you’re wondering, instead of adding and deleting anchors, you could have just moved the anchor you deleted to reshape the path.
To lock the path so you don’t accidentally edit it in the next section, choose Object > Lock > Selection.
Creating corners with the Curvature tool
By default, the Curvature tool creates smooth anchor points—anchor points that cause the path to curve. Paths can have two kinds of anchor points: corner points and smooth points. At a corner point, a path abruptly changes direction. At a smooth point, path segments are connected as a continuous curve. With the Curvature tool, you can also create corner points to create straight paths. Next, you’ll draw a mountain for the logo using corner points.
![]() Note
Note
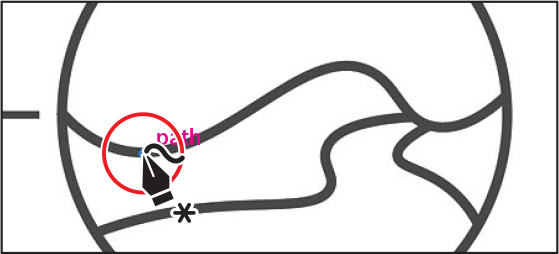
If the word “path” doesn’t appear, make sure Smart Guides are turned on (View > Smart Guides).
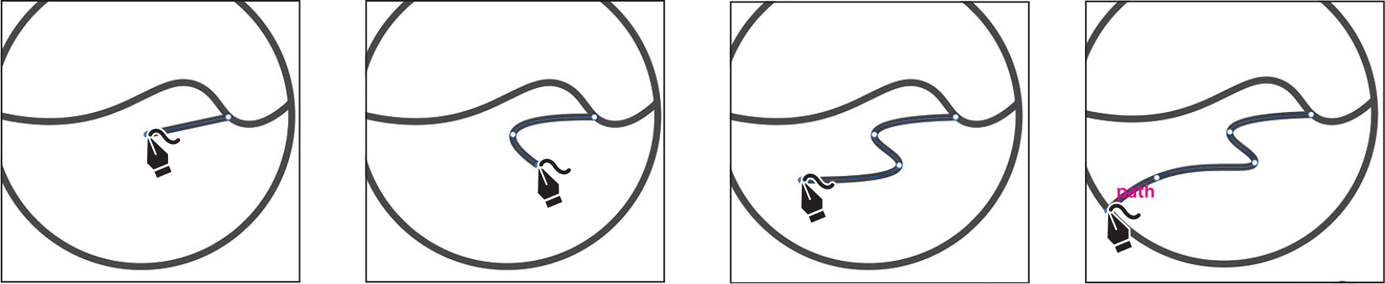
With the Curvature tool (
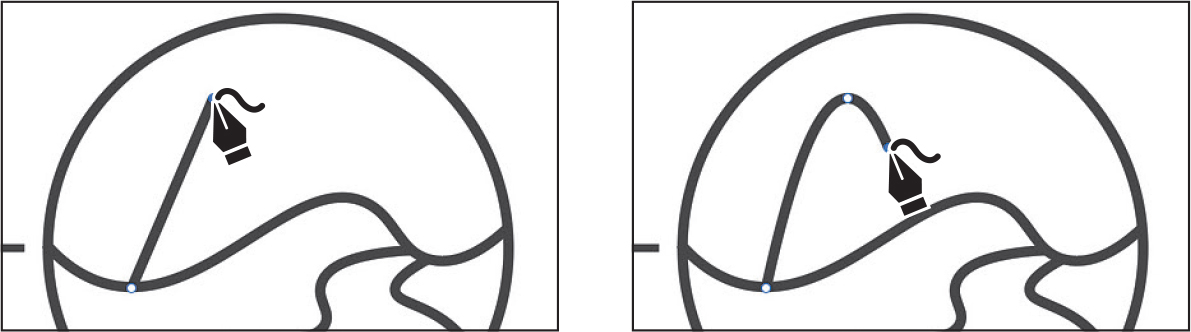
) selected, move the pointer over the left side of the horizon path. When the word “path” appears, telling you the point you add will start on the path, click to set the first point.Move the pointer up and to the right, and click to start a mountain peak.
Move the pointer down and to the right, and click to create a new point.
To make the mountain peak have a point to it and not be curved, you’ll convert the anchor point you just created to a corner point.
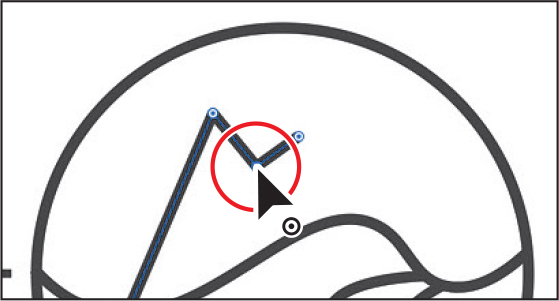
Move the pointer over the top anchor point on the mountain path, and when the pointer changes (
 ), double-click to convert it to a corner point.
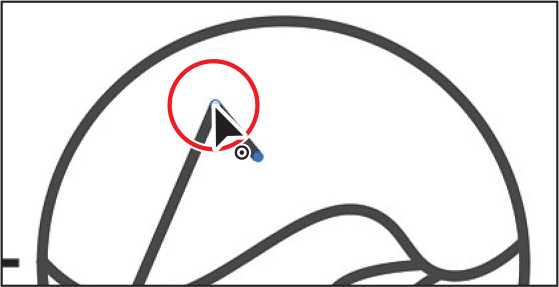
You can tell which points are smooth and which are corners by their appearance. Each point you create with the Curvature tool can have three appearances, indicating their current state: a selected point (
 ), a corner point that is not selected (
 ), and smooth point that is not selected (
 ).
).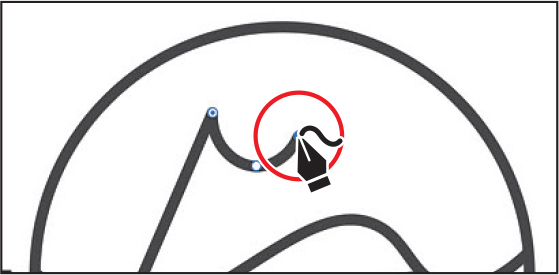
To continue drawing, move the pointer over and up, and click to create another point and start another mountain peak.
The point you just created and the point before it also need to be converted to corner points. All of the anchor points you create for the mountain path need to be corners. You’ll convert the two anchor points to corner points next.
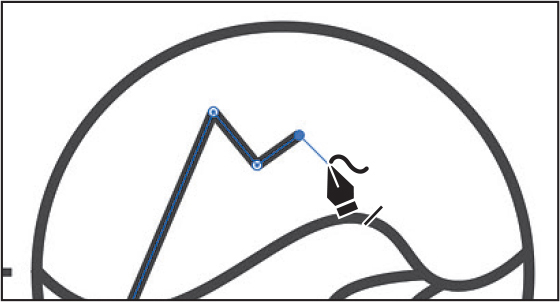
Double-click the last two anchor points you made to make them corners.
To finish the mountain path, you’ll create a few more anchor points, but you will make corner points instead of smooth points by pressing a key as you create them.
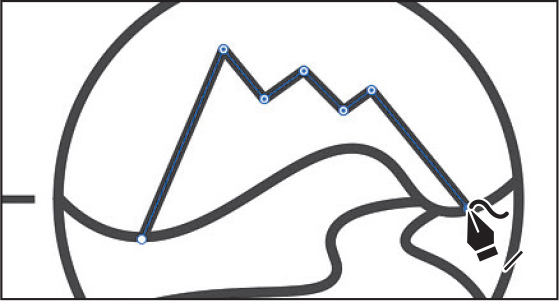
Press Option (macOS) or Alt (Windows), and the pointer will change (
 ). Click to make a corner anchor.
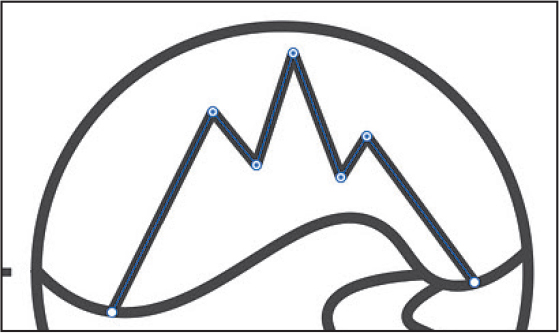
While still pressing Option (macOS) or Alt (Windows), click a few more times to finish the mountain path. Make sure the last point you create is on the horizon path.
Feel free to adjust any anchor points. Drag a point to reshape the path, double-click a point to convert it between a corner and smooth point, or select an anchor and press Delete or Backspace to remove it from the path.
Press the Escape key to stop drawing.
Choose Select > Deselect, and then choose File > Save.
Creating dashed lines
To add some design flair to your artwork, you can add dashes to the stroke of a closed path (like a square) or an open path (like a line). You add dashes to paths in the Stroke panel, where you can specify a sequence of dash lengths and the gaps between them. Next, you’ll add a dash to lines to add sun rays around the circle.
Select the Selection tool (
), and click the line to the left of the circle. TipThe Preserves Exact Dash And Gap Lengths button (
 ) allows you to retain the appearance of the dashes without aligning to the corners or the dash ends.
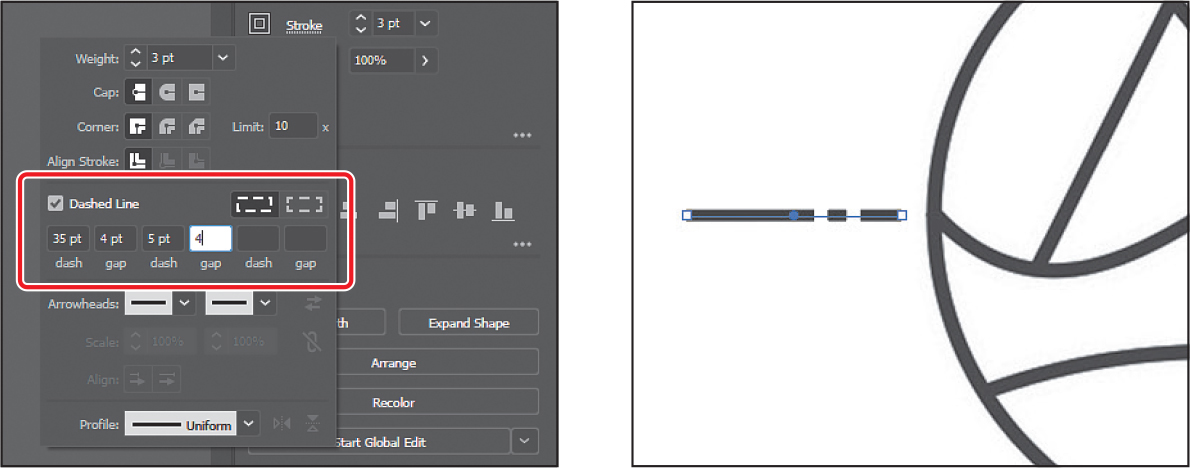
In the Properties panel, click the word “Stroke” to show the Stroke panel. Change the following options in the Stroke panel:
Weight: 3 pt (should already be set)
Dashed Line: Selected
Preserves Exact Dash and Gap Lengths (
 ): Selected (The dashes won’t be adjusted at all.)
First Dash value: 35 pt (This creates a 35-pt dash, 35-pt gap pattern.)
First Gap value: 4 pt (This creates a 35-pt dash, 4-pt gap pattern.)
Second Dash value: 5 pt (This creates a 35-pt dash, 4-pt gap, 5-pt dash, 5-pt gap pattern.)
Second Gap value: 4 pt (This creates a 35-pt dash, 4-pt gap, 5-pt dash, 4-pt gap pattern.) After entering the last value, press Return or Enter to accept the value and close the Stroke panel.
Now you’ll make copies of the dashed line around the circle.
 Note
NoteIf the word “center” doesn’t appear, make sure Smart Guides are turned on (View > Smart Guides).
With the dashed line selected, select the Rotate tool (
 ) in the toolbar. Move the pointer into the center of the circle, and when you see the word “center,” Option-click (macOS) or Alt-click (Windows) to set the reference point (the point at which the artwork rotates around) and open the Rotate dialog box.
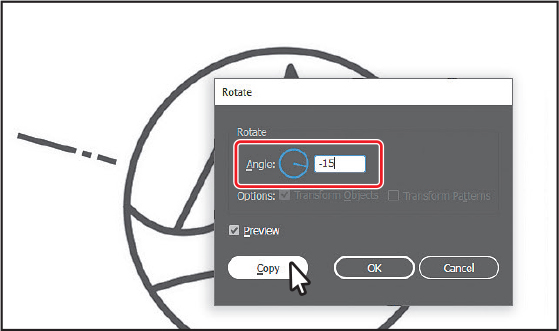 Note
NoteTo preview the rotation, you may need to turn off Preview then turn it back on.
Select Preview to see the results of the changes you make in the dialog. Change the Angle to —15, and click Copy.
To copy the dashed line again using the same rotation, choose Object > Transform > Transform Again.

To make 10 more copies, press Command+D (macOS) or Ctrl+D (Windows) 10 times.
That keyboard command invokes the Transform Again command you chose in the previous step.
To finish the artwork, you’ll cut off part of the circle and drag the text at the bottom of the artboard onto the logo.
Select the Rectangle tool (
 ) in the toolbar and draw a rectangle that covers the lower part of the circle (see the following figure). Notice that the dashed stroke is applied to the rectangle.
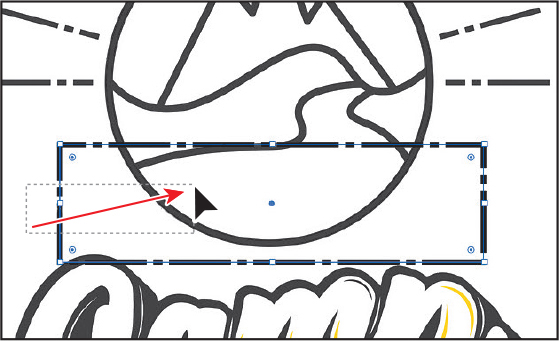
Select the Selection tool (
) and drag across the rectangle and circle (only!).Select the Shape Builder tool (
 ) in the toolbar. Press the Option key (macOS) or Alt key (Windows) and drag across the rectangle and bottom part of the circle to remove them. Release the mouse button and then the key. You removed the bottom part of the circle so it won’t show when you drag the text into place.
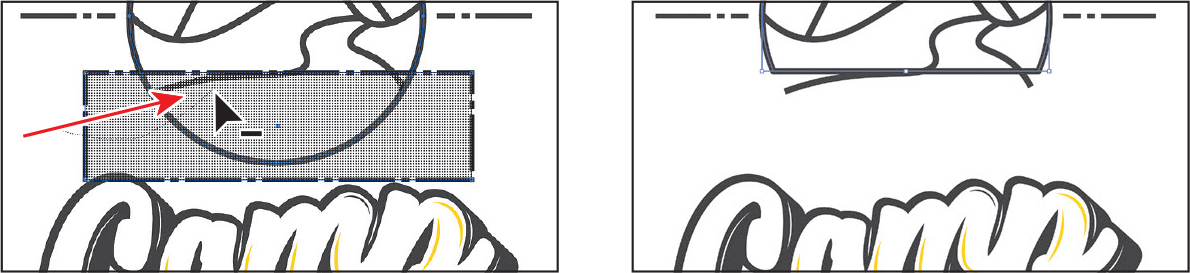
Select the Selection tool and drag the text at the bottom of the artboard up, onto the logo.

Click the Arrange button in the Properties panel and choose Bring To Front so the text is in front.
Choose Select > Deselect, and choose File > Save.
Creating with the Pencil tool
Another drawing tool in Illustrator is the Pencil tool. The Pencil tool (![]() ) lets you draw free-form open and closed paths that contain curves and straight lines and is similar to drawing on paper. As you draw with the Pencil tool, anchor points are created on the path, where necessary, according to the Pencil tool options you set. The path can easily be adjusted when the path is complete.
) lets you draw free-form open and closed paths that contain curves and straight lines and is similar to drawing on paper. As you draw with the Pencil tool, anchor points are created on the path, where necessary, according to the Pencil tool options you set. The path can easily be adjusted when the path is complete.
Drawing paths with the Pencil tool
Next you’ll draw and edit a simple path to make fire for one of the logos, using the Pencil tool.
Choose 2 Pencil from the Artboard navigation menu in the lower-left corner of the Document window.
TipWhen it comes to the Fidelity value, dragging the slider closer to Accurate usually creates more anchor points and more accurately reflects the path you’ve drawn. Dragging the slider toward Smooth makes fewer anchor points and a smoother, less complex path.
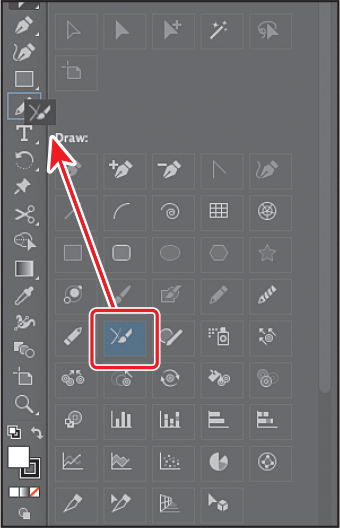
Select the Pencil tool (
 ) from the Paintbrush tool (
 ) group in the toolbar.
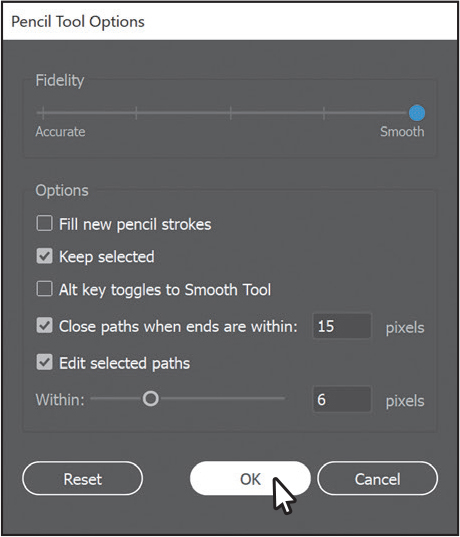
Double-click the Pencil tool. In the Pencil Tool Options dialog box, set the following options:
Drag the Fidelity slider all the way to the right to Smooth. This will smooth the path and reduce the number of points on a path drawn with the Pencil tool.
Keep Selected: Selected (the default setting)
Click OK.
If you move the pointer into the Document window, the asterisk (*) that appears next to the Pencil tool pointer indicates that you’re about to create a new path.
In the Properties panel, make sure that the fill color is None (
), the stroke color is the dark gray swatch with the tool tip “C=0 M=0 Y=0 K=90,” and the stroke weight is 3 pt.Starting at the red dot on the template labeled “A,” drag clockwise around the dashed template path. When the pointer gets close to where you started the path (the red dot), a small circle displays next to it (
 ). This means that if you release the mouse button, the path will be closed. When you see the circle, release the mouse button to close the path. Note
If the pointer looks like
 instead of the Pencil icon (
 ), the Caps Lock key is active. Caps Lock turns the Pencil tool icon into an X for increased precision.
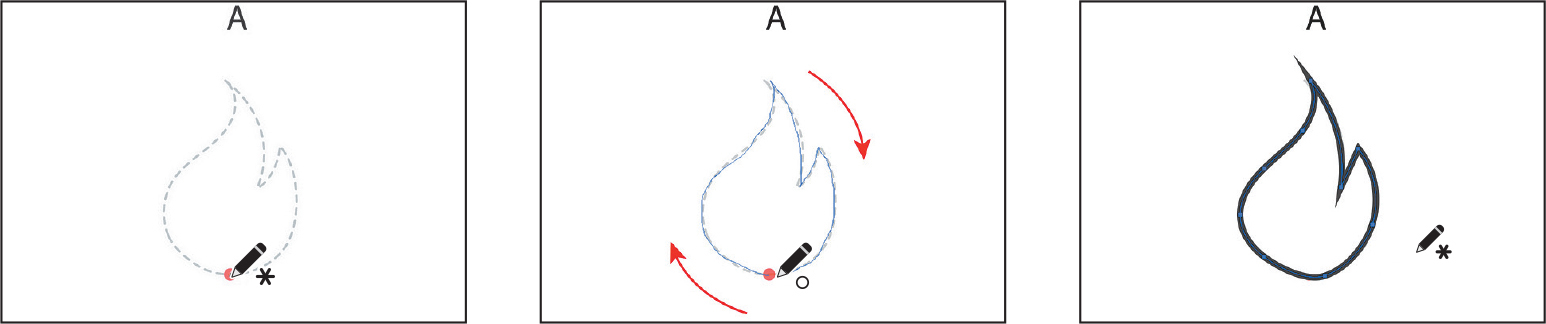
Notice that as you draw, the path may not look perfectly smooth. After releasing the mouse button, the path is smoothed based on the Fidelity value that you set in the Pencil Tool Options dialog box. Next, you’ll redraw a part of the path with the Pencil tool.
Move the pointer on or near the path to redraw a part of it. When the asterisk next to the pointer disappears, press and drag to reshape the path, making sure the pointer begins on the original path and returns to it before releasing the mouse. If both ends of the redrawn path don’t intersect with the original path, you’ll end up creating a separate path alongside the original one.

With the fire shape selected, change the fill color to a red in the Properties panel.

Drawing straight lines with the Pencil tool
In addition to drawing free-form paths, you can create straight lines that can be constrained to 45-degree angles with the Pencil tool. Next, you’ll create a log for the fire using the Pencil tool. The shape you draw could be created by drawing a rectangle and rounding the corners, but we want it to look more hand-drawn, which is why you’re drawing it with the Pencil tool.
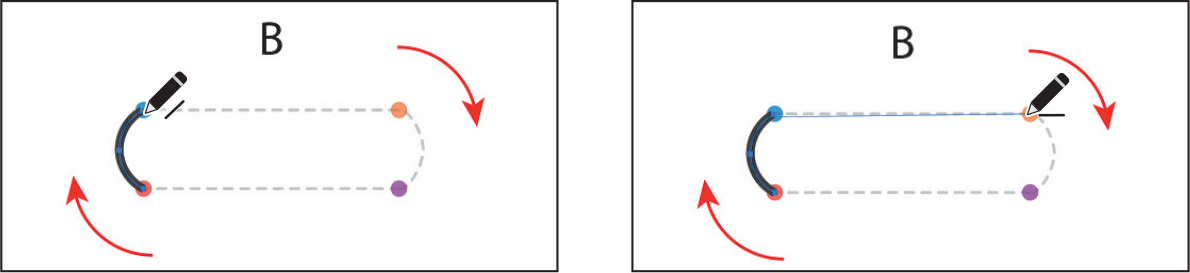
Move the pointer over the red dot on the left side of the path labeled “B.” Press and drag up and around the top of the shape, and release the mouse button when you get to the blue dot and move the pointer away.
The next part of the path you draw will be straight. As you draw with the Pencil tool, you can easily continue drawing paths.
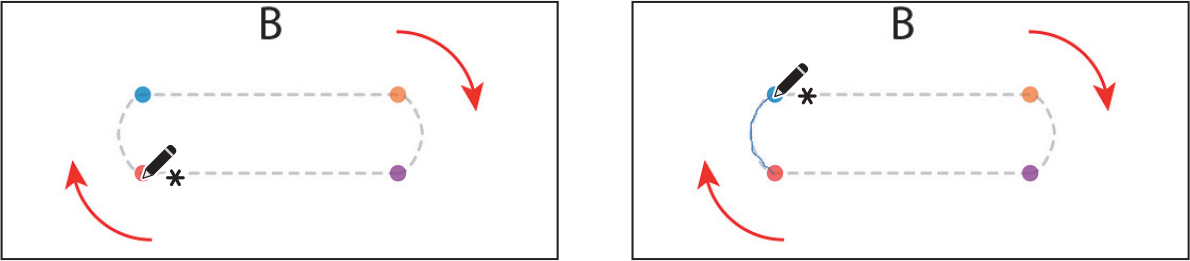
Move the pointer over the end of the path you just drew. When a line appears next to the Pencil tool pointer (
 ), indicating that you can continue drawing the path, press Option (macOS) or Alt (Windows) and drag to the right to the orange dot. When you reach the orange dot, release the key but not the mouse button.
Pressing the Option (macOS) or Alt (Windows) key when you’re drawing with the Pencil tool lets you create a straight path in any direction.
 Tip
TipYou can also press the Shift key when drawing with the Pencil tool and drag to create a straight line that is constrained to 45°.
With the mouse button still held down, continue drawing around the bottom of the template path. When you reach the purple dot, keep the mouse button held down and press the Option (macOS) or Alt (Windows) key. Continue drawing to the left until you reach the start of the path at the red dot. When a small circle displays next to the Pencil tool pointer (
 ), release the mouse button and then the modifier key to close the path.
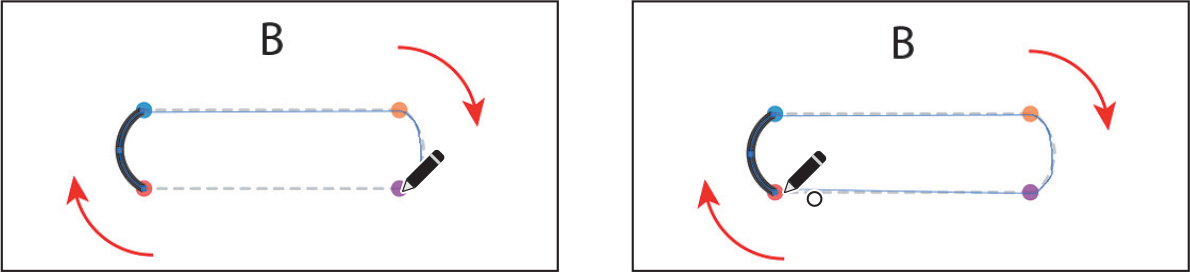
With the path selected, change the fill color to a brown swatch in the Properties panel.
Select the Selection tool (
), and drag the fire shape down onto the log shape.To bring the fire shape on top of the log shape, click the Arrange button in the Properties panel and choose Bring To Front.
Drag across both shapes to select them.

Copy the two shapes by choosing Edit > Copy.
To move to the next artboard, click the Next artboard button (
 ) below the Document window in the Status bar.
To paste the shapes, choose Edit > Paste.
Drag the shapes onto the artwork as you see in the figure.

Joining with the Join tool
In earlier lessons, you used the Join command (Object > Path > Join) to join and close paths. You can also join paths using the Join tool. With the Join tool (![]() ), you can use scrubbing gestures to join paths that cross, overlap, or have open ends.
), you can use scrubbing gestures to join paths that cross, overlap, or have open ends.
Select the Direct Selection tool (
 ), and click the yellow circle on the artboard. The yellow circle will become the center of the flame.
Choose View > Zoom In a few times to zoom in.
Select the Scissors tool (
 ), which is grouped with the Eraser tool (
 ), in the toolbar.
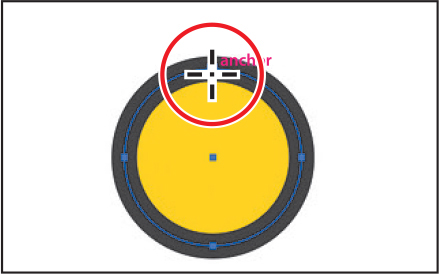
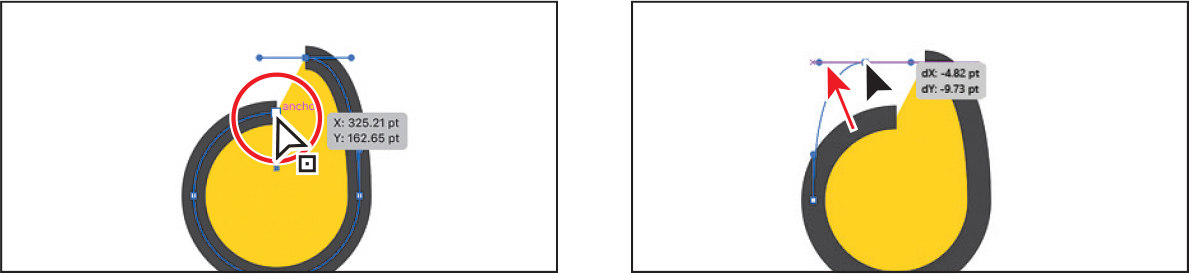
Move the pointer over the top anchor point. When you see the word “anchor,” click to cut the path there.
A message stating that the shape has been expanded appears at the top of the Document window. This circle, by default, was a Live Shape. After cutting the path, it’s no longer a live shape.
Select the Direct Selection tool and drag the top anchor point up and slightly to the right.
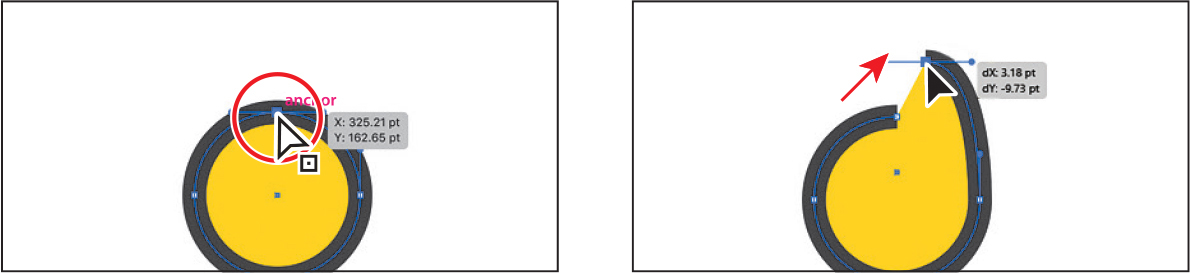
Drag the anchor point on the other end of the path up just to the left. A purple alignment guide will appear when the anchor point is aligned with the first anchor point.
Right now the two endpoints are curved, but they need to be straight.
With the Direct Selection tool selected, drag across the two end points.
In the Properties panel on the right, click the Convert Selected Anchor Points To Corner button (
 ) to straighten the ends of the path.
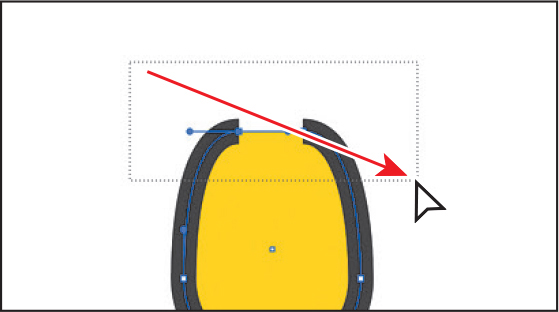
You’ll learn more about converting anchor points in the next lesson.
 Note
NoteYou may want to press the Escape key to hide the extra tools menu.
Click Edit Toolbar (
 ) at the bottom of the toolbar on the left. Scroll in the menu that appears, if necessary, and drag the Join tool (
 ) onto the Pencil tool () in the toolbar to add it to the list of tools. Tip
Pressing the Caps Lock key will turn the Join tool pointer into a precise cursor (
 ). This can make it easier to see where the join will happen. Note
If you were to instead join the ends of the open path by pressing Command+J (macOS) or Ctrl+J (Windows), a straight line would connect the ends.
With the Join tool now selected, drag across the top two ends of the path (see the following figure).
When dragging (also called scrubbing) across paths, they will be either “extended and joined” or “trimmed and joined.” In this example, the ends of the path were extended and joined. Also, the resulting joined artwork is deselected to allow you to continue working on other paths.

Finishing the Camp logo
Now you’ll put everything together to finish the logo.
Choose View > Fit Artboard In Window.
Select the Selection tool (
), and select the yellow shape.To bring the yellow shape on top of the other artwork, click the Arrange button in the Properties panel and choose Bring To Front.
Drag the yellow shape onto the fire shape, aligning it with the bottom of the shape.

Drag the “Camp” text at the bottom of the artboard onto the rest of the logo.
To bring the text on top of the other artwork, click the Arrange button in the Properties panel and choose Bring To Front.
Choose Select > Deselect, and choose File > Save.
Adding arrowheads to paths
You can add arrowheads to both ends of a path using the Stroke panel. There are many different arrowhead styles to choose from in Illustrator, as well as arrowhead editing options. Next, you’ll apply arrowheads to a few paths to finish a logo.
Choose 4 Logo 3 from the Artboard Navigation menu below the Document window to switch artboards.
Click the curved pink path on the left to select it. Press the Shift key, and click the curved pink path to the right, to select it as well.
With the paths selected, click the word “Stroke” in the Properties panel to open the Stroke panel. In the Stroke panel, change only the following options:
NoteWhen you draw a path, the beginning is where you start drawing, and the “end” is where you finish. If you need to swap the arrowheads, you can click the Swap Start And End Arrowheads button (
 ) in the Stroke panel.
Stroke Weight: 3 pt
Choose Arrow 5 from the Arrowheads menu on the right. This adds an arrowhead to the end of lines.
Scale (directly beneath where you chose Arrow 5): 70%
Choose Arrow 17 from the Arrowheads menu on the left. This adds an arrowhead to the beginning of lines.
Scale (directly beneath where you chose Arrow 17): 70%

Experiment with some of the arrowhead settings. Maybe try changing the Scale values or choosing different arrowheads.
With the paths selected, change the stroke color to white in the Properties panel.
Choose Select > Deselect.
Choose File > Save, and then choose File > Close.

Review questions
1 By default, what type of path is created by the Curvature tool, curved or straight?
2 How do you create a corner point when working with the Curvature tool?
3 How can you change the way the Pencil tool (![]() ) works?
) works?
4 Explain how you can redraw parts of a path with the Pencil tool.
5 How do you draw a straight path with the Pencil tool?
6 How is the Join tool different from the Join command (Object > Path > Join)?
Review answers
1 When drawing paths with the Curvature tool, curved paths are created by default.
2 When drawing with the Curvature tool, either double-click an existing point on a path to convert it to a corner or, while drawing, press Option (macOS) or Alt (Windows) and click to create a new corner point.
3 To change the way the Pencil tool (![]() ) works, double-click the Pencil tool in the toolbar or click the Tool Options button in the Properties panel to open the Pencil Tool Options dialog box. There you can change the fidelity and other options.
) works, double-click the Pencil tool in the toolbar or click the Tool Options button in the Properties panel to open the Pencil Tool Options dialog box. There you can change the fidelity and other options.
4 With a path selected, you can redraw parts of it by moving the Pencil tool pointer over the path and redrawing part of it, ending up back on the path.
5 Paths you create with the Pencil tool are free-form by default. To draw a straight path with the Pencil tool, press the Option (macOS) or Alt (Windows) key and drag to create a straight line.
6 Unlike the Join command, the Join tool can trim or extend overlapping paths or the ends of an open path as it joins, and it doesn’t simply create a straight line between the anchor points you are joining. The angle created by the two paths to be joined is taken into account.