
Chapter 7. Creating an Interactive digital Media Publication
Chapter Learning Objectives
![]() Set up a new document for digital media.
Set up a new document for digital media.
![]() Create object animations.
Create object animations.
![]() Control the timing for animations.
Control the timing for animations.
![]() Animate along a motion path.
Animate along a motion path.
![]() Build an image slideshow.
Build an image slideshow.
![]() Add video and audio.
Add video and audio.
![]() Set up control buttons to play interactive elements.
Set up control buttons to play interactive elements.
![]() Insert a Google Map.
Insert a Google Map.
![]() Export digital media projects.
Export digital media projects.
Chapter ACA Objectives
DOMAIN 2.0
UNDERSTANDING PRINT AND DIGITAL MEDIA PUBLICATIONS
2.1 Understand key terminology related to print and digital media publications.
2.4 Demonstrate knowledge of color and its use in the print and digital media publication industries.
DOMAIN 4.0
CREATING PRINT AND DIGITAL MEDIA PUBLICATIONS USING ADOBE INDESIGN
4.1 Create a new project.
4.6 Add interactive elements such as hyperlinks, interactive media objects, HTML5, and video; and assign triggers for different actions.
DOMAIN 5.0
PUBLISH, EXPORT, AND ARCHIVE PAGE LAYOUTS USING ADOBE INDESIGN
5.1 Prepare publications for print.
5.2 Prepare page layouts for export to digital media publications such as multiscreen devices.
In your final project, you’ll learn to create an engaging and interactive digital media publication that you can publish in EPUB and other digital media formats (Figure 7.1). You’ll add animations that move along motion paths on your pages, create an interactive slideshow of images, learn to embed audio and video into your documents, and even add an interactive Google Map. To conclude, you’ll investigate exporting and publishing your publication to a number of interactive formats, such as a fixed-layout eBook and an online document.

Starting with Digital Media
InDesign can be used as a layout tool for many different publication types. From print publications to interactive PDFs, eBooks, apps for mobile devices created with the Adobe Digital Publishing Solution, and online publications. Although most of your projects thus far have been print-based, this time you’ll be going digital.
![]() ACA Objective 2.1
ACA Objective 2.1
![]() ACA Objective 2.4
ACA Objective 2.4
![]() ACA Objective 4.1
ACA Objective 4.1
Document Setup
In Chapter 1, you learned that when you start a new publication, you specify what the intent of the document will be. The New Document dialog box provides three different intents. Can you remember what they were?
![]() Print
Print
![]() Web
Web
![]() Digital Publishing
Digital Publishing
![]() Video 7.1
Video 7.1
Note
This chapter supports the project created in video lesson 7. Go to the Project 7 page in the book’s Web Edition to watch the entire lesson from beginning to end.
As soon as you start to design for digital media, you will work in either Web or Digital Publishing intent. What main settings will differ in your document when compared to Print intent?
![]() The default color mode for the document is RGB. Swatch colors will default to RGB colors as does the transparency blend space.
The default color mode for the document is RGB. Swatch colors will default to RGB colors as does the transparency blend space.
![]() Units of measurement change to pixels.
Units of measurement change to pixels.
As you select either Web or Digital Publishing intent, the Page Size menu in the New Document dialog box provides you with numerous screen and device presets (Figure 7.2).
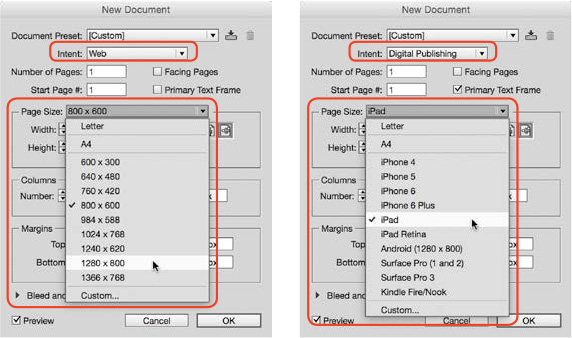
Figure 7.2 Different screen and device presets for web and digital publishing in the New Document dialog box
Interactive PDF
Interactive PDFs support the inclusion of buttons, form elements, and page transitions, as well as media files such as video and audio. Hyperlinks, cross-references, table of contents entries, and index items all become clickable links when viewing the PDF in Adobe Acrobat Reader. Animations and multistate objects (slideshows) are not supported in PDF.
For quick access to all the interactive panels that work with interactive PDF, choose Window > Workspace > Interactive For PDF.
![]() ACA Objective 5.2
ACA Objective 5.2
eBooks
You can create two types of eBooks from InDesign: reflowable EPUB and fixed-layout EPUB. EPUB files are designed for display on an e-reader, such as Kindle or Nook; in e-reader software that runs on your mobile devices, such as Adobe Digital Editions, iBooks (Mac OS, iOS), or Google Play (Android); or with an extension for the Chrome web browser, such as Readium.
Reflowable EPUBs are well suited for text-heavy publications, such as fiction and nonfiction novels. Reflowable means that the text and images flow to the width of the e-reader screen, a bit like web pages do when you make the browser window wider or narrower. When you increase the font size in the e-reader, the text automatically reflows as well. The layout from InDesign is not maintained and the text and images from your InDesign project appear in a linear format.
Fixed-layout EPUBs retain the layout you create in InDesign, and they support animations, media files (audio and video), embedded HTML, and a number of button actions, such as play (for videos) and navigation (for slideshows). Fixed-layout EPUBs work well for illustrated publications that rely on an engaging graphic design, such as comic books, children’s books, cookbooks, or photography books.
Hyperlinks, cross-references, tables of contents, and indexes all become clickable links in fixed-layout and reflowable EPUBs.
![]() ACA Objective 5.2
ACA Objective 5.2
Publish Online (Technology Preview)
By now, you’ll have noticed the Publish Online button at the top of the Control panel, which allows you to publish your design projects to the web. Your designs automatically convert to HTML5, the markup language used for web development; CSS3, which controls the styling and positioning of all the objects in your designs; and JavaScript, which provides some of the interactive control. With Publish Online, your online designs will be accessible through a web address that is automatically generated, and you can even share your publications via social media, such as Facebook, Twitter, and email.
In InDesign CC (2015), Publish Online is still a Technology Preview. Technology previews are features that are still under development, and will likely change between different releases of InDesign.
The Publish Online feature is also available in a number of Export dialog boxes, such as when exporting to print, interactive PDF, or EPUB.
Publish Online supports many of InDesign’s interactive features found in the Digital Publishing workspace, such as animations, audio, video, slideshows with navigation buttons, interactive tables of contents, hyperlinks, cross-references, indexes, and more.
![]() ACA Objective 5.2
ACA Objective 5.2
Digital Publishing Solution
The Adobe Digital Publishing Solution (DPS 2015) allows you to publish apps to the Apple iTunes, Google Play, and Windows stores. These apps provide an engaging and interactive user experience, and they are filled with interactive features such as hyperlinks, slideshows, image sequences, audio, video, pan and zoom photos, web content, and more.
Designs and layouts created for DPS 2015 can be submitted as reflowable HTML or as fixed-layout InDesign files, called articles in DPS 2015. Many of the
InDesign interactive features found in the Digital Publishing workspace (Window > Workspace) are supported in DPS 2015. Unsupported features are animations created with the Animation panel, page transitions, indexes, cross-references, and bookmarks. For a complete overview of supported interactivity features, refer to the online Digital Publishing Solution Help pages on the Adobe website.
Working with Animations and Timing
Animations cause objects to move or transform on the page. With the help of the Animation and Timing panels (Window > Interactive), you can control the type of movement that occurs, for example, the motion path that the object follows as it moves, or the length of time over which that movement occurs.
![]() Video 7.6
Video 7.6
Creating Simple Animations
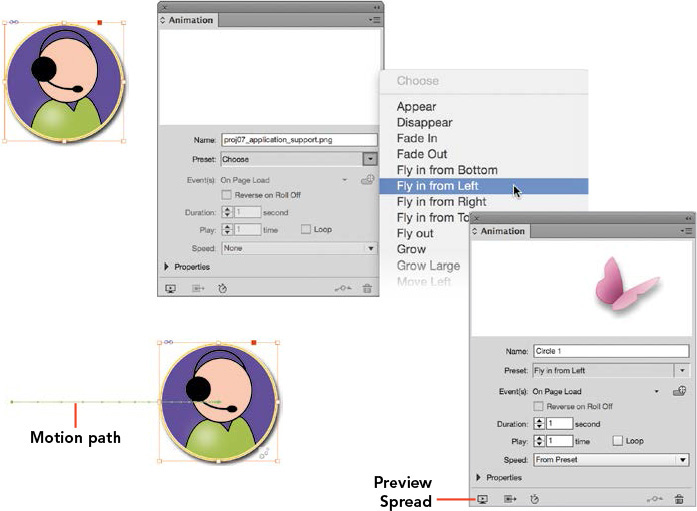
The Animation panel comes with a number of motion presets; these are predefined animations with their own motion path and timing and transform settings applied. The motion presets make it easy to get started with animations.
Applying Presets
InDesign provides so many cool presets. You can make objects fly onto the page from any side or make them dance, fade in, fade out, and much more.
To apply a motion preset (Figure 7.3):
1. Choose View > Screen Mode > Normal to see the motion paths added to the page element.
2. Choose Window > Interactive > Animation to show the Animation panel.
3. Select a page element to animate.
4. Select a motion preset from the Preset menu.
5. Enter a descriptive Name for the animation, such as Circle 1. Once you have created multiple animations on a page and want to start controlling the timing for the animations, it will help if the animations are named appropriately.
6. Enter a value in the Duration field to control the length of time it will take for the animation to complete.
7. Enter the number of times the animation plays in the Play field. To play the animation continuously, select Loop.
8. From the Speed menu, select a speed option to control whether the animation runs at a constant speed, accelerates, or slows down.
![]() From Preset: The selected motion preset settings are used.
From Preset: The selected motion preset settings are used.
![]() None: The animation runs at a constant speed for the length of the animation.
None: The animation runs at a constant speed for the length of the animation.
![]() Ease In: The animation accelerates slowly at the beginning.
Ease In: The animation accelerates slowly at the beginning.
![]() Ease Out: The animation slows down towards the end.
Ease Out: The animation slows down towards the end.
![]() Ease In And Out: The animation starts slowly and finishes by slowing down.
Ease In And Out: The animation starts slowly and finishes by slowing down.
Tip
To get an idea how the different motion presets animate an object, select different presets and move the pointer over the preview area at the top of the Animation panel.
The motion preset with all of its default settings applies to the object. Repeat the process for each animation on the page, and preview the results with the EPUB Interactivity Preview, covered next.
Previewing Interactivity
To see the animation on the page, you can either (Figure 7.4):
![]() Click the Preview Spread button at the bottom of the Animation panel.
Click the Preview Spread button at the bottom of the Animation panel.
![]() Choose Window > Interactive > EPUB Interactivity Preview.
Choose Window > Interactive > EPUB Interactivity Preview.
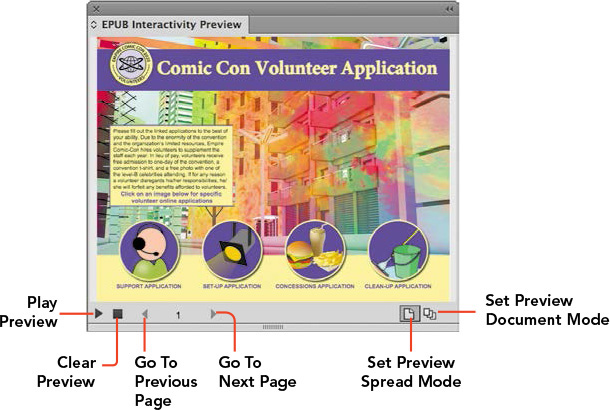
The EPUB Interactivity Preview panel appears, and the animation on the active page automatically plays.
The EPUB Interactivity Preview lets you preview a complete interactive InDesign document, test animations, test button controls, play movies, navigate slideshows, and more. You can drag the corners or sides of the EPUB Interactivity Preview panel to make the panel larger if needed.
To preview all of the pages in a document, click the Set Preview Document Mode button at the bottom of the EPUB Interactivity Preview panel, then click the Play Preview icon. Click the Go To Next Page and Go To Previous Page buttons to navigate to the different pages.
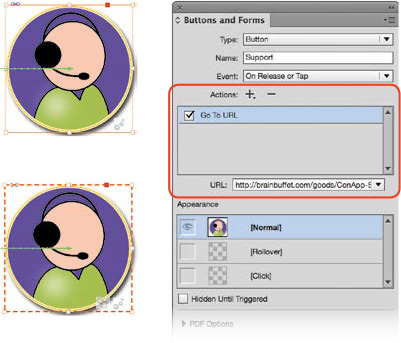
Creating a Hyperlink Button
In earlier chapters, you were introduced to hyperlinks. Can you remember how you applied them? You used the Hyperlink panel to apply a hyperlink to selected text or an object.
![]() Video 7.7
Video 7.7
There is another technique you can use when working with interactive documents: Any design element can be converted to a button, and the action for the button set to navigate to a web address. Before you convert the object to a button, copy the web address.
To create a hyperlink button (Figure 7.5):
1. Using the Selection tool, select the object or group to serve as the button.
2. Choose Object > Interactive > Convert To Button. Or, in the Buttons And Forms panel, select Button from the Type menu.
3. Enter a Name for the button.
4. Leave the Event set to On Release Or Tap.
5. Select Go To URL from the Action menu (+).
6. Enter or paste the web address in the URL field.
Tip
You can convert an animated object to a button without losing its animation.
![]() ACA Objective 4.6
ACA Objective 4.6
Controlling Animation Timing
Without further action, animations play in sequential order, one after the other. The first animation you created on a page plays first, followed by the second and so on. There might be times when you want to change the order in which animations play, or you might want multiple animations to start playing at the same time.
You can use the Timing panel (Window > Interactive) to change the order in which animations play, set multiple animations to play at the same time, and add a delay to an animation.
One reason for delaying an animation could be that you want to ensure that the full page is loaded and visible before any animations start playing. In that case, set a delay timing on the first animation in the Timing panel.
To change the timing for animations (Figure 7.6):
1. Choose Window > Interactive > Timing to show the Timing panel.
2. To change the order in which animations play, drag an animation up or down in the Timing panel and release when you see a thicker line at the insertion point.
3. Enter a Delay amount for a selected animation to prevent that animation from playing immediately.

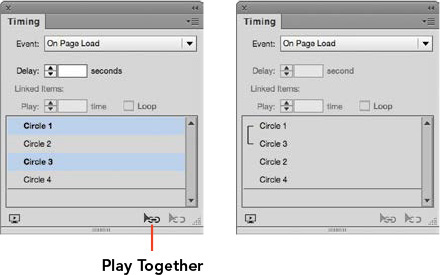
You can also group animations so that they play at the same time.
Tip
To select a continuous range of animations in the Timing panel, Shift-click the first and last animation in the range.
To play several animations at the same time (Figure 7.7):
1. In the Timing panel, Ctrl-click (Windows) or Command-click (Mac OS) the animations you want to group together.
2. Click the Play Together button at the bottom of the Timing panel.
![]() ACA Objective 4.6
ACA Objective 4.6
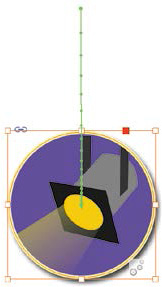
Working with Motion Paths
Many of the motion presets automatically add a motion path to the animated object. This path is visible as a green line when the Screen Mode is set to Normal and you select the animated object on the page. The motion path is the guide for the movement of the animation, and as such it provides some valuable information (Figure 7.8):
![]() Video 7.12
Video 7.12
![]() The motion path is an arrow that indicates the direction of the animation.
The motion path is an arrow that indicates the direction of the animation.
![]() The dots along the path indicate the speed of the animation. Where dots are closer together, the speed is faster.
The dots along the path indicate the speed of the animation. Where dots are closer together, the speed is faster.
To see where an animation starts or finishes, click the Show Animation Proxy button at the bottom of the Animation panel (Figure 7.9). A gray preview shows you the start or end position.
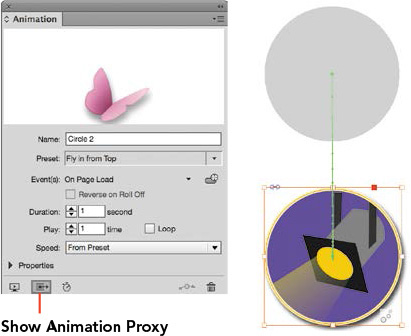
Figure 7.9 Showing the animation proxy makes it easier to see where an animation starts or finishes.
Note
The Animation Proxy can appear at the start or end of an animation, depending on the direction of the animation.
Editing the Motion Path
You might not always be happy with the default start or end positions created by motion presets for your animations. For example, when using the Fly In From Top motion preset, you might want to extend the motion path so that the animation starts off the page and then flies in. Not to worry! You can edit a motion path the same way you have learned to edit paths earlier in this book. Can you remember which tools you used to edit paths?
Tip
You can also use the Pen tool to extend the motion path: First, select the path with the Direct Selection tool, then click the end point with the Pen tool. Each time you click (or click and drag) with the Pen tool, you add another anchor point extending the path.
You can use the Direct Selection tool to select the anchor points on a motion path and reposition them. To edit a motion path (Figure 7.10):
1. Choose View > Screen Mode > Normal.
2. Using the Direct Selection tool (![]() ), click the motion path.
), click the motion path.
3. Drag the anchor point at the end of the motion path to a new position.
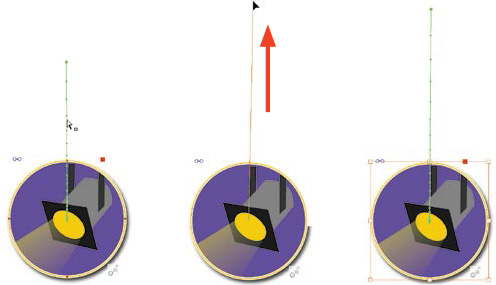
With the motion paths edited, preview the result in the EPUB Interactivity Preview panel, and make further adjustments as desired.
![]() ACA Objective 4.6
ACA Objective 4.6
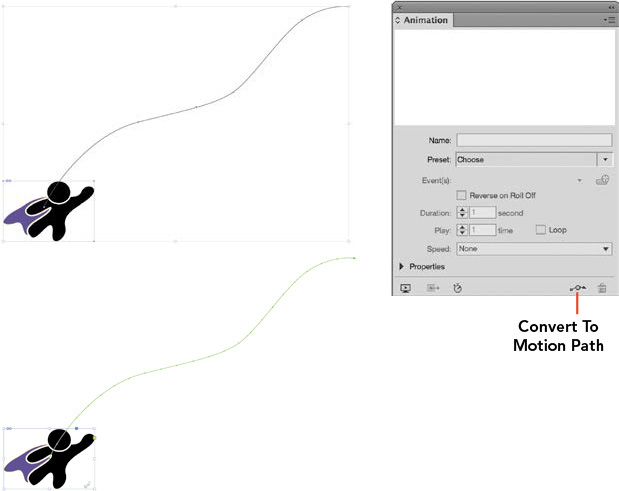
Creating a Custom Motion Path
Instead of editing a motion path that is created through a preset, you can also animate an object along a freeform path you’ve drawn with the Pencil tool or Pen tool in InDesign.
To add an animation to a custom motion path (Figure 7.11):
1. Shift-click the object to animate and the path you have drawn.
2. With both objects selected, click the Convert To Motion Path button at the bottom of the Animation panel.
Animation Properties
A number of fun animation properties are revealed when you click the disclosure triangle to the left of Properties in the Animation panel. For example, you can make an object shrink to a smaller size (Scale) as part of the animation, or have it disappear by applying a Fade Out Opacity setting.
Tip
A number of motion presets also change various properties in the Animation panel. You can adjust the properties set for those presets to customize the animation.
To change any properties for an animation (Figure 7.12):
1. Select an animated page element.
2. Click the disclosure triangle to the left of Properties in the Animation panel to reveal the additional options. Select the preferred animation options:
![]() Animate: With this setting, you control whether the animation properties you apply change the size, rotation angle, and position of the object that is being animated. To Current Appearance applies the animation properties so that the current appearance of the object is the end result. From Current Appearance applies the properties to the current appearance, and results in a different object appearance at the end of the animation.
Animate: With this setting, you control whether the animation properties you apply change the size, rotation angle, and position of the object that is being animated. To Current Appearance applies the animation properties so that the current appearance of the object is the end result. From Current Appearance applies the properties to the current appearance, and results in a different object appearance at the end of the animation.
![]() Rotate: Objects can rotate as part of an animation. Use the reference point markers to control around which point of an object you want to rotate or scale an object.
Rotate: Objects can rotate as part of an animation. Use the reference point markers to control around which point of an object you want to rotate or scale an object.
![]() Scale: You can change the size of an object during the animation. Values lower than 100% will reduce the size and values higher than 100% will make the object grow.
Scale: You can change the size of an object during the animation. Values lower than 100% will reduce the size and values higher than 100% will make the object grow.

![]() Opacity: You can gradually make an object appear (Fade In) or disappear (Fade Out).
Opacity: You can gradually make an object appear (Fade In) or disappear (Fade Out).
![]() Visibility: You can hide animated objects on the page until they are animated, and hide them again after animation.
Visibility: You can hide animated objects on the page until they are animated, and hide them again after animation.
![]() ACA Objective 4.6
ACA Objective 4.6
Adding a Control Button
Part of creating an interactive design is giving readers an engaging experience when they move through a digital media publication. Adding button controls for interacting with pages and content is one way of engaging the reader.
So far, the animations have started automatically on page load. Let’s look at a simple technique you can use to work with a button that starts the animation. Before you start, make sure you:
![]() Have the animation applied to an object.
Have the animation applied to an object.
![]() Added a design element on the page that will become the button.
Added a design element on the page that will become the button.
To control an animation with a button (Figure 7.13):
1. Select the animated object on the page.
2. From the Event(s) menu in the Animation panel, deselect On Page Load so no events are active.
3. Click the Create Button Trigger icon in the Animation panel. The appearance of the pointer becomes a target.
4. Click the button design element on the page. The Buttons And Forms panel opens and you’ll see that InDesign has done all the hard work for you!
The design element is converted to a button, and an action is applied that will play the animation you selected in step 1. How cool is that? You can still enter a Name and Description for the button to complete the process.
Embedding Media Files
Adding video to your digital media publication enables you to tell a story through moving images and sound. This is highly engaging for the person viewing the publication. Video is therefore a very popular design element to add to interactive designs. Similarly, adding sound gives the reader an enhanced interactive experience.
![]() Video 7.9
Video 7.9
Adding video
Although you can import a number of different video file formats into InDesign, such as QuickTime (MOV), Flash Video (FLV, F4V), or SWF files, the one format that works for all digital media publication types (Interactive PDF, Fixed Layout EPUB, Publish Online, and DPS) is H.264-encoded MP4. This format also works on all operating systems (iOS, Android, Windows, Mac OS).
Tip
Video file sizes can be quite large. Consider keeping your embedded videos short and below about 10–15MB in file size, especially when your digital media publication is published through an online format that requires downloading.
Placing Video
To add a video to your publication (Figure 7.14):
1. Choose File > Place and navigate to the location of the video file.
2. The pointer turns into a loaded video icon (![]() ).
).
3. Using the Pages panel or other navigation options, display the page where you want to add the video.
4. Drag to create a new frame. The video will automatically resize to fit in the frame.
5. Choose Object > Fitting > Fit Frame To Content to reduce the size of the media frame so that it is the same size as the video.
Using the Media Panel
The placed video file appears like a static image on the page. You can’t access the video controller buttons, such as play, pause, or stop from the media frame. Thankfully, the Media panel (Window > Interactive) comes to the rescue. You can use the Media panel to play the video, as well as set playback controls for the video.
Note
The Media panel plays only video or audio file formats that are compliant with the Flash Player. A warning will appear in the preview area at the top of the panel if the placed file is not compliant.
Additionally, clicking the Place A Video Or Audio File button at the bottom of the Media panel provides an alternate method for adding video or audio to your design (Figure 7.15).
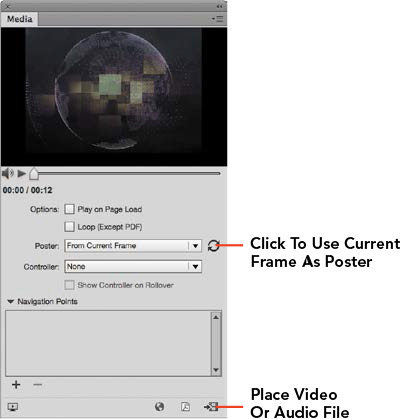
To change the media settings for the video (Figure 7.16):
1. Using the Selection tool, click the media frame to select the video.
2. Choose Window > Interactive > Media to display the Media panel.
3. To preview the video, click the Play button below the video preview area.
4. To mute or unmute the audio, click the Audio button below the preview.
Warning
Always test whether video controllers work as expected. They will work in Interactive PDF. However, EPUB export settings, Publish Online, and DPS 2015, for example, ignore the controller settings applied in the Media panel, and instead add a standard controller to the video. As a work-around, you could try hiding the controllers by placing an object over the top of it.
5. Select Play On Page Load to automatically start playing the video when you get to the page with the video on it. Select Loop to play the video continuously.
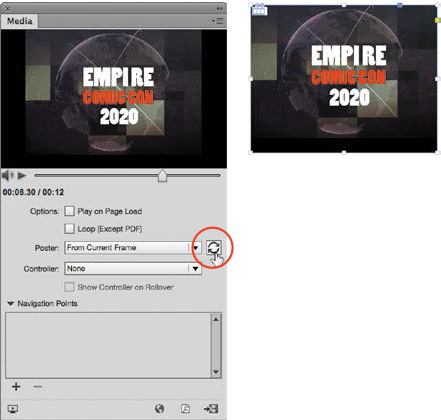
6. The Poster is the image that you see when the page is first loaded. You can select Choose Image from the Poster menu, and then select any image on your system as a poster image.
You can also capture a video frame from anywhere in the video and use that as the poster. To do this, move the play head in the Media panel to the spot in the video you want to capture, and then click the Click To Use Current Frame As Poster icon.
7. Select whether or not you want to add a controller to the video on the page. If you choose not to add a controller, and deselected Play On Page Load, you’ll need to add additional control buttons to the video page so that the reader is able to play and stop the video.
Adding Control Buttons
When the video controller is hidden from the reader, you can add custom-designed buttons to the page to play, pause, resume, or stop the video.
To add a play button for video (Figure 7.17):
1. Create and format objects to serve as the buttons.
2. Using the Selection tool, select the object or group that is the button design element on the page.
3. Select Video from the Action menu (+) in the Buttons And Forms panel. The selected object or group is automatically converted to a button.
4. From the Video menu, select the video on the page. If there is only one video on the page, the video is automatically selected.
5. From the Options menu, select Play to create a button that will start the video playback when clicked.
6. Enter a descriptive name for the button in the Name field.
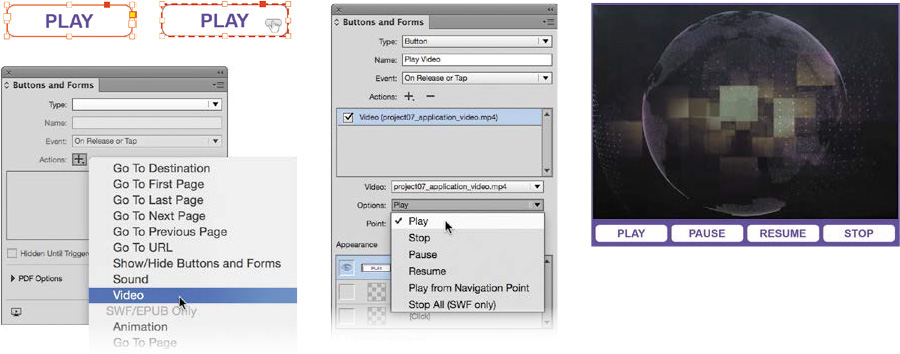
To add a stop, pause, or resume button for the video, repeat steps 1 through 5; but for step 4, select Stop, Pause, or Resume from the Options menu, respectively.
![]() ACA Objective 4.6
ACA Objective 4.6
Adding Audio
Although you can place AIFF and WAV audio file formats in InDesign, the recommended audio file format is MP3 because it works for Interactive PDF, Fixed Layout EPUB, Publish Online, and DPS 2015 publications.
To place an audio file (Figure 7.18):
1. Choose File > Place and navigate to the location of the audio file. Select the file, and the pointer turns into a loaded audio icon (![]() ).
).
2. Click the page to place the audio file.
3. With the Selection tool, click the media frame to select it.
4. Choose Window > Interactive > Media to show the Media panel.
Warning
As with video, audio controller settings applied via the Media panel might be ignored for certain export formats, and a default controller would appear when a page with embedded audio is displayed. Be sure to test your files.
5. Select an option to specify when the audio starts to play. Play On Page Load automatically starts playing the audio file when the reader turns to the page with audio on it. Stop On Page Turn stops playing the audio when the reader moves to another page. Loop plays audio continuously.
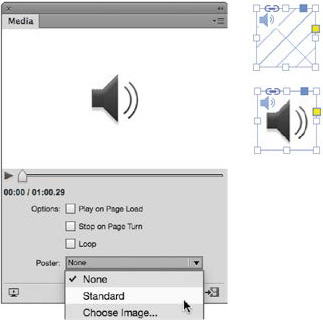
6. Select a Poster option. None displays no poster image in the media frame that contains the audio. Standard displays a default audio icon you see in the media panel. Choose Image allows you to select a custom image as a poster image.
Tip
Audio controllers are squashed into the available media frame space they are given. To increase the width of the controllers on the page, increase the width of the media frame.
To convert video or sound files to a supported or recommended file format, such as H.264-encoded MP4 (video) or MP3 (audio), you can use the Adobe Media Encoder. The encoder is one of the applications you can install as part of Adobe Creative Cloud.
Creating a Slideshow
Slideshows are a series of images that are positioned in the same location on the page and displayed one after another. They are great to use in digital media publications as they allow you to showcase a number of images without needing to insert more pages into your design.
![]() Video 7.10
Video 7.10
Building a Multi-State Object
Slideshows in InDesign are created using a multi-state object. A multi-state object (MSO) is an object that behaves as a single page element but contains different “layers” of content, called states. Only one state within an MSO is visible at a time, and generally a button control is added to allow the reader to see each state within the MSO. For example, when you create an image slideshow as a multi-state object, the various images (slides) of the slideshow are the individual states, and by clicking a “next slide” button you can see the different images, one at a time.
Before you can create a multi-state object that becomes an image slideshow, you must first place a number of images on a page. Can you think of some ways in which you can create a stack of images that are all the same size on the page?
Placing the Images
If your source images are all different sizes or proportions, and you want to create a stack of images that are an identical size, consider doing the following (Figure 7.19):
1. Create an empty placeholder frame on the page with the Rectangle Frame tool. Make it the exact size you want the slide to be.
2. Select the frame.
3. Choose Edit > Step And Repeat. This feature lets you quickly create a series of duplicate frames.
4. Enter the amount of additional frames to create in the Count field.
5. Enter amounts in the Vertical and Horizontal Offset fields, so that the frames you create are slightly offset. Click OK.

You can now place the images into the frames.
Tip
Apply Frame Fitting Options (Object > Fitting) to the empty placeholder frames before placing the images into the frames.
Aligning the Images
The last thing to do is ensure that the top and left sides of all the images are aligned.
To align the images (Figure 7.20):
1. Using the Selection tool, select all the images. You can drag a marquee around them or Shift-click each.
2. Choose Window > Object & Layout > Align to show the Align panel.
3. In the Align panel, click the Align Top Edges icon.
4. Click the Align Left Edges icon.

Tip
To vertically and horizontally center all images, click Align Horizontal Centers and Align Vertical Centers in the Align panel. This is particularly handy when the images have different sizes.
The images are now placed in a perfect stack, and you are ready to turn this stack of images into a multistate object.
Creating a Multi-State Object
With the images all stacked on top of each other, you are ready to convert the stack of images into a multi-state object with different states for each image.
Tip
MSOs are not restricted to images only. You can also convert text frames to MSOs. When you want to combine text and images as part of a slideshow, first group each state, before converting selected objects to an MSO.
To create a multistate object (Figure 7.21):
1. With the Selection tool, drag a marquee around the images to select them.
2. Choose Window > Interactive > Object States.
3. Select New State from the Object States panel menu, or click the Convert Selection To Multi-State Object button at the bottom of the Object States panel.
4. Enter the Object Name for the slideshow.
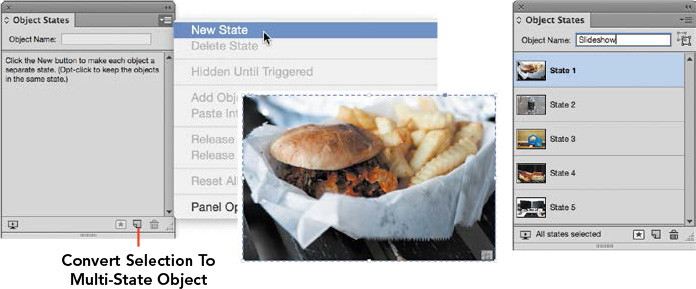
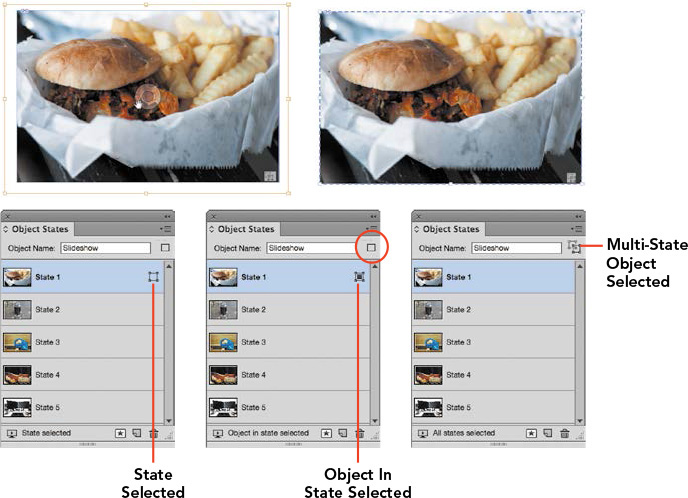
The stack of images is combined into a single object. Within the Object States panel, you can click the individual states to see each image.
Adding an Object Name for a slideshow is helpful when you have different slide-shows on the same page, and want to add controller buttons to navigate through the slides. Also, if the digital media publication is designed for DPS 2015, the names of multi-state objects are used for analytical purposes. This gives the publisher an idea of the interactive objects that the readers interact with the most.
Tip
For more complex multi-state objects, such as states that consist of text and images, consider designing each state in a different layer. This way you can hide the layers you are not working on and focus on the design for each state.
To edit the content of individual states, for example, to crop an image differently, do this after you have created the multistate object (Figure 7.22):
1. Select the multi-state object on the page.
2. In the Object States panel, click the state you want to edit. A small rectangle appears to the right of the state name to indicate that the state is selected.
3. With the Selection tool, click the Content Grabber to select the image and resize or reposition it as needed. The icon to the right of the state changes to indicate that an object in the state is selected (in this case, the frame’s content).
4. To select the multi-state object again, click the icon to the right of the Object Name.
Tip
To edit objects within a state, double-click the object with the Selection tool. This isolates the object so you can edit it more easily.
Changing the Stacking Order
The order in which the images will appear in the slideshow is set by the order they appear in the Object States panel. The topmost object displays first.
To change the order in which images appear (Figure 7.23):
1. Select the multi-state object on the page.
2. In the Object States panel, select a state and drag it to its new position.
3. Release the mouse button when you see a thick line appear at the insertion point.

Apply Interactive Overlay Settings
When designing for Adobe Digital Publishing Solution, interactive overlays are the design elements in your layout that contain interactivity. When the project is published, these elements appear above the static elements in your design.
The Overlays panel (Window > Overlays) is part of the Digital Publishing Solution tools that install in InDesign. It is used to apply playback settings for slideshows, hyperlinks, video, and audio and any other interactive elements supported by DPS 2015.
For example, DPS 2015 provides an auto-play setting for slideshows, which makes the images appear one after another when the page is loaded in the app. It also lets you add a cross-fade as a transition between the images, fading out one image and at the same time fading in the next one.
To apply overlay settings (Figure 7.24):
1. Select the interactive object, for example, a multi-state object on the page.
2. Choose Window > Overlays to show the Overlays panel.
3. In the Overlays panel, select the desired playback settings for the slideshow, such as Auto Play. Enter a Cross-Fade amount to control the blend speed between images in the slideshow. Cross-Fade shows a gradual blend between two images as they transition from one to the next.

Figure 7.24 The Overlays panel is used to apply playback settings for interactive design elements in publications that are published with DPS 2015.
Note
To preview and test interactive overlays for DPS 2015, you can use the DPS Preflight app, which is available for the iTunes App Store, Google Play Store, and Windows Store. However, note that you must have access to an Adobe Digital Publishing Solution account in order to preview content.
For more information about DPS 2015 and working with interactive overlays, refer to the Digital Publishing Solution Help on the Adobe website.
![]() ACA Objective 4.6
ACA Objective 4.6
Adding Control Buttons
To allow the reader of the fixed-layout EPUB or web version of the digital media publication to see the different slides in the slideshow, you must add some control buttons. These allow the reader to access the different states of the multi-state object.
To work with button controls for slideshows:
![]() Create a multi-state object.
Create a multi-state object.
![]() Add button design elements to the page design. These can be images or graphics you created in Photoshop or Illustrator and placed on the page, or they can be shapes created in InDesign that are either a single object, such as a text frame with some text, or grouped objects.
Add button design elements to the page design. These can be images or graphics you created in Photoshop or Illustrator and placed on the page, or they can be shapes created in InDesign that are either a single object, such as a text frame with some text, or grouped objects.
To add a controller button to show the next slide in the slideshow (Figure 7.25):
1. Using the Selection tool, select the object or group to serve as the button.
2. Choose Object > Interactive > Convert To Button, or in the Buttons And Forms panel, select Button from the Type menu.
3. Enter a Name for the button.
4. Leave the Event set to On Release Or Tap.
5. From the Action menu (+), select Go To Next State.
6. From the Object menu, select the multi-state object. If there is only one multi-state object on the page, InDesign will automatically select this multi-state object.
7. Deselect Stop At Last State if you want the slideshow to loop back to the first state in the multi-state object when the Next Slide button is clicked or tapped.
8. Click the Preview Spread button at the bottom of the Buttons And Forms panel to test the button in the EPUB Interactivity Preview panel.
Figure 7.25 Adding an action to a button that goes to the next state in the slideshow (multi-state object)
To add a controller button that navigates to the previous slide in the slideshow, repeat steps 1–6, but in step 5 select Go To Previous State from the Action menu (+) instead.
Inserting HTML
You might wonder why you would want to ever insert HTML, the markup language used for the creation of web pages, in your InDesign publications. HTML allows you to embed content from the Internet into your digital media publications. For example, you can embed an online Vimeo video, YouTube video, or Google Map.
![]() Video 7.11
Video 7.11
The first step to take when embedding web-based content into a digital publication is to obtain the embed code. That sounds a little scary, but websites that allow their content to be embedded often provide a special share button that helps you locate the embed code.
Let’s look at Google Maps as an example (Figure 7.26):
1. Start by opening your default web browser.
2. Enter maps.google.com in the URL field at the top of the browser window, and press Enter (Windows) or Return (Mac OS).
3. Enter the address or location you want to locate in the Search Google Maps field at the top left of the screen. In the example, the location is Pioneer Park in San Francisco.
4. Click the menu at the top left, and select Share Or Embed Map.
5. Click Embed Map. Select the preferred map size from the Size menu, for example, Medium.
6. Click the <iframe> code at the top of the screen and choose Edit > Copy to copy the text to the clipboard.
7. Back in InDesign, navigate to the page to place the map on.
8. Choose Object > Insert HTML.
9. In the Edit HTML dialog box, select the default text.
10. Choose Edit > Paste to insert the embed code.
Tip
To avoid issues with some e-readers, you can remove the allowfullscreen text from the pasted embed code.
11. Click OK.
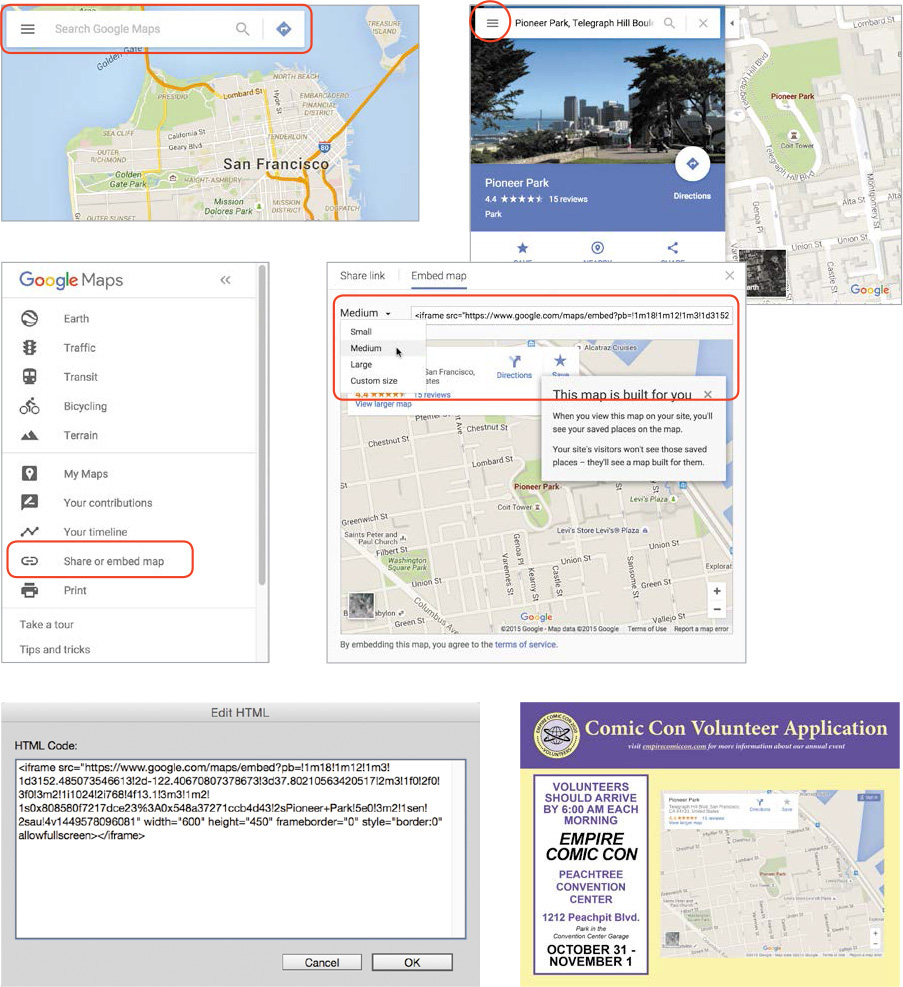
It might take a few seconds for the embed code to render on the page. But, as the end result you’ll see the map on the InDesign page. When your digital media publication is published to Fixed Layout EPUB export, Publish Online, and DPS 2015, an interactive Google Map will appear on the page.
Exporting the Project
At the start of this chapter, we mentioned a number of different interactive digital media projects you could design with InDesign. As you have seen, many of the interactive features work across a number of publication types, from Interactive PDF to eBooks to publishing online.
It’s time to export your project and test the new interactive features in the finished publication.
![]() ACA Objective 5.1
ACA Objective 5.1
Exporting to EPUB
You can create two types of EPUBs from InDesign: a reflowable EPUB and a fixed-layout EPUB. Only the fixed layout supports the interactive features, such as animations and slideshows.
![]() Video 7.12
Video 7.12
To test your EPUB, you’ll need access to an e-reader.
If you work on Mac OS 10.9 or higher, you’ll be able to use the iBooks application for this. Adobe has also released an e-reader called Adobe Digital Editions. You can download it from the Adobe website, and it is available for Windows, Mac OS, and iOS (iPad). The latest version can display reflowable and fixed-layout EPUBs.
To export your publication as a fixed-layout EPUB (Figure 7.27):
1. Choose File > Export.
2. Select EPUB (Fixed Layout) from the Save As Type (Windows) or Format (Mac OS) menu.
3. Enter a Name for the eBook in the File Name (Windows) or Save As (Mac OS) field.
4. Click Save. The EPUB – Fixed Layout Export Options dialog box appears.
5. Click General in the scroll list at the left, and select the preferred settings.
![]() Export Range: Select All Pages to export the complete document. You can also enter a page range.
Export Range: Select All Pages to export the complete document. You can also enter a page range.
![]() Cover: Select Rasterize First Page to add a cover image based on the first page in your document. You can also select Choose Image, and use a custom image file as the cover image for your book.
Cover: Select Rasterize First Page to add a cover image based on the first page in your document. You can also select Choose Image, and use a custom image file as the cover image for your book.
Tip
Continuous page ranges are separated by a hyphen; for example, 1-3 would include pages 1, 2, and 3. Noncontinuous page ranges are separated by a comma; for example, 1, 4 would include only page 1 and 4.
![]() Navigation TOC: Select None for short interactive publications. For longer digital media publications, select Multi Level (TOC Style), and select a table of contents style you created (Layout > Table Of Contents Styles) in the document. The File Name option is useful when you create an EPUB from a collection of InDesign documents you combined into a book. Bookmarks let you create a custom table of contents based on what is listed in the Bookmarks panel (Window > Interactive > Bookmarks). Creating a Navigation TOC adds an easily accessible table of contents to the user’s e-reader that allows access regardless of where the reader is in the book (without the need to turn back to a physical table of contents you might have added to the front matter of the publication).
Navigation TOC: Select None for short interactive publications. For longer digital media publications, select Multi Level (TOC Style), and select a table of contents style you created (Layout > Table Of Contents Styles) in the document. The File Name option is useful when you create an EPUB from a collection of InDesign documents you combined into a book. Bookmarks let you create a custom table of contents based on what is listed in the Bookmarks panel (Window > Interactive > Bookmarks). Creating a Navigation TOC adds an easily accessible table of contents to the user’s e-reader that allows access regardless of where the reader is in the book (without the need to turn back to a physical table of contents you might have added to the front matter of the publication).
Note
Keep in mind that by rasterizing the first page for the cover image, the cover will appear twice when the eBook is viewed. First the rasterized version, and secondly the converted InDesign page, which is converted to HTML.
![]() Spread Control: The Spread Control menu lets you choose whether pages appear as single pages or page spreads in the e-reader. Select Based On Document Setup to use the setup from the document (facing pages appear as spreads, and single pages as pages). To publish single pages as spreads, select Convert Spread To Landscape Page, or Enable Synthetic Spreads. Select Disable Spreads to publish facing pages as single pages.
Spread Control: The Spread Control menu lets you choose whether pages appear as single pages or page spreads in the e-reader. Select Based On Document Setup to use the setup from the document (facing pages appear as spreads, and single pages as pages). To publish single pages as spreads, select Convert Spread To Landscape Page, or Enable Synthetic Spreads. Select Disable Spreads to publish facing pages as single pages.
6. Click Conversion Settings in the scroll list at left.
The Conversion Settings control the file format of the exported images. As an EPUB is HTML based, images export in JPEG, PNG, or GIF format. The Format menu lets you select whether you want InDesign to automatically select the export format for the image, or you can force the images to be exported as JPEG, GIF or PNG images. For JPEG and GIF, you can select additional export settings.
Note
CSS stands for Cascading Style Sheets, which are used to control how HTML appears on the page. Under the hood, InDesign eBooks are HTML based, so attaching CSS could overwrite any CSS formatting created by InDesign itself.
7. The CSS and JavaScript options in the scroll list at left enable you to attach CSS or JavaScript files to the EPUB.
Note
JavaScript is a programming language that works with HTML and CSS; it can be used to add more interactive effects to your publication.
8. Click Metadata in the scroll list at left, and enter information in the metadata fields.
Metadata is used to provide additional information about the EPUB file you’re creating. The Identifier for a book you publish and distribute online would be an ISBN or other unique sequence of characters. ISBN is an International Standard Book Number.
Tip
You can add metadata to any InDesign document. Choose File > File Info. Data in the File Information dialog box is automatically used to populate the EPUB metadata.
9. Click Viewing Apps in the scroll list at left and select apps to use for previewing the EPUB once it’s exported. Click Add Application to add newly installed e-readers, such as Adobe Digital Editions, to the list of viewing apps.
10. Click OK to export and view the EPUB.
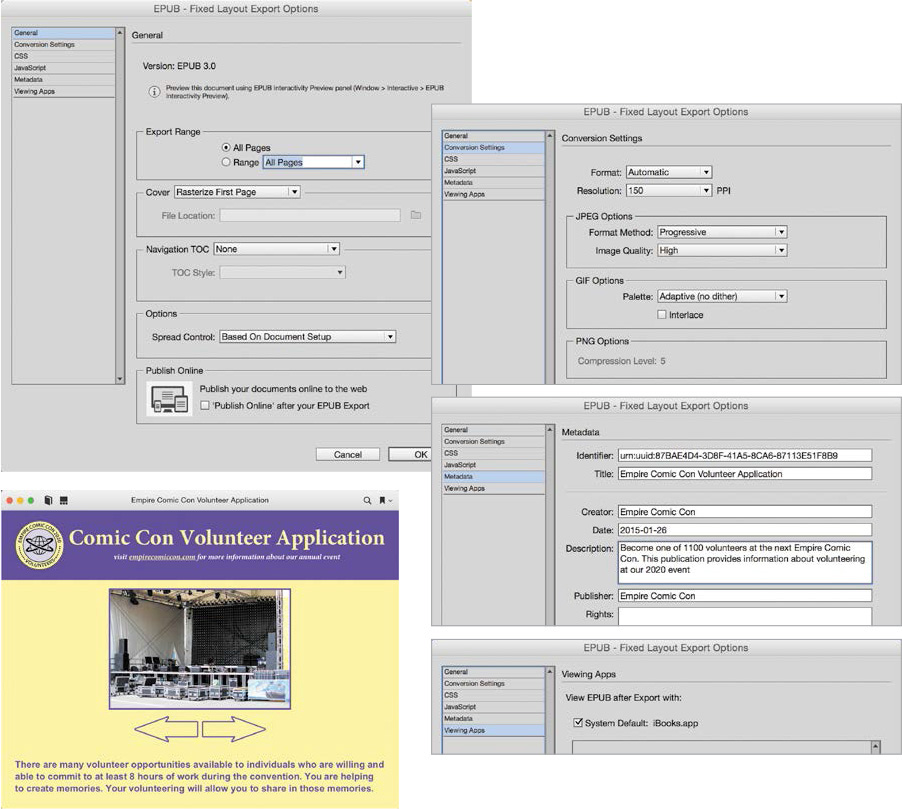
With the EPUB published, you can now go through all the pages in an e-reader and test the many interactive features you added to the project.
Publishing Online
Publish Online lets you publish your digital media design to the Internet and share it publicly. Most of the interactive features will work, including animations (Figure 7.28).
Figure 7.28 An interactive digital media publication published from InDesign viewed in a web browser
To publish your interactive project online (Figure 7.29):
1. Choose File > Publish Online (Preview) or click the Publish Online button in the Control panel. The Publish Online Options dialog box opens.
2. Click General at left.
3. Select Publish New Document to create a new online publication. If you’ve previously published a project, you can select Update Existing Document to make a change to the online version.
4. Enter the Title for the project.
5. Enter a brief description of the project.
6. Select All from Pages. This publishes all pages of the InDesign project.
7. Select Pages from the Export As section.
8. Optional: Select Allow Viewers To Download The Document As A PDF (Print) to allow readers to download a PDF copy of the published online version of the document. Keep in mind that this is a static version of the publication, without any interactivity.
9. Click Advanced in the scroll list at left to access additional export options.
![]() Select the Cover Thumbnail option.
Select the Cover Thumbnail option.
![]() Select the Image settings to use. Images can be exported in one of three web formats: JPEG, PNG, or GIF.
Select the Image settings to use. Images can be exported in one of three web formats: JPEG, PNG, or GIF.
10. Click OK to start the file upload to the web.

When the document upload is completed, you can click View Document to view the project in your default web browser. You can also copy the web address (URL) so you can share it with others, as well as share the project through various social media networks, such as Facebook and Twitter.
The projects you published online can be managed and deleted as necessary.
To manage online publications:
![]() Choose File > Web Dashboard. A web page opens in your default web browser, and you might be prompted to Sign In with your Adobe ID (email) and password.
Choose File > Web Dashboard. A web page opens in your default web browser, and you might be prompted to Sign In with your Adobe ID (email) and password.
Once logged in, you can access all of your online publications. Click the publication name to load the publication in the browser. To delete a publication, move the mouse over the publication name in the Publications list and click the Delete icon at right.
Exporting for DPS 2015
Designs you create for DPS 2015 in InDesign must be exported in a special DPS Article file format, and then uploaded to the Adobe Digital Publishing Solution, where they will become part of the content and layouts for publication.
To export a layout from InDesign for use in the Digital Publishing Solution:
1. Choose File > Export.
2. Enter the Name for the article in the File Name (Windows) or Save As (Mac OS) field.
3. From the Save As Type (Windows) or Format (Mac OS) menu, select DPS Article.
4. Navigate to a save location, and click Save.
An ARTICLE file is created, and if you have access to a Digital Publishing Solution account, you are able to upload the files to the required publication. Alternatively, you can submit these files to someone who does have access.
For more information about the Adobe Digital Publishing Solution, refer to the Adobe Publishing Solution Help on the Adobe website.
Conclusion
Congratulations! You have come to the end of Chapter 7, and with that the end of this book. It has been a pleasure stepping you through the various design projects you have worked on along the way, and teaching you how to create print and digital media publications in InDesign.
You are well on your way to becoming a seasoned graphic designer. Your creativity is what makes your designs stand out, and as the authors of the book and videos, we hope you’ll enjoy working on many more creative projects, and we wish you every success in your future endeavors.